
9. Creative Compositions

ISO 100 • 1.6 sec. • f/22 • 108mm lens
Better Photography Starts with Better Composition
Creating a good image requires you to go beyond your camera settings. A skilled photographer has an intimate knowledge of his or her camera capabilities coupled with a sound understanding of composition. Some people have a natural eye for composition, while others struggle with how to frame an image. Composition can be taught—I’m proof of that! This chapter will cover several basic rules of composition and serve as a nice refresher for the more experienced photographer.
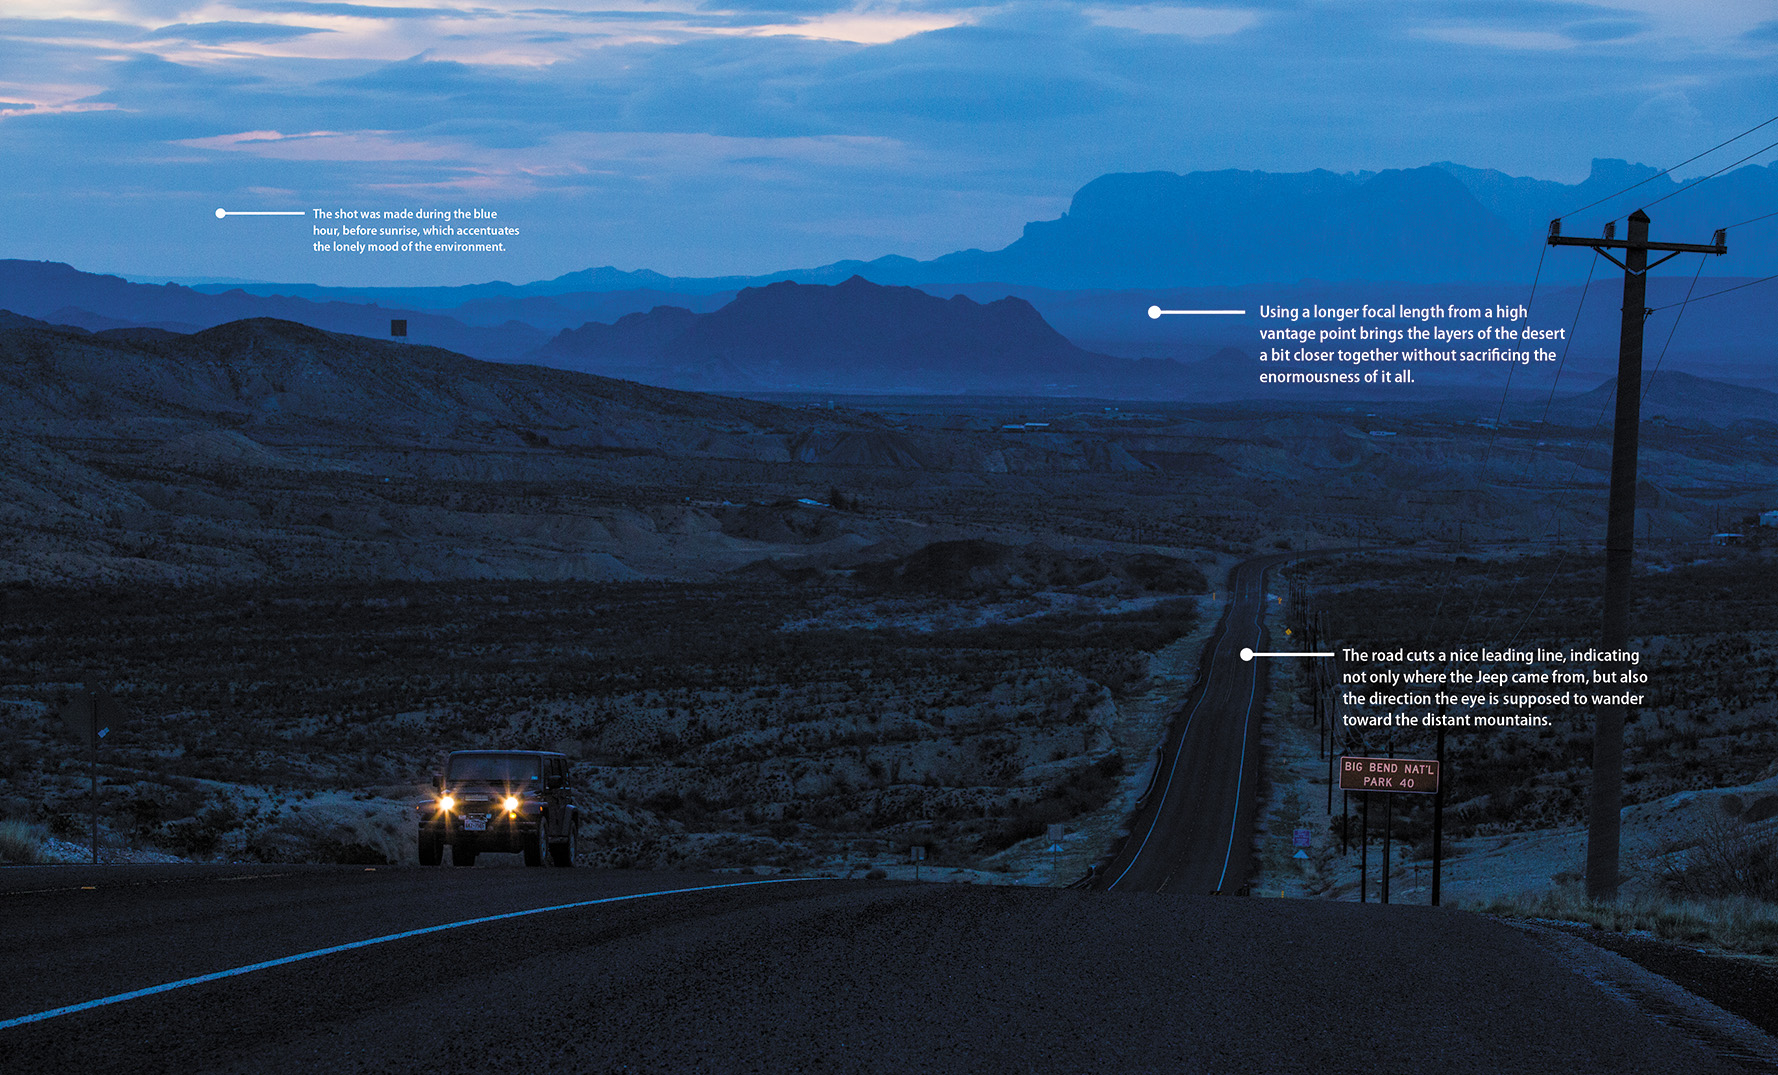
Poring Over the Picture
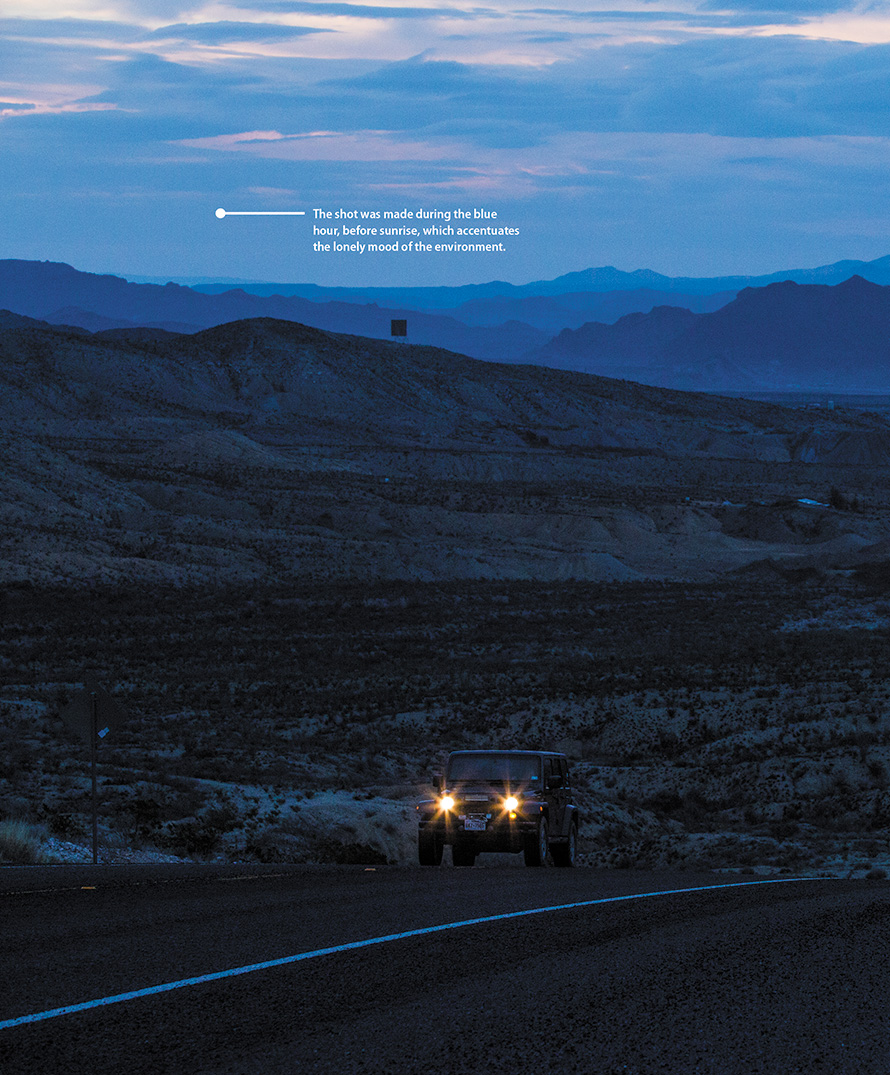
The Big Bend area in west Texas is one of my favorite places to visit and photograph. It’s a peculiar-looking environment of varying ecosystems, and its loneliness is a signature characteristic. One early morning, I was shooting over the small village of Terlingua toward Big Bend National Park when a single Jeep made its way up the highway. From my vantage point, it was the perfect setting for composing a shot that embodies the adventurous isolation that comes along with the place.
ISO 1600 • 1/400 sec. • f/6.3 • 95mm lens

Depth of Field
I shoot a majority of my photography using Aperture Priority, and my number one concern beyond how to frame the shot is what depth of field to use. Depth of field can be critical in telling a story. If I want to create a portrait with a blurry background, I use a large or open aperture, such as f/1.2–2.8, to create what we call a shallow depth of field, meaning an in-focus foreground with a blurry background (Figure 9.1). If I’m shooting a landscape and the whole scene needs to be sharp, then I’ll use a higher or less open aperture, such as f/16 or f/22, to ensure sharpness.

ISO 200 • 1/500 sec. • f/1.8 • 85mm lens
Figure 9.1 I wanted a shallow depth of field, so I used a large aperture (f/1.8). Notice how everything in the background of Eva’s portrait is blurry.
Occasionally a greater depth of field is required to maintain a sharp focus across a farther distance. This might be due to the sheer depth of your subject, where you have objects that are near the camera but sharpness is desired at a greater distance as well (Figure 9.2).
ISO 200 • 1/80 sec. • f/11 • 80mm lens
Figure 9.2 Typically we want landscape photos to be very sharp, so use a tripod and shoot at a higher aperture to allow for maximum clarity.
Or perhaps you are photographing a reflection. With a shallow depth of field, I could only get the reflected mountains in focus, but not the mountains themselves in the background. By using a higher aperture, you will be able to maintain acceptable sharpness in both the subject and the reflection (Figure 9.3).
ISO 100 • 1/40 sec. • f/22 • 18mm lens
Figure 9.3 Getting a distant subject in focus in a reflection, along with the reflective surface, requires a small aperture. Keep an eye out for opportunities like this—these are always fun and creative shots.
Angles
Having strong angular lines in your image can add to the composition, especially when they are juxtaposed (Figure 9.4). This can create a tension that is different from the standard horizontal and vertical lines that we are so accustomed to seeing in photos.
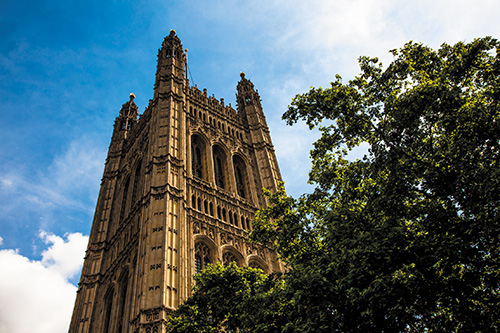
ISO 100 • 1/320 sec. • f/8 • 32mm lens
Figure 9.4 Although not highly encouraged, keystoning the dramatic structure of Parliament’s Victoria Tower in London adds dynamic appeal.
Point of View
Sometimes the easiest way to influence your photograph is to simply change your perspective. Instead of always shooting from a standing position, try moving your camera to a totally different point of view. Try getting down on your knees or even lying on the ground. This low angle can completely change how you view your subject and create a new interest in common subjects (Figure 9.5).

ISO 100 • 1/2500 sec. • f/2.8 • 17mm lens
Figure 9.5 Put your camera in a position that presents an unfamiliar view of your subject or exaggerates an element in the photo. By taking this shot from a low point of view, I exaggerated the comically menacing characteristic of the Ogo as it rolls over tourists in its path.
Patterns
Rhythm and balance can be added to your images by finding the patterns in everyday life and concentrating on the elements that rely on geometric influences. Try to find the balance and patterns that often go unnoticed (Figure 9.6).

ISO 320 • 1/60 sec. • f/11 • 23mm lens
Figure 9.6 The windows decorating the ceiling of the San Francisco International Airport create an interesting pattern of light and shadow.
Color
Color works well as a tool for composition when you’re dealing with very saturated colors. Some of the best colors are those within the primary palette. Reds, greens, and blues, along with their complementary colors (cyan, magenta, and yellow), can all be used to create visual tension (Figure 9.7). This tension between bright colors will add visual excitement, drama, and complexity to your images when combined with other compositional elements.
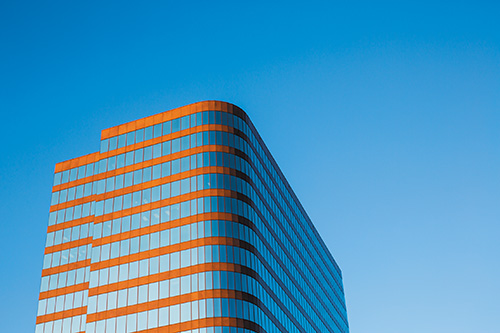
ISO 100 • 1/125 sec. • f/5.6 • 50mm lens
Figure 9.7 The gradation of blues and the copper tone of the building’s lines make for a simple image, but one that relies solely on the complementary colors.
Color can make an image more compelling. On a rainy day in Wellington, New Zealand, the coloration of this downtown district was fairly monochromatic except for the mural overlooking the parking lot (Figure 9.8). Color can add balance, which is pleasing to the eye, or act as a contrast to a subject, adding visual interest.
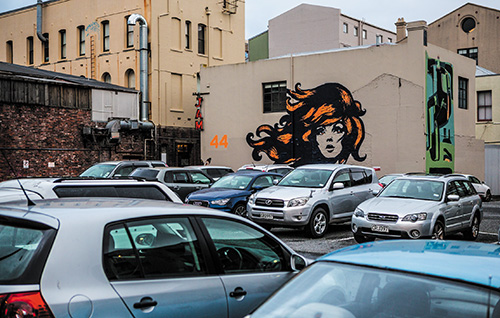
ISO 400 • 1/100 sec. • f/2.8 • 45mm lens
Figure 9.8 The eye will quickly zoom in on the neon oranges in the mural, especially since the rest of the frame is made up of toned-down color values.
Contrasting and Complementing
We just saw that you can use color as a strong compositional tool. One of the most effective uses of it is to combine two complementary colors that make the eye move back and forth across the image (Figure 9.9). There is no exact combination that will work best, but consider using dark and light colors, or red and green or blue and yellow, to provide the strongest visual. Studying a color wheel or color theory can help you to strengthen your color images. (In Figure 9.9, the blue evening environment and the yellowish light of the lamp bulbs are complementary because blue and yellow are across from one another on a color wheel.) For a more detailed look at color, you might enjoy reading the book I wrote on that very subject: Color: A Photographer’s Guide to Directing the Eye, Creating Visual Depth, and Conveying Emotion (Peachpit Press, 2013).

ISO 800 • 1/60 sec. • f/5.6 • 23mm lens
Figure 9.9 The contrasting colors—blue and yellow/gold—complement each other in this Queenstown setting. The more aggressive yellows and golds that take up the smaller amount of frame real estate help balance out the more recessive blues.
You can also introduce contrast through different geometric shapes that battle (in a good way) for the attention of the viewer. You can combine circles and triangles, ovals and rectangles, curvy and straight, hard and soft, dark and light, and so many more (Figure 9.10). You aren’t limited to just one contrasting element either. Combining more than one element of contrast will add even more interest. Look for these contrasting combinations whenever you are out shooting, and then use them to shake up your compositions.
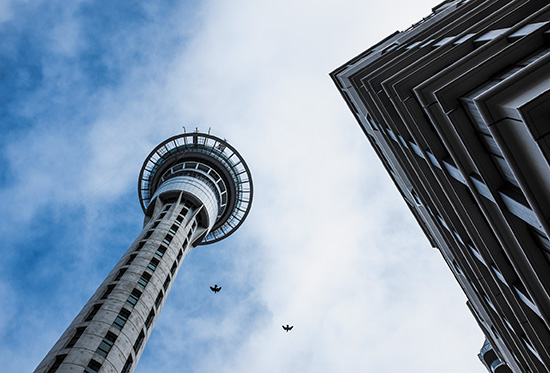
ISO 200 • 1/1000 sec. • f/5 • 23mm lens
Figure 9.10 The converging directions of the tower and the building are made more abstractly compelling by the general shapes, circles, and triangles.
Leading Lines
One way to pull a viewer into your image is to incorporate leading lines. These are elements that come from the edge of the frame and then lead into the image toward the main subject. Examples include vanishing perspective lines or an element such as a river—any feature used to move from the outer edge into the heart of the image.
Leading lines can be effective in establishing the mood of an image. Vertical lines feel bold and rigid, while S-curve lines usually give a sense of relaxation or going with the flow. When you’re visualizing your image and preparing your composition, remember to be intentional with your composition without losing sight of your creative vision. Leading lines can be particularly striking in black-and-white photography, in which an image’s strength rests almost entirely upon its composition (Figure 9.11).
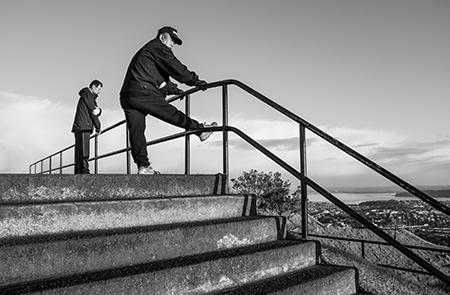
ISO 200 • 1/100 sec. • f/11 • 23mm lens
Figure 9.11 The handrails of staircases and walking bridges work great for leading lines.
Splitting the Frame
Generally speaking, splitting the frame right down the middle is not your best option. While it may seem more balanced, it can actually be pretty boring. Consider using the rule of thirds when deciding how to divide your frame (Figure 9.12).

ISO 400 • 1/60 sec. • f/4 • 28mm lens
Figure 9.12 I used the rule of thirds to place the bride on the left third line, allowing room for the eye to travel to the stained glass windows, which are placed on the right third line.
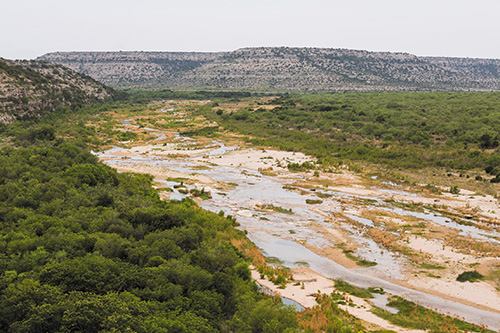
When a horizon is in the shot, a low horizon will give a sense of stability to the image. Typically, this is done when the sky is more appealing than the landscape below. When the emphasis is to be placed on the landscape, the horizon line should be moved upward in the frame, leaving the bottom two-thirds to the subject below (Figure 9.13).
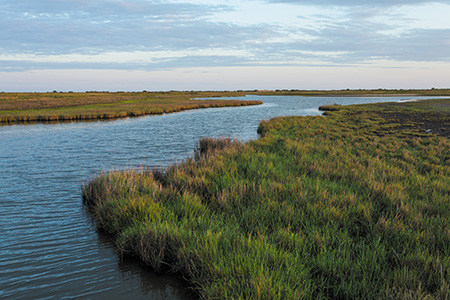
ISO 200 • 1/30 sec. • f/8 • 35mm lens
Figure 9.13 I placed the horizon in the top third of the frame, with the grasslands and water taking up most of the bottom two-thirds. This helps emphasize the diagonal line that the water cuts through the image.
Frames Within Frames
The outer edge of your photograph acts as a frame to hold all of the visual elements of the photograph. One way to add emphasis to your subject is by using internal frames (Figure 9.14). Depending on how the frame is used, it can create the illusion of a third dimension to your image, giving it a feeling of depth.
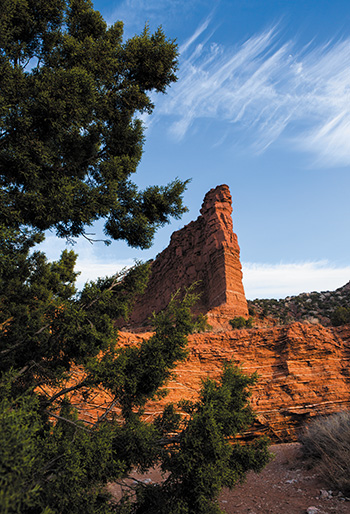
ISO 200 • 1/50 sec. • f/11 • 24mm lens
Figure 9.14 I used the juniper tree in the foreground to frame the Caprock Canyon escarpment, forcing the eye to the structure by using storytelling components in the environment.
Chapter 9 Assignments
Apply the shooting techniques and tools that you have learned in the previous chapters to these assignments, and you’ll improve your ability to incorporate good composition into your photos. Make sure you experiment with all the different elements of composition and see how you can combine them to add interest to your images.
Learning to see lines and patterns
Take your camera for a walk around your neighborhood and look for patterns and angles. Don’t worry so much about getting great shots as about developing an eye for details.
Point of view
Next time you’re out shooting and you see something interesting, force yourself to shoot at least 25 frames of the same subject. Vary your point of view as much as possible. Lie on the ground, climb up high, get close up, get farther away; force yourself to try different points of view. This will train your eye to see these points of view more often. You may be surprised and get an image that you didn’t imagine before.
Finding the square peg and the round hole
Circles, squares, and triangles: Spend a few sessions concentrating on shooting simple geometric shapes.
Using the aperture to focus attention
Depth of field plays an important role in defining your images and establishing depth and dimension. Practice shooting wide open, using your largest aperture for the narrowest depth of field. Then find a scene that would benefit from extended depth of field, using very small apertures to give sharpness throughout the scene.
Leading viewers into a frame
Look for scenes where you can use elements as leading lines, and then look for framing elements that you can use to isolate your subject and add both depth and dimension to your images.
Share your results with the book’s Flickr group!
Join the group here: flickr.com/groups/nikond7200_fromsnapshotstogreatshots