7. Landscape Photography
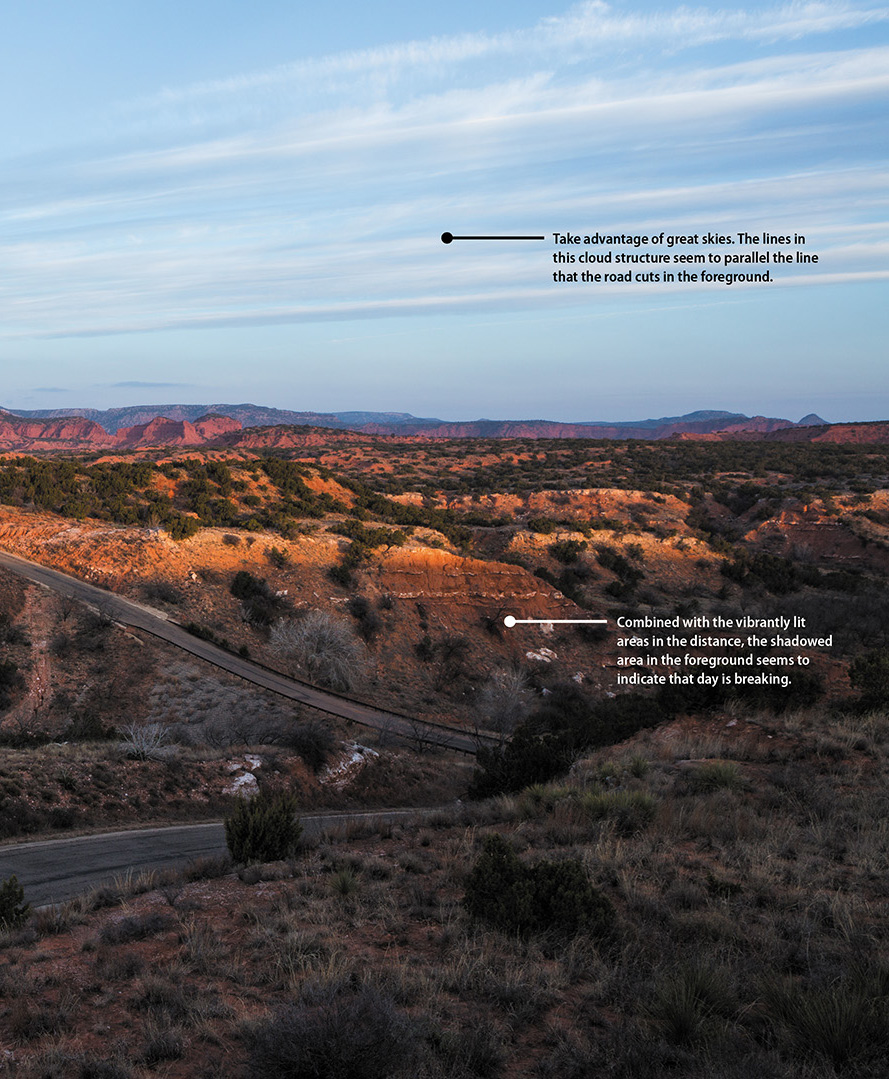
ISO 100 • 1/100 sec. • f/16 • 17mm lens
Tips, Tools, and Techniques for Taking Beautiful Landscape Photographs
My friend and colleague Cris Duncan told me once that every photographer is a landscape photographer at heart. I can’t argue with him much. It’s how I started out, and it still accounts for probably half of my professional work. I love great landscape photography, and chances are, you appreciate it as well. The camera gives us great opportunity to capture the large and small facets of nature, and being able to successfully achieve a well-exposed and well-composed landscape shot will encourage you to keep exploring the natural world!
In this chapter, we will explore some typical scenarios and discuss methods to bring out the best in your landscape photography. We’ll delve into some of the features of the D7200 that not only improve the look of your landscape photography, but also make it easier to take great shots.
Poring Over the Picture
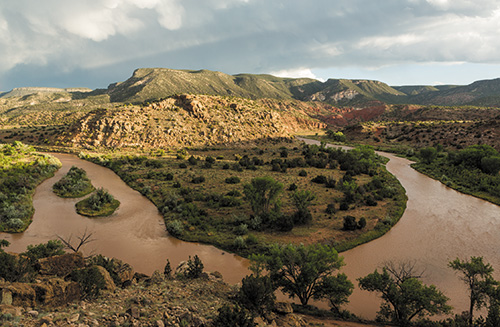
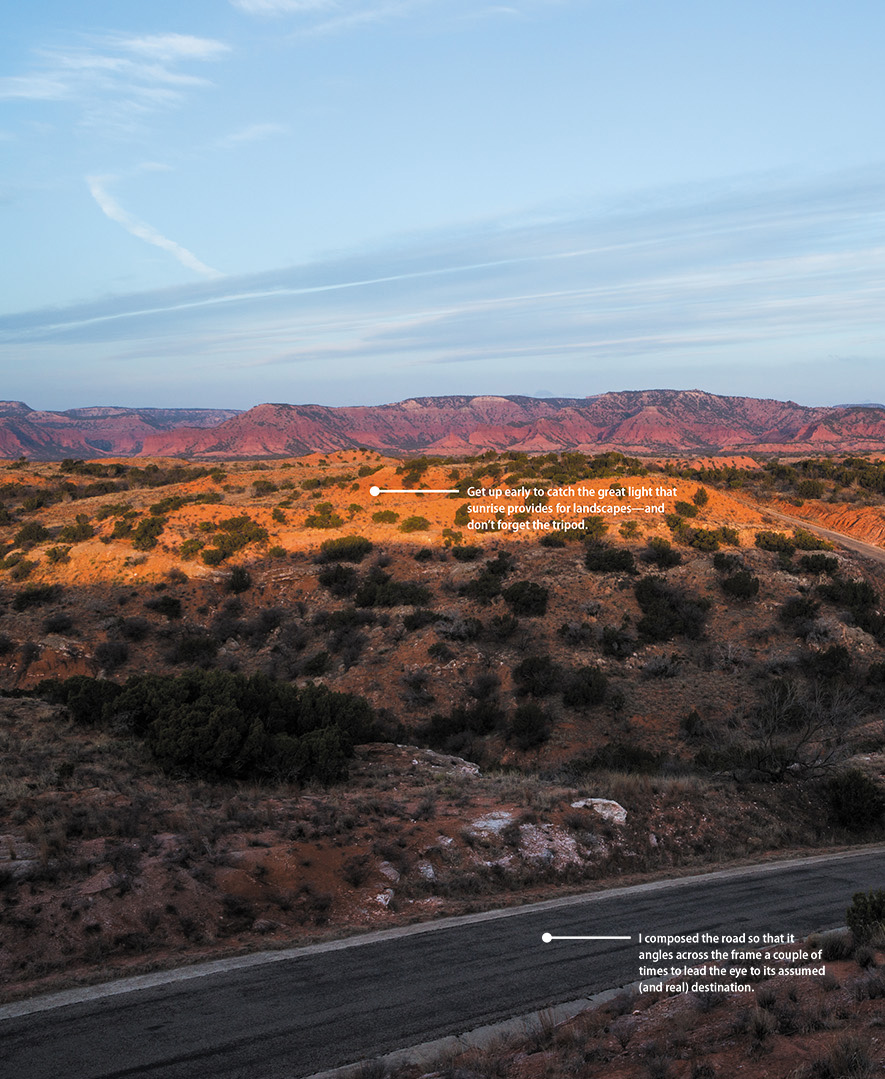
Caprock Canyons State Park, near Quitaque, Texas, is one of those places I go to relax, decompress, and shoot a genuinely unique part of the state. Instead of dropping into the canyon, as you do in similar parks, one drives, bikes, or hikes into it. Early one morning, I was driving toward my favorite trailhead and the clouds parted, revealing a strong quality of light and some great coloration in the distant canyon walls. I quickly stopped, hiked to an elevated point, and because of the strong line, used the road as a leading element to move the eye along the very route that many hikers take to get to a grand destination. The image also employs expansive perspective, in which the distance between the foreground and the background seems larger than it really is, adding to the feeling of isolation and spaciousness.
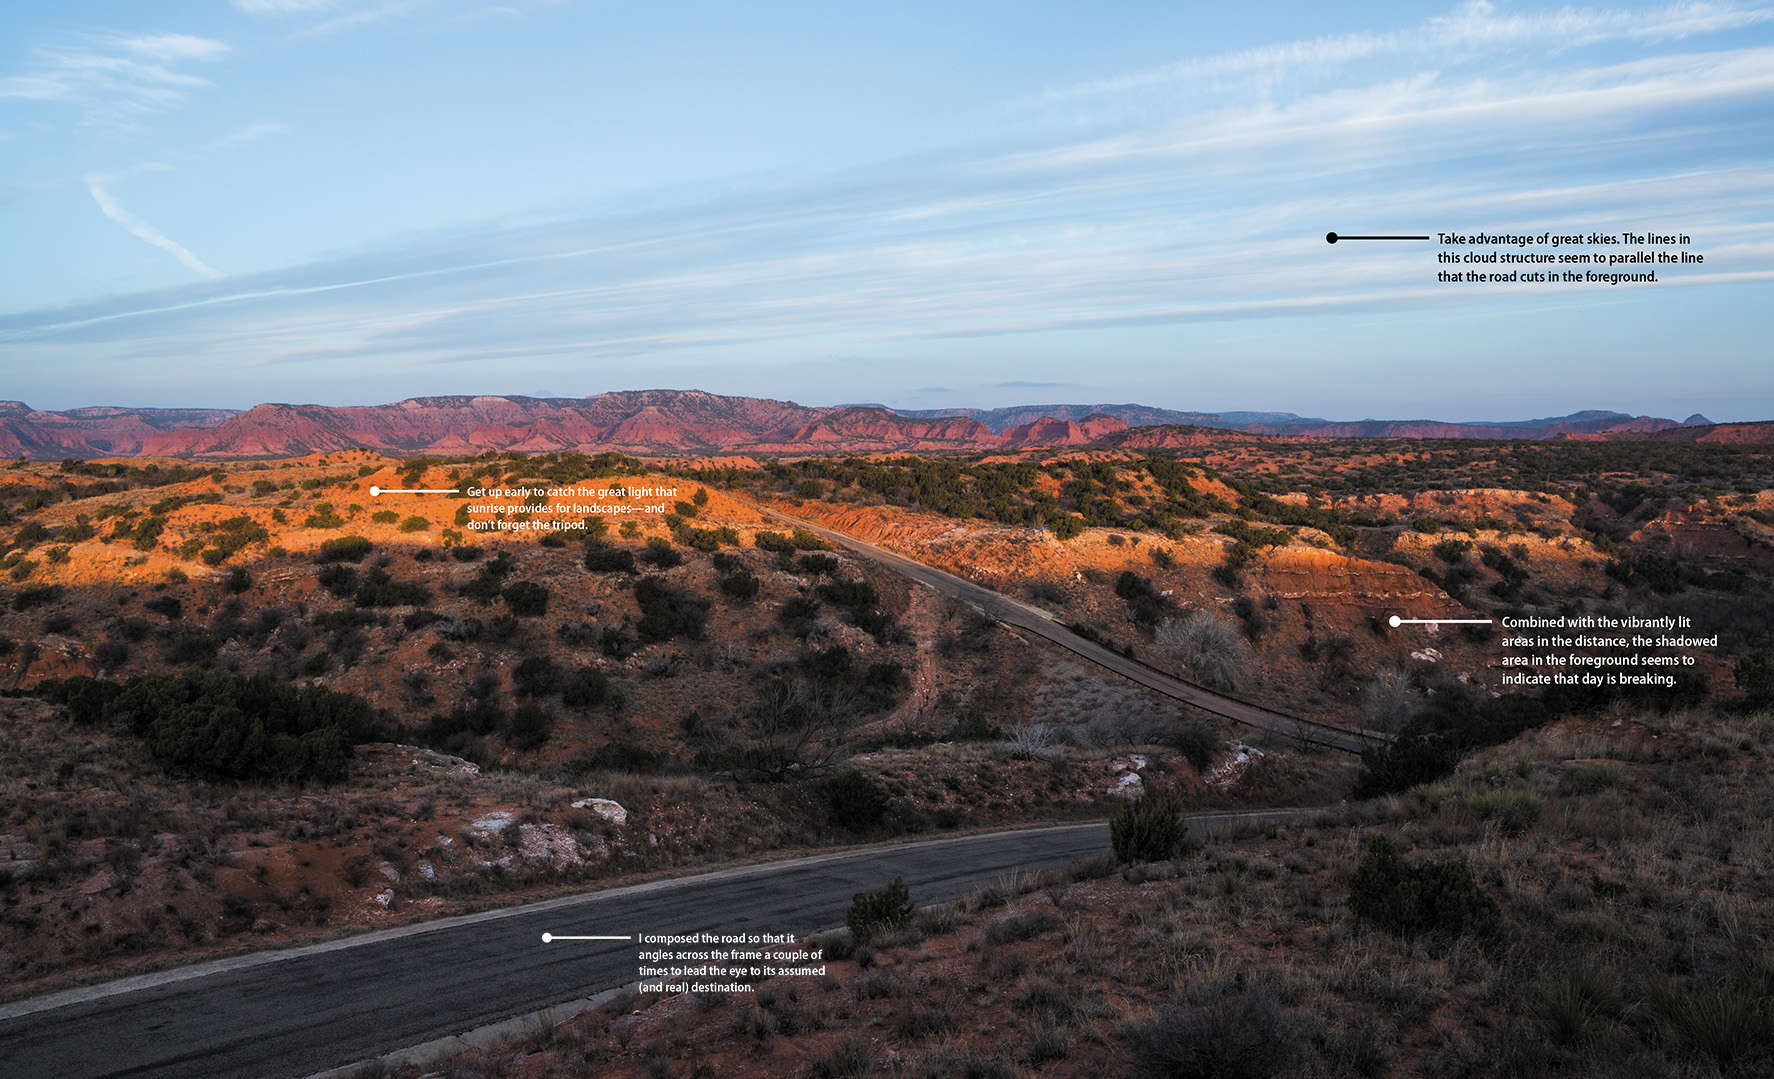
ISO 200 • 1/40 sec. • f/11 • 24mm lens
Sharp Focus: Using a Tripod
Throughout the previous chapters we concentrated on using the camera to create great images. We will continue that focus through this chapter, but we’ll add a piece of equipment that is crucial in the world of landscape shooting into the mix: the tripod. There are a couple of reasons tripods are so critical to your landscape work, the first being the time of day that you will be working. As we’ll cover later, the best light for most landscape work happens at sunrise and just before sunset. While this is the best time to shoot, it’s also kind of dark. That means you’ll be working with slow shutter speeds. Slow shutter speeds mean camera shake, unless you take precautions. Camera shake equals bad photos.
The second reason is also related to the amount of light that you’re gathering with your camera. When taking landscape photos, you will usually want to be working with very small apertures, as they give you lots of depth of field. This also means that, once again, you will be working with slower-than-normal shutter speeds.
Slow shutter = camera shake = blurry photos.
If you’re serious about landscape photography, then the one tool that you must have is a good tripod. We might argue over what camera or what lens, but we all agree a tripod is key to getting a good image (Figure 7.1).
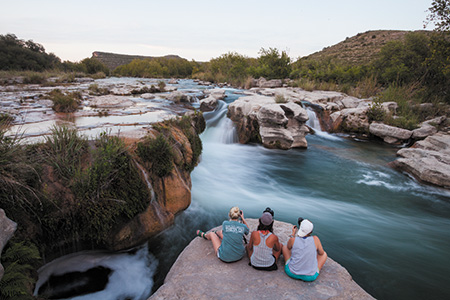
ISO 100 • 2 sec. • f/22 • 22mm lens
Figure 7.1 These students in my Junction Intersession photography course are using their tripods to slow Dolan Falls down and create that signature smooth look in the water.
So what should you look for in a tripod? Well, first make sure it is sturdy enough to support your camera and any lens that you might want to use. Most manufacturers will list the weight limits by model. Next, check the height of the tripod. There is nothing worse than having to bend over all day to look through your viewfinder. Think about getting a tripod that uses a quick-release head. This usually employs a plate that screws into the bottom of the camera and then quickly snaps into place on the tripod. A quick-release head is especially handy if you are going to move between shooting by hand and using the tripod. Finally, consider the weight of the tripod. If you’re traveling a lot or backpacking, having a heavy tripod is a real burden. Carbon fiber tripods are nice since they are very light and incredibly sturdy, but of course that combination comes at an increased cost.
Selecting the Proper ISO
When you’re shooting most landscape scenes, the ISO is the one factor that should be increased only as a last resort. While it is easy to select a higher ISO to get a smaller aperture, the noise that it can introduce into your images can be quite harmful. The noise is not only visible as large grainy artifacts; it can also be multicolored, which further degrades the image quality.
When shooting landscapes, set your ISO to the lowest possible setting at all times (Figure 7.3). Between the use of Vibration Reduction lenses (if you are shooting handheld) and a good tripod, you will seldom need to shoot landscapes with anything above an ISO of 400.
ISO 200 • 1/80 sec. • f/14 • 42mm lens
Figure 7.3 I used a very low ISO of 200 in order to maintain the best image quality possible given the available light.
Using Noise Reduction
The temptation to use higher ISOs should always be avoided, because it will result in more image noise and less detail. Even when you have your camera set to a low ISO, however, noise can be introduced when the shutter is held open during a long exposure. Long exposures are fun to take but are notorious for introducing noise in an image. This noise is the result of the heating of the camera sensor while in use. The longer the exposure, the longer the sensor works and heats up, creating “hot pixels” or noise. This effect is not visible in short exposures, but as you start shooting with shutter speeds that exceed one second, the level of image noise can increase. Your camera has a built-in Noise Reduction (NR) feature to help eliminate noise from long exposures. The camera reduces noise by taking two images, the original exposure followed by another exposure with the shutter closed. The camera then measures the “hot pixels” created by the heating of the sensor and subtracts the noise pattern from the original exposure. The downside to this technique is that it doubles your exposure time, so be prepared to wait while the camera does its job.
Setting up Long Exposure Noise Reduction
1. Press the Menu button, then use the Multi-selector to select Long Exposure NR from the Photo Shooting menu (A).

2. While Long Exposure NR is highlighted, press the OK button. Next, move the Multi-selector up to select On. Press the OK button to activate (B).
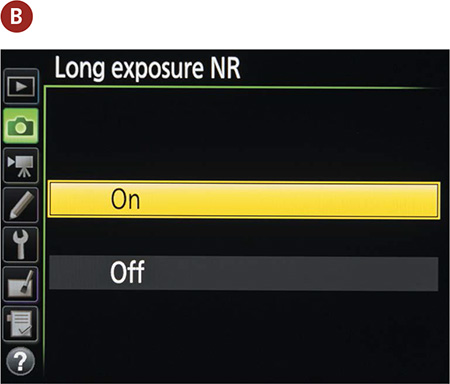
While the goal is to always use as low an ISO as possible, at times you may have to use a higher ISO. For instance, available light might be dwindling with no tripod in sight, so you may need to increase your ISO so that you can handhold your camera without introducing camera shake. The D7200, like its predecessor, handles high ISO noise well, and you may even find yourself shooting at ISO 1600 without any visible evidence of noise. But you still might come across shooting situations when noise is very apparent as a result of the higher ISO. To combat noise at higher ISOs, the D7200 has a High ISO Noise Reduction feature that basically blurs the image in camera to reduce the visible noise. I suggest using this feature only when you have visible noise in your image and don’t plan on using noise reduction software in post-processing.
Activating High ISO Noise Reduction
1. Press the Menu button, then use the Multi-selector to select High ISO NR from the Photo Shooting menu, and press OK (A).

2. Now use the Multi-selector to choose from one of four options: High, Normal, Low, and Off. Select one and press OK to activate (B). Be aware that ISO Noise Reduction can be activated only when your ISO exceeds 1200.
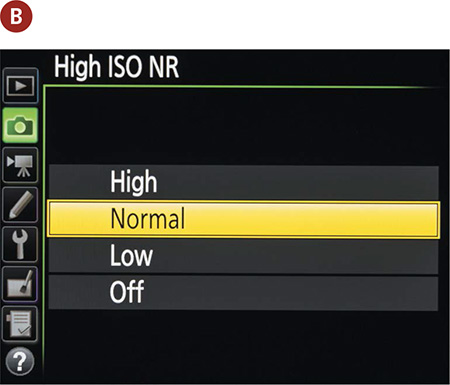
I suggest experimenting with different ISOs and NR settings to establish one that meets your expectations.
Selecting a White Balance
This probably seems like a no-brainer. If it’s sunny, select Daylight. If it’s overcast, choose the Shade or Cloudy setting. Those choices wouldn’t be wrong for those circumstances, but why not get creative? Sometimes you can actually make the mood of the photo more intriguing by selecting a white balance that doesn’t quite fit the light for the scene that you are shooting.
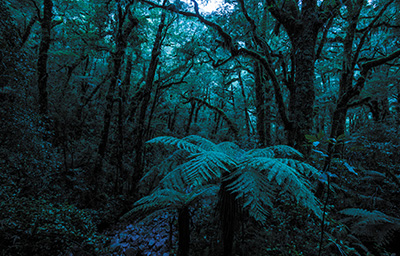
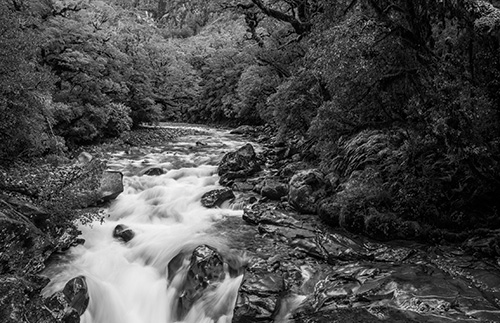
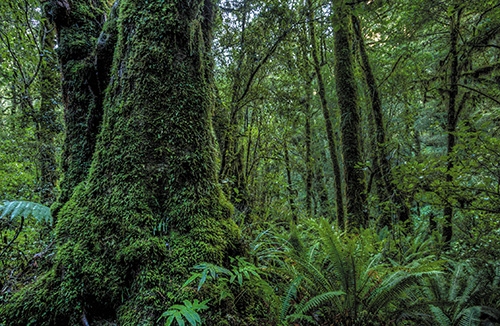
Figure 7.4 is an example of a correct white balance. It was late afternoon, and even though I was deep in a New Zealand rain forest, the light overhead provided warmth to the greens below. The white balance for this image was set to Shade.
ISO 100 • 2 sec. • f/16 • 17mm lens
Figure 7.4 Using the correct white balance produces an appealing image.
But what if I want to make the scene look as if it had been shot during the blue hour? Simple—I just change the white balance to White Fluorescent, which is a much cooler setting (Figure 7.5).
ISO 100 • 2 sec. • f/16 • 17mm lens
Figure 7.5 Changing the white balance to White Fluorescent gives the image a totally different look and feel without the need to go into post-production software to change the look.
You can select the most appropriate white balance for your shooting conditions in a couple of ways. The first is to just take a shot, review it on the LCD, and keep the one you like. Of course, you would need to take one for each white balance setting, which means that you will have to take about seven different shots to see which is most pleasing.
The second method doesn’t require taking a single shot. Instead, it uses Live View to get perfectly selected white balances. Live View gives instant feedback as you scroll through all of the White Balance settings and displays them for you right on the LCD. Even better, you can choose a custom setting that will let you dial in exactly the right look for your image.
To use Live View to preview the white balance, first you need to turn the Live View selector to the camera icon and press the LV button. Next, hold the WB button, as discussed in Chapter 1, while rotating the main Command dial to the right (Figure 7.6).
Figure 7.6 Press the LV button to get instant feedback on all your white balance options. You can even choose a custom setting.
Finally, for those of you who might like creating your own custom white balances, the D7200 allows you to spot white balance and create six custom presets while using Live View.
Spot White Balance in Live View
1. To set your custom white balance, turn the Live View selector to the camera icon and press the LV button to activate Live View.
2. Next, press the WB button while rotating the main Command dial until PRE1 is displayed in the upper-right corner. Release the WB button.
3. Now, press the WB button and turn the Sub-command dial until d-1 appears at the bottom left of the screen. Release the WB button.
4. Press the WB button again until the PRE icon begins to flash. Once it’s flashing, a yellow square balance target will appear in the middle of the Live View screen.
5. Using the Multi-selector, place the spot white balance target over a neutral color area such as a gray or white. Next, press the OK button. If the spot white balance target was recorded correctly, then the words Data Acquired will be displayed on the LCD.
You can record and access up to six custom presets (d-1 through d-6) by following the above steps.
Setting a Custom White Balance
Your custom presets may also be accessed via the Photo Shooting menu.
1. Press Menu and then select White Balance with your Multi-selector (A).
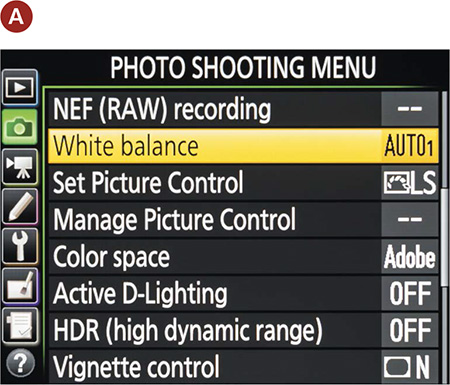
2. Press the OK button, then move the Multi-selector to highlight PRE. Press the Multi-selector to the right to display all six presets. The presets will provide a visual confirmation of where the spot balance target was placed on the image to generate the custom white balance (B).

Using the Landscape Picture Control
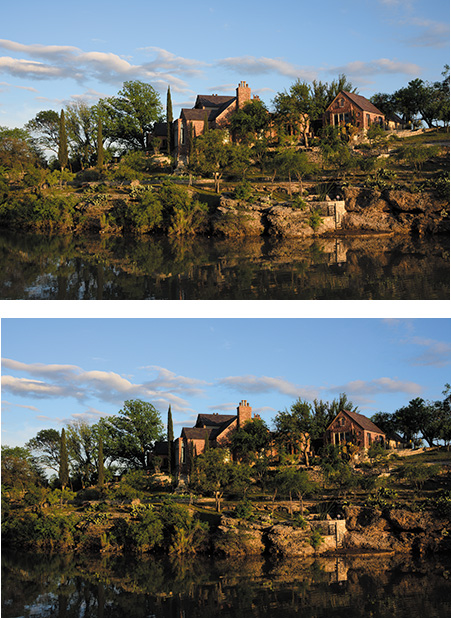
When shooting landscapes, I always look for great color and contrast. This is one of the reasons that so many landscape shots are taken in the early morning or during sunset. When the sun is at a low angle, it creates a softer light that adds more texture and richer colors to any scene. That’s why we call it the golden hour. You can help boost this effect, especially in the less-than-golden hours of the day, by using the Landscape picture control (Figure 7.7). Just as in the Landscape mode found in the automatic scene modes, you can set up your landscape shooting so that you capture images with increased sharpness and a slight boost in blues and greens. This style will add some pop to your landscapes without the need for additional processing in any software.
ISO 100 • 1/50 sec. • f/11 • 24mm lens
Figure 7.7 Using the Landscape picture control can add sharpness and more vivid color to skies and vegetation. Compared to the Standard picture control (top), Landscape helped me capture the blues in the sky, the reds in the museum’s brickwork, and the greens of the leafy trees.
Setting up the Landscape picture control
1. Press the i button, then use the Multi-selector to highlight the Set Picture Control feature (this is normally set to SD) and press OK (A).
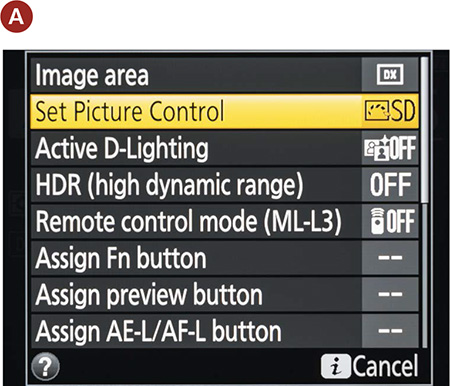
2. Now use the Multi-selector to scroll down to the LS option, and press OK to lock in your change (B).
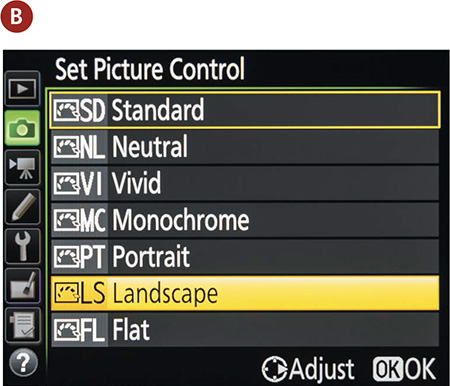
The camera will now apply the Landscape picture control to all of your photos. This style will be locked in to the camera even after turning it off and back on again, so make sure to change it back to SD when you are done with your landscape shoot.
Taming Bright Skies with Exposure Compensation
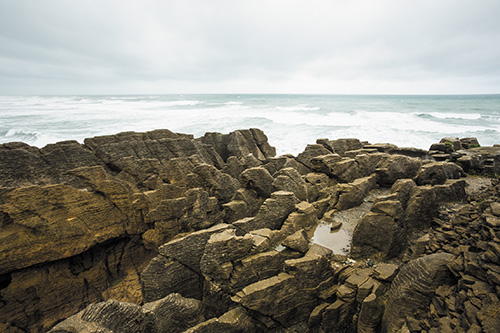
Balancing exposure in scenes that have a wide contrast in tonal ranges can be extremely challenging. The one thing you should never do is over expose your skies to the point of blowing out your highlights (unless, of course, that is the look you are going for). It’s one thing to have white clouds, but it’s a completely different, and bad, thing to have no detail at all in those clouds. This usually happens when the camera is trying to gain exposure in the darker areas of the image (Figure 7.8).
ISO 100 • 1/80 sec. • f/8 • 17mm lens
Figure 7.8 Overcast skies can often force the sky to overexpose, especially if the primary subject to be exposed is darker and on the ground, such as this unique geological formation, Pancake Rocks.
With the Exposure Compensation feature, you can force your camera to choose an exposure that ranges, in one-third-stop increments, from five stops over to five stops under the metered exposure (Figure 7.9).
ISO 800 • 1/160 sec. • f/8 • 17mm lens
Figure 7.9 I compensated my exposure by one stop (–1 on the Exposure Compensation adjustment) and was able to bring details back into the clouds, sky, and water. You will notice that the image itself is darker as a result of this compensation.
The one way to tell if you have blown out your highlights is to turn on the highlight alert feature—often referred to as the “blinkies”—on your camera (see the “How I Shoot: My Favorite Camera Settings” section in Chapter 4). When you take a shot where the highlights are exposed beyond the point of having any detail, that area will blink in your LCD. It is up to you to determine if that particular area is important enough to regain detail by altering your exposure. If the answer is yes, then the easiest way to go about it is to use some exposure compensation.
Using Exposure Compensation to regain detail in highlights
1. Activate the camera meter by lightly pressing the shutter release button.
2. Using your index finger, press and hold the Exposure Compensation button (which has a +/- symbol on it) on the top of the camera to change the over-/underexposure setting by rotating the main Command dial.
3. Rotate the main Command dial to the left one click and take another picture (each click of the dial is a one-third-stop change).
4. If the blinkies are gone, you are good to go. If not, keep subtracting from your exposure by one-third of a stop until you have a good exposure in the highlights.
Adjusting Exposure Compensation
1. Press the Exposure Compensation button to adjust exposure by –5 to +5 stops.
2. Hold the Exposure Compensation button while rotating the main Command dial to the left to decrease exposure and to the right to increase exposure. Each left click of the dial will continue to reduce the exposure in one-third-stop increments for up to five stops (although I rarely need to go past two stops).
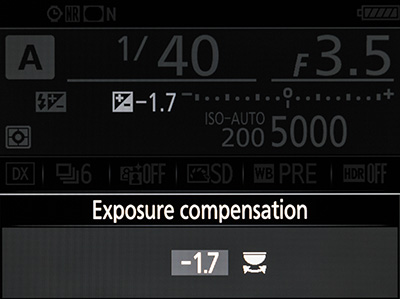
It should be noted that any exposure compensation will remain in place even after turning the camera off and then on again. Don’t forget to reset it once you have successfully captured your image. Also, the Exposure Compensation feature works only in the Program, Shutter Priority, Aperture Priority, Manual, and Night Vision (effects) modes. Changing between the first four modes will hold the compensation you set while switching from one to the other. When you change the Mode dial to one of the automatic scene modes, the compensation will set itself to zero.
Shooting Amazing Black-and-White Landscapes
There is almost nothing as timeless as a beautiful black-and-white landscape photo. For many, it is the purest form of photography. The genre conjures up thoughts of Ansel Adams out in Yosemite Valley capturing stunning monoliths with his 8 x 10 view camera. Shooting with a digital camera doesn’t mean you can’t create your own stunning black-and-white photos. Using the power of the Monochrome picture control, you’re able to tap into that same visual style. (See the “Classic Black-and-White Portraits” section of Chapter 6 for instructions on setting up this feature.) Not only can you shoot in black and white, you can also customize the camera to apply built-in filters to lighten or darken elements within your scene, as well as add contrast and definition.
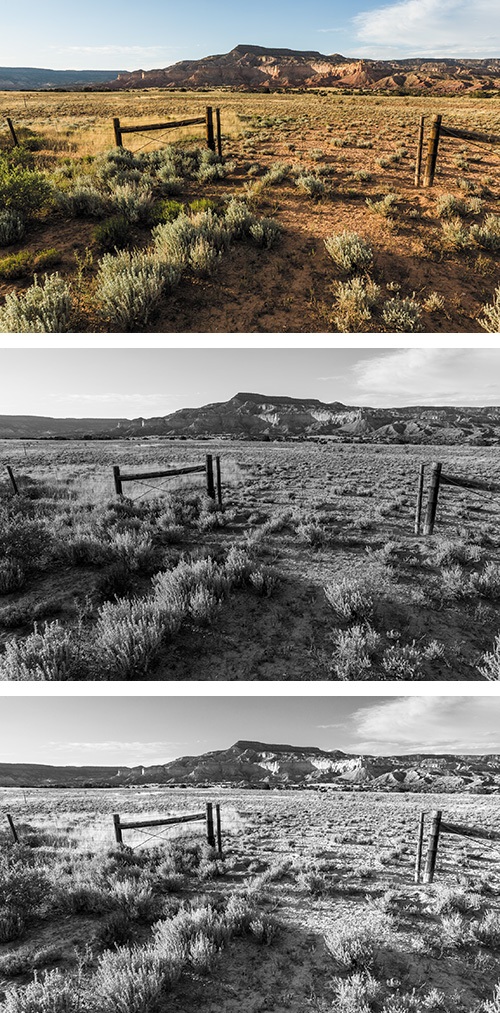
The four filter colors are red, yellow, green, and orange. The most typically used filters in black-and-white photography are red and yellow. This is because the color of these filters will darken opposite colors and lighten similar colors. So if you want to darken a blue sky, use a yellow filter because blue is the opposite of yellow. To darken green foliage, you would use a red filter. Check out the series of shots in Figure 7.10 with a red filter applied.
ISO 100 • 1/50 sec. • f/16 • 24mm lens
Figure 7.10 In the first shot, taken in color, notice the brighter blue skies and green grass. The second shot was done with the Monochrome setting. The third image was shot with a red filter applied in the Monochrome setting with contrast increased. Adding color filter settings to the Monochrome picture control allows you to lighten or darken elements in your scene.
You can see that there is no real difference in contrast between the color and the black-and-white image with no filter. A red filter effect can help create contrast by darkening the sky and making the green foliage much darker. Other options in the Monochrome picture control enable you to adjust the sharpness, clarity, contrast, and brightness and even add some color toning to the final image. This information is also in the “Classic Black-and-White Portraits” section of Chapter 6. Experiment with the various settings to find the combination that is most pleasing to you.
The Golden Light
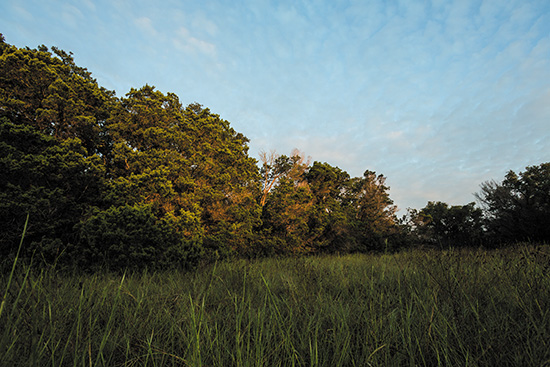
If you ask any professional landscape photographer what their favorite time of day to shoot is, chances are they’ll tell you it’s the hours surrounding daybreak and sunset (Figures 7.11). The light at these times is coming from a very low angle to the landscape, which creates shadows and gives depth and character to the content it hits. There is also a quality to the light that seems cleaner and more colorful (although the reason it is more colorful is because it is passing through all the atmospheric debris closer to the earth) than what you get when shooting at midday. One thing that can dramatically improve any morning or evening shot is the presence of clouds. The sun will fill the underside of the clouds with a palette of colors and add drama to your skies.
ISO 400 • 1/125 sec. • f/8 • 18mm lens
Figure 7.11 The first minutes of the day gently touch a grouping of live oaks, framing the shadows and sky in the new light.
Where to Place Your Focus
Large landscape scenes are great fun to photograph, but they can present a problem: Where exactly do you focus when you want everything to be sharp? Since our goal is to create a great landscape photo, we will need to concentrate on how to best create an image that is tack sharp, with a depth of field that renders great focus throughout the scene.
I have already stressed the importance of a good tripod when shooting landscapes. The tripod lets you concentrate on the aperture portion of the exposure without worrying how long your shutter will be open. The tripod provides the stability to handle any shutter speed you might need when shooting at small apertures. For most of my landscape work I set my camera to Aperture Priority mode, with the ISO set to 100 (for a clean, noise-free image).
However, shooting with the smallest aperture on your lens doesn’t necessarily mean that you will get the proper sharpness throughout your image. The real key is knowing where in the scene to focus your lens to maximize the depth of field for your chosen aperture. To determine this, you must use something called the hyper focal distance of your lens.
Hyper focal distance, also referred to as HFD, is the point of focus that will give you the greatest acceptable sharpness from a point near your camera all the way out to infinity. If you combine good HFD practice with a small aperture, you will get images that are sharp throughout the frame.
A couple of ways exist to do this, and the one that is probably the easiest, as you might guess, is the one that is most widely used by working pros. When you have your shot all set up and composed, focus on an object that is about one-third of the distance into your frame (Figure 7.12). It is usually pretty close to the proper distance and will render favorable results. When you have the focus set, take a photograph and then zoom in on the preview on your LCD to check the sharpness of your image.
ISO 160 • 1/20 sec. • f/16 • 24mm lens
Figure 7.12 To get maximum focus from near to far, I manually focused one-third of the way into the frame, or at the bottom of the small mountain where light meets shadow. I then recomposed the image before taking the picture. Using AF-S focus mode and f/16 gave me a very sharp image throughout the frame.
One thing to remember is that as your lens gets wider in focal length, your HFD will be closer to the camera position. This is because the wider the lens, the greater the depth of field you can achieve. This is yet another reason why a good wide-angle lens is indispensable to the landscape shooter.
Focusing with Live View
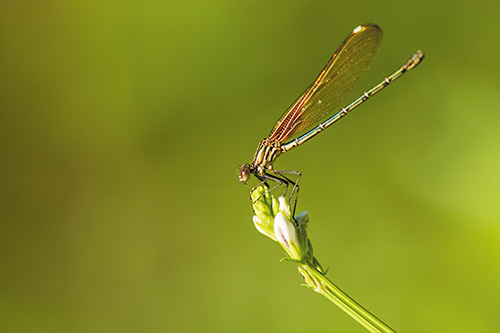
The automatic focus features on the D7200 are great, but sometimes it pays to turn them off and go manual. The reason I use manual focus is to avoid having the camera’s autofocus inadvertently refocus when the shutter is released. I always start out with the assistance of autofocus but then switch over to manual focus to avoid any refocusing mistakes. Sometimes, I like to take it a step further and cheat a bit by using Live View along with the Playback Zoom In button to assure absolute sharpness throughout the image (Figure 7.13).
ISO 200 • 1/500 sec. • f/4 • 300mm lens
Figure 7.13 I used the rule of thirds (discussed later in the chapter) to help frame this image by placing the dragonfly closer to the right vertical third line and letting the soft background fill the rest of the frame. Using Live View with manual focus allowed me to make sure the dragonfly was tack sharp while blurring the background.
Improving your focus using Live View
1. Compose your shot by either using the viewfinder or activating Live View by pressing the LV button.
2. Set your camera to AF-S mode and use one of the 51 focus points to select the area you wish to focus on. Remember, you can use your Multi-selector to move around. Next, press the shutter button halfway to focus the camera.
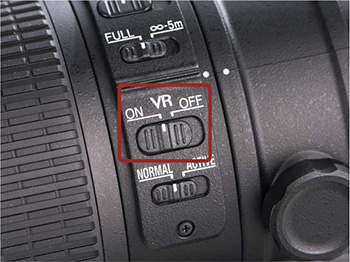
3. Switch the camera to manual focus by sliding the switch on the lens barrel from A to M and turn off VR (if your lens comes equipped with Vibration Reduction).
4. With Live View activated, use the Zoom In button with the aid of the Multi-selector to pan the image for sharpness. If it’s blurry, then make small adjustments with your lens focus ring until ideal sharpness is achieved. Now take the shot using a cable release (my favorite), a remote, or the self-timer feature.
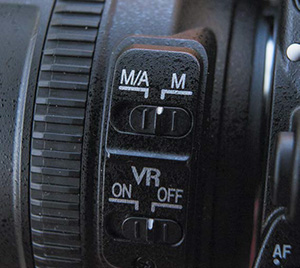
The camera will fire without trying to refocus the lens. This works especially well for wide-angle lenses, which can be difficult to focus in manual mode.
Smooth Water
There’s little that is quite as satisfying for the landscape shooter as capturing a smooth waterfall shot. Creating the smooth-flowing effect is as simple as adjusting your shutter speed to allow the water to be in motion while the shutter is open. The key is to have your camera on a stable platform (such as a tripod) so that you can use a shutter speed that’s long enough to work (Figure 7.14). To achieve a great effect, use a shutter speed that is at least 1/15 of a second or longer.
ISO 100 • .4 sec. • f/16 • 29mm lens
Figure 7.14 Placing my camera on a tripod was essential to keeping everything but the water in this shot tack sharp during the longer exposure.
Setting up for a waterfall shot
1. Attach the camera to your tripod, then compose and focus your shot.
2. Make sure the ISO is set to 100.
3. Using Aperture Priority mode, set your aperture to the smallest opening (such as f/22).
4. Press the shutter button halfway so the camera takes a meter reading.
5. Check to see if the shutter speed is 1/15 of a second or slower.
6. Take a photo and check the image on the LCD.
You can also use Shutter Priority mode for this effect by dialing in the desired shutter speed and having the camera set the aperture for you. I prefer to use Aperture Priority to ensure that I have the greatest depth of field possible.
If the water is blinking on the LCD, indicating a loss of detail in the highlights, then use the Exposure Compensation feature (discussed earlier in this chapter) to bring details back into the water. You will need to have the highlight alert feature turned on to check for overexposure (see “How I Shoot: My Favorite Camera Settings” in Chapter 4).
It is possible that you will not be able to have a shutter speed that is long enough to capture a smooth, silky effect, especially if you are shooting in bright daylight conditions. To overcome this obstacle, you need a filter for your lens—either a polarizing filter or a neutral density filter.
The polarizing filter redirects wavelengths of light to create more vibrant colors, reduce reflections, and darken blue skies, as well as lengthen exposure times by two stops due to the darkness of the filter. It is a handy filter for landscape work. The neutral density filter is typically just a dark piece of glass that serves to darken the scene by one, two, or three stops. Some offer up to ten stops of filtration. This allows you to use slower shutter speeds during bright conditions. Think of it as sunglasses for your camera lens.
Directing the Viewer’s Eye: A Word About Composition
As a photographer, it’s your job to lead the viewer through your image. You accomplish this by using the principles of composition, which is the arrangement of elements in the scene that draws the viewer’s eyes through your image and holds his attention. You need to understand how people see and then use that information to focus their attention on the most important elements in your image.
There is a general order in which we look at elements in a photograph. The first is brightness. The eye wants to travel to the brightest object within a scene. So if you have a bright sky, it’s probably the first place the eye will go. The second is sharpness. Sharp, detailed elements get more attention than soft, blurry areas. Finally, the eye will move to vivid colors while leaving the dull, flat colors for last. It is important to know these essentials in order to grab—and keep—the viewer’s attention and then direct him through the frame.
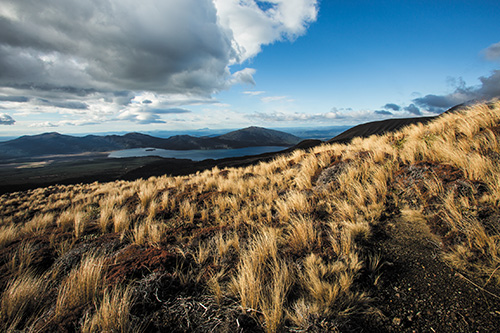
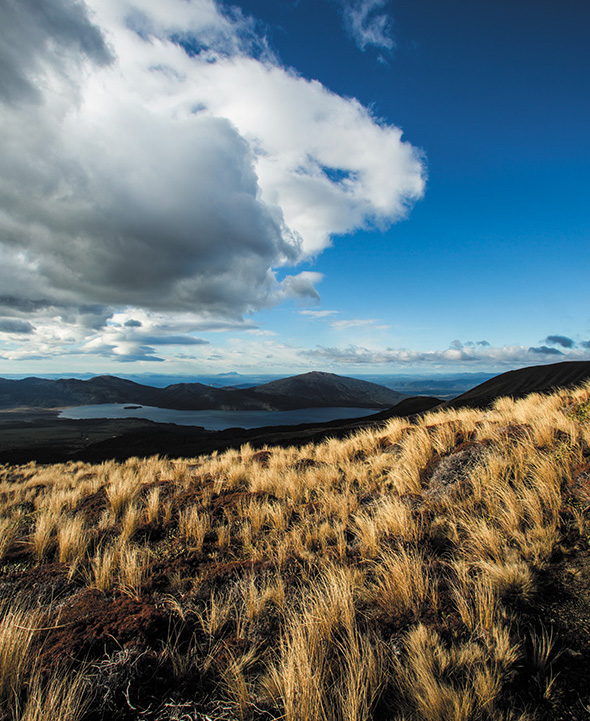
In Figure 7.15, the eye is drawn to the brightly lit long grasses in the foreground. From there it is pulled over the hillside to the lake and mountains, where the frame gets darker. Quickly after, the eye acknowledges the mountains and expanse in the far distance. Finally, the viewer’s gaze moves up into the active sky, starting with the lighter parts of the clouds in the top left and ending in the dark blue at top right.
ISO 100 • 1/80 sec. • f/16 • 17mm lens
Figure 7.15 The Tongariro Alpine Crossing in New Zealand offers some of the most incredible vistas I’ve been fortunate enough to see. After coming down from the heavy snow atop the mountains, I took this shot of the descending grasslands toward Lake Rotoaira, to the northeast. When composing it I wanted the viewer’s eye to be drawn into the image from the bottom and pulled inward to the mountains and up to the sky.
Rule of thirds
There are quite a few philosophies concerning composition. The easiest and arguably most foundational is the rule of thirds. Using this principle, you simply divide your viewfinder into thirds by imagining two horizontal and two vertical lines that divide the frame equally.
The key to using this method of composition is to have your main subject located at or near one of the intersecting points (Figure 7.16).
ISO 200 • 1/200 sec. • f/5.6 • 200mm lens
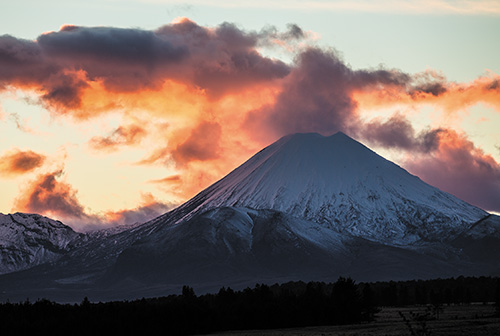
Figure 7.16 I placed the real horizon of this shot just below the lower horizontal third line, and if a vertical line were to be drawn downward through Mount Ngauruhoe (Mount Doom for you “Lord of the Rings” fans), it would be fairly close to the righthand vertical third line in the frame. This leaves the left side of the frame open for more visual information, such as the vibrant cloud structure.
By placing your subject near these intersecting lines, you are giving the viewer space to move within the frame. The one thing you normally don’t want to do is put your subject smack-dab in the middle of the frame, sometimes referred to as “bull’s-eye” composition. Centering the subject is not always wrong, but it will usually be less appealing and may not hold the viewer’s attention.
Speaking of the middle of the frame: Another rule of thirds deals with horizon lines. Generally speaking, you should position the horizon one-third of the way up or down in the frame. Splitting the frame in half by placing your horizon in the middle of the picture is akin to placing the subject in the middle of the frame; it doesn’t lend a sense of importance to either the sky or the ground.
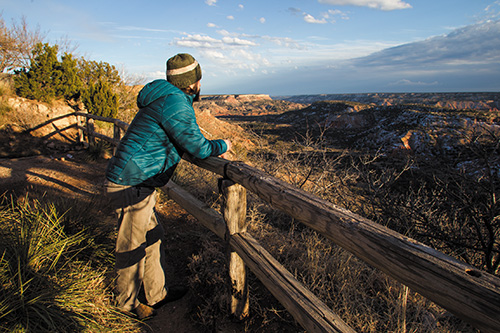
In Figure 7.17, I incorporated the rule of thirds by aligning my horizon in the top third of the frame. I also placed the intrepid adventurer in the foreground on the lefthand third line and along the fence’s leading line to draw the eye through the bottom two thirds of the frame, giving the viewer a chance to travel throughout the frame.
ISO 200 • 1/250 sec. • f/8 • 17mm lens
Figure 7.17 Placing the horizon in the top third of this frame allowed me to draw viewer attention to what the subject in the shot is looking at—Palo Duro Canyon.
The D7200 has a visual tool for assisting you in composing your photo in the form of grid overlay. This grid can be set to appear in the viewfinder and on the rear LCD when in Live View mode.
Using a grid overlay in the viewfinder
1. Press the Menu button, then use the Multi-selector to navigate to the Custom Settings menu and select D Shooting/Display.
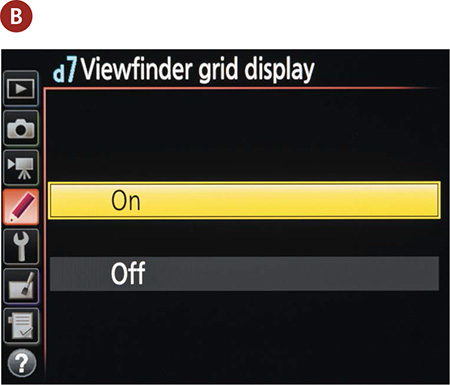
2. Navigate to D7 Viewfinder Grid Display (A) and press OK.
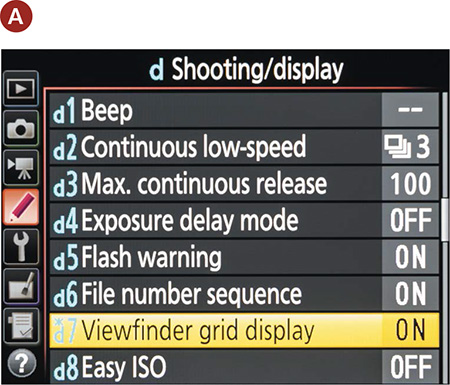
3. Move the Multi-selector up to highlight On and press OK (B).
Using a grid overlay in Live View
1. Press the LV button to turn on Live View.
2. Press the Info button until the grid appears on the viewfinder.
Although the grid in the viewfinder and the Live View screen aren’t equally divided into thirds, they will give you an approximation of where you should be aligning your subjects in the frame.
Creating depth
Because a photograph is a flat, two-dimensional space, you need to establish a sense of depth by using the elements in the scene to give the image a three-dimensional feeling. This is accomplished by including different and distinct spaces for the eye to travel to: a foreground, a middle ground, and a background. By using these three spaces, you draw the viewer in and give your image depth.
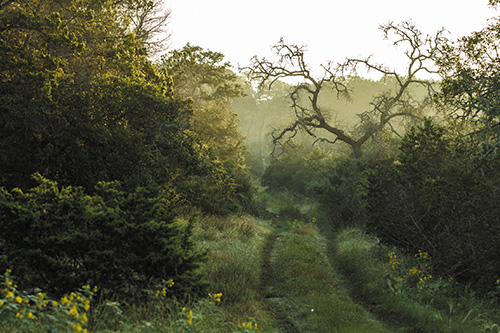
Figure 7.18 is a nice example of how thinking about foreground, midground, and background creates depth. The trail entering the frame on the right and the out-of-focus trees on the left form the foreground. The trail leads the eye to the focal plane, which happens to cross the leafless tree, which serves as the midground. Finally, beyond the tree and up the trail, the background hill on which the trail and vegetation climb creates the background. This scene pulls me in as I find myself wandering up the trail and over the hill.
ISO 400 • 1/640 sec. • f/4.5 • 105mm lens
Figure 7.18 Natural and man-made structures can serve as great leading lines for an eye to travel into your frame. The trail offers a nice way to get through the thick Texas Hill Country vegetation and simplifies the experience.
Advanced Techniques to Explore
This section comes with a warning attached. All of the techniques and topics up to this point have been centered on your camera and hardware like tripods. The following two sections, covering panoramas and high dynamic range (HDR) images, require you to use image-processing software to complete the photograph. These two popular techniques are, however, important enough that you should know how to shoot for success should you choose to explore them.
Shooting panoramas
I don’t shoot a lot of panoramas. Don’t get me wrong—I love looking at them, but I’m more apt to shoot a single wide-angle image of a great landscape than a multi-shot panorama. But when you see one, you just have to do it. Landscapes of large proportion, those that will never be served properly by the expansive qualities of a wide-angle lens, necessitate panoramic technique. New Zealand, for example, is such a place and offers a great many of these types of landscapes, and nothing but a panorama can do them justice.
The multiple-image panorama
To shoot a true panorama, you need to use either a special panorama camera that shoots a very wide frame or the following method, which requires combining multiple frames.
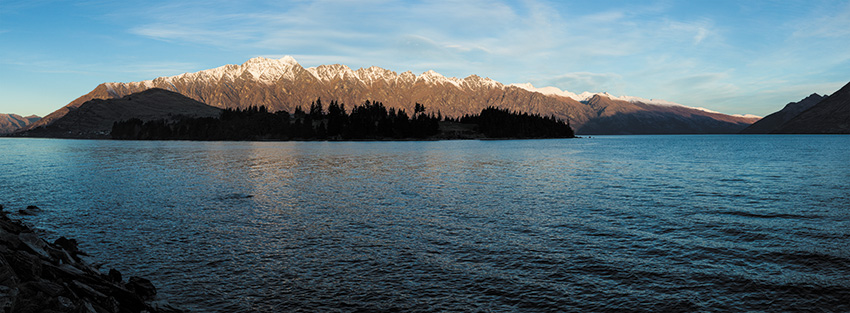
The multiple-image panorama has gained popularity in the past few years, principally due to advances in image-processing software. Many software options available now will take multiple images, align them, and then “stitch” them into a single panoramic image. The real key to shooting a multiple-image pano is to overlap your shots by about 30 percent from one frame to the next (Figures 7.19 and 7.20). It is possible to handhold the camera while capturing your images, but the best method for capturing great panoramic images is to use a tripod.
ISO 100 • 1/200 sec. • f/8 • 50mm lens
Figure 7.19 Here you see the makings of a panorama, with six shots overlapping by about 30 percent from frame to frame.
Figure 7.20 I used Adobe Photoshop to combine all the exposures into one large panoramic image of the Remarkables mountain range, near Queenstown, New Zealand.
Now that you have your series of overlapping images, you can import them into your image-processing software to stitch them together and create a single panoramic image.
Shooting properly for a multiple-image panorama
1. Mount your camera on your tripod and make sure it is level.
2. In Aperture Priority mode, use a very small aperture for the greatest depth of field. Take a meter reading of a bright part of the scene, and make note of aperture and shutter speed.
3. Now change your camera to Manual mode (M), and dial in the aperture and shutter speed that you obtained in the previous step.
4. Set your lens to manual focus, and then focus it for the area of interest using the HFD method of finding a point one-third of the way into the scene. (If you use the autofocus, you risk getting different points of focus from image to image, which will make the image stitching more difficult for the software.)
5. While carefully panning your camera, shoot your images to cover the entire area of the scene from one end to the other, leaving a 30 percent overlap from one frame to the next. The final step involves using your favorite imaging software, such as Photoshop, to take all of the photographs and combine them into a single panoramic image.
Shooting high dynamic range (HDR) images
High dynamic range (HDR) can create stunning images by using the full tonal range of an image, especially when recorded as a RAW file. Depending upon your preference, HDR images can look quite real or very surreal. I have found people either love or hate HDR, but regardless of what side of the fence you are on, it is a wonderful way to understand the effects of exposure on an image.
HDR is used quite often in landscape, cityscape, and, believe it or not, interior architecture images. Typically, when you photograph a scene that has a wide range of tones from shadows to highlights, you have to make a decision regarding which tonal values you are going to emphasize, and then adjust your exposure accordingly. This is because your camera has a limited dynamic range, at least compared to the human eye. HDR photography allows you to capture multiple exposures for the highlights, shadows, and midtones, and then combine them into a single image using software (Figure 7.21).

ISO 100 • 4 sec. • f/16 • 17mm lens
Figure 7.21 This HDR image is made up of several exposures combined in Photomatix Pro.
A number of software applications allow you to combine images and then merge them into a single HDR image. I will not be covering the software applications, but I will explore the process of shooting a scene to help you render properly captured images for the HDR process. Note that using a tripod is essential for this technique, since you need to have perfect alignment of the images when they are combined.
Setting up for shooting an HDR image
1. Set your ISO to 100 to ensure clean, noise-free images.
2. Set your program mode to Aperture Priority. During the shooting process, you will be taking three shots of the same scene, creating an overexposed image, an underexposed image, and a normal exposure. Since the camera is going to be adjusting the exposure, you want it to make changes to the shutter speed, not the aperture, so that your depth of field is consistent.
3. Set your camera file format to RAW. This is extremely important because the RAW format contains a much larger range of exposure values than a JPEG file, and the HDR software needs this information.
4. Change your shooting mode to Continuous Release mode (preferably Continuous High Speed, or CH). This will allow you to capture your exposures quickly. Even though you will be using a tripod, there is always a chance that something within your scene will be moving (like clouds or leaves). Shooting in the Continuous Release mode minimizes any subject movement between frames.
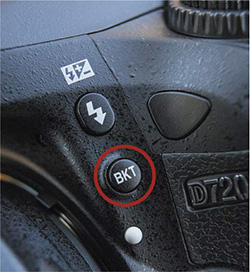
5. Adjust the Auto Bracketing (BKT) mode to shoot three exposures in two-stop increments. To do this, you will first need to press the BKT button while moving the main Command dial to the right.
6. Now use the Sub-command dial to adjust the bracketing exposure increment to 2.0.
7. Focus the camera using the manual focus method discussed earlier in the chapter, compose your shot, secure the tripod, and hold down the shutter button until the camera has fired three consecutive times. The result will be one normal exposure, as well as one under- and one overexposed image.
A software program such as Adobe Photoshop, Photomatix Pro, or Google’s HDR Efex Pro (Nik Collection) can now process your exposure-bracketed images into a single HDR file. Remember to turn off the BKT function when you are done or the camera will continue to shoot bracketed images.
Using your camera’s built-in HDR feature
The D7200 includes an in-camera HDR feature, but I’m not a fan of it. The D7200’s HDR feature works only when the image format is set to JPEG, and it takes only two images, not three or more. This takes away a lot of user control. My recommendation is that if you’re serious about creating high dynamic range images, you skip this setting and refer to my steps above.
Chapter 7 Assignments
We’ve covered a lot of ground in this chapter, so it’s time to put our knowledge to work in order to get familiar with these new camera settings and techniques.
Comparing depth of field: Wide-angle vs. telephoto
If you have a zoom lens, try using the longest focal length. Compose your image and find an object to focus on. Set your aperture to f/22 and take a photo.
Now do the same thing with the zoom lens at its widest focal length. Use the same aperture and focus point.
Review the images and compare the depth of field when using wide angle as opposed to a telephoto lens. Try this again with a large aperture.
Applying hyper focal distance to your landscapes
Speaking of depth of field, practice using the hyper focal distance of your lens to maximize the depth of field. You can do this by picking a focal length to work with on your lens.
Pick a scene that has objects that are near the camera position and something that is clearly defined in the background. Try using a wide to medium-wide focal length for this (18–35mm). Use a small aperture and focus on the object in the foreground; then recompose and take a shot.
Without moving the camera position, use the object in the background as your point of focus and take another shot.
Finally, find a point that is one-third of the way into the frame from near to far and use that as the focus point.
Compare all of the images to see which method delivered the greatest range of depth of field from near to infinity.
Using Live View to focus and compose
Now let’s get some practice using the rule of thirds for improving composition. To do this, you need to employ Live View with the grid overlay turned on for a little visual assistance.
Using the Live View grid, practice shooting while placing your main subject in one of the intersecting line locations. Take some comparison shots with the subject at one of the intersecting locations, and then shoot the same subject in the middle of the frame.
Get the sharpest image possible by using Live View in conjunction with the Zoom In button. Pan your image using the Multi-selector while zooming in to double-check the sharpness throughout the image.
Placing your horizons
Finally, find a location with a defined horizon and, using the Live View grid, shoot the horizon along the top third of the frame, in the middle of the frame, and along the bottom third of the frame.
Share your results with the book’s Flickr group!
Join the group here: flickr.com/groups/nikond7200_fromsnapshotstogreatshots

