
1. The D7200 Top 12 List
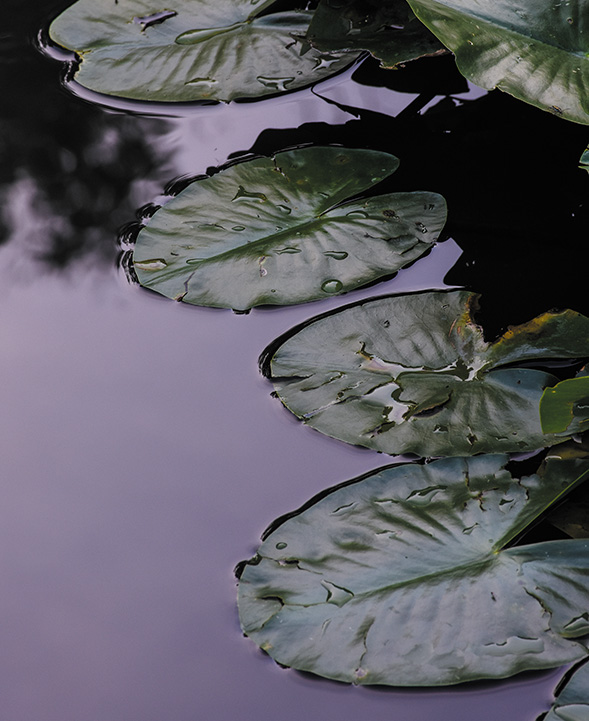
ISO 400 • 1/30 sec. • f/11 • 140mm lens
Twelve Tips to Make Your Shooting More Productive Right Out of the Box
Whenever I get a new camera, the first thing I do is grab the battery and the memory card and start shooting. What I should be doing is taking the extra time and reading the manual, but that’s not much fun. Instead, I thought, why not make a chapter for people, like me, who can’t wait to start taking images but don’t want to feel guilty about not setting up their camera first? Here are 12 things you can do right now that are going to make your experience with your shiny new D7200 a ton better, from turning on the audible chirp for focusing to getting a feel for ISO settings, white balance settings, image review, focus settings, and several other custom functions that will help you right now. That doesn’t mean I want you to skip over the other chapters, because they’re filled with some really good tips, but this is a great starting point.
Poring Over the Picture
Camera Front
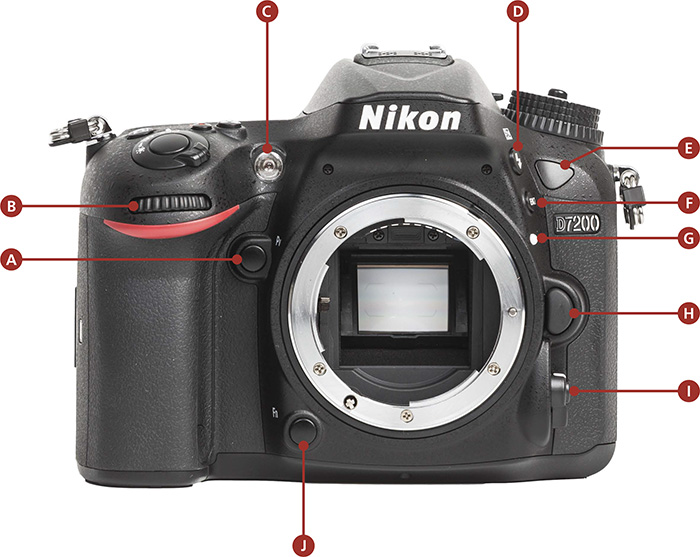
A Depth of Field Preview button
B Sub-command dial
C AF-assist illuminator
D Flash mode button
E Infrared receiver
F Bracketing button
G Lens mounting mark
H Lens Release button
I Focus mode selector and AF button
J Function button
Camera Back
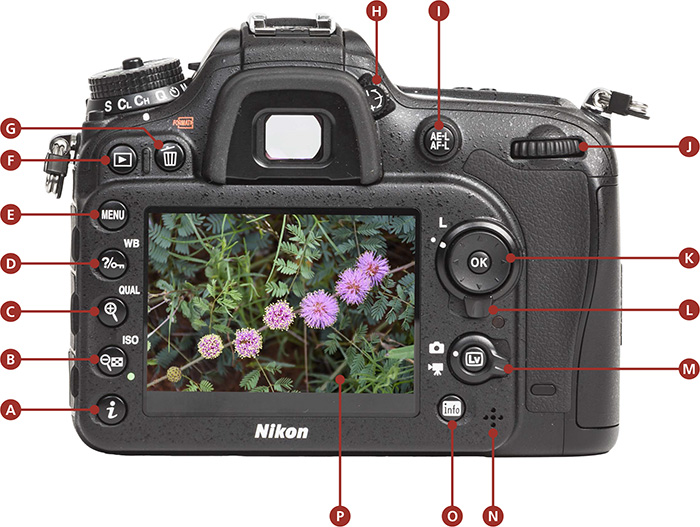
A I Button
B ISO button/Zoom Out/ISO sensitivity
C Qual button/Zoom In/Image Quality
D White Balance/Help/Protect button
E Menu button
F Playback button
G Delete button
H Diopter Adjustment control
I AE/AF Lock button
J Main Command dial
K Multi-selector with OK button
L Focus Lock selector
M Live View selector with LV button
N Speaker
O Info button
P Monitor/LCD
Poring Over the Camera
Camera Top

A Release Mode dial
B Release Mode dial lock release
C Mode dial
D Mode dial lock release
E Stereo microphone
F Meter/Format button
G Movie Record button
H Power switch
I Shutter release button
J Exposure Compensation button
K Control panel
L Accessory shoe
Camera Side
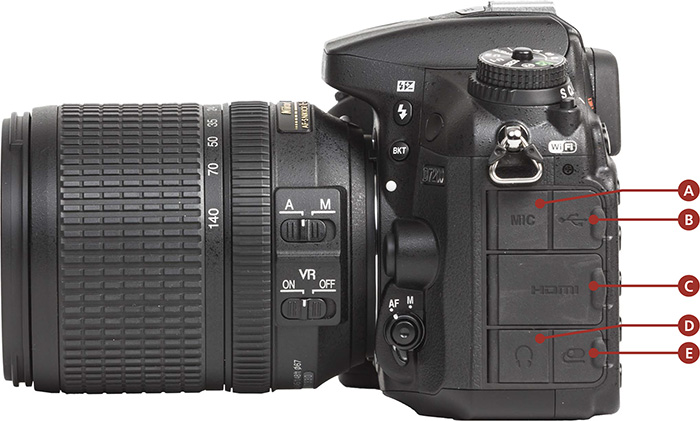
A Microphone connector
B USB connector
C HDMI mini connector (Type C)
D Headphone connector
E Accessory terminal
The D7200 makes it easy to access many of the controls we use every day with a few clicks of a button. Unlike previous models, you no longer have to drill through two or three menus to make simple adjustments. But don’t worry, for those of you who love menus, they’re still there. I’ll briefly discuss how to adjust settings using the buttons and then discuss some of the custom menu options for those of you looking to tweak your camera a bit.
1. Set the Correct White Balance
Color balance correction is the process of rendering accurate colors in your final image. Most people don’t even notice that light has different color characteristics because the human eye automatically adjusts to different color temperatures—so quickly, in fact, that everything looks correct in a matter of milliseconds.
When color film ruled the world, photographers would select which film to use depending on what their light source was going to be. The most common film was balanced for daylight, but you could also buy film that was color balanced for tungsten light sources. Most other lighting situations had to be handled by using color filters over the lens. This process was necessary for the photographer’s final image to show the correct color balance of a scene.
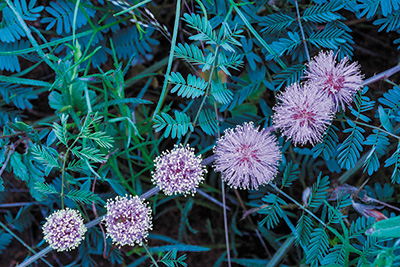
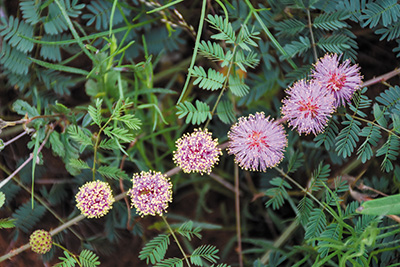
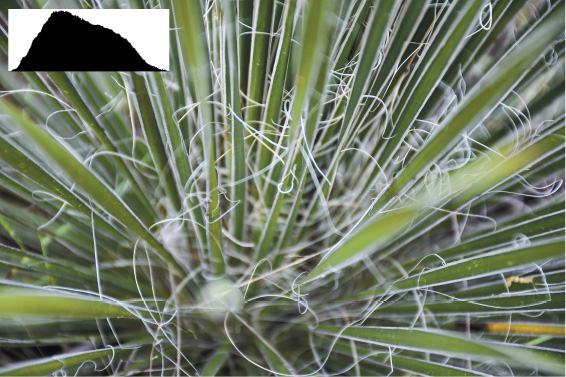
Luckily, you don’t need to have a deep understanding of color temperatures to control your camera’s white balance (Figures 1.1 and 1.2). The choices are given to you in terms that are easy to relate to and that will make things pretty simple.
Do I really need to change my white balance? I always answer this question by stating that if you’re a RAW file shooter, then it depends on your workflow. I shoot strictly in RAW format, which allows me to change the white balance at any time in post-processing. However, I find setting my white balance to the correct setting in the field helps cut down on post-processing time. If you’re a JPEG shooter, then the answer is an easy, “Yes, change the white balance!” As a JPEG shooter, you’ll want the camera to make the best possible color rendition, so having your white balance properly set will help the camera make the appropriate adjustments. But when in doubt, use Auto.
Your white balance choices are:
• Auto: The default setting for your camera. It is also the setting used by all of the automatic scene modes (see Chapter 3).
• Incandescent: Appropriate for any occasion when you are using regular household-type bulbs for your light source. Tungsten is a very warm light source and will result in a yellow-orange cast if you don’t correct for it.
• Fluorescent: Gets rid of the green-blue cast that can result from using regular fluorescent lights as your dominant light source. Some fluorescent lights are actually balanced for daylight, which would allow you to use the Direct Sunlight white balance setting.
• Direct Sunlight: Most often used for general sunlit shooting.
• Flash: Used whenever you’re employing the built-in flash or an external flash connected via the hot shoe. You should select this white balance to adjust for the slightly cooler light that comes from using a flash. (The hot shoe is the small bracket on the top of your camera, resting just above the eyepiece. It is used for attaching a more powerful flash to the camera.)
• Cloudy: The choice for overcast or very cloudy days. This and the Shade setting will eliminate the blue colorcast from your images.
• Shade: Used when working in shaded areas where sunlight is the dominant light source.
• Preset Manual: Indicates that you are using a customized white balance that is adjusted for a particular light source. This option can be adjusted using an existing photo you have taken or by taking a picture of something white or gray in the scene.
Your camera has two different “zones” of shooting modes to choose from. These are located on the Mode dial, which separates your choices into automatic scene modes, effects, and what I refer to as the professional modes. None of the automatic, scene, or special effects modes allow for much customization, including white balance. The professional modes, defined by the letter symbols M, A, S, P, U1, and U2, allow for much more user control (Figure 1.3).
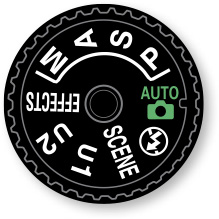
Figure 1.3 The camera’s shooting modes are divided into the automatic scene modes, the special effects modes, and the professional modes (M, A, S, P, U1, and U2).
1. After turning on or waking the camera, select one of the professional shooting modes, such as P (you can’t select white balance when using any of the automatic modes).
2. Press and hold the WB button (A) on the back of the camera to activate White Balance, visible on the control panel or rear LCD.
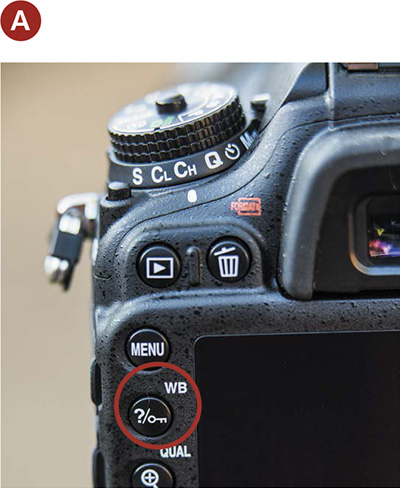
3. While pressing the WB button, use your thumb to rotate the main Command dial to the appropriate setting, and release it to make your selection.
2. Turn Off the Auto ISO Setting
The ISO setting in your camera allows you to choose the level of sensitivity of the camera sensor to light. The ability to change this sensitivity is one of the biggest advantages to using a digital camera. In the days of film cameras, you had to choose the ISO by film type. This meant that if you wanted to shoot in lower light, you had to replace the film in the camera with one that had a higher ISO. So not only did you have to carry different types of film, but you also had to remove one roll from the camera to replace it with another, even if you hadn’t used up the current roll. Now all you have to do is go to your information screen and select the appropriate ISO.
Having this flexibility is powerful, but just as with the JPEG quality setting, the ISO setting has a direct bearing on the quality of the final image. The higher the ISO, the more digital noise the image will contain. Since our goal is to produce high-quality photographs, it is important to get control over all of the camera settings and bend them to our will. When you turn your camera on for the first time, the ISO will be set to Auto. This means that the camera is determining how much light is available and will choose what it believes is the correct ISO setting. Since you want to use the lowest ISO possible, you will need to turn this setting off and manually select the appropriate ISO.
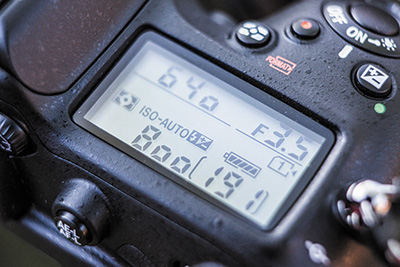
Which ISO you choose depends on your level of available or ambient light. For sunny days or very bright scenes, use a low ISO such as 100. As the level of light is reduced, raise the ISO level. Cloudy days or indoor scenes might require you to use ISO 800 (Figure 1.4). Low-light scenes, such as when you are shooting at night, will mean you need to bump up that ISO to 1600 or higher. The thing to remember is to shoot with the lowest setting possible for maximum quality.
The D7200 has the ability to shoot at very high ISOs with very little noise, but I prefer to have direct control over those ISO settings, so I turn off Auto ISO. There are a few situations, however, where I would turn the feature back on, which I discuss in Chapter 5. But for now, let’s review how to turn Auto ISO off.
Setting the ISO
1. Press and hold the ISO button on the back of the camera while rotating the main Command dial to select ISO Sensitivity based on available light.
2. Release the button when you have made your selection.
You should know that the Auto ISO option is enabled as a default only when using one of the automatic scene modes. When using one of the professional modes (M, A, S, and P; we’ll discuss these in Chapter 4), the Auto ISO feature will be automatically turned off. If you wish to use Auto ISO in one of these modes, you must activate it and set the ISO Sensitivity settings in the Photo Shooting menu. If you plan on shooting with the Auto mode, you cannot turn off the Auto ISO option at all.
3. Set Your Image Quality
Your new D7200 has a number of Image Quality settings to choose from, and depending on your needs, you can adjust them accordingly.
This is probably one of the most important setting adjustments you can make. Most professional photographers shoot using RAW file format because it gives them the greatest control over their images. Now, if RAW is a new term for you and you have no experience in post-processing applications like Adobe’s Lightroom or Photoshop, then I recommend holding off on selecting this setting for now.
If you’re familiar with RAW, then I highly suggest you select that option now.
For non-RAW shooters, we will be focusing in on the JPEG option. JPEG is a format that has been around since 1994 and is widely accepted. Most of your photos that are e-mailed or uploaded to social network sites like Facebook are JPEG images. Moreover, most printing services, such as Walgreens, Kodak, Shutterfly, Mpix, or your local camera shop, use JPEG.
The JPEG file format compresses your image before it’s stored on your memory card, meaning the camera, not you, is applying all the image processing first. Image processing involves such factors as sharpening, color adjustment, contrast adjustment, noise reduction, and so on. Many photographers prefer to use the RAW file format to have greater control over the image processing. We will take a closer look at this in Chapter 2, but for now let’s just make sure that we are using the best-quality JPEG possible.
The D7200 has nine settings for the JPEG format. There are three settings each for Large, Medium, and Small image sizes. These settings (Basic, Normal, and Fine) represent image compression. The Large, Medium, and Small settings determine the actual physical size of your image in pixels. Let’s work with the highest-quality setting possible.
1. Press and hold the Qual button, to the left of the camera’s LCD on the back of the camera, while rotating the main Command dial to select the Fine Image Quality setting (A). You can view the changes on the LCD by pressing the Info button to activate the monitor (B).

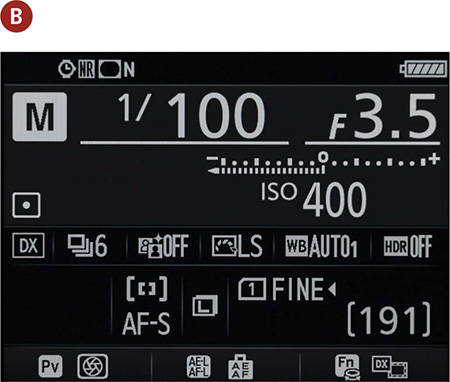
2. Then, while still holding down the Qual button, rotate the Sub-command dial with your right finger to choose the file setting Large, which selects the largest image size available.
3. Release the Qual button when you have made your selection.
4. If you’ve set up your camera properly, it should read L and Fine on the monitor after you press the Info button on the back of the camera.
As you will see when scrolling through the quality settings, the higher the quality, the fewer pictures you will be able to fit on your card. If you have a 16 GB memory card, the quality setting we have selected will allow you to shoot about 930 photographs before you fill up your card. I always try to choose quality over quantity.
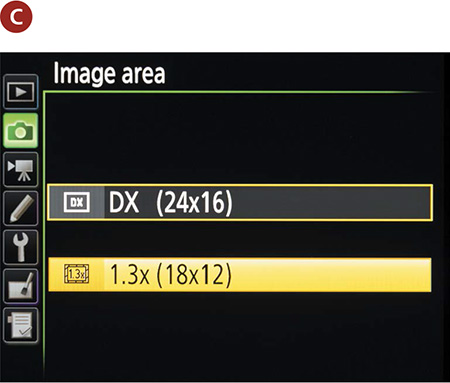
4. Set the Appropriate Image Area
One of the most interesting features of the D7200 is its ability to change the camera’s crop factor. This camera has a standard crop size of DX 24 x 16. You can change that setting to get some additional reach by increasing the crop factor to 1.3 times the standard, or 18 x 12.
The 1.3 DX crop has four main benefits. First, it gives you a faster frame advance rate of 7 frames per second when in JPEG/12-bit NEF RAW mode. Second, it creates a telephoto effect without the need for changing lenses because it instantly increases the reach of your lens by a factor of 1.3. Third, because the viewable area is smaller, the camera records less information. Thus, the recorded file sizes are smaller. For instance, a standard DX 12-bit RAW file is 22.2 MB, and a 1.3 DX crop 12-bit RAW file is only 15 MB in comparison. Lastly, because the 1.3 crop image area is smaller, nearly all 51 AF points are able to saturate the viewable area, allowing for a very selective focus.
Now, I know all of this sounds really great, but my personal opinion is that this feature will be loved by those who find a special use for it and neglected by most. I can see some sports photography enthusiasts using this feature when they want better AF coverage and when a 1-frame-per-second increase in shutter speed is beneficial. I also found that when I was trying to get an image of a bird that was out of my reach, it helped me get closer without fumbling for a different lens. If I’d had to mess with changing lenses, I could have missed the image. However, for our purposes going forward, this will be the only place in the book where I’ll address using the 1.3 crop, to avoid any unnecessary confusion. My suggestion is that if this is your first dSLR, or if this concept is new to you, practice using the standard DX frame size before experimenting with the 1.3 crop. As I will remind you throughout this book, experimentation is key to your growth, so come back to this section and try out the feature once you become familiar with your camera—give it a test drive with your sports, macro, or wildlife photography.
Changing the crop factor
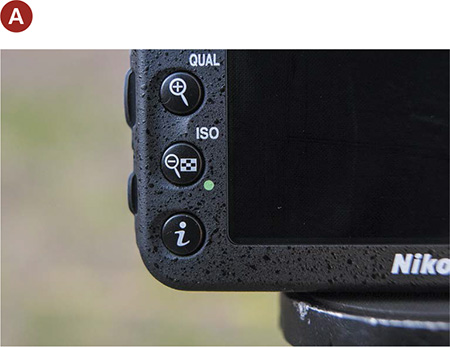
1. Turn your camera on and press the i button (A).
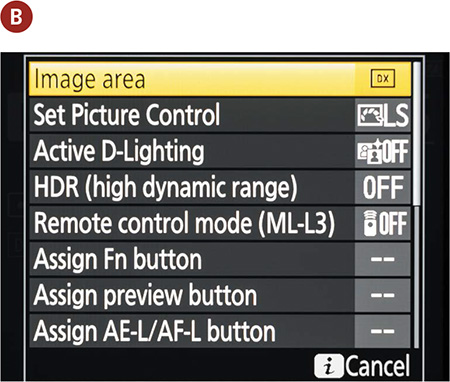
2. Next, using your Multi-selector, select Image Area and press OK (B).
3. Select 1.3x (18 x 12) using your Multi-selector, and press OK (C).
Remember that the 1.3 crop will remain even if you turn the camera on and off. To change the crop back to its default, simply follow steps 1 and 2, and then select DX (24 x 16).
5. Set Your Focus Point and Mode
The Nikon focusing system is well known for its speed and accuracy. The automatic focus modes will give you a ton of flexibility in your shooting. There is, however, one small problem inherent with any focusing system. No matter how intelligent it is, the camera is looking at all of the subjects in the scene and noting which is closest to the camera. It then uses this information to determine where the proper focus point should be. It has no way of knowing what your main emphasis is, so it is using a “best guess” system. To eliminate this factor, you should set the camera to single-point focusing so that you can ensure that you are focusing on the most important feature in the scene.
The camera has 51 separate focus points to choose from. They are arranged in a grid, but I always like to start by selecting the focus point in the center. Once you have become more familiar with the focus system, you can experiment with the other points, as well as the automatic point selection.
You should also change the focus mode to AF-S so that you can focus on your subject and then recompose your shot while holding that point of focus.
Setting the focus point and focus mode
1. To choose a single point of focus, wake the camera (if necessary) by lightly pressing the shutter release button.
2. Press and hold the AF-mode button on the front of the camera near the lens, using your left thumb. Now rotate the main Command dial to select AF-S (Single-servo AF) mode. This mode is used for photographing stationary objects but can be used in some motion shots as well. Next, rotate your Sub-command dial to select your AF-area mode; in this case we want Single-point AF, represented by the letter S.
The camera is now ready for single focusing. You will know if your subject is in focus by pressing the shutter button halfway while watching for the in-focus indicator to appear in the viewfinder. (Please review page 34 of your manual for a visual.) To focus on your subject and then recompose your shot, just place the focus point in the viewfinder on your subject, depress the shutter release button halfway until the in-focus indicator appears, and without letting up on the shutter button, recompose your shot and then press the shutter button all the way down to make your exposure (Figure 1.5).
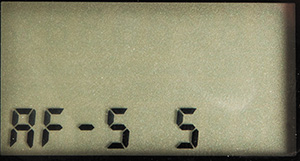
Figure 1.5 Using the center single focus point in AF-S mode allows you to focus on your subject in the center, then recompose your photograph.
6. Manual Focus
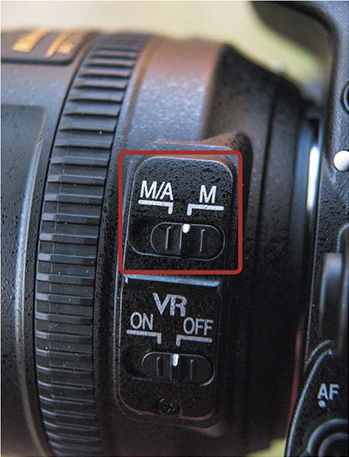
As good as the Nikon autofocus system is, there are times when it just isn’t doing the job for you. Often this has to do with how you would like to compose a scene and where the actual point of focus should be. This can be especially true when you are using the camera on a tripod, where you can’t easily prefocus and then recompose before shooting. In some low-light situations, your camera may find it difficult to focus the lens even with the assistance of the AF-assist illuminator. To remedy this problem, you will need to manually focus the lens. I am only going to cover the kit lens that came with my D7200 (the 18–140mm VR), so if you have purchased a different lens, be sure to check its accompanying instruction manual.
On the 18–140mm kit lens, you simply need to slide the switch located at the base of the lens (located on the lens barrel near the body of the camera) from the M/A setting to the M setting (Figure 1.6). You can now turn the focus ring near that switch to set your focus. Now that you’re in manual focus mode, the camera will not give you any notification when you have correctly focused. If you are using a non-AF-S lens, then you will need to move the focus mode switch on the barrel of the camera to M as well as the focus mode selector to M.
We’ll cover more manual focus situations in greater detail in future chapters.
7. Review Your Shots
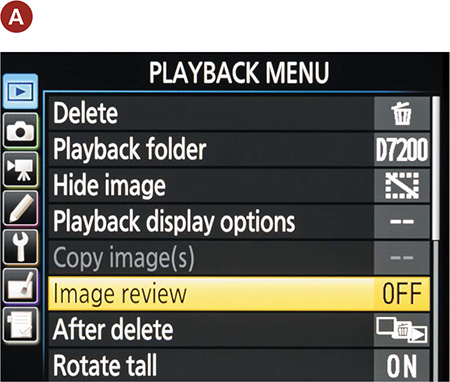
One of the greatest features of a digital camera is its ability to give us instant feedback. By reviewing your images on the camera’s LCD, you can instantly tell if you got your shot. This visual feedback allows you to make adjustments on the fly. However, the D7200 ships with the Image Review feature turned off. If you want instant feedback on your images, then you should consider turning this feature on.
1. Highlight Image Review in your Playback menu using the Multi-selector, and press OK (A).
2. Next, using your Multi-selector, highlight the On option and press OK (B).

After this feature is turned on, when you first press the shutter release button, your camera quickly processes your shot and then displays the image on the LCD. The default setting for that display is four seconds. Four seconds works for me, but if you want to increase the amount of time you have to view a shot, such as up to 10 seconds, you can do that, using the following steps.
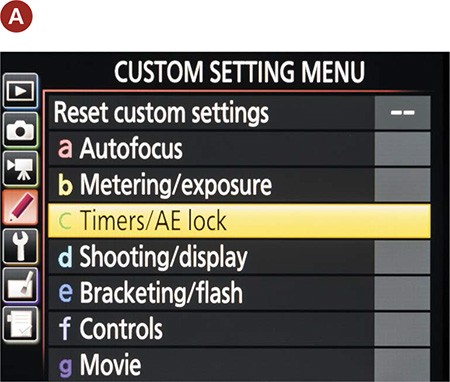
1. Go to the Custom Setting menu, and select C Timers/AE Lock (A).
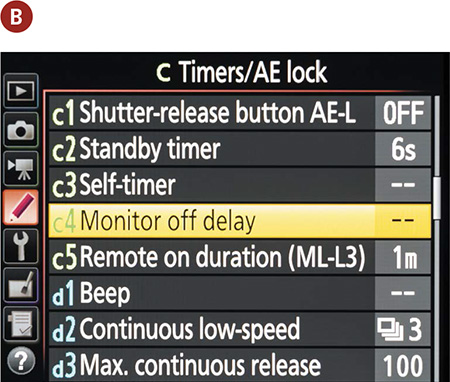
2. Choose C4 Monitor Off Delay (B).
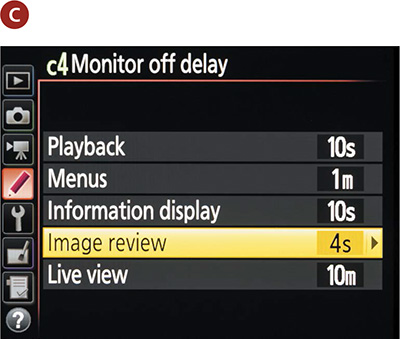
3. Select Image Review, and choose your preferred review time (C).
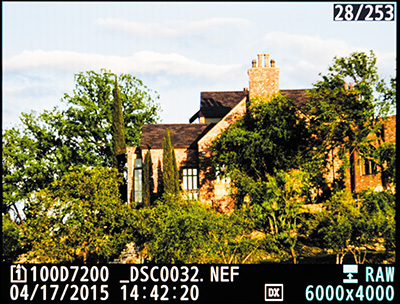
Two display modes give you different amounts of information while reviewing your photos. The default view (Figure 1.7) simply displays your image along with its filename, date, time, and image quality.
Review even more image details
To get more visual feedback, such as exposure information, you’ll need to activate the Overview display option in the Playback menu.
1. Press the Menu button, and use the Multi-selector to navigate to the Playback menu. Then navigate to the Playback display option, and press OK.
2. Next, move the Multi-selector down until you highlight Overview. Press the Multi-selector to the right to place a check mark in the option. Press OK.
Now, when you review a shot, press the Multi-selector up to display the Overview data (Figure 1.8). This view mode not only displays the same information as the default view, but also includes aperture, shutter speed, lens length, white balance, exposure compensation, shooting mode, ISO, white balance setting, picture style, quality setting, any compensation settings, the active color space, picture control, and the D-Lighting setting. The other noticeable item will be the histogram, which gives you important feedback on the luminance values in your image (more on this in the sidebar “The Value of the Histogram”).

You probably won’t want to use this display option as your default review setting because the image thumbnail is so small, but if you are trying to figure out what settings you used or if you want to review the histogram, you now have all of this great information available.
Other display options are available, and they must also be turned on using the playback display options under the Playback menu (Figure 1.9). With this menu choice you can add display modes such as Highlights, RGB histograms (Figure 1.10), and additional camera data (Figure 1.11). I personally don’t use the RGB Histogram and Shooting Data settings because they don’t offer me any visual information that I find critical during a photo session. I do, however, always have the Highlights option turned on so that I can make sure I’m not clipping any information from my image highlights.
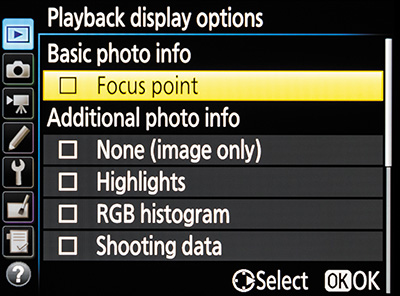
Figure 1.9 Display mode options: Here’s where you need to choose the image information you want displayed when reviewing an image during playback.
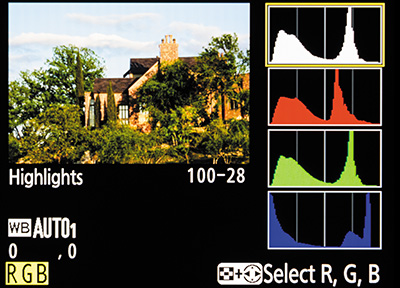
Figure 1.10 The RGB Histogram display mode: If you’re interested in monitoring the histogram of your images’ color channels, select this option.
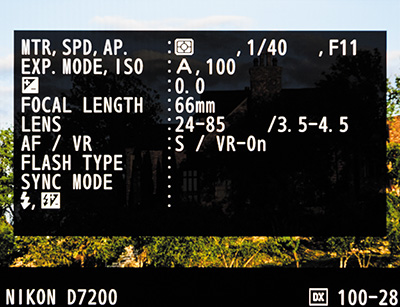
Figure 1.11 The Shooting Data display mode: Select this option if you wish to display focal length, exposure, lens info, and more.
8. Where’s the Beep? Custom Focusing Options
The D7200 is known for being ultra quiet. When I received my camera, I noticed there was no beep when I focused in on an image. The camera had shipped to me with the focus confirmation beep turned off. For the most part, I don’t shoot with this feature turned on, but it is useful when I have a hard time confirming focus with just my eyes. If you are new to using a camera, it’s nice to hear that little confirmation beep telling you that the lens is in focus. Often I’m moving very quickly, and just hearing a beep that says everything is in focus is reassuring. Here’s how you can turn the beep back on and select a volume.
1. Press the Menu button.
2. Choose Custom Setting Menu.
3. Select D Shooting/Display.
4. Choose D1 Beep.
5. Select Volume and Pitch.
6. Click OK.
Focus Point Wrap—Turn this feature on and you’ll save your thumb from doing a lot of clicking when working from opposite ends of the AF points.
1. Press the Menu button.
2. Select Custom Setting Menu.
3. Choose A Autofocus.
4. Choose A6 Focus Point Wrap Around.
5. Select Wrap.
AF-Assist Illuminator—The D7200 is equipped with an autofocus illuminator. Basically, a light comes on when the camera is trying to focus in the dark. It’s similar to a red-eye light but serves a totally different purpose. I am not a fan of this function, but you may like it. I don’t recommend it for low-light portraits, because the flashing light bothers some people’s eyes. If you want to turn this function off, either all the time or only for low-light portraits, here is how you do that.
1. Press the Menu button.
2. Select Custom Setting Menu.
3. Choose A Autofocus.
4. Select A9 Built in AF-assist Illuminator.
5. Select Off.
6. Press OK.
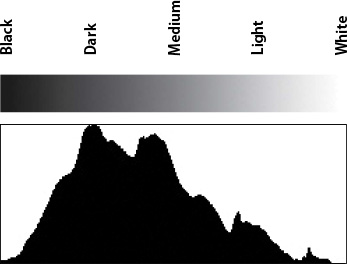
Figure 1.12 This is a typical histogram, where the dark to light tones run from left to right. The black to white gradient above the graph demonstrates where the tones lie on the graph and would not appear above your camera histogram display.
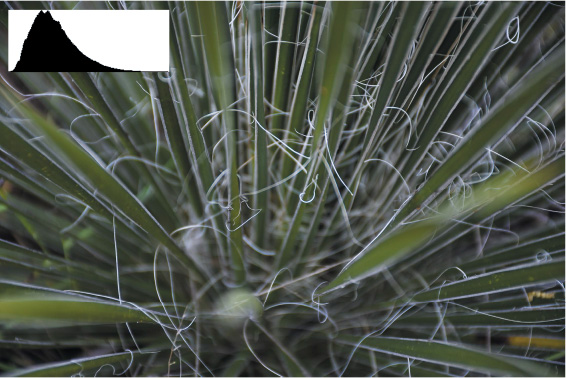
Figure 1.13 This image is about two stops under-exposed. Notice that the histogram is skewed to the left.
9. Use the Grid
I love a viewfinder grid. I think it’s super handy when composing images and lining things up. Those of you familiar with the rule of thirds will recognize this grid.
1. Press the Menu button.
2. Select Custom Setting Menu.
3. Choose D Shooting/Display.
4. Choose D7 Viewfinder Grid Display.
5. Select On.
6. Press OK.
10. Shutter Delay Options
Exposure Delay mode—This is a landscape photographer’s dream. It’s a great feature to activate if you don’t have a remote or cable release for your camera. We all know that movement is bad when taking long exposures. This feature delays the shutter for one, two, or three seconds after the shutter release button has been pressed. I love this feature because otherwise I would need to use a self-timer, but the problem with a self-timer is that it’s designed around getting people in front of the camera, so the shortest delay is still longer than I need when taking landscape shots. Exposure Delay is better than using the timer because there isn’t such a long delay, but it achieves the same function as a cable release.
Setting up Exposure Delay mode
1. Press the Menu button.
2. Choose Custom Setting Menu.
3. Select D Shooting/Display.
4. Choose D4 Exposure Delay Mode.
5. Select either 1s, 2s, or 3s Delay, and press OK.
1. Press the Menu button.
2. Choose Custom Setting Menu.
3. Select C Timers/AE Lock.
4. Choose C3 Self-Timer.
5. Select Self-Timer Delay (from 2 to 20 seconds).
11. Oh, Shoot! Reset Options
Don’t you wish everything in life had a reset button? Well, the folks at Nikon have made it simple with the D7200. If at any time you want to reset the camera’s shooting options, then all you need to do is press the ISO button and the Exposure Compensation button (a green button is located next to each icon) simultaneously for more than two seconds (Figure 1.15). The control panel will turn off as it resets, indicating that the shooting options have been reset to their default. If you need to reset the Shooting menu or restore custom settings, then follow the steps below.
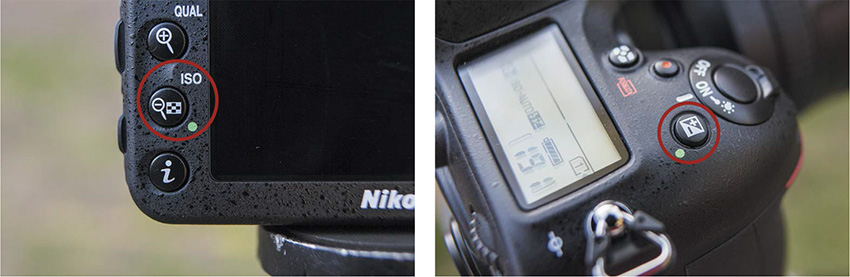
Figure 1.15 Press the ISO button and the Exposure Compensation button simultaneously to reset shooting options.
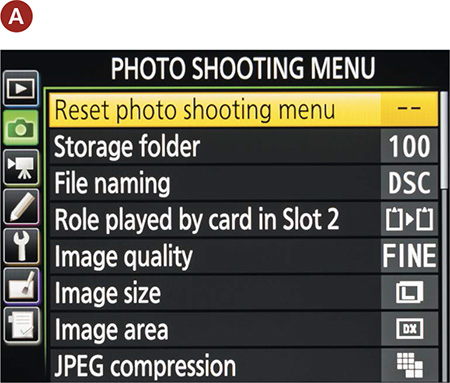
To restore the Photo Shooting menu to its default, go to the Photo Shooting menu and select Reset Photo Shooting Menu (A). Press OK, and select Yes.
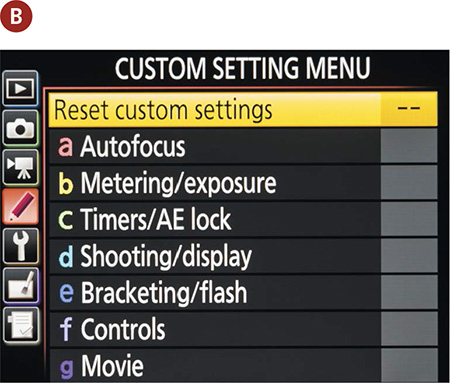
Finally, to restore your custom settings to their default values, go to the Custom Setting menu and select Reset Custom Settings (B). Press OK, and select Yes.
12. Hold Your Camera for Proper Shooting
It’s worth taking a few seconds to think about how you hold your camera. DSLR cameras are made to favor right-handed people. Grasp the camera body with your right hand. Most of the important camera controls are within easy reach. Create a stable base for your camera to rest on by placing the camera body on the up-facing palm of your left hand (Figure 1.16). Now you can curl your fingers around the lens barrel. By using the underhand grip, you keep your elbows close to your body. Pull them in to stabilize your shooting position. Also try to maintain proper upright posture. Leaning forward at the waist will begin to fatigue your back, neck, and arms. Finally, place your left foot in front of your right foot, and face your subject in a wide stance.

Figure 1.16 Here’s the proper way to hold your camera to ensure sharp, blur-free horizontal images (photo by Jacob Copple).
For vertically oriented shots, continue to use your left hand as a foundation for the camera’s weight by keeping your palm facing upward. Turn your camera so the right-hand grip points upward (Figure 1.17). Many folks default to turning the grip toward the ground, but in doing so, you place the weight of the camera and lens in your shooting hand, a platform that is not nearly as stable as your left.

Figure 1.17 To shoot vertically, keep using your left hand as a base for the camera’s weight (photo by Jacob Copple).
Chapter 1 Assignments
Let’s begin our shooting assignments by setting up and using all of the elements of the Top 12 list. Even though I have yet to cover the professional shooting modes, you should set your camera to the P (Program) mode. This will allow you to interact with the various settings and menus that have been covered thus far.
Basic camera setup
Charge your battery to 100 percent. Next, using your newfound knowledge, set up your camera to address the following settings: Image Quality and Auto ISO.
Selecting the proper white balance
Take your camera outside into a daylight environment and then photograph the same scene using different white balance settings. Pay close attention to how each setting affects the overall colorcast of your images. Next, try moving inside and repeat the exercise while shooting in a tungsten lighting environment. Finally, find a fluorescent light source and repeat one more time.
Focusing with single point and AF-S
Change your camera setting so that you are focusing using single-point focus. Try using all of the different focus points to see how they work in focusing your scene. Then set your focus mode to AF-S and practice focusing on a subject and then recomposing before actually taking the picture. Try doing this with subjects at varying distances. Remember to turn Focus Wrap Around on.
Evaluating your pictures with the monitor
Set up your image display properties and then review some of your images using the different display modes. Review your shooting information for each image and take a look at the histograms to see how the content of your photo affects the shape of the histograms.
Discovering the manual focus mode
Change your focus mode from Auto to Manual and practice a little manual focus photography. Get familiar with where the focus ring is and how to use it to achieve sharp images.
Get a grip: proper camera holding
This final assignment is something that you should practice every time you shoot: proper grip and stance for shooting with your camera. Use the described technique and then shoot a series of images. Then try shooting some with improper technique to compare the stability of the grip and stance.
Share your results with the book’s Flickr group!
Join the group here: flickr.com/groups/nikond7200_fromsnapshotstogreatshots