
11. Advanced Techniques
ISO 400 • 1/30 sec. • f/16 • 17mm lens
Impress Your Family and Friends
We covered a lot of ground in the previous chapters, especially on the general photographic concepts that apply to most, if not all, shooting situations. There are, however, some specific tools and techniques in this chapter that will give you an added advantage in obtaining a great shot. Additionally, we will look at how to customize certain controls on your camera to reflect your personal shooting preferences so you will always have them at the ready.
Poring Over the Picture
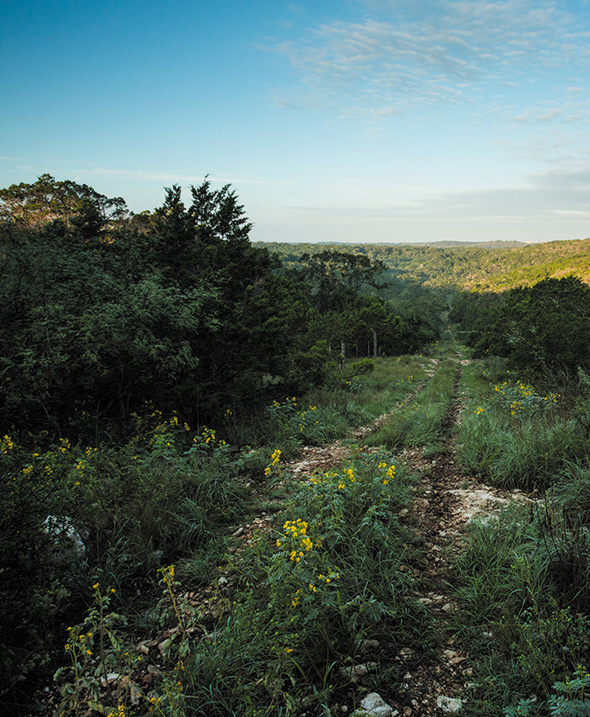
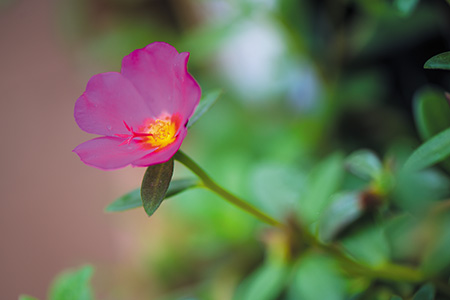
Oriental Bay is one of the most beautiful visuals of Wellington, New Zealand, especially during the blue hour of the morning. Each morning I was there, I walked down the docks and photographed the boats, the water, the sky, and any structure that helped accentuate the size and beauty of the area. I ended my stroll each morning at this pier, which is backgrounded by the homes that overlook the bay. Not a bad place to finish sipping my morning coffee.
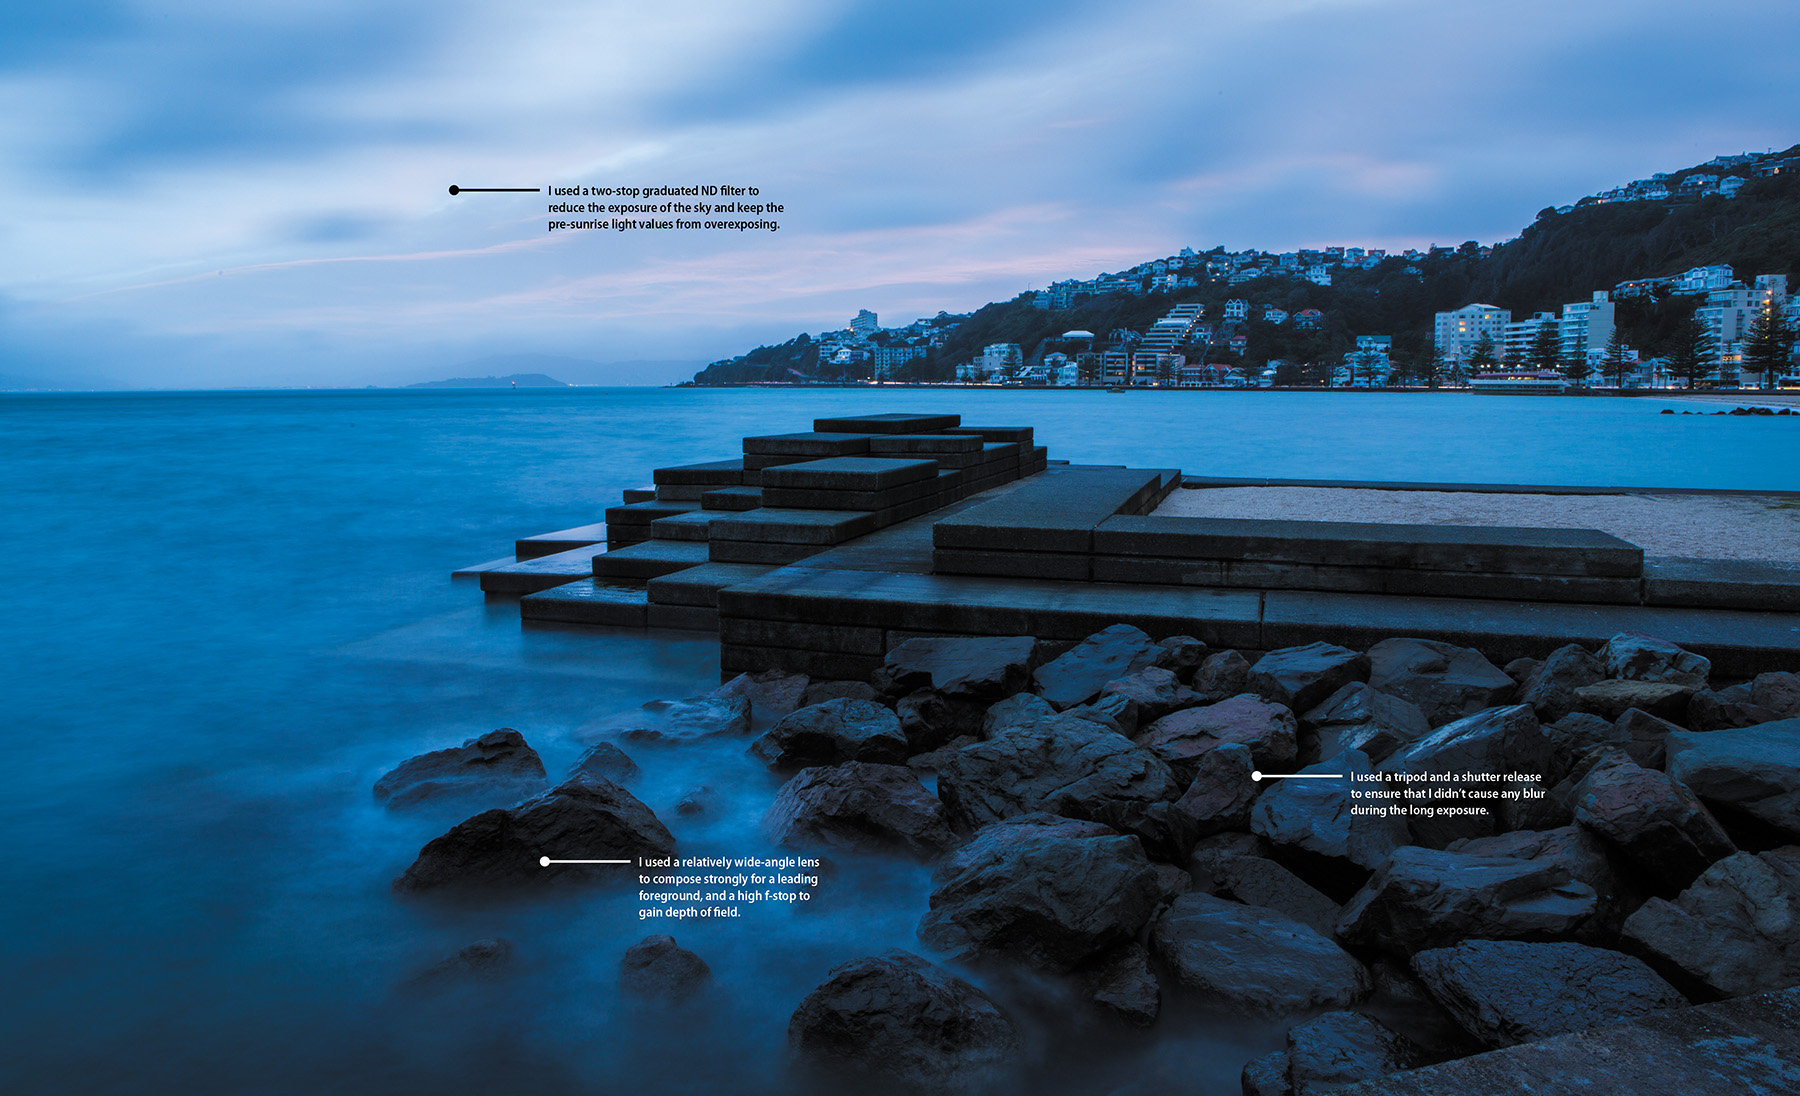
ISO 100 • 10 sec. • f/22 • 24mm lens

Spot Meter for More Exposure Control
Generally speaking, Matrix mode provides accurate metering information for the majority of your photography. It does an excellent job of evaluating the scene and then relating the proper exposure information to you. The only problem with this mode is that, like any metering mode on the camera, it doesn’t know what it is looking at. In specific circumstances, you’ll want to get an accurate reading from just a portion of a scene and discount all of the remaining area in the viewfinder. To give you greater control of the metering operation, you can switch the camera to Spot mode. This allows you to take a meter reading from a very small circle in the center of the viewfinder, while ignoring the rest of the viewfinder area.
So when would you need to use this? Think of a person standing in front of a very dark wall. In Matrix mode, the camera would see the entire scene and try to adjust the exposure information so that the dark background is exposed to render a lighter wall in your image. This means that the scene would actually be overexposed and your subject would then appear too light. To correct this, you can place the camera in Spot mode and take a meter reading right off of—and only off of—your subject, ignoring the dark wall altogether. Spot mode will read the location where you have your focus point, placing all of the exposure information right on your point of interest.
Other situations that would benefit from Spot mode include:
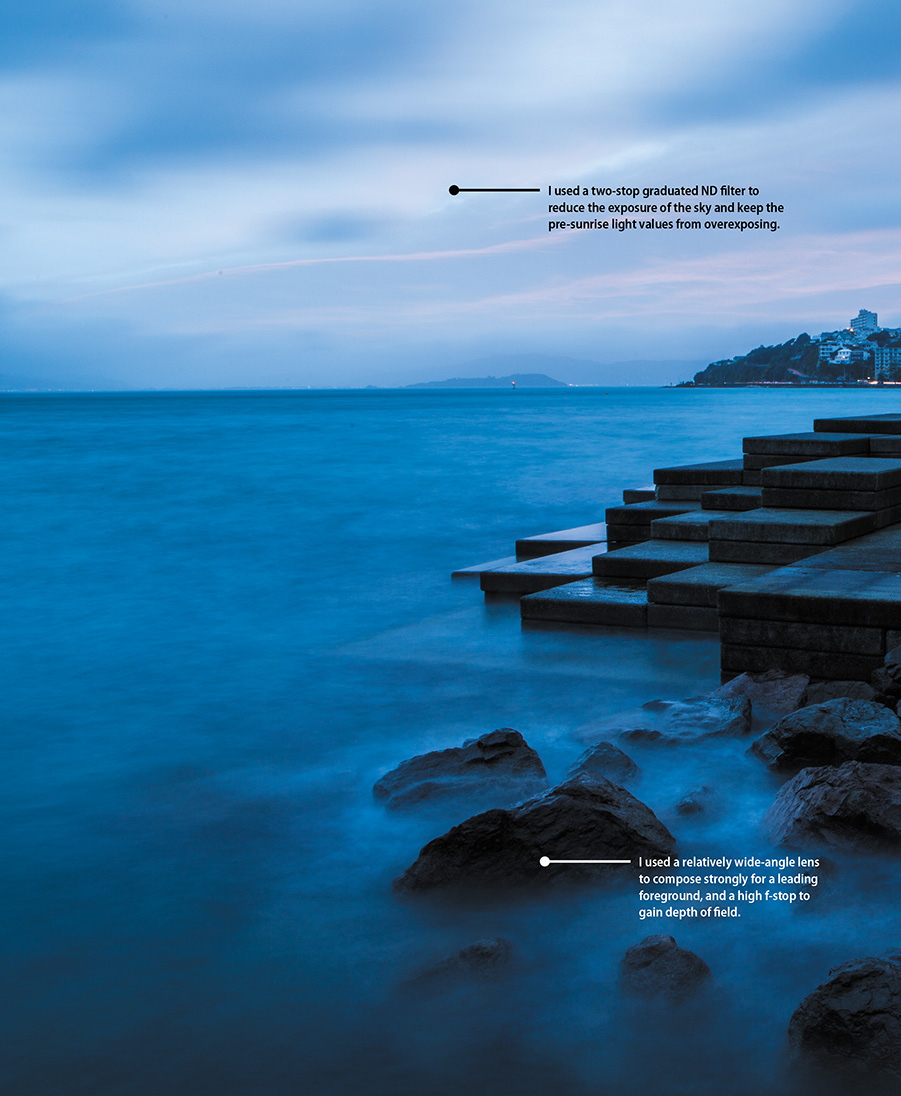
• Snow or beach environments where the overall brightness level of the scene could fool the meter (Figure 11.1)
ISO 200 • 1/1250 sec. • f/8 • 125mm lens
Figure 11.1 The dark background of water and forest easily throws off the exposure when the camera is set to Matrix mode. Changing the metering mode to Spot allowed me to take an exposure reading off the bright plane and avoid overexposing it and the snow-capped mountains.
• Strongly backlit subjects that leave the subject underexposed
• Cases where the overall feel of a photo is too light or too dark
Setting up and shooting in Spot Metering mode
1. Make sure the camera is in one of the professional shooting modes, as indicated by M, A, S, or P on the Mode dial. You cannot change metering in the automatic modes.
2. Press and hold the Metering button while rotating the main Command dial with your thumb. Select Spot metering by watching the control panel as you turn the dial.
3. Once you have selected Spot metering, release the meter button.
4. Now use the Multi-selector to move the focus point onto your subject and take your photo. The meter reading will come directly from the location of the focus point.
Note that if you are using the Auto-area AF mode, the camera will use the center focus point as the Spot metering location.
When using Spot mode, remember that the meter believes it is looking at a middle gray value, so you might need to incorporate some exposure compensation of your own to the reading that you are getting from your subject. This will come from experience as you use the meter.
Metering for sunrise or sunset
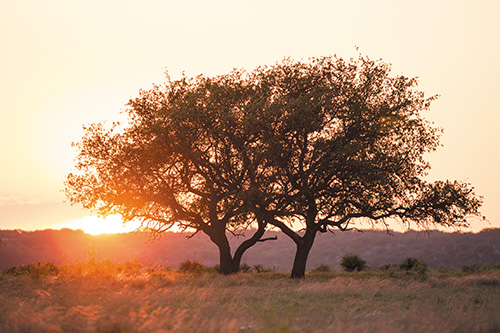
Capturing a beautiful sunrise or sunset is all about the sky. If there is too much foreground in the viewfinder, the camera’s meter will deliver an exposure setting that is accurate for the darker foreground areas while leaving the sky overexposed, undersaturated, and generally not very compelling (Figure 11.2). To gain more emphasis on the colorful sky, point your camera at the brightest part of it and take your meter reading there. Use the AE Lock to meter for the brightest part of the sky and then recompose. The result will be an exposure setting that underexposes the foreground but provides a darker, more dramatic sky (Figure 11.3).
ISO 200 • 1/320 sec. • f/4 • 300mm lens
Figure 11.2 Originally, I metered off the tree and recomposed, resulting in a well-exposed foreground but an extremely overexposed sky.

ISO 200 • 1/1600 sec. • f/4 • 300mm lens
Figure 11.3 I exposed for the sky right off the tree, and the brighter values let me silhouette the tree and capture the highlights in the grasses.
Manual Mode
Probably one of the most advanced skills to master is shooting in Manual mode. With the power and utility of most of the automatic modes, Manual mode almost never sees the light of day. I have to admit that I don’t use it very often, but at times no other mode will do. One of the situations that works well with Manual is studio work with external flashes. When I work with studio lights, my exposure will not change, so I use Manual to eliminate any automatic changes that might happen from shooting in Program, Shutter Priority, or Aperture Priority mode.
I typically shoot environmental portraits using Manual mode, especially those that I light artificially. Figure 11.4 was taken with one external Speedlight. I fired it against a white wall to the subject’s left (camera right), and the light reflected back onto the subject, creating a nice, soft transition from light to shadow on the environment and subject. Manual mode allowed me to keep the background (the exterior) from overexposing.
ISO 400 • 1/100 sec. • f/4 • 34mm lens
Figure 11.4 To avoid over-exposing the exterior through the window while artificially lighting the subject, I used Manual mode.
Manual mode gives you ultimate creative control.
Bulb photography
If you want to work with long shutter speeds that don’t quite fit into one of the selectable shutter speeds, you can choose Bulb. This setting is available only in Manual mode, and its sole purpose is to open the shutter at your command and then close it again when you decide to. Several scenarios where you would want to use Bulb mode come to mind: shooting fireworks, photographing lightning, capturing the movement of the stars at night (star trails), or any other very long exposure.
If you are photographing fireworks, you could certainly use one of the longer shutter speeds available in Shutter Priority mode, since they are available for exposure times up to 30 seconds—but many long exposures require shutter speeds much longer than 30 seconds.
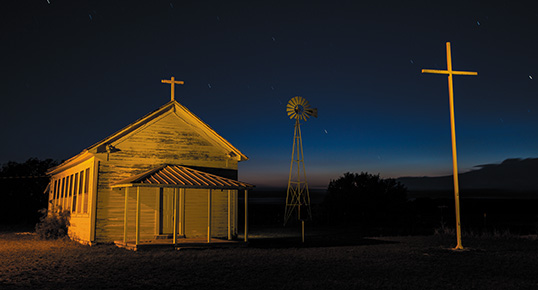
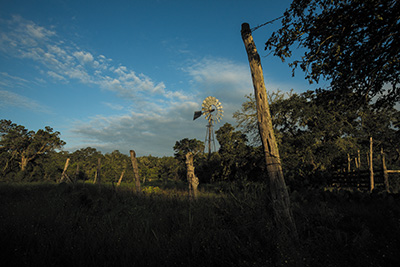
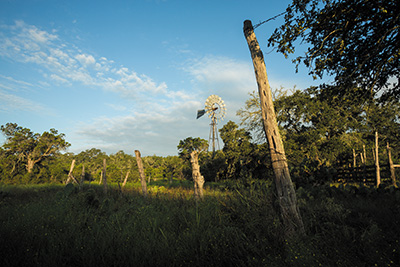
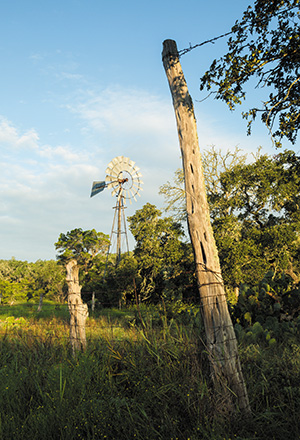
Star trail photography is one of my favorite techniques to teach at my Texas Tech Junction Intersession workshop, because the skies are typically very clear with little light pollution (Figure 11.5). I often combine it with light painting an interesting subject. The key to successfully shooting any bulb exposure, and especially star trail photography, is setting your camera to Bulb mode while using a tripod and a locking shutter release. It’s not uncommon for a star trail exposure to take several minutes to several hours, so be patient. Here are some tips that will help you explore your camera’s Bulb setting while capturing star trails.
ISO 100 • 2 min. • f/5.6 • 34mm lens
Figure 11.5 Stair trail photography is nice to combine with light painting. Here, I kept the star trails short so as not to inundate the image with distraction. But the two minutes it took to paint the church, the cross, and the windmill was sufficient for trails to appear on the brighter stars in the western sky.
• Set the camera to Bulb mode.
• Use a low ISO (I used 100).
• Use a fairly open aperture (I used f/5.6).
• Use a wider focal length (34mm).
• Locate the North Star, Polaris.
• Focus your lens to infinity while pointing toward Polaris (although I didn’t include it in the frame, you can tell by the rotation of the stars that it is just outside the upper-right corner). Remember to turn autofocus off!
• Make sure your D7200’s batteries are fully charged!
• Feel free to skip Mirror-up mode (for exposures of 30 seconds or longer, mirror lockup is really not needed).
• Use a locking shutter release.
• Exposure: This is where the real art comes in. For a half moon or brighter, you’ll want to start at around 15 minutes. If no moon exists or if you have a new moon, you’ll be looking at upwards of 50 minutes to two hours. The longer the exposure, the longer the star trails will be, which is why you want to plan for a new moon phase.
To select the Bulb setting, simply place your camera in Manual mode, press the shutter release halfway to activate metering, and then rotate the main Command dial to the left until the shutter speed displays Bulb on the control panel.
When you’re using the Bulb setting, the shutter will stay open only while you are holding down the shutter button. You should also be using a sturdy tripod or shooting surface to eliminate any self-induced vibration while using the Bulb setting. Pressing the shutter button down opens the shutter, and releasing it closes the shutter.
I want to point out that using your finger on the shutter button for a Bulb exposure will definitely increase the chances of getting some camera shake in your images. To get the most benefit from Bulb, I suggest using a remote cord such as the Nikon MC-DC2 Remote Switch, Nikon ML-L3, or WR-R10/WR-T10 Wireless Remote Transceiver and Transmitter. For more information on using Bulb exposures with the different Nikon remotes, see pages 156 and 272 in the manual. You may want to turn on Long Exposure Noise Reduction (aka Long Exp. NR), as covered in Chapters 7 and 8, but remember that the time for your camera to process that image nearly equals that of the exposure itself.
Avoiding Lens Flare
Lens flare is one of the problems you will encounter when shooting in bright sunlight. Lens flare will show itself as bright circles on the image (Figure 11.6). Often you will see multiple circles in a line leading from a very bright light source such as the sun. The flare is a result of the sun bouncing off the multiple pieces of optical glass in the lens and then being reflected back onto the sensor. You can avoid the problem using one of these methods:
• Try to shoot with the sun coming more from over your shoulder, not in front of you or in your scene.
• Use a lens shade to block the unwanted light from striking the lens. You don’t have to have the sun in your viewfinder for lens flare to be an issue. All the sunlight has to do is strike the front glass of the lens to make flare happen.
• If you don’t have a lens shade (hood), try using your hand or some other element to block the light.

ISO 800 • 1/1400 sec. • f/8 • 23mm lens
Figure 11.6 Images with starbursts are dynamic, but they are often prone to flares.
Bracketing Exposures
So what if you are doing everything right in terms of metering and mode selection, yet your images still sometimes come out too light or too dark? A technique called bracketing will help you find the best exposure value for your scene by taking a normal exposure as well as two more: one that is overexposed and one that is underexposed. Having these differing exposure values will most often present you with one frame that just looks better than the others.
If I am in a tricky situation when I have to get the exposure right, such as an outdoor wedding, then I’ll use bracketing. I’ll start by spacing my exposures apart by one stop and taking three images: one normal exposure, one underexposure, and one overexposure (Figure 11.7). This is the same technique we used in Chapter 7 for HDR.
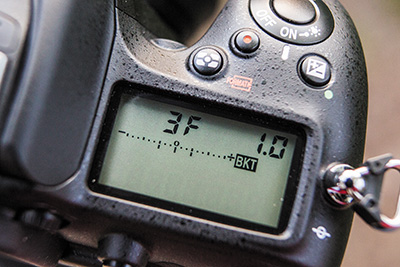
Figure 11.7 The control panel shows you how much bracketing is being applied on an over/under scale in the upper-right corner of the screen. The number and letter to the left tells you how many frames you’re shooting; here, it’s three frames, shown as 3F.
As you are viewing the control panel and holding the BKT button, you can decide how much variation you want between bracketed exposures. You can choose from one-third of a stop all the way to three full stops of exposure difference between each bracketed exposure. If I am in a particularly difficult setting, I will typically bracket in one-stop increments to help zero in on that perfect exposure, and then just delete the ones that didn’t make the grade (Figures 11.8–11.10). Remember that your lighting will dictate how many stops you want between exposures.
ISO 400 • 1/200 sec. • f/16 • 22mm lens
Figure 11.8 One stop of exposure below normal, creating a much darker image
ISO 400 • 1/100 sec. • f/16 • 22mm lens
Figure 11.9 Normal exposure, as indicated by the camera meter
ISO 400 • 1/60 sec. • f/16 • 35mm lens
Figure 11.10 One stop of exposure above normal, creating a much lighter image
Setting auto-exposure bracketing
1. You can quickly set your bracketing by holding the BKT button (on the front of your camera directly below the flash button) (A) while rotating the main Command dial to 3F (three frames or exposures).
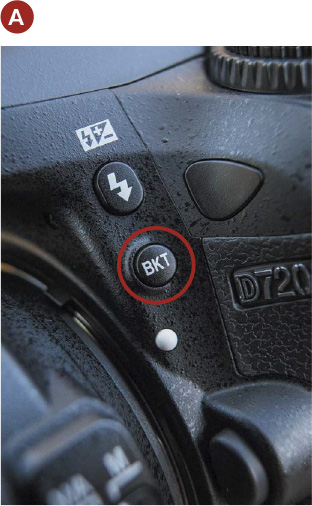
2. Next, continue holding the BKT button down while rotating the Sub-command dial to the 2.0 setting (two stops between each exposure). For more information on bracketing, please review pages 197–202 of your manual.
3. If you are in Single Frame shooting mode, you will have to press the shutter three times, one for each exposure. If you are in continuous shooting mode, you will press and hold the shutter button and the camera will take all three exposures with one press of the button.
When I am shooting in the RAW file format, I typically shoot with my camera set to an exposure compensation of –1/3 stop to protect my highlights. If I am dealing with a subject that has a lot of different tonal ranges from bright to dark, I will often bracket by one stop over and one stop under my already compensated exposure. That means I will have exposures of –1 1/3, –1/3, and +2/3.
Another thing to remember is that auto-exposure bracketing will use the current mode for making exposure changes. This means that if you are in Aperture Priority mode, the camera will make adjustments to your shutter speed. Likewise, if you are in Shutter Priority, the changes will be made to your aperture value. This is important to keep in mind because it could affect certain aspects of your exposure such as depth of field or camera shake. You also need to know that AE bracketing will remain in effect until you set it back to zero, even if you turn the camera off and then on again.
Macro Photography
Put simply, macro photography is close-up photography. Depending on the lens or lenses that you got with your camera, you may have the perfect tool for macro work. Some lenses are designed to shoot in a macro mode, but you don’t have to feel left out if you don’t have one of those. Check the spec sheet that came with your lens to see what its minimum focusing distance is.
If you have a zoom, you should work with the lens at its longest focal length. Also, work with a tripod because handholding will make focusing difficult. The easiest way to make sure that your focus is precisely where you want it to be is to use manual focus mode with the aid of Live View. Live View is very handy in allowing you to zoom in on an object and carefully fine-tune your focus.
I also recommend using A (Aperture Priority) mode so that you can achieve differing levels of depth of field. Long lenses at close range can make for very shallow depth of field, so you will need to work with apertures that are probably much smaller than you would normally use. If you are shooting outside, try shading the subject from direct sunlight by using some sort of diffusion material, such as a white sheet or a diffusion panel. By diffusing the light, you will see much greater detail because you will have a lower contrast ratio (softer shadows), and detail is often what macro photography is all about (Figure 11.11).
ISO 200 • 1/320 sec. • f/3.2 • 105mm lens
Figure 11.11 A good macro shot contains elements that make any shot successful: good composition and great focus. Most macro shots also benefit from diffused lighting and attention to color.
Active D-Lighting
Your camera provides a function that can automatically make your pictures look better: Active D-Lighting. It works this way: The camera evaluates the tones in your image and then underexposes for the highlight areas while lightening any areas that it believes are too dark or lacking in contrast (Figures 11.12 and 11.13). Active D-Lighting is automatically applied to images that are shot in any of the automatic scene modes except for High Key, Low Key, and Silhouette.

ISO 100 • 1/500 sec. • f/5.3 • 90mm lens
Figure 11.12 Without Active D-Lighting, the shadows are very dark and lack contrast.
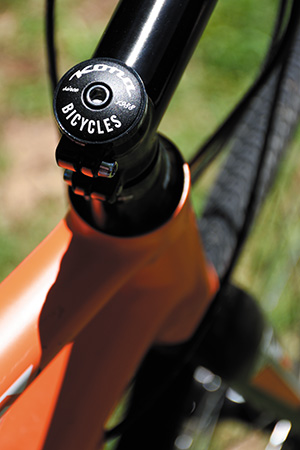
ISO 100 • 1/500 sec. • f/5.3 • 90mm lens
Figure 11.13 With D-Lighting set to Normal, you will see shadows become lighter. The highlights of the bike brand name also are toned down just a bit.
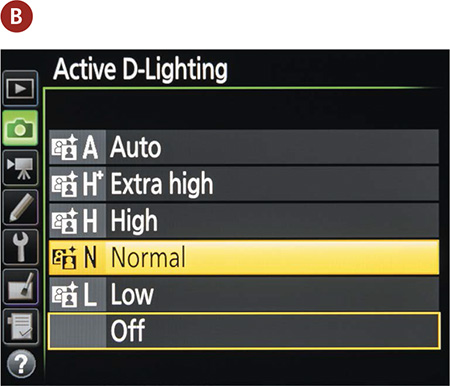
You can choose from six levels: Off, Low (L), Normal (N), High (H), Extra High (H), and Auto (A). You will need to evaluate the strength of the effect on your images and change it accordingly. I typically leave it set to Normal so that I have brighter, more detailed shadow areas in my photographs while still maintaining good exposure in my skies. Additionally, I typically use it when lighting conditions are harsh. You should know that Active D-Lighting can be adjusted only when using one of the professional modes. Also, you will want to turn it off if you are using flash exposure compensation, since it will work against you when you alter the flash strength.
Setting up Active D-Lighting
1. Press the i button to activate the cursor in the information screen, then navigate to the Active D-Lighting setting by using the Multi-selector (A).
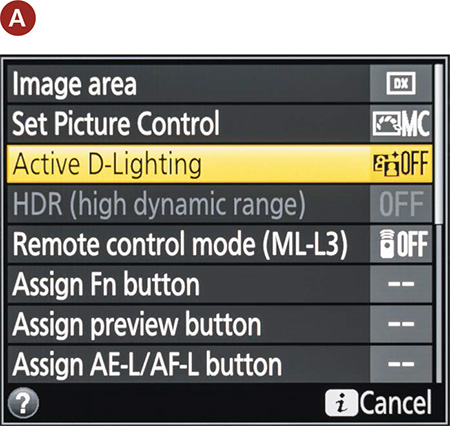
2. Press the OK button and then move the Multi-selector up or down to select the level of Active D-Lighting that you desire (B).
3. Press the OK button to lock in your changes and resume shooting.
The Active D-Lighting setting can also be changed in the Photo Shooting menu.
Conclusion
We’ve covered a lot of ground over these last few chapters, and not everything is going to sink in overnight. After all, it has taken me more than a decade to learn it, and I’m still learning! Take a breather, do the practice assignments at the end of the chapters, reflect upon your progress, and most importantly, remember to enjoy it!
Mastering a skill takes time. I have over 150,000 images to my name. Steve McCurry has over a million. The bottom line is that the more you shoot, the better you’ll be at your craft. Who knows, maybe one day your hobby will become your full-time job, or maybe you’ll even be the next Henri Cartier-Bresson. Remember that all photographers start at the same point, but one thing all the greats have in common is that they know their equipment inside and out. I hope you enjoy your new D7200, and I can’t wait to see your photographic journey on our Flickr group.
Chapter 11 Assignments
Many of the techniques covered in this chapter are specific to shooting situations that may not come about very often. That doesn’t mean you shouldn’t learn them. Play around with them, and then when the situation does present itself you will be ready.
Adding some drama to the end of the day
Most sunset photos don’t reflect what the photographer saw, because he or she didn’t meter correctly for them. The next time you see a colorful sunset, pull out your camera and take a meter reading from the sky, then one without the sky, and see what a difference it makes.
Making your exposure spot on
Using the Spot mode can give accurate results, but only when the meter is pointed at something that has a middle tone. Try adding something gray to the scene and taking a reading off it. Now switch back to your regular metering mode and see if the exposure isn’t slightly different.
Using the Bulb setting to capture the moment
This is definitely one of those settings that you won’t use often, but it’s pretty handy when you need it. If you have the opportunity to shoot a fireworks display, distant storm, or even a star trail, try setting the camera to Bulb and varying the length of the exposure until you get the results you want.
Bracketing your way to better exposures
Why settle for just one variation of an image when you can bracket to get the best exposure choice? Set your camera up for a three-frame bracket series, and then expand your exposure by one stop so that in the end you have –1, 0, and +1 exposures. This is a great tool in helping you understand exposure compensation, which we discussed in Chapter 7.
Moving in for a close-up
Macro photography is best practiced on stationary subjects, which is why I like flowers. If you have a zoom lens, check the minimum focusing distance and then try to get right to that spot to squeeze the most from your subject. Try using a diffuse light source as well to minimize shadows.
Share your results with the book’s Flickr group!
Join the group here: flickr.com/groups/nikond7200_fromsnapshotstogreatshots