
Chapter 6. Bring in Phoenix
This chapter covers
- Configuring your environment to use Phoenix
- Creating a new Phoenix project inside your umbrella app
- Using the Auction business logic in a Phoenix project
So far, you’ve been running your Auction application in IEx. Although IEx does the job, is full-featured, and generally looks nice, the UI isn’t going to raise millions of dollars in seed money for your auction startup. To get users on your site and bids on the items in your database, you need a web interface so users can interact with the data. It’s time to bring in Phoenix.
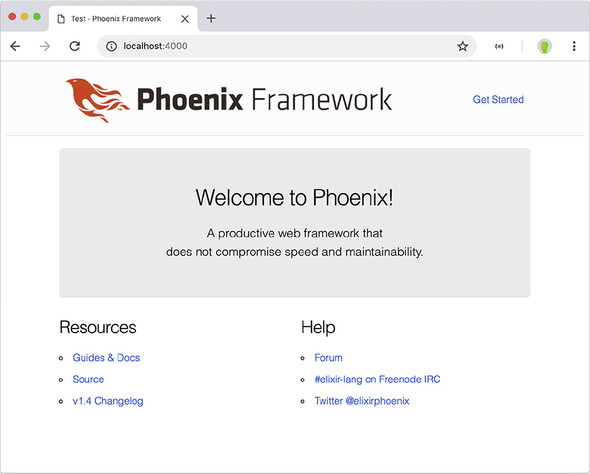
The first thing you’ll want to do with Phoenix is list the items in the database—that’s what you’ll do in this chapter. Creating, editing, and deleting the items and bidding on them will all come later. By the end of this chapter, you should have something like figure 6.1 in your web browser.
Figure 6.1. Listing items from your Auction’s fake repo

6.1. Installing Phoenix on your system
The first thing you need to do to get your Phoenix application going is install Phoenix itself. If you’ve followed along so far, you should already have Elixir 1.5 or later installed on your system, as well as the Hex package manager tools.
The most up-to-date installation instructions are always found in Phoenix’s documentation (https://hexdocs.pm/phoenix/installation.html#phoenix), and detailed instructions can be found in appendix A, but if you have all the prerequisites, you should be able to type the following line in your terminal to install the latest version of Phoenix:
mix archive.install hex phx_new 1.4.2
You also need Node.js (version 5.0.0 or greater), and you can find instructions for installing it on the Node.js download page (https://nodejs.org/en/download/) or in the Phoenix documentation (https://hexdocs.pm/phoenix/installation.html#node-js-5-0-0).
If you’ve installed Phoenix correctly, you should now see some entries for mix phx in the output of mix help.
Listing 6.1. The new Phoenix Mix tasks
> mix help | grep phx         1

mix local.phx         # Updates the Phoenix project generator locally
mix phx.new           # Creates a new Phoenix v1.4.0 application
mix phx.new.ecto      # Creates a new Ecto project within an umbrella project
mix phx.new.web       # Creates a new Phoenix web project within an umbrella
     project
These are some of the Mix tasks you’ll use as you build your Phoenix application.
6.2. Creating a new Phoenix application
Once you’ve verified that Phoenix is installed on your system, you can ask it to create a new, blank Phoenix project. If you look at the output of listing 6.1, you’ll see the mix phx.new task—that sounds like the one you want, but take a closer look at the last option. Because you’ve been building your application as an umbrella application, you can generate a new project within that application.
As discussed previously, you can ask Mix tasks for help to find out how to use them. In your terminal, type mix help phx.new.web.
Listing 6.2. The output of mix help phx.new.web
Creates a new Phoenix web project within an umbrella project.

It expects the name of the otp app as the first argument and for the command to
be run inside your umbrella application's apps directory:

    $ cd my_umbrella/apps
    $ mix phx.new.web APP [--module MODULE] [--app APP]

This task is intended to create a bare Phoenix project without database
integration, which interfaces with your greater umbrella application(s).
The Phoenix (web) portion of your application won’t be using a database directly because you want to keep your domain logic separate from your web interface. All the database interactions will be handled in the Auction application you started in chapter 5. That means you won’t need Ecto in this application, and you can pass the --no -ecto flag to mix phx.new.web.
Figure 6.2 shows what your current umbrella application directory looks like.
Figure 6.2. The umbrella app directories before you create a Phoenix app

To create the application, navigate to the apps directory of your auction_umbrella application (auction_umbrella/apps), and run this command:
> mix phx.new.web auction_web --no-ecto
You’ll see a lot of output scroll by as the Mix task generates skeleton files for your application. Once those files are created, you’ll be greeted by a prompt asking if you’d like to “Fetch and install dependencies? [Yn].” You can type Y(or just press Return), and it will fetch all the dependencies you’ll need for your Phoenix application. Again, more text will scroll by as your dependencies are fetched from hex.pm.
You need to do one more thing before you can start up the server. Phoenix requires you to let it know which library you’d like it to use when processing data in JSON format. The default library that Phoenix uses is called Jason, and it’s what you’ll use as well. In the top level of your umbrella application, you need to configure the Phoenix dependency to use Jason. In auction_umbrella/config/config.exs, add the last line in the following listing.
Listing 6.3. Configuring Phoenix in auction_umbrella/config/config.exs
use Mix.Config

import_config "../apps/*/config/config.exs"       1

config :phoenix, :json_library, Jason             2
- 1 Imports all the sub-application configurations
- 2 Here is where you configure Phoenix to use Jason.
Now any app inside the umbrella application that relies on Phoenix will use the Jason package as its JSON processing library.
6.2.1. Running your server for the first time
Once your dependencies are fetched, you’ll be greeted with some good news.
Listing 6.4. Your Phoenix application is ready!
We are all set! Go into your application by running:

    $ cd auction_web

Start your Phoenix app with:

    $ mix phx.server

You can also run your app inside IEx (Interactive Elixir) as:

    $ iex -S mix phx.server      1
- 1 Allows you to enter commands for your application while also running the Phoenix server
You do want to start your application, so follow the suggestion and go into your new auction_web directory and run the Mix task to start your server (mix phx.server). As soon as you do so, you’ll see yet more debug text scroll by, as your application is compiled and the server is started up. As soon as you see something like the following, you’re serving web pages (like in figure 6.3)!
Figure 6.3. If everything has gone correctly, this is what you’ll see—a web page served up from your local computer through Phoenix.
[info] Running AuctionWeb.Endpoint with Cowboy using http://localhost:4000
20:15:09 - info: compiled 6 files into 2 files, copied 3 in 970 ms
Now for the moment of truth. Fire up your favorite web browser and navigate to http://localhost:4000. You should see something similar to figure 6.1. You’re now serving up web pages through Phoenix on your computer!
You may be used to entering domain names into your web browser—numbers and colons and unqualified domains may be foreign to you. So what does the localhost:4000 address mean?
The address can be broken down into two sections:
- The IP address or domain
- The port number
The IP address is the address of the computer that’s hosting the content. When you enter a domain name into your browser, that domain name is an alias for an IP address that your browser actually calls. localhost is simply the IP address of the local computer.
The port is like a tunnel that the connection uses when making requests. The Phoenix web server listens for connections on port 4000, so you’re telling your browser go there explicitly. When you don’t enter a port number, a browser uses port 80 by default for unsecured HTTP traffic.
Put the two together, and you have http://IP_ADDRESS:PORT, or http://localhost: 4000, in this case.
To stop the server, you can press Ctrl-C twice in the terminal that’s running the server.
6.3. Listing items from the fake repo
You now have a running Phoenix web application, but it’s not going to take over the world. For starters, no auction items are listed. All you’re seeing now is the placeholder stuff that the mix phx.new.web Mix task generated. Although it’s exciting that you have a working web application, I, for one, want more. Let’s list the items that you currently have up for auction.
If you’ve been following along in chapters 4 and 5, you’ve built an Auction application that contains all the business logic of your site. When you left it, it was using a fake repo to serve up hardcoded items. But the nice thing about how you created it is that you don’t care what repo it uses, where it gets its items, or anything about its logic—you just want the items. This is where having strong boundaries between your interface (like a Phoenix web application) and your business logic has huge benefits. As long as your business logic provides a public interface you can use to get the information you’re after, you can let it take care of where it keeps the data and how it gets it. You want your web interface to be as naive as possible about the inner workings of the business logic.
You did build a simple public interface to get the items from your database: Auction.list_items/0. You can bring in that application and use it in this application. How can you do that? Specify it as a dependency in your mix.exs file. The mix.exs file contains a function named deps where you can list dependencies for your application. Right now, it contains the default dependencies for a Phoenix application generated with the phx.new.web generator.
All you need to do is tell this web application about your Auction application. A dependency declaration typically contains the name of the application required, plus the version numbers that would satisfy the dependency. But there are other ways you can declare a dependency: via the path option to direct it to a directory machine, via the github option to specify a Git repo on GitHub, or via the in_umbrella option to tell it that the dependency is available as another app within the same umbrella. This last scenario is the one you have going on, so you’ll use in_umbrella.
Add {:auction, in_umbrella: true} to the list of dependencies (don’t forget the comma at the end of the line above it, if you’re adding it to the end of the list). See the following listing as a guide.
Listing 6.5. The default list of dependencies
defp deps do
  [
    {:phoenix, "~> 1.4.0"},
    {:phoenix_pubsub, "~> 1.1"},
    {:phoenix_html, "~> 2.11"},
    {:phoenix_live_reload, "~> 1.2", only: :dev},
    {:gettext, "~> 0.11"},
    {:jason, "~> 1.0"},
    {:plug_cowboy, "~> 2.0"},
    {:auction, in_umbrella: true}         1
  ]
end
- 1 Add this line.
Once you’ve added that dependency, you can use the Auction module in your new AuctionWeb Phoenix application inside the umbrella.
6.3.1. Modifying the controller and template
In order to see the list of items in your fake repo, you need to modify the controller and the view template. In the controller, you need to bind the result of the Auction.get_items/0 function call to a variable, and then pass that to the view template. In the template, you need to iterate through that list of items and display information about each one.
The controller
If you’re wondering which controller is being used to serve up the page you see when you navigate to http://localhost:4000, you can figure that out in a couple of different ways:
- Open auction_web/lib/auction_web/router.ex. In there, you can see that the root route (/) is handled by the AuctionWeb.PageController index.
- Inside the auction_web directory, run mix phx.routes in your terminal. The output of that is simply page_path GET / AuctionWeb.PageController :index, which indicates that the only route being handled right now is GET /, and it’s being routed to the AuctionWeb.PageController index.
We aren’t going to do anything super fancy in this chapter, so you’ll reuse the controller that the Phoenix generator made for you: AuctionWeb.PageController. That controller was generated for you at auction_web/lib/auction_web/controllers/page_controller.ex. The contents of that file are shown in the following listing—it’s a minimally defined controller.
Listing 6.6. AuctionWeb.PageController
defmodule AuctionWeb.PageController do
  use AuctionWeb, :controller

  def index(conn, _params) do
    render(conn, "index.html")        1
  end
end
- 1 Renders the index.html.eex template
You can see that the only function defined in the controller right now is the index function that the root route points to. In the index function, you need to do two things:
- Get the list of Items, binding it to a variable.
- Pass that list to the view template so you can render the Items.
A controller’s functions are just like any other Elixir function definitions—you can call external modules’ functions, bind the results of those to a variable, and transform data. Your Auction module’s public interface was written so that you could easily get a list of Items with Auction.list_items/0. You’ll use that function and capture the result. The following listing shows the modified index function.
Listing 6.7. Capturing the list of Items
def index(conn, _params) do
  items = Auction.list_items()       1
  render(conn, "index.html")
end
- 1 The new line, which grabs all the items up for auction
You now have the list of Item structs in the items variable, so step 1 is done. Step 2 is to pass the list to the view template. The second line of the index function is a call to Phoenix.Controller.render/2, and it takes two parameters: conn, which is the Plug.Conn struct that’s passed through the application from the initial connection through rendering the view, and the name of the template Phoenix should render for this route ("index.html").
If you’re wondering why the generated code in the controller in listing 6.6 calls render instead of using the full name of Phoenix.Controller.render, take a look at the second line: use AuctionWeb, :controller. That line does a whole bunch of stuff behind the scenes, but the thing we’re interested in here is that it calls import Phoenix.Controller. That allows you to use any Phoenix.Controller function in your module without having to type the full name.
Inside Phoenix.Controller, there’s also a render/3 that accepts a third parameter: assigns (variables) to be passed through to the view. All you need to do to use this other render function is add your items list to the render call.
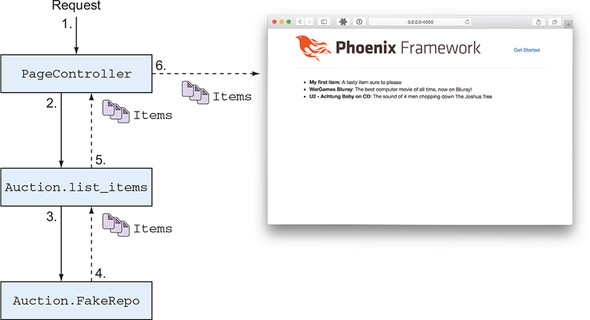
Figure 6.4 gives an overview of how the group of items moves from a request from the controller, through the Auction module, to the Auction.FakeRepo module, and then back to the controller to be finally passed to the view and template.
Listing 6.8. Passing items to the view/template
def index(conn, _params) do
  items = Auction.list_items()
  render(conn, "index.html", items: items)         1
end
- 1 Passes the list of items to the index.html.eex template
Figure 6.4. The flow of items from the fake repo to the view/template
Now the view has access to your items through an @items variable.
The template
The final step for rendering your list of items in the browser is to use the @items variable that you set up in the controller. As you’ll recall, the second parameter of the Phoenix.Controller.render/3 function on the last line of index/2 is "index.html". That defines the template Phoenix will use to render the web page. Phoenix will look for a file named index.html in the page subdirectory (short for PageController) of the templates directory. The full path of the template file is auction_umbrella/apps/auction_web/lib/auction_web/templates/page/index.html.eex.
This file is an .eex file, which means it will be preprocessed by Phoenix before the final HTML is output. This means you can use some Elixir inside the template file itself. Everything inside the <%= and %> tags will be processed by Elixir, and the result will be rendered in its place. You can also enclose Elixir code within <% and %> if you don’t need to render the results.
If you open the index template file, you’ll see some straight HTML that provides the “Welcome to Phoenix” banner and links to resources and help. You can safely delete all this HTML and replace it with your own. For your purposes, a simple unordered list (<ul>) will be enough to list your items. You can open the unordered list, but you still need to iterate through your list of items and output a list item (<li>) for each entry.
There’s an idiomatic way to render each item in a list like this—using for. for is a comprehension, and according to the docs, “comprehensions allow you to quickly build a data structure from an enumerable.” Figure 6.5 has a breakdown of the portions of the for comprehension as you’ll use it.
Figure 6.5. Breakdown of the for comprehension

The full documentation contains some pretty neat examples and shows how useful for can be (https://hexdocs.pm/elixir/Kernel.SpecialForms.html#for/1), but you’ll use it pretty simply. The following listing shows how you can use for to iterate through the items in @items and output a <li> tag for each one.
Listing 6.9. Using the for comprehension in index.html.eex
<ul>
  <%= for item <- @items do %>       1
    <li>
      <strong><%= item.title %></strong>: <%= item.description %>
    </li>
  <% end %>                          2
</ul>
- 1 Code contained inside <%= and %> will output into the view.
- 2 Code contained inside <% and %> will not output anything.
Each Item struct from your list of @items is bound to the item inside the do/end block, one at a time. Inside that block, you render an opening <li> tag, render the title of your item with <%= item.title %> inside a <strong> HTML tag, and then render the description of the item with <%= item.description %>. Remember, anything inside the <%= and %> tags will be evaluated as Elixir code, and the result will be rendered. This allows you to get data from the database, transform the data in any way necessary, and then render what you need. Figure 6.6 breaks down how the listing is generated.
Figure 6.6. A breakdown of the list of items

Start your server up again (if you killed it earlier) with mix phx.server in the top level of your Auction umbrella application, and then point your browser to http://localhost:4000. You should see a list of your own like figure 6.7.
Figure 6.7. Listing items from your Auction’s fake repo

You’ll notice that there are some things on the web page that you didn’t add. In particular, there’s a large “Phoenix Framework” banner image and some baseline CSS and styles. Back in chapter 3, I briefly introduced the idea behind the layout and page templates. You edited the page template in this chapter, but the layout template wraps every page template. The banner and the rest of the wrapping HTML are contained in a layout template named app.html.eex. We won’t cover it here, but if you’d like, go ahead and take a peek inside that file to see how it works.
In the next chapter, you’ll bring in a real database and start persisting items into it
Summary
- Use mix phx.new to generate a brand new Phoenix application.
- Use the mix phx.new.web Mix task to generate a new Phoenix application inside an existing umbrella application.
- mix phx.server can be used to serve your Phoenix application locally at http://localhost:4000.
- Controllers are where you set up your application’s state in order to correctly render what needs to be rendered to the user.
- Templates contain the HTML and Elixir code that’s processed and sent back to the user to view in their browser.