Chapter 14. Testing in Elixir and Phoenix
This chapter covers
- Writing tests for simple Elixir functions
- Writing tests for Phoenix interactions
- Using doctests to simultaneously document and test your functions
Some developers love them and write them before writing anything else, and some developers can only barely stomach them. But even developers who’d rather not write a single one can agree that they’re helpful and can be critical to a healthy application. What can cause such extremes of emotion? Tests!
Tested code can help a developer sleep better at night. Tested code allows a developer to refactor code while being confident that no regressions occur. But testing can also be tedious and time-consuming. If you’ve had bad experiences with tests in the past, I have good news for you: testing Elixir code is a first-class concern, and the Elixir standard library contains a number of helpful utilities to help make sure your code isn’t only well tested, but also well documented.
For starters, a fantastic testing library called ExUnit is included with Elixir’s standard library.
14.1. An introduction to ExUnit
I have a surprise for you: your application already has tests! Don’t believe me? Try running mix test from the top of your application (auction_umbrella/). You’ll likely see some compilation notices and then, at the bottom, something like this:
Finished in 0.08 seconds
3 tests, 1 failure
Depending on the version of Elixir and Phoenix you had when you first ran the mix new --umbrella or mix phx.new.web generators, the number of tests you have and even the number of failures may be different. One thing is for certain, though: your application already has at least one test. Doesn’t that already make you sleep better at night?[1]
Of course not. A test suite is only as good as the things it actually tests.
The tests that ran were automatically generated for you when you first ran the mix new --umbrella or mix phx.new.web generators. Let’s take a look inside one of the tests—the one located at auction_umbrella/apps/auction/test/auction_test.exs. Mine is shown in the following listing.
Listing 14.1. The contents of my auction_test.exs file
defmodule AuctionTest do
  use ExUnit.Case
  doctest Auction

  test "greets the world" do            1
    assert Auction.hello() == :world
  end
end
- 1 This test was automatically generated when I created the app.
This happens to be the test that’s currently failing for me. I no longer have an Auction.hello/0 function defined, because I replaced the contents of the module when I first started work on the application. Nevertheless, let’s go through this file line by line and see what you can learn:
- defmodule AuctionTest do ... end—A test module is defined like any other module is. It’s idiomatic to name the module after the module being tested, with Test appended to the module name. For example, if you were testing a module named Phoenix.Action, you’d name your module Phoenix.ActionTest.
- use ExUnit.Case—This sets up the test module so it can run tests with the functions that ExUnit.Case provides. You’ll see those functions shortly.
- doctest Auction—Any module can include documentation. Not only is it helpful for you as you look at your source code, it’s used by documentation generators and is output into a nice format, like the documentation at https://hexdocs.pm. Beyond that, your documentation can include usage examples of the function being documented. In the past, that practice was frowned on, because it can be easy to let your documentation examples grow stale when your function is refactored and rewritten over the years. The beautiful thing about doctest Auction is that it actually runs the examples in your documentation as a test to verify that the results are as expected. We’ll dive into this in a later section in this chapter.
- test "greets the world" do ... end—A test is actually a macro (ExUnit.Case .test/3) that accepts a string as a description, some optional variables, and a code block that contains the test.
- assert Auction.hello() == :world—The actual testing is done with the ExUnit.Assertions.assert/1 macro (and its friends). All assert/1 does is verify that its argument (the return value of Auction.hello() == :world, here) is truthy.
You’ll soon use these functions in tests to make sure your code is actually doing what you think it’s doing.
ExUnit.Assertions provides a number of assertion macros that you can use in your tests. For the majority of the tests you’ll write, you’ll find that assert is exactly what you need. But there are other macros you can use if the situation calls for them, a few of which are listed in the following table.
A selection of other assertions
|
Function or macro |
Description |
Example |
|---|---|---|
| assert | Asserts that the given value is true | assert true |
| refute | Asserts that the given value is false | refute false |
| assert_in_delta | Asserts that the difference between two values is within the delta | assert_in_delta 1.0, 1.5, 0.6 |
| assert_raise | Asserts that a specific exception is raised | assert_raise ArgumentError, fn -> Integer.to_string(3.5) end |
14.1.1. Writing a first test
The test in listing 14.1 fails for me because I have no Auction.hello() function defined. Let’s delete that test and write one that passes.
You can write a simple test to verify that the test suite works. You’ll test “the truth.”
Listing 14.2. The new AuctionTest module
defmodule AuctionTest do
  use ExUnit.Case
  doctest Auction
  test "the truth" do
    assert true           1
  end
end
I could run mix test again, but I’d like to be more specific and see more information about the tests that are running. mix test alone will search for every test file in the project (determined by a filename of *_test.exs).
mix test also accepts a filename, or a list of filenames if you want to be specific about which files to test. But the way it works in an umbrella application like yours is a little strange. When you run mix test in the top level of your umbrella application, you can think of it then cd ing into each app and running mix test in its directory. This means that your file, even from the root of your umbrella application, is referenced only as test/auction_test.exs and not apps/auction/test/auction_test.exs.
You can also pass mix test the --trace flag to get more verbose output from the tests being run. Otherwise, a test will only output a period (.) when run.
The following listing shows the result of running mix test test/auction_test.exs --trace.
Listing 14.3. The output of my test run
> mix test test/auction_test.exs --trace
==> auction

AuctionTest
  * test the truth (0.00ms)        1


Finished in 0.03 seconds
1 test, 0 failures

Randomized with seed 418767
- 1 The output matches the test name from listing 14.2.
You can see that the truth is true (that’s a relief)! But what happens if a test fails? You can modify your test to easily fail by asserting false.
test "the truth" do
  assert false
end
If you run the tests again, you see the output of the failing test.
Listing 14.4. A failing test
> mix test test/auction_test.exs
==> auction

  1) test the truth (AuctionTest)
     test/auction_test.exs:5
     Expected truthy, got false              1
     code: assert false                      2
     stacktrace:
       test/auction_test.exs:6: (test)       3


Finished in 0.05 seconds
1 test, 1 failure

Randomized with seed 348538
- 1 What it expected vs. what it got
- 2 The code that failed the assertion test
- 3 File and line number of the failing code
The information that Elixir gives you about a failing test is great. As your test suite grows, you’ll undoubtedly run into some failing tests, and the output will typically point out where they fail and how. That kind of information is invaluable during development.
14.2. Setting up tests for Ecto
Now that we’ve briefly explored a passing and a failing test, let’s modify the test so it’s a little more helpful in your application. Your Auction module deals extensively with your database queries, so it will use Ecto and hit the database that you configure for it. Ecto has a nice guide for setting up your Ecto-using application for testing (https://hexdocs.pm/ecto/testing-with-ecto.html), but we’ll go over it briefly here.
There are a few things you need to do:
- Configure a new database.
- Configure a sandbox pool for tests, and tell Ecto about the sandbox.
- Set up the database before the tests run.
- Create a Mix alias to make test setup easier.
Let’s look at each of those in turn.
14.2.1. Configuring a new database
At the beginning of the book, you set up a new database for the Auction application. If you followed along with the text, that database is likely named auction, and it’s using a Postgres adapter. You’ll now create a new, separate database that you can safely add rows to and delete rows from during tests, without affecting any existing development data.
The first step is to create a new database (I named mine auction_test). You need to reference your preferred database documentation for how to do that.
After you’ve created the database, you need to configure your application to communicate with it. As you’ll recall, you put a lot of configuration information in the config directories of your applications. This will be no different.
In the auction_umbrella/apps/auction/config directory, you already have a config.exs file. This is where you initially configured your application’s database while you developed it. There are some comments in this file, and the one to pay attention to is echoed in the following listing. It tells you that you can use multiple configuration files based on the environment you run your application in.
Listing 14.5. Important comments from config.exs
# It is also possible to import configuration files, relative to this
# directory. For example, you can emulate configuration per environment
# by uncommenting the line below and defining dev.exs, test.exs and such.
# Configuration from the imported file will override the ones defined
# here (which is why it is important to import them last).
#
# import_config "#{Mix.env}.exs"        1
- 1 Uncomment this line to take advantage of environment-specific configs.
If you uncomment that last line (go ahead and do so, and save the file), Mix will automatically look for additional config files based on the name of the environment you’re in (typically dev, test, or prod). In these environment-specific files, you can override any configuration done in the main config.exs file, or you can provide additional configuration as needed.
In your case, you need to configure the test environment to use the test database and repo. To do so, you create an auction_umbrella/apps/auction/config/test.exs file and override the database configuration.
Listing 14.6. The new test.exs config file
use Mix.Config                           1

config :auction, Auction.Repo,
  username: "postgres",
  password: "postgres",
  database: "auction_test",              2
  hostname: "localhost",
  port: "5432",
  pool: Ecto.Adapters.SQL.Sandbox        3
- 1 Every Mix config file needs this as the first line, even environment-specific files like this.
- 2 Update this line with your database name.
- 3 Ecto provides this adapter to help pool database connections.
The test environment won’t be the only environment you run your application in. If you simply ran mix phx.server or iex -S mix phx.server, the environment would be dev, and Mix would complain that it couldn’t find config/dev.exs. Although you don’t have any dev-specific configuration to do at the moment, you still need to create the config/dev.exs file and put use Mix.Config in it.
Create auction_umbrella/apps/auction/config/dev.exs with the following line in it:
use Mix.Config
That’s all you need in the file to get things started.
14.2.2. Creating a sandbox and configuring Ecto to use it in tests
Ecto provides something called a sandbox that’s useful when running tests. It’s a pool of connections to your database. The sandbox can share these connections with any tests that request access.
You need to configure Ecto to use a sandbox and start it up when you run your tests. Elixir creates a file named test_helper.exs; and you can put whatever setup you need in that file, and it will be run before your tests. In this case, Ecto requires a special function before you can use the test database. In short, it tells Ecto that you’d like to use the sandbox mode for a particular repo (Auction.Repo, in your case).
The command is a one-liner: Ecto.Adapters.SQL.Sandbox.mode(Auction.Repo, :manual). Adding that line to auction_umbrella/apps/auction/test/test_helper.exs gives you the following.
Listing 14.7. The test helper file contents
ExUnit.start()                                         1
Ecto.Adapters.SQL.Sandbox.mode(Auction.Repo, :manual)
- 1 This function call was already here and is what starts ExUnit.
This helper will be executed before every test run. You can put any setup code you need to run before your tests in this file.
14.2.3. Setting up the database before tests run
So far, you’ve configured the database and let Ecto know about the sandbox in the test helper. Before you actually start testing with information from the test database, you need to start the database connection in the tests that require them. Your entire Auction module needs a connection to the database, so you can use a setup block in your test file to start that connection.
ExUnit.Callbacks.setup/1 takes a block as its argument and runs that block of code before each and every associated test. This is the perfect place to call Ecto.Adapters.SQL.checkout/1. checkout/1 will “check out” a connection from the Sandbox pool of connections, and that connection is usable during the rest of that test run (or until checkin/1 is called). checkout/1 expects the repo name as the one and only argument.
You can then modify your AuctionTest module to use that setup block. setup expects :ok, a keyword list, or a map as its return value. Fortunately, checkout/1 returns :ok on success, which makes it easy to pattern-match.
Listing 14.8. Modifying the AuctionTest module
defmodule AuctionTest do
  use ExUnit.Case
  alias Auction.{Repo}         1
  doctest Auction

  setup do
    :ok = Ecto.Adapters.SQL.Sandbox.checkout(Repo)
  end

  test "the truth" do
    assert true
  end
end
- 1 Aliases Auction.Repo so you can simply type “Repo” in this file
After making that edit, you should be able to successfully run your test again from the command line.
If you get an error about the database not existing, run the following command from the command line to set up the test database. Note that you can force the environment you want Mix to run in by setting MIX_ENV in the command. (Here, you’ll run it in the test environment.)
> MIX_ENV=test mix do ecto.create, mix ecto.migrate
As you can see, this command uses mix do to run multiple tasks in one command. It creates the test database and makes sure it’s migrated up to the latest version.
14.2.4. Creating a Mix alias for use during test runs
Mix allows you to create “aliases” to use during Mix tasks. You can use these to run multiple functions with one command or do regular setup tasks. You’ll use one in this section to make sure your test database is created and migrated every time you run your tests.
You can set up aliases in the mix.exs file for an application. In this case, you need to edit auction_umbrella/apps/auction/mix.exs.
The project function defined in each mix.exs file specifies a list of options used for setting up the application. One option you can set is aliases. When setting up aliases, the first element is what you type after mix (for example, mix my_alias), and the second element is a list of commands to run in order. You set your alias to first run ecto.create, then ecto.migrate, and finally the original test task. You can specify that as follows.
Listing 14.9. Setting up aliases for the auction application
defmodule Auction.MixProject do
  use Mix.Project

  def project do
    [
      app: :auction,
      version: "0.1.0",
      build_path: "../../_build",
      config_path: "../../config/config.exs",
      deps_path: "../../deps",
      lockfile: "../../mix.lock",
      elixir: "~> 1.7",
      start_permanent: Mix.env() == :prod,
      deps: deps(),                                           1
      aliases: aliases()                                      2
    ]
  end

  # ...

  def aliases do                                              3
    [test: ["ecto.create --quiet", "ecto.migrate", "test"]]   4
  end
end
- 1 Don’t forget the new trailing comma on this line.
- 2 Aliases will be defined by the aliases/1 function.
- 3 Defines the aliases/1 function
- 4 The --quiet flag for ecto.create silences the output.
Now if you run mix test from within the auction_umbrella/apps/auction application, it will ensure that the database is created and migrated to the latest version, and the tests for the application are run.
14.3. Testing Ecto queries in Auction
Now you can finally get to the fun part: testing your application code! For the sake of space in this book, we’ll walk through setting up just three tests for the Auction module in AuctionTest, but you should be able to apply what you learn and test the entire module.
The three functions you’ll test are Auction.list_items/0, Auction.get_item/1, and Auction.insert_item/1.
14.3.1. Testing Auction.list_items/0
ExUnit provides the describe/2 macro, which is a convenient way to group together tests that belong together. The first argument is the string description of the group, and the second is a block of tests. You’ll use this describe macro for each of the functions you test. It will look something like this:
describe "list_items/0" do
  # ... tests
end
The first function you test is Auction.list_items/0. This function is supposed to return all the items in the database as a list. To test this, you first need some items in your database.
You can use another setup block to create items before your tests run. Plus, you can provide those created items to every test in the current describe block. Do you remember me saying that setup/1 expects a return value of :ok, a keyword list, or a map? Anything you return from the setup block is provided to the test macro as its second argument, and you can then make use of that data in your tests. This data is called a context.
Finally, you need to actually make an assertion in a test. For this function, you test that the return value of list_items/0 is a list of all the items you’ll insert into the database during setup. You can use the data in the context from the setup block to make that assertion.
This is one of those times when showing is clearer than explaining. Take a look at the test in the following listing. Pay special attention to the setup block and its return value (the last line), the nesting of the test within the describe block, and the use of the context (which is passed as the second argument to the test/3 macro).
Listing 14.10. Testing list_items/0
defmodule AuctionTest do
  use ExUnit.Case
  alias Auction.{Item, Repo}                                       1
  doctest Auction

  setup do
    :ok = Ecto.Adapters.SQL.Sandbox.checkout(Repo)
  end

  describe "list_items/0" do
    setup do                                                       2
      {:ok, item1} = Repo.insert(%Item{title: "Item 1"})
      {:ok, item2} = Repo.insert(%Item{title: "Item 2"})
      {:ok, item3} = Repo.insert(%Item{title: "Item 3"})
      %{items: [item1, item2, item3]}                              3
    end

    test "returns all Items in the database", %{items: items} do   4
      assert items == Auction.list_items
    end
  end
end
- 1 Adds Item to the list of aliases
- 2 You can have an additional setup block inside a describe block. This will run for each test in the describe block.
- 3 This map will be passed in as an argument to the tests in this block.
- 4 Pattern-matches the passed map and assigns it to an items variable for use in the test
If you run the tests with the --trace flag, as before, the test descriptions have a nice flow.
Listing 14.11. Output from testing /0
> mix test --trace test/auction_test.exs
21:31:26.341 [info] Already up

AuctionTest
  * test list_items/0 returns all Items in the database
21:31:26.460 [debug] QUERY OK db=1.8ms
begin []
21:31:26.478 [debug] QUERY OK db=3.1ms

[ REMOVED: LOTS OF DATABASE DEBUG NOISE ]        1

  * test list_items/0 returns all Items in the database (45.4ms)


Finished in 0.08 seconds
1 test, 0 failures

Randomized with seed 385816
- 1 This noise isn’t very helpful, is it?
You may have noticed that a lot of database debug output was present in your test run. For your purposes, that’s just noise that gets in the way of the test results. How can you turn that off? Earlier I mentioned that you can use environment-specific config files to override configuration settings. In this case, you can set the logger level to :info for the test environment so that all these debug-level statements aren’t output to the screen.
Modify your auction_umbrella/apps/auction/config/test.exs file and add the final config line in the following listing.
Listing 14.12. Changing the logging level in test.exs
use Mix.Config

config :auction, Auction.Repo,
  username: "postgres",
  password: "postgres",
  database: "auction_test",
  hostname: "localhost",
  port: "5432",
  pool: Ecto.Adapters.SQL.Sandbox

config :logger, level: :info        1
If you save that file and run the tests again, you see a nicely output list of tests that were run and their results (see the following listing). You may see other debug information, like the compilation of files or compilation warnings for those files. Unless there are errors, you can ignore the warnings.
Listing 14.13. The nicely cleaned-up run of tests
> mix test --trace test/auction_test.exs

AuctionTest
  * test list_items/0 returns all Items in the database (22.0ms)
                                                                 1

Finished in 0.05 seconds
1 test, 0 failures

Randomized with seed 34812
- 1 No more debug output
Your one test passes, and all the noisy debug output has been removed. You can now move on to testing Auction.get_item/1.
14.3.2. Testing Auction.get_item/1
The next function you’ll test is Auction.get_item/1. The purpose of this function is to retrieve a specific item by id, which is the parameter you pass in. In order to test this function, you need to have an item in the database already, and then you need to verify that the item you get back from the function is the item you requested.
Because you create the items during the test run, you won’t know for certain what the id of the item is beforehand. Instead of passing an integer directly, you just pass in the id attribute of one of the items you create.
You create two items in this setup block. Why? Because you want to make sure that you only get one item back, and not two as you would in Auction.list_items/0. Finally, you pass the result of inserting the items into the database in the setup block as context for the test. The following listing puts it all together.
Listing 14.14. Testing Auction.get_item/1
defmodule AuctionTest do
  # ...

  describe "get_item/1" do
    setup do
      {:ok, item1} = Repo.insert(%Item{title: "Item 1"})
      {:ok, item2} = Repo.insert(%Item{title: "Item 2"})
      %{items: [item1, item2]}
    end

    test "returns a single Item based on id", %{items: items} do
      item = Enum.at(items, 1)
      assert item == Auction.get_item(item.id)          1
    end
  end
In the test, you pass the first item’s id into Auction.get_item/1 and make sure you get the correct item back.
14.3.3. Testing Auction.insert_item/1
The last Auction function you’ll test in this chapter is Auction.insert_item/1. This function takes the attributes of the item to insert into the database, and it returns {:ok, item} on success or {:error, changeset} on error. The following listing tests each of those paths.
Listing 14.15. Testing Auction.insert_item/1
defmodule AuctionTest do
  import Ecto.Query                                             1

  # ...

  describe "insert_item/1" do
    test "adds an Item to the database" do
      count_query = from i in Item, select: count(i.id)         2
      before_count = Repo.one(count_query)
      {:ok, _item} = Auction.insert_item(%{title: "test item"})
      assert Repo.one(count_query) == before_count + 1          3
    end

    test "the Item in the database has the attributes provided" do
      attrs = %{title: "test item", description: "test description"}
      {:ok, item} = Auction.insert_item(attrs)
      assert item.title == attrs.title
      assert item.description == attrs.description              4
    end

    test "it returns an error on error" do
      assert {:error, _changeset} = Auction.insert_item(%{foo: :bar})
    end
  end
end
- 1 Imports Ecto.Query so you can use from and select later in your tests
- 2 Queries can be assigned to a variable. You do that here because you use the same query twice in this test.
- 3 Reuses the query to make sure there’s an additional item in the database after the insert_item call
- 4 You can have as many assertions as you like in a test.
The tests you’ve written here obviously only cover a small portion of the functions in the Auction module. I’ll leave the testing of the rest as an exercise for you to tackle.
14.4. Simultaneously writing documentation and tests with doctests
Well-documented code is typically easier to use (especially for developers who aren’t the author). But documentation can easily get out of sync with what the functions actually do, particularly as refactorings take place and project requirements change. Elixir provides doctests: documentation and tests wrapped up together. Although this feature doesn’t automatically create top-notch documentation, it does provide a guard against documentation examples getting out of sync with what the functions actually do.
14.4.1. Writing function-level documentation
Let’s first focus on how to write regular documentation and then later add tests. For the purposes of this section, you’ll document Auction.get_user_by_username_and_password/2. This function requires a username and password to be passed as arguments, and it returns a user if the username and password match ones in the database or false if one can’t be found.
The following listing should remind you of the function’s implementation—it’s the same as in previous chapters.
Listing 14.16. The Auction.get_user_by_username_and_password function
def get_user_by_username_and_password(username, password) do
  with user when not is_nil(user) <- @repo.get_by(User, %{username:
     username}),
       true <- Password.verify_with_hash(password, user.hashed_password) do
    user
  else
    _ -> Password.dummy_verify
  end
end
Function documentation starts with a @doc module attribute just above the function declaration. If the documentation is multiple lines long (and it usually is), it also starts a HEREDOC string (a multiline string prepended and appended by three double quotes: """); for example, @doc """.
The line after @doc is the first line of the documentation. It’s normally good practice to keep this line short and sweet, as it shows up in multiple places as a summary of the function’s functionality.
So far, your documentation might look like the following.
Listing 14.17. Beginning documentation for get_user_by_username_and_password/2
@doc """                                                               1
Retrieves a User from the database matching the provided username and
     password
"""
def get_user_by_username_and_password(username, password) do
  # ...
end
- 1 The documentation starts with @doc.
After the summary line, an empty line and then more descriptive text follows. This descriptive text can be as long as you want, and it should provide enough information to let future developers know how to use the function. For your example function, you describe the different return values that can occur (a user or false) and what they mean.
Oh, and did I mention that documentation supports Markdown?[2] Woohoo!
Not familiar with Markdown? It’s a tool that allows you to provide text formatting inside plain text. See Daring Fireball’s Markdown page for more information: https://daringfireball.net/projects/markdown/.
The following listing shows how I documented the function.
Listing 14.18. Further documenting get_user_by_username_and_password/2
@doc """
Retrieves a User from the database matching the provided username and password

## Return values              1

Depending on what is found in the database, two different values could be
returned:

  * an `Auction.User` struct: An `Auction.User` record was found that matched
    the `username` and `password` that was provided.
  * `false`: No `Auction.User` could be found with the provided `username`
    and `password`.

You can then use the returned value to determine whether or not the User is
authorized in your application. If an `Auction.User` is _not_ found based on
`username`, the computational work of hashing a password is still done.
"""
def get_user_by_username_and_password(username, password) do
  # ...
end
- 1 ExDoc uses Markdown for formatting, which allows you to use things like ## for a second-level heading and * for bullet points. Not only does it look nice in plain text, it transforms into nice HTML as well.
That should provide almost enough information for future me or any other developer who needs to use the function.[3]
Spoiler: you need examples! You’ll add them in the next section.
The text above the function definition is nice in and of itself, but your written documentation really comes to life when used inside an IEx session and with the ExDoc package.
14.4.2. Viewing documentation in IEx
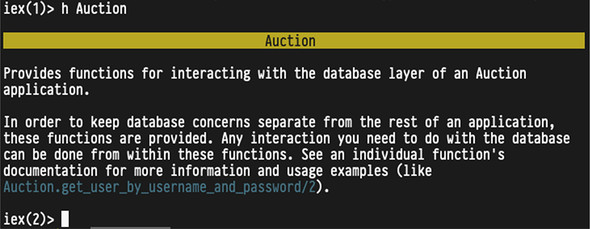
In chapter 2, I showed how you can use the IEx.Helpers.h/1 macro to print out documentation for a function or module in an IEx session. You used it to learn about the Enum module and the Enum.map/2 and Enum.reverse/1 functions. Because I’m reminding you about those here, you may be able to guess where that documentation came from. If you guessed from their in-module function documentation, you’re correct! That also means that your own function documentation can be seen in IEx the same way.
For example, you can ask IEx about the Auction.get_user_by_username_and_password/2 function. (Make sure you start the IEx session while including your application with iex -S mix.)
Listing 14.19. Displaying your documentation in IEx
iex(2)> h Auction.get_user_by_username_and_password/2          1

           def get_user_by_username_and_password(username, password)

Retrieves a User from the database matching the provided username and
     password

## Return values

Depending on what is found in the database, two different values could be
returned:

  • an Auction.User struct: An Auction.User record was found that matched
    the username and password that was provided.
  • false: No Auction.User could be found with the provided username and
    password.

You can then use the returned value to determine whether or not the User is
authorized in your application. If an Auction.User is not found based on
username, the computational work of hashing a password is still done.
- 1 Use h to show the documentation for a module or function.
This text listing doesn’t quite do it justice because the real IEx output has color and Markdown markup (like an underline under not in the last sentence). Neat, huh?
14.4.3. Viewing documentation with ExDoc
Another no-less-awesome way to view your application documentation is through the ExDoc module. If you’ve ever viewed the online documentation for a package at hexdocs.pm, you’ll be pretty familiar with the look of ExDoc’s output. ExDoc will take in your application documentation and output very nice HTML that you can read in your web browser.
Although ExDoc is provided by the Elixir team, it’s not included in the standard library. That means you need to explicitly require it in your mix.exs config. You only need this package during development, so you can use the dev: true option to make sure it isn’t included when you build your application for production.
Edit auction_umbrella/mix.exs so that your deps function looks like the following listing. You add ExDoc as an umbrella-level dependency so that you can use it in all the apps inside the umbrella.
Listing 14.20. Including ex_doc during development
defp deps do
  [
    {:ex_doc, "~> 0.19", dev: true, runtime: false}        1
  ]
end
- 1 dev: true specifies that this dependency isn’t included in your production builds.
Once that change has been made, run mix deps.get, and then mix compile. Those two commands ensure that ExDoc’s Mix tasks are installed and ready to go.
Once the compilation is complete, you can run mix docs to generate your documentation. All that’s left to do after that is to marvel at the beauty of your documentation in your browser, as in figure 14.1.
Figure 14.1. Your documentation in a browser
14.4.4. Adding examples and doctests
I mentioned earlier in this section that you almost have enough information in your documentation. One thing that would make it a lot better is usage examples. There’s a specific format you can use for examples, and a side benefit of this format is that it’s testable as doctests!
As you’ll recall, your generated test file has doctest Auction in it. This is what tells ExUnit to test your documentation. For the sake of brevity in your tests, you can also pass in an import option:
doctest Auction, import: true
With this done, you won’t have to prepend your function names with the module name in your doctests. For example, you only have to write list_items instead of Auction.list_items.
A doctest line starts with iex> and a call to your function. If you require multiple lines, you can start subsequent lines with ...>. After you’re finished with the example call of your function, the expected return value is provided on the next line.
This is easiest to understand by looking at an example. You’ll add a usage example to your current get_user_by_username_and_password/2 documentation.
Listing 14.21. Adding examples and doctests
@doc """
Retrieves a User from the database matching the provided username and password

# current documentation ...                                            1

## Examples                                                            2

    iex> get_user_by_username_and_password("no_user", "bad_password")  3 4
    false                                                              3 5
"""
def get_user_by_username_and_password(username, password) do
  # ...
end
- 1 The documentation you’ve already written for this function
- 2 Creates a Markdown subsection in the documentation for examples
- 3 Markdown uses four spaces of indentation to indicate a code block
- 4 Calls your function
- 5 Shows what you expect to get back in return
It would be nice to also include an example of the “happy path”—when a user is found with the provided username and password combination. To include multiple examples, you separate them by an empty line. In this case, you need to have a user in the database before looking it up, so you first create the user and then use get_user_by_username_and_password/2 to retrieve it.
A limitation of doctest is that you can’t pattern-match the return value inside a test. Because of that, you have to go through an extra step or two to make sure you get back something comparable to what you expect (in this case, a user with the username of “geo”).
The following listing shows the updated examples.
Listing 14.22. Adding happy-path documentation
@doc """
Retrieves a User from the database matching the provided username and
     password

# current documentation ...

## Examples

    iex> insert_user(%{username: "geo", password: "example",
     password_confirmation: "example", email_address: "[email protected]"}) 1
    ...> result = get_user_by_username_and_password("geo", "example")      2
    ...> match?(%Auction.User{username: "geo"}, result)                    3
    true

    iex> get_user_by_username_and_password("no_user", "bad_password")
    false
"""
def get_user_by_username_and_password(username, password) do
  # ...
end
- 1 Inserts the new user into the database
- 2 Stores the result from your function
- 3 Uses Kernel.match?/2 to ensure that the User struct you get back has the username of “geo”
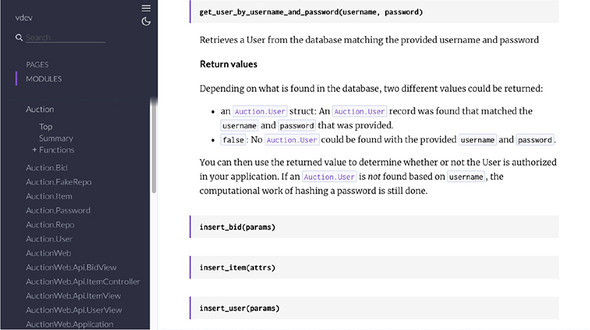
Note that you haven’t only added examples to your documentation—they’re also doctests. This means that as long as you have doctest Auction in your auction_test.exs module (which you do), ExUnit.Case will go through your documentation looking for these iex> examples. When it finds one, it runs the code provided in the documentation and compares the result it gets with what you document that it should get. This is a doctest!
You can verify that these doctests are being tested by running mix test in the application root.
Listing 14.23. Running your doctests with your test suite
> mix test
.......

Finished in 1.1 seconds
2 doctests, 5 tests, 0 failures            1
- 1 Declares that it tested two doctests, both of which you added for Auction.get_user_by_username_and_password/2
You can also see the code examples nicely formatted in the ExDoc output in figure 14.2. You can refresh your browser to see those changes after you generate your documentation again with mix docs.
Figure 14.2. Updated documentation with examples

14.4.5. Module-level documentation
Most of what we’ve focused on in this chapter is documenting and testing specific functions, but you can also write module-level documentation. To do so, you declare a @moduledoc module attribute inside the module definition.
We won’t spend a lot of time on module documentation, because it’s so similar to function documentation. And like function documentation, you can view it in IEx (figure 14.3).
Figure 14.3. IEx module-level documentation
You can also view the documentation in the browser with ExDoc (figure 14.4).
Figure 14.4. ExDoc module-level documentation

The following listing shows my minimal initial documentation for the Auction module.
Listing 14.24. Minimal documentation for the Auction module
defmodule Auction do
  @moduledoc """
  Provides functions for interacting with the database layer of an Auction
     application.

  In order to keep database concerns separate from the rest of an
     application, these
  functions are provided. Any interaction you need to do with the database
     can be done
  from within these functions. See an individual function's documentation for
     more
  information and usage examples (like
     `Auction.get_user_by_username_and_password/2`).      1
  """

  # ...
end
- 1 Always refer to functions with their full names, including modules. This allows ExDoc to automatically add hyperlinks to function documentation.
Module documentation is written with the same standards and best practices as function documentation. In other words, keep the first line short and sweet, and expand your description in the following paragraphs. Feel free to provide examples (and doctests).
14.5. Writing tests For Phoenix
So far, you’ve only tested the non-Phoenix parts of your application. We started there because it made for an easier introduction to the basics of testing, but testing Phoenix doesn’t involve much more than what we’ve already covered. The main difference is that Phoenix also provides some extra helpers you can use to verify that you get back what you expected.
The Phoenix mix phx.new generators provide some example tests, and I have one that’s failing.
Listing 14.25. I get an error when running the Phoenix tests
1) test GET / (AuctionWeb.PageControllerTest)                         1
   test/auction_web/controllers/page_controller_test.exs:4
   Assertion with =~ failed                                           2
   code:  assert html_response(conn, 200) =~ "Welcome to Phoenix!"
   left:  "<!DOCTYPE html>"                                           3
   right: "Welcome to Phoenix!"
- 1 This test sends a GET request to /.
- 2 This is the code that failed the test.
- 3 I’ve removed the actual HTML here for space reasons.
You can open that test (auction_umbrella/apps/auction_web/test/auction_web/controllers/page_controller_test.exs) and see what it’s attempting to test. Based on listing 14.25, it’s attempting to send a GET request to / and assert that not only did it receive a 200 response, but that the body of the response contained the phrase “Welcome to Phoenix!” As you’ll recall, you changed the PageController to display a list of items instead.
Ideally, you’d like any request for / to be handled by the ItemController index function, so users can see the items up for auction. You can make that happen with the Phoenix.Router.get/4 function. The following listing details the changes to the router.ex file.
Listing 14.26. Adding a default route to your application
defmodule AuctionWeb.Router do
  # ...
  scope "/", AuctionWeb do
    pipe_through :browser # Use the default browser stack

    get "/", ItemController, :index        1
    # ...
  end
end
- 1 If no path is entered into the browser, this is how the request is routed.
Now you no longer even need a PageController. You can safely delete that file, along with its test, and create one for ItemController instead. That test should be located in auction_umbrella/apps/auction_web/tests/auction_web/controllers/item_controller_test.exs, and you can copy what was in PageControllerTest, taking care to rename PageControllerTest to ItemControllerTest.
Listing 14.27. The initial ItemControllerTest
defmodule AuctionWeb.ItemControllerTest do
  use AuctionWeb.ConnCase

  test "GET /", %{conn: conn} do
    conn = get conn, "/"
    assert html_response(conn, 200) =~ "Welcome to Phoenix!"       1
  end
end
- 1 The test expects the page to contain the string “Welcome to Phoenix!”
Now that that’s taken care of, you can run the tests again. This time you get the same error saying that it expected the words “Welcome to Phoenix!”
You need to fix the test. You no longer display the “Welcome to Phoenix!” phrase and instead display the list of items. You can insert an item and test that the result body has the title of the item in the generated HTML.
Listing 14.28. The new test for your index page
defmodule AuctionWeb.ItemControllerTest do
  use AuctionWeb.ConnCase

  test "GET /", %{conn: conn} do
    {:ok, _item} = Auction.insert_item(%{title: "test item"})     1
    conn = get conn, "/"
    assert html_response(conn, 200) =~ "test item"                2
  end
end
If you now run the test, you should see a successful run. We won’t take the time to test every endpoint in this chapter, but let’s test one more. This time, let’s try testing the submission of a form to create a new item. This would be handled in ItemController.create/2.
Let’s test four things for this action:
- On success, an item should be added to the database.
- On success, you should be redirected to the item’s show page.
- On error, no item should be added to the database.
- On error, you should be shown the form again.
You’ll use a describe block to group all the tests for this section together.
14.5.1. Testing that an item is added to the database on success
The first thing you test here is that an item is successfully added to the database, based on your params. To do so, you first count all the items currently in the database and assign that count to the before_count variable. Then you make the request. Finally, you count all the items in the database again and assert that the new count is one more than before_count.
The following listing shows the code I ended up with.
Listing 14.29. Testing that an item is added to the database
defmodule AuctionWeb.ItemControllerTest do
  # ...
  describe "POST /items" do                                         1
    test "with valid params, creates a new Item", %{conn: conn} do
      before_count = Enum.count(Auction.list_items())
      post conn, "/items", %{"item" => %{"title" => "Item 1"}}
      assert Enum.count(Auction.list_items()) == before_count + 1
    end
  end
end
- 1 Uses a describe block to group similar tests together
If you’re coming from another language with a very expressive testing suite syntax, it may take a while to get used to the simplicity that Elixir provides. I’ll admit that at first I didn’t particularly take to it and wished for something more like Ruby’s RSpec.[4] But as I’ve used it more and more, I’ve come to enjoy that almost everything I need to know about the test and setup is very visible, and that there’s not much “magic” happening out of view. Even though I may type more for a test, when I go back to view it later, I don’t have to dig around as much to find out what’s happening.
If you still wish you had something like Ruby’s RSpec (or some other language’s test suite), you can likely find a similar implementation on hex.pm.
Feel free to run that test in your environment. I got a notification that all the tests are still passing.
14.5.2. Testing that you’re redirected to the new item on success
You’ve successfully tested the first part of the success path (the “green” path). Now, let’s ensure that the user is redirected to the page you expect. Phoenix.ConnTest has more helpers than just html_response/2. One of them is redirected_to/2, which tests that a conn is redirected to a particular URL or path. You can pattern-match against the path to ensure that you’re sent to /items/:id.
Listing 14.30. Code to test redirection
defmodule AuctionWeb.ItemControllerTest do
  # ...
  describe "POST /items" do
    test "with valid params, redirects to the new Item", %{conn: conn} do
      conn = post conn, "/items", %{"item" => %{"title" => "Item 1"}}
      assert redirected_to(conn) =~ ~r|/items/d+|                     1
    end
    # ...
  end
end
- 1 Asserts that you’re redirected and that the URL matches the regex pattern you expect
This test makes sure that after a new item is created, the user’s connection is redirected to the item’s show page. You don’t know the ID of the item that was just inserted, but you can match against the path, expecting one or more integers to be in a particular position, with a regular expression. ~r|...| defines a regular expression, and /items/d+ matches that the characters of “/items/” are followed by one or more “digits” (integers)—the item ID.
14.5.3. Testing that no item is created on error
Now you can test the red path—the path of errors. First, you’d like to ensure that no item will be created if the controller is passed bad params.
The ExUnit.Assertions module provides the assert macro, and it also provides the refute macro, which is the opposite of assert—it tests the falsity of the statement. One way you could go about testing this is by copying and pasting the green path test, in which you store the before_count and assert that the new count is one more than that. But that could leave some edge cases open. If all you do is refute that the counts differ by one, the test would pass if your controller ended up deleting an item. Or it could add two items.
The point is that it’s nice to be as specific as possible in your tests. For that reason, you’ll explicitly test that before_count and the after count are exactly the same.
Listing 14.31. Testing that no item is created on error
defmodule AuctionWeb.ItemControllerTest do
  # ...
  describe "POST /items" do
    test "with invalid params, does not create a new Item", %{conn: conn} do
      before_count = Enum.count(Auction.list_items())
      post conn, "/items", %{"item" => %{"bad_param" => "Item 1"}}   1
      assert Enum.count(Auction.list_items()) == before_count        2
    end
    # ...
  end
end
- 1 Sends bad params in to the controller
- 2 Asserts that the item count hasn’t changed
You may have a lot of database debug noise in your test run. If so, you can configure logger to ignore :info messages and below, just as you did in listing 14.12.
Listing 14.32. Ignoring database noise in auction_web/config/test.exs
use Mix.Config

# ...

config :logger, level: :warn        1
- 1 Ignores any logs that are of a lower priority than :warn
Configuring this logger level in both applications in the umbrella application will keep the noise down while you’re testing.
14.5.4. Testing that the new item form is rendered on error
Finally, you’ll test that the user is shown the new item form after an error, so that they can correct any mistakes and retry their submission. You know that the new item form has an <h1> tag that says “New Item,” so you assert that the page that’s rendered has that in its HTML response. You could also test that a <form> tag is rendered.
Listing 14.33. Testing that the new item form is rendered
defmodule AuctionWeb.ItemControllerTest do
  #  ...
  describe "POST /items" do
    test "with invalid params, shows the new Item form", %{conn: conn} do
      conn = post conn, "/items", %{"item" => %{"bad_param" => "Item 1"}}
      assert html_response(conn, 200) =~ "<h1>New Item</h1>"              1
    end
    # ...
  end
end
- 1 Ensures that the new item form is rendered
When running this test, you should get a green passing message. You’ve completed testing the four points you wanted to test in the ItemController.
14.5.5. The entire ItemControllerTest module
You’ve worked on this module small piece by small piece in the previous sections. It’s helpful to see the full test suite in one listing, so that’s how you’ll finish up this chapter.
Listing 14.34. The full ItemControllerTest
defmodule AuctionWeb.ItemControllerTest do
  use AuctionWeb.ConnCase

  test "GET /", %{conn: conn} do
    {:ok, _item} = Auction.insert_item(%{title: "test item"})
    conn = get conn, "/"
    assert html_response(conn, 200) =~ "test item"
  end

  describe "POST /items" do
    test "with valid params, redirects to the new Item", %{conn: conn} do
      conn = post conn, "/items", %{"item" => %{"title" => "Item 1"}}
      assert redirected_to(conn) =~ ~r|/items/d+|
    end

    test "with valid params, creates a new Item", %{conn: conn} do
      before_count = Enum.count(Auction.list_items())
      post conn, "/items", %{"item" => %{"title" => "Item 1"}}
      assert Enum.count(Auction.list_items()) == before_count + 1
    end

    test "with invalid params, does not create a new Item", %{conn: conn} do
      before_count = Enum.count(Auction.list_items())
      post conn, "/items", %{"item" => %{"bad_param" => "Item 1"}}
      assert Enum.count(Auction.list_items()) == before_count
    end

    test "with invalid params, shows the new Item form", %{conn: conn} do
      conn = post conn, "/items", %{"item" => %{"bad_param" => "Item 1"}}
      assert html_response(conn, 200) =~ "<h1>New Item</h1>"
    end
  end
end
You’ve only tested a couple of the endpoints for the ItemController—there are more to be tested. With what we’ve covered here, you should be able to add your own tests to verify that your controllers are working as they should.
14.6. What next?
Testing is as much an art as it is a science. You may not agree with what someone else tests against, or you and a colleague may test for exactly the same thing in two different ways. In this chapter, I’ve given you an overview of how testing works in Elixir, but my approach is not necessarily the best way for you to write tests. That’s something you’ll have to discover on your own as you hone your toolset and develop your own style. As an exercise, consider going back through previous chapters and experiment with turning the examples you’ve run in IEx sessions into tests or doctests.
If you’d like more information on testing in Elixir, a good place to start would be the ExUnit documentation at https://hexdocs.pm/ex_unit/ExUnit.html.
For more information on testing in Phoenix, the Phoenix guides are a great resource. They can be found at https://hexdocs.pm/phoenix/testing.html.
With that in mind, go write more tests!
Summary
- Use Elixir’s built-in test framework named ExUnit, which provides everything you need to start testing your Elixir code.
- Configure Ecto to use its sandbox repo, which allows you to test against a database without messing up your development database.
- Write documentation (which Elixir treats like a first-class concept) in Elixir with the inclusion of @moduledoc and @doc module attributes.
- Write documentation examples and tests simultaneously with doctests.
- Use Phoenix’s test helper macros to make testing your Phoenix applications more straightforward.