
Chapter 12. Using Phoenix channels for real-time communication
This chapter covers
- Making use of Phoenix’s real-time channels
- Using channels to update an item’s bids in real time
- Using Phoenix’s JavaScript helpers in association with channels
Believe it or not, this may be the most surprising chapter in the book. Not necessarily because of the content, but because of the disconnect between the perceived difficulty of real-time communication and updates and how easy Phoenix makes this with channels. I think it’s fair to say that in most books about web development, apart from Phoenix, covering a topic like this would take up multiple chapters and certainly would require more code than you’ll see here.
You’ll be using some JavaScript in this chapter, but only minimal knowledge will be required to follow along. Ready to get started? Let’s do it.
12.1. What are Phoenix channels?
You’ll use channels to update an item’s page with the current bid information. If another user enters a bid, the item’s page will be updated without your intervention to show that new bid. If you enter a new bid, that other user’s browser will reflect that bid without them (or the client) refreshing the web page.
You’ll use JavaScript to update the HTML, and Phoenix has an official JavaScript library that’s already part of the Auction application (it’s included in every generated app). One of the neat things about Phoenix and the channels idea is that it’s not limited to JavaScript. There are clients for Swift (iOS), Java (Android), C#, and other languages.
Behind the scenes, Phoenix channels make use of Elixir processes. We discussed Elixir processes in chapter 1, but the main thing you need to know is that they’re very lightweight—they take up minimal server resources, and they allow Elixir modules to pass messages back and forth and maintain state. Without getting too much into the technical details, Phoenix uses those Elixir processes and a pubsub (publish-subscribe) mechanism to allow different clients to subscribe to different “topics” and “subtopics.” One of the great consequences of Elixir processes being so lightweight (and channels being implemented on top of them) is that a huge number of simultaneous connections can be handled—it’s been tested with millions of clients being connected to moderate server hardware.
For your Auction application, when a user visits an auction item’s page, the user will be subscribed to a topic of “item” and a subtopic of the item’s ID (for example, "item:123"). You can then broadcast messages on that topic/subtopic combo, and the user’s client will receive that message. You can then write some simple JavaScript to respond to that message. For this implementation, the response will be to update the list of bids in the user’s browser with the information passed along in the broadcasted message. On the other side of the channel, whenever a user submits a new bid for an item, you’ll accept that bid and broadcast it to all the clients connected to that item’s topic/subtopic.
If this process sounds complicated, that’s because it is. The good news for you is that nearly all of the internal complications are handled by Phoenix and Elixir. In fact, the best way to describe how uncomplicated it can be is to just dive in.
12.2. Connecting a user to a channel and a topic
When you generated the Phoenix app with mix phx.new, one of the files that was generated was lib/auction_web/channels/user_socket.ex. Most of that file is comments, letting you know how to get started with channels. This is where you do the initial setup and enabling of channels.
If you look near the top of that file, you’ll find a heading comment of Channels, as shown in the following listing. By default, channels aren’t enabled, which is why you’ll find this section commented-out.
Listing 12.1. The initial state of user_socket.ex
defmodule AuctionWeb.UserSocket do
  use Phoenix.Socket

  ## Channels
  # channel "room:*", AuctionWeb.RoomChannel         1

  # ...
end
To enable channels, you need to add a call to channel in this file. There are two arguments to this function: the topic name you’re listening for, and the module that handles those broadcasts.
Topics are formatted as topic:subtopic. The commented-out example has room:* as the topic—this specifies any broadcast that goes to the room topic with any subtopic. If a broadcast that matches this pattern is sent, it will be forwarded to AuctionWeb.RoomChannel (if this line were uncommented).
As we discussed in the last section, you’d like each item to have its own topic so that you can broadcast item-specific updates. With that in mind, your pattern might look like item:*, and you’ll pass the item’s id as the wildcard. For example, item 123 would have a topic named item:123.
As for the name of the module that will handle those messages, you’ll use AuctionWeb.ItemChannel. The following listing shows the updated AuctionWeb .UserSocket module.
Listing 12.2. The updated AuctionWeb.UserSocket
defmodule AuctionWeb.UserSocket do
  use Phoenix.Socket

  ## Channels
  channel "item:*", AuctionWeb.ItemChannel       1

  # ...
end
- 1 Sends all channel requests that begin with item: to AuctionWeb.ItemChannel
When a channel request is received with the topic of item:*, it’s forwarded to AuctionWeb.ItemChannel to be handled.
12.2.1. Handling topic join requests
Now whenever a client requests to join the topic item:*, the request will be handled by AuctionWeb.ItemChannel. The signature of that request is join/3, so you need to implement AuctionWeb.ItemChannel.join/3. The arguments to join/3 are
- The topic name
- Any parameters passed along with the request
- The socket that the request is communicating on
You can use Elixir’s pattern-matching feature on function definitions to match topic names exactly, or to match any subset of parameters passed along. That means you can pattern-match the topic and grab the id out of the string for use later. As a response, it’s expected that your implementation will return {:ok, socket} or {:ok, reply, socket} on success, or {:error, reply} if there’s an error.
You can do any number of things in a function to determine whether a user should be able to join a specific topic. In your application, though, the topics will be wide open to allow any user, logged-in or not, to receive updates on item pages. For that reason, you’ll allow all connections and always return a successful response.
The implementation of this join handler is very simple (apps/auction_web/lib/auction_web/channels/item_channel.ex).
Listing 12.3. Setting up the join handler
defmodule AuctionWeb.ItemChannel do
  use Phoenix.Channel

  def join("item:" <> _item_id, _params, socket) do           1
    {:ok, socket}
  end
end
- 1 Pattern-matches the topic string when a join request is received (the pattern is “item:” and an id)
By pattern matching the topic string, you can pull out the id of the item whose topic you’re subscribing to. In this case, you don’t need the id, so it’s denoted with an underscore (_) before the variable name.
12.2.2. Getting the user’s browser to join a topic
Whenever a user visits the page for an item, you’d like their browser to join a topic for that item. That way, you can broadcast a message to every client currently on that channel when an item has a new bid (or send any other message you need to send). For web clients, the best way to join a topic is via JavaScript. Thankfully for you, Phoenix already has set up a good JavaScript client for interacting with these channels: socket.js.
By default, Phoenix uses Webpack to compile JavaScript and CSS into compact files that the browser can understand. That means you can use multiple sources or styles of JavaScript and combine them in the final app. You can split out implementation details for JavaScript or have a different stylesheet for each area of your site. When it comes time to render your site in your browser, Webpack will have already compiled those assets into a small number of files (one JavaScript and one stylesheet, by default). Webpack is very powerful but also very flexible.
Where do all these assets live? If you look in the apps/auction_web directory, you’ll notice that there’s an assets directory within it.
That directory contains the files that are considered assets for your application (JavaScript, stylesheets, images, fonts, and so on). JavaScript that needs to be compiled goes in the js directory, CSS goes in the css directory, and anything that needs to be copied directly to the served site goes in the static directory (images, fonts, and the like).
The assets directory
The socket.js file can be found in apps/auction_web/assets/js. If you take a moment to open that file, you’ll see that the vast majority of the file is comments letting you know how to correctly set up the socket connection on the client side (browser).[1] The following listing shows the contents of this file with the comments removed. You’ll see that most of the work you need to do has already been done for you.
It’s stuff like this that makes Elixir and Phoenix such a joy to develop with. It makes your life as a developer so much easier.
Listing 12.4. The socket.js file with comments removed
import {Socket} from "phoenix"

let socket = new Socket("/socket", {params: {token: window.userToken}})

socket.connect()
let channel = socket.channel("topic:subtopic", {})          1
channel.join()
  .receive("ok", resp => { console.log("Joined successfully", resp) })
  .receive("error", resp => { console.log("Unable to join", resp) })

export default socket
If you aren’t familiar with JavaScript, the syntax can be a little bit intimidating. Let’s break this file down bit by bit.
Importing the socket library
The first line in listing 12.4 simply extracts the Socket class from the phoenix JavaScript library.
import {Socket} from "phoenix"
Where did the phoenix library come from? It’s provided with Phoenix and is indicated as a JavaScript package your application requires in auction_web/assets/package.json.
Creating a new Socket instance
Now that you’ve imported the Socket class, you need to instantiate a new instance of the class with the parameters you require. By default, channels communicate over the /socket path of your app (you can customize this in AuctionWeb.Endpoint), so you’ll tell it that that’s the path you’d like to connect over. Furthermore, you pass a userToken as a param. You could use that param for user authentication if you needed or wanted authentication. This is all code that’s generated by Phoenix’s Mix task; you won’t need a userToken in your implementation.
let socket = new Socket("/socket", {params: {token: window.userToken}})
This new Socket instance is referenced via the newly created socket variable.
Connecting to the channel
Now that you’ve set up the properties of the connection, you can connect:
socket.connect()
Setting up the correct channel
The connection to the socket has been initiated, but the connection hasn’t requested any particular topic for the connection yet. No messages will be sent or received by this connection until a particular topic is set up. The following line sets up the channel to listen to a specific topic and subtopic (passing in an empty object as the params):
let channel = socket.channel("topic:subtopic", {})
Note that this is just Phoenix’s example code. You’ll soon change this to request the correct topic for your Auction application.
Joining the channel and setting up message listeners
Once the topic has been specified, you can join the topic and start responding to messages sent on that topic. One of the cool things that the phoenix JavaScript library provides is a form of function pattern matching in receive.
The example code has two different receive function calls looking for different messages. The matched message is the first argument to receive, and the second argument is the function to call once the message is matched.
channel.join()
  .receive("ok", resp => { console.log("Joined successfully", resp) })
  .receive("error", resp => { console.log("Unable to join", resp) })
In this example, resp is the response from the server. In case of ok or error, the example simply logs a message to the console.
Making the socket available to import elsewhere
The final line of the example exports the socket variable you set up so that it can be imported in other JavaScript files.
export default socket
Making changes to the JavaScript
Now that you’ve looked at what each line of the example JavaScript does, you can make the changes you need. You don’t need to make many changes in this file. The major thing that needs to change is the name of the topic to join (instead of the default topic:subtopic). You also don’t want to try to connect on every page.
You want the topic to be item:${item_id}, and because you only want updates on item pages, you only need to connect on item pages. This book isn’t about JavaScript itself, so I’ll try to stay as elementary as possible when making these changes. Here’s the plan:
- Check to see if the browser’s location is an item page (/items/:id).
- If it is an item page, grab the item ID from the location and connect to the ID’s topic.
- If it’s not an item page, don’t try to connect to a topic.
For the first step, you’ll use a regex pattern to see if the page contains /items/:id. The good thing about doing it this way is that you can use regex capture groups to capture the ID for use later in the script. The following regex will look for the pattern and capture any digits at the end:
let match = document.location.pathname.match(//items/(d+)$/)
A regular expression (regex) is a search pattern that allows you to search text for a sequence of characters. The pattern you’re searching for here is
//items/(d+)$/
Briefly, this pattern starts by searching for the literal characters /items/ (the slashes / need to be escaped by backslashes ). Next, it searches for any digit (d) one or more times (+). That digit search is surrounded with parentheses in order to “capture” them for use later. Next, you make sure that those digits are the last thing in the string by using the $metacharacter, which matches the end of a string. Finally, you surround the whole expression with slashes (/), which is the customary way to indicate a regex.
You can then use this match variable to enter an if block. If there is a match, the if statement will evaluate to truthy. If there’s no match, it’s falsy.
if (match) {
  // ...
}
If you do have a match, you enter that block and evaluate the code there. The first thing you do is grab the item ID from the capture group you originally set up in the regex. The way JavaScript’s match function works with capture groups is that the first item in the matched array is the entire matched string. The subsequent indexes in the array are the capture groups in order. As a reminder, JavaScript indexes start with 0.
Because you had only one capture group, your item ID is captured in the array index of 1.
let itemId = match[1]
The last change you need to make to the original example script is to use that item ID to join the correct topic. In JavaScript, you can interpolate strings by surrounding the string with backticks (`). Inside the backticks, you can interpolate JavaScript variables inside a ${...} call.
With that in mind, you can join the correct item topic/subtopic with this line:
let channel = socket.channel(`item:${itemId}`, {})
The rest of the example channel-joining code inside the if block will suffice.
Once you’ve made these changes, the final socket.js file will look like the following listing.
Listing 12.5. The edited socket.js file
// NOTE: The contents of this file will only be executed if
// you uncomment its entry in "assets/js/app.js".

import { Socket } from "phoenix"

let socket = new Socket("/socket", { params: { token: window.userToken } })
socket.connect()
let match = document.location.pathname.match(//items/(d+)$/)
if (match) {
  let itemId = match[1]
  let channel = socket.channel(`item:${itemId}`, {})
  channel
    .join()
    .receive("ok", resp => {                      1
      console.log("Joined successfully", resp)
    })
    .receive("error", resp => {                   2
      console.log("Unable to join", resp)
    })
}

export default socket
- 1 If the channel receives “ok”, you respond by logging “Joined successfully” to the console.
- 2 If there was an error joining the channel, you respond by logging “Unable to join” to the console.
You’ve created this JavaScript, but it won’t run unless it’s imported into the main app.js file. The first comment in socket.js tells you exactly what you need to do:
// NOTE: The contents of this file will only be executed if
// you uncomment its entry in "assets/js/app.js".
If you open assets/js/app.js, you’ll see more comments. Those comments say that even though Webpack compiles all the JavaScript files in the assets/js directory, none of them will be run unless they’re explicitly imported.
The final line of app.js has such an import for socket. Remember that on the last line of socket.js you called export default socket? Well, you can import it into app.js to execute it.
After uncommenting the appropriate line, app.js will look like the following listing.
Listing 12.6. The app.js file after uncommenting the appropriate line
// you need to import the CSS so that webpack will load it.
// The MiniCssExtractPlugin is used to separate it out into
// its own CSS file.
import css from "../css/app.css"

// webpack automatically bundles all modules in your
// entry points. Those entry points can be configured
// in "webpack.config.js".
//
// Import dependencies
//
import "phoenix_html"

// Import local files
//
// Local files can be imported directly using relative paths, for example:
import socket from "./socket"                                              1
- 1 Uncomment this line.
With those changes made, you have a system set up to connect a user’s client to an item-specific channel on page load. On my system, this only took changing or adding 30 lines of code. Even though you haven’t quite finished the real-time connection (you haven’t set up the JavaScript client to respond to messages), it’s amazing how little it takes to get this set up.
If you fire up the Phoenix server, visit the item’s page (such as http://localhost:4000/items/1), and open the browser’s JavaScript console, you’ll see a message: “Joined successfully.” That’s exactly what you told the JavaScript client to log on a successful channel join (see figure 12.1).
Figure 12.1. The JavaScript console reports a successful channel join on loading.

Beyond that, if you look at the logged output of the Phoenix server itself (my output is shown in the following listing), you’ll see some debug strings letting you know that a user (you) successfully connected to a channel.
Listing 12.7. The debug output of the Phoenix server
17:46:18.171 [info]  GET /items/1
# ...
17:46:18.182 [info]  Sent 200 in 11ms

17:46:18.261 [info]  CONNECT AuctionWeb.UserSocket
  Transport: :websocket
  Connect Info: %{}
  Parameters: %{"token" => "undefined", "vsn" => "2.0.0"}

17:46:18.261 [info]  Replied AuctionWeb.UserSocket :ok

17:46:18.266 [info]  JOIN "item:1" to AuctionWeb.ItemChannel
  Transport:  :websocket
  Serializer: Phoenix.Socket.V2.JSONSerializer
  Parameters: %{}

17:46:18.266 [info]  Replied item:1 :ok       1
- 1 The server sent :ok to the topic of item:1.
This debug output shows that :ok was sent to the channel topic of item:1. This corresponds to the request from the user’s browser to join item:1.
12.3. Sending real-time messages to a user
To this point, you’ve automatically had a user join a channel in a topic that depends on the viewed item’s ID. That’s half of what’s required to get real-time communication going with the server. What you need now is for the client to receive messages on a channel and have the server send messages over a channel.
Enabling the client to receive messages will require changes in the socket.js JavaScript file you were editing in the last section. Sending messages to the client will require some changes on the Elixir/Phoenix side of the application. We’ll look at those in order.
12.3.1. Receiving messages in the user’s browser
You’ll first change the auction_web/assets/js/socket.js file to allow a user’s browser to receive messages over the connected channel. To do so, you need to add a listener to the channel.
When a message is sent over a channel, it will contain two things:
- A string corresponding to the message type sent
- The body of the message sent from the server
For the first point, you can pattern-match the message from the server with the provided JavaScript library. For the second point, you can provide a callback function that’s called with the body of the message from the server.
You’ll have your client listen for a new_bid message type and log the body of the message in the browser’s JavaScript console, and have the JavaScript set this listener up before it joins the specific channel topic.
Listing 12.8. Setting up the message listener
// ...
if (match) {
  let itemId = match[1]
  let channel = socket.channel(`item:${itemId}`, {})
  channel.on("new_bid", data => {                      1
    console.log("new_bid message received", data)      2
  })

  channel
    .join()
    .receive("ok", resp => {
      console.log("Joined successfully", resp)
    })
    .receive("error", resp => {
      console.log("Unable to join", resp)
    })
}
// ...
- 1 The channel you’ve joined, with the message “new_bid”
- 2 Takes the message from the server (data) and logs it to the console
Save the socket.js file. If you’re still running the Phoenix server and you check the page for an item, you’ll notice that the browser has automatically reloaded the page. That’s thanks to Webpack and the automatic code watcher/reloader.
You’ll also notice that the console has the same output as it did before you added the changes in listing 12.8. You haven’t sent it any messages, so you see the Joined successfully message.
12.3.2. Configuring the channel to handle messages
Before you can send a message over a channel, you need to set up AuctionWeb.ItemChannel to handle those messages. Whenever the channel is sent a message, the module set up to handle it looks for a matching handle_in/3 function, so it’s up to you to implement that function to handle the messages.
Because you’re expecting a new_bid message in the JavaScript you added in listing 12.8, you need a matching handle_in/3 function to handle new_bid messages. Part of the handle_in/3 function implementation broadcasts a message to the channel’s connected sockets, so although you could receive one message type and send another, it’s helpful to match the handled messages with the corresponding broadcasted messages.
The handle_in/3 function expects three arguments:
- The message type string
- A params object
- The socket of the connection
For the item:${item_id} topic, you pass the message that AuctionWeb.ItemChannel received to the socket. Any client that’s connected on that socket will receive the message and can decide what to do with it. Because you set up your JavaScript to log the message body to the console, your application isn’t doing much at the moment. Finally, the handle_in/3 function must return one of the following:
- {:noreply, socket}
- {:reply, message, socket}
- {:stop, reason, socket}
- {:stop, reason, message, socket}
Most of the time, the message sender doesn’t require a reply. For your purposes, you just respond with {:noreply, socket}.
With these things in mind, write the handle_in/3 function.
Listing 12.9. Writing the handle_in/3 implementation
defmodule AuctionWeb.ItemChannel do
  use Phoenix.Channel
  # ...
  def handle_in("new_bid", params, socket) do        1
    broadcast!(socket, "new_bid", params)
    {:noreply, socket}
  end
end
- 1 Pattern-matches on the new_bid message
The broadcast! function broadcasts (using Phoenix.Channel.broadcast!/3) the message you received (params) with the type of new_bid to all connections on socket.
12.3.3. Sending your browser a message from IEx
If you didn’t start your server via an IEx session (with iex -S mix phx.server), use Ctrl-C to exit the server and restart it using that command. This allows you to interact with the application from an IEx session while also running the Phoenix server. In this section, you’ll send the browser a message from IEx through the channel the browser has connected over.
As configured in AuctionWeb.Endpoint, channel communication happens over the path of /socket. But you can also send messages to channels outside of a Phoenix request (that is, not hitting /socket with an HTTP request). You can do so using AuctionWeb.Endpoint.broadcast/3.
AuctionWeb.Endpoint.broadcast/3 expects three parameters:
- The topic:subtopic to broadcast the message to
- The message type as a string
- The message to send, which must be an Elixir map
Navigate to an item’s page in your browser (noting the id of the item), and open the JavaScript console. If everything has been hooked up correctly, you’ll see a notice in the console that a message has been received, along with the message itself. Then, in your IEx session, send all the connected clients a message with AuctionWeb.Endpoint.broadcast/3, making sure you use the id of the item you’re looking at (I’m using an id of 1).
iex(1)> AuctionWeb.Endpoint.broadcast("item:1", "new_bid", %{body: "Hello
     from IEx!"})
:ok                     1
- 1 Notifies you that your message has been successfully queued. Make sure you replace 1 with the ID of the item you’re currently viewing.
If you now look in your browser, you’ll see that the message has been received, as in figure 12.2.
Figure 12.2. The message has been received!

12.4. Updating all users when a new bid is made
Before we get into how you can update all the listeners on the item:item_id topic, let’s take a quick detour into rendering collections of items. On your show item page, you have a section named Current Bids. In the code for this section, you iterate through @item.bids and display a bit of HTML for each bid.
At this point, it would be a good idea to extract that bit of HTML into its own template and render that small template for each bid. Phoenix provides a Phoenix .View.render_many/4 function that will render a collection of things based on a single template—just like your bids.
The following listing shows the specific portion of HTML in auction_web/lib/auction_web/templates/item/show.html.eex that you’ll extract. All this code is from before the refactoring and should be the same as when you last left it.
Listing 12.10. The code you’ll refactor
# ...
<h2>Current bids</h2>
<%= for bid <- @item.bids do %>
  <p>
    <%= integer_to_currency(bid.amount) %>
    <em>from <%= bid.user.username %></em>
  </p>
<% end %>
# ...
Once you’re done refactoring this code, you’ll render a collection of bids based on this HTML.
12.4.1. Refactoring the rendering of an item’s bids
The render_many/4 function requires three arguments in order to work correctly:
- The collection of things to render
- The view the template belongs to (such as AuctionWeb.ItemView)
- The template name
- Optionally, a map of assigns to pass into the template
You could put this code in AuctionWeb.ItemView, but it isn’t really displaying anything about the item. Instead, it’s displaying something about the bid. For that reason, this template would belong more in a new view named AuctionWeb.BidView.
In previous instances where you’ve created a view, you also created a controller (such as AuctionWeb.BidController). In this situation, though, you don’t need a controller for handling interactions with bids—you just need to display bids. You can thus create a BidView without a corresponding controller.
Listing 12.11. Creating auction_web/lib/auction_web/views/bid_view.ex
defmodule AuctionWeb.BidView do
  use AuctionWeb, :view
end
You can now extract the code from listing 12.10 into its own template file. Because you’re creating the HTML for displaying a single bid, you’ll name this template file bid.html.eex (in auction_web/lib/auction_web/templates/bid/).
You’ll mostly copy and paste the code from item.html.eex, but there’s one important change: this time you’ll use Map.get/3 to get the username. You’ll have preloaded the user association when loading an item’s page, but when you create an item, you won’t have the user preloaded. Instead, you’ll pass in a new @username assign. Map.get/3 looks for the username key in @bid.user, and if it’s not found there, falls back to @username. The following listing shows that template code.
Listing 12.12. HTML template for a single bid
<p>
  <%= integer_to_currency(@bid.amount) %>                            1
  <em>from <%= Map.get(@bid.user, :username) || @username %></em>    1
</p>
- 1 You changed from bid to @bid because you’re in a new template with no knowledge of the bid variable.
How do you know that the assign in the template will be named @bid? Phoenix automatically names the assign after the view name. In this case, you have BidView, so it named the assign @bid. If you had a GlobeView, the assign name would be @globe. If desired, that can overridden with the as option. For example, if you wanted to render something in GlobeView but name the assign @sphere, you could call render_many @globes, GlobeView, "globe.html.eex", as: :sphere.
Now you can replace the code in the view itself with the call to render_many/4.
Listing 12.13. The modified code in item/show.html.eex
<h2>Current bids</h2>
<div id="bids">                                                   1
  <%= render_many @item.bids, AuctionWeb.BidView, "bid.html" %>
</div>
- 1 Adds an ID on the div so you can reference it later in JavaScript
If you reload the show item page, you should notice no difference in how the Current Bids section looks. If that’s the case, good job: successful refactoring!
12.4.2. Modifying the controller to broadcast a message
You’re now able to receive messages in the browser, but to make this real-time bid update feature work, you need to respond to new bids and broadcast that bid information to the item’s topic. You already have a controller and action that accepts bids (AuctionWeb.BidController.create/2), and this is probably the best place to broadcast the bid information.
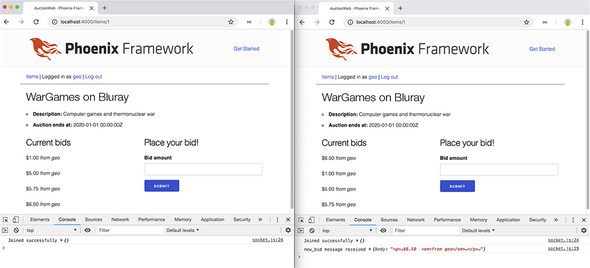
Figure 12.3 illustrates what you’re trying to achieve. The browser on the left submits a new bid and the browser refreshes after the form is submitted. It now shows three bids. However, the browser on the right has received a message from Phoenix letting it know that the left browser submitted a new bid. You won’t make any UI changes in this section, so the right browser just logs the message in the console.
Figure 12.3. The browser on the right receives a new_bid message when the browser on the left submits a bid.

Once a bid is placed and recorded, you broadcast that bid information to all browsers currently connected to that item’s topic. To do so, you use the AuctionWeb.Endpoint.broadcast/3 function you used previously in IEx.
The AuctionWeb.BidController.create/2 function has two paths via the case statement:
- A successful bid ({:ok, bid})
- An unsuccessful bid ({:error, bid})
You don’t want the bid information to be broadcast on an unsuccessful bid, so you only broadcast in the {:ok, item}path of the case statement. All you need to know is the item ID (which you can get from item_id in the params), the message type to send (new_bid), and the message payload.
For the message payload, you use the new BidView template you extracted in the last section to send the HTML you’d like displayed in the Current Bids section of the show item page. Phoenix has a nice function named Phoenix.View.render_to_string/3 that you can use to get the HTML of the template and send it to the topic via the broadcast. render_to_string/3, like Phoenix.View.render, requires as arguments the view module, the template name, and a map of assigns to pass on. In this case, you use the AuctionWeb.BidView module and the bid.html template, and you need to send in a bid and a username assign (because the bid’s user association won’t be preloaded). For clarity, I’ve broken this out into an html variable before sending it in the payload to the broadcast/3function.
Listing 12.14. Modifying the controller to broadcast a successful bid
defmodule AuctionWeb.BidController do
  # ...
  def create(conn, %{"bid" => %{"amount" => amount}, "item_id" => item_id}) do
    case Auction.insert_bid(%{amount: amount, item_id: item_id, user_id: conn.assigns.current_user.id}) do
      {:ok, bid} ->
        html = Phoenix.View.render_to_string(AuctionWeb.BidView,
                                            "bid.html",
                                             bid: bid,
                                          username:
                                          conn.assigns.current_user.username)
        AuctionWeb.Endpoint.broadcast("item:#{item_id}",
        "new_bid", %{body: html})
        redirect conn, to: item_path(conn, :show, bid.item_id)      1
      {:error, bid} ->
        item = Auction.get_item(item_id)
        render conn, AuctionWeb.ItemView, "show.html", [item: item, bid: bid]
    end
  end
  # ...
end
"new_bid", %{body: html})
redirect conn, to: item_path(conn, :show, bid.item_id) 1
{:error, bid} ->
item = Auction.get_item(item_id)
render conn, AuctionWeb.ItemView, "show.html", [item: item, bid: bid]
end
end
# ...
end
- 1 Before this change, redirect was the only call on the successful path.
In order to see this work, you need to have two browser windows open to the same item page. Once you submit a bid in one browser, that browser is redirected, which refreshes the page. The second browser gets the broadcast, as shown in figure 12.3.
12.4.3. Handling the broadcasted HTML in the browser
Your browser now gets sent the HTML payload when another user (or you in another browser window) submits a bid. In order to get other browsers listening on the topic’s channel to update their HTML with that template fragment, you need to dive back into JavaScript and edit auction_web/assets/js/socket.js. You’ll prepend the new bids to the list of current bids so the newest one is on top.
With that in mind, it would make more sense for the most recent bid to be on top when the page loads as well. You can easily change the ordering of the Ecto query that fetches an item’s bids in auction_umbrella/apps/auction/lib/auction.ex using the Ecto from syntax you used in get_bids_for_user/1. Ecto.Repo.preload/3 can accept an Ecto query, and you’ll use this to order the preloaded bids by their inserted_at attribute, with the most recent bid first (see figure 12.4).
Listing 12.15. Ordering the preloaded bids
defmodule Auction do
  # ...
  def get_item_with_bids(id) do
    id
    |> get_item()
    |> @repo.preload(bids: from(b in Bid, order_by: [desc: b.inserted_at]))1
    |> @repo.preload(bids: [:user])                                        2
  end
  # ...
end
- 1 This is the line you’re adding.
- 2 You keep the nested user preload as well.
Figure 12.4. On the left: submitting bids; on the right: receiving broadcasts and updating the page
If you open auction_web/assets/js/socket.js, you’ll be reminded of the code you added earlier in this chapter to listen for the new_bid message on your channel. Previously, whenever you received that event, you logged the payload to the console. You now want to modify that behavior to also prepend the HTML in the payload to the Current Bid list. In order to do so, do two things:
- Find the div with the id of bids (which you added in the show.html.eex HTML template)
- Prepend the new HTML you received in the event listener to that div with insertAdjacentHTML.
The following listing shows that implementation.
Listing 12.16. Prepending the HTML
// ...
let match = document.location.pathname.match(//items/(d+)$/)
if (match) {
  let itemId = match[1]
  let channel = socket.channel(`item:${itemId}`, {})

  channel.on("new_bid", data => {
    console.log("new_bid message received", data)
    const elem = document.getElementById("bids")             1
    elem.insertAdjacentHTML("afterbegin", data.body)         2
  })
  // ...
}
// ...
- 1 Finds the element with the ID of bids and assigns it to elem
- 2 In the elem HTML node, inserts HTML. The first argument (“afterbegin”) tells JavaScript that you want to insert this HTML before the first child of the element; data.body is the HTML received from the broadcast.
Voila! You now have real-time updates in your browser. Any time a user submits a bid for an item, anyone else looking at that page in their own browser will see the new bid pop up in the list of Current Bids without refreshing the page!
Summary
- Phoenix channels are powerful tools that can have many client-side implementations—JavaScript in the browser is just one.
- Sockets are split into topic:subtopic channels to limit who can receive messages.
- Phoenix comes with a powerful JavaScript library for handling real-time communication.
- When a user’s browser connects to a channel, you can set up listeners for specific messages and react accordingly when those messages are received.
- Use Phoenix.View.render_many/4 when rendering a collection of things.
- Use Phoenix.View.render_to_string/3 to render a template to a string in order to send it in a broadcasted payload.