
2 REVERSE ENGINEERING
Being able to look at pictures and reverse engineer, or break down, how they were lit is an incredibly useful skill. Determining how many light sources were used by examining the shadows, highlights, and catch lights and observing whether the light is soft or hard not only tests your knowledge and understanding of light, but also will help you to replicate looks and go on to create your own unique images.
In this chapter we’ll look at a number of images and by studying the clues, we’ll be able to pretty accurately say how each image was lit, how many lights were used, where the lights were positioned, and to some extent, what modifiers were used.
Catch lights in a subject’s eyes are always a good place to start, but these days we can’t trust them completely because they may have been moved or even eliminated in post-production. Fake light sources can also be added in post-production, and this can make lighting appear much more complicated that it actually is.
The goal here is to have an understanding of how a picture could have been lit. It will be easier to determine the lighting setup for some images than it is for others, and it may be that we’re not one-hundred percent accurate in figuring out an exact setup, but that’s not a problem because who’s to say a similar type of light couldn’t be achieved with a slightly different setup? The idea is to get the gray matter working by looking at the clues. This exercise, in addition to spending plenty of time behind the camera, will help you to keep building your knowledge and understanding of light and photography.
Let’s start off with just a few simple setups to show how the size, position, and type of modifiers used affects the appearance of catch lights, highlights, and shadows.
SETUP 1
One of the first clues we can see in Figure 2.1 are the catch lights in the eyes (A). There is one round catch light in each eye at the twelve o’clock position (top and middle). This would initially suggest the use of a single light source like a beauty dish (because it’s round) on a boom.
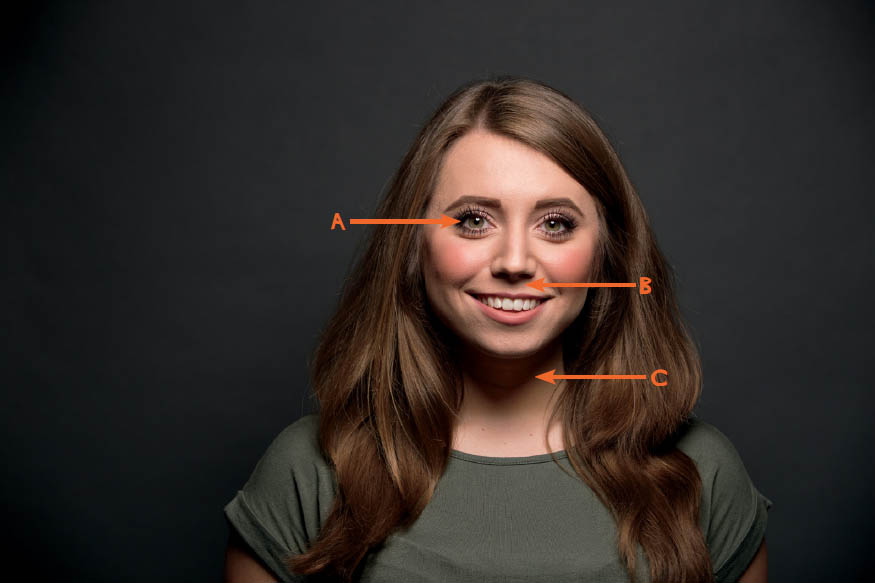
FIGURE 2.1
Looking at the shadows we can see that there is one directly beneath the model’s nose (B) and one under her chin on her neck (C). The shape of the shadows—how each one comes to almost a point in the middle—would suggest that the light source was in front of the model, in line with her face on the camera axis, positioned up high and angled downward. Also note how the shadow areas on either side of the model’s face are quite even, again suggesting that the light source was in line with the model’s face on the camera axis.
Figure 2.2 shows a behind-the-scenes look at the lighting that created the catch lights and shadows; however, the reflector you can see at chest height was not used to create the image in Figure 2.1.

FIGURE 2.2
SETUP 2
Figure 2.3 shows what the catch lights and lighting look like with the same setup as that which was used for Figure 2.1, but this time with the reflector at chest height.

FIGURE 2.3
The reflector bounced light upward and the consequence of this is that the shadow areas aren’t quite as dark. We can still see the shadows underneath the model’s nose and chin, but they are significantly brighter than before.
In both shots, the beauty dish had material stretched over the front (Figure 2.4), which softened the light a touch.

FIGURE 2.4
SETUP 3
In Figure 2.5 just one side of the model’s face is lit (A). This suggests that there was a light source aimed at the model directly from the side—in this case, from camera left.

FIGURE 2.5
We can see from the catch light (B) that the light source is round, which would mean it’s something like a beauty dish. The catch light is in the nine o’clock position, which tells us the light was positioned at the same height as her head at camera left. The fact that the edge of the shadow runs down the middle of her face (C), rather than being at an angle, is another clue that the light was positioned at head height.
The area where the highlight and shadow areas meet is very pronounced and does not blend gradually, especially on the model’s neck (D), meaning the light source was quite hard.
Figure 2.6 is a behind-the-scenes picture showing the setup. In this case, the beauty dish did not have any diffusion material other than the deflector across the front to soften the light, and it was positioned at head height and directly to the side.

FIGURE 2.6
SETUP 4
In Figure 2.7 we can see that, again, one side of the model’s face is lit and the other side is in shadow (A). However, on the shadowed side of her face there is a little bit of light underneath her eye (B). This suggests that the light was again positioned to the side of the model at camera left. However, because some light hits the shadowed side of her face, we can tell the light was slightly in front of of the model and closer to the camera. This allows the light to reach past the model’s nose and hit that part of her face.
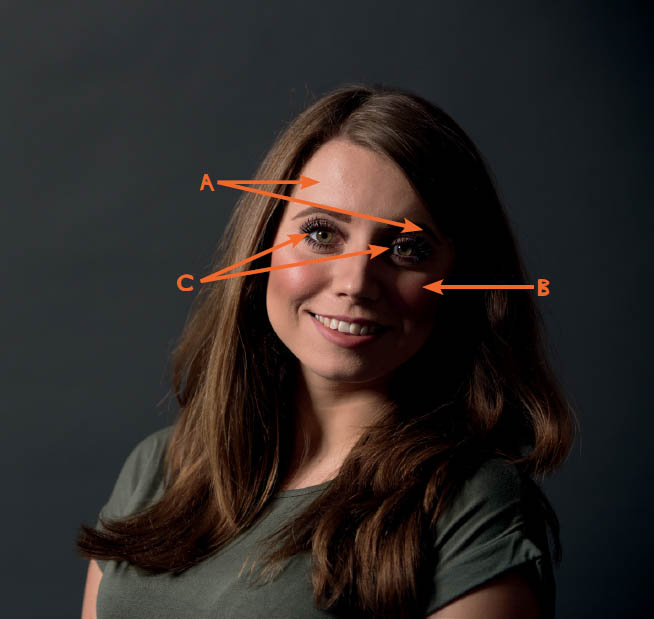
FIGURE 2.7
There are two clues that tell us the light was also positioned above the model. First, the catch lights are in the ten o’clock position (C). Second, on the shadowed side of the model’s face, more light falls on her cheek than on her eye or the part of her forehead above her eye.
The behind-the-scenes shot in Figure 2.8 shows the lighting setup for this particular picture. The beauty dish is a relatively small light source with no diffusion material apart from the deflector over the flash bulb. It was also positioned at a greater distance from the model than it was for previous shots. This explains why the lighting is hard, by which I mean the shadow and highlight areas are pronounced and don’t blend into each other gradually.

FIGURE 2.8
SETUP 5
The setup for Figure 2.9 was very similar to the previous setup, but this time the relatively small beauty dish was replaced by a large light source—the Elinchrom Rotalux 135cm Octa.
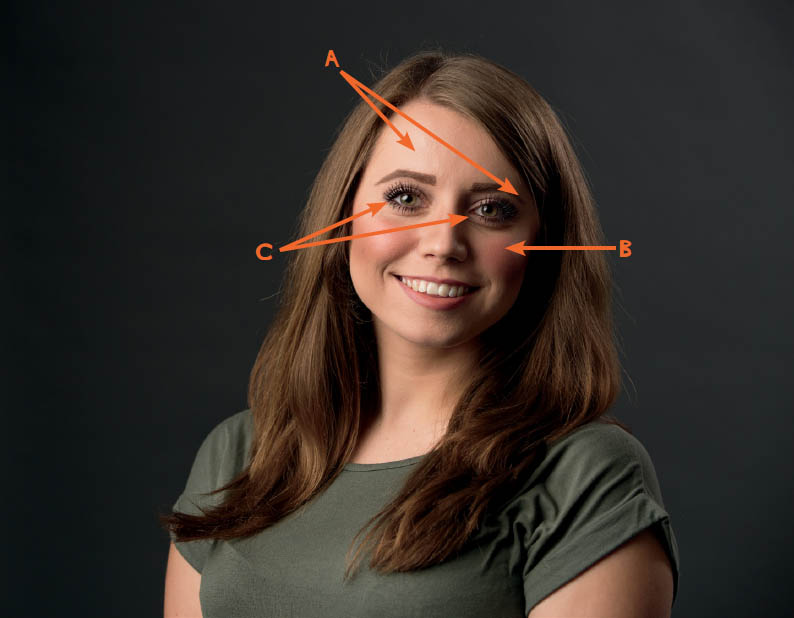
FIGURE 2.9
The light source was positioned to the side and slightly in front of the model. We can tell this because one side of her face is lit and the other is in shadow (A), except for an area on her cheek (B). The light source was again positioned above the model and angled downward, which we can tell by the fact that the catch lights in her eyes (C) are roughly around the ten o’clock position and the light on the shadowed side of her face falls mainly on her cheek and just a little to the side of her mouth. There is not much light falling on her eye or the part of her forehead just above her eye.
Figure 2.10 is a behind-the-scenes picture showing the lighting setup that produced this particular look.

FIGURE 2.10
SETUP 6
Figure 2.11 is a silhouette created by positioning the model directly in front of the light source (Figure 2.12), which in this case was the Elinchrom Rotalux 135cm Octa (my favorite).
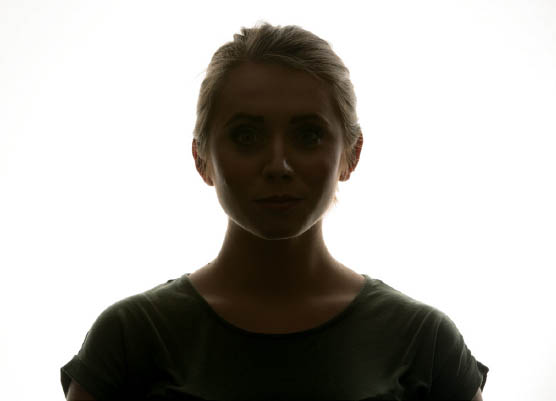
FIGURE 2.11
I like to use this setup when I want a clean, bright-white background behind a model. Obviously, I can’t use a setup like this for full length shots, but when I use the larger 175cm version I can take three-quarter length shots from about knee height upward.
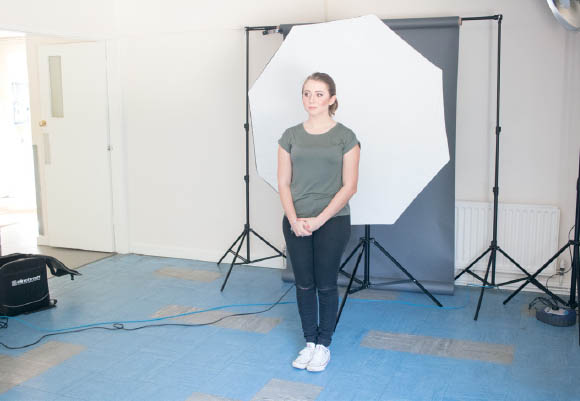
FIGURE 2.12
This is a setup I started to use after a shoot I did when a light I had positioned to the front of my subject did not go off. It turned out that I really liked the result, as did the subject in the shot, boxer Steven Cook (Figure 2.13).

FIGURE 2.13
Placing a light source behind the model to create a white background is a great setup when you’re shooting in an area where space is limited. For Figure 2.14 I used this setup with the addition of the beauty dish and reflector positioned as in Setup 2 (Figure 2.15).
FIGURE 2.14
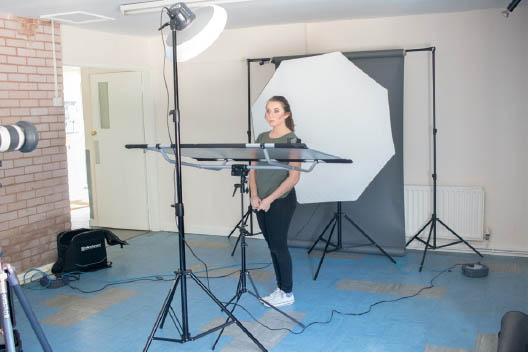
FIGURE 2.15
Oh, and let me share a random tip that I use when photographing someone in front of a light source like this. Invariably, doing so results in your model’s ears lighting up (Figure 2.16), so one thing you can do to combat this is to stick a piece of gaffers tape behind their ears (Figure 2.17). This might sound a little crazy and you might get a few odd stares, but it’ll save you a heck of a lot of time in post-production. Just don’t forget to tell your model to remove it when you’re done.

FIGURE 2.16
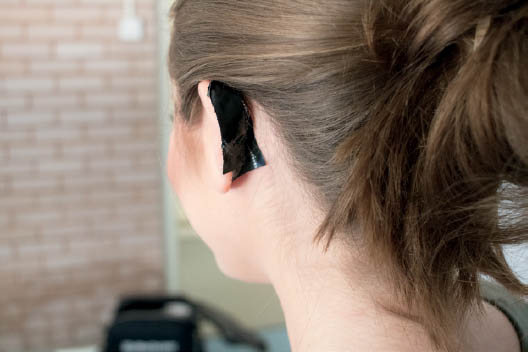
FIGURE 2.17
Okay, now that we’ve gone through some basic setups and seen a few examples of how we can look at shadows, highlights, and catch lights to get a good idea of the lighting setup used, let’s take a look at some finished images from my own portfolio.
PICTURE 1
You wouldn’t be wrong if you guessed that two light sources were used to create this picture (Figure 2.18). One light produced the bright highlight on the model’s face and the highlights running down the arm and front of his coat (A), and another, coming from camera left, caused the shadow of the dog to fall on the model’s coat (B).

FIGURE 2.18
The actual setup is shown in Figure 2.19. I positioned one light at camera right, aimed at the model. I positioned a silver reflector at camera left to bounce light back onto the model. A light positioned at camera left would have worked great as well; the only reason I didn’t use one was because the power cable was not long enough to reach the one power source we had on location.

FIGURE 2.19
This is a great example of how post-production can hide the evidence of light sources. In the native image you could clearly see the silver reflector in the front wing of the car so I used Photoshop to remove it.
PICTURE 2
For Figure 2.20 I used just one light source positioned to the side (camera left) and slightly in front of the subjects. I placed it up high and angled down slightly, just as in Setup 5.

FIGURE 2.20
We can tell how the lights were positioned by looking at the highlights and shadows on most of the faces. Notice how the camera-left side of each face is lit and the camera-right side is in shadow, except for the area under each subject’s eye (A)?
We can also see that the light was positioned at camera left by examining the shadows cast onto the floor (B) and the shadow on the back of my nephew Will’s upper arm (C).
In the behind-the-scenes picture you can just about see the light source on the left-hand side (Figure 2.21).
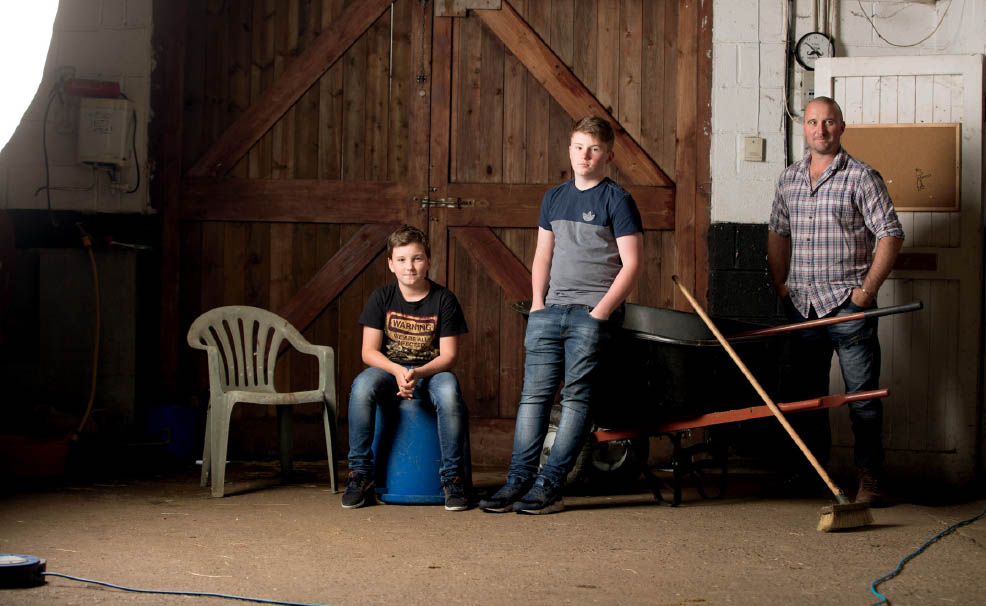
FIGURE 2.21
PICTURE 3
I used just one light source for Figure 2.22, which we can tell by looking at the shadows and highlights on the subject’s face. The camera-left side of his face is lit and camera-right side is darker, except for the light around his cheek and eye (A).
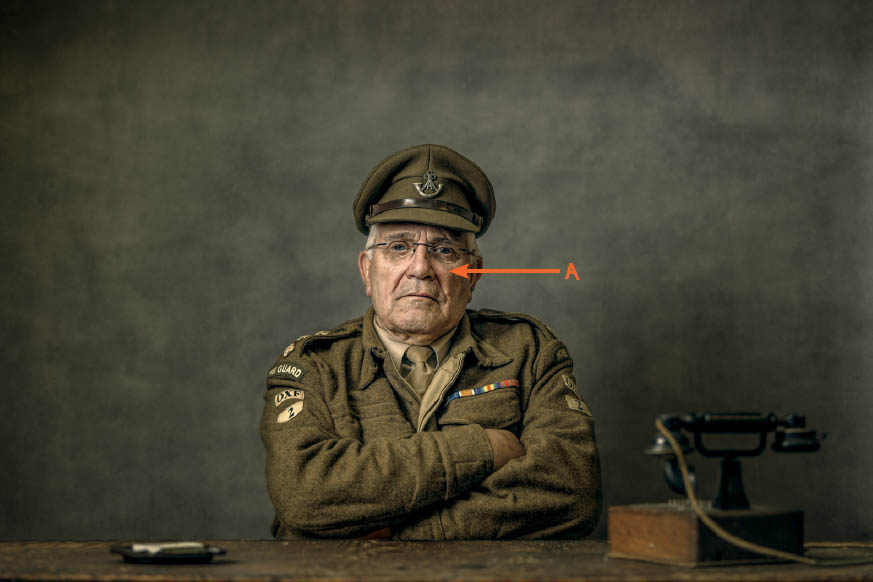
FIGURE 2.22
Going by what was covered in Setups 4 and 5, the light on the camera-right side of the subject’s face would suggest the light source was positioned at camera left and in front of the subject, and here’s a behind-the-scenes picture to prove it (Figure 2.23).

FIGURE 2.23
A similar setup was used for Figure 2.24, but on a much smaller scale. The subject, Steven Cook, was lit with a Phottix Mitros+ speedlight and the Rogue FlashBender 2 XL Pro (see chapter 3), which is a smaller light source, but because it was positioned very close to Steven it gave a softer light.

FIGURE 2.24
We can tell whether the light source was positioned higher than the model and angled down or placed directly to the side by considering the prominence of the nose shadow. When the light comes directly from the side we can see the nose shadow very clearly (Figure 2.25). When the light is positioned higher and angled down the nose shadow joins with the shadow around the cheek.

FIGURE 2.25
PICTURE 4
In Figure 2.26 we can see that two light sources were used: one lit the side of the model’s face furthest from camera (A) and the other lit the side of his face closest to the camera (B).

FIGURE 2.26
The setup for this started out very similar to Setup 3, with a light source—in this case, an Elinchrom Rotalux 135cm Octa—positioned directly to the side of the subject in the nine o’clock position. This would have left the side of his face nearest to the camera in shadow; however, another light was placed behind the model at camera right and aimed at that side of his face (Figure 2.27).

FIGURE 2.27
This is a great example of how moving around your subject to take photographs from different angles, rather than sticking to one camera position in front of the subject, can result in more picture options.
PICTURE 5
In this portrait of World Champion Bodybuilder Nigel St Lewis (Figure 2.28) we can see that two light sources have been used due to the fact that both the camera-left (A) and camera-right (B) sides of Nigel are being hit with light.
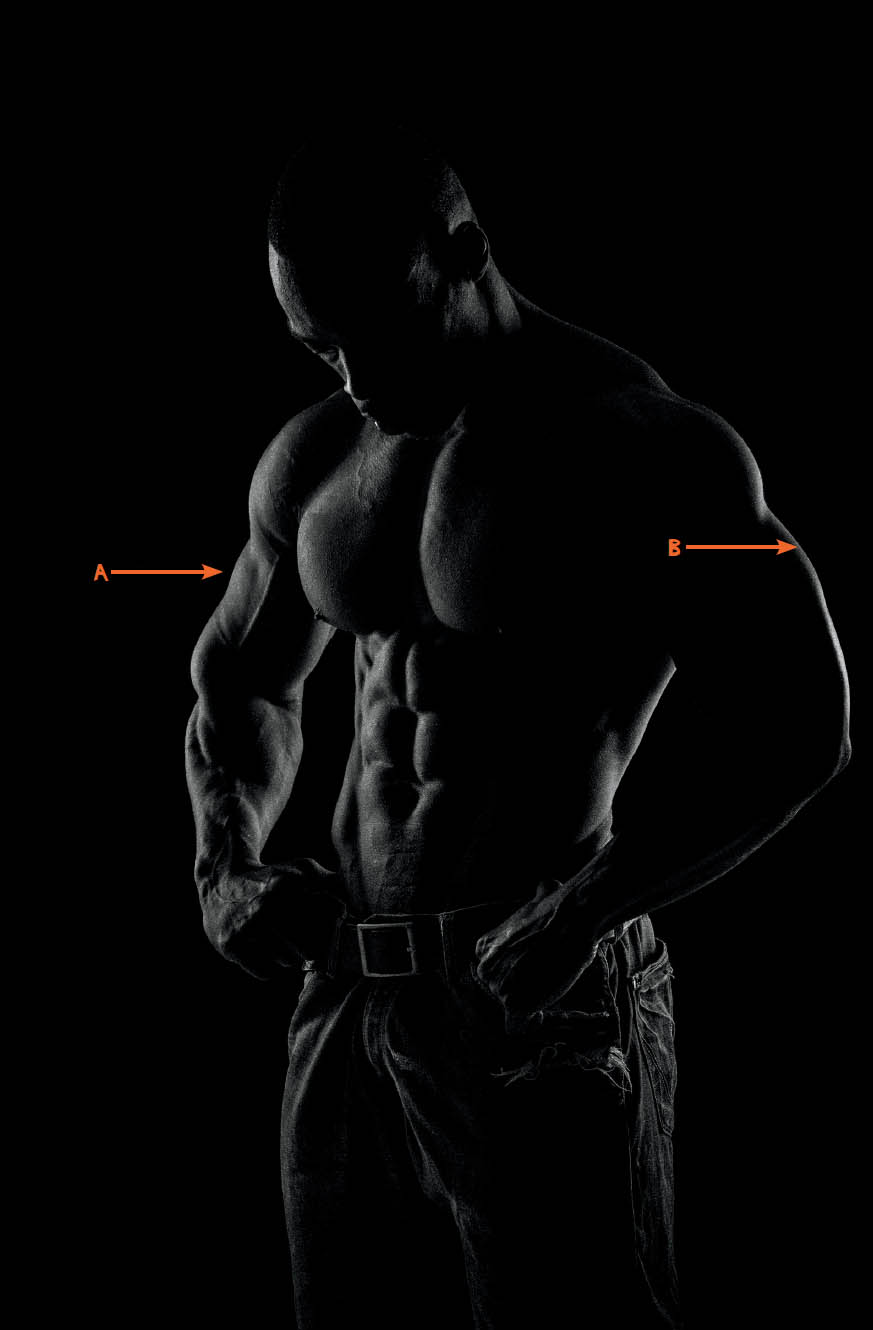
FIGURE 2.28
The light on both sides of the model is even from top to bottom. This is due to the use of strip boxes (Figure 2.29). The strip boxes were fitted with grids to avoid unwanted light spill, giving the light more direction and focus, which works perfectly on physique shots like this.

FIGURE 2.29
PICTURE 6
In this picture of boxer Nathan Graham (Figure 2.30) I used a single light source positioned higher than him at camera right. We can see that one main light was used because the light falls naturally in one direction. We can also see that the side of his face nearest the camera is lit and the side furthest from the camera is in shadow (A).
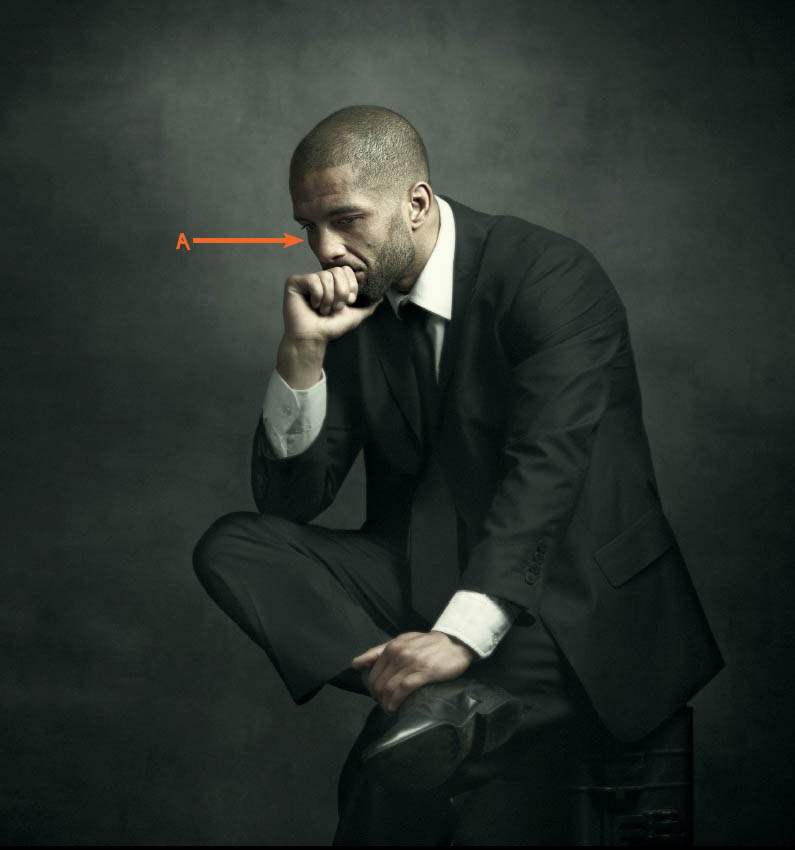
FIGURE 2.30
I also used a reflector (Figure 2.31) to bounce a little bit of light back onto Nathan because he was wearing dark clothing and the shadows were darker than I wanted. Of course, I could have used another light source on a very low power setting, instead.

FIGURE 2.31
PICTURE 7
When you first look at Figure 2.32 you could easily think that a large number of lights were used; however, this is another good example of how post-production can change the appearance of the lighting. In fact, just three lights were used to create this image.
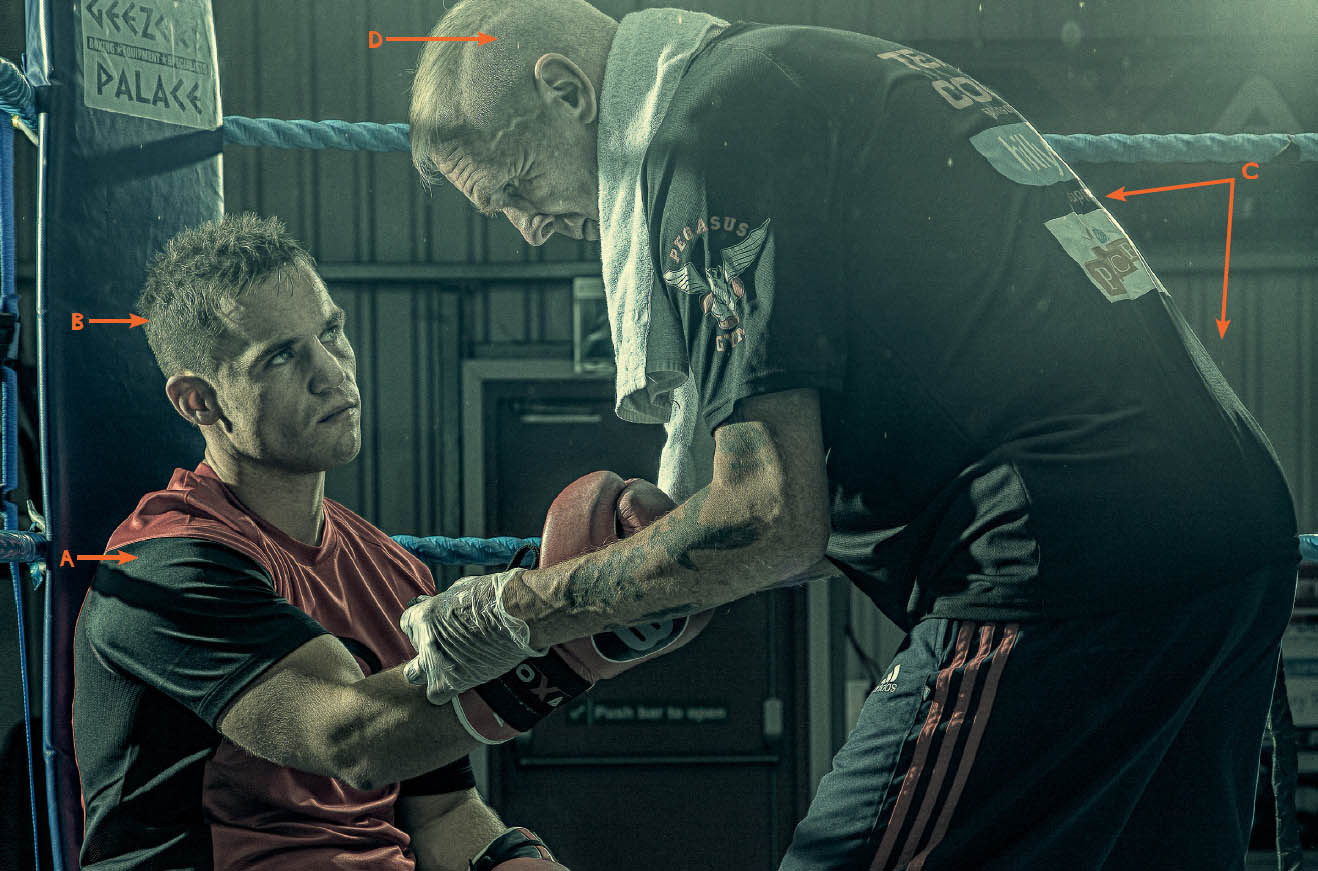
FIGURE 2.32
Let’s break it down by first looking at boxer Steven Cook on the left. We can see that there is a shadow being cast onto his shoulder and upper arm by the boxing ring rope (A), which would suggest that a light was positioned somewhere at camera left. This is backed up by the fact that there is light hitting the back and side of his head (B).
When we look at Coach Michael Zilles on the right we can see that his back is being lit (C), as is the back and top of his head (D). This would suggest that there was a light source positioned somewhere at camera right. This is backed up by the shadow we can see on the padding just above Steven’s head.
Two lights would have been sufficient, but I added a third light above the camera to fill in shadow areas on both Steven and Michael; otherwise, the picture would have been way too dark.
In the behind-the-scenes picture (Figure 2.33) you can see the lights at camera left and camera right. I fitted reflectors to the flash heads to mimic the kind of lighting you would get in a boxing arena.

FIGURE 2.33
PICTURE 8
Figure 2.34 shows the typical lighting style I use when photographing muscular physiques. Again, because of all the highlights and shadows, you could easily overthink the lighting setup, whereas, in fact, it is very simple.
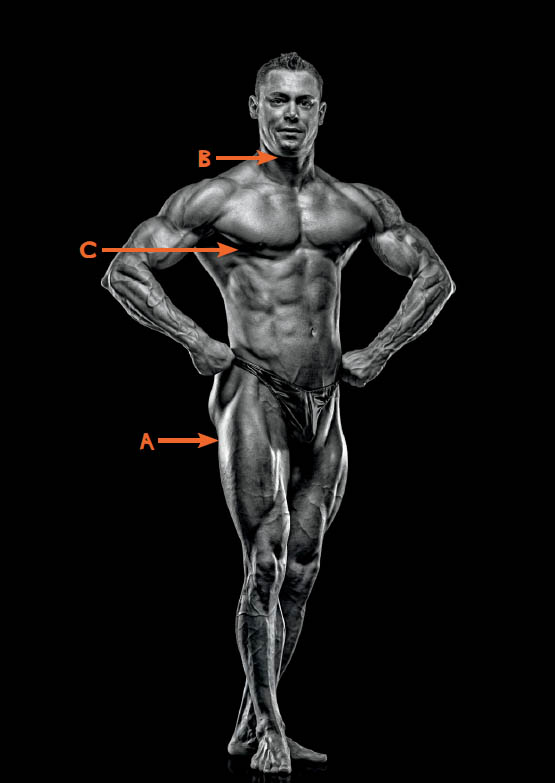
FIGURE 2.34
First of all, when we look at the outline of physique athlete James Borne’s body, we can see that the light around him (A) is brighter than that on the front of his body or his face. This suggests that he was being lit on either side, which is true—there was a strip box at camera left and one at camera right.
When we look the front of James we can see that the top of his head is lit and there is a shadow under his chin (B). There are also shadows underneath his chest muscles and armpits (C), which tells us there was a light source above James that was angled down.
Figure 2.35 is a behind-the-scenes picture showing the lighting setup.

FIGURE 2.35
You can see that there were two strip boxes on either side of the platform, and there was an Elinchrom Rotalux 135cm Octa overhead that was pointed directly down to the ground. This light was positioned about a half meter in front of where James stood. This light illuminates areas of the body that are pronounced and deepens the shadows on areas that are recessed. The result of this is like dodging and burning in-camera so that the muscle looks much more defined.
James was situated on a platform so that the reflector on the floor in front him was out of camera view but bounced a little bit of light back onto his lower body.
Note also that I removed the outer diffusion panels on each of the modifiers to create a light that is midway between soft and hard—a lighting style I prefer to use on muscular physiques.
PICTURE 9
This picture of physique athlete Glenn Richardson (Figure 2.36) is a bit misleading, to be honest, because there were actually no flash heads used. If you looked at this and thought there was a light aimed at his shoulders and back to produce the highlights on top of his shoulders, and maybe another light at the front of Glenn, you wouldn’t be wrong.
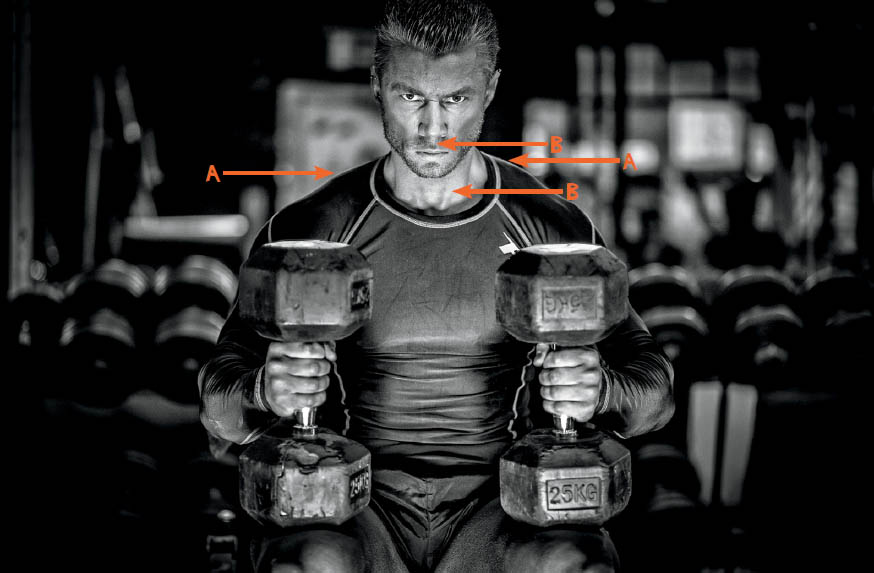
FIGURE 2.36
In fact, this was photographed using natural, ambient light, which is something I try to do as often as possible when I’m photographing in a gym so I cause as little disruption as possible.
The light on Glenn’s shoulders (A) comes from lights in the ceiling directly above him (Figure 2.37). The only other light is sunlight bounced off a silver reflector on the ground in front of Glenn, creating the uplighting effect. We can tell a light of some sort was aimed up toward Glenn because there are no shadows under his chin or nose (B).

FIGURE 2.37
So, now we’ve looked at just a few example pictures to get a feel for how they were lit. Reverse engineering pictures is a great exercise that can really help you gain a better understanding of light. Like I said before, the idea here isn’t necessarily to be spot-on with the lighting and which modifiers were used, because similar looks can be achieved in many different ways. However, being able to see where light is being used is a great way to replicate looks, and with that knowledge, go on to create something of your own.