
12 BOOK COVER INSPIRED
Creating this picture was very much one of those spur of the moment ideas that came to me on a day when I (unusually) had some down time. My wife had given me a copy of American Sniper (Figure 12.1), the autobiography of Chris Kyle. The book had since been made into a movie and I just happened to look at the cover image and thought it would be kind of cool to create my own version, just as a one off. I wanted give myself a challenge to see how I would shoot the photograph and then retouch it.
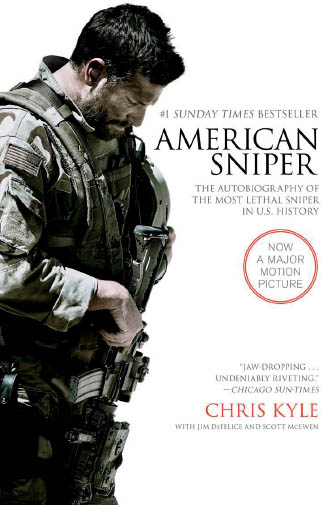
FIGURE 12.1
First things first, though, who would I photograph and where could I get access to authentic-looking military kit?
As luck would have it, my dear friend Barry (Figure 12.2)—who incidentally was the first person I ever photographed when I became interested in photography and lighting—happens to have connections with the United States military and lives not too far from me in the UK.

FIGURE 12.2 Barry, my first model
Rather than trying to explain what kind of picture I wanted to work on, I texted Barry the cover of the book to see if he’d like to be my model. After what must have been a nanosecond, he replied, “OH YES,” in uppercase letters. Barry was free right then, so I packed the car with some kit and headed off through the lanes to his house.
We took the photograph out in Barry’s back garden, and you’ll see a little later on how we set it up to get that pure-white background without the use of an artificial background and supports. We used a technique I stumbled across during one of my projects with kickboxer Steven Cook that I mentioned in chapter 1. Basically, it’s a two-light setup that can give you a background, rim lighting, and light your subject from the front. Oh, and in the post-processing section I’ll also show you a really cool way to use brushes in Photoshop to create fake facial hair (i.e., Barry’s beard).
Right, we’ve got lots to cover over the next few pages so let’s get started.
REVERSE ENGINEERING
I would hazard a guess that the picture on the cover of the book was actually taken outside, possibly on location during filming, or maybe it’s a still from the movie itself. The dominant light is coming from behind the subject, so I would suggest that he has his back to the sun. His front (his face, chest, etc.) is definitely in shadow.
We can see very defined lines where the highlight and shadow areas meet, especially on his neck around his ear and on his arm that is nearest the camera. Notice how the patch on his shoulder casts a shadow onto his arm. This shadow is angled from across, which would suggest the light source is coming in from behind and high above. Again, this suggests that he is being lit by the sun, which is a hard light source due to its distance from the subject.
THE SETUP
As it happens, the lighting in my image of Barry is slightly different than that of the image on the book cover, which I used more for inspiration rather than “stealing” the lighting style.
I wanted this picture to have the same white background, as if it had been shot in a studio in front of a seamless, white roll of paper. Since we shot the photograph in Barry’s backyard, I set up my Elinchrom Rotalux 175cm Octa Softbox and positioned him in front of it, and I used my Elinchrom Rotalux 135cm Octa Softbox to light him from the front (Figure 12.3).
I often use a softbox as a white background because it’s much more portable than background stands with paper rolls and it takes up less space. Naturally, it has it’s limitations in that it doesn’t work for full-length portraits, but for anything at around knee height and up, this large Octa works perfectly (Figure 12.4).

FIGURE 12.3
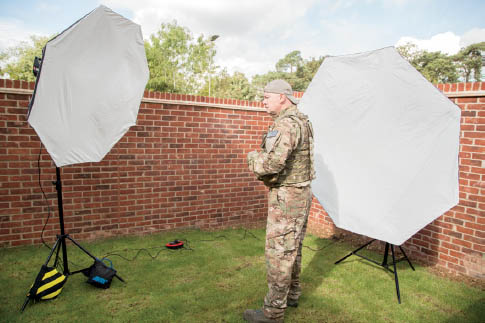
FIGURE 12.4
The technique for getting a clean, bright-white background is to meter the background light (Octa) at no more than two stops brighter than what would normally be a perfect exposure. For example, I photographed Barry at f/11 to ensure that he was entirely in focus. I metered the rear light at f/11, and then I increased the power of the light by two stops to give me approximately f/22.
I metered the front light at f/11 and then lowered the power by about half a stop. As you can see, I tend to use my light meter to get me to a good starting point, and then I make adjustments to suit exactly what I’m after.
In the behind-the-scenes pictures and lighting diagram (Figure 12.5) you can see how I positioned the lights. As I mentioned, I positioned one Octa behind Barry to create the white background and one to the side, but with Barry turned toward it so that the light on his face and body was even.

FIGURE 12.5
Positioning the Octa behind and quite close to Barry also adds rim lighting to either side (Figure 12.6). The further he steps away from the Octa, the less of a rim light there is, until eventually it disappears.

FIGURE 12.6
CAMERA SETTINGS
I shot in Manual mode and I chose to use an aperture of f/11 so that Barry would be sharp and in focus from the tip of his nose to the back of his head and beyond.
As mentioned in the setup section, I metered both the front and rear lights at f/11, and then increased the power of the rear light by around two stops to f/22 to ensure a clean, bright-white background. I lowered the power of the front light by around half a stop.
I kept the ISO as low as possible at ISO 100 and used a shutter speed of 1/125sec, which allowed just enough ambient light into the scene.
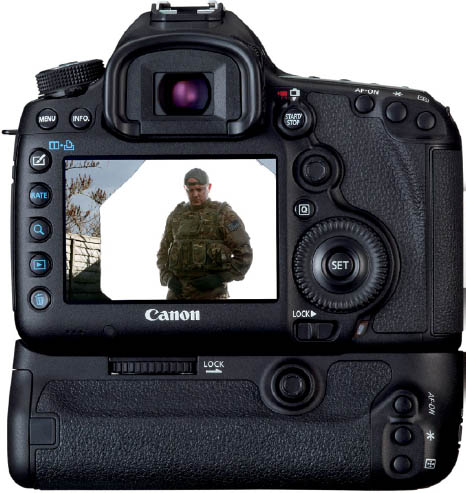
FIGURE 12.7
MODE Aperture Priority
ISO 100
APERTURE f/11.0
SHUTTER SPEED 1/125 sec.
LENS Canon 70–200mm f/2.8L IS II USM
GEAR GUIDE
For this shoot, I used an Elinchrom Rotalux 175cm Octa Softbox (Figure 12.8) and an Elinchrom Rotalux 135cm Octa Softbox (Figure 12.9).
The 175cm Octa is great for using as a background when you’re photographing anything from a head shot to around three-quarter length. You can extend the canvas in Photoshop with the Crop Tool and simply fill it with white (which we’ll do during the postprocessing section in this chapter) to make it as big as you like.
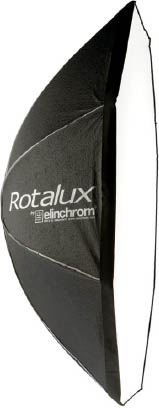
FIGURE 12.8

FIGURE 12.9
SMALL FLASH GEAR GUIDE
For those of you who are using small, battery-powered flashes such as Speedlights, I’ve put together an example of a kit you could use to create the same or similar look.
A large 60” shoot-through umbrella (Figure 12.10) would work great behind your subject.
However, you may find that you’ll need to do a little extra postprocessing to remove the umbrella framework (Figure 12.11). You can fix this easily by simply adding a new blank layer in Photoshop and painting over the framework with a round brush and a white foreground color.
For the front light you could use another 60” umbrella or maybe even the Lastolite Ezybox II Octa Large 1.2m (Figure 12.12).

FIGURE 12.10

FIGURE 12.11

FIGURE 12.12
POST-PROCESSING
The post-processing for this picture is actually quite straightforward. The main part of the retouch involves enhancing the details and giving the picture a grungy, gritty look that is so fitting for the subject.
We’ll be using brushes in Photoshop to add a beard onto Barry’s face and to create some smoke and dust. Brushes in Photoshop are an incredibly powerful tool, so I’d highly recommend that you start experimenting with them, if you haven’t already. As photographers, there are so many ways we can use them to refine our images.
We’ll also use the little trick I shared in chapter 7 for enhancing male physiques. It’s just one step, but it really does make a big difference.
So, although you may never end up making a picture exactly like this one, you’ll certainly learn some techniques that will come in handy for other pictures you may find yourself working on in the future.
Right, let’s get cracking.

NOTE Download the file you need to follow along step-by-step at: http://www.rockynook.com/photograph-like-a-thief-reference/
- 1. With the file open in Camera RAW, we’ll start by bringing back a bit of detail in the shadow areas. In the Basic tab, increase the Shadows slider to around +55 (Figure 12.13).
Next, we’ll add some sharpening. In the Detail tab under Sharpening, increase the Amount to 40 (Figure 12.14). Then hold down the Option key (Mac) or Alt key (PC) and drag the Masking slider to around 60. This determines where the sharpening is mainly applied, which is indicated by the white areas in Figure 12.15.
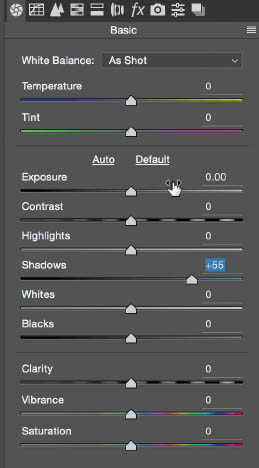
FIGURE 12.13
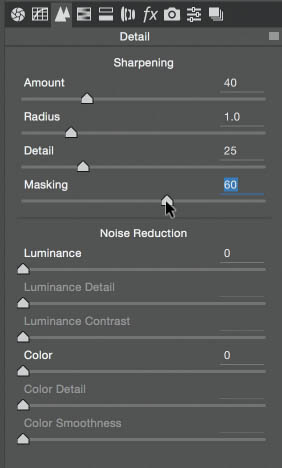
FIGURE 12.14

FIGURE 12.15
Release the Option key (Mac) or Alt key (PC) and click on Open Image at the bottom-right corner of the screen to send the image into Photoshop.
- 2. Go to Window > Info, and then without clicking down on the image, drag your cursor around the white area surrounding Barry, which in this case is our 175cm Octa. As you do so, look in the Info Properties and you’ll see that the RGB values are all 255, which is pure white (Figure 12.16).
Close the Info Properties and use the Lasso Tool to make a selection of the upper-right corner of the image (Figure 12.17). Hold down the Shift key and use the Lasso Tool to drag out a selection that encompasses the left side of the image (Figure 12.18). Make sure to overlap a little onto the Octa.
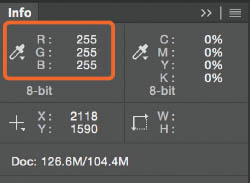
FIGURE 12.16

FIGURE 12.17

FIGURE 12.18
Now go to Edit > Fill, choose White from the Contents Menu (Figure 12.19), and click OK. This fills the selected areas, extending the background behind Barry (Figure 12.20).
Turn off the active selection by going to Select > Deselect, or by pressing Command + D (Mac) or Ctrl + D (PC).
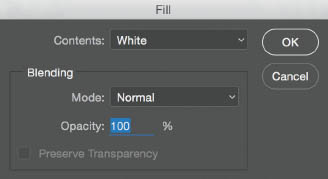
FIGURE 12.19

FIGURE 12.20
- 3. This next step is something I do when I’m working on pictures of males and looking to enhance their power and impact. It’s especially good for physique pictures.
Create a duplicate of the Background layer by pressing Command + J (Mac) or Ctrl + J (PC). Rename this layer “width” (Figure 12.21).
Then go to Edit > Free Transform, or press Command + T (Mac) or Ctrl + T (PC). In the options at the top of the screen, ensure that the chain icon linking the width (W) and the height (H) is not active, and then increase the width to 105% (Figure 12.22) and press Return (Mac) or Enter (PC).
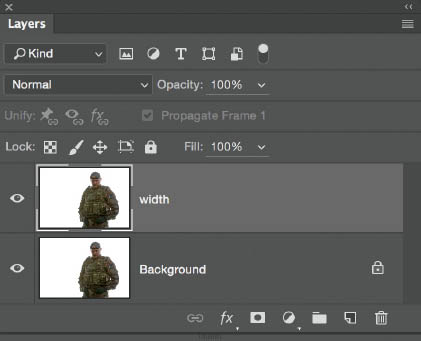
FIGURE 12.21

FIGURE 12.22
TIP When you add extra width, use an increase of no more than 5%; otherwise, you risk stretching your subject, making it look both obvious and a little, ermmm, strange.
If you turn the visibility of the width layer on and off by clicking on it’s eye icon in the Layers panel, you can see that we’ve increased the width of Barry, but not to the point that it looks fake.
- 4. We’re going to be using a couple of brushes while retouching this picture, but neither are included in Photoshop. However, one of them is free and the other is incredibly inexpensive and comes with a bunch of additional brushes from my buddy Aaron Blaise.
Aaron is an artist in the true sense of the word, having worked at Disney for around 20 years on movies such as The Lion King, Pocahontas, and Beauty and the Beast, to name just a few. He also directed the movie Brother Bear. He’s an insanely talented guy who is incredibly open and willing to share his techniques and teach others. He has created all manner of brushes—ranging from special effects brushes to create snow and debris to brushes that mimic hair and fur—that you can purchase and download from his website (creatureartteacher.com) for use in Photoshop (Figure 12.23).
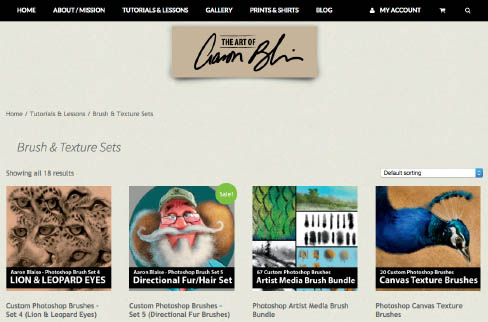
FIGURE 12.23
First, we’re going to use brush 344 from Aaron’s Directional Hair/Fur set (Figure 12.24) to give Barry a beard.
Without making any changes to the brush, press D on the keyboard to set the foreground and background colors to their defaults of black and white. Then create a new layer in the layer stack and rename it “beard” (Figure 12.25).
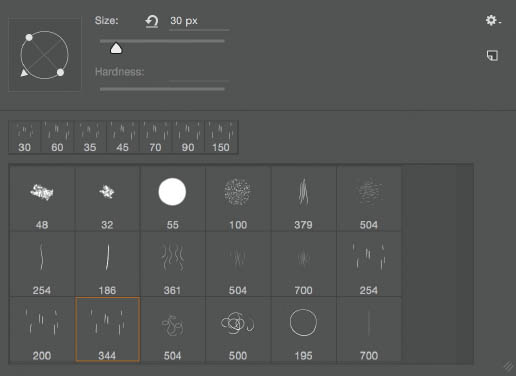
FIGURE 12.24
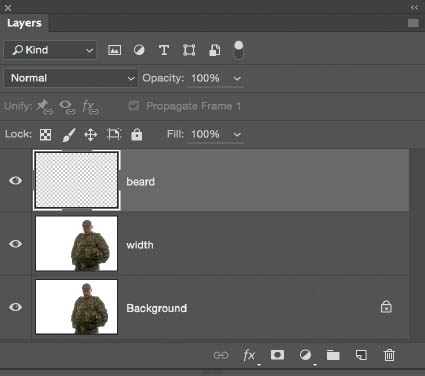
FIGURE 12.25
Using the right and left bracket keys to increase and decrease the size of the brush, paint a beard on Barry’s face (Figure 12.26).
If you go over the edges, simply use the Eraser Tool (E) to remove the mistake. Rather than using the default round eraser, you can go to the options at the top of the screen and change the shape of the eraser to match the brush you’re using. This way when you erase the parts you don’t want, the eraser will remove them in the shape of hair (Figure 12.27).
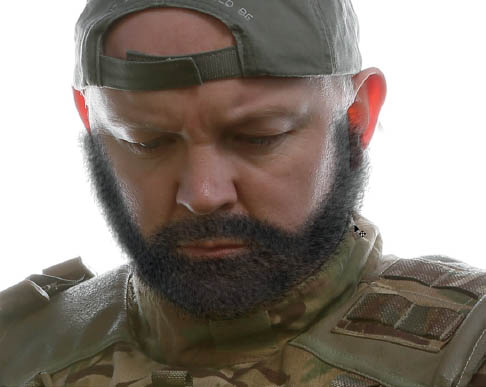
FIGURE 12.26

FIGURE 12.27
- 5. Add a Hue/Saturation adjustment layer to the top of the layer stack (above the beard layer). In the properties, ensure that the Clipping Mask is active so that the adjustments we make will only affect the beard layer below. Put a check in the Colorize checkbox, and then change Hue to 39, Saturation to 18, and Lightness to -20 to give Barry’s new beard a brownish color (Figure 12.28).
- 6. The beard looks like it’s been painted on and is very flat and two-dimensional, so we’ll do a little bit of dodging and burning so that it takes on the shape of Barry’s face.
Go to Layer > New > Layer, and in the New Layer properties, rename the layer “db beard” for dodge and burn beard. Select Soft Light from the Mode menu, check the box for Fill with Soft-Light-neutral color (50% gray), and click OK (Figure 12.29).

FIGURE 12.28

FIGURE 12.29
Now use the Dodge and Burn Tools as I showed in chapter 4 (page 66) to brighten and darken areas around the beard to add some depth and dimension. Remember, you can toggle between the Dodge Tool and Burn Tool by simply holding down the Option key (Mac) or Alt key (PC). This allows you to maintain the same settings for both tools.
In Figure 12.30 you can see where I added some dodging and burning. To see only the gray layer you’re working on, hold down the Option key (Mac) or Alt key (PC) and click on the eye icon next to the gray (db beard) layer in the Layers panel. This will turn every other layer off. To go back to normal view, hold down the Option key (Mac) or Alt key (PC) again and click where the eye icon for the gray (db beard) layer would be.
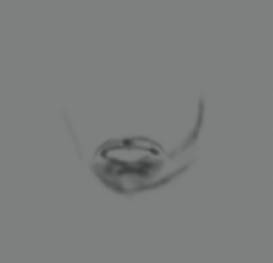
FIGURE 12.30
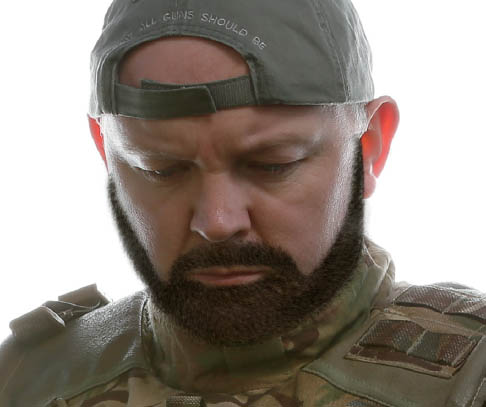
FIGURE 12.31 Before dodging and burning
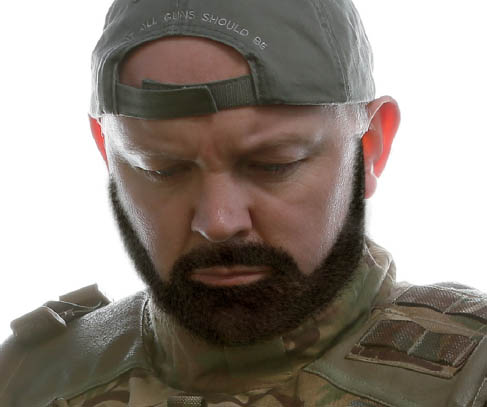
FIGURE 12.32 After dodging and burning
- 7. Click on the width layer in the Layers panel (Figure 12.33) and use the Lasso Tool to draw a selection around the American Flag (Figure 12.34).
Press the Q key to enter Quick Mask mode, and then go to Filter > Blur > Gaussian Blur. Add in a Radius of 2 pixels and click OK (Figure 12.35). Press Q to exit Quick Mask mode.

TIP When you have an active selection and then enter Quick Mask mode, this is a great way to feather your selection by simply adding blur. This technique takes the guesswork out of determining how much to feather your selection because you can see it.
Press Command + J (Mac) or Ctrl + J (PC) to add a new layer containing this selection of the arm badge, and then rename the layer “arm badge.” Hold down the Command key (Mac) or Ctrl key (PC) and press the right bracket key three times to put the arm badge layer at the top of the layer stack (Figure 12.36).

FIGURE 12.33
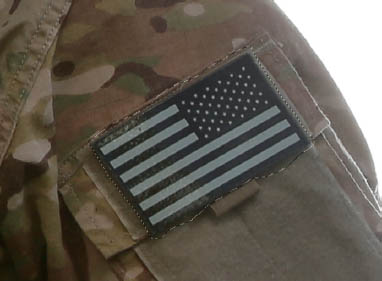
FIGURE 12.34
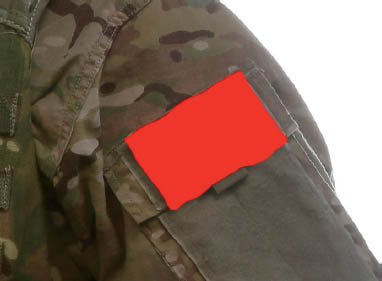
FIGURE 12.35
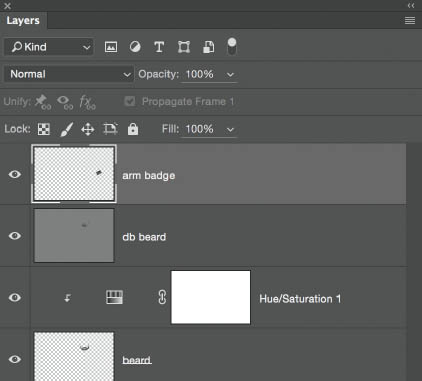
FIGURE 12.36
- 8. Go to Edit > Transform > Flip Horizontal (Figure 12.37), and then to Edit > Free Transform to bring up the transform handles. Position your cursor outside of the handles and click and drag to rotate the patch into place (Figure 12.38). Press Return (Mac) or Enter (PC).

FIGURE 12.37
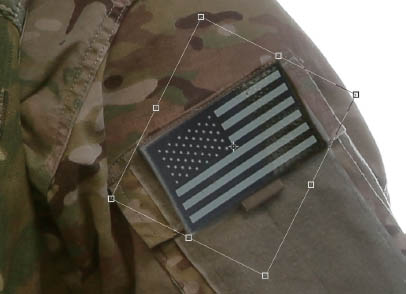
FIGURE 12.38
Now add a Layer Mask to the arm badge layer. With a black foreground color and a round, soft-edged brush, paint around the arm badge to blend it in by revealing original shadows that may now be underneath it and maybe even some stitching (Figure 12.39).

FIGURE 12.39
- 9. Let’s look at increasing the details to add a bit of drama and grunge to our picture. Up until fairly recently, I used a plugin from Topaz Labs called Topaz Details that is great for this, but there’s also a technique we can use in Photoshop that is very good. I’ll go through the Photoshop technique, which I first saw being demonstrated by German photographer Calvin Hollywood. I don’t tend to use it much now, but if you want to add a gritty look to your pictures this works great.
Start off by adding a merged layer to the top of the layer stack. To do this, go to Select > All, then Edit > Copy Merged, and then Edit > Paste. Next, create a duplicate of this layer by pressing Command + J (Mac) or Ctrl + J (PC). Finally, hold down the Shift key and click on the first merged layer (Figure 12.40) so that both layers are selected.

FIGURE 12.40
Press Command + G (Mac) or Ctrl + G (PC) to put the layers into a group. Rename the group “details” (Figure 12.41).
Change the Blend Mode of the group from Pass Through to Overlay (Figure 12.42), and then click on the uppermost layer in the group and change its Blend Mode to Vivid Light (Figure 12.43).
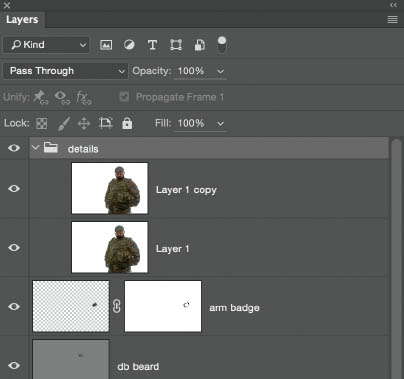
FIGURE 12.41
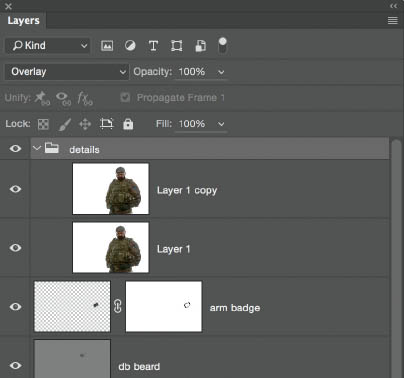
FIGURE 12.42

FIGURE 12.43
- 10. With the uppermost layer still selected, go to Image > Adjustments > Invert. We are going to use a filter to increase the details in the image, so we’ll convert this layer to a Smart Object so that we can change the settings at a later stage, if necessary. Go to Filter > Convert for Smart Filters (Figure 12.44).
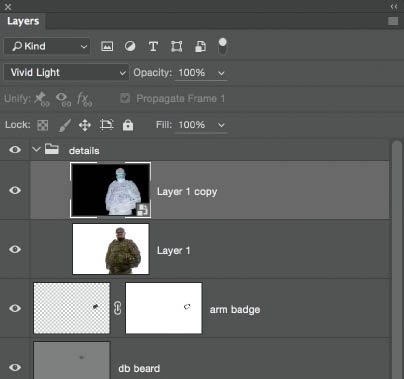
FIGURE 12.44
- 11. Go to Filter > Blur > Surface Blur (Figure 12.45), and in the properties, add in a Radius of 40 pixels and a Threshold of 15 levels and click OK (Figure 12.46).

FIGURE 12.45

FIGURE 12.46

FIGURE 12.47 Before adding the Surface Blur filter

FIGURE 12.48 After adding the Surface Blur filter
- 12. I want to add even more grit to this picture, which I’ll do by increasing the contrast with the Topaz Clarity plugin.
Add a merged layer to the top of the layer stack and rename it “contrast.” Then go to Filter > Topaz Labs > Topaz Clarity (Figure 12.49).
In the Topaz Clarity window on the right side of the screen, make the following adjustments: Micro Contrast 0.35, Low Contrast 0.19, and Medium Contrast 0.05 (Figure 12.50). Click OK.

FIGURE 12.49
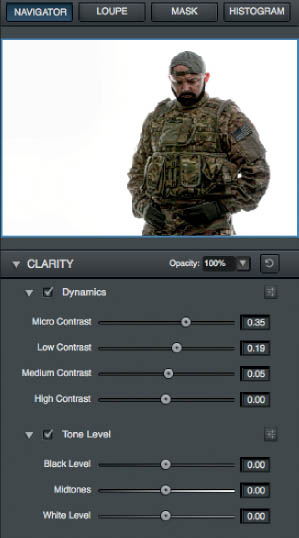
FIGURE 12.50
- 13. Once you’re back in Photoshop, hold down the Option key (Mac) or Alt key (PC) and click to add a Layer Mask. This adds a black Layer Mask, which hides the contrast that was added to the entire picture. Since we only want it on Barry’s face and hat, choose a white foreground color and then use a round, soft-edged brush to paint over Barry’s face and reveal the contrast.

FIGURE 12.51 Before increasing contrast with Topaz Clarity

FIGURE 12.52 After increasing contrast with Topaz Clarity
- 14. Add a blank layer to the top of the layer stack and rename it “flare.” With a white foreground color and a round, soft-edged brush, press once on Barry’s left shoulder (Figure 12.53).
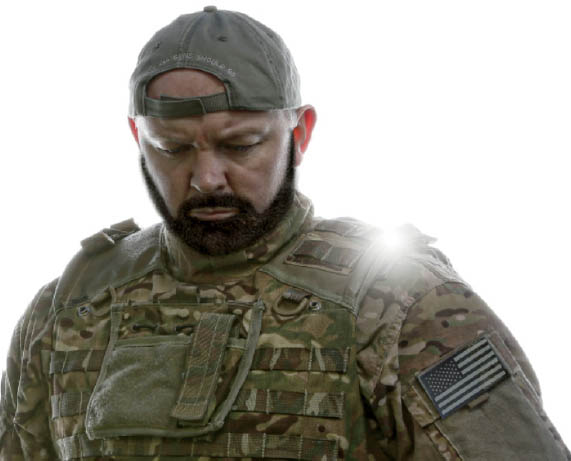
FIGURE 12.53
Go to Edit > Free Transform, and then hold down Shift + Option (Mac) or Shift + Alt (PC) and drag outward on a corner transform handle to increase the size of the flare. Press Return (Mac) or Enter (PC). Use the Move Tool (V) to click and drag the flare into position so that it’s mainly over Barry’s shoulder and just touching his face (Figure 12.54).
- 15. After taking a short break from the screen and coming back to the image with fresh eyes, I think we need to add a little more contrast. Add a merged layer to the top of the layer stack and rename it “contrast 2.” Then use whatever technique you like to add some contrast to the image (see chapter 4, page 60). I’ll use Topaz Clarity and increase Micro Contrast to 0.38, Low Contrast to 0.13, and Medium Contrast to 0.03 (Figure 12.55).
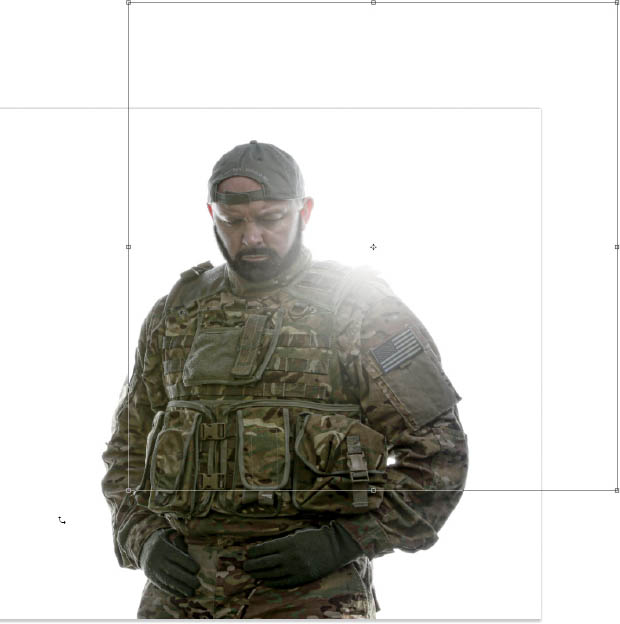
FIGURE 12.54

FIGURE 12.55
- 16. Now we’ll do the black-and-white conversion. There is a seemingly unlimited number of ways to do this in Photoshop and with third-party plugins. We’ll use Photoshop this time, so press D to set the foreground and background colors to their defaults of black and white, and then click to add a Gradient Map adjustment layer (Figure 12.56).

FIGURE 12.56
This does a pretty good job straight out the gate, but we’ll bring back just a little of the color by lowering the Opacity of the Gradient Map adjustment layer to 80% (Figure 12.57).
- 17. With all the contrast that’s been added, I think the shadow areas have gone a little too far toward the dark side. To fix this, click to add a Levels adjustment layer (Figure 12.58), in the Levels adjustment properties, drag the black Output Levels marker to the right until it reads 40 (Figure 12.59).
With the Levels adjustment layer mask active, use a black foreground color and a round, soft-edged brush set to 100% Opacity to paint over Barry’s face and remove the effect of the Levels adjustment layer (Figure 12.60).
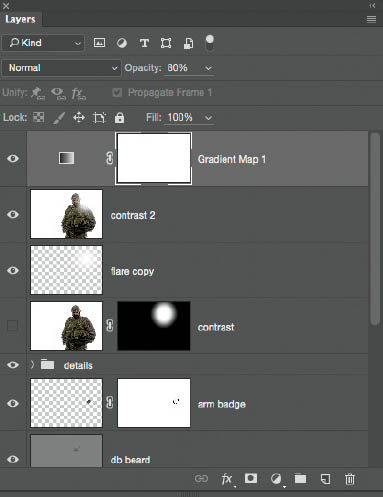
FIGURE 12.57

FIGURE 12.58
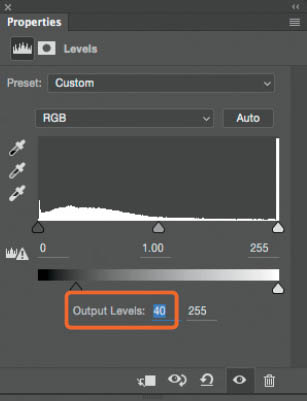
FIGURE 12.59
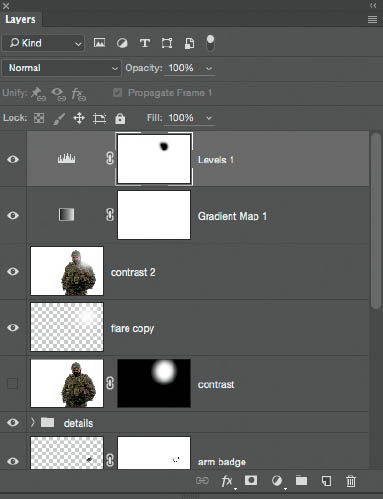
FIGURE 12.60
- 18. The last thing we’ll do is add in some smoke and dust. Again, there are lots of ways to do this, but one of the most effective and flexible ways is by using Photoshop brushes. The very best brushes (by far) for this kind of effect were recommended to me by my friend Uli Staiger, a digital artist based in Germany. What makes them even better is that they are completely free. You can download the xplosion brush set at: http://bit.ly/PLAT_brushes.
Once you’ve installed the xplosion brush set, add a new layer to the top of the layer stack and rename it “smoke.” Choose brush 217 from the Brush Preset Picker (Figure 12.61), and then click to open the Brush panel. In the Brush Tip Shape section, increase Spacing to 33% (Figure 12.62). In the Shape Dynamics section, set Size Jitter to 100% and Angle Jitter to 100% (Figure 12.63). In the Transfer section, set Opacity Jitter to 100% and Flow Jitter to 30% (Figure 12.64).
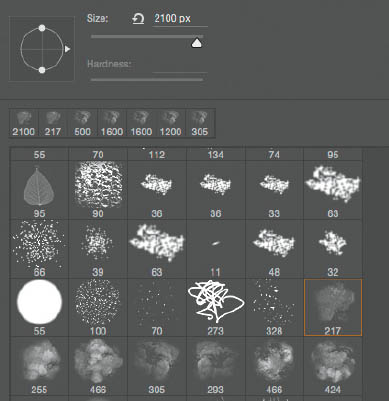
FIGURE 12.61
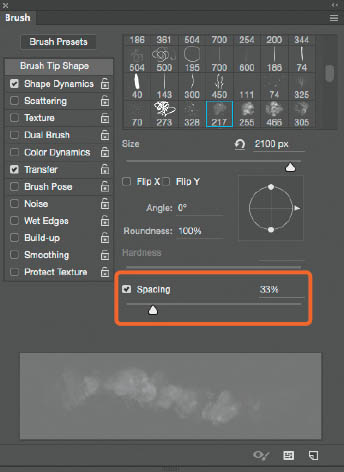
FIGURE 12.62
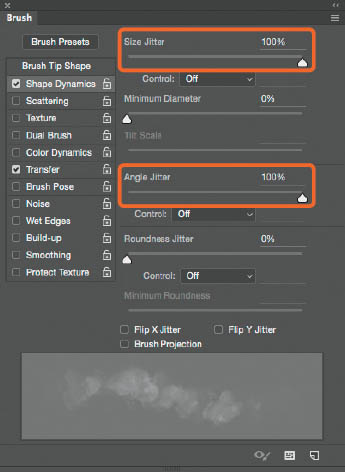
FIGURE 12.63
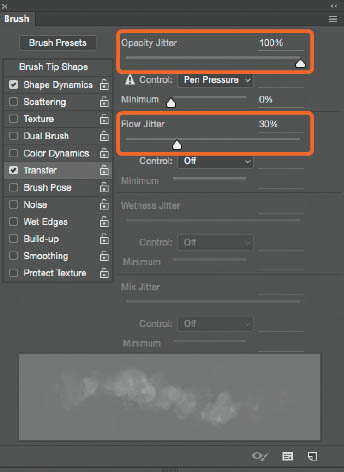
FIGURE 12.64
- 19. Finally, with a black foreground color, start painting around the lower portion of the picture to lay down some smoke. Because the smoke is on its own layer, we can lower the Opacity of the layer to get the exact look we’re after (Figure 12.65).
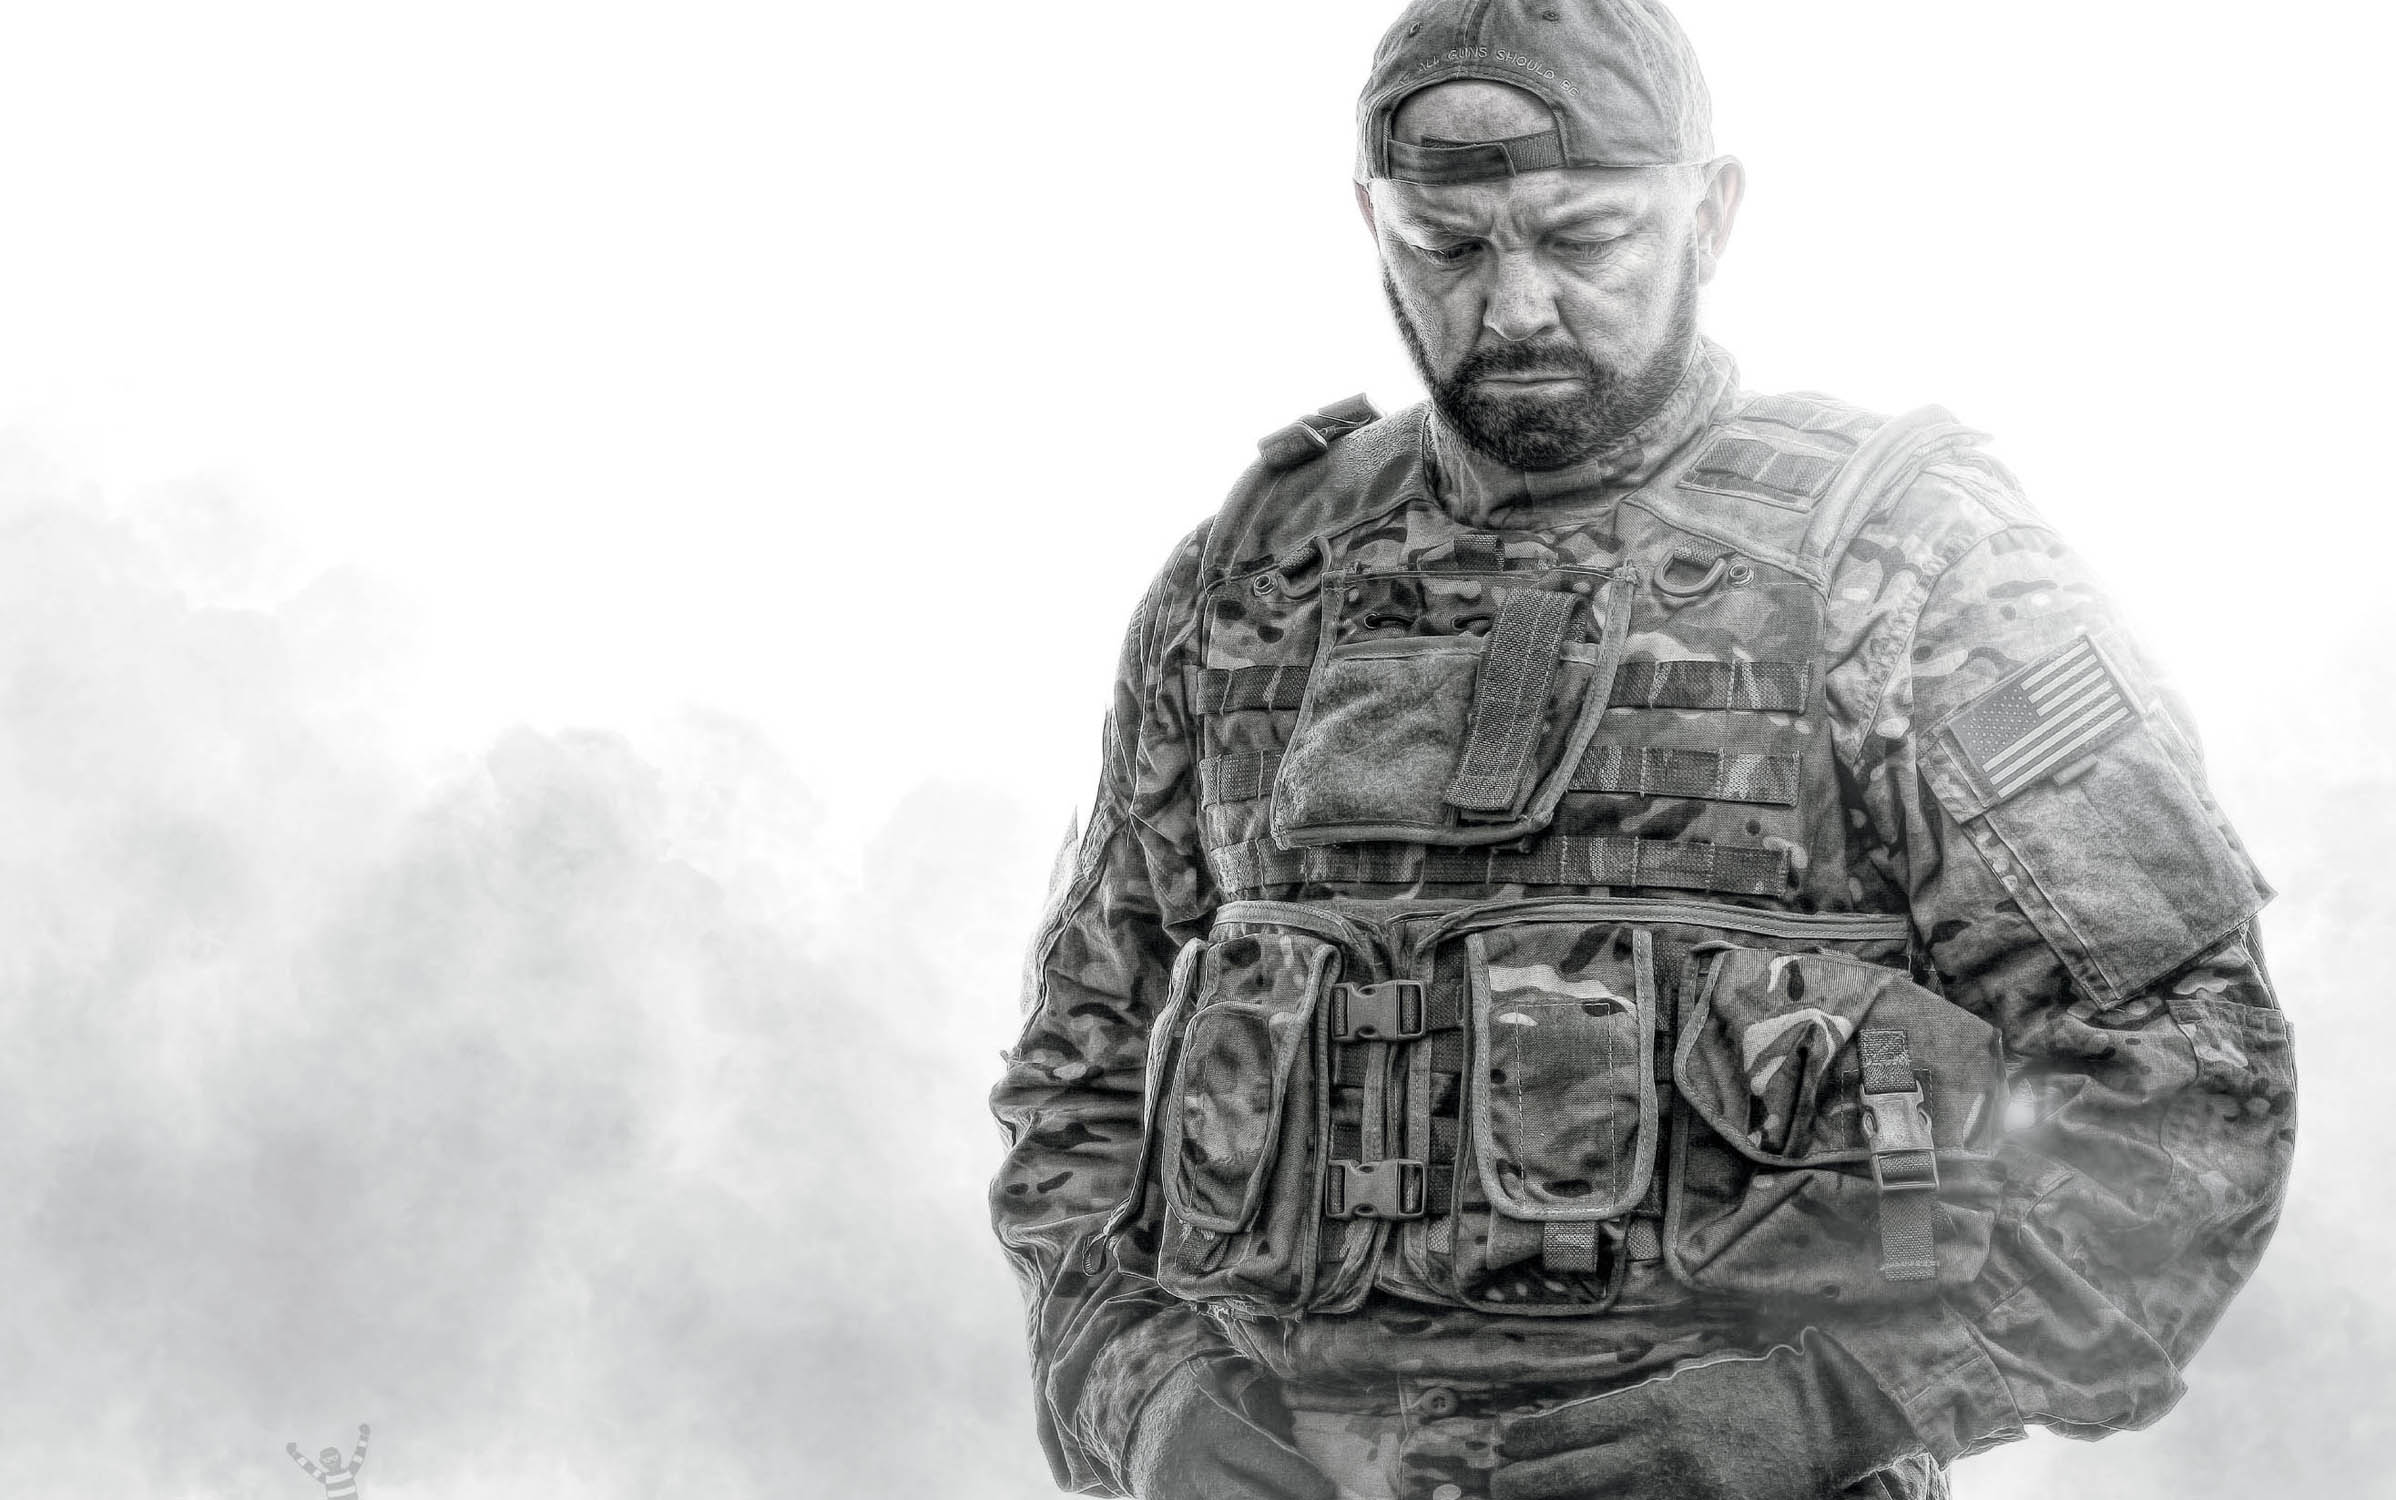
FIGURE 12.65 Final retouched image