6 INTERNET INSPIRED
I’ve always been an animal lover. When I was young my parents had what’s called a smallholding here in the UK, which is a small, self-sufficient farm with just a few livestock such as cows, sheep, goats, and, of course, the obligatory chickens roaming free.
Photographing wildlife is something I haven’t done often enough. I keep telling myself that I should just take off for a few days with a tent and supplies and go into the countryside to photograph nature and take some time out—yeah, that’s my idea of bliss for sure.
I’ve never been on a safari, although it is high up on my wish list, but I started a personal project some time ago where I photograph animals in captivity, such as in wildlife parks and zoos. Then I use Photoshop to cut them out of their surroundings, create scenes that look like their natural habitats, and place them in those scenes. In my mind, this sets them free, if that makes sense. In chapter 10 I’ll take you through one of these pictures, which was inspired by the work of wildlife photographer Nick Brandt.
One picture I wanted to create, although not part of my Animals project, was of a stag out in the Highlands of Scotland, amongst the heather with mountains in the distance. With this image in mind, I headed out with a friend to a nearby farm during the mating season to photograph a stag. I planned to later go to Scotland to photograph the scenery so I could put the images together, but this never happened. For some reason, I lost the motivation to work on the image, despite having taken the stag photographs, and I ended up putting it on the back burner for another day.
One day I happened to be browsing wildlife photographs on the 500px website and on the website of my friend Moose Peterson, who is a photographer and Nikon Ambassador. I often browse 500px and the websites of other photographers whose work I love, not just to see great images, but also to look for inspiration.
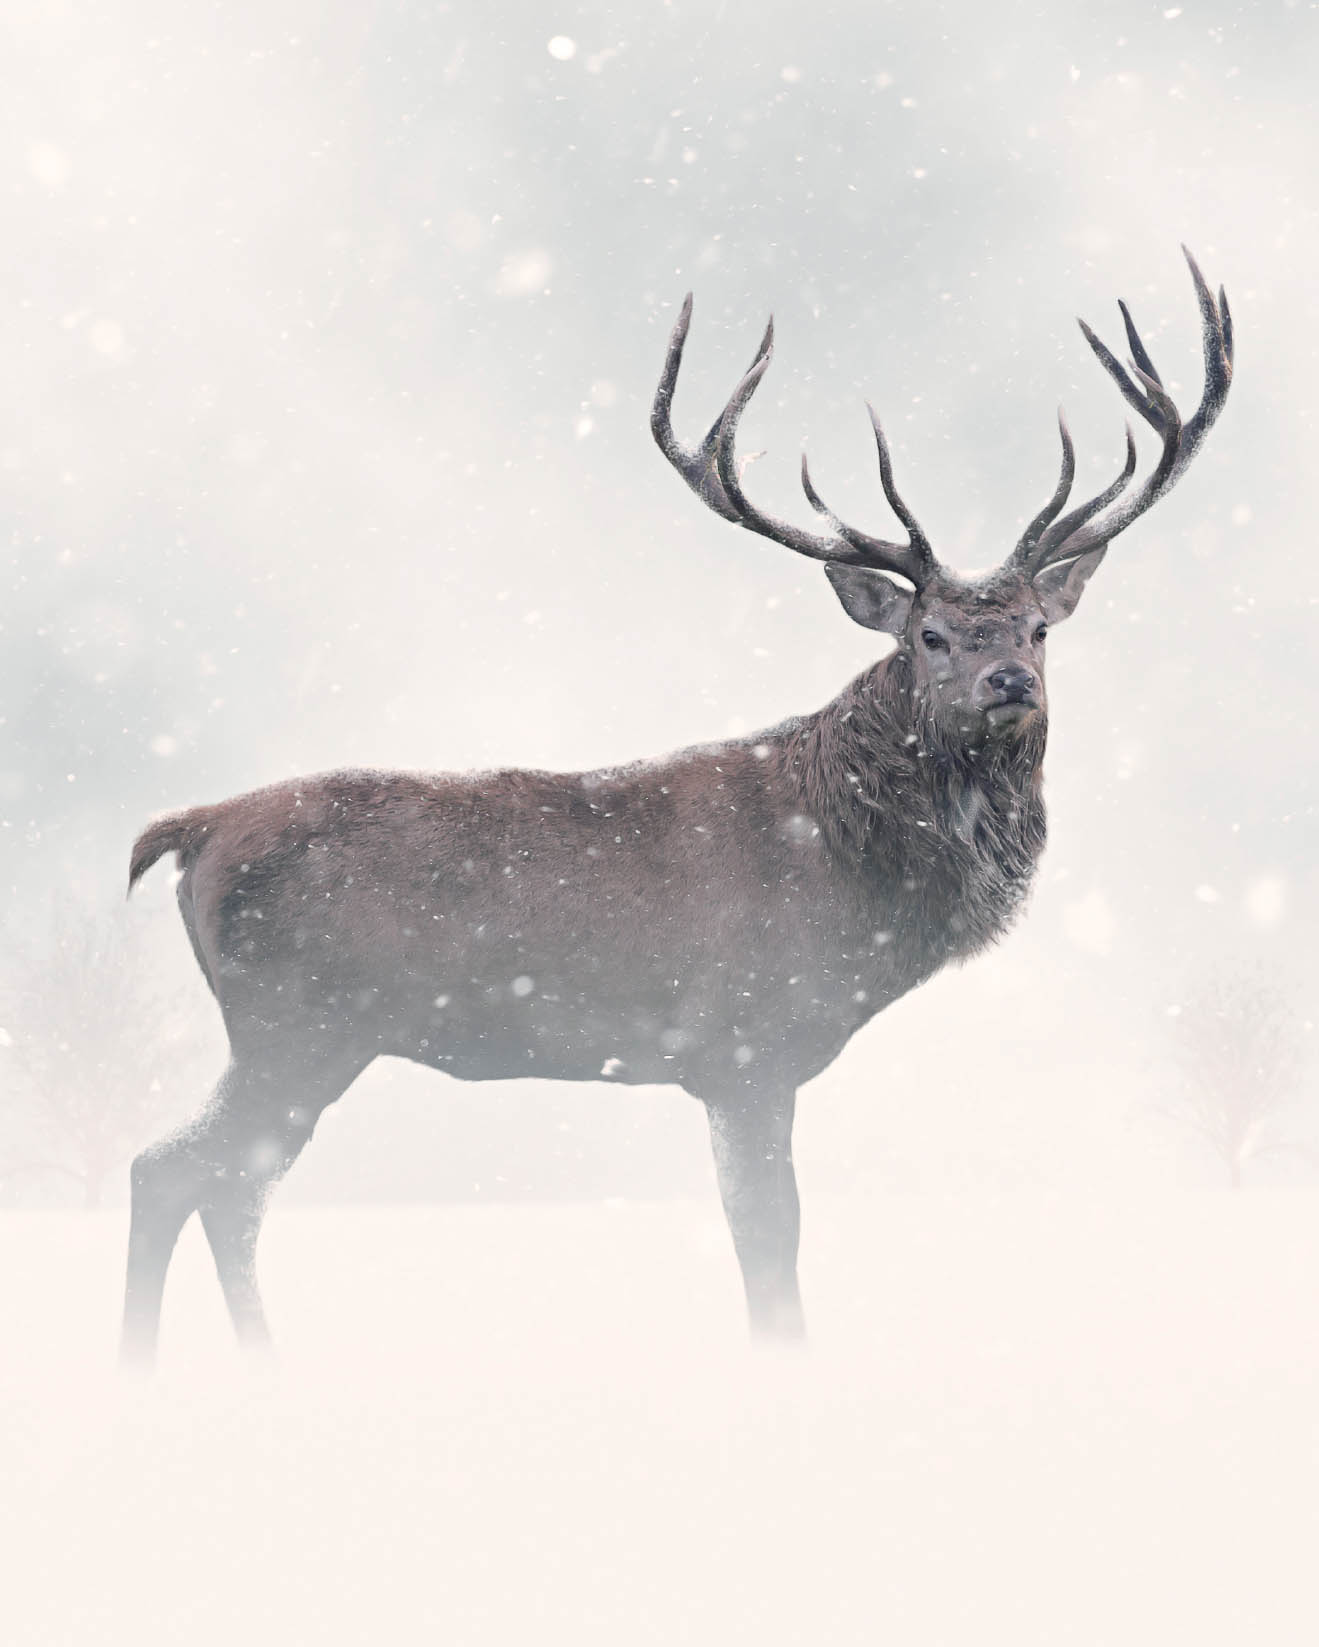
One particular wildlife photograph that Moose had taken stuck with me. It is a photograph of a bison in the middle of what looks like a pretty fearsome blizzard (Figure 6.1). It is truly a beautiful image and it immediately made me think of my photographs of the stag, inspiring me to create a picture of the stag in the snow instead of the expected Scottish Highlands scene.
FIGURE 6.1 Photograph © Moose Peterson
REVERSE ENGINEERING
There’s actually nothing to reverse engineer for this chapter because there’s no particular picture from which we’re looking to copy elements like lighting. However, this is a good opportunity to talk about observing.
Without a doubt, one of the best things you can do as a photographer and digital artist, especially when creating composite images like we are in this chapter, is to get outside and observe your surroundings. Examine how shadows behave, look at their characteristics, look at reflections, look at what happens to the color of distant objects, and on and on.
Taking the time to regularly observe what “real life” is like, as opposed to guessing what something should look like, can save you a ton of time in post-production and will take your images to the next level (to use a well-known phrase).
For example, I shot Figure 6.2 purely to make use of the sky in a future picture, but let’s look at it for a moment. Look at the distant trees and hills and notice how in addition to being out of focus, they also have a blue color cast, whereas the foreground is much warmer. This kind of information is vital when it comes to putting your images together and making them believable.
FIGURE 6.2
In this chapter, we’re going to create a snow scene. Notice how in the bison picture the lighting is even and soft. Light is reflected from the white snow, filling in shadow areas and making the scene brighter. It may be a little difficult to see here, but the moving snowflakes nearest the camera are much larger and blurrier than those further into the picture, which is to be expected. And, of course, there’s a subtle cool tint to the image that makes us feel cold just looking at it.
We can use all of this information to create our own believable snow scene, as you’ll see in the following pages.
CAMERA SETTINGS
I knew I was going to cut the deer out of its original background in post-production, and the light wasn’t particularly bright when I shot the photograph, so I chose an aperture of f/2.8.
I set the camera to Aperture Priority mode so it would only change the shutter speed. An ISO of 640 gave me a shutter speed in the 1/1000s range, which would pretty much guarantee a tack-sharp frozen deer even if it decided to move. As for focusing, I set the camera to Servo mode so that it would constantly react as I tracked the deer.
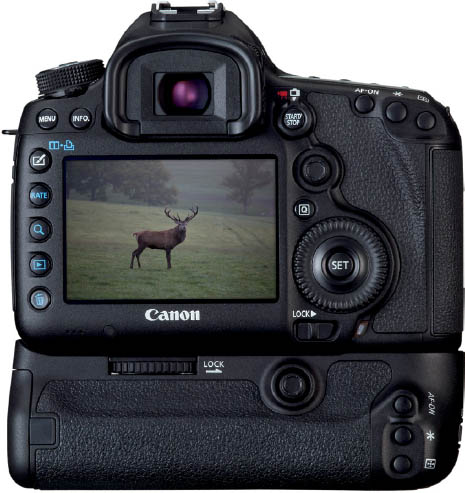
FIGURE 6.3
MODE Aperture Priority
ISO 640
APERTURE f/2.8
SHUTTER SPEED 1/1000 sec.
LENS Canon 70–200mm f/2.8 IS II USM
GEAR GUIDE
There isn’t much to cover in terms of gear because it was just me and my camera (Figures 6.4 and 6.5).
Had I thought about it, I most certainly would have used a monopod or even a tripod when photographing the stag, but I was with a large group and didn’t know how much space we’d have and . . . yeah, I know, it sounds like I’m making excuses.

FIGURE 6.4 Canon EOS 5D Mark III

FIGURE 6.5 Canon 70–200mm f/2.8L IS II USM
POST-PROCESSING
There’s quite a few steps involved in taking this picture from the original selection and cutout to the final snow scene. We’ll start off in Adobe Photoshop Lightroom, but if you don’t use Lightroom you can follow the exact same steps in Adobe Camera RAW. Once we’ve completed the RAW conversion, we’ll head over to Photoshop to build the image up step-by-step and create effects that simulate real life so our final image is believable. We’ll use Smart Filters and Adjustment layers so we can dive in and make changes later if we need to, without having to redo lots of steps.
Once you’ve gone through the steps in this chapter, why not create a snow scene using your own pictures? Instead of the deer you could insert your family members or the family dog.

NOTE Download the image file you need to follow along step-by-step at: http://www.rockynook.com/photograph-like-a-thief-reference/
- 1. We’ll start with the original, out-of-camera picture. Although we’re going to be doing a cutout a little later on, there’s just a few things we need to tidy up to give us the best starting point.
Grab the Crop Tool (R) and bring in the sides, top, and bottom so that there is a smaller frame around the deer (Figure 6.6). Then bring your cursor outside of the crop handles and drag up to rotate and straighten the image (Figure 6.7).
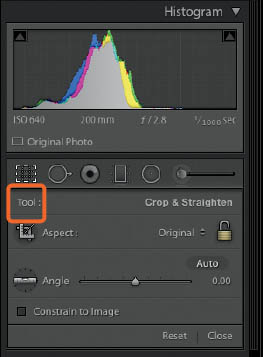
FIGURE 6.6

FIGURE 6.7
- 2. Now we need to bring out a little more detail in the deer. Even though the deer will be partially obscured by snow in the final image, the image will improve if the shadow areas reveal a bit more and the overall brightness of the deer is increased.
In the Basic tab, start by increasing the Exposure slider to around +0.55 and the Shadows slider to +65 (Figure 6.8). The adjustment caused by the Shadows slider is subtle, but it does tend to flatten the image out, so we’ll move the Clarity slider to around +20 to bring back a little midtone contrast.
- 3. Next we’ll sharpen the image. Click on the Detail tab, and in the Sharpening section, increase the Amount to around 35 (Figure 6.9). Then hold down the Option key (Mac) or Alt key (PC) and click and drag the Masking slider to the right. When we do this our image turns black and white, with black indicating areas that are not being sharpened and white indicating those that are (Figure 6.10). The further right we drag the Masking slider, the more we restrict where the sharpening is applied. Since we want the sharpening mainly confined to the deer, dragging the slider to around 77 will be just fine.
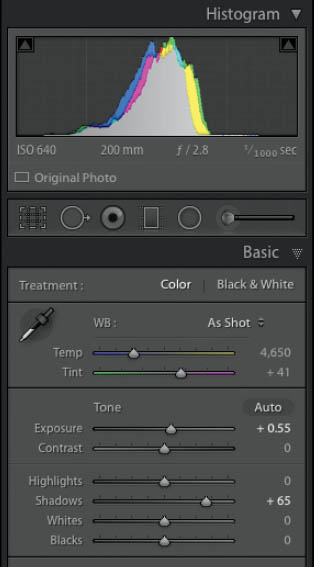
FIGURE 6.8
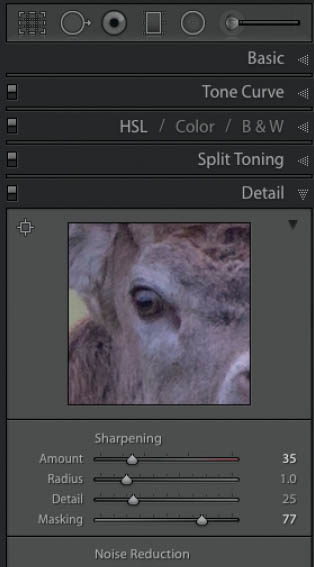
FIGURE 6.9

FIGURE 6.10 In the Masking view, white indicates areas where sharpening is applied
- 4. Because we increased the Exposure and Shadow sliders and added some sharpening, there’s some noise in the picture. Before heading over to Photoshop, zoom in with a ratio of 2:1 (Figure 6.11) to enlarge the deer on the screen and the noise will become more noticeable. In the Detail tab, under Noise Reduction, increase the Luminance value to around 25, the Radius to 60, and the Contrast to 20 (Figure 6.12).

FIGURE 6.11

FIGURE 6.12
Figures 6.13 and Figure 6.14 show the before and after versions of the deer image.
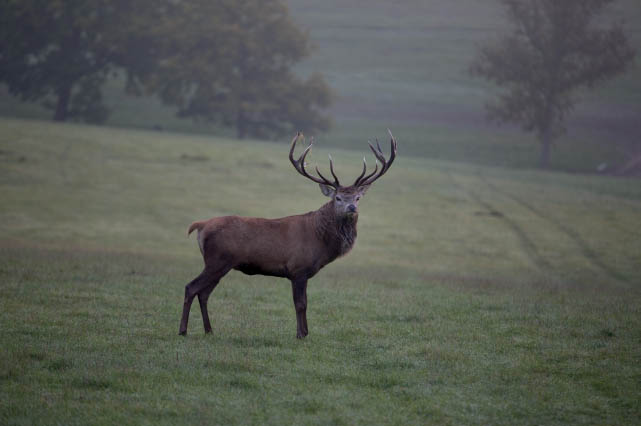
FIGURE 6.13 Before RAW Processing

FIGURE 6.14 After RAW processing and ready for Photoshop
- 5. Go to Photo > Edit In > Edit In Adobe Photoshop (Figure 6.15).
Now we’re going to make a selection and cut the deer out of its original background. With the Quick Selection Tool, start making a selection of the deer by clicking and dragging over it (Figure 6.16).
If the Quick Selection Tool has included any areas that you don’t want to select (Figure 6.17), hold down the Option key (Mac) or Alt key (PC) and drag the cursor over those areas to remove them from the selection (Figure 6.18).

FIGURE 6.15
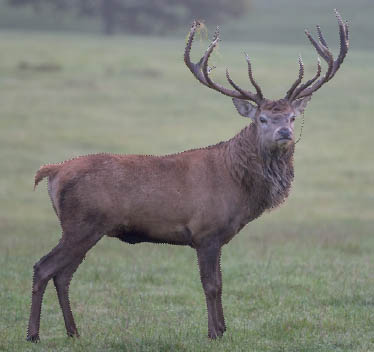
FIGURE 6.16
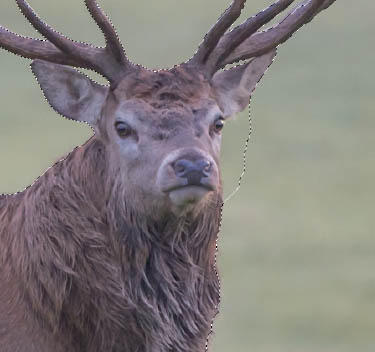
FIGURE 6.17 The Quick Selection Tool has included part of the background in the selection
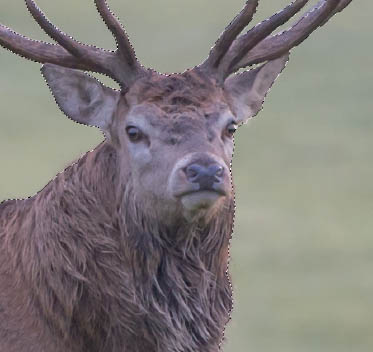
FIGURE 6.18 The background has been removed from the selection
NOTE Don’t expect to get a perfect selection with the Quick Selection Tool. Bright parts of the deer’s antlers and its fur are quite challenging, so we’ll be using other techniques to pick up those areas next.
- 6. Now that we’ve made as good of a selection as we can with the Quick Selection Tool (without spending too much time laboring over it), let’s finesse the selection. First, because getting to this stage has taken a little time, we’ll save the current selection by going Select > Save Selection (Figure 6.19). Name the selection “Deer 1” and click OK (Figure 6.20).
- 7. Double-click on the Quick Mask icon in the toolbar (Figure 6.21), make sure that Selected Areas is checked in the Quick Mask options (Figure 6.22), and click OK. Now you’ll see that the deer is covered with a red overlay, which makes it much easier to see and work with the selection.
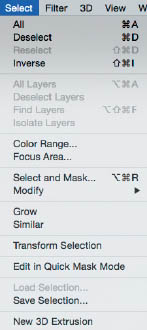
FIGURE 6.19

FIGURE 6.20
FIGURE 6.21
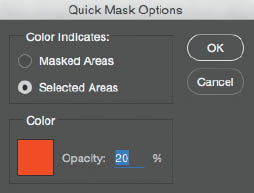
FIGURE 6.22

NOTE By default, Quick Mask is set to Masked Areas, which means the area that is NOT included in the selection is covered with the red overlay. I prefer it when the selected area is covered in the red overlay, but this is just a personal preference.
Choose a normal round brush (B) with a Hardness of about 90% (Figure 6.23), zoom in to the antlers, and start painting over them to add or remove areas from the selection. Don’t include the bit of grass hanging off of them.
Now that we’ve finished working on the antlers, press Q on the keyboard to exit Quick Mask mode and you’ll see the marching ants selection around the deer (Figure 6.26). Again, to be safe, save the selection by going Select > Save Selection. Name the selection “Deer 2” and click OK (Figure 6.27).
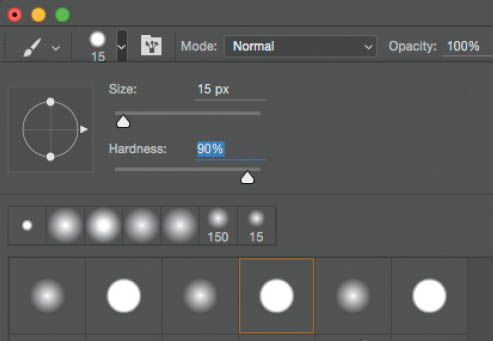
FIGURE 6.23

FIGURE 6.24 Painting an area black will add it to the selection (red overlay)

FIGURE 6.25 Painting an area white will remove it from the selection
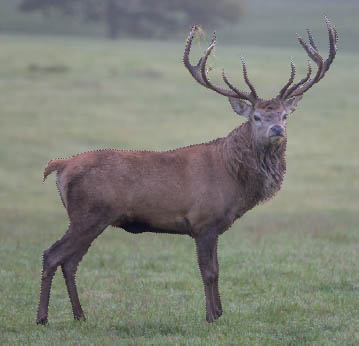
FIGURE 6.26

FIGURE 6.27
- 8. Press W on the keyboard to choose the Quick Selection Tool, and then click on Select and Mask in the options bar (Figure 6.28). (Note: If you are not using the subscription version of Photoshop, then click on Refine Edge.)
We’re not going to do much in here because I found that trying to pick up too many of the fine hairs affects the selection we’ve already been working on (especially if you turn on Smart Radius). With the Refine Edge Brush Tool, paint down the front of the deer (his neck) to pick up the fine hair in this area (Figure 6.29). Then paint around the deer’s tail, across the top of his back, and along his underside (Figure 6.30). Click OK to exit Select and Mask or Refine Edge.

FIGURE 6.28
FIGURE 6.29

FIGURE 6.30
- 9. Once again, let’s save the selection by going to Select > Save Selection. This time, name the selection “Deer Final” and click OK (Figure 6.31).
With the marching ants selection still active around the deer, click on the Layer Mask icon at the bottom of the Layers panel (Figure 6.32). This hides the background and gives us a cutout of the deer that we will add into the snow scene (Figure 6.33).
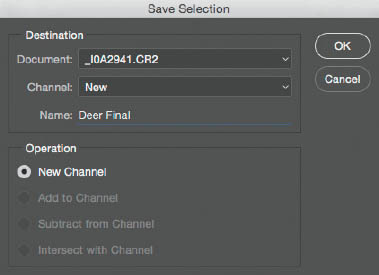
FIGURE 6.31
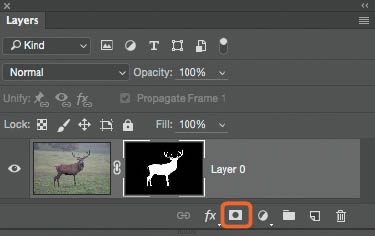
FIGURE 6.32 When a selection is active, clicking the Layer Mask icon hides everything outside of the selection
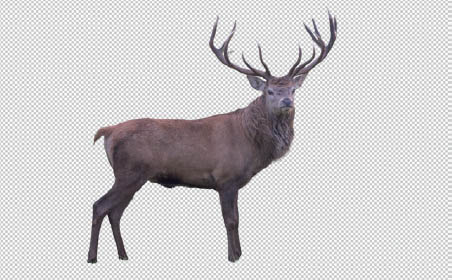
FIGURE 6.33 The deer cutout
- 10. Before we start building the new snow scene we’ll remove the remaining grass from the antlers. Click on the thumbnail of the deer in the Layers panel so that it is surrounded by the white frame. Grab the Clone Stamp Tool (S) (Figure 6.34) and uncheck the Aligned checkbox in the options bar at the top of the screen (Figure 6.35).
Hold down the Option key (Mac) or Alt key (PC) and click on areas of the antlers that have grass nearby to sample a clean area (Figure 6.36), and then clone over the grass (Figure 6.37). Keep Option-clicking (Mac) or Alt-clicking (PC) different areas to sample and clone so that the cloning doesn’t look repetitive and obvious.
FIGURE 6.34

FIGURE 6.35

FIGURE 6.36 Grass on the antlers from the original picture

FIGURE 6.37 The grass has been cloned away with the Clone Stamp Tool
NOTE We don’t have to be careful about cloning outside of the deer because the Layer Mask will hide it.
- 11. Rename this layer “Deer.” Go to Layer > New Fill Layer > Solid Color (Figure 6.38), name the layer “Sky,” and click OK.
Open the Color Picker and set the RGB values to R: 194, G: 206, and B: 210 (Figure 6.39), then click OK. Drag this Layer to position it beneath the Deer layer in the Layers panel (Figure 6.40).
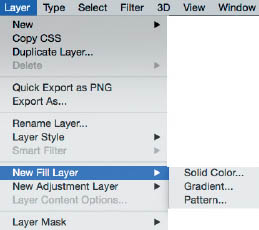
FIGURE 6.38
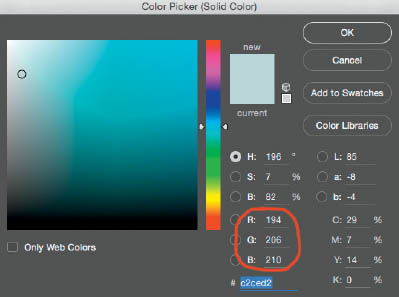
FIGURE 6.39

FIGURE 6.40
- 12. Hold down the Command key (Mac) or Ctrl key (PC) and click on the New Layer icon in the Layers panel to add a blank layer to the very bottom of the layer stack. Rename this layer “Background” (Figure 6.41). Choose the Crop Tool (C) and drag the crop handles outward to increase the canvas area. The grid intersections should be positioned approximately as they are in Figure 6.42. Press Return (Mac) or Enter (PC) to set the crop in place.
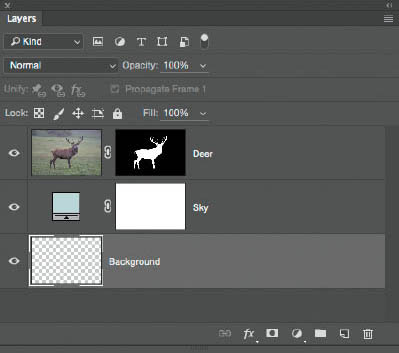
FIGURE 6.41

FIGURE 6.42 The Crop Tool can be used to increase the canvas size
- 13. Now we’ll add in the ground. Grab the Marquee Tool (M) from the toolbar and drag out a selection of the lower part of the picture. You can see in Figure 6.43 that I selected an area that extends from the bottom edge of the picture up to just above the deer’s knee joints. With the selection in place, go to Edit > Fill and select White from the Contents menu (Figure 6.44). Click OK, and then go to Select > Deselect.

FIGURE 6.43
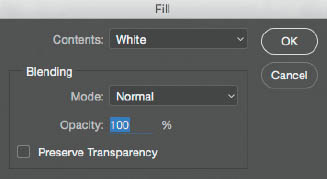
FIGURE 6.44
It’s very unlikely for a horizon line to be perfectly straight, so we’ll warp it a little bit in our picture to make it look more realistic. Go to Edit > Transform > Warp (Figure 6.45), and then click and drag inside the Warp grid to make the horizon line a little more wavy (not too much, though; Figure 6.46). Press Return (Mac) or Enter (PC) to set the line.
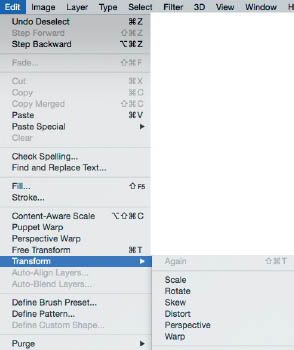
FIGURE 6.45

FIGURE 6.46

FIGURE 6.47 Before Warp – the horizon line looks too straight

FIGURE 6.48 After Warp – the horizon line looks more natural with a slight curve
- 14. Next we’ll blend the feet into the ground we’ve just created by making use of the Layer Mask on the Deer layer and a brush.
Press B to go to the Brush Tool, and in the options bar at the top of the screen, click to open the Brush Preset Picker (Figure 6.49). From there, choose Brush 59, which looks a spray-can effect (Figure 6.50).
We need to make some changes to the brush so that it behaves how we want it to, so open up the Brush panel (Figure 6.51). At the bottom of this panel we can see a real-time representation of what the brush will look like as we use it. Set Size to 125 px and Spacing to 7%.
Click on Shape Dynamics on the left side of the panel and increase Size Jitter to 14% (Figure 6.52). This controls the amount of variation between each brushstroke.

FIGURE 6.49
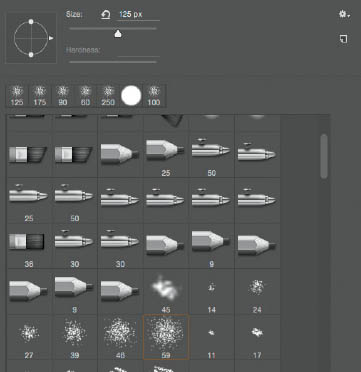
FIGURE 6.50

FIGURE 6.51
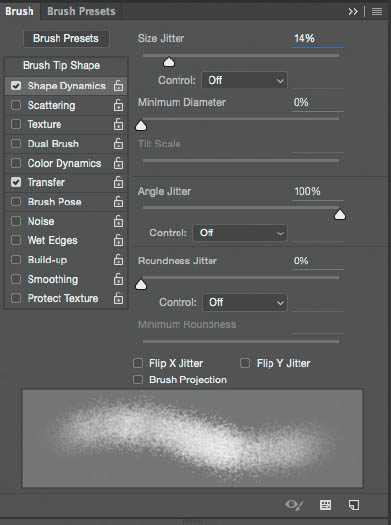
FIGURE 6.52
Finally, click on Transfer and increase Opacity Jitter to 100%. If you’re using a pressure-sensitive tablet and pen like those made by Wacom, turn on Pen Pressure (Figure 6.53).
Then simply zoom in on the lower portion of the picture, and with a black foreground color, use the brush we’ve created to apply a few strokes over the bottom of each leg to make it look like the deer is standing in snow (Figure 6.54 and Figure 6.55).
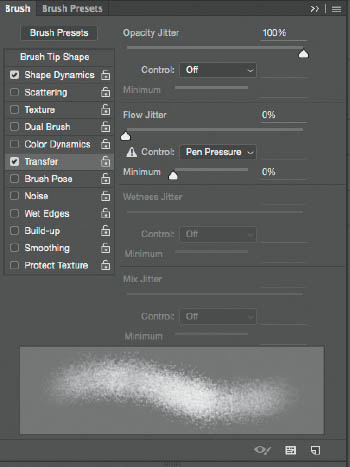
FIGURE 6.53

FIGURE 6.54 Before
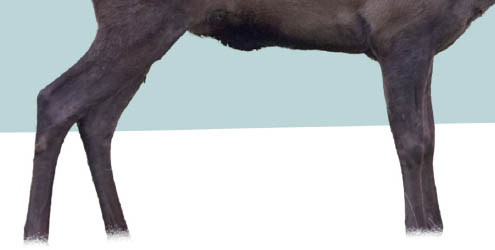
FIGURE 6.55 After
- 15. Hold down the Option key (Mac) or Alt key (PC) and click once on the Deer Layer Mask in the Layers panel to show it in the main part of the workspace. Choose the Blur Tool (Figure 6.56), and in the options bar, set Strength to 20% (Figure 6.57). Apply a few strokes over each of the deer’s hooves to blend the previous brushstrokes so they don’t look so hard and sharp (Figure 6.58). This will again add to the realistic look of the image.
Hold down the Option key (Mac) or Alt key (PC) and click once on the Layer Mask in the Layers panel to return to normal, full-color view.
FIGURE 6.56

FIGURE 6.57
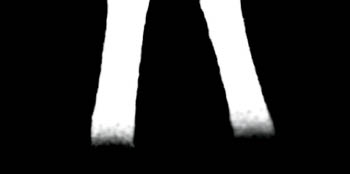
FIGURE 6.58 Blur the brushstrokes to help them blend in with the scene
- 16. Now we’re going to start adding in some trees in the distance. Click on the Sky layer in the Layers panel, and then add a new blank layer above it by clicking on the New Layer icon at the bottom of the Layers panel. Rename this layer “Tree – Left” (Figure 6.59).
I use the subscription-based version of Photoshop CC, which has tools that enable me to render all kinds of trees. I can control the branches, the amount of leaves, the color, and so much more. However, if you are using a standalone version of Photoshop, you’ll need to use a different method to add trees. You can use stock images or your own photographs, for example.
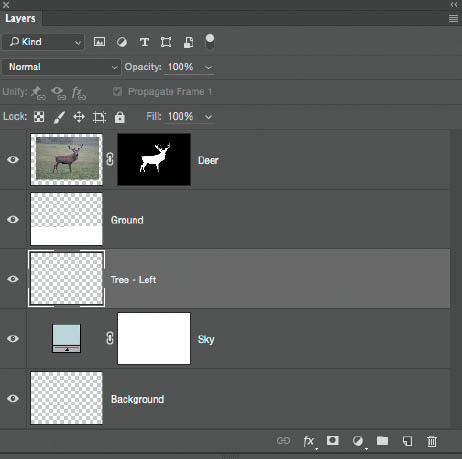
FIGURE 6.59
![]()
NOTE If you’re adding in stock images or your own photographs of trees, I have a great video on my YouTube channel that shows how to cut them out from their background. Just visit www.youtube.com/glyndewis, and check out Episode 76 in my Weekly Show Playlist.
If you’re using Photoshop CC, go to Filter > Render > Tree (Figure 6.60), and in the Base Tree Type menu choose 12: Ash Tree (Figure 6.61). Now we can make the tree look exactly how we want it to by adjusting the sliders as follows: Light Direction: 5; Leaves Amount: 2; Leaves Size: 101; Branches Height: 83; Branches Thickness: 107. Leave Default Leaves and Randomize Shapes checked, and then click OK.
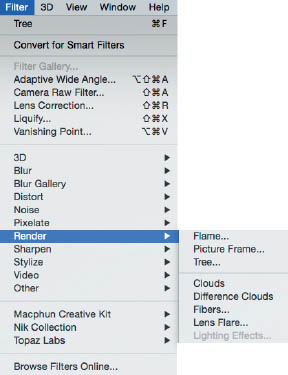
FIGURE 6.60
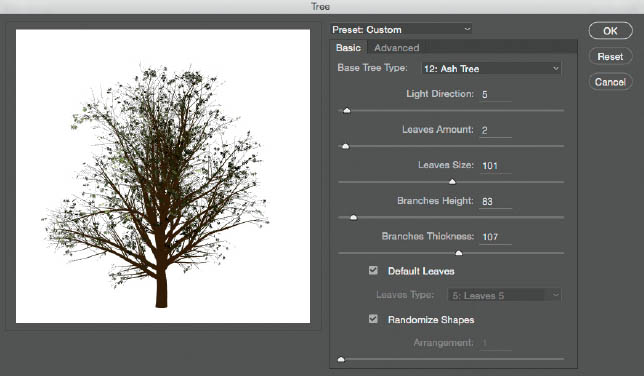
FIGURE 6.61 Adjusting the sliders changes the look of each type of tree
- 17. Resize the tree by going to Edit > Free Transform [or pressing Command + T (Mac) or Ctrl + T (PC)]. Hold down Shift + Option (Mac) or Shift + Alt (PC) and click on a corner handle and it drag inward. Reposition the tree to the left of the deer (Figure 6.62) and press Return (Mac) or Enter (PC).
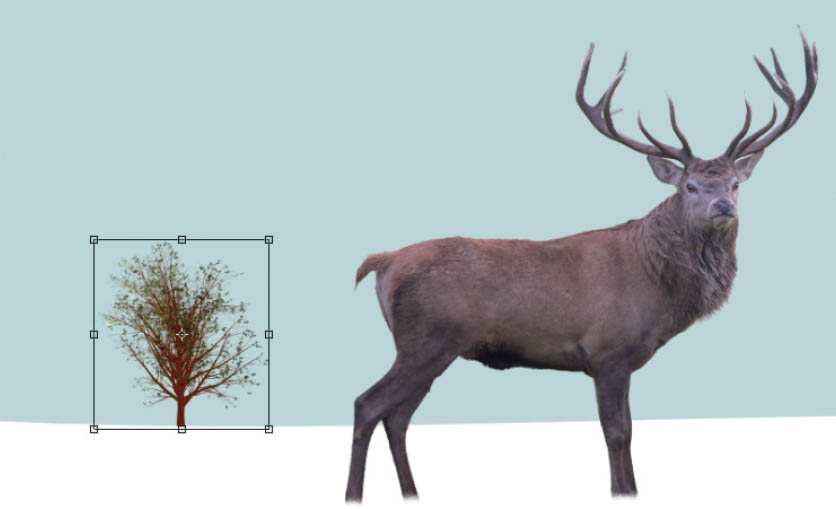
FIGURE 6.62
- 18. We need to make the tree darker since it is supposed to be way in the distance and we shouldn’t be able to see quite so much color. Hold down the Option key (Mac) or Alt key (PC) and click on the Levels icon in the Adjustments panel to add a Levels adjustment layer. In the dialog box that appears, name the adjustment “Darken Tree – Left” and put a check next to Use Previous Layer to Create Clipping Mask (Figure 6.63). Click OK.
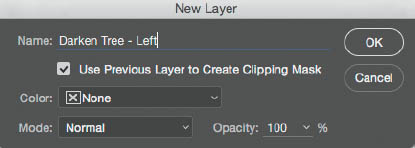
FIGURE 6.63
Darken the tree by dragging the midtone slider in the Levels properties to the right so it reads 0.70 (Figure 6.64). Click on the Tree – Left layer in the Layers panel and lower its Opacity to 50% (Figure 6.65), which will make the tree look like it’s off in the distance.
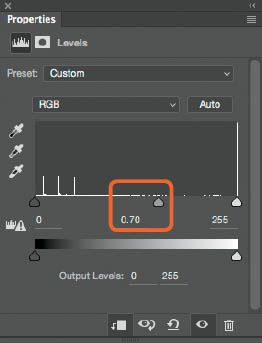
FIGURE 6.64
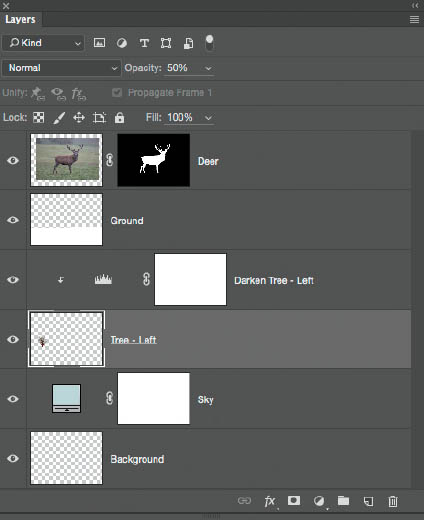
FIGURE 6.65 Lowering the opacity of the tree lowers the contrast, which is characteristic of distant objects
- 19. The last thing we’ll do to the tree is blur it slightly, because objects obviously lose their sharpness when they’re further away. With the Tree – Left layer selected, go to Filter > Convert for Smart Filters (Figure 6.66), and then to Filter > Blur > Gaussian Blur. Set Radius to 1.5 Pixels and click OK (Figure 6.67).
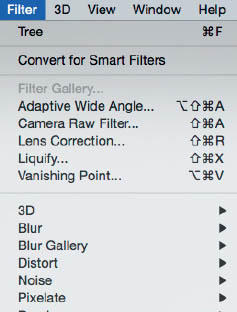
FIGURE 6.66
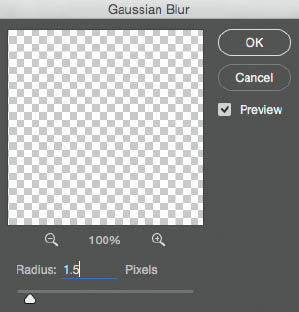
FIGURE 6.67 Adding a small amount of blur helps make the tree appear as though it’s far away
NOTE Converting a layer to a Smart Object before applying a filter gives us much more flexibility because it enables us to go in at a later stage and adjust the filter without having to redo lots of steps.
- 20. Repeat steps 16–19 to add a tree in front of the deer and another tree further over to the right (Figure 6.68).
Vary the tree settings in step 16 each time so the trees aren’t identical. Set the Opacity of the layer with the middle tree to 60% (Figure 6.69), and add Gaussian Blur with a Radius of 2 Pixels. Set the Opacity of the layer with the tree on the far right to 50% (Figure 6.70), and add Guassian Blur with a Radius of 1 Pixel.
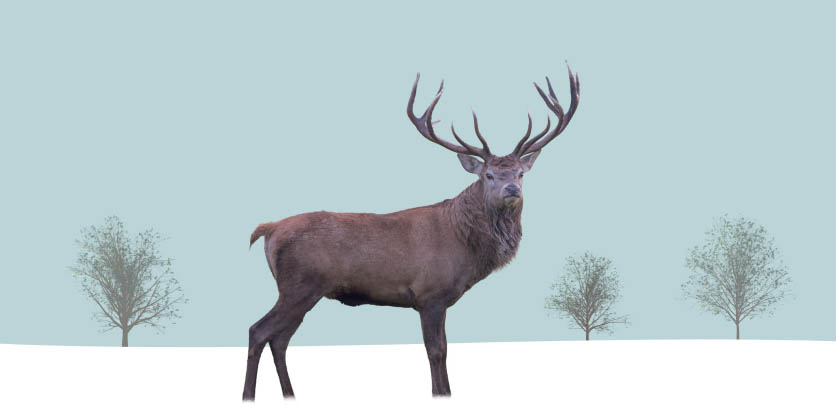
FIGURE 6.68
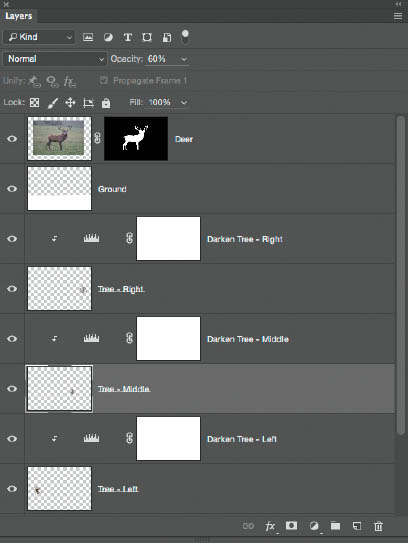
FIGURE 6.69
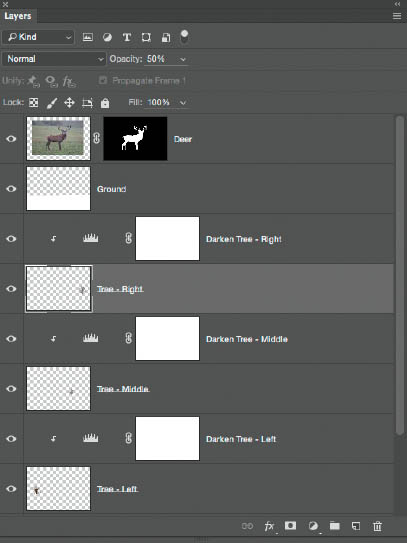
FIGURE 6.70 Varying the opacity, size, and level of blur for each tree will add to the realistic look of the final picture by making the trees appear closer or further away.

TIP Getting out and about and simply observing your surroundings can go a long way toward helping you with your retouching. Notice how distant objects have lower contrast and appear to have a blue cast over them.
- 21. By now the Layers panel is starting to build up, so let’s just tidy things up a bit by putting all the tree layers into a group. Click on the Levels adjustment named Darken Tree – Right, hold down the Shift key, and click on the layer named Tree – Left (Figure 6.71). Then go to Layer > New > Group from Layers (Figure 6.72), name the group “Trees,” and click OK.

FIGURE 6.71
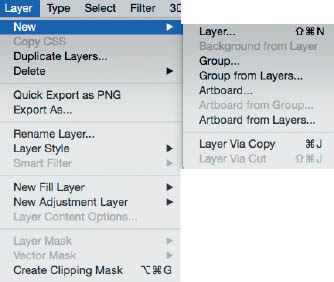
FIGURE 6.72
- 22. The next thing we’ll do is add in some mist, which will add to the atmosphere of the picture and help to create a feeling of depth.
Add a new blank layer above the Tree group by clicking on the New Layer icon at the bottom of the Layers panel. Press D to set the foreground and background colors in the toolbar to their defaults of black and white, and then go to Filter > Render > Clouds (Figure 6.73).

FIGURE 6.73
Click on the eye icon of the Deer layer to turn off this layer’s visibility while we work on the mist (Figure 6.74).
Select the Marquee Tool (M) and drag out a small rectangle in the middle of the layer that contains the clouds. Then go to Layer > New > Layer via Copy to put this rectangular selection onto its own layer (Figure 6.75). Rename this layer “Mist,” and then delete the original clouds layer.

FIGURE 6.74

FIGURE 6.75
- 23. With the Mist layer selected in the Layers panel, go to Edit > Free Transform, and while holding down Shift + Option (Mac) or Shift + Alt (PC), click on a corner handle and drag outward until the frame is outside of the canvas area (Figure 6.76). Press Return (Mac) or Enter (PC).
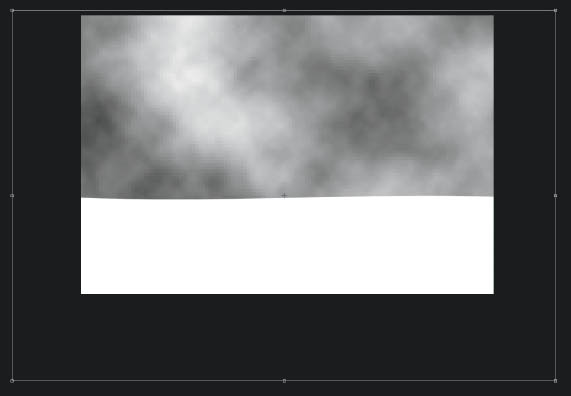
FIGURE 6.76
Hold down the Option key (Mac) or Alt key (PC) and click on the Levels icon in the Adjustments panel to add a Levels adjustment layer. Name this adjustment “Lighten Mist” and click OK. In the Levels adjustment properties, drag the black Output Levels marker to the right until you reach 100 (Figure 6.77).
In the Layers panel, lower the Opacity of the Mist layer to around 70%. Then click to reveal the eye icon on the Deer layer and turn on its visibility.

FIGURE 6.77
- 24. Soon we’ll be adding in some snowfall, but before we do that, let’s make it look like the deer has some snow on him. We’ll do this with a brush that is similar to the one we used earlier when we blended the deer’s legs into the ground.
Click on the Deer layer in the Layers panel and add a new blank layer above it by going to Layer > New > Layer. In the properties, name the new layer “Deer Snow” and check the Use Previous Layer to Create Clipping Mask checkbox (Figure 6.78).
Note: We use a clipping mask so that when we paint to add snow onto the deer, the snow will only appear on the deer and not on other parts of the image. The clipping mask restricts the snow so it is only visible per the layer mask below.
Press B to select the Brush Tool. Click on the Brush Preset Picker in the options bar at the top of the screen and choose Spatter Brush number 27 (Figure 6.79).

FIGURE 6.78

FIGURE 6.79
Open the Brush panel, and in the Brush Tip Shape section, set Size to 80 px and Spacing to 40% (Figure 6.80).
Click on Shape Dynamics and set Size Jitter to 25% and Angle Jitter to 100% (Figure 6.81).
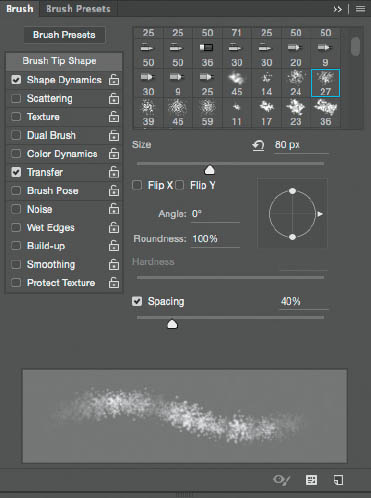
FIGURE 6.80
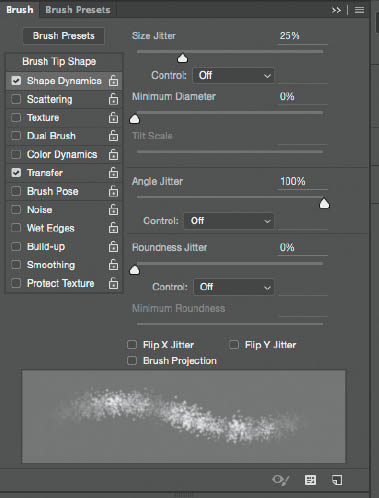
FIGURE 6.81
Click on Transfer and set Opacity Jitter to 100% (Figure 6.82). If you’re using a pressure-sensitive tablet and pen, choose Pen Pressure from the Control menu.
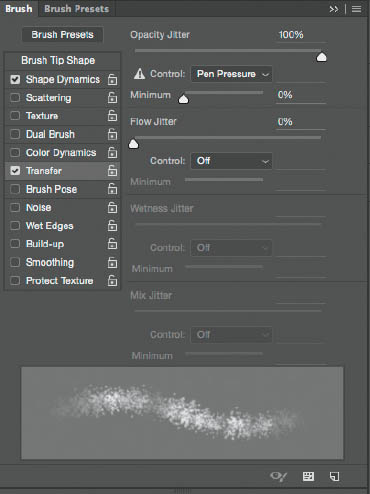
FIGURE 6.82
With a white foreground color, paint over the areas of the deer where you want to add snow (Figure 6.83).

FIGURE 6.83
- 25. Let’s add a little bit of blur to this snow to make it look lighter and fluffier. Go to Filter > Convert for Smart Filters, and then go to Filter > Blur > Gaussian Blur. Set Radius to 1 Pixel and click OK.
- 26. Looking at the image now, I think we need to brighten the background and the deer a little. Start by clicking on the Lighten Mist Levels adjustment layer (Figure 6.84). In the properties, move the midtone slider to the left until you hit 3.00 (Figure 6.85).
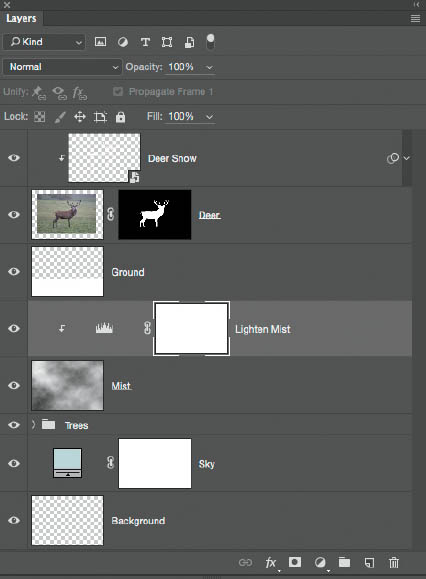
FIGURE 6.84

FIGURE 6.85
- 27. Click on the Deer Snow layer in the Layers panel, and then click on the Levels icon in the Adjustments panel to add a Levels adjustment layer. Rename this layer “Brighten,” and in the properties, drag the midtones slider to the left until you reach 1.26 (Figure 6.86). With a round, soft-edged brush and a black foreground color, randomly paint on the layer mask (Figure 6.87). Make sure to paint over the deer’s face to bring back some of the contrast that this adjustment layer reduced. Leaving contrast on the face draws attention to it, which is what we want.

FIGURE 6.86
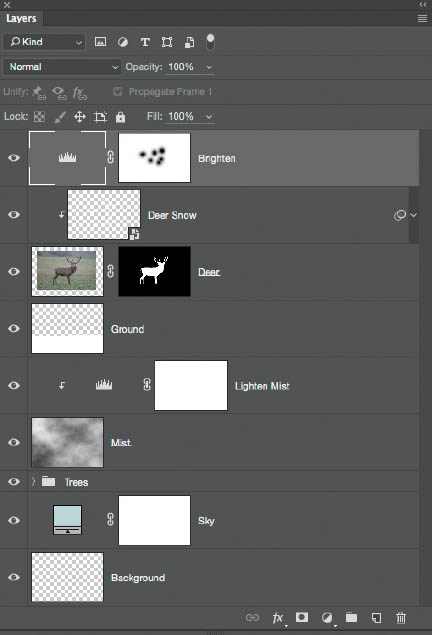
FIGURE 6.87
- 28. Next we’ll add some mist in the foreground. But before we do, I want to soften the horizon line because to me it looks a little too sharp, especially since it’s supposed to be in the distance. Click on the Ground layer, and then go to Filter > Convert for Smart Filters, followed by Filter > Blur > Gaussian Blur. Set Radius to 1 Pixel and click OK.
Add a new layer to the top of the layer stack and rename it “Mist 2.” Set the foreground color in the toolbar to white, and then press G to select the Gradient Tool. In the options bar at the top of the screen, open the Gradient Picker and choose the second gradient, which is called Foreground to Transparent (Figure 6.88). Hold down the Shift key and click and hold at the bottom of the deer’s front leg. Without letting go, drag upward to the top of the deer’s shoulder and then release (Figure 6.89). This adds a mist effect to the lower part of our picture (Figure 6.90).
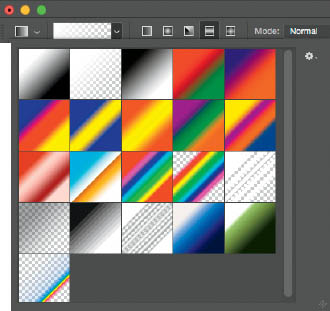
FIGURE 6.88
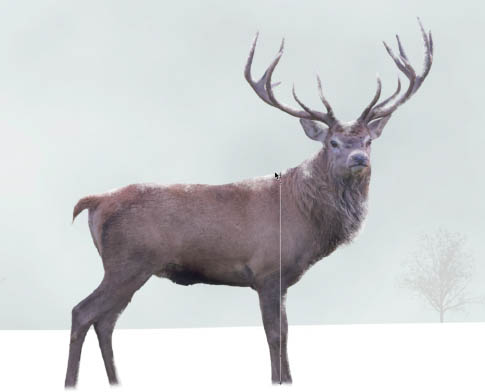
FIGURE 6.89
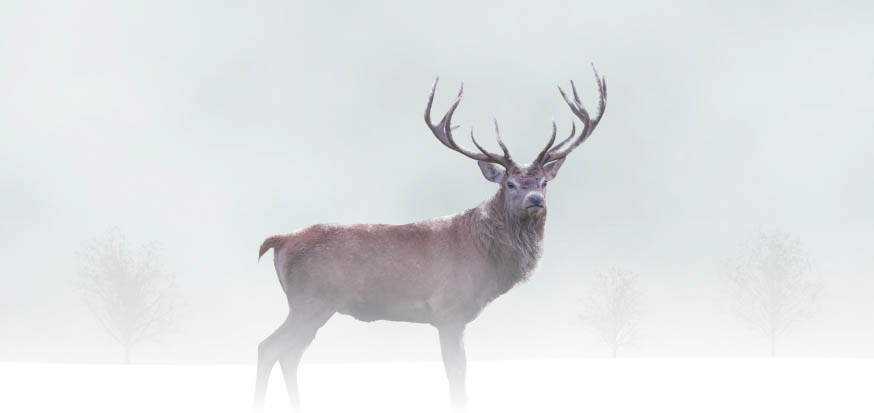
FIGURE 6.90 The mist effect is added by using a simple Foreground to Transparent gradient
- 29. There are only a few more steps, and the next step is to add in snowfall. There are many techniques for creating snow, and I’ve recorded videos over on my YouTube channel (www.youtube.com/glyndewis) showing exactly that; however, the very best snow I’ve found for use in Photoshop is from my friend Renee Robyn (www.reneerobynphotography.com; Figure 6.91). In the Stock section of her website she has a whole host of textures and effects that you can purchase. The snow packs are individual files that you can drag into your image as layers.

FIGURE 6.91
Having tried all kinds of techniques for creating snow, I still turn to these individual files from Renee. Rather than storing them in a folder on my computer, I actually store them in a catalog within my Creative Cloud so that I have them wherever I go, regardless of what computer I’m using (Figure 6.92).

FIGURE 6.92 The Creative Cloud Library where I store files that I use often
- 30. When it comes to adding the snow layers that I got from Renee’s website, I like to add a few different ones to increase the density of the snow and create depth. For this image, I added a layer of snow that shows snowflakes on a black background to the top of the layer stack (Figure 6.93). To remove the black, all we have to do is change the Blend Mode of the layer to Screen (Figure 6.94).
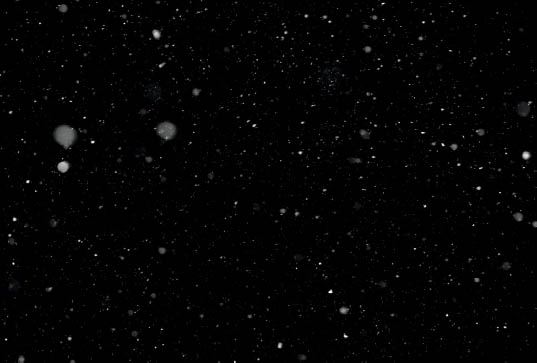
FIGURE 6.93
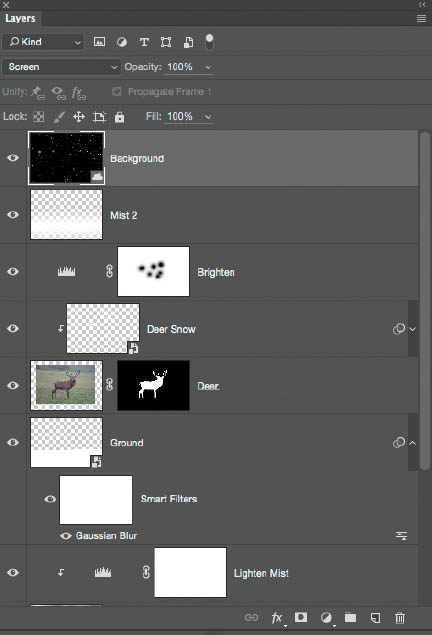
FIGURE 6.94
I may add up to six different snow layers. When the snow looks dense enough, I’ll put all the snow layers into a group by clicking on the uppermost snow layer, holding down my Shift key, clicking on the first snow layer, and then going to Layer > New > Group from Layers (Figure 6.95).
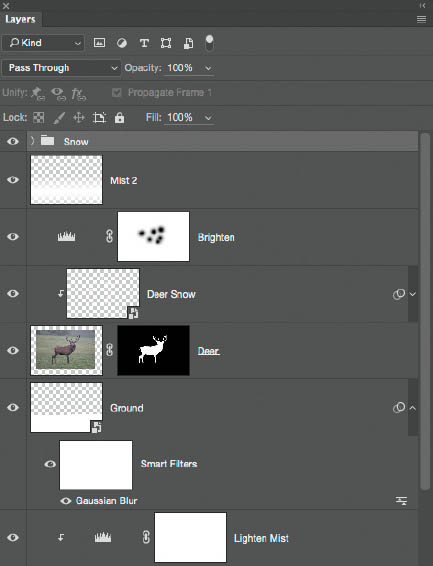
FIGURE 6.95 Adding multiple snow layers increases the depth and variation of the snow
- 31. Finally, to finish the picture off we’ll make it look a bit cooler by changing the color slightly with a Hue/Saturation adjustment layer.
Start by adding a new layer to the top of the layer stack and renaming it “Noise.” Go to Edit > Fill, choose 50% Gray from the Contents menu, and click OK. Then go to Filter > Noise > Add Noise, set Amount to 3%, select Gaussian, and put a check in the Monochromatic checkbox (Figure 6.96). Click OK. Change the Blend Mode of the Noise layer to Soft Light (Figure 6.97) to hide the gray and reveal our picture, which now has added noise and texture.
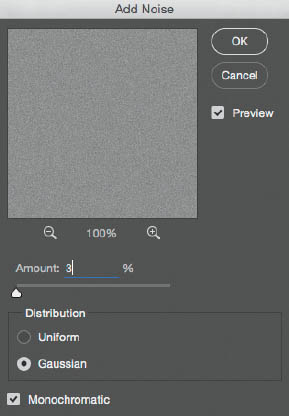
FIGURE 6.96
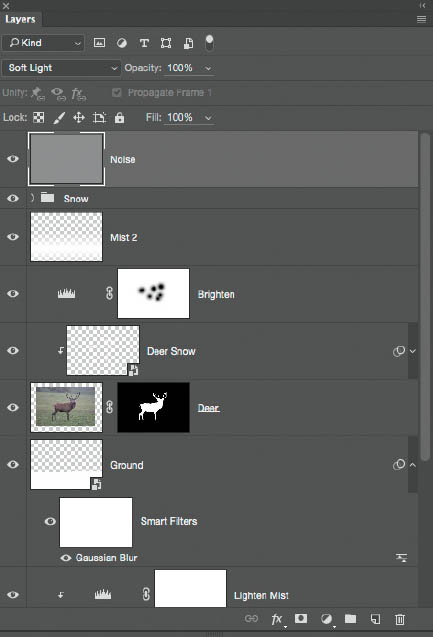
FIGURE 6.97
Hold down the Option key (Mac) or Alt key (PC) and click on the Hue/Saturation icon in the Adjustments panel to add a Hue/Saturation adjustment layer. Name this adjustment “Cool” and click OK. In the Hue/Saturation properties, click the Colorize checkbox and dial in Hue: 215 and Saturation: 25 (Figure 6.98). Lower the Opacity of the layer to 30%.

FIGURE 6.98
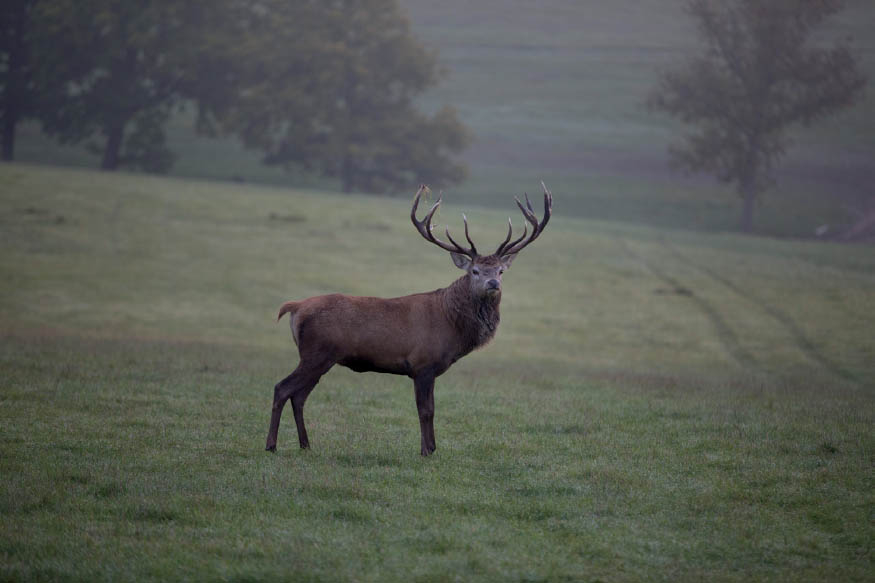
FIGURE 6.99 Original photograph
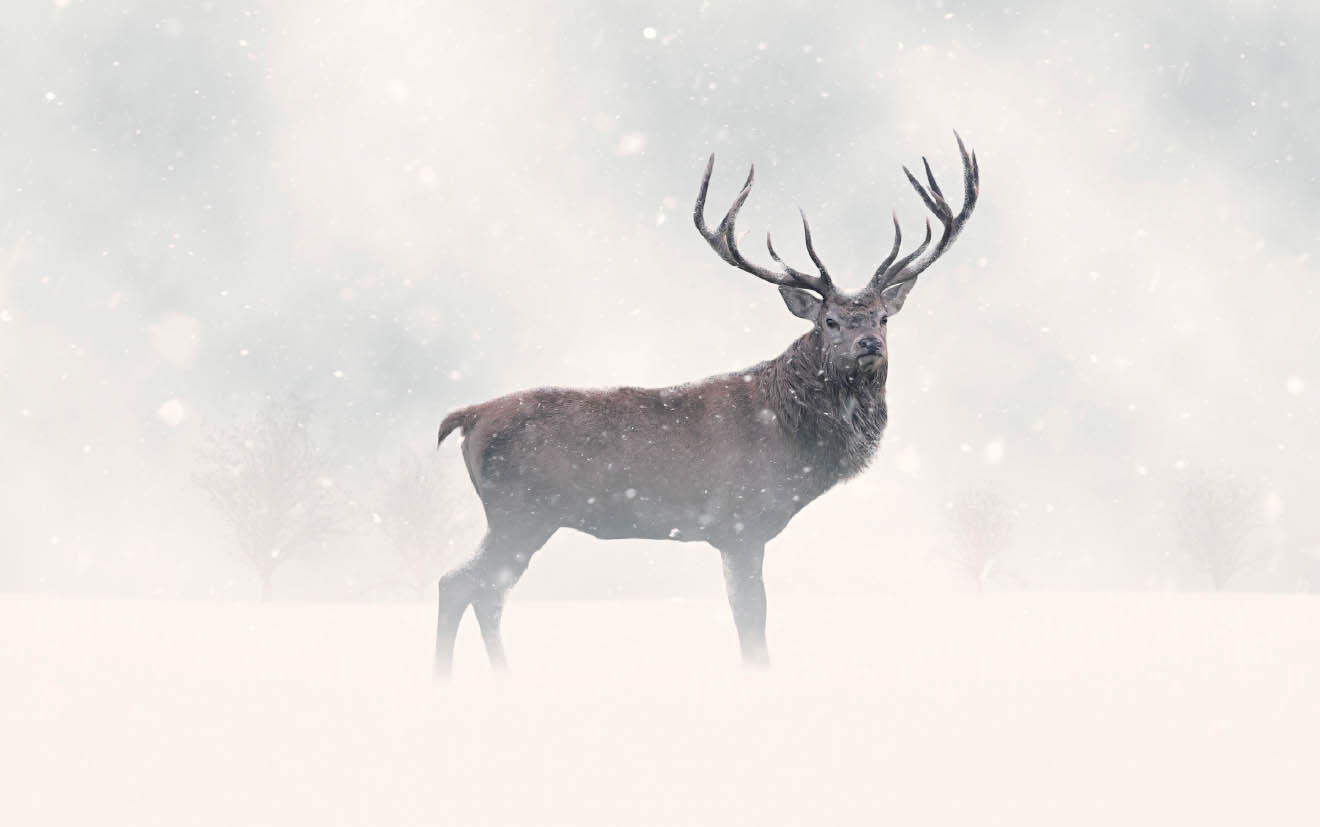
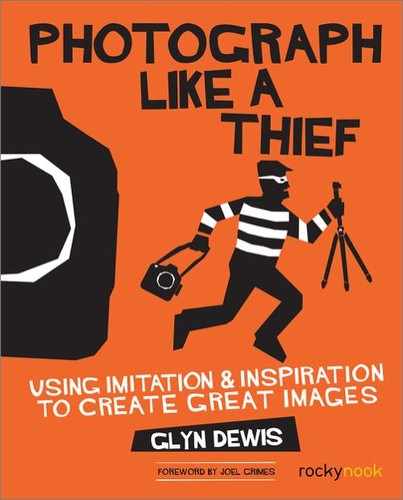
FIGURE 6.100 Final deer in snow composite