9 ACTION MOVIE INSPIRED
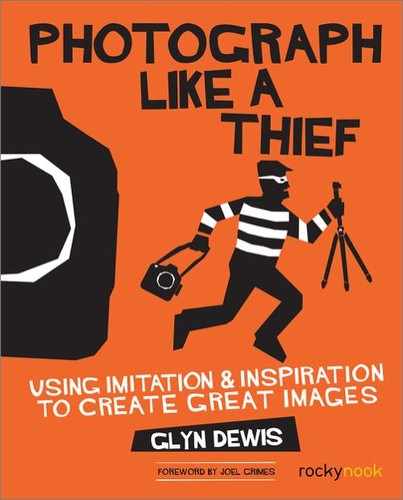
If you ask anyone who knows me who I would most like to photograph, they’ll tell you it’s Arnold Schwarzenegger. Unfortunately, that hasn’t happened just yet, but I’m still holding out. In the meantime, the Hot Toys action figure we’ll be working on in this chapter is a darn convincing alternative.
Originally, having just seen the new Terminator Genisys movie, I purchased the Hot Toys action figure with the intention of creating a Terminator-themed picture similar to one of the original posters. However, as time went on, I thought that was a little cliché and expected, and because of the incredible detail in the action figure, I decided I’d go for a portrait instead of compositing a new background, lighting effects, debris, and other effects.
This tends to happen to me from time to time. I initially approach a shoot 100% convinced of the way I want to go, but after the shoot I’m not so convinced. In the past, when I was just starting out, I would have doggedly carried on regardless of how I felt about it, but I’ve discovered over time to trust my instinct. Slowing down and being open to alternative ideas is what allows you to produce your very best work.
There’s quite a bit to cover here, so we better get started, but before we do I have a word of warning . . . The force in these action figures is strong. Buy one, and the urge to buy another is almost overpowering. So far, I’m managing to resist, but Lord only knows for how long!
REVERSE ENGINEERING
Because I decided to see if I could make a convincing and life-like portrait of the Arnold action figure, instead of creating a Terminator movie–inspired image, there’s no specific photograph I used for inspiration. However, I opted to do a portrait with a lighting style similar to that of Annie Leibovitz’s work, with a single light source coming from the side and slightly in front of the subject. In fact, it’s pretty much the same lighting I used in chapters 5 and 8, but obviously on a much smaller scale.
I also chose to make this a low-key portrait with a technique that I call The Invisible Black Background, which I covered in chapter 4. This technique allows me to create a portrait with a completely black background, regardless of whether I’m photographing indoors or outdoors, and without having an actual black background set up. This look is perfect for this portrait of Arnold—well, for his action figure, at least.
THE SETUP
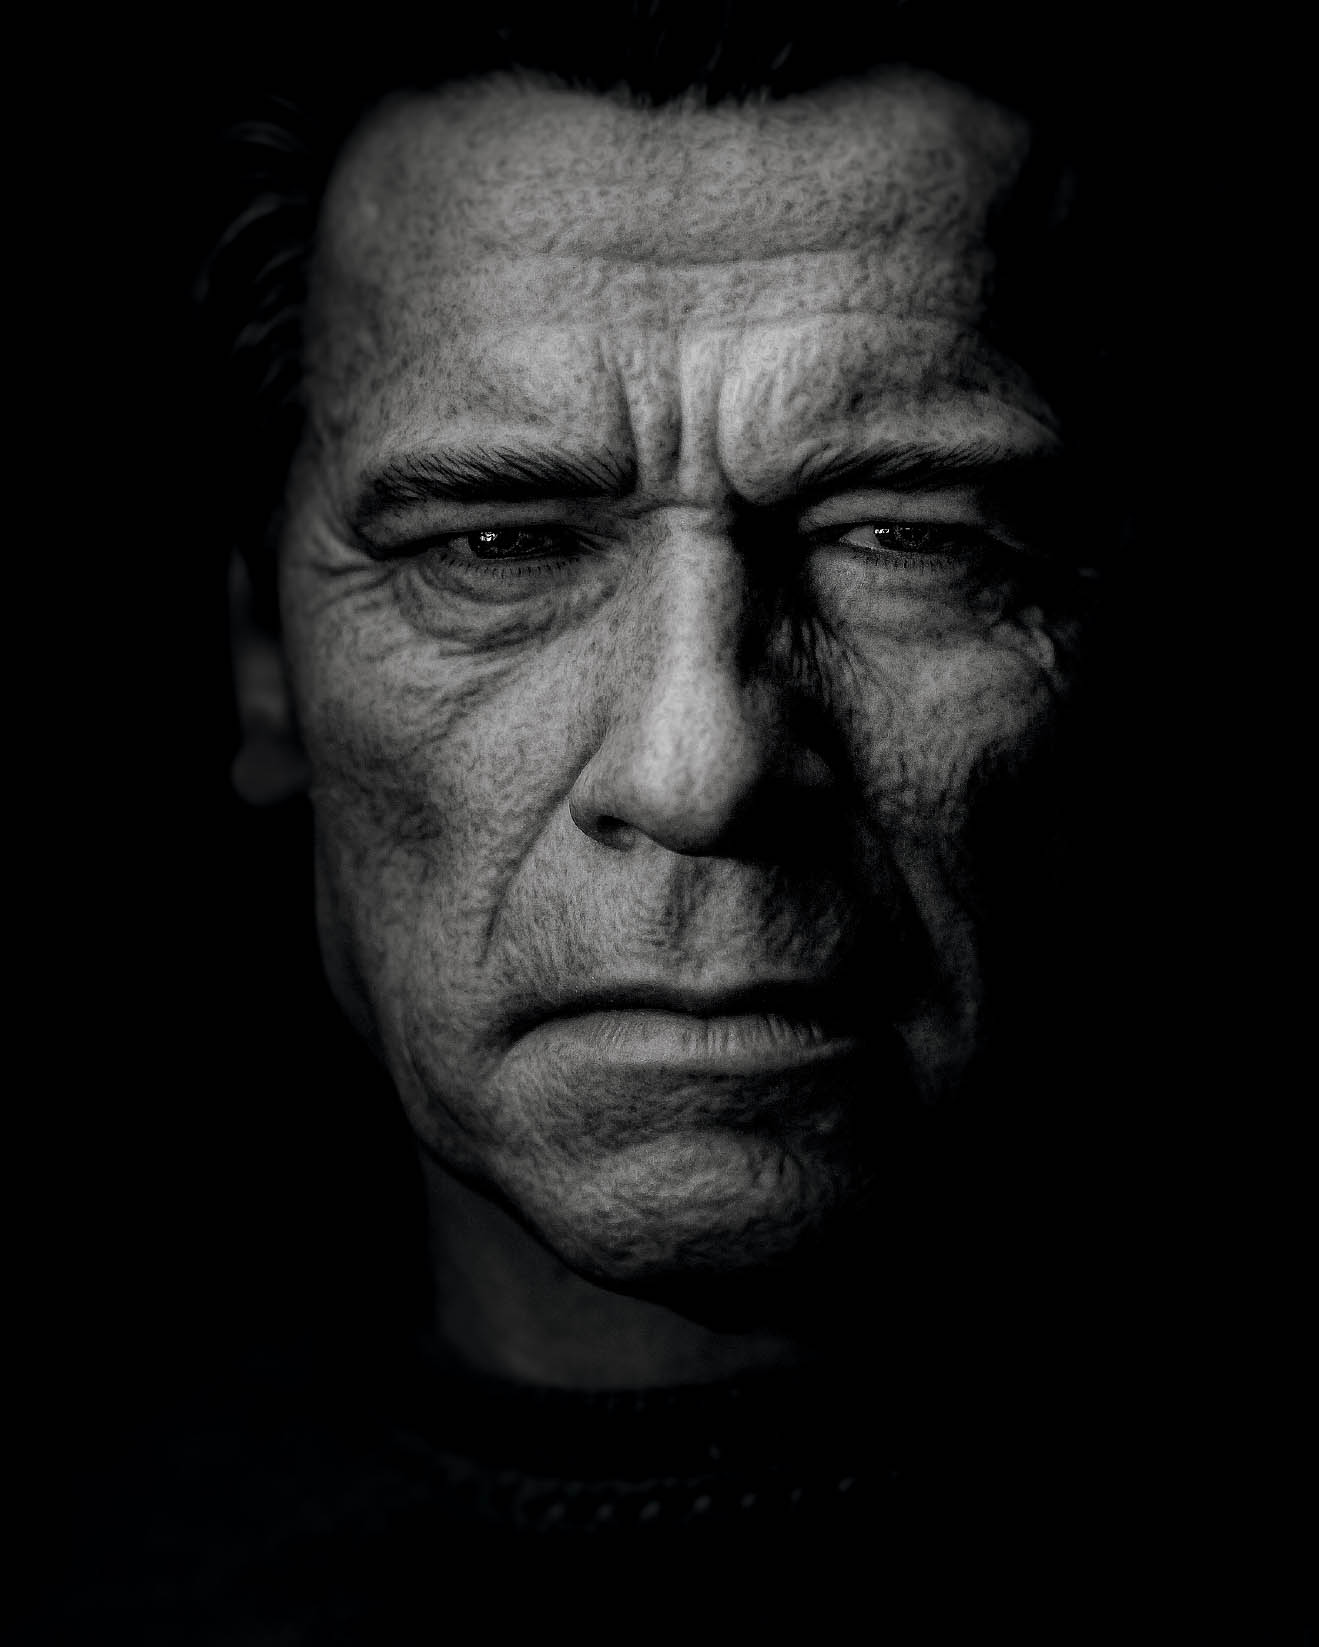
For this picture, I used the Invisible Black Background technique I discussed in chapter 4 (page 51). I could have just put up a piece of black cardboard behind the Arnold figure, but I was shooting tethered to my main computer on my desk and my large Benq screen was great for seeing the images as they came in, so checking the focus, sharpness, and lighting was that much easier with this setup (Figure 9.1).
FIGURE 9.1
Also, despite working in such a small area, using the light modifiers with the grids attached meant that there was minimal light spill, so getting a completely black background was super easy.
I went for a cross-lighting setup with just one light positioned to the left of the camera and slightly in front of the Arnold figure. This meant that the side of the figure’s face nearest the flash was lit and only a small area on the opposite side was lit (Figure 9.2).
I placed the flash on top of a box and covered the lower part of the modifier with my diary so that the light was restricted to the top half of the model (Figure 9.3).
I angled the camera and lens upward so I was photographing up toward the model, which gives the portrait more impact and power.

TIP In addition to shooting tethered, I used a cable release to prevent any movement of the camera while I photographed the Arnold action figure with the macro lens.
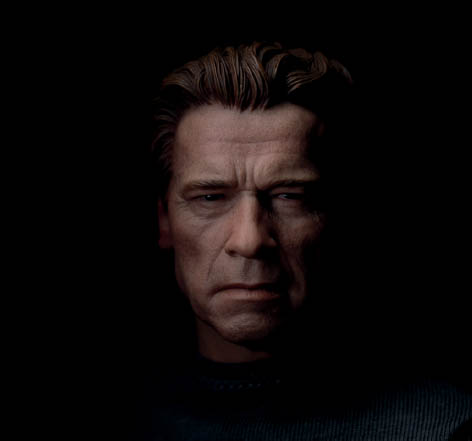
FIGURE 9.2

FIGURE 9.3
FIGURE 9.4
CAMERA SETTINGS
Despite shooting in a tight area and having a computer screen behind the Arnold action figure, I was able to get a completely black background with an aperture of f/8.0.
Of course, using the grid on the Rogue light modifier was key here because it allowed me to get directional light that didn’t affect anything other than the action figure. This is something to always be mindful of when using the Invisible Black Background technique. This is rarely an issue in a large indoor space or outdoors, but when you’re close to walls and in a tight space it’s important to use a modifier that controls the light and gives it direction.
I kept the ISO at 100 to make the sensor as least sensitive to light as possible and to get the cleanest possible file.
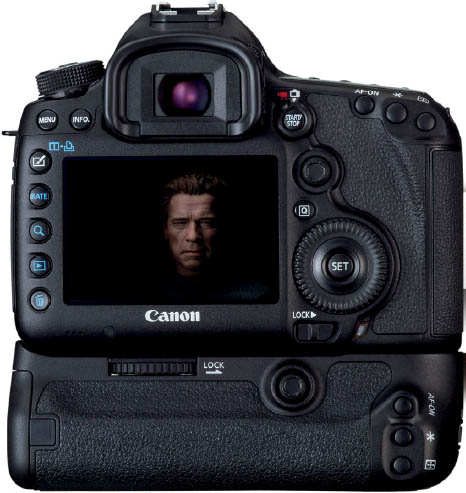
FIGURE 9.5
MODE Manual
ISO 100
APERTURE f/8.0
SHUTTER SPEED 1/125 sec.
LENS Canon EF 100mm f/2.8 Macro USM
GEAR GUIDE
For this shoot I used a small flash, namely my Phottix Mitros+ TTL Transceiver (Figure 9.6), and a Rogue light modifier (Figure 9.7) that is easy to attach and that also came with a grid to control light spill.

FIGURE 9.6

FIGURE 9.7
This was actually the first time I’d shot with or ever needed to use a macro lens. I opted for the Canon EF 100mm f/2.8 Macro USM (Figure 9.8), which is not the top-end macro lens from Canon, but it certainly did a great job for this shoot. I didn’t want to invest in the more expensive model because I have no idea how many times I’ll use it.
I mounted my camera on a 3 Legged Thing Winston tripod to keep it nice and steady (Figure 9.9).
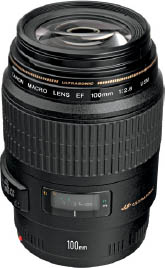
FIGURE 9.8

FIGURE 9.9
POST-PROCESSING
So now the photo shoot has been done and it’s time to bring the Arnold action figure to life. We’re going to go through quite a few steps here, despite the fact that the portrait has a simple black background.
Our main goal is to make the portrait look as believable as possible, so we’ll be enhancing the eyes, adding more detail and texture to the skin, and dodging and burning to enhance the highlight and shadow areas. I’ll also show you a bit of what I call depth building, which involves adding increasing layers of contrast, light, and sharpness to make it appear as though the portrait is coming forward from the screen. This works especially well when you print the images.
Right, let’s get to work.

NOTE Download the file you need to follow along step-by-step at: http://www.rockynook.com/photograph-like-a-thief-reference/
- 1. As always, we’ll start in Lightroom, but if you’re not a Lightroom user you can also use Camera RAW, seeing as how the programs are exactly the same in the Develop Module. But to be honest, we’re going to do very little in here anyhow.
Let’s begin by sorting out the composition of our picture using the Crop Tool (R). For this portrait, I prefer to have Arnold positioned on the right side of the frame, so we’ll crop from the top just above his hairline and bring in the right side to position him in the Rule of Thirds grid. I don’t often follow such rules, but for this portrait it definitely works (Figure 9.10).

FIGURE 9.10
- 2. Now that we have the composition sorted, let’s tidy up some of the dust and scratches on the figure before moving over into Photoshop. Select the Spot Removal Tool (Q) and set it to Heal (Figure 9.11), and then clean up some of the obvious dust spots and scratches, such as on Arnold’s hair and forehead (Figure 9.12). To make this easier, zoom in on these areas by going to a 1:1 view in the Navigator (Figure 9.13).
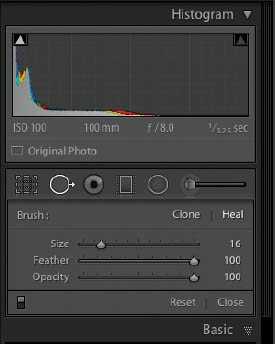
FIGURE 9.11

FIGURE 9.12

FIGURE 9.13
- 3. Press Q or click on the Spot Removal Tool icon to exit, and now we’ll send our picture over into Photoshop by going to Photo > Edit In > Open as Smart Object in Photoshop (Figure 9.14).
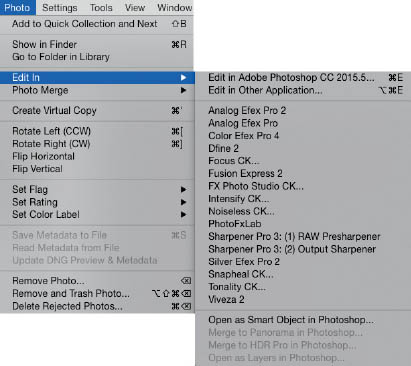
FIGURE 9.14
- 4. Now we’re going to enhance Arnold’s eyes. Go to Filter > Camera RAW. Zoom in on the eyes so they’re nice and big on the screen, and then choose the Adjustment Brush (Figure 9.15).

FIGURE 9.15
Set the Exposure to around +0.50 and paint over both eyes. Turn on the Mask so that the red overlay clearly shows the area being affected by the Adjustment Brush (Figure 9.16).
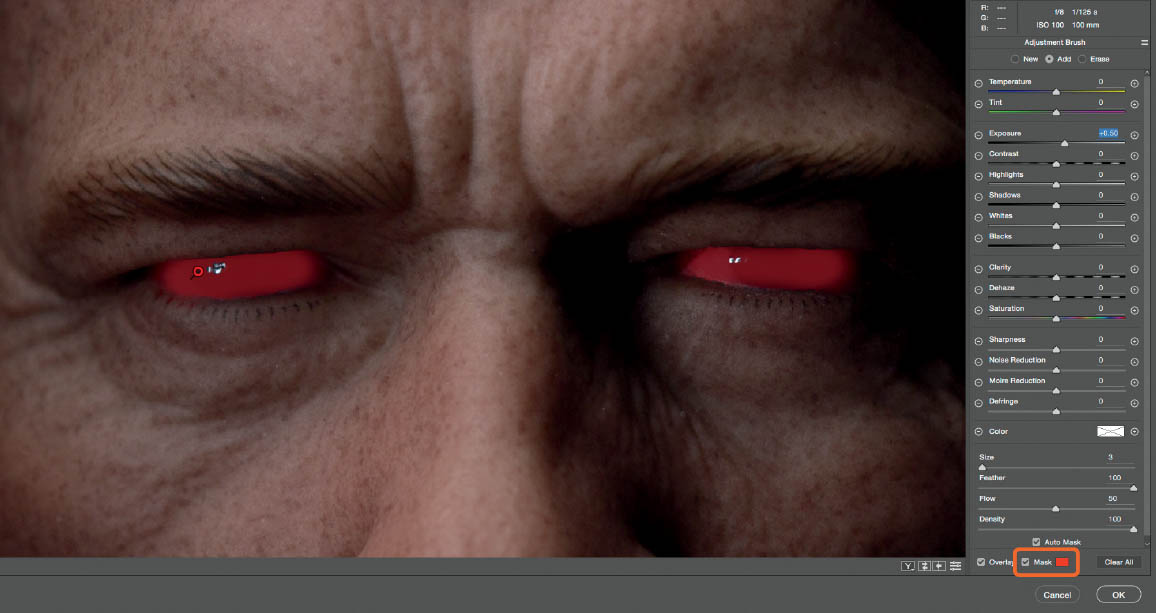
FIGURE 9.16
To remove the adjustment from specific areas, click on Erase (Figure 9.17) and brush over the unwanted areas.
- 5. To me it looks like the white of the figure’s right eye is not quite as bright as that of the left, despite the fact that the light is coming from camera left (the figure’s right). So to even out the eyes, make sure the Adjustment Brush is still selected and click New (Figure 9.18), and then paint over the eye on the left side of the picture (the figure’s right eye) with the Exposure again set to +0.50. Click OK to exit Camera RAW and return to Photoshop.

FIGURE 9.17
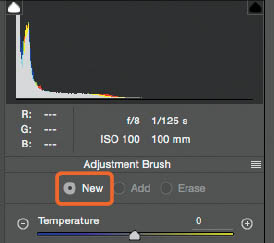
FIGURE 9.18
- 6. Now we’ll use a Quick Mask to select the middle (cornea) of both eyes, but before we do, double-click on the Quick Mask icon in the toolbar (Figure 9.19), and in the Quick Mask Options, ensure that Selected Areas is checked and click OK (Figure 9.20).
Now choose a round, soft-edged brush with a black foreground color from the toolbar, press Q or click on the Quick Mask icon in the toolbar, and paint over the cornea of both eyes. If you paint over some unwanted areas, simply change the foreground color to white and paint over them again to remove them.
When you have covered the middle of the eyes with the Quick Mask overlay, press Q or click on the Quick Mask icon to exit Quick Mask mode, and the marching ants will indicate the areas you have selected (Figure 9.21).

FIGURE 9.19
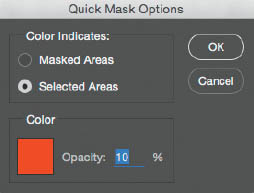
FIGURE 9.20
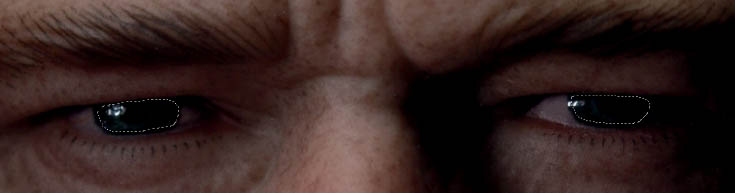
FIGURE 9.21
- 7. With the marching ants selection visible, click on the Selective Color icon in the Adjustments panel to add a Selective Color adjustment layer. In the Layers panel, change the Blend Mode from Normal to Linear Dodge (Add) (Figure 9.22). When you do this you’ll see that Arnold’s eyes get a lot brighter (Figure 9.23). We can adjust the Opacity of the layer to control how much brighter the eyes are, but don’t do that just yet because it’s easier to see the color change we’re going to make when the eyes are nice and bright.

FIGURE 9.22

FIGURE 9.23
- 8. In the Selective Color Properties, select Neutral from the Colors menu. We can now use the Cyan, Magenta, and Yellow sliders to dial in a color for the eyes. In this example, lets go for Cyan: +1, Magenta: +8, and Yellow: -20.
We can also add in some contrast by changing the Colors menu to Blacks and dragging the Black slider to +3 (Figure 9.24).

NOTE Although we’re going to be turning this portrait into a black-and-white image, changing the eye color can have a big impact on how the eyes convert. Plus, I thought this was a pretty neat technique to share with you.
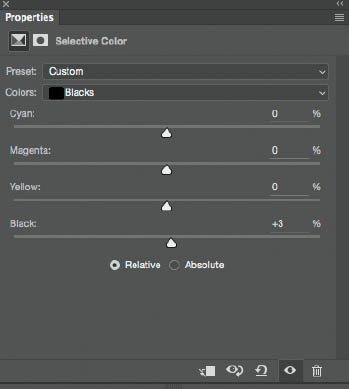
FIGURE 9.24
- 9. Now we can add some sharpening to the eyes to make them stand out even more. What’s really cool here is that we can do this on a blank layer, so it doesn’t add to the file size and it’s nondestructive.
Add a new blank layer to the top of the layer stack and rename it “Eye Sharpen” (Figure 9.25). Grab the Sharpen Tool from the toolbar (Figure 9.26), and in the options bar at the top of the screen, set Strength to 30% and put a checkmark next to Sample All Layers (Figure 9.27).
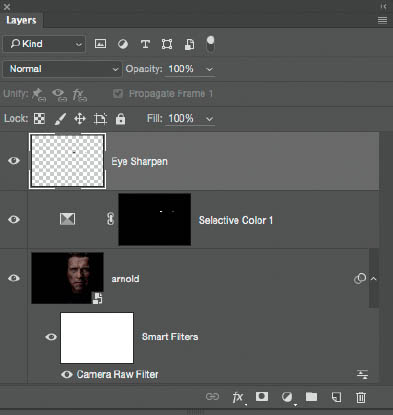
FIGURE 9.25

FIGURE 9.26
FIGURE 9.27
Now paint over both eyes to sharpen them. You can see the difference this makes in Figures 9.28 and 9.29.

FIGURE 9.28 Before sharpening
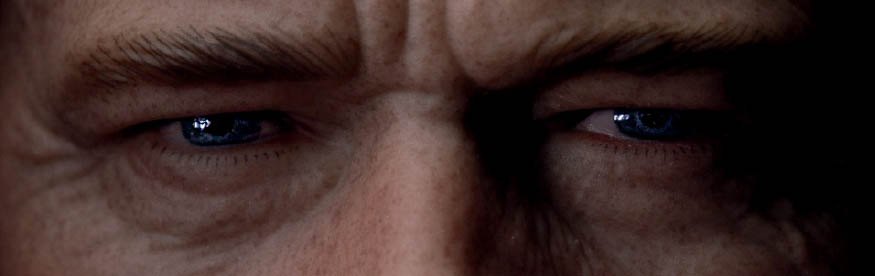
FIGURE 9.29 After sharpening
- 10. Let’s keep things nice and organized by putting the layers affecting the eyes only into a group. With the Eyes Sharpen layer selected, hold down the Shift key and click on the Selective Color 1 adjustment layer below so both layers are selected (Figure 9.30). Then go to Layer > New > Group from Layers, rename the group “Eyes,” and click OK. Lower the Opacity of this group to 80%.
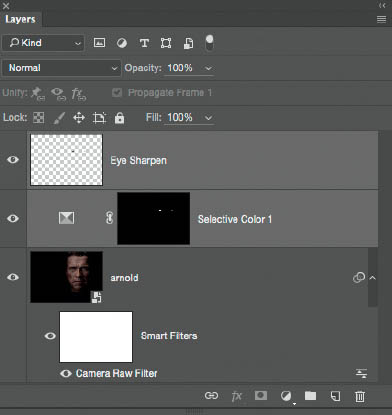
FIGURE 9.30
- 11. Now we’ll add some depth to the portrait and make it look a little more alive with dodging and burning. We’ll use the 50% Gray Layer technique that I covered in chapter 4 (page 66). Add a new blank layer by going to Layer > New > Layer. In the New Layer properties, rename the layer “Dodge & Burn,” change the Mode to Soft Light, put a checkmark next to Fill with Soft-Light-neutral color (50% gray), and click OK (Figure 9.31).
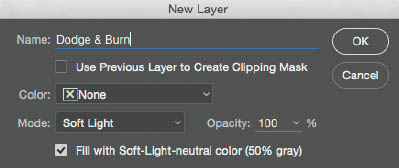
FIGURE 9.31
- 12. Choose the Dodge Tool (O) from the toolbar, and in the options at the top of the screen, leave Range set to Midtones, set Exposure to 10%, and tick the Protect Tones checkbox (Figure 9.32).

FIGURE 9.32
Use the Dodge Tool to paint over the brighter areas of Arnold’s face to enhance them. Hold down the Option key (Mac) or Alt key (PC) to activate the Burn Tool with the same settings and darken the areas on either side of the highlights and the other darker areas of the image.
This is all very dependent on personal taste and how you want the image to look, but you can see the areas I enhanced in Figure 9.33.
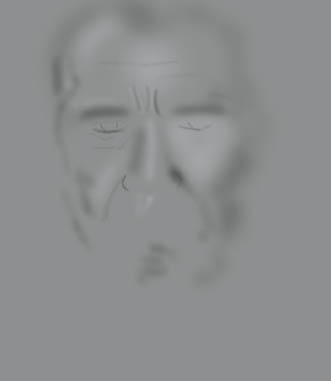
FIGURE 9.33 The 50% gray Dodge & Burn layer showing the areas I brightened and darkened to add more depth and dimension to Arnold’s portrait
NOTE To see just the gray layer, hold down the Option key (Mac) or Alt key (PC) and click on the eye icon of the Dodge & Burn layer. To return to normal view, simply do the same thing again.
You can see the effects of the dodging and burning by comparing the before (Figure 9.34) and after (Figure 9.35) images.

FIGURE 9.34 Before dodging and burning

FIGURE 9.35 After dodging and burning
TIP If you want to increase the effect of the dodging and burning, you can duplicate the Dodge & Burn layer by pressing Control + J (Mac) or Control + J (PC).
- 13. Although we’re working with an action figure, I want to make it look as real and lifelike as possible. I’m sure you’ll agree that the Hot Toys action figure is incredibly detailed, but there are some areas that need to be cleared up if we’re going to “Sell the Fake,” to quote Joel Grimes.
The hairline is a giveaway that the figure is made of molded plastic, but I’ll share a quick fix for that in just a bit. First we need to fix some of the color that’s missing (Figure 9.36).
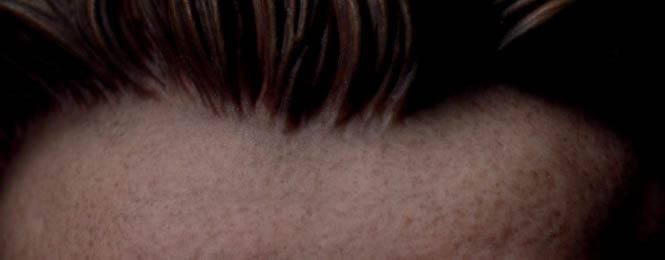
FIGURE 9.36
Add a new blank layer and rename it “Hair.” Grab the Clone Stamp Tool (S), and in the options at the top of the screen, set the Opacity to 30%, tick the Aligned checkbox, and select All Layers from the Sample menu (Figure 9.37). Hold down the Option key (Mac) or Alt key (PC) and click to sample an area of brown hair near an area where the color is missing. Then brush over the areas missing color with the Clone Stamp Tool to gradually cover them with the brown hair. Doing this with a reduced opacity, rather than cloning over the areas at 100%, helps to build the effect gradually.

FIGURE 9.37
- 14. Before we move on to my favorite part, where we’ll take this portrait go to a whole new level by enhancing the skin texture and contours, let’s fix the eyes because they’re bugging me a little. The eye on the right side of the picture looks a little too bright for my taste, so we’ll bring it down. This is where working nondestructively like we have been comes in extra handy.
Double-click on the bottom Smart Object layer named “arnold” (Figure 9.38). This takes us into Camera RAW where we can adjust some of the retouching steps we performed earlier. Choose the Adjustment Brush and make sure that both the Overlay and Mask checkboxes are turned on (Figure 9.39).

FIGURE 9.38

FIGURE 9.39
Hover over both pins with your cursor to identify which one turns on the red overlay for both eyes (Figure 9.40). When you identify the correct pin, click on it to make it active. Now choose Erase (Figure 9.41) and paint away the red overlay covering the eye on the right side of the frame to remove the brightening (Figure 9.42). Click OK to return to Photoshop.

FIGURE 9.40

FIGURE 9.41
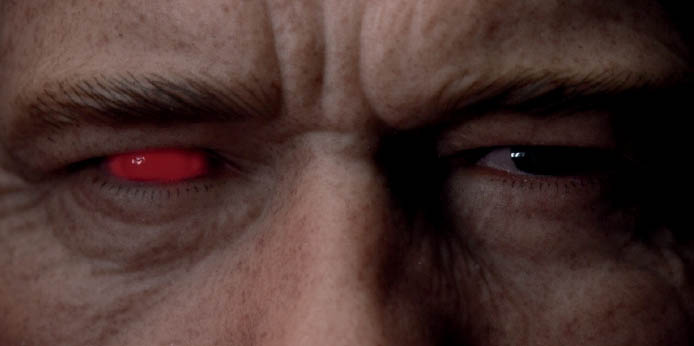
FIGURE 9.42 Camera RAW adjustment removed from eye on right side of frame
- 15. Click on the Hair layer in the Layers panel, and then go to Select > All, then Edit > Copy Merged, then Edit > Paste to create a merged layer at the top of the layer stack. Rename this layer “Clarity.”
Now we’re going to use one of my favorite plugins, Topaz Clarity, to enhance the skin texture and contours. The results of this are quite fantastic and make a huge difference in the portrait.
As I mentioned in chapter 4, at this stage you could also use Clarity within the Camera RAW Filter or the Details technique (page 63) as an alternative to Topaz Clarity. However, in all honesty, neither of these produces results that are as good as Topaz.
Go to Filter > Topaz Labs > Topaz Clarity, and on the right side of the Topaz window, increase Micro Contrast to around 0.28 and Low Contrast to around 0.14 (Figure 9.43). Click OK.
Notice how the plugin has enhanced the skin texture, and with the settings we’ve applied, it makes the model look older, which works perfect for this picture.

FIGURE 9.43
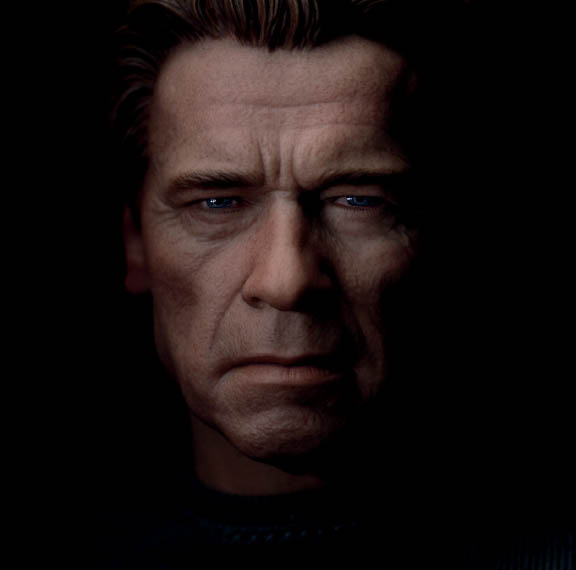
FIGURE 9.44 Before Topaz Clarity

FIGURE 9.45 After Topaz Clarity
- 16. One way I like to add even more depth and dimension to portraits is by adding layers of contrast. We’ll do that here by choosing a black foreground color in the toolbar and selecting a round, soft-edged brush. Press Q or click on the Quick Mask icon in the toolbar to enter Quick Mask mode, and then paint over an inner area of the face to include the eyes, nose, and mouth (Figure 9.46).
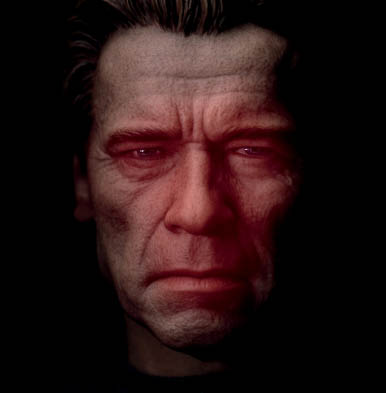
FIGURE 9.46
Press Q to exit Quick Mask mode, and the marching ants will show the selected area of the face. Go back to Topaz Clarity and reapply the settings we used in Step 15 (Micro Contrast: 0.28, Low Contrast: 0.14) and click OK.
Now go to Edit > Fade, and in the Fade properties, reduce Opacity to 80% and click OK (Figure 9.47). This reduces this second Topaz Clarity effect a little bit. Go to Select > Deselect to remove the marching ants selection.

FIGURE 9.47
- 17. Okay, now let’s sort out that hair and add just a little extra blur to help hide the fact that’s it’s molded.
Click on the Clarity layer and create a duplicate layer by pressing Command + J (Mac) or Ctrl + J (PC). Rename this layer “Blur Hair.” Then go to Filter > Blur Gallery > Iris Blur (Figure 9.48). Click in the center of the disc that appears and drag it on top of Arnold’s nose, then click on the outer points to resize and reposition the blur ellipse (Figure 9.49).

FIGURE 9.48

FIGURE 9.49
A Blur Amount of 15 px is enough to achieve the effect we’re after (Figure 9.50). Click OK.

FIGURE 9.50
TIP The adjustable inner pins control how the blur fades in toward the center. If you click on one of the adjustment pins and drag it in or out, the other pins move proportionally. To adjust a pin on it’s own, hold down the Option key (Mac) or Alt key (PC) and drag the pin in or out.
- 18. Now let’s turn this portrait into a black-and-white image. There are a lot of ways this can be done with Photoshop, Camera RAW, or plugins. The method I choose all depends on the picture because I’ve certainly found that there isn’t one technique that works on every image.
Here we’ll use a good old Gradient Map. With the foreground and background colors set to their defaults of black and white, click on the Gradient Map icon in the Adjustments panel to add a Gradient Map adjustment layer (Figure 9.51).
This immediately gives us a pretty decent conversion, but we can tweak it now to get exactly what we’re after. Click on the gradient bar in the Gradient Map properties (Figure 9.52) to opens the Gradient Editor (Figure 9.53).
Click on the White Point and drag it to the left until the Location amount reaches 75% (Figure 9.54), then click OK.
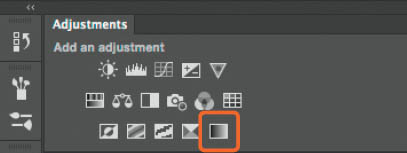
FIGURE 9.51

FIGURE 9.52
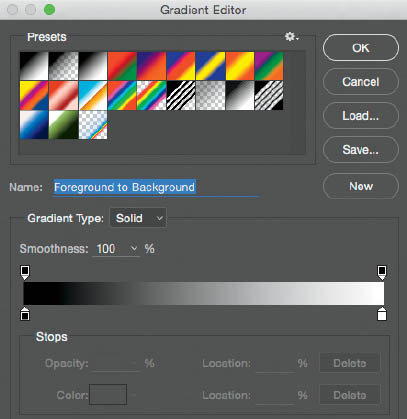
FIGURE 9.53
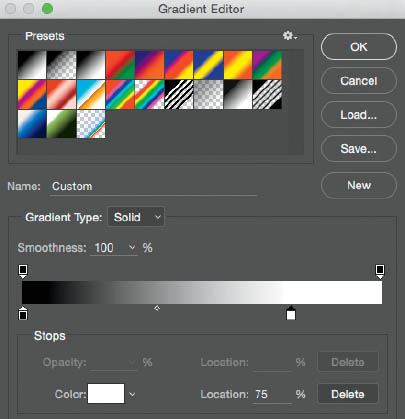
FIGURE 9.54
- 19. We have just a couple more things to do before the picture is finished, or at least before it’s a good time to step away for a while. Let’s add some finishing touches by first bringing back a bit of detail in the shadow areas. Add a Levels adjustment layer and drag the bottom-left point directly upward to just under halfway up the first small square (Figure 9.55).
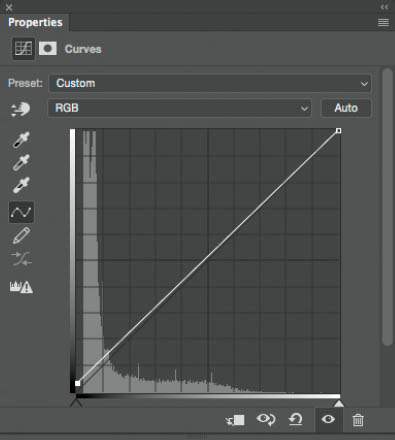
FIGURE 9.55
Create a merged layer at the top of the layer stack by going to Select > All, then to Edit > Copy Merged, and then to Edit > Paste. Rename this layer “FT” for Finishing Touches.
Go to Filter > Camera RAW, and in the Camera RAW window, choose a Radial Gradient (Figure 9.56).

FIGURE 9.56
Click and drag out a gradient that covers Arnold’s face (Figure 9.57). Dial in an Exposure of +0.15 and choose Inside under Effect at the bottom of the panel (Figure 9.58).
Click New in the Radial Filter panel to add another gradient, and this time click and drag out a gradient from the center to further outside Arnold’s face (Figure 9.59).
Dial in an Exposure of -0.55 and choose Outside under Effect at the bottom of the panel (Figure 9.60). Click OK.

FIGURE 9.57
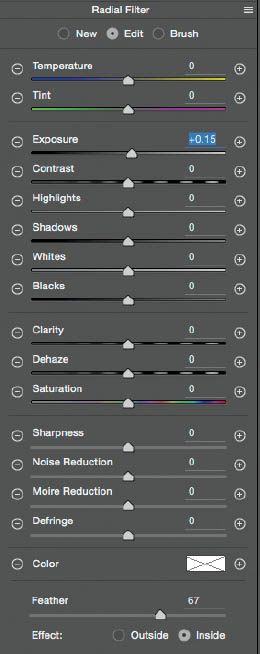
FIGURE 9.58

FIGURE 9.59

FIGURE 9.60
Now would be a good time to step away from the computer and come back later with fresh eyes. This way you’ll see what you have done much clearer and will be able to tell straight away what you need to do, if anything, to finish the picture completely.
As an extra finishing touch, I added the painterly skin texture effect that I covered in chapter 4 (page 94), but this is a decision I made based purely on personal taste.

FIGURE 9.61 Original RAW image
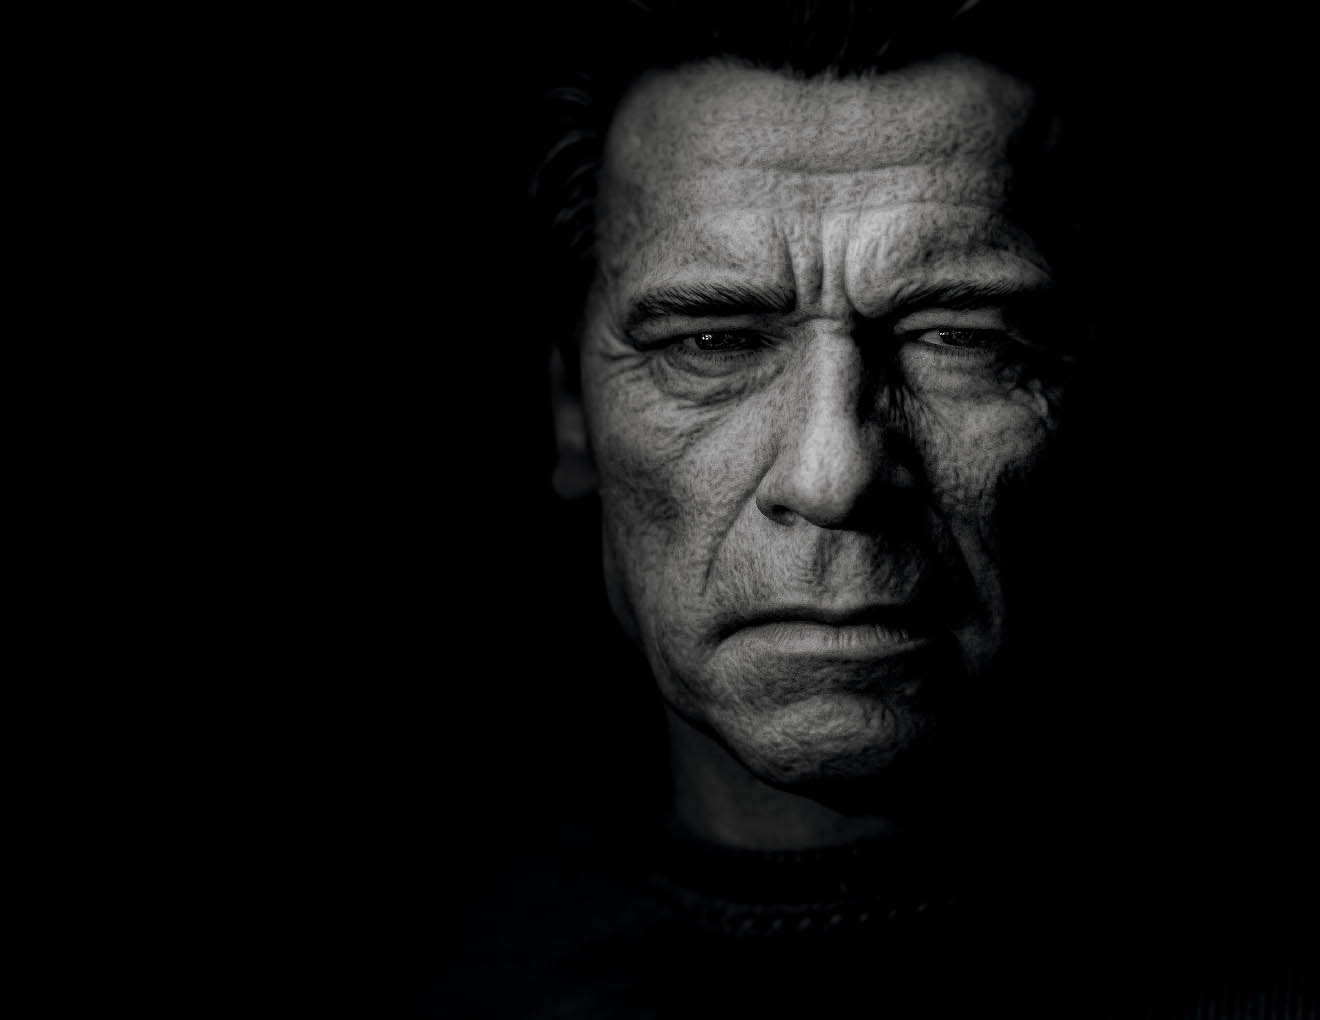
FIGURE 9.62 Final retouched image