
7 JOEY LAWRENCE INSPIRED
The very first time I became aware of Joey Lawrence was back when the first Twilight movie was released. Now don’t get me wrong here, I’m not saying I’m a fan of the Twilight series (truth be told, I’ve never seen one of them), but I do remember being in London and seeing the good ol’ London buses adorned with promotional pictures for the new movie—images that Joey had photographed at the crazy-young age of 18.
There’s no mistaking a Joey Lawrence picture. His use of light, which the majority of the time seems to be just one light source, and the ever-so-slightly desaturated and cool look he gives his images during post-processing really appeals to me. As does the wide variety of subject matter he photographs, from musicians and movie stars to people in places such as Ethiopia and beyond.
One evening I was browsing around the Internet looking for inspiration and ideas for a new picture when I came across a picture that Joey had made for a docudrama on the National Geographic Channel called Killing Lincoln. You can see the image at: http://bit.ly/PLAT_joeyl.
Posing people together is always a challenge, so what initially drew me to this picture is how the key characters are pretty much standing back-to-back. This certainly isn’t the way you would ordinarily position people, but here it works so well. I knew straight away where I could make use of this.
At the time, I was working on an ongoing photography project with World Champion Kickboxer Steven Cook and we’d been thinking about making a portrait of him and his coach, Michael Graham. Rather than try to explain what I wanted to do, I texted Steven the Killing Lincoln picture and told him I’d like to create something similar in terms of the pose and lighting. The next day it was game on, and we were off to the gym to shoot the picture.
REVERSE ENGINEERING
In the picture by Joey Lawrence we can see that the lighting is quite soft because there is no hard, defined line where the highlights and the shadows meet, but rather they gently blend into each other. That would suggest soft lighting, so we’re going to say that soft boxes with both their inner and outer diffusion panels have certainly been used.
We can also say that the John Wilkes Booth character has been lit with cross lighting. The side of his face that’s furthest away from the camera is well lit, and there is a triangular pattern of light underneath his eye and on his cheek on the side that’s nearest the camera. This would certainly suggest that a light source is coming from the right-hand side of the frame and is slightly in front of John Wilkes Booth.
The profile of the Abraham Lincoln character is lit by a very defined white light going down his face onto his chest and hands. This light is even and defined, which suggests the possible use of a strip box positioned at the left-hand side of the frame.
Speaking of profiles, when we look back at John Wilkes Booth, although it’s not quite as obvious, we can see that his profile has also been lit, and this light is brighter than that coming from the cross lighting. This tells us that a third light has been used, which could be something like a strip box placed at the right-hand side of the frame.
In summary, I think we can be pretty confident that three lights were used: two strip lights coming in from the left and right to illuminate the profiles of our characters, and the light source coming in from the right to provide cross lighting. The cross lighting also adds a little bit of fill light to the front of both characters to prevent the shadows from becoming too dark, which is important because both characters are wearing dark clothing. Having watched plenty of Joey Lawrence behind-the-scenes videos, I’m fairly confident that he used something like the Elinchrom Rotalux 135cm Octa Softbox.
THE SETUP
The diagram in Figure 7.1 shows the approximate positioning of the lights I used for the photograph of Steven Cook and Michael Graham.
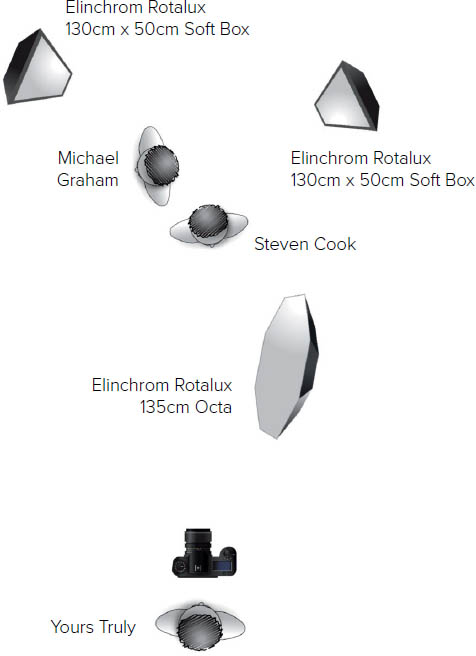
FIGURE 7.1
Rather than photograph in a studio, we decided to set up on location in Pegasus Gym so we could include an array of training equipment in the picture (Figures 7.2 and 7.3). This adds to the atmosphere and sets the scene.
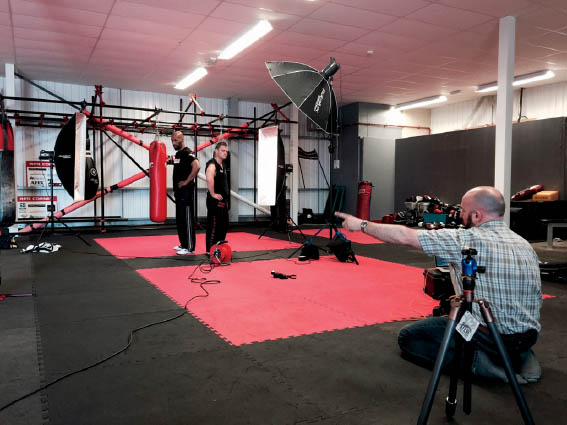
FIGURE 7.2
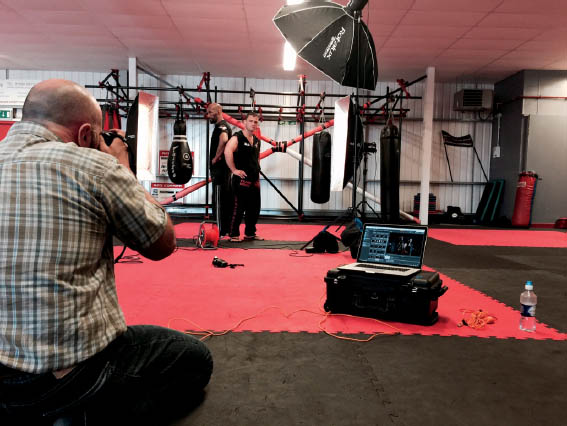
FIGURE 7.3 Tethered shooting with the images uploading directly into Adobe Photoshop Lightroom

NOTE Notice how the outer diffusion panel on each softbox has been removed, leaving just the inner diffusion panel. I did this to create a light that is slightly harder than that in Joey Lawrence’s Killing Lincoln photograph and is more fitting for Steven and Mike.
CAMERA SETTINGS
I chose to use an aperture of f/5.6 to keep the subjects sharp and the background slightly out of focus. Therefore, the main light (the Octa) was metered to give a reading of f/5.6, and the two strip lights profiling Steven and Mike were metered approximately 1 stop brighter.
I kept the ISO low to give me the cleanest possible file with no noise. I used a shutter speed of 1/125s because it’s a good sync speed and it allowed enough of the ambient light from the studio into the picture.
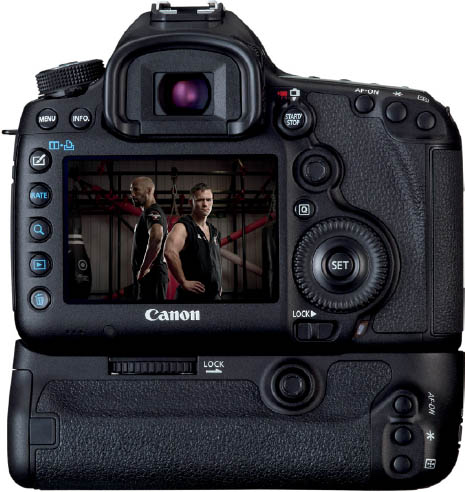
FIGURE 7.4
MODE Manual
ISO 100
APERTURE f/5.6
SHUTTER SPEED 1/125 sec.
LENS 85mm f/1.8
GEAR GUIDE
For this setup I used two Elincrhom Rotalux 50 × 130cm Strip Softboxes (Figure 7.5), an Elinchrom Rotalux 135cm Octa Softbox (Figure 7.6), an Elinchrom ELC Pro HD 1000 flash head (Figure 7.7), and an Elinchrom D-Lite RX One flash head (Figure 7.8).
As you can see, I like to use Elinchrom lights and modifiers, but this is just my personal preference, of course.
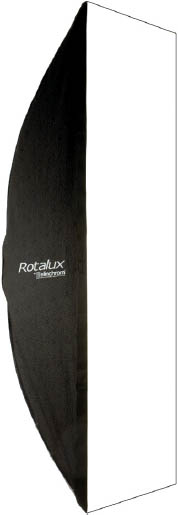
FIGURE 7.5
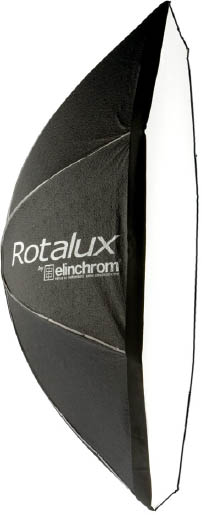
FIGURE 7.6

FIGURE 7.7
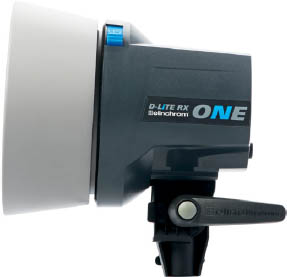
FIGURE 7.8 I use D-Lite RX One on a boom or whenever I need to position a light up high because it’s incredibly light.
SMALL FLASH GEAR GUIDE
For those of you who tend to favor using speedlights as opposed to big, powerful, studio-style lights, nowadays there are so many modifiers available to us that are produced by a range of companies.
To achieve a look that is very similar to that provided by my three-light setup, you could use your speedlights with modifiers such as the Lastolite Hotrod Strip Softbox 30cm (Figure 7.9) and Lastolite Ezybox II Octa (Figure 7.10).

FIGURE 7.9

FIGURE 7.10
POST-PROCESSING
Some of the adjustments we’re going to make to this picture are obvious, like adding in texture and an overall color grading, but there’s also some that are not so obvious. In the original RAW image, Steven is sharp and in focus, whereas parts of Michael are slightly out of focus. The difference isn’t huge, but even so, we can definitely improve the image very quickly using a filter in Photoshop. I’ll also show you one sneaky little technique that I use on almost all male portraits to make them appear much more powerful. Overall though, there isn’t a huge amount of work that needs to be done to get this picture to where we want it to be. But of course, if you’re going to “steal” this setup and look, you can go on to add your own touches, too.
NOTE Download the image file you need to follow along step-by-step at: http://www.rockynook.com/photograph-like-a-thief-reference/
- 1. Here’s the original, as-shot, RAW image open in Lightroom. Even though we’ll be altering the overall color later on, it’s always a good idea to give yourself the best starting point, so let’s fix the white balance. As luck would have it, the back wall in the gym was a neutral grey, so all we have to do is select the White Balance Tool (W) and click on an area just above Steven’s head (Figure 7.11).

FIGURE 7.11
- 2. Next we need to straighten the image. To do this, click on the Crop Tool (R) and then the Angle Tool (Figure 7.12). Bring the cursor over into the image area, click on an area along the top of the back wall, and without releasing, drag out a line to the right following the line of the back wall (Figure 7.13). Then release. This has straightened our picture, so now we’ll alter the composition slightly by dragging the crop handles in from the bottom and top. Press Return (Mac) or Enter (PC).
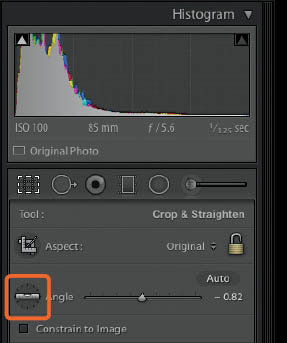
FIGURE 7.12

FIGURE 7.13
- 3. Because both Steven and Michael are wearing dark clothing, the shadow areas could use a little more detail. We can sort this out a by dragging the Shadows slider in the Basic Panel all the way to the right to reach +100 (Figure 7.14). Looking at Steven’s face, we can see that we also need to reduce the highlights a little by dragging the slider to the left to around -14.

FIGURE 7.14
- 4. Let’s brighten the shadow areas on both Steven and Michael’s faces so that their eyes show up a little more. Select the Adjustment Brush (K), and then double-click on the word Effect to reset all the sliders to zero. Increase the Shadows slider to 50 (Figure 7.15) and turn on Show Selected Mask Overlay (Figure 7.16).
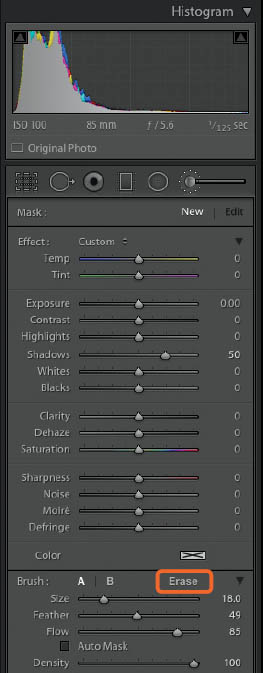
FIGURE 7.15
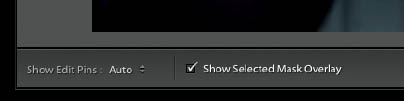
FIGURE 7.16
Brush over Steven and Michael’s faces so that you see the red overlay covering only the shadow areas you want to enhance (Figure 7.17). If you paint over unwanted areas, click on Erase at the bottom of the Adjustment Brush Panel and paint over the areas to remove the red overlay. Turn off Show Selected Mask Overlay (O), and then increase or decrease the Shadows slider to taste. (Note: I increased the Shadows slider to 100.)

FIGURE 7.17
- 5. I always like to add sharpening at this stage in Lightroom because I feel it does such a great job and also because we can use the masking slider to quickly and easily control which areas are sharpened. Open the Detail tab, and in the Sharpening section, increase Amount to around 50 (Figure 7.18). I tend to use this amount quite often on male portraits. Leave the Radius and Detail sliders at their defaults of 1.0 and 25. While holding down the Option key (Mac) or Alt key (PC), click and drag the Masking slider to the right to around 80. The black-and-white mask on the image indicates what is (white) and isn’t (black) being sharpened (Figure 7.19).
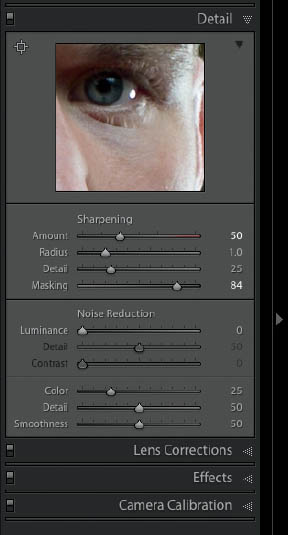
FIGURE 7.18
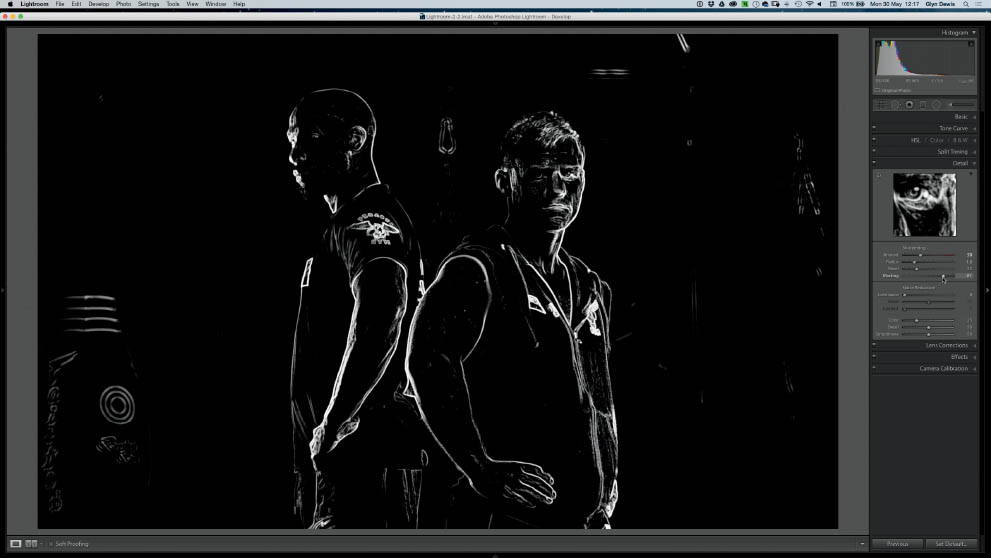
FIGURE 7.19 White areas on the mask indicate the areas that are being sharpened
- 6. Before heading into Photoshop, we’ll shape the light to draw more attention to Steven and Michael by adding in a vignette. Open the Effects tab and drag the Amount slider to -40. Leave all other sliders at their defaults (Figure 7.20).
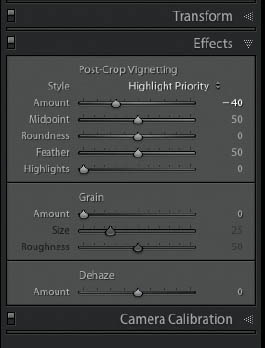
FIGURE 7.20
- 7. Now we’re now ready to send this file over into Photoshop. Ordinarily, I would send the file as a Smart Object so I could continue working nondestructively. However, we haven’t done any major steps so far, so we can send it to Photoshop as a regular layer by going to Photo > Edit In > Edit In Adobe Photoshop CC (Figure 7.21), or simply press Command + E (Mac) or Ctrl + E (PC: Ctrl).

FIGURE 7.21
- 8. Now that we’re in Photoshop, let’s sort out that sharpness issue on Michael. We’ll do this with the Shake Reduction filter, which is not a filter I tend to use all that much, thankfully, but when I have used it it’s does a great job. Of course, it has its limitations, but for the right picture it can really save the day.
Press Command + J (Mac) or Ctrl + J (PC) to create a copy of the background layer, and then go to Filter > Sharpen > Shake Reduction. In the Shake Reduction dialog, drag the square boundary over Michael’s face and resize it by dragging on the outer handles (Figure 7.22). I tend to use the default settings and very rarely adjust them, so once the filter has finished processing, just click OK.
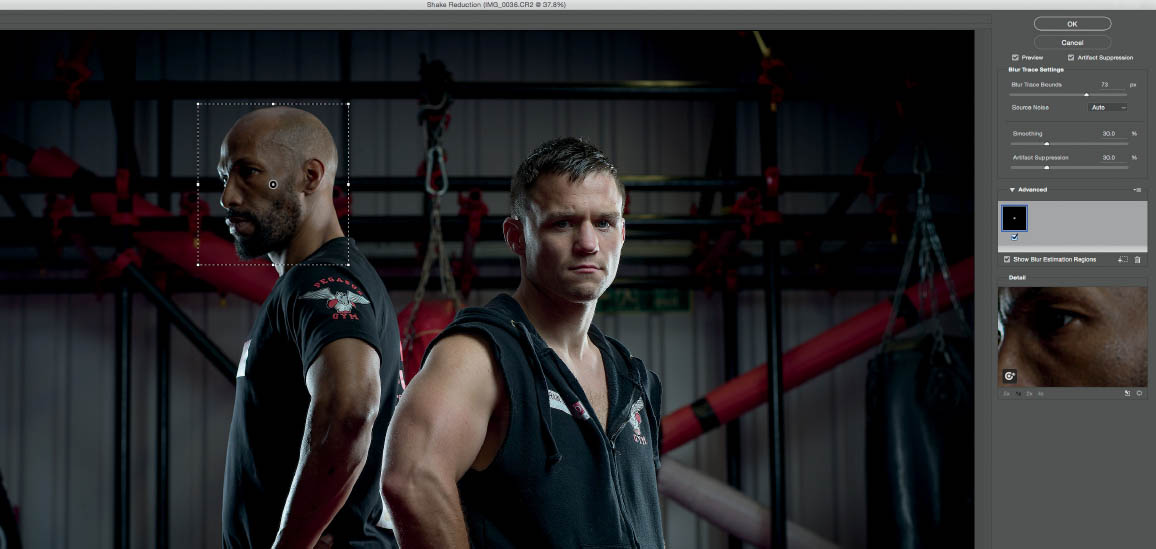
FIGURE 7.22
- 9. We want to apply the Shake Reduction filter mainly on Michael’s face, so we’ll mask out the other areas. Hold down the Option key (Mac) or Alt key (PC) and click on the Add Layer Mask icon at the bottom of the Layers panel (Figure 7.23). This adds a black layer mask that hides the results of the Shake Reduction filter. Press D on the keyboard, and then with a normal, round, soft-edged brush (B), paint over Michael’s face to reveal the results of the Shake Reduction filter. Rename this layer “Reduce Shake.”
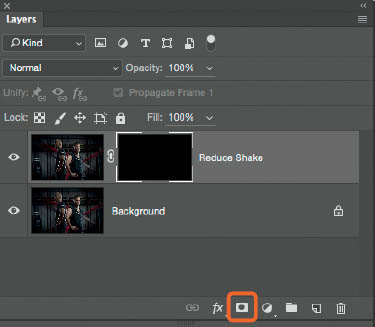
FIGURE 7.23
You can see the results of the Shake Reduction figure by looking at Figure 7.24 (before) and 7.25 (after). Naturally, this filter has limitations, but on an image such as this, the results can be very impressive.
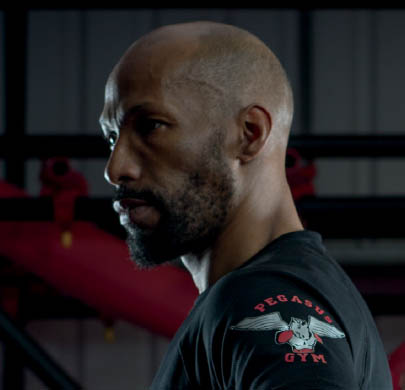
FIGURE 7.24 Before Shake Reduction
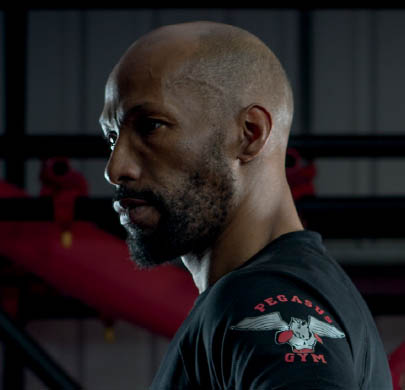
FIGURE 7.25 After Shake Reduction
- 10. Now here’s that sneaky tip you can use to give male portraits a little more power: Add a merged layer to the top of the layer stack by pressing Command + Option + Shift + E (Mac) or Ctrl + Alt + Shift + E (PC), or by going to Select > All, then Edit > Copy Merged, then Edit Paste. Rename this layer “Widen.” Then go to Edit > Free Transform, and in the options bar at the top of the screen, change the width (W) to 105% (Figure 7.26) and press Return (Mac) or Enter (PC). At first it’s hard to see any difference, but try turning the layer on and off by clicking the eye icon to the left of the layer, and you’ll see the change.

FIGURE 7.26

TIP When using this Free Transform trick to give male portraits more power, increase the width to anywhere between 100% and 105%, but avoid going any further than that; otherwise; you’ll stretch the image too much and it will be obvious that you’ve done something to alter it. This trick could also be used on female portraits, but you may want to go to 95% instead of 105%.
- 11. We could do with a little body reshaping, mainly because of the way the clothing is hanging on both Steven and Michael. We’ll do this with the Liquify Filter. Thanks to an update, we can now use the Liquify Filter as a Smart Object. This means we can alter any changes we make later, as opposed to having to completely redo them from scratch.
Add another merged layer to the top of the layer stack by pressing Command + Option + Shift + E (Mac) or Ctrl + Alt + Shift + E (PC). Rename this layer “Liquify” (Figure 7.27). Go to Filter > Convert for Smart Filters, then Filter > Liquify.
First we’re going to work on Michael’s T-shirt. In the Liquify filter dialog, choose the Freeze Mask Tool (F) (Figure 7.28) and paint over some of the area in front of Michael, his arm, and his hand to protect them from being affected. The areas you paint will be covered with a red overlay (Figure 7.29). Now choose the Forward Warp Tool (W) and increase the Size to around 1000. (Tip: You can increase or decrease the size by using the right and left bracket keys.) Then press down and drag the circle to the right over Michael’s T-shirt to bring it in at the waist (Figure 7.30).
Repeat this process on Steven to bring in the lower area of his top.
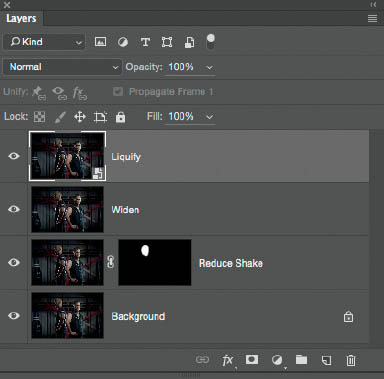
FIGURE 7.27

FIGURE 7.28 Freeze Mask Tool (bottom square) and Forward Warp Tool (top square)

FIGURE 7.29 The Freeze Mask protects areas from being affected when you use tools in the Liquify filter dialog

FIGURE 7.30
- 12. Now we’ll give this picture a bit more punch (no pun intended) by using the third-party plugin Topaz Clarity from Topaz Labs. I love the way this plugin allows you to control different levels of contrast, from Micro to High, and although I only use a fraction its features, I really do like the results I get with it. I use only the Micro Contrast and Low Contrast sliders since these tend to add much more texture and dimension to skin, which is what we’re after. Generally, I’ll increase Micro Contrast to around 0.25 and Low Contrast to 0.10 (Figure 7.31). After you’ve adjusted the sliders, click OK.
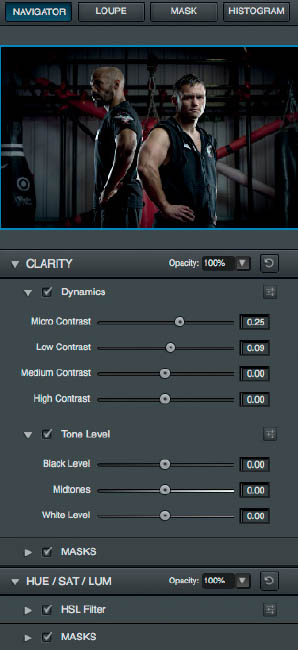
FIGURE 7.31 Using the Micro Contrast and Low Contrast sliders is a great way to enhance texture in skin and clothing
- 13. In Joey Lawrence’s Killing Lincoln photograph, there’s definitely some smoke or fog that adds to the atmosphere, and I think adding this to the picture of Steven and Michael would work really well. Add a new blank layer to the top of the layer stack, and then press D on the keyboard to set the foreground and background colors to their defaults of black and white. Next go to Filter > Render > Clouds, and Photoshop will add the most unrealistic-looking clouds ever! Grab the Rectangular Marquee Tool and drag out a selection in the middle of these Photoshop Clouds (Figure 7.32). Press Command + J (Mac) or Ctrl + J (PC) to create a new layer containing this selected area of clouds. Rename this layer “smoke” (Figure 7.33).

FIGURE 7.32 Use the Marquee Tool to select a small area of the Photoshop Clouds

FIGURE 7.33
- 14. We don’t need the original layer containing the Photoshop Clouds filter so we can just delete it. Now click on the smoke layer and zoom out a bit so that there is some space around the image in the main workspace. Then go to Edit > Free Transform. Hold down Shift + Option (Mac) or Shift + Alt (PC) and click on a corner transform handle and drag it outward to make the smoke layer much, much bigger (Figure 7.34). Press Return (Mac) or Enter (PC), and then lower the Opacity of the smoke layer to around 25% (Figure 7.35).

FIGURE 7.34

FIGURE 7.35
- 15. It looks like there are some lights in the upper-left and upper-right corners of the Killing Lincoln photograph, so we’ll add a couple of fake lights in the corners of our picture as well. We’ll use what I call The World’s Simplest Lighting Effect, because it really is exactly that.
Add a new blank layer to the top of the layer stack and rename it “Light Left.” With a white foreground color and a normal, round soft-edged brush, click once in the center of the picture (Figure 7.36).

FIGURE 7.36
Zoom out and then go to Edit > Free Transform. Hold down Shift + Option (Mac) or Shift + Alt (PC) and drag outward to increase the size (Figure 7.37), and then press Return (Mac) or Enter (PC). Select the Move Tool and click and drag the “light” into the top-left corner of the picture so that only the soft area is visible and the center is outside of the picture area. Lower the Opacity to around 80%. Copy the Light Left layer by holding down Command + J (Mac) or Ctrl +J (PC) + J, rename it “Light Right,” and use the Move Tool to drag the “light” across to the upper-right corner (Figures 7.38 and 7.39).
The next steps are where we add the finishing touches and these are subject to personal taste. I’ll take you through the steps I did to get to my final image, but it’s worth noting that I generally perform these steps after taking a break and then returning to the picture. Giving yourself some time away from the screen will help you to look at your picture with fresh eyes and instantly see what you need or want to do.

FIGURE 7.37

FIGURE 7.38
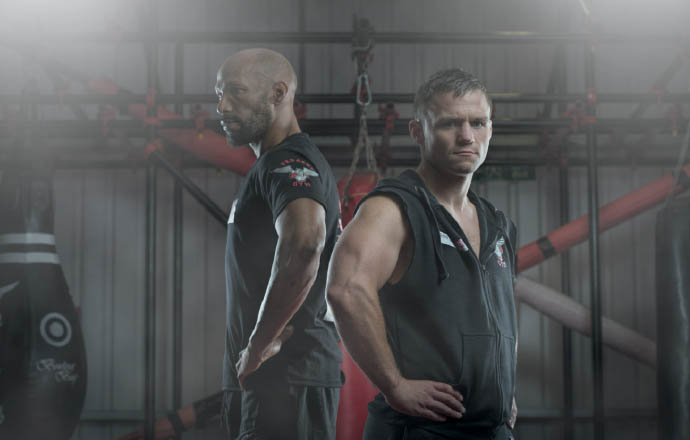
FIGURE 7.39
- 16. Add a merged layer to the top of the layer stack by pressing Command + Option + Shift + E (Mac) or Ctrl + Alt + Shift + E (PC). Now we’re going to use the Nik Collection Color Efex Pro 4 plugin to color grade the picture. As I mentioned in chapter 4 (page 56) there are alternative plugins and techniques you can use here, but at the time of writing this book, I favor this Nik Collection plugin from Google.
Open the plugin by going to Filter > Nik Collection > Color Efex Pro 4. Choose Cross Processing and select Y06 from the Method menu (Figure 7.40). Increase the Strength slider to 60 and click OK (Figure 7.41).
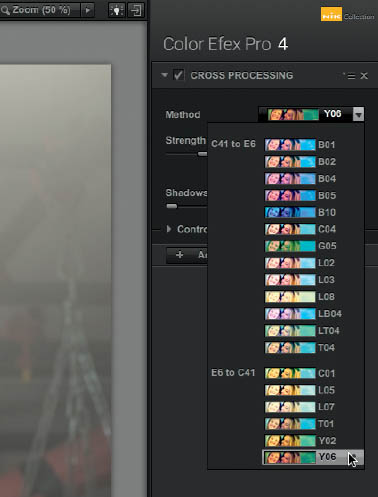
FIGURE 7.40

FIGURE 7.41
- 17. We’ll use the Nik Collection Silver Efex Pro 2 plugin to desaturate the image. Go to Filter > Nik Collection > Silver Efex Pro 2. Use the default Neutral black-and-white filter that is applied when you first enter the plugin, increase the Structure to 40% (Figure 7.42), and click OK. Once you’re back in Photoshop, lower the Opacity of this layer to around 25% (Figure 7.43).
- 18. To finish off I think we need to add a little more contrast and texture to the picture to increase the drama and mood. To do this, we’ll make one more visit to Topaz Clarity. Press Command + Option + Shift + E (Mac) or Ctrl + Alt + Shift + E (PC) to add a merged layer to the top of the layer stack, rename it Topaz Clarity, and go Filter > Topaz Labs > Topaz Clarity. Click OK to use the previous settings.
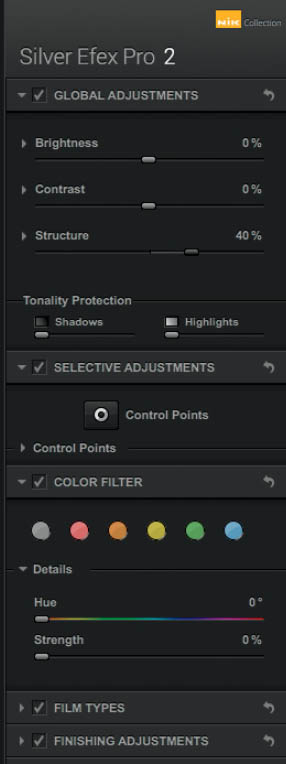
FIGURE 7.42

FIGURE 7.43
As I said, adding these final finishing touches is very much a matter of personal taste. I’ll often dive in and out of plugins and try out different Photoshop techniques until I get the look I’m after (Figure 7.44).
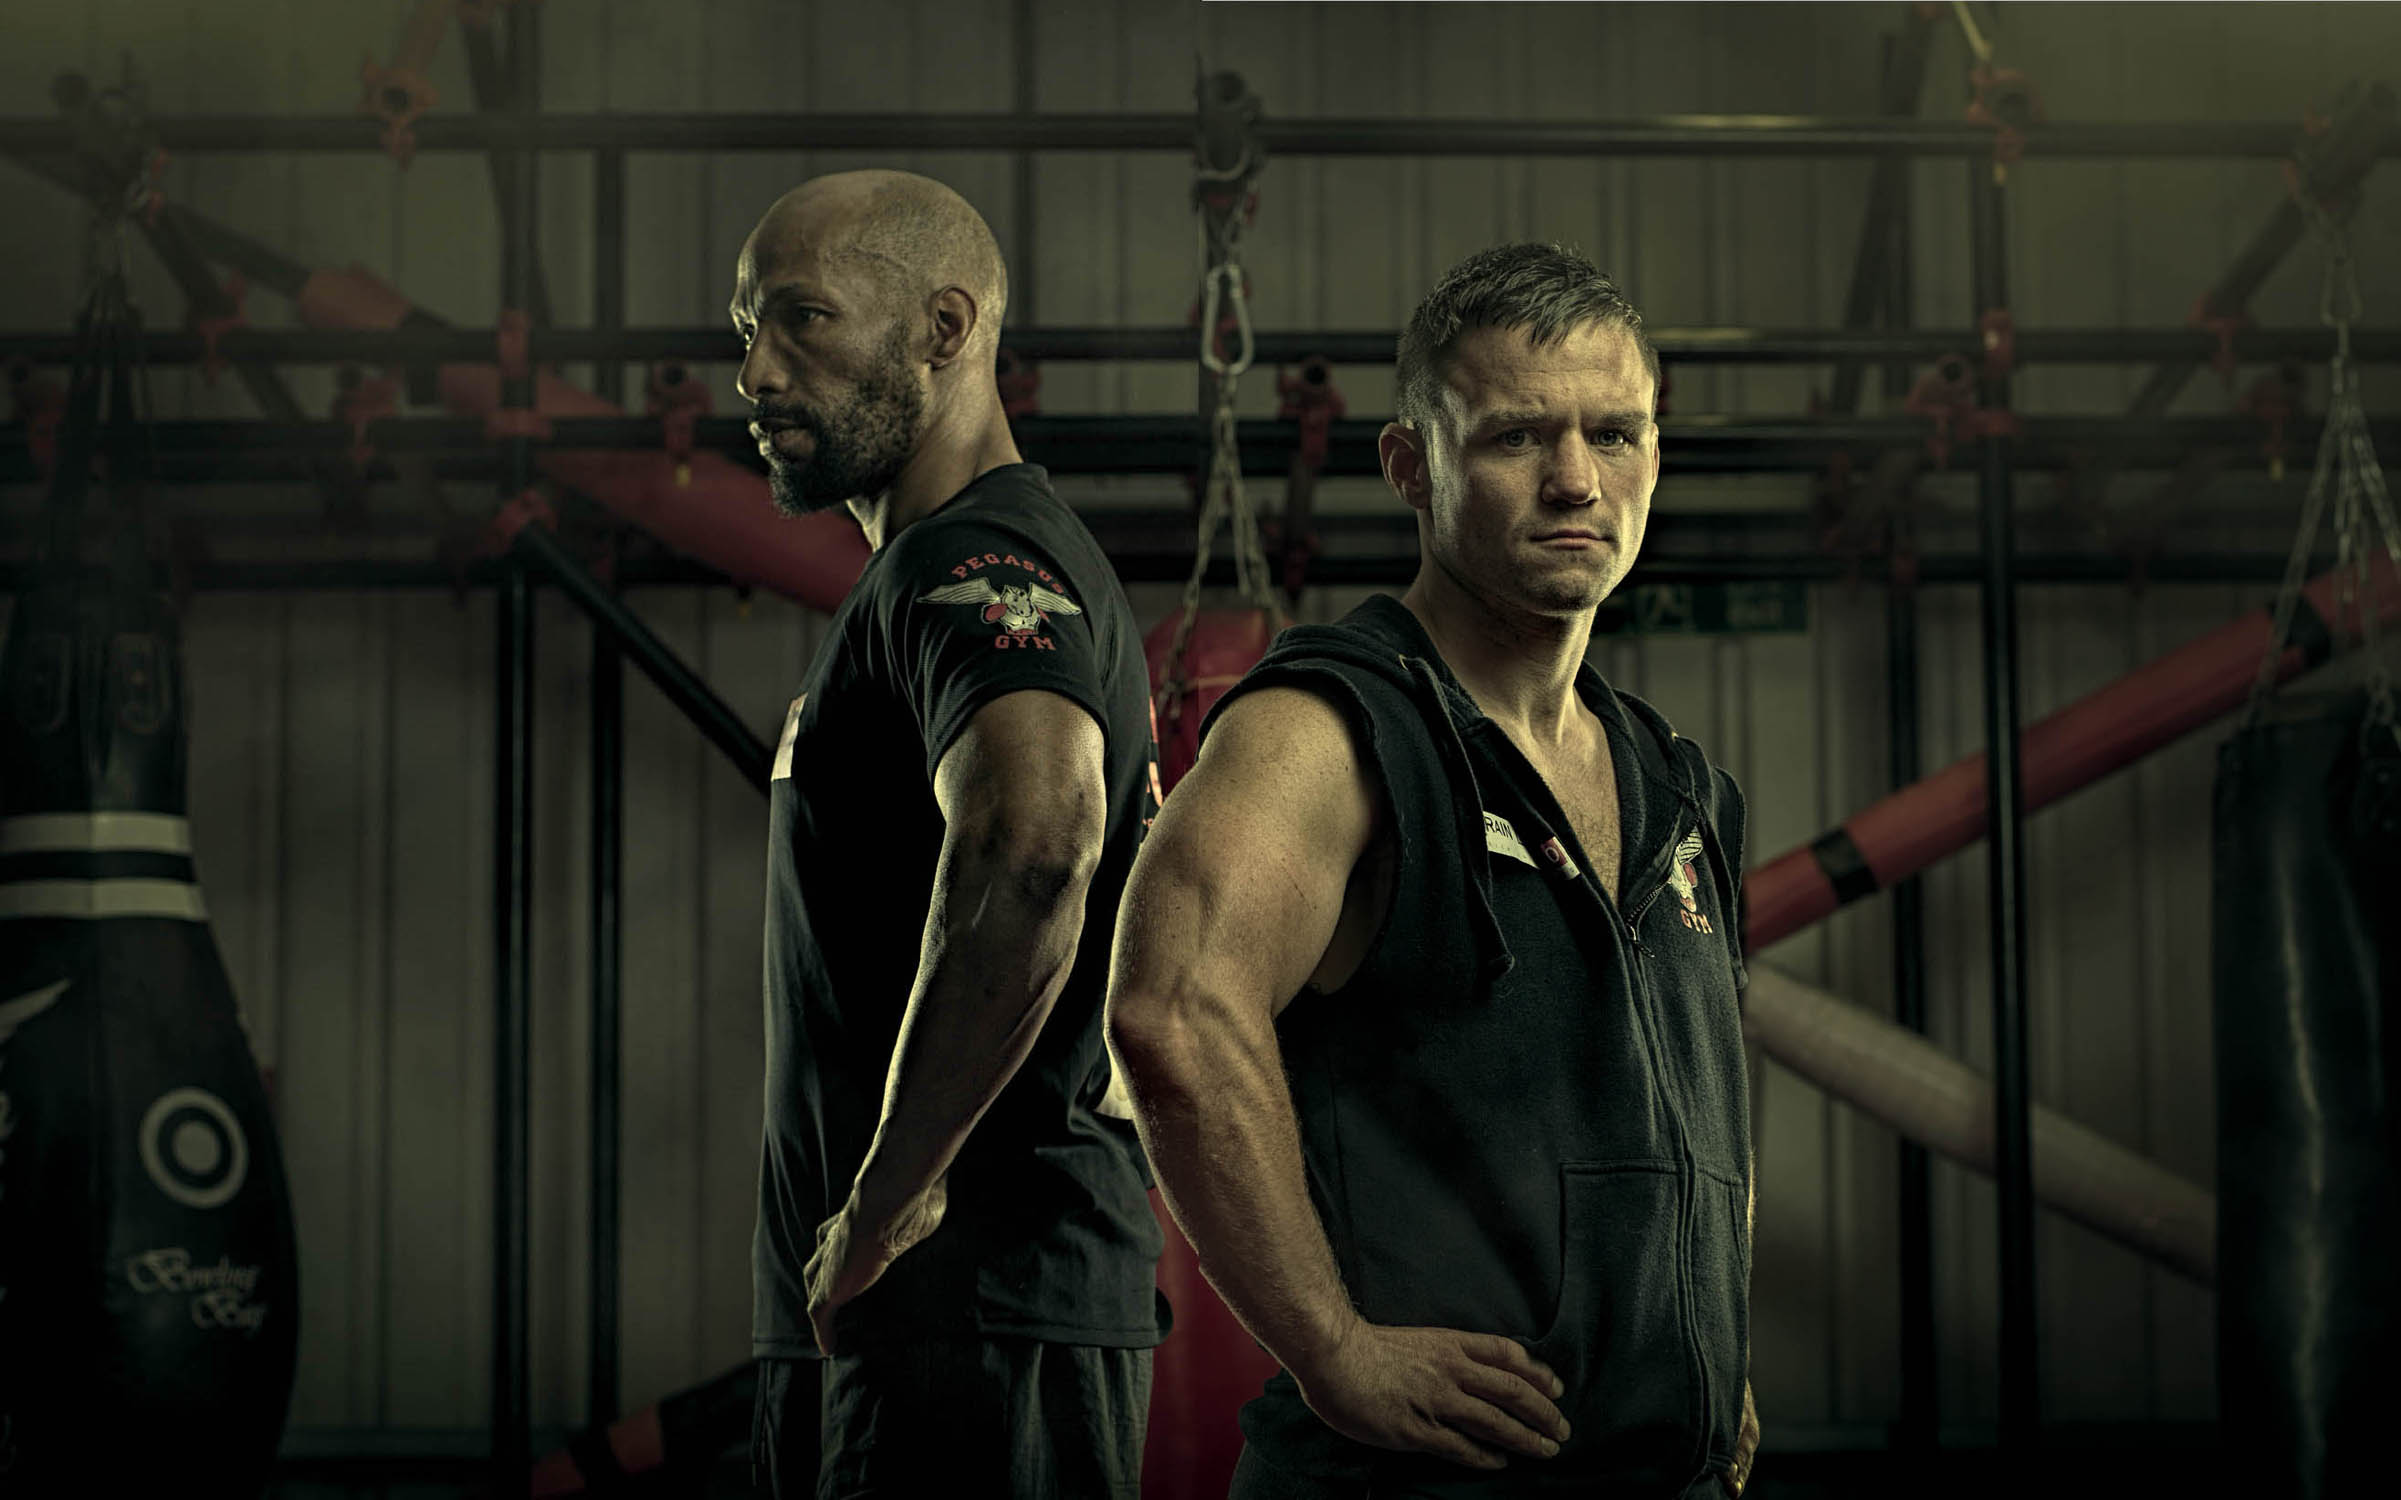
FIGURE 7.44 Final retouched image