If I had been writing this book a couple of years ago, I would most likely not have included a chapter on raw. That's because at the time most of the people shooting raw were pro photographers. Today that's all changed as more and more people are seeing the value of this file format. In this chapter, I explain exactly what raw is and how to handle raw files in Photoshop Elements (PSE). If you've been shooting raw, this chapter should help you get a better understanding of raw and how to get the best results possible from your raw files. If you haven't begun to shoot raw just yet — or even if your camera isn't capable of shooting raw — I recommend that you read this chapter so you understand why so many photographers have made the switch to raw.
When I point my digital single lens reflex (dSLR) camera at a scene and click the shutter, the camera's sensor captures a huge amount of information. If I have the camera set to capture JPEG files, the camera's onboard processor processes the captured information into a compressed JPEG file, using the image settings I have dialed into my camera.
This resulting file contains only a fraction of the available information. Any information that isn't used to create the JPEG file is discarded.
The JPEG capture process seems the obvious choice because the camera automatically processes files quickly. However, it leaves something to be desired for photographers looking to maximize the quality of their images. The problem with JPEG is that photographers don't get to look at all the information before most of it is discarded.
Note
Almost every dSLR camera can capture photos in the raw file format. Only a limited number of point-and-shoot cameras have this capability, though that number is increasing every year.
When you shoot in the raw mode, nearly all the information that the camera's sensor captures is saved in the file. This enables you to selectively choose which information to use because you manually convert the data from the raw file into a form that the PSE Editor can use.
This conversion process is one of the reasons some photographers choose to stay away from shooting raw because they either don't understand it or it seems like too much work. By the time you finish this chapter, I hope you not only see the importance of the raw file format, but also understand how easy it is to handle the conversion process.
So back to the question: What is raw? A raw file is a grayscale image. This means that qualities such as color attributes and color space have not been assigned to the file. In fact, the primary camera settings that are permanently part of a raw file are ISO, aperture, and shutter speed. Everything else is mostly up for grabs.
You can make decisions about color space or white balance after the fact, during the process of converting the raw file. This is why you often hear raw files described as digital negatives. They are open to a great deal of interpretation that can be done during conversion — just like the process a film photographer goes through to interpret a negative when printing in a darkroom.
Another reason a raw file is called a digital negative is it shares an important trait of a film negative. Altering a raw file permanently with the PSE Editor is virtually impossible. The file can be interpreted in many ways, but none of the conversions alters the underlying file. Instead, a set of metadata instructions is written to describe the way the raw file is meant to look.
This means that no matter what you make a raw file look like when you convert it (changes to cropping, tone, color, and so on), you can always undo those settings on the original raw file and back up to what it looked like the day it was shot.
Any adjustments you make are simply written to a file that can be overwritten or deleted at any time. In fact, when you convert a raw file and open it in the PSE Editor, it has to become something different than a raw file because the Editor can't work directly with raw files. That's why a conversion process is necessary.
All digital camera manufacturers have their own versions of raw. Nikon uses NEF and Olympus uses ORF. My Canon shoots with the CR2 raw file format.
However, when I open a file in the Editor and then use the Save As command to save it, the Format section of the Save As dialog box doesn't include an option for a format called CR2 — or NEF or ORF, for that matter. Instead, files must be saved as TIFF, PSD, or JPEG.
Because of this, the data in the original raw file remains intact, allowing me to re-convert it for editing in the Editor at a later date with completely different settings.
Note
Is it RAW or raw? Most file formats are spelled with all caps because they're acronyms. For example, the raw file formats CR2 and NEF stand for Canon Raw 2 and Nikon Electronic Format. When referring to these files generically, raw refers to the type of information that's stored.
I imagine that you're starting to see some advantages to shooting raw. I'd be remiss if I didn't take a moment to tell you about some of the disadvantages.
Raw files are much larger in size than JPEG files. They can run two to four times larger because a lot more information is being saved. This means that raw files consume media cards and hard drives much faster than their JPEG cousins. You need to be aware of this, especially if you're going on vacation and have a limited number of media cards.
Tip
Most dSLR cameras enable you to shoot raw and JPEG at the same time. At first this may seem like a good idea. However, I find that those JPEG files are of little use. Why use a JPEG when you have a raw file? Also, it's easy enough to make a JPEG from a raw file if you need it.
The biggest problem with the raw format is that there are many varieties of raw files, as I mentioned earlier. Each camera company creates its own flavor of the raw format. In fact, these companies have several slightly different flavors that all use the same name.
For example, my Canon camera shoots raw files with the extension of CR2. Other Canon dSLRs also share this CR2 extension, yet the files are different; different algorithms are used to convert the files. Adobe estimates that at least 200 different versions of the raw file format exist.
Some people envision a nightmare scenario when it comes to the expanding variety of raw file types. What would happen if one of the major camera manufacturers went out of business and no longer supported its raw format? At some point it could become difficult to convert those files because no one would have the software for them.
Adobe is attempting to address the complex issue of varying raw formats with the creation of a standardized raw format called DNG (digital negative). Its goal is to have the major camera manufacturers support this format as new cameras are rolled out. Some are beginning to get on board, but the adoption rate is slow.
Most people begin their digital camera experience shooting JPEG files. It doesn't take them long to realize that when they overexpose the highlights in a JPEG file, it's nearly impossible to bring detail back into them by darkening the image. If there's no detail in a highlight, there is no way to appropriately add it back in. This is a different scenario when shooting raw.
Note
Digital capture is linear in nature. Without getting too technical, this means that it devotes more bits to capturing highlights than it does to capturing shadows. This is the opposite of the way humans see things. Humans are really good at distinguishing detail in the shadows and not very good at seeing detail in the highlights.
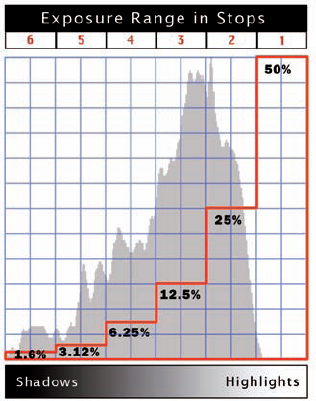
A typical raw file captures 4,098 distinct tonal levels within a six-stop range, stretching from pure black to pure white. This range is graphically represented by a histogram. Because raw is a linear capture, a full 50 percent (2,048 levels) of the file's tonal information is devoted to the brightest stop of information, which is represented by the right side of the histogram. Only 1.6 percent (64 levels) of the file's tonal information is devoted to capturing the shadow detail, which is represented by the left side of the histogram. When an image is underexposed by one stop, no information is captured in the brightest stop that contains 50 percent of the tonal information, as shown in Figure 8.1. This essentially wastes half of the data capturing capacity of the file.
If the camera is adjusted to the correct exposure, the histogram moves to the right one stop, as shown in Figure 8.2.
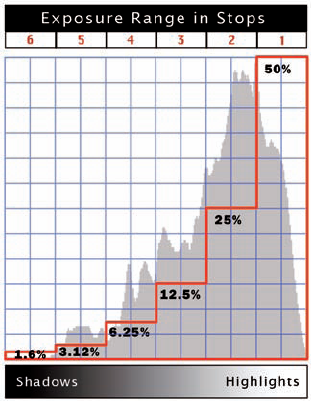
Now the brightest stop of information is used to describe the highlights in the image. Because so much information describes these highlights, detail that seems lost at first can be recaptured during the raw conversion process with ACR.
Another benefit to adjusting the exposure to the right is that now twice as much information is being used to describe the darkest shadows on the left side of the histogram, giving you more information to work with when adjusting shadow tones with ACR.
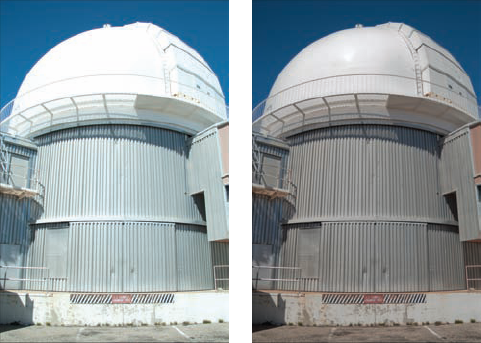
Figure 8.3 shows a photo I shot of one of the observatories at Kitt Peak National Observatory. When I shot this picture, I inadvertently overexposed it.
As you can see in the first photo in Figure 8.3, the Arizona sun is reflecting so brightly off of the domed roof, that there's no detail in it. Fortunately, this was a raw file with 50 percent of its data-capturing bandwidth devoted to recording highlights. I opened the file in the ACR converter and recovered most of the highlight detail, as shown in the second photo in Figure 8.3.
Notice that you can now see the railing in the walkway around the lower part of the white dome. One other thing to note is that I didn't make any color adjustments to the second photo. Merely adjusting the tonality of this photo revealed its hidden color. If this photo had been shot in JPEG, the file would have been useless because it would have been impossible to show the detail in the blown-out highlights.
Something else about underexposure versus overexposure is that it's better to have to darken a photo in post-processing than it is to have to lighten it. That's because much of the noise in a digital photo is in the shadows.
Noise refers to digital artifacts (unwanted leftovers) that often show up as specks that make an image look grainy. It's usually caused by shooting at high ISO speeds and by underexposure. When a photo is lightened, the tonal range of the shadows is expanded, revealing the noise. When a photo is darkened, these tonal ranges are compressed, helping to hide any noise.
So here's the thing to remember: If you're shooting raw, be sure to fully expose for the highlights. Naturally, nailing your exposures is always best. But if you're going to err on one side or the other of a perfect exposure, make sure that you err in the overexposed direction when shooting raw.
One of the big advantages to shooting raw is that metadata is used to record any changes made to a file, preventing any editing changes from having a permanent effect on the image. But because there are so many versions of raw, it's difficult for Adobe to completely understand the inner workings of each version, especially when you consider that these formats are proprietary (the companies that create the formats don't openly share the code that's used inside them).
Adobe decided a long time ago that they would not allow their products to write information to these files because they could not predict exactly how a file would be affected by a process as simple as writing some metadata to the file's header.
Note
Because the DNG raw format was developed by Adobe, metadata can be written directly to DNG files.
Adobe solved the metadata problem with a unique solution for storing this information, called XMP sidecar files. XMP stands for Extensible Metadata Platform. It is a labeling technology that enables information to be embedded into a file. Because that isn't an option when working with proprietary raw files in PSE, the XMP data is stored in a separate sidecar file that is placed next to the original raw file.
This file has the same root name as its parent raw file with an XMP file extension. Figure 8.4 shows some CR2 raw files and their XMP sidecar files. Notice how much smaller in size the XMP files are than their parent files.
Because raw files need these XMP sidecar files, you need to be sure to copy both sets of files when you're moving or backing up your photos.
When you copy the original raw file, be sure to copy its associated XMP sidecar file, too. That way when the copied files are viewed on another computer, all the previous edits are visible.
Note
If a raw file's XMP sidecar file is deleted, the original file reverts to looking like it did when it was first downloaded from the camera.
Now that you understand the theory behind raw, it's time to learn how to quickly get great conversions from your raw files using ACR. ACR is a plug-in that comes with PSE. A plug-in is a supplemental software program that adds functionality to PSE.
Adobe and a host of other companies make plug-ins. In this case, the added functionality enables you to seamlessly incorporate raw files into your PSE workflow by providing an intermediate program that's used to convert the raw files for editing.
Whether you open a raw file from the Organizer, (or Bridge on the Mac), or by using the File
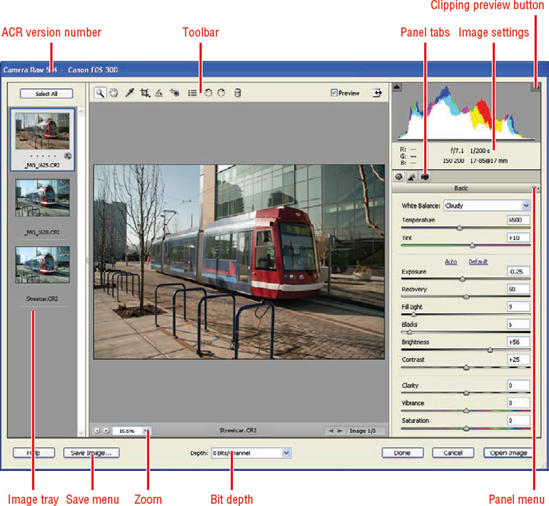
Figure 8.5 shows the ACR workspace, which provides you with a lot of control over the massive amount of data stored inside the file.
Tip
To open multiple files into ACR from the Organizer, select them and then choose Full Photo Edit from the Organizer's Fix tab. If you're using a Mac, select the files in Bridge and double-click on one of them.
To understand the ACR workspace, it's best to break it down into its key parts:
Image tray. The Image tray is only visible when more than one file is open in ACR. To adjust all images at the same time, click Select All before making adjustments. To work with a smaller group of images, Shift+click or Ctrl/

Toolbar. The Toolbar at the top of the workspace has a handful of tools. I discuss the more important ones in detail in a moment.
Image Display area. The Image Display area is where the most active photo is displayed. All adjustments are previewed here. Click the Zoom Level buttons or use the Zoom menu to change magnification. Select the Hand tool (H) from the Toolbar (or press the Spacebar to momentarily access it) to pan the zoomed photo.
Image settings. Basic exposure information about the selected photo is displayed here. Additionally, a color value readout shows red, green, and blue channel values of any color you hover over, much like in the Editor's Info panel.
Clipping Preview indicators. At the top left and top right of the histogram are two small triangular buttons. Each is a Clipping Preview button. The one on the left is used for displaying shadow clipping, and the one on the right is used for displaying highlight clipping. Click the preview buttons to activate them in the Image Display area.
Panel buttons. Three sets of panels are stacked on top of one another to save space. By default, the top panel is the Basic panel. Click one of the other tabs to bring its panel to the front.
Panel menu: Like all panels in the Editor, the ACR panels have a menu. It's the same menu, no matter which panel is at the front. Among other things, it enables you to reset a photo to its default settings, or to apply the previous conversion to it.
Tip
To reset a raw file to its original state, click the Panel menu button and choose Image Settings from the menu.
Converting a raw file with ACR is actually quite similar to adjusting a file in the PSE Editor.
The advantage to using ACR for these adjustments is that you are able to access all the raw data before the file is converted. Another advantage is that you can undo any adjustment you make with ACR at any time because of the nature of raw files. Because of that, it's best to do as much as you can with ACR before opening a raw file into the Editor.
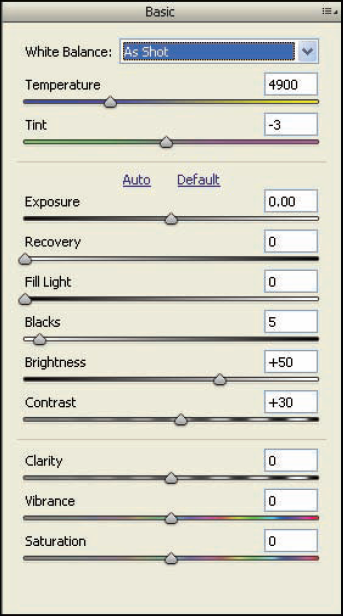
Most of the editing action in ACR takes place in the Basic panel, shown in Figure 8.6. Refer to this figure as you go through the following sections.
Digital cameras enable you to choose a white balance setting that's appropriate for the color of light that illuminates your subject. For example, if you're shooting under fluorescent lights, it's necessary to insure that your camera's white balance is set to Fluorescent.
To avoid confusion and mistakes, many people shoot with their camera's white balance set to Auto. This allows the camera to make adjustments according to the light. However, these in-camera adjustments aren't always completely accurate.
When you're working with raw files, you have a lot of control over the photo's white balance because it hasn't officially been assigned to the file. Even if you choose a specific in-camera white balance setting, it can be overridden during the conversion process. In ACR, you can fine-tune the white balance of a photo a few ways:
White Balance tool. The White Balance tool, (third from the left on the Toolbar shown in Figure 8.5) is the easiest way to set your white balance. This tool works much like the gray eyedropper tool in the Levels dialog discussed in Chapter 7. You use it to click on something that's supposed to be neutral (white, gray, or black) to remove any colorcast from the photo.
White Balance menu. You can also adjust white balance by choosing a white balance preset from the White Balance menu at the top of the Basic panel. It has the same presets your camera has.
White Balance sliders. If neither of the two previous options works for your image, use the Temperature and Tint sliders to manually adjust white balance. Moving the sliders to the right warms the color and moving them to the left cools it. Be aware that small changes often make big changes.
Tip
White balance is often the first thing to address when converting a raw file, but if the photo's tonality is way off, you may need to get it closer to ideal before you can make a meaningful assessment of color.
After you get the white balance set, you can further adjust the photo's color using the Vibrance and Saturation sliders found at the bottom of the Basic panel. The Saturation slider works very much like the Saturation slider in the Hue/Saturation command, discussed in Chapter 7. However, it does not have the ability to work with different color ranges selectively.
The Vibrance slider is a smart version of the Saturation slider. It has a greater effect on less saturated colors than it does on colors that are already saturated. This helps bring overall color saturation into parity. Additionally, it attempts to prevent colors from over-saturating and becoming clipped, and it tries to protect skin tones from over-saturation as well.
The tonal adjustment sliders in the Basic panel enable you to modify a number of aspects of a photo's tonality. The main goal is to expand contrast while avoiding shadow and highlight clipping, and then adjust overall image brightness. Here's the basic workflow for adjusting tonality with these sliders:
Click both of the Clipping Preview buttons that are above the histogram. When these previews are activated, all shadow clipping is displayed in blue and all highlight clipping is displayed in red. You can also get a preview similar to the clipping preview in the Levels command by holding down the Alt key while adjusting the Exposure, Recovery, and Blacks sliders.
Adjust the Exposure slider to fine-tune highlight clipping. This works much like the white Input slider in Levels. If you see the red clipping preview, drag it to the left until the red disappears. If you don't see clipping, drag it to the right until you just see clipping and then back off until the clipping goes away. Don't worry if overall image brightness is affected by this slider because you'll be able to adjust it in a moment.
Adjust the Blacks slider to fine-tune shadow clipping. It works much like the black Input slider in Levels. If you see blue clipping, drag it to the left until the clipping disappears. If you don't see clipping, drag it to the right until you just see clipping and then back off until the clipping goes away.
Use the Brightness slider to modify overall brightness. This slider works much the same way as the gray Input slider in Levels. Drag it to the right to brighten the image and drag it to the left to darken it.
For most photos, this is all that's required for tonal adjustment. However, there are some special situations that require you to use two of the sliders that were not used in the previous steps: the Recovery and Fill Light sliders. These sliders are very similar to the Shadows and Highlights sliders in the Editor's Shadows/Highlights command, discussed in Chapter 7. You use them as follows:
Recovery. The Recovery slider is used to bring problem highlights into line. Remember that a raw file has a lot of information in the highlights, so quite often you're able to recover quite a bit of highlight detail. It's always worth giving it a try.
Fill Light. The Fill Light slider is used to open up dark shadows. This is especially useful when the Blacks slider is at a value of 0, but you still see clipping in important shadow detail.
The thing to be aware of with the Recovery and Fill Light sliders is that, like the Shadows/Highlights command, these adjustments can negatively affect overall contrast by reducing it and making the entire image look flat in tone. Use them only when you need them.
There are two more sliders I didn't mention: the Contrast and Clarity sliders.
Contrast. On occasion, you may need to further adjust an image's midtone contrast. One way to do this is to use the Contrast slider. Values greater then 50 increase contrast, and values less than 50 reduce it. Remember, though, if you're comfortable using Adjust Color Curves in the Editor, you can exercise more control over contrast adjustment after the file is open.
Clarity. Another way to adjust midtone contrast is to use the Clarity slider. Positive values with this slider increase midtone contrast and add a bit of sharpening to the photo. Negative values do the opposite.
Select the Detail panel by clicking its tab. When you do, you see the panel shown in Figure 8.7. This panel enables you to adjust two different aspects of the image, sharpening and noise reduction.
Sharpening works by finding an edge between tones in the photo and then enhancing the contrast around those edges by darkening one side and lightening the other side. These adjustments create a haloing effect called sharpening halos. They trick your eyes into thinking the photo is sharper.
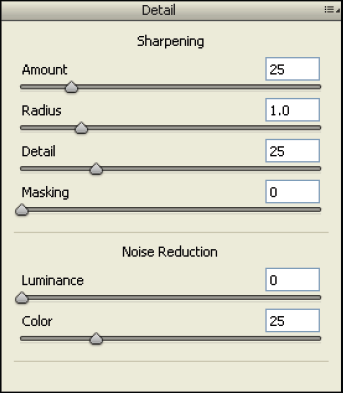
The main thing to be aware of when it comes to sharpening is that the most important sharpening step, which is the final output sharpening, should only take place after a photo has been cropped and sized to its final size for printing or other output uses.
Because that's typically at the end of the workflow, it's best to avoid excessive sharpening at this early stage. With that said, here's what the Sharpening sliders are used for:
Amount. The Amount slider is just that — the amount of sharpening. Higher values equal more edge contrast, which equals more edge detail.
Tip
When using the Detail panel, it's important to zoom the photo to 100 percent in order to be able to evaluate the adjustments you make with these sliders.
Radius. The Radius slider determines how many surrounding pixels are considered part of the edge. Higher values expand the size of the sharpening halo. Extreme values create noticeable halos that detract from the image. Notice that a value of 3.0 is the maximum value. You can go much higher with the Editor's sharpening filter. Adobe kept the maximum value low because they understand the need for low levels of sharpening at this phase of the workflow.
Detail. The Detail slider is used to modify the degree of sharpening applied by the Amount and Radius sliders. Lower values restrict sharpening to edges with higher contrast. Higher values increase haloing and apply sharpening effects to most of the image.
Masking. The Masking slider is also used to control the effects of the Amount and Radius sliders by creating an edge mask that attempts to isolate higher contrast edges that benefit the most from sharpening. Low values allow sharpening to be applied to a greater range of detail. High values restrict sharpening to edges with the strongest contrast.
Remember to take it easy with sharpening this early in the workflow. Also be aware that if a photo is out of focus, these sliders won't be able to bring it back into focus.
The second set of sliders is used to remove noise, which looks similar to tiny grain in an image. Noise comes in two basic types: luminance noise (often called grayscale noise) and color noise. Luminance noise is specks of the same color of gray. Color noise is specks of different colors. Noise usually occurs in the darker tones of photos that were underexposed or shot at higher ISO settings.
Both of the Noise Reduction sliders work the same way. Use Luminance if you see grayscale noise and use Color if you see color speckles in the noise. (It's not uncommon to see color noise after the luminance noise is removed.)
Increase the values on the sliders until you see the noise begin to blur, which is how noise is typically removed. Because noise removal tends to affect the sharpness of the entire image, it's a good idea to use the Sharpening sliders to recover some of the lost detail.
The third panel in the stack of adjustment panels is the Camera Calibration panel. This panel contains the Camera Profile menu shown in Figure 8.8.
These presets enable you to synchronize the ACR depiction of the photo with scene presets found on many dSLRs. When you shoot JPEG, you must choose a scene preset before shooting. But when you shoot raw, you can apply these settings after the fact — much like changing the white balance after the fact.
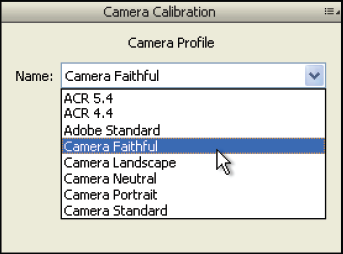
If you use any of these in-camera presets, consider trying some of the options in the Camera Calibration panel's Camera Profile menu to see if any of them improves the look of your photos.
You use the Crop tool (C), fourth from the left on the Toolbar (as seen back in Figure 8.5), to apply a crop to the raw file before it's opened into the PSE Editor. I recommend that you save final cropping for later in the workflow because you may change your mind after the raw file is opened into the Editor. However, if you're working quickly and you don't plan to do extended editing in the Editor, it may be easier to crop a raw photo in ACR.
You have two different options when using the Crop tool. You can create a freeform crop or you can crop to a specific aspect ratio, such as 4:5 or 5:7. To see the cropping options shown in Figure 8.9, click and hold on the Crop tool.
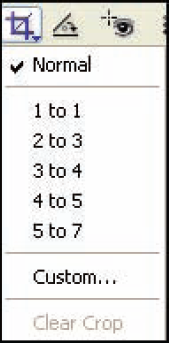
There are two important things to understand when using this tool. The first one is that when you crop a raw file, you aren't actually cropping to a specific size.
For example, if you choose 4 to 5 for a cropping aspect ratio, the file will not measure 4 × 5 inches when it's opened into the Editor. The aspect ratio will be the same as a 4 × 5-inch print, but the actual size depends on the size of your camera's sensor.
If you want a 4 × 5-inch print, you'll need to do final sizing in the Editor. That's why the aspect ratios say to instead of ×. That's also why there is no 8 to 10 option because 4:5 and 8:10 are the same aspect ratio. (Divide 8 and 10 by 2 and you get 4:5.)
The second thing to understand about cropping a raw file is that you can modify or undo the cropping on the raw file at a later date. That's because, like all other modifications, cropping instructions are a set of metadata that doesn't permanently affect a file. To undo a crop, choose Clear Crop from the bottom of the Crop menu.
At the bottom of the ACR workspace is a menu named Depth. It enables you to choose to open a photo into the PSE Editor as an 8-bit or 16-bit file. Though the number 16 is twice the number 8, the difference between 8-bit and 16-bit files is much larger.
Consider this: an 8-bit file has 256 distinct tones and 16.7 million color definitions. A true 16-bit file contains 65,000 different tones and 281 trillion colors. This may seem like overkill — and quite often it is.
Humans can't even see 281 trillion individual colors. But if you're going to be making cumulative or massive adjustments in the Editor, or if you're working with marginal original files, having a lot of extra editing headroom is good. That's because just about anything you do in the Editor is destructive by its very nature.
Data is even lost with simple tonal and color corrections. When you have a 16-bit file with a lot of extra tones and colors, the data loss isn't as noticeable.
If you're not doing heavy editing to a file, the difference between 8-bit and 16-bit can be hard to see. For that reason, it's best to work with 8-bit files because 16-bit files are twice the size of 8-bit files. That means they consume more hard drive space and other computer resources like RAM.
Another reason to avoid 16-bit files is that many of the Editor's commands don't work with 16-bit files and it's impossible to save a JPEG of a 16-bit file.
Tip
If you open a 16-bit file into the Editor, you can convert it to 8-bit by choosing Image
When you take a few moments to make a quality raw conversion with ACR, a 16-bit file is rarely necessary. Because of that, I don't use them very often.
When you have a raw file looking the way you want it to look, you have a few options. You can click the Open Image button to open a version of the file into the PSE Editor.
If you have multiple raw files in ACR, your can select all of them or a group of them and open them by clicking the Open Image(s) button. Remember that the raw file itself isn't opened in the Editor. A converted version of the file opens instead because the Editor can't work with a raw file. When editing is complete, you need to save this derivative file as a PSD, TIFF, or JPEG.
If you aren't ready to edit the file in the Editor, you can click the Done button to apply your settings to the raw file without opening it. Doing this writes all the appropriate metadata to the file's XMP sidecar file so that the next time you look at it, the file will look the way it last did in ACR.
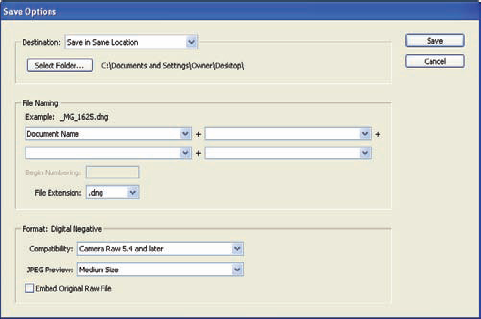
The third option is that you can click the Save Image button to open the dialog box shown in Figure 8.10. You use this dialog box to save files in Adobe's DNG raw format. As I discussed earlier in this chapter, many photographers prefer to do this to archive important raw files.
The Save Options dialog box is divided into three sections. Here's how they're used:
Destination. Use this section to determine which folder to save the DNG files into. If you choose Save in Same Location from the menu, the DNG is placed next to the original raw file, (provided that you use the same name). This can be confusing, so I recommend that you choose Save in New Location and click the Select Folder button to create a sub-folder that's placed within the original folder.
File Naming. Though you can click this menu to choose a different filename, I recommend leaving it set to Document Name so that the DNG file has the same name as the original raw file it's derived from. Otherwise, it can be difficult if you ever need to trace a DNG back to its source image.
Format. This section enables you to choose which version of ACR the DNGs are compatible with. It's almost always best to leave this set to Camera Raw 5.4 and later. You can also manage the size of the JPEG preview that's placed inside of the raw file so that other software, such as Windows Explorer or Mac Finder can display a thumbnail of the photo. One other thing you can do here is choose to embed the original raw file inside of the DNG, which gives you access to the original proprietary file if you need it. Just be aware that this significantly increases the size of the DNG file.
Now you know everything you need to know to start working with raw files. If you have a dSLR and you haven't tried shooting raw before, think about giving it a whirl. Just be sure to shoot your first raw files of a test subject so you can experiment. That way you're not going into uncharted territory when photographing a special event.