Most of the tools and techniques you've learned about in this book so far have been used with single photos. Sometimes, though, one photo doesn't have all the information needed to create the desired image. That's when you need to work with a group of photos, combining the best parts of each into the perfect photo. Photoshop Elements (PSE) provides several intuitive and useful methods for combining images. After working through this chapter, you may never shoot a single photo of an important scene again.
One of the great things about working with digital photos is you can mix and match elements of different photos to create the perfect composition. There are a variety of reasons you might do this, from fixing someone's expression to creating completely new compositions.
Photoshop Elements 8 has some really cool automated tools that help you combine photos. However, before you begin using the automated tools, it's important to understand how to manually combine photos in case one of the automated features doesn't fit a specific project that you're working on.
One of the most common methods for moving content from one photo into another photo is to create a selection around the content, copy the content, and then paste it into a second photo. This is a relatively straightforward procedure that takes only a few minutes. In the following exercise, you learn how to combine parts of two photos to create a new composition.
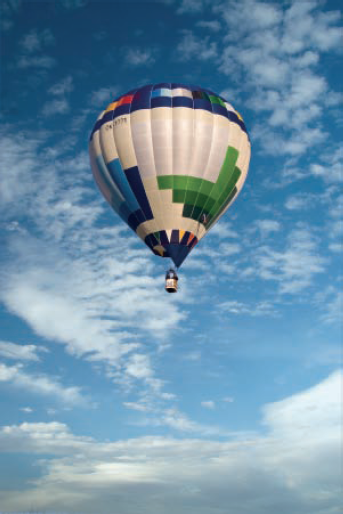
Open the Sky.tif and Balloon1.tif files from the downloadable practice files on the Web site (
www.wiley.com/go/pse8aftertheshoot). The goal with this project is to copy the hot air balloon from the Balloon1 file and place it into the Sky file, which has a more dynamic sky.Choose the Magic Wand tool (W), seventh from the top in the single-column Toolbox and set the Tolerance value on the Options bar to 20. You can use the Magic Wand tool to select the balloon by first selecting the sky and then inverting the selection so that the balloon is selected instead of the sky. Because this balloon has some blue tones that closely approximate the color of the sky, it's important to choose Contiguous on the Options bar so that when you click the sky, only blue tones that touch each other are selected.
Click the blue sky next to the balloon to select most of the sky. To add any unselected areas, choose the Add to Selection option on the Options bar and click those unselected areas to add them. Also be sure to click inside the small blue sky area just above the basket to include it in the selection. If the Magic Wand picks up part of the top of the balloon in its selection, choose the Subtract from Selection option and click those areas. If necessary, zoom in closer when working with problem areas.
Tip
Holding the Shift key temporarily changes the Magic Wand tool to the Add to Selection mode. Holding the Alt key temporarily changes it to Subtract from Selection mode.
If the lines that connect the basket to the balloon are being selected with the sky, switch to the Selection Brush tool (A), eighth from the top in the single-column Toolbox. Choose the Subtract from Selection option and paint the lines with a 1 px (pixel) brush. You can also use this tool to remove any other areas that were inadvertently selected in Step 3.
Choose Select

Choose Select
Choose Layer
Choose Select
Click the header of the Sky.tif photo to make it active; then choose Edit
To move the balloon to a different location, choose the Move tool, the first tool on the single-column Toolbar. The Move tool enables you to reposition the content of the active layer. Click and drag the balloon to a location of your choosing. Leave this file open so that you can use it in the next exercise.
Warning
The Move tool does not work with the Background layer because the layer is locked. If you need to move a Background layer, you can unlock it by simply renaming it. To do that, double-click the layer name and rename it when the New Layer dialog box opens.
Using a selection to copy and paste part of one photo into another photo is a great way to create photo composites. Also, each time you paste new content it's added to its own layer. This gives you control over the individual image components.
In Chapter 10 you learned how to correct camera and lens distortion using the Correct Camera Distortion filter. Sometimes, though, you only need to make a minor adjustment to the geometry of a layer. For example, what if you want to make the hot air balloon in the previous exercise smaller? To do so, follow these steps.
Return to the project file you created in the last exercise, picking up where you left off with Step 10.
Make sure that you're on Layer 1 with the balloon in it and then choose Layer
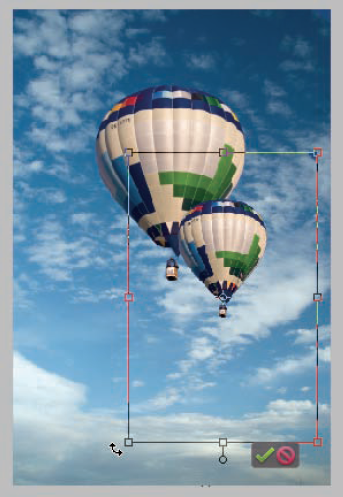
Choose the Move tool (V) and click and drag the duplicate balloon to the lower right of the image. Notice that when you choose either of the balloon layers from the Layers panel while the Move tool is active, adjustment handles appear at the corners, sides, top, and bottom of the layer. You use these handles to adjust the geometry of the layer. If you can't see all the handles, zoom out until you can.
Click one of the corner handles and drag inward toward the balloon to scale the image smaller. Notice that the aspect ratio remains fixed. If you use one of the handles at the top, bottom, or sides to scale the layer, the aspect ratio is changed — squashing or elongating the image on only one axis. If you want to reposition the layer while transforming it, move the cursor inside the bounding box and then click and drag.
When you like the size of the scaled balloon, click the green check mark, shown in Figure 11.3, to apply the transformation. If you want to cancel the transformation and start over, click the cancel button (the red circle with a diagonal slash) next to it. After you get the smaller balloon scaled down in size, if it's in front of the larger balloon, the photo looks kind of funny because the smaller balloon should be farther away, behind the larger balloon instead of in front of it.
Go to the Layers panel and click and drag the Layer 1 copy layer down in the layer stack so that it's below Layer 1 with the original balloon on it. Now the smaller balloon is behind the larger balloon because it's lower in the layer stack. Another option is to place the smaller balloon lower in the image so that the balloons don't overlap.
Naturally, it would be better to use a different balloon for the second balloon to make this composition more realistic. My goal here is to keep it simple so that you focus on the fundamentals. However, there's one last thing you can do to make the composite more compelling.
Choose Image
You can modify the geometry of a layer countless ways. Just remember that when scaling, you should try to always go smaller in size rather than larger. That's because if you significantly enlarge a layer, it can seriously compromise the quality of that layer's content by spreading the pixels too far apart.
Tip
If you want to try some other ways to change the geometry of a layer, choose Image
Quite often when you're photographing a group of people, it's difficult to get everyone looking good all at the same time.
Figure 11.4 shows a group photo I shot just before a local parade.
Overall, this photo isn't too bad, considering that there are sixteen people and fourteen dogs in the shot. The biggest problem with the photo is the woman on the left, in the green jacket, who's looking at her dog instead of the camera.
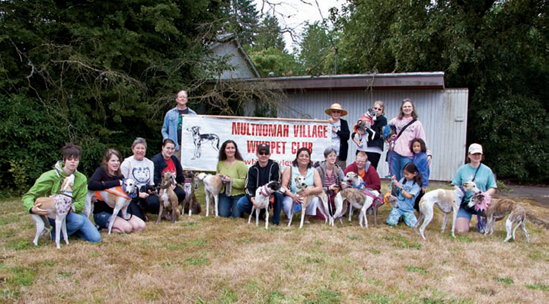
Fortunately, I shot two photos of this group so I can copy the woman from one of the other photos. While I'm at it, I'll also replace the two women next to the woman in the green jacket because they also look better in the second photo.
Naturally, I could use a selection tool to copy and paste the people, though it would require a more complex selection than was used in the previous exercise. Fortunately, the PSE Editor offers a much simpler solution called Photomerge Group Shot.
When opening a group of photos into the Photomerge Group Shot, you'll first open them into the Editor. You can either select them in the Project Bin before opening Photomerge Group Shot, or choose to use all open photos when you launch the command. You can also select a group of photos in the Organizer and then change the Project Bin menu to Show Files from Elements Organizer to display them in the Project Bin.
To open Photomerge Group Shot, choose File
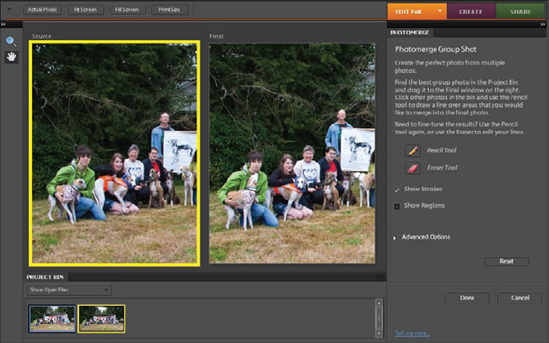
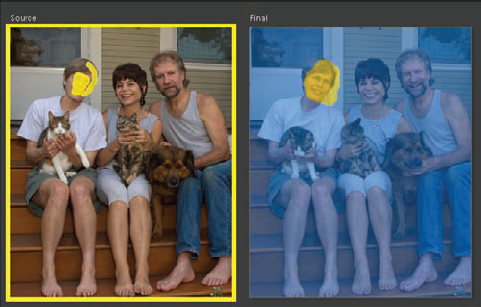
Notice that the thumbnails in the Project Bin are color-coded, making it easier to keep track of the photos as they're used. In Figure 11.5 the second photo with the yellow box around it is displayed on the left in the Source preview.
Photomerge Group Shot has several features. Here's what they do:
The Source preview area displays the donor image that you use to copy people from to place into the final image. Images that you want to copy material from are dragged from the Project Bin and dropped here as you need them.
The Final preview area is where the final image composite is displayed. This is where you drag and drop the best of the group photos from the Project Bin to use as a starting point.
The Zoom and Hand tools appear at top left and enable you to zoom and pan both the Source and Final preview photos.
The Pencil tool appears in the Photomerge Group Shot panel on the right and is used to indicate the people in the Source preview who will appear in the Final preview. When you select the Pencil tool, a Size slider appears on the Options bar, enabling you to change the diameter of this brush size selection tool.
An Eraser tool appears below the Pencil tool and is used to erase Pencil tool strokes in the source image preview. This deselects those areas and removes them from the Final preview. This tool also has a Size slider on the Options bar.
Show Strokes displays all pencil strokes on the source image. It's best to have this option selected.
Show Regions adds a colored overlay, indicating which parts of each photo are in the Final preview. The colors coincide with the color-coding on each photo in the Project Bin.
Click the Reset button to undo any changes and begin again without closing Photomerge Group Shot.
It may seem as though there's a lot going on with Photomerge Group Shot, but it's actually quite easy to use. Follow these steps to see how I use it to quickly combine these photos.
After opening both photos of the Multnomah Village Whippet Club members into the Editor, I open the Photomerge Group Shot dialog box and drag the base photo — the photo with the most redeeming qualities — into the Final preview box. That photo is the one with a blue outline in the Project Bin.
I then drag the donor photo with a yellow box around it in into the Source preview box and use the Zoom tool to zoom in closer so I can better see the faces.
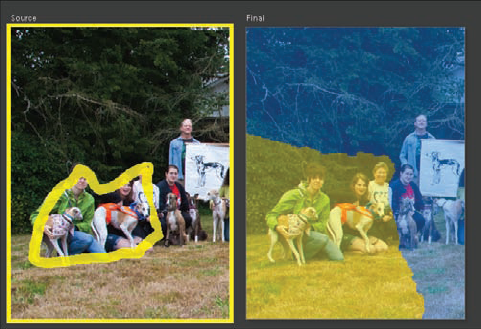
I select the Pencil tool and draw a loose selection around the three people I want to copy into the final image. When I do, the selected people are added to the Final preview. Figure 11.6 shows the source where I drew the selection on the left and the Final preview on the right. Notice that a blue overlay indicates the original material and a yellow overlay indicates the added material. As you can see in this figure, Photomerge Group Shot has a mind of its own. It doesn't simply transfer the outlined information. It selects a large area around it. This is one of the downsides of this tool, because it's sometimes hard to control what the Pencil tool's selection adds.
If too much material is copied from the source image, I use the Eraser tool to fine-tune the selection by using a small Eraser to remove slivers of the selection until the composite image looks good.
I click Done to complete the process. Photomerge then creates a new document with two layers. The Background layer contains the image that was used as the starting point in the Final preview window. Layer 1 contains the composite result from the blending of both images.
Something to be aware of when using Photomerge Group Shot is that image alignment is crucial. If the images are not in alignment, material copied from the source image falls into the wrong spot on the final image. Even though Photomerge Group Shot attempts to automatically align the selected images when you open the Photomerge Group Shot dialog box, it can't always get them into perfect alignment.
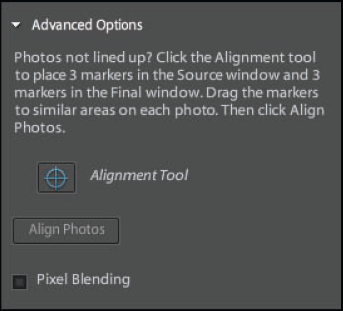
If you run into an alignment problem, click the Advanced Options on the lower section of the Photomerge panel and choose the Alignment tool. When you do, you see the Advanced Options shown in Figure 11.7.
To align images, click the Alignment tool. When you do, it places three markers on both the Source and Final previews. Click and drag these markers to place them on identical features in each image and then click the Align Photos button. Just be aware that the placement of these markers must be exact or you may find that the source photo is severely distorted.
Note
The Pixel Blending option blends source material with the surrounding areas in the final image. Sometimes it works quite well, while other times it doesn't. I suggest trying it on a project-by-project basis to see if it helps.
One last thing to remember about using Photomerge Group Shot is that it often gets your finished image close to the way you want it, but it isn't always perfect. Be prepared to do a bit of cleanup with the Clone Stamp or the Healing Brush tools after clicking Done.
Sometimes it isn't necessary to change a person's body, or even her head, when fixing a photo. In many cases you only need to replace closed eyes or an open mouth that's awkward. For example, I shot the photo in Figure 11.8 of some friends with their pets.
Everyone's expressions look good, except for the woman on the left. Fortunately, I shot a second photo where she has a nice smile.
In order to fix this photo by combining the woman's face from the second photo, I choose File

Photomerge Faces works the same as Photomerge Group Shot. You choose one image to use as a base image by dragging it from the Project Bin into the Final preview window. Then you drag a second photo with material you want to copy into the Source preview window and use the Pencil tool to indicate the material to be copied into the final image.
Figure 11.9 shows the images. You can see where I painted the face of the woman on the left. Because her head is tilted a bit more to the side in the source image, I painted the side of her head to copy it too.
The main difference between Photomerge Group Shot and Photomerge Faces is that smaller areas are selected by the Pencil selection tool.
For example, if you compare Figures 11.6 and 11.9, you see that the area selected by the Pencil tool in Figure 11.6 is much larger than the area in Figure 11.9.
Again, it's important that your photos are in alignment when you shoot them. Though this feature has an alignment option, it's always best to shoot photos that are closely aligned from the start. So when you're shooting a scene like this or like the one from the previous example, try to keep your camera and zoom setting consistent in case you need to merge a couple of photos together.
So far in this chapter you've learned how to add elements from one photo to another photo to fine-tune it. But what about when you want to remove something that doesn't belong in a photo?
For example, suppose you're photographing a famous monument, but you can't get a decent photo of it without other sightseers being in the way. One way to solve the problem would be to use the retouching tools and techniques discussed in Chapter 10. However, with a complex scene, such retouching could take a while. A much better way to handle this is to shoot multiple photos and then use Photomerge Scene Cleaner to remove unwanted subject matter.
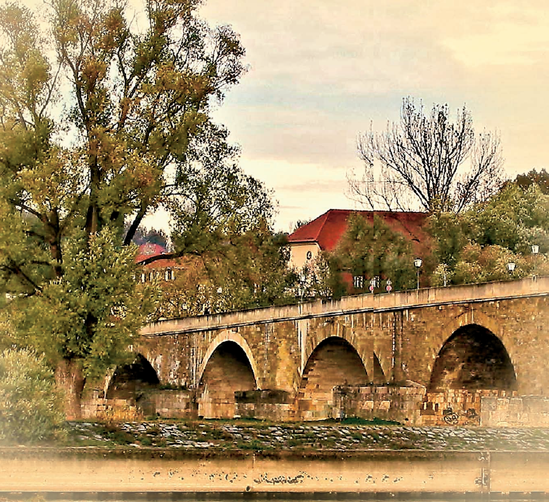
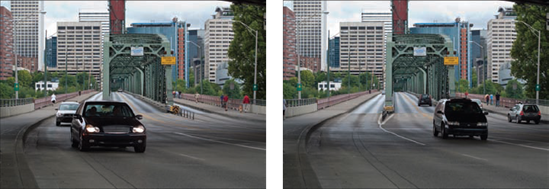
Figure 11.10 shows two photos of the Hawthorne Bridge, one of the main bridges that connects the east and west sides of downtown Portland, Oregon. This bridge is so busy during the day that it's nearly impossible to get a photo of it without traffic in the shot.
Do the following exercise to see how easy it is to remove these cars and reveal an empty bridge:
Open the Bridge1.tif and Bridge2.tif files from the downloadable practice files on the Web site (
www.wiley.com/go/pse8aftertheshoot). Select both thumbnails in the Project Bin.Choose File
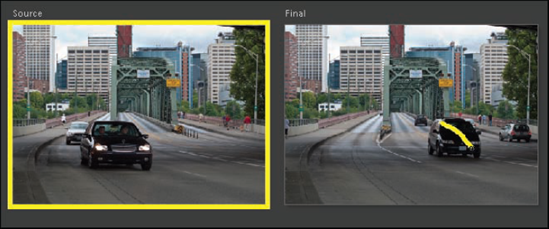
Drag the Bridge1.tif photo into the Final preview window and then click on the Bridge2.tif photo to load it into the Source preview window.
Choose the Pencil tool from the Photomerge panel on the right and draw a stroke through the van in the photo in the Final preview window, as shown in Figure 11.11. When you release the mouse button, the car instantly disappears from the photo. Not only that, but the car behind it that's headed in the opposite direction is also removed, as well as another car in the far distance that's in front of it. These vehicles are replaced with the empty section of the bridge from the source photo. A yellow line appears in both photos to indicate the stroke.
Note
Using the Pencil tool on the source image adds content to the final image instead of removing it.
Use the Pencil tool to draw another line through the white car on the right in the final photo to remove it. Then do the same thing to the distant oncoming car on the left side of the bridge. Now all cars are removed from the bridge in the final image except for one central car in the distance. Notice that if you try to remove it, the other distant car that was removed in Step 4 is added back to the final photo. That's because each photo has a car in this location. To completely remove it using Photomerge Scene Cleaner, a third image with no cars in that location is needed as a source image.
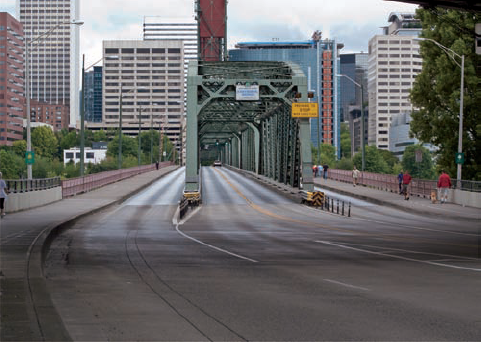
Click Done to complete the project so that it looks like Figure 11.12. If you want to remove the final car in the distance, use the Clone Stamp tool to quickly retouch it out of the photo.
You have to admit that this is a powerful feature. With three simple strokes, you quickly removed all cars (except for the small one in the distance) from the scene. Just remember that as with the other Photomerge features, alignment between photos is critical. Otherwise, results can be somewhat unpredictable.
My favorite Photomerge feature is Photomerge Panorama. That's because it's used to stitch together several photos of a wide or tall scene. This is especially useful for scenes that are impossible to capture in a single image without zooming out so far that all detail is lost.
Figure 11.13 shows Photomerge Panorama. It offers five different methods for aligning photos:
Auto. This method analyzes the source photos and chooses the best layout option.
Perspective. With this method, the middle image is designated as the main source image. All other images are transformed and repositioned to match that image's geometry.
Cylindrical. Sometimes when you use the Perspective method, your finished panorama has what's called bow-tie distortion. This is when the ends of the image are stretched farther vertically than the middle of the image. If you encounter bow-tie distortion when using Perspective, try the Cylindrical method instead.
Reposition Only. This method aligns the photos and matches overlapping content, but does not transform the geometry of the images.
Interactive Layout. This method enables you to assemble the panorama manually.
With the first four alignment methods, Photomerge Panorama first stitches the photos together and then blends all the edges together to make all transitions seamless.
The easiest way to see how the Photomerge feature works is to give it a try:
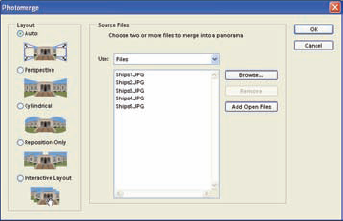
Open the five Ships files, Ships1.jpg through Ships5.jpg, from the downloadable practice files on the Web site (
www.wiley.com/go/pse8aftertheshoot). If any other files are open, close them now. I shot this series of photos as two tugboats escorted a large container ship out of port on the Willamette River near downtown Portland.Choose File
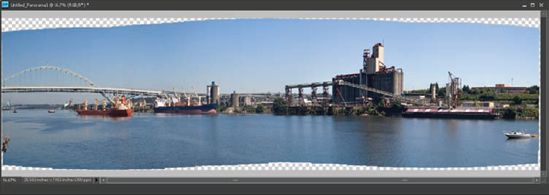
Choose the Cylindrical alignment method and then click OK. When Photomerge Panorama completes the process, your photo should look something like Figure 11.14. If you notice some squiggly seams between some of the blended areas, zoom in closer. These temporary artifacts are not part of the image. They're usually caused by the zoom ratio and disappear when it's changed.
To check the final size of the finished panorama, choose Image
Notice that there are some empty areas at the top and bottom of the finished panorama. That's because as these five photos were transformed to fit together, parts of them were removed. You can crop these missing areas out, reducing the height of the panorama. Another solution is to use the Clone Stamp tool or the Healing Brush tool to sample existing sky and water and add it to the missing sections.
Tip
Photomerge Panorama adds each of the source photos to an individual layer in the finished image. Because of that, it's best to flatten the image into a single layer before attempting to retouch it by choosing Layer
If you have time, try re-creating the panorama using some of the other alignment methods. For example, create a second panorama from the same five photos using the Perspective option. Notice that the final panorama displays a strong bow-tie distortion.
Photomerge Panorama is one of the most intelligent of the Photomerge tools. But you still need to help it by shooting images intended for a panorama. Here are some helpful tips to keep in mind when shooting photos that you plan to stitch into a panorama.
Provide at least 25 percent overlap between photos. This gives Photomerge Panorama sufficient content to compare from image to image.
If the scene has important detail in one place, be sure to include all of it in a single photo. That way Photomerge Panorama doesn't need to try to stitch together complicated details.
Use one focal length on your lens. Don't zoom in for some photos and zoom out for others.
Maintain a consistent exposure. Photomerge Panorama does a good job of matching image tones. However, when extreme differences occur, the final result suffers. The best way to maintain consistency when photographing is to shoot in manual mode instead of program mode, if your camera allows it. That way you're sure to shoot each photo with the same exposure settings.
Keep your camera level. The best way to accomplish this is to use a tripod with a rotating head.
Avoid extra wide-angle lenses. Photomerge Panorama has trouble working with images made with fish-eye and other super wide-angle lenses.
The dynamic range of a photo is the tonal range from the darkest shadow to the lightest highlight. Sometimes the dynamic range of a scene is beyond the range of what a camera is capable of capturing.
When this is the case, you can shoot two photos and let PSE's newest Photomerge tool, Photomerge Exposure, combine them to create the perfect exposure balance.
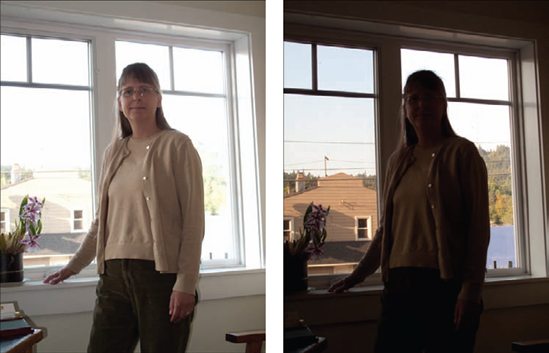
Figure 11.15 shows two photos of my wife standing in front of a window. The first photo is a nice exposure of her, but the area outside the windows is very overexposed. In the second photo the outside area is exposed correctly, but she's underexposed.
To combine both of these photos I opened them into the Editor, selected them in the Project Bin, and then launched Photomerge Exposure (File
Photomerge Exposure provides two different ways to combine photos. These methods are chosen using the tabs at the top of the Photomerge Exposure panel.
One is Manual, which is similar to the other Photomerge tools previously discussed. It provides Foreground and Background preview windows, enabling you to use the Pencil tool to indicate scene content in the source image in the Foreground window that's added to the final image in the Background window. Sometimes this works, but quite often too much detail is selected.
For example, with this project I found that when I selected part of the bright area outside the window with a small stroke, the inside frame was selected as well.
The other method for using Photomerge Exposure is the Automatic method, which is shown in Figure 11.16. When you choose this option, all photos are automatically blended together and displayed in a single preview.
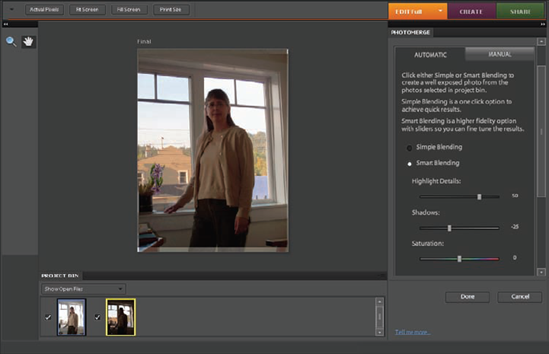
There are two blending options within the Automatic mode: Simple Blending and Smart Blending. Simple Blending automatically blends the images together without any user input. Smart Blending creates an initial blend but provides a set of sliders, enabling you to fine-tune the blend. Here's what the sliders are used for:
Highlight Details. This slider enables you to adjust the amount of highlight detail that's mixed into the blend. Higher values increase the amount of highlights and lower values reduce the amount.
Shadows. This slider is similar to Highlight Detail. Lower values increase the amount of shadow detail that's included in the blending, and higher values reduce shadow detail.
Saturation. Sometimes when multiple exposures are blended together, saturation is affected. The Saturation slider enables you to modify the overall saturation of the blended images by reducing or increasing it.
Warning
If you plan to use raw files with Photomerge Exposure, it's best to process them using Adobe Camera Raw (ACR) and open them into the Editor instead of using them directly from the Organizer. That's because when raw files are converted for use by Photomerge Exposure, an automatic routine is run on each photo, attempting to balance their exposures, which completely negates their effectiveness for exposure blending.
In this example, I used only two photos for blending. Be aware that you can use up to ten photos, which enables you to capture a very broad range of exposure values. When the Photomerge Exposure dialog box is open, all selected photos are displayed in the Project Bin. To remove a photo from the blended image, simply deselect the box next to it. Just keep in mind that you need to have at least two photos selected.