Retouching means lots of things to different people. Someone who's interested in fashion may think about the type of high-end glamour retouching that's used for magazine covers. Another person who's interested in photographing landscapes may think of retouching in terms of removing unwanted image content, such as a small sign or litter. In this chapter, you learn exactly what retouching is, and how to use a common set of tools and techniques to accomplish almost any retouching task you're faced with.
In the most basic sense, retouching is minimizing a weakness in an image by removing it. For example, if you have a great photo, but there's something objectionable in the scene, you can simply remove it — whether it's a pimple or a sign.
The funny thing, however, is that when you remove a distraction from a photo, you don't actually remove it; you cover it up with something else. So retouching is actually a process of copying pixels from a good part of the image and then painting them over unwanted parts of the image.
Naturally you want to create the best photos you can at the time the shutter clicks. However, that's not always possible due to things that are out of your control, or outside of your photographic experience. If you have one of those good-to-great images, but it has a minor flaw, isn't it nice to know that the photo can still be great after a bit of retouching?
The two photos in Figure 10.1 show a nice example of the value derived from a few minutes of retouching. This close-up photo of a leaf is a great study in form and shape, but the specks of dirt that Mother Nature provided distract from the geometric flow of the image.
Instead of messing with Mother Nature, this photographer chose to spend a few moments to remove the dirt. The second photo shows the subtle difference when the dirt is gone. It completely changes the scale of the image, transforming it into an abstract composition.
Retouching doesn't necessarily need to mean fundamental changes are made to the image for it to be effective. In fact, quite often less is better than more.

Because retouching is such a broad concept, you can accomplish it using a variety of tools and techniques.
However, when using Photoshop Elements (PSE) for retouching, you will do most of the work using two primary retouching tools — the Clone Stamp and the Healing Brush. Both of these tools are used to sample source information from one area of the image and then paint the sampled information into an area that needs to be covered. The difference between these tools is that each handles that sampled information in a completely different way.
The Clone Stamp tool has been an important tool since the earliest days of PSE. The tool's name tells you exactly what it's used to do. Information is cloned from one place and stamped somewhere else in the image. In this case, though, the stamp is a brush.
To understand how this tool works and how to use its options, follow these steps.
Open the Bike_Race.tif file from the downloadable practice files on the Web site (
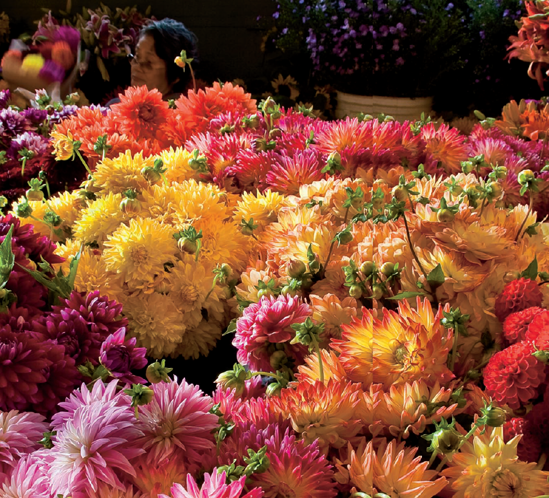
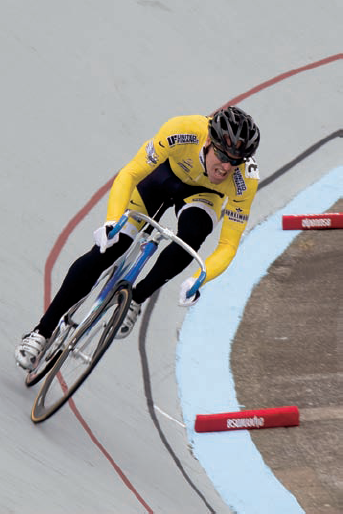
www.wiley.com/go/pse8aftertheshoot). I shot the photo of this bicycle racer, shown in Figure 10.2, at Alpenrose Velodrome, a bicycle racing track in Portland, Oregon. I like the photo, but I don't like the two red safety markers at the top and bottom of the right side. This photo would look a lot better without them.Duplicate the Background layer by choosing Layer

Zoom to 50 percent magnification so that you can more easily focus on the red markers. If you have a really large screen, you may want to zoom in even closer. Just don't go beyond 100 percent magnification because it's not necessary to get in that close for this project.
Choose the Clone Stamp tool (S) fifteenth from the top in the single-column Toolbox. Make sure that you're not choosing the Pattern Stamp tool that's stacked with it.
Note
The Pattern Stamp tool is used to paint a pre-defined pattern into the image.
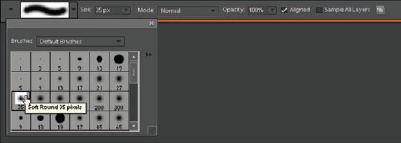
Figure 10.3 shows the Options bar settings for the Clone Stamp tool. Notice it has the same Brush Picker pop-up panel as the Detail Smart Brush tool, discussed in the last chapter. Choose the Soft Round 35 pixels brush preset from the Brush Picker pop-up panel.
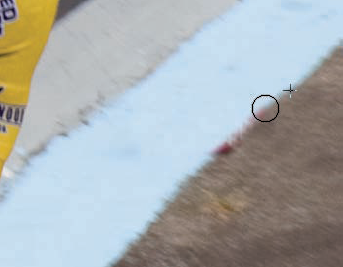
Hold down the Alt key and notice that when the Alt key is depressed, the cursor changes to a crosshair. This indicates that the tool is ready to take a sample wherever you click. Work on the upper red safety marker first. With the Alt key still depressed, click inside the wide blue line, near the edge of the red shape. Just be careful not to click too close to the red. The idea is to sample a shade of blue to use for painting over the red. If you sample too close to the red, you end up sampling the red too.
Release the Alt key. Your Clone Stamp brush is now loaded with pixels from the blue area.
Choose Aligned from the Options bar. Selecting this insures that the sample point stays aligned with the brush. You see this in action in a moment.
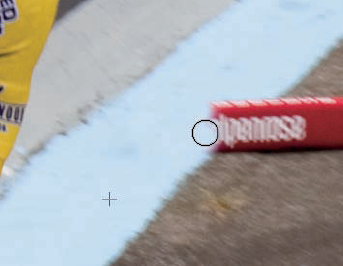
Begin painting out the red shape by covering it with blue, as shown in Figure 10.4. Try to cover only the red that's on top of the blue stripe. As you paint, notice that two cursors appear. One is in the usual spot where you're painting and the other cursor marks the sample area.
The fact that these two cursors move in unison tells you that they're in alignment. The relationship between them is fixed until you take another sample. If you had not selected the Aligned option in Step 5, you would find that every time you painted a stroke, the same sample point would be used. Typically, you want to have the Aligned option selected when using the Clone Stamp.
Paint with short strokes and release the mouse button occasionally to start a new stroke. If you notice that the red is reappearing, it means you sampled too closely, or you're not breaking up your strokes enough. If the sample begins to pick up details you don't want, take a new sample from another area and apply it using the brush.
Tip
If you have trouble getting smooth transitions between cloned and uncloned areas, try lowering the Clone Stamp's Opacity value and then sampling and painting from a few different spots. Just be aware that when using a lower opacity, you need to add multiple strokes to build up the retouching.
When the blue area looks good, hold down the Alt key and take a sample of the concrete and begin painting the other side of the marker. Work your way up to the line between the concrete and blue stripe until all of the red marker is gone except for the part on the dividing line between the blue line and the concrete.
Sample the line just above that narrow strip and paint out the upper half, as shown in Figure 10.5. Then sample below it and paint out the lower portions. The important thing is to keep the line straight by sampling and painting in exact alignment. If you have a problem getting the source material to line up with the brush, do the best you can. I show you a way to handle this more elegantly in a moment.
When all of the red is gone, check your work to insure that you haven't copied any obvious shapes that form patterns when repeated. These patterns are a sure sign that retouching has occurred. If you see any, simply sample a different area and paint them out.
Zoom to Fit Screen so that you can see the entire image to check your work. This is a good idea because when you're zoomed in close, you're seeing the image much larger than it will appear to most viewers. Try hiding the retouching layer to check your work against the unretouched Background layer.
Tip
When retouching an image, try to keep the final viewing scenario in mind. If the photo will never be viewed larger than an 8 × 10, there's no need to knock yourself out retouching small details that are only seen when the image is zoomed to 100 percent in the Editor.
That was fairly simple, wasn't it? As you can see, the real tricks when retouching something like this are changing samples occasionally to avoid repeating patterns and lining up important features, such as the dividing line between the blue stripe and the concrete.
In this exercise, that alignment was a guessing game. Fortunately, there's a better way to align image details.
A new feature in PSE 8 is the Clone Overlay preview. The Clone Overlay displays a preview of the sampled material before it's painted. This preview is an option when you're using the Clone Stamp or Healing Brush tools.
To activate the preview, click the Clone Overlay button (an icon with two overlapping boxes) on the far right side of the Options bar. Clicking this button opens the pop-up panel, shown in Figure 10.6.
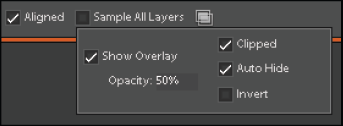
The Clone Overlay Options panel has five settings:
Show Overlay. Choosing Show Overlay activates the overlay. You can also press Alt+Shift to display the preview temporarily instead of choosing this option.
Clipped. This is an important setting because it reduces the size of the overlay, limiting it to the size of the current brush. Without Clipped selected, the overlay is the size of the entire image, which can be very disorienting.
Opacity. Opacity is used to control the opacity of the preview. If you choose not to use the clipped preview setting, be sure to keep the Opacity value low. Otherwise it's difficult to see the underlying image.
Auto Hide. When Auto Hide is active, the overlay disappears when you use the brush. This is quite useful because it enables you to see what the brush is doing as it applies sampled pixels.
Invert. Invert turns the overlay into a negative, which is extremely useful for aligning fine detail. When the lines in the inverted overlay line up with the image, they tend to cancel each other out.
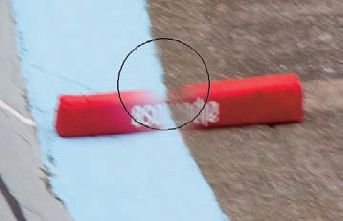
Figure 10.7 shows the Clone Overlay in action. In this case, I sampled the line between the blue and the concrete and then hovered over the lower red safety marker. Using the overlay enabled me to see exactly where to place the sampled line before using the brush.
With the Clone Overlay option activated, finish removing the lower red safety block. When cloning the concrete, be sure to sample different areas in between brush strokes so that you don't create a noticeable replicating pattern.
Figure 10.8 shows the finished photo after the safety blocks have been removed. I also removed some stains on the track, especially near the top of the image.
Compare it to Figure 10.2 to see how different the image looks without the distracting red blocks.

Though the Clone Stamp tool has been the staple tool for retouching in PSE for quite a while, it does have some limitations. The primary one is that it clones exactly what is sampled. That means that if you don't sample something that exactly matches the tone and color of the area you're retouching, the retouching is noticeable.
In early versions of PSE, the only way around this limitation was to fiddle with the tool's options until it behaved properly for a specific task. Fortunately, much of that changed with the introduction of the Healing Brush tool in Photoshop Elements 6.
The Healing Brush tool is designed to be an intelligent version of the Clone Stamp tool because it blends sampled source material with the tone and color of the area it's being applied to.
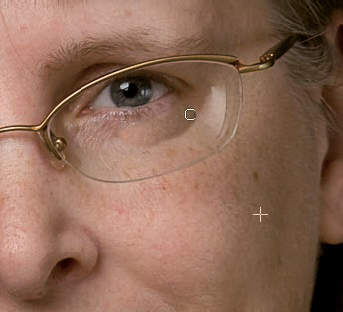
The only thing that doesn't blend is the texture caused by image details in the sampled area. This means that you don't need to be as careful when sampling tone and color. Because of its blending capability, the Healing Brush tool is especially well suited for retouching photos of people, such as the portrait shown in Figure 10.9.

Follow these steps to learn how the Healing Brush tool is different than the Clone Stamp tool:
Open the Portrait.tif file from the downloadable practice files on the Web site (
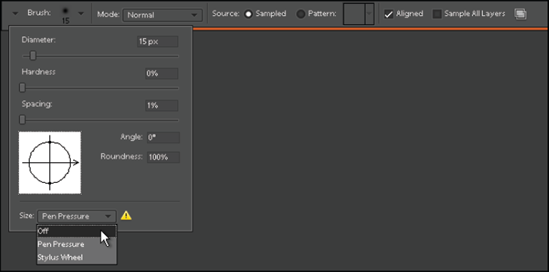
www.wiley.com/go/pse8aftertheshoot). Duplicate the Background layer and name it Retouching. Zoom to 100 percent so you can get a close look at the woman's face.Choose the Healing Brush (J) from the Toolbox. Make sure you aren't choosing the Spot Healing Brush, which is stacked with it. When the Healing Brush tool is selected, the Options bar looks like Figure 10.10.
Notice that it has some similarities with the Clone Stamp's options, such as the Aligned option and the Clone Source Overlay button. Also notice that the Healing Brush tool uses the more advanced Brush Picker pop-up panel, which is like the one used by the Smart Brush tool that I covered in Chapter 9.
Note
The Pen Pressure setting in the Size drop-down menu is used with a pressure sensitive graphics tablet, such as the tablets by Wacom. When you use one of these tablets, it's possible to vary the diameter of the brush by changing the pressure of the pen on the tablet. The Stylus Wheel option is used for graphics tablets with a thumbwheel. When no tablet is connected, these settings don't take effect.
Use the Brush Picker panel to set up your brush with the same settings shown in Figure 10.10 and then use the brush to remove the lines under the eye on the right. Sample the cheek and begin painting the wrinkle below the eye, as shown in Figure 10.11. Notice that as you paint, the darker tones of the sampled cheek area appear under the eye. But when you release the mouse button, the darker tones are blended with the tone and color of the target area.
Though this tool is powerful, it's missing one key feature. There's no opacity setting that enables you to vary the strength of the retouching. Because of that, the wrinkle removal on this woman's eye is a bit heavy-handed, giving it a slightly unnatural appearance.
The best way to deal with this issue is to do all wrinkle removal on a separate layer after you have completed all other retouching. Then lower the opacity of the wrinkle layer so that some of the lines show through the retouching.
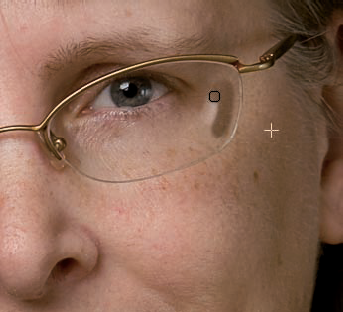
Sample just to the right of the reflection on the right of the woman's glasses, as shown in Figure 10.12 and then paint the glass glare. Be sure to cover the entire glare with one stroke for the best blending.
Sample the gray background on either side of the woman's head and then paint one of the blemishes on her chin. Notice that this tool is so smart that it's able to blend the gray background tones with the skin tone.
However, because the background doesn't have much texture, it tends to smooth the skin a bit more than when sampling skin texture. I normally wouldn't recommend that you use this background sampling technique for a project like this because there's plenty of unblemished skin for sampling.
There are times when you don't have an adequate area for sampling so it's good to know you can sample all sorts of tones and colors when needed. Just remember to be careful when sampling an area with a strong texture.
As you can see, the Healing Brush tool is quite useful. But be aware that it has one serious issue. When you use it in an area that has strong tonal differences, such as along an edge, it often gets confused.
In Figure 10.13 I tried to sample the background and use it to retouch some of the flyaway hair near the woman's ear. Because the tool attempts to blend tone and color, it tries to blend the nearby skin color with the retouched area, causing the smearing shown in Figure 10.13.
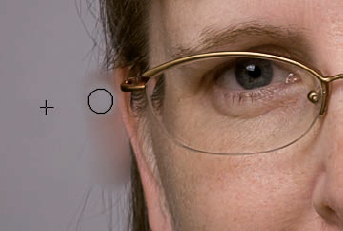
Be advised that whenever you use the Healing Brush tool along an edge with strong contrast, it will almost always fail. Instead, choose the Clone Stamp tool for retouching details along an edge.
Though the Clone Stamp and Healing Brush tools have a lot in common, they each have their specialties. Sometimes it's a toss-up as to which is better suited for a specific retouching task. However, there are also times when there's no contest as to which is best.
When you need a literal copy of something, use the Clone Stamp. For example, if you have three ducks walking in a row and you want to copy one of them to add a fourth duck to the end of the row, use the Clone Stamp to duplicate it. Also use the Clone Stamp when you're working near an edge with strong contrast because of the Healing Brush's smearing issues.
If you're retouching something that's isolated and not near an edge, the Healing Brush does a really great job provided the sampled material has a similar texture. Also when it's important for your retouching to blend with the surrounding area, as when retouching a face, the Healing Brush can't be beat.
Tip
You can use both the Clone Stamp tool and Healing Brush tool to sample material from one photo and paint with it on another photo. To do so, open both photos and position them so you can see both. Then sample source pixels from one photo and paint the pixels onto the other.
As much as I love digital photography, there is one thing that really bugs me — sensor dust. It seems that no matter how often I clean my dSLR camera's sensor, or how careful I am about changing lenses, a few specks of dust wind up on the sensor, causing dark spots on every photo.
Naturally, when they are on dark areas of the scene, they aren't noticeable. Though dust can be removed with the Clone Stamp or the Healing Brush tools, the Spot Healing Brush tool (J) is specifically tailored to working with these kinds of spots.
Tip
Dust can be a big problem when scanning prints or negatives. If you run into it on your scans, think about using the Spot Healing Brush to clean them up.
The Spot Healing Brush tool is stacked with the Healing Brush tool. It uses the same type of intelligent blending system as the Healing Brush. However, there's one big difference between these two tools.
When using the Spot Healing Brush, instead of choosing an area to sample using the Alt key, the tool automatically samples source material. In fact, you cannot manually sample source material with this tool.
The Spot Healing Brush has two options, displayed on the Options bar, that affect the kind of material it picks up when it samples. Here's how they differ:
Proximity Match. This option evaluates pixels around the edge of the area being painted to find suitable sample material.
Create Texture. This option uses all the pixels in the painted area to create a texture that's applied to the painted area.
It's usually best to begin with the Proximity Match method. If it doesn't provide satisfactory results, try the Create Texture method to see if you get a better result.
The reason the Spot Healing Brush tool is useful for removing spots (such as dust or small facial blemishes) is that you don't need to manage it at all. You simply click spots to remove them.
When working with this tool, use a brush that's slightly larger than the area being painted so you can do it in one click. Otherwise you may experience smearing similar to what you get with the Healing Brush tool.
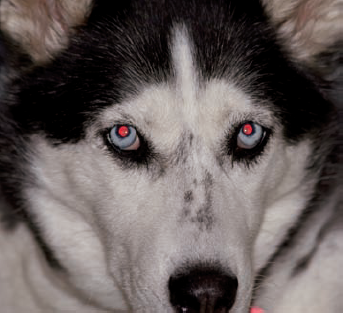
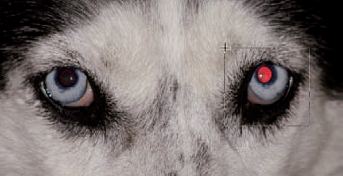
If you use an on-camera flash, you've probably run into red-eye. Red-eye is caused by light reflecting off the retina and bouncing back into the lens of the camera. It usually appears when a camera's flash is on or near the same plane as the lens. The effect is more pronounced in subjects who have gray or blue eyes, as well as children. It's the worst when subjects are in a darkened room, which causes their pupils to dilate.
Figure 10.14 shows a photo of my Siberian Husky, Ruby, who's famous for her red-eye. Whenever I photograph her with a flash, if she's looking at the camera, her pupils are almost always red.
To fix the red-eye in this photo, simply follow these steps:
Choose the Red Eye Removal tool (Y), thirteenth from the top in the single-column Toolbox.
Click and drag a rectangular selection over an entire eye, as shown on the right eye in Figure 10.15. When the mouse button is released, the red is automatically removed. You can see the end result in the left eye in Figure 10.15. Notice that the tool didn't affect the red in the white of Ruby's eye on the left. That's because it only works on the red in the pupil of the eye.
If the darkening of the pupil isn't strong enough, undo the adjustment (Ctrl/

Fixing red-eye doesn't get much easier than this. Well, maybe it does. This tool also features an Auto button on the Options bar. Clicking it allows the tool to automatically find and fix red-eye. It doesn't work in every case, but when it does, it's quite easy.
Though distortion isn't traditionally considered retouching, I think it is good to discuss it here. That's because sometimes after correcting a distorted photo, it's necessary to do a bit of cleanup with the retouching tools.
Distortion is caused by a couple of factors having to do with a camera's lens — its position and focus point relative to the subject. When a camera is pointed at a tall building, the vertical lines tend to converge near the top of the building. That's because those portions of the lines are farther from the camera.
Two other common types of distortion are barrel distortion, where the vertical or horizontal lines bulge away from the center of the image, and pincushion distortion, where lines tend to bend inward toward the center of the image. To quickly correct distortion, choose Filter
Figure 10.16 shows the Correct Camera Distortion dialog box with a photo of Mission San Xavier, which is located a few miles outside of Tucson, Arizona. The vertical lines in this photo converge near the top of the image, causing the building to look short and squat.
Tip
The Correct Camera Distortion filter affects only the active layer. This means you can copy your main layer and run the filter on the copy.
Look at what the controls below the image and on the right side of the dialog box are used for so that you know how to fix camera distortion in your photos.
Show Grid. Select this check box, located under the image, to display a grid that helps to evaluate alignment. Click the color swatch next to it to change the color of the grid. (I have the grid unselected in Figure 10.16 to help you see the building better.)
Remove Distortion. Plus values correct for barrel distortion, squeezing the middle of each side and the center of the top and bottom toward the center of the image. Negative values correct for pincushion distortion by expanding the middle of each side and the center of the top and bottom away from the center.
Vignette Amount. Quite often a by-product of lens distortion is lens fall-off, where the exposure at the corners of the lens is darker because these areas received less light. Improper lens shading with wide-angle lenses also causes vignetting. If you experience this, use the Amount slider to lighten the corners.
Vignette Midpoint. Use the Midpoint slider to adjust how close the darkening/lightening is to the center of the image. Lower values bring the effect closer to the center.
Vertical Perspective. You use this slider to correct perspective caused by pointing the camera up or down. Positive values tilt the top of the image away, increasing the distortion in an image like the photo of the mission building. Negative values tilt the bottom of the image away, which, in this case, helps the mission photo.
Tip
Some of these sliders can be difficult to control when making minor adjustments. To make minor tweaks, click in the number box next to the slider to highlight the number and then use the keyboard's up and down arrow keys to slightly increase or decrease the value in the box.
Horizontal Perspective. This slider is used to correct for the camera being pointed left or right. Positive values tilt the image to the right, while negative values tilt the image to the left.
Angle. After the perspective in an image is fixed, it's often necessary to do some final straightening. Click and drag the vertical line on the dial to change the angle of the image. Use the grid overlay to check your alignment. You can also use the Angle adjustment to fix a photo that was shot a bit crooked (for example, a horizon that isn't straight).
Edge Extension Scale. Quite often when you correct perspective, parts of the photo end up outside of the image frame, even though you can't see them. To scale down the image so that it fits inside the canvas, use a negative value on the Scale slider.
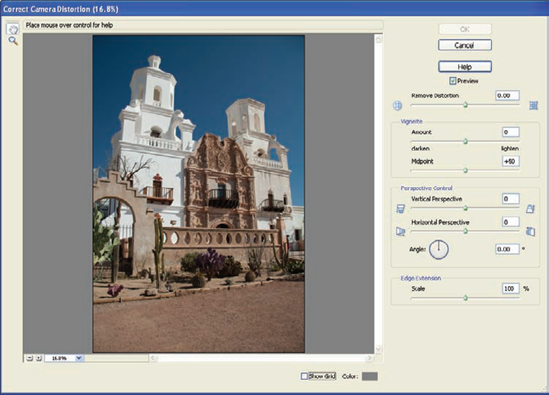
Figure 10.17 shows the Photo of Mission San Xavier after most distortion has been removed. Now the building looks taller and more elegant. Notice how much narrower the bottom of the frame is than the top due to the perspective correction.
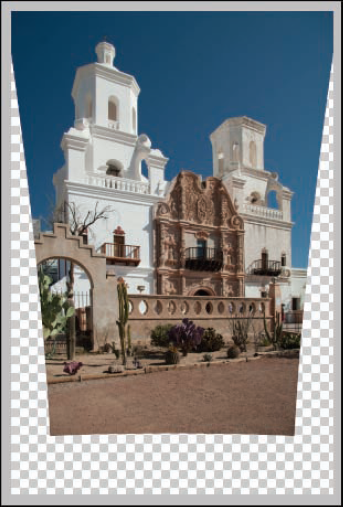
If this photo is cropped full frame, the width of the top will be cropped to the same width as the widest part of the bottom. This means that the sides of the image will be cropped up against the outer sides of the bell towers. Some of the bottom can be recovered by cloning it onto the empty areas at the sides. For example, it would be fairly straightforward to clone the gravel road to make it wider.
However, some of the other parts of the scene that are a bit higher in the image would be more difficult to clone. Because of this, when shooting a subject that you know you'll need to adjust the geometry of later in post production, be sure to leave some extra room around it so that you can crop after making adjustments.
Note
The checkerboard around the image in Figure 10.17 indicates transparency, meaning that nothing exists in the checkerboard area. Something that's interesting is that you can't have transparency on a layer named Background because a Background layer is locked. The Correct Camera Distortion filter bypasses this limitation by renaming the Background layer.
As you can see, the Correct Camera Distortion filter is powerful and easy to use. Use it to fix distortion caused by camera position and/or lens angle. Just remember that if you use Correct Camera Distortion and don't like the results, undo the process and start again instead of running the filter a second time. Running the filter consecutive times degrades the quality of the file because each application is destructive to the image.