In This Chapter
Adding and subtracting from a selection
Using the Select commands
Feathering selections
Moving and cloning a selection
Saving and loading selections
Transforming selections
For most people, getting the perfect, pristine selection on the first attempt is pretty difficult. A little too much caffeine or not enough shut eye, and that once steady hand is no longer so. Fortunately, Elements, being the compassionate digital-imaging friend that it is, understands this and doesn't make you settle for inaccurate selections. You have many ways to modify and transform selections to refine them to the point of near-perfect accuracy. You can add or remove pixels from your selection, scale the selection outline, smooth out jagged edges, or switch what's selected for what isn't. In this chapter, we'll show you how how to clean up and modify your selections and enable you to nail the desired element with precision.
If you haven't already checked out the first chapter of Book IV and gotten a good grasp of how to create selections in the first place, you may want to start there.

Although the selection tools, such as the Lasso, Quick Selection, and Magic Wand tools, usually do a fair job of capturing most of the desired selection, making a really accurate selection often requires some amount of modification and cleanup. If you give the selection a little extra TLC, you are rewarded with more accuracy and precision. By adding and subtracting from the selection, you can refine it and ensure that you capture only what you really want.
With the multitude of tools and features in Elements, there is usually more than one way to execute the task. In this section, we show you how to use keyboard operations (along with your mouse) to modify your selections. But note that you can also use the four selection option buttons on the left side of the Options bar to create a new selection, add to a selection, subtract from a selection, or intersect one selection with another. You just choose the selection tool, click the selection option button you want, and drag (or click and release, if you're using the Magic Wand or Polygonal Lasso tool). When you're using the Selection Brush, the Add to Selection and Subtract from Selection buttons are also available.
Tip
When adding to a selection, a small plus sign (+) appears next to your cursor. When subtracting from a selection, a small minus sign (-) appears. When intersecting two selections, a small multiplication sign (×) appears.
If your selection doesn't contain all the elements you want to capture, you need to add those portions to your current selection.
To add to a current selection, simply hold down the Shift key and click and drag around the pixels you want to include when using the regular Lasso or the Rectangular or Elliptical Marquee tool. If you're using the Polygonal Lasso, click and release around the area. (We wouldn't use the Magnetic Lasso tool to add to a selection; it's way too cumbersome.)
You can also hold down the Shift key and click the area you want when using the Magic Wand tool, or drag on the area you want when using the Quick Selection tool.
Tip
Note that after your first drag with the Quick Selection tool, your selection option button should convert to the Add to Selection button automatically. When using the Selection Brush on Selection mode, the selection option button is also set automatically to the Add to Selection button.
Tip
You don't have to use the same tool to add to your selection that you used to create the original selection. Feel free to use whatever selection tool you think can get the job done. For example, it's common to start off with the Magic Wand and clean up your selection with the Lasso tool. See Book IV, Chapter 1 if you need more info on selection tools.
Follow these steps to add to a circular selection, such as the one shown in Figure 2-1:
Make your first elliptical selection with the Elliptical Marquee tool, as shown in the top example in Figure 2-1.
Be sure you hold down the Alt key (Option on the Mac) to draw from the center out. Also, press the Shift key if you wish to constrain your selection to a circle.
To add to your initial selection, you hold down two keys at once. First hold down the Shift key to add to the selection, and then hold down the Alt key (Option on the Mac) to draw from the center out. You must press and hold down the keys in this order.
Note that if you also need to constrain your selection to a perfect circle you have a dilemma because the Shift key is already being used to add to the selection. See the upcoming section "Avoiding Keyboard Collisions" for a solution.
Drag around the second selection by using the Elliptical Marquee tool.
We had to do Steps 2 and 3 several times because we had to select all the tennis balls. The resulting selection is shown in the example on the bottom in Figure 2-1.

Just as you can add to a selection marquee, you can also subtract from a selection. Here's how to subtract from a current selection using the following tools:
Using the Lasso or the Rectangular or Elliptical Marquee tool: Hold down the Alt key (Option on the Mac) and drag around the pixels you want to subtract.
Using the Magic Wand and Quick Selection tools: Hold down the Alt key (Option on the Mac) and click the area you want to remove.
Using the Polygonal Lasso tool: To subtract a straight-sided area, hold down the Alt key (Option on the Mac) and click and release around the area.
Using the Selection Brush tool: Hold down the Alt key (Option on the Mac) and drag.
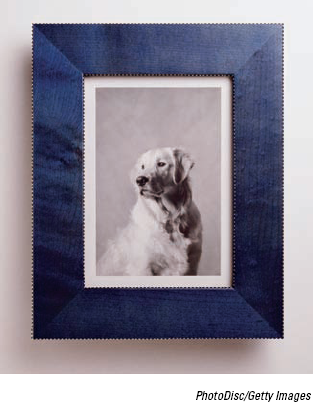
In Figure 2-2, we first selected the frame by using the Polygonal Lasso tool. We didn't use the obvious tool of choice — the Rectangular Marquee tool — because the frame wasn't completely straight. To deselect the inside of the frame from the selection, we again used the Polygonal Lasso tool, holding down the Alt key (Option on the Mac) and clicking at each corner of the inside of the frame to produce the selection shown.
What happens when you hold down the Shift and Alt keys (Shift+Option on the Mac) together? An intersection, that's what. Holding down both keys while dragging with the Lasso and Marquee tools, clicking and releasing with the Polygonal Lasso tool, or clicking with the Magic Wand tool all create the intersection of the original selection with the second selection.
Elements has a little conflict in its methods. With so many ways of doing things, sometimes you may have to fiddle with Elements to get it to do what you want. For example, when you press the Shift key, how does Elements know whether you want to create a perfect square or add to a selection? Or, what if you want to delete part of a selection while also drawing from the center outward? Both actions require the use of the Alt key (Option on the Mac). There is a way out of this keyboard madness.
To add a perfectly square or round selection to an existing selection, follow these steps:
Hold down Shift and drag when using the Rectangular or Elliptical Marquee tool.
Your selection is unconstrained.
While you drag, keeping your mouse button pressed, release the Shift key for just a moment, and then press and hold it again.
Your unconstrained selection suddenly snaps into a constrained square or circle.
Release the mouse button before you release the Shift key.
Note
If you don't release the mouse button before you release the Shift key, the selection shape reverts back to its unconstrained form.
To delete part of a selection while drawing from the center out, follow these steps:
Hold down the Alt key (Option on the Mac) and drag when using the Rectangular or Elliptical Marquee tool.
While you drag, keeping your mouse button pressed, release the Alt key (Option on the Mac) for just a moment, and then press and hold it again.
You're now drawing from the center outward.
Release the mouse button before you release the Alt key (Option on the Mac).
Tip
Use this technique when you're selecting a doughnut, tire, inflatable swim ring, or other circular items that have holes in the middle, as shown in Figure 2-3.

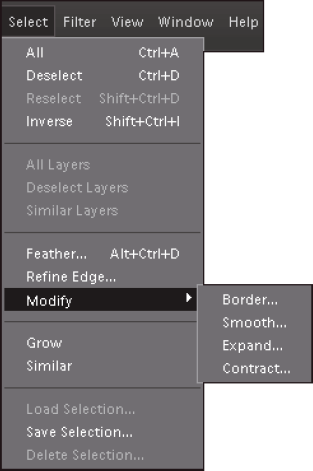
Although you can add, subtract, and intersect selections by using the Shift and Alt keys (Option on the Mac) and the selection option buttons on the Options bar, you can do even more with the commands on the Select menu, shown in Figure 2-4. In this menu, you find ways to expand, contract, smooth, and soften your selection, and even turn your selection inside out. You can also use this menu to automatically select similar colors. If you use the Select menu, your selections should be ready and rarin' for action.
The Select All and Deselect commands are pretty self-explanatory. To select everything in your image, or if your image has layers, everything in the chosen layer, choose Select
If you've taken some valuable time to carefully lasso a spiky iguana from its perch on a mangrove tree, the last thing you want is to lose your hard-earned selection border. But that's what happens if you inadvertently click the image when you have an active selection border — it disappears.
Yes, technically, you can choose Edit
Note
The Reselect command works for only the last selection you made, so don't plan to reselect a selection you made last Wednesday — or even two minutes ago — if you've selected something else after that selection. If you want to reuse a selection for the long term, save it, as we explain in the section "Saving and loading selections," later in this chapter.
Tip
Sometimes, selecting what you don't want is easier than selecting what you do want. For example, if you're trying to select your cat Princess, photographed against a neutral background, why spend valuable time meticulously selecting her with the Lasso tool, when you can just click the background with the Magic Wand tool?
After you select the background, just choose Select

In Book IV, Chapter 1, we describe how to feather (soften or blur the edges of) a selection when using the Lasso and Marquee tools by entering a value in the Feather option in the Options bar. This method of feathering requires that you set your Feather radius before you create your selection.
A problem may arise with feathering before you select if later you want to modify your initial selection. When you make a selection with a feather, the selection border adjusts to take into account the amount of the feather. So, the resulting marquee outline doesn't resemble your precise mouse movement. As a result, modifying, adding, or subtracting from your original selection is pretty difficult.
Note
A much better way to feather a selection is to make your initial selection without a feather, as shown in the top image of Figure 2-6. Clean up your selection as necessary, and then apply your feather by choosing Select
Note
The radius is how far out in all directions the feather extends. A radius of 8 means the feather extends 8 pixels outward from the selection outline. A large feather radius makes the image appear to fade out.
The Refine Edge command, which appears right after Feather in the Select menu, enables you to fine-tune your selection edges using various options. For full details on this option, see the section "Freeform Selecting with the Lasso Tools" in Book IV, Chapter 1.

The Select
Border: Selects the area around the edge of the selection. You specify the width of the area from 1 to 200 pixels, and you get a border outline, as shown on the left in Figure 2-7. Choose Edit

Smooth: Rounds off the nooks, crannies, and jagged edges. Enter a radius value from 1 to 100 pixels, and Elements looks at each selected pixel and then includes or deselects the pixels based on the radius value. If most of the pixels are selected, Elements includes the strays; if most of the pixels are unselected, Elements removes these pixels. Start with 2 pixels or so — and if that doesn't seem like enough, increase it by a few pixels.
Warning
Use this command with great caution. It's just too easy to get mushy, inaccurate selections.
Expand: Increases the size of your selection by a specified number of pixels, from 1 to 100. This command comes in handy if you just miss the edge of an elliptical selection and want to enlarge it just a tad.
Contract: Shrinks your selection by 1 to 100 pixels. When you're compositing multiple images, you can benefit by slightly contracting your selection if you plan on applying a feather. This enables you to avoid picking up a fringe of background pixels around your selection.
Tip
After you make a selection, contract it and then feather it before you drag it onto the canvas. This technique helps to create a natural-looking transition between the images in your composite. The amount you decide to contract and feather varies according to the resolution of the images. For example, if you're using low-resolution (72 ppi) images, you may want to use 1 pixel for the Contract amount and 0.5 pixels for the Feather amount; higher-resolution images may warrant 2 to 3 pixels for the Contract amount and 1 to 2 pixels for the Feather amount. If the word resolution makes you scratch your head, see Book III, Chapter 1.

The Grow and Similar commands are often mentioned in the same breath with the Magic Wand tool. If you didn't get the perfect selection on the first click — a very common occurrence, unfortunately — you can use the Grow command. For example, to include more in your selection, you increase the Tolerance setting and try again — hold down Shift and click the area to include. Or you can choose Select
The Similar command is like Grow, only the pixels don't have to be adjacent to be selected. The command searches throughout the image and picks up pixels within the Tolerance range.
Note
Both commands use the Tolerance value that's displayed on the Options bar when you have the Magic Wand tool selected. Adjust the Tolerance setting to include more or fewer colors by increasing or decreasing the setting, respectively.
When you have your selection modified to perfection, you may then want to move it or clone it. To move a selection, simply grab the Move tool (the four-headed arrow) in the Tools panel, and then drag the selection.
Sounds easy enough, right? When you move the selection, however, be warned that the area where the selection used to reside is now filled with the background color, as shown in Figure 2-8. It turns out, though, that the background color only appears if you decide to move both the selection outline and the image pixels. But you don't have to move both; you can move just the selection outline (without the pixels), as we explain in the section "Moving the selection outline, but not the pixels," later in this chapter. Also, if you're moving a selection on a layer, you're left with transparent pixels (see Book VI).
Note
The Move tool has a few options residing in the Options bar that are mostly relevant when working with layers. For a description of these options, see Book VI, Chapter 2.

Figure 13.8. When you move a selection by using the Move tool, you leave a hole that reveals the background color.
If you don't want to leave a hole in your image, you can copy and move the selection, leaving the original image intact, as shown in Figure 2-9. Just hold down the Alt key (Option on the Mac) and drag when using the Move tool. This action is often referred to as cloning because you're essentially making a duplicate of a selected area and then moving that duplicate elsewhere.
If all you want to do is move the selection outline without moving the pixels underneath, for example, to better center an elliptical selection around what you want, avoid using the Move tool. Instead, choose any selection tool — a Marquee or Lasso tool — and then click anywhere inside the selection and just drag. That way, you move only the outline of the element, not the pixels of the element itself. You can also use the arrow keys to nudge a selection marquee.

After you select an element, you may find you need to resize or reorient that element. Transforming involves scaling, rotating, skewing, distorting, flipping, or adjusting the perspective of your pixels. Although you may consider these types of transformations somewhat pedestrian, we're sure you'll find them practical and useful in your daily digital-imaging chores.
Follow these steps to transform a selection:
Create your selection.
We'll leave this task up to you; just use your selection expertise (or refer to Book IV, Chapter 1 for assistance).
Note
You can also apply transformations to a layer or to multiple layers. (For more on this topic, see Book VI.)
If you need to rotate the selection, choose Image
Rotate.Free Rotate Selection: Enables you to manually rotate the selection.
Selection 180°, 90° Left, or 90° Right: Rotates the selection by specified amounts.
Flip Selection Horizontal or Vertical: Flips your selection along the vertical or horizontal axis, respectively.
The other rotate commands have to do with layers. See Book VI, Chapter 1 for more info.
To scale the selection, choose Image
ResizeScale.To freely transform, skew, distort, or adjust the perspective of a section, choose Image
Transform and choose a transformation type from the submenu:Free Transform: Enables you to rotate, resize, skew, distort, and adjust perspective all within a single command. See the sidebar for more on this productive command.
Skew: Distorts your selection on a given axis.
Distort: Distorts your selection with no restrictions on an axis.
Perspective: Applies a one-point perspective to your selection.
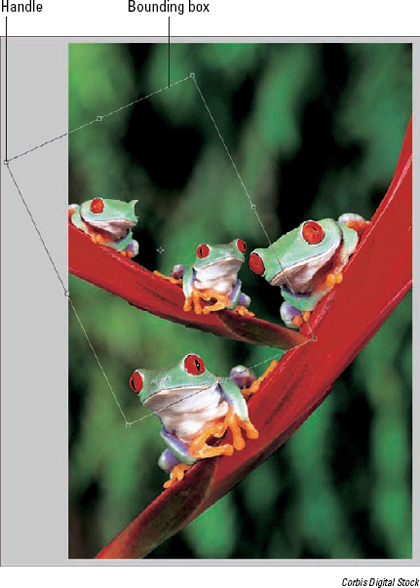
As soon as you select your desired distortion and release the mouse button, a box called the bounding box or transform box surrounds your selection, complete with handles on the sides and corners. You don't get a bounding box when you select the Flip or Rotate (by degrees) transformations (these commands just get applied to your image).
Depending on which transformation type you choose in Steps 2, 3, or 4, drag the appropriate handle:
Free Rotate: Move your cursor outside the bounding box. When the cursor becomes a curved arrow, drag clockwise or counter-clockwise. Hold down Shift to rotate in 15-degree increments.
Remember choosing Rotate 180°, 90° CW, or 90° CCW, or Flip Horizontal or Vertical just executes the command. Handle-dragging isn't necessary.
Scale: Corner handles work best for this transformation. Hold down Shift to scale proportionately. Hold down the Alt key (Option on the Mac) to scale from the center.
Skew: Drag a side handle.
Distort: Drag a corner handle.
Perspective: Drag a corner handle.
Elements executes all the transformations around a point called thereference point. The reference point appears in the center of the transform box by default. You can move the reference point anywhere you want, even outside the bounding box. In addition, you can set your own reference point for the transformation by clicking a square on the reference point locator on the Options bar. Each square corresponds to a point on the bounding box.
Warning
Execute all your transformations in one fell swoop, as shown in Figure 2-10, if possible. In other words, don't scale a selection now and then five minutes later rotate it, and then five minutes after that distort it. Every time you apply a transformation to an image, you're putting it through a resampling process. You want to limit how many times you resample an image because it has a degrading effect — your image starts to appear soft and mushy. Only flipping or rotating in 90-degree increments is resample-free. For more on resampling, see Book III, Chapter 1.
After you transform the selection to your liking, double-click inside the bounding box, or click the Commit button on the Options bar.
To cancel the transformation, press Esc or click the Cancel button on the Options bar.
Your selection is now magically transformed. If your image isn't on a layer, you can end up with a hole filled with the background color after your image is transformed. Check out Book VI on layers to avoid this calamity.
Distorting selected pixels with Free Transform
An efficient way to apply multiple transformations is to use the Free Transform command. Like the Transform command, the Free Transform command surrounds the selection with a bounding box. Within the bounding box, you can scale, rotate, skew, distort, or apply perspective without having to choose the individual distortions. You just have to use the right keyboard shortcuts. To scale and rotate, use the same method as the Image
Skew: Ctrl+Shift-drag (

Distort: Ctrl-drag (
Perspective: Ctrl+Shift+Alt-drag (
If you forget these tedious keyboard shortcuts, simply right-click with the mouse (Control+click on the Mac) to access a context-sensitive menu with the transform commands from which you can then select.
Tip
When the Move tool is active, you can transform a layer without choosing a command. Select the Show Bounding Box option on the Options bar. This option surrounds the layer or selection with a box that has handles. Drag the handles to transform the layer or selection.
Removing an Element from an Image
Sometimes, you remove a distracting element from a picture to provide a stronger focal point. Or maybe you just don't want the element in the image. But remember, if you simply delete an unwanted element without cloning, you leave a hole (colored with the background color) in place of the element. Probably not what you want.
Follow these steps to remove an unwanted element (in this case, a bystander) from an image:
Tip
When you first attempt this technique, start with an image that has an element not physically attached to something you want to keep in the image.
Open an image that contains something you want to remove.
Use the selection tool of your choice to select the element that you want to remove.
In this step, you're creating a selection border that you use to clone another area of the image.
You don't have to be super-precise, so feel free to grab a Lasso tool. When you make your selection, be careful not to cut off any portion of the element. Otherwise, you leave some stray pixels — a dead giveaway that something was once there. Using the Polygonal Lasso tool, we made a rough outline around the bystander on the right, as shown in the following figure.

Position your cursor inside the selection border, press and hold the mouse button, and drag your selection to move it horizontally (or vertically, if the image warrants it) to an area of the photo that you want to clone.
The selection border, shown in the following figure, is the only thing that we moved.

With the Move tool selected, position your cursor inside the selection marquee, hold down Alt key (Option on the Mac), and then drag to move the cloned area on top of the element that you're removing. Carefully match up the edges, as shown in the figure, and release your mouse button, and then release the Alt key (Option on the Mac).
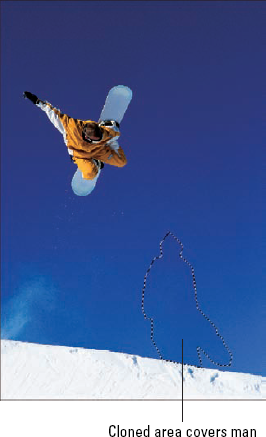
Choose Select
The cloned area now covers the element that you want to remove, as shown in the following figure. In the example, the sky selection now covers the bystander.
Tip
Depending on your image, you may want to choose Select
The final step is to clean up any telltale signs that the element was there.
Select the Clone Stamp tool and select a medium-size feathered brush from the Brush Preset picker on the Options bar, hold down the Alt key (Option on the Mac), and click a good area next to a seam or flaw; release the Alt key (Option on the Mac) and then click the flaw.
If the Clone Stamp is a mystery to you, be sure to check out Book VIII, Chapter 1.
Repeat this step until you fix all the flaws and the clone blends in seamlessly with the background. Don't get carried away with the Clone Stamp tool, or you may end up with a smudgy mess. Being light-handed is a good thing, as we were in the now-retouched image. Nobody can tell that the awesome snowboarder had an audience at one time.
