In This Chapter
Working with the Effects panel
Taking photo effects for a spin
Stylizing layers
Tweaking layer styles
After you have all the basic elements lined up in your layered composite image, you may want to give it a little pizazz. Elements provides a lot of different effects that you can apply to enhance your images. Maybe a headline would pop out a little more if you beveled the edge, or maybe that silhouetted image would take on a little more dimension if you placed a drop shadow behind it. This chapter is where you find out how to do all these things.
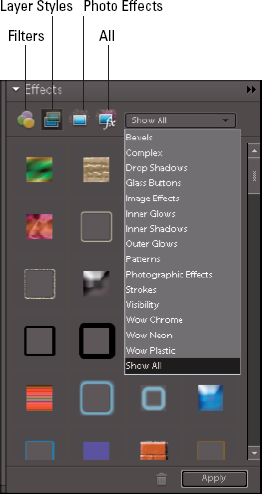
Elements has organized all its various effects in one neat panel. In the Editor in Full Edit mode, choose Window

Click the double arrow in the upper-right corner of the Effects panel to change the view of your effects, filters, and styles as thumbnails or as names. You can also choose to show default (referred to as local) content (stuff that loaded when you installed Elements), or content you downloaded from www.photoshop.com with your Photoshop.com Plus membership (see the Book IX, Chapter 4 for details on Photoshop.com), or all content. With a Plus membership, in addition to online storage for your photos, you have access to artwork, templates, fonts, frames, backgrounds, tutorials, and tips. Finally, you also find a fast track to Styles and Effects help, if you need it.
The upcoming sections explain how to apply photo effects and styles. We go into a hefty discussion about filters in Book VII, Chapter 1.
Elements provides a variety of photo effects that you can apply to your photos. Note that some effects automatically create a duplicate of the selected layer, whereas other effects work only on flattened images. You can't preview how the effect will look on your image or type, as you can when you apply filters. Also, you have no options to specify.
Here are the steps to follow when applying a photo effect:
In the Editor in Full Edit mode, select your desired image layer in the Layers panel.
Or, if you're applying the effect to only a single a selection, make the selection before applying the effect.
Choose Window

In the Effects panel, select the Photo Effects button (blue screen with white dots around it) at the top. (Refer to Figure 3-1.)
Select your desired subcategory, or library, of Photo Effects from the drop-down list in the upper-right area of the panel:
Frame: Includes photo effects that enhance the edges of the layer or selection.
Faded Photo, Monotone Color, Old Photo, and Vintage Photo: This group of photo effects makes your image fade from color to grayscale, appear as a single color, or look like an old pencil sketch or a photo on old paper.
Misc Effects: This group includes a wide variety of effects to make your image appear as though it's snowing, made of lizard skin or neon tubes, or painted with oil pastels.
Show All: Shows all the photo effects described in this list.
On the Effects panel, double-click an effect or drag the effect onto the image.
In our example, in Figure 3-2, we applied the Oil Pastel photo effect in the Misc Effects library.
Tip
You can also apply a photo effect to type. Select a type layer in the Layers panel and follow Steps 2–5 in the preceding list. Note that a dialog box alerts you that the type layer must be simplified before the effect can be applied. Remember that simplifying the layer means the text can no longer be edited, so be sure your type is exactly as you want it. For more on working with type layers, see Book V, Chapter 3.
Warning
Unlike layer styles, note that photo effects can't be edited. Photo effects automatically create another layer, so if you don't care for the effect, simply delete that layer by dragging it to the trashcan at the top of the Layers panel.
Layer styles range from simple shadows and bevels to more-complex designs, such as buttons and patterns. The wonderful thing about layer styles is that they're completely nondestructive. Unlike filters, layer styles don't change your pixel data. You can edit them or even delete them if you're unhappy with the results, so feel free to use them with abandon.
Here are a few fun facts about layer styles:
Layer styles can be applied only to layers. Therefore, if all you have in your image is a background, be sure to convert it to a layer first. See Book VI for details on working with layers.
Layer styles are dynamically linked to the contents of a layer. If you move or edit the contents of the layers, the results are updated.
When you apply a layer style to a layer, an fx symbol appears next to the layer's name on the Layers panel. Double-click the fx to bring up the Styles Settings dialog box and make any adjustments that are necessary to get the look you want.
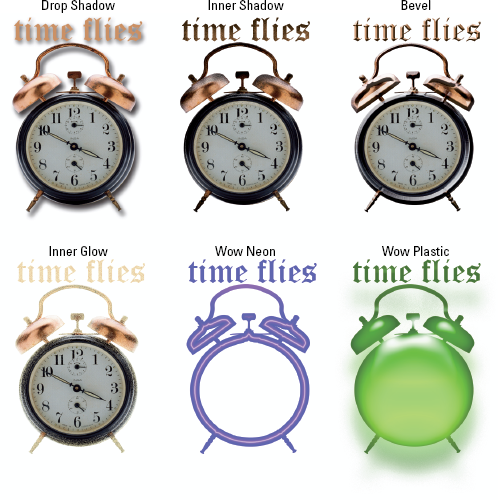
Layer styles are stored in different libraries. You can add shadows, glows, beveled and embossed edges, and more-complex appearances, such as neon, plastic, chrome, and other manmade textures. See Figure 3-3 for a layer style sampler.
Delete a layer style or styles. Choose Layer
Copy and paste layer styles onto other layers. Select the layer containing the layer style and choose Layer
Hide or show layer styles. Choose Layer
Scale a layer style. Choose Layer
Here are the steps to apply a style and a description of each of the style libraries.
In the Editor, in Full Edit mode, select an image or type layer on the Layers panel.
Choose Window
Select the Layer Styles button (an icon of two overlapping screens) at the top of the Effects panel. (Refer to Figure 3-1.)
Select a library of styles from the drop-down list in the upper-right area of the panel:
Bevels: Adds a three-dimensional edge on the outside or inside edges of the contents of a layer, giving the element some dimension. Emboss styles make elements appear as though they're raised off or punched into the page. You can change the appearance of these styles, depending on the type of bevel chosen. Adjust attributes, such as the lighting angle, distance (how close the shadow is to the layer contents), size, bevel direction, and opacity.
Drop and Inner Shadows: Add a soft drop or inner shadow to a layer. Choose from an ordinary shadow or one that includes noise, neon, or outlines. You can adjust the lighting angle, distance, size, and opacity, as desired.
Outer and Inner Glows: Add a soft halo that appears on the outside or inside edges of your layer contents. Adjust the appearance of the glow by changing the lighting angle, size, and opacity of the glow.
Visibility: Click Show, Hide, or Ghosted to either display, hide, or partially show the layer contents. The layer style remains fully displayed.
Complex and others: The remaining layer styles are a group of different effects ranging from simple glass buttons to the more exotic effects, such as Groovy and Rose Impressions. You can customize all these layer styles somewhat by adjusting the various settings, which are similar to those for other styles in this list.
On the Effects panel, double-click a layer style or drag the layer style onto the image.
The style, with its default settings, is applied to the layer. Note that layer styles are cumulative. You can apply multiple styles — specifically, one style from each library — to a single layer.
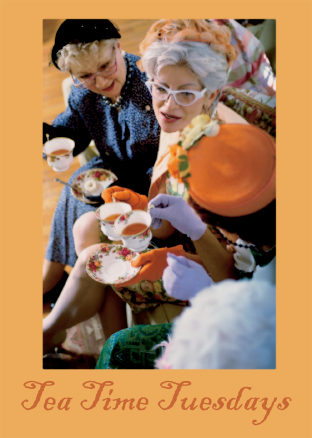
Note that you can also apply layer styles to type layers, and the type layer doesn't need to be simplified. This is an advantage over Photo Effects because it enables you to retain the type's editability, as shown in Figure 3-4.
Layer styles are very agreeable. Not only are they easy to apply, they are equally easy to edit. Here's how:

In the Layers panel, double-click the Layer Style icon (fx icon).
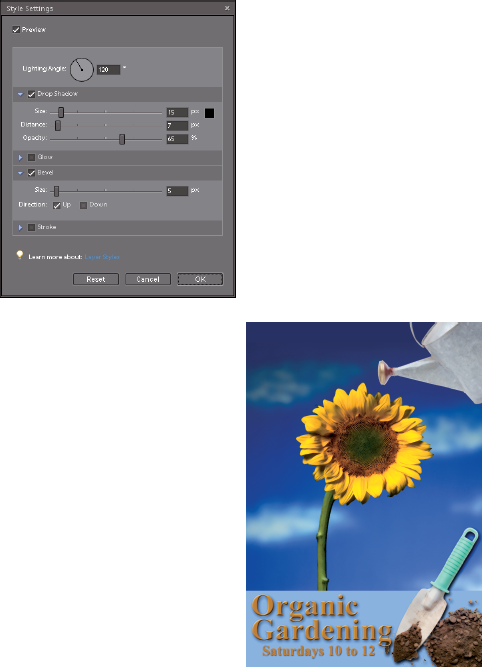
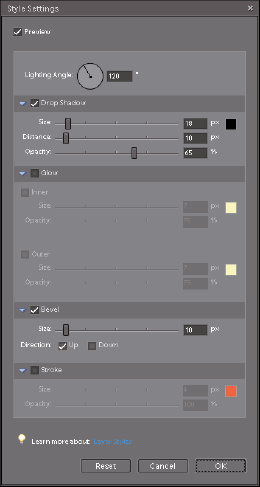
The Style Settings dialog box opens, as shown in Figure 3-5.
Be sure to check Preview so you can view how your edits are affecting the layer style.
Expand the options for any layer style category by clicking the arrow just to the left of the layer style name.
Note that you can toggle the layer style on and off by checking and unchecking the style.
Depending on what category of layer styles you used, your settings may vary some. Here is a rundown:
Lighting Angle: Specify the angle of your light source. If you've decided to put together a realistic composite of a number of different images, make sure that all the shadows and highlights of all the different elements are consistent. You don't want one layer to look like it's 6 a.m. and another to look like it's 2 p.m.
Size: Specify the size of your shadow, glow, bevel, or stroke from 0 to 250 pixels.
Distance: Adjust how far the shadow or glow is offset (0 to 30,000 pixels) from your element.
Opacity: Adjust the Opacity setting to change how transparent the shadow, glow, or stroke appears — from 0% to 100%.
Inner/Outer: Specify whether your glow is an inner or outer glow.
Color: Click the color swatch and choose a glow color from the Color Picker. Click OK to close the Color Picker dialog box.
Direction Up/Direction Down: Specify whether your bevel (the raised or sunken-in edge) direction is up or down. Direction Up positions the highlight along the edge closest to the light source and the shadow on the opposite edge. Direction Down does the opposite, positioning the shadow near the light source.
After you refine your layer style settings, click OK.
The layer style is edited and ready to go, as shown in Figure 3-6. Note that there are also options for Reset, to start over; or Cancel, to bail out entirely.

Note
Adding Photo Effects and Layer Styles to a Collage
If you like your images and text simple and unadorned, more power to you. But if you feel a sudden urge to add an embellishment or two, make sure you're prepared to do that. In this exercise, we show you how to add some type to a collage and apply effects and styles to the various elements. Just follow these simple steps:
In the Editor, in Full Edit mode, open a previously created and saved collage file.
Make sure that the Layers panel is also open.
Select the Eyedropper tool from the Tools panel. Click a color in the collage that you like.
The color you sampled is now the foreground color, as you can see from your swatches at the bottom of the Tools panel.

Select the Type tool and then select a font, style, point size, and other formatting options from the Options bar.
We recommend choosing an easy-to-read font and applying a bold style to it. We're using Times New Roman Bold, and we set the point size to 30 and the leading to 24 points.
We checked the Anti-Aliasing option so that our text transitions nicely with the image elements.
Click inside the image and type some text.
We typed Organic Gardening for our garden collage. We also added a second line of text with the day and time.
Select the Move tool from the Tools panel and position the type in the collage.
We put the text in the bottom-left corner.

With the type layer selected in the Layers panel, choose Window
If you need to edit the layer style, double-click the fx icon in the Layers panel and specify settings. For details on how to do this, see the earlier section "Editing layer styles." We edited the drop shadow to make it a little smaller in size, less opaque, and closer to the type.
Next, choose Bevels from the library drop-down list. Double-click the Simple Inner bevel. Make any necessary edits to the bevel layer style.
We reduced the size of our bevel to make the effect crisper.
Repeat Steps 6 and/or 7 on any other of your layers, if desired.
We added a Low drop shadow to our trowel and dirt pile layer.
Now to add an effect. In the Effects panel, click the Photo Effects icon at the top and choose Misc Effects from the library drop-down list. Double-click the Soft Flat Color effect.
Choose File
You're all done. If you feel like it, keep adding to or refining the collage when you discover new tricks.