In This Chapter
Preparing images for printing
Printing multiple images
Using color profiles
Printing color from different printers
Using service providers
Using online printing services
Exploring other print options
Perhaps the greatest challenge for individuals using programs such as Photoshop Elements (and even for the professionals who use its granddaddy, Adobe Photoshop) is turning what you see on your monitor into a reasonable facsimile on a printed page. You can find all sorts of books on color printing — how to get color right, how to calibrate your equipment, and how to create and use color profiles — all for the purpose of getting a good match between your computer monitor and your printer. It's downright discouraging to spend a lot of time tweaking an image so that all the brilliant blue colors jump out on your computer monitor, only to find that all those blues turn to murky purples when the photo is printed.
If you've already read Book III, Chapters 1 and 2, you're ahead of the game because you know a little bit about color management, color profiles, and printer resolutions. After you check out those chapters, your next step is to get to know your printer or your print service center and understand how to correctly print your pictures.

In this chapter, we talk about options — many options — for setting print attributes for printing to your own color printer. We also toss in some tips on how to get better results when you're using print service centers. If you need to, reread this chapter a few times just to be certain that you understand the process for printing good-quality images. A little time spent here will, we hope, save you some headaches down the road.
The first step toward getting your photos to your desktop printer or to a printing service is to prepare each image for optimum output. You have several considerations when you're preparing files, including the ones in this list:
Set resolution and size. Before you print a file, use the Image Size dialog box (Image

Make all brightness and color corrections before printing. It stands to reason that you want to make sure that your pictures appear their best before sending them off to your printer. If you have your monitor properly calibrated, as we discuss in Book III, Chapter 4, you should see a fair representation of what your pictures will look like after they are printed.
Decide how color will be managed before you print. You can color-manage output to your printer in three ways, as we discuss in the next section. Know your printer's profiles and how to use them before you start to print your files.
Get your printer ready. Finally, when printing to desktop color printers always be certain your ink cartridges have ink and the nozzles are clean. Make sure you use the proper settings for paper and ink when you send a file to your printer. Be sure to review the manual that came with your printer to become aware of how to perform all the steps required to make a quality print.
As you might suspect, you print files from Elements using the File
You have a number of different settings to adjust when printing color photos as we explain a little later in the section "Printing with Color Profiles." For now, let's have a look at the different options you have in the print dialog boxes you open from the Organizer and from Full Edit mode.
You can select one or more images in the Organizer and then choose File

Image Thumbnails: When you select multiple images in the Organizer, all the selected images appear in a scrollable window on the left side of the dialog box.
Scroll bar: When so many photos are selected that they all cannot be viewed in the thumbnail list on the left side of the dialog box, you can use the scroll bar to see all images.
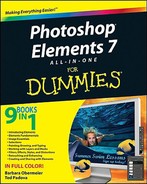
Add/Remove: If the Print Photos dialog box is open and you want to add more photos to print, click the Add (+) icon and the Add Photos dialog box opens as shown in Figure 2-2. A list of thumbnails appears, showing all photos in the current open catalog. Check the check boxes adjacent to the thumbnails to indicate the photos you want to add to your print queue. You can also choose an entire catalog, albums, photos marked with keyword tags, and photos having a rating. For more information on albums, keyword tags, and ratings, see Book II, Chapter 2.
If you want to remove photos from the list to be printed, click the photo in the scrollable list in the Print Photos dialog box and click the Remove (-) icon.
Help: Click the Help button to open help information pertaining to printing photos.
Page Setup: Click this button to open the Page Setup dialog box shown in Figure 2-3.
More Options: Click More Options to open another dialog box where additional options are chosen (see the section "Using More Options" later in this chapter).
Scroll Print Preview: Click the arrows to toggle a print preview for all images in the list.
Print Preview: This image displays a preview of the first file to be printed.
Print: Click Print after making all adjustments in the Print Photos dialog box.
Cancel: Clicking Cancel dismisses the dialog box without sending a photo to the printer.
Select Printer: Choose a target printer from the drop-down list.
Printer Properties: Click this icon to open properties unique to the selected printer.
Media Type: Choose the type of media you have loaded in your printer.
Paper Size: Choose from print sizes that are supported by your printer. This list may change when you choose a different printer from the Select Printer drop-down menu.
Orientation: Choose either Portrait or Landscape.
Borderless: Check this box for borderless prints when using printers supporting borderless.
P.I.M.: Print Image Matching. If your printer supports P.I.M. and Exif color matching, you can often see improved results.
Exif Print: This option is available for digital cameras and printers supporting Exif for better-quality prints.
Type of Prints: You have three options available. Print Individual Prints, Contact Sheets, or Picture Packages. For more information on Contact Sheets and Picture Packages, see "Printing Multiple Images" later in this chapter.
Print Size: Select from the number of options for print sizes supported by your printer.
Photos Per Page: By default, One Photo Per Page is selected. Remove the check mark and you can choose to print a number of prints on the same page by making selections from the drop-down menu.
Crop to Fit: Check this box to crop an image to fit the selected paper size.
When you click the Page Setup button in the Print Photos dialog box, the Page Setup dialog box opens as shown in Figure 2-3. In this dialog box, you can make a few selections for print attributes that may be unique to your printer. However, for most desktop printers, the options you find in the Page Setup dialog box can be controlled in the Print Photos dialog box.

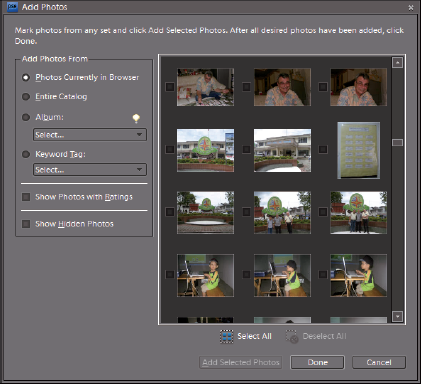
When printing photos from the Organizer, click the More Options button in the Print Photos dialog box. The More Options dialog box opens, as shown in Figure 2-4. In this dialog box you find settings for
Label: Check the check boxes for the labels you want printed on your output.
Invert Image: This option is used for heat transfer material: Mylar, Lexjet, and other substrates that require E-down printing — emulsion-down printing, where the negative and the image are flipped.
Print Crop Marks: Check this box to print crop marks.
Max Print Resolution: All printers can take advantage of a resolution up to a maximum value, and that value varies among different printers. You can set this option to the maximum resolution supported by your printer. When files are sent to the printer, they are downsampled if the resolution is larger than the value in this text box. The result is that less data is sent to the printer, yielding faster print times.
Border: Check Add a Border, and you can specify the size of the border in the check box and choose a unit of measure in the drop-down list. Click the Color swatch to choose a color for the border. Check Include Trim Guideline to print guides for trimming the paper.
Color Management: From the drop-down list you can choose a printer profile. See "Printing with Color Profiles" later in this chapter.
If you want to print a photo while in Full Edit mode, choose File
Print Preview: This image displays a preview of the file to be printed.
Notice that the Print dialog box does not display Image Thumbnails in a scrollable list like the one in the Print Photos dialog box.
Printer: Choose a target printer from the drop-down list.
Print Size: Select from the number of options for print sizes supported by your printer.
Output: Options for adding labels, captions, and a border are the same as those you find in the More Options dialog box when printing from the Organizer.
Background: You can create a background color by clicking the Background check box and then clicking the color swatch to choose a color. This option is not available in the Print Photos dialog box.
Print Crop Marks: Prints crop marks. This is the same as the option available in the More Options dialog box when you are printing from the Organizer.
Flip Image: This option is used for heat transfer material: Mylar, Lexjet, and other substrates that require E-down printing. It is the same option as found in the More Options dialog box.
Crop to Fit Print Proportions: Check this box and in the Position area below you find options for centering the image or cropping from the top and left sides. The Units drop-down list enables you to choose from the preset measuring units. A single option is available for Crop to Fit in the Print Photos dialog box.
Color Handling: Determines what manages color (your printer or Photoshop Elements). See "Printing with Color Profiles" later in this chapter.
Printer Preferences: Click this icon to open properties unique to the selected printer. This has the same options as Printer Properties in the Print Photos dialog box.
Printer Profile: Choose a color profile from the drop-down list the same as you do in the More Options dialog box. See "Printing with Color Profiles" later in this chapter.
Rendering Intent: Choose a rendering intent from the drop-down list. This item is not available in the Print Photos or More Options dialog boxes. For more information on rendering intents, see Book III, Chapter 1.
Scaled Print Size: You can scale the photo to the size of the media loaded in your printer or uncheck the box and type values for the height and width. The chain link icon enables you to toggle on and off constraints for the height/width. In the Print Photos dialog box, your only option is to choose the Crop to Fit check box.
Unit: Choose a unit of measure from the drop-down list. This item is not available in the Print Photos dialog box.
Show Bounding Box: The Bounding Box is the peripheral area of the data on all sides. Check this box to see the boundaries of the data. This option is not available in the Print Photos dialog box.
Cancel: Clicking Cancel dismisses the dialog box without sending a photo to your printer.
Print: Click Print after making all adjustments in the Print Photos dialog box.
Page Setup: Click this button to open the Page Setup dialog box shown earlier in Figure 2-3.
Rotate (Left/Right): Click the Left or Right icon to rotate the image. This option is not available in the Print Photos dialog box.
Left/Right Arrows (1 of 1): When you click the arrows in the Print dialog box, you can toggle the print preview to display different photos you have selected for printing. This option relates to Scroll Print Preview in the Print Photos dialog box.
In the Print dialog box, you can print only a single photo. However, if the photo has multiple pages, you can use the arrow icons to toggle the pages that are shown in the print preview. For more information on adding pages to a file in Full Edit mode, see Book II, Chapter 1.
Print Multiple Photos: If you want to print multiple photos, click this button. When you click the button, you are taken out of Full Edit mode and the Organizer opens. You then use the Print Photos dialog box to print the multiple photos you select in the Organizer.
Help: Click the Help button to open help information pertaining to printing photos.
Orientation: Click the left icon for Portrait and the right icon for Landscape.

You have two choices in the Organizer for printing multiple images. Neither option, printing contact sheets or picture packages, is available from within Full Edit mode.
Contact sheets in traditional photography were used to get a print from a roll of film. Rather than viewing negatives, a photographer could see a thumbnail print of each frame on a roll in a few contact sheets. These revealed how the frames would appear when printed.
You can get the same results in Elements by printing contact sheets from a collection of photos. When you can look over the thumbnails and choose which photos to print at larger sizes, you are saving money on your printer consumables.
To print a contact sheet, do the following:
Open the Organizer.
Select photos in the Organizer you want to print on a contact sheet.
Click and press Ctrl + click to choose multiple photos in a noncontiguous selection. You can also sort photos by keyword tags, albums, dates, and so on. You then select all the sorted photos by pressing Ctrl+A. For more information on sorting files see Book II, Chapter 2.
Choose File
The Print Photos dialog box opens. In the dialog box select the printer you want to use for your output from the Select Printer drop-down list.
Choose Contact Sheet from the Select Type of Print drop-down menu.
The Print Photos dialog box refreshes to show your Contact Sheet options, as shown in Figure 2-6.
Select a layout.
Choose the number of columns you want for the contact sheet. If you specify fewer columns, the images appear larger; as more columns are selected the images appear smaller. Choose a size according to the number of columns that you want to print.
Check the boxes for the items you want included in the captions.
Caption items can include the date, a text line for the caption, filename, and page numbers.
Click More Options in the bottom left of the dialog box.
Choose a color profile from the Print Space drop-down menu shown in Figure 3-7. For more on printing with color profiles see the section "Printing with Color Profiles" in this chapter.
Click OK in the More Options dialog box.
Click Print (back in the Print Photos dialog box) to print your contact sheet.


Another option you have for printing multiple photos is picture packages. This feature prints multiple copies of the same photo or multiple copies of many photos.
A picture package is typically a single sheet of paper with the same photo printed at different sizes — something like your graduation photos or prom photos. You can choose to print a single picture package from one photo selected in the Organizer, or you can select multiple photos and print them all as multiple picture packages.
To create a picture package, do the following:
Open the Organizer.
Select a single photo or multiple photos in the Organizer that you want to print as a picture package(s).
Choose File
The Print Photos dialog box opens. In the dialog box, select the printer you want to use for your output from the Select Printer drop-down list.
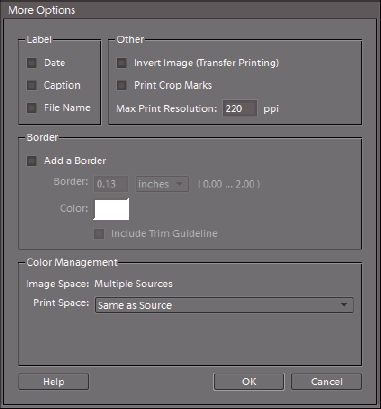
Choose Picture Package from the Select Type of Print drop-down list.
The Print Photos dialog box refreshes to show your Picture Package options.
Choose a layout.
Choose a layout from the Select a Layout drop-down menu. As you make layout selections, you see a dynamic preview of the picture package as shown in Figure 2-8. Select different layouts to examine the results and choose the layout you want for your picture package.
Select a frame.
The photos can be printed with a frame. Choose an option from the Select a Frame drop-down list or leave the default None selected to print no frame on the photos.
Click More Options.
Choose a color profile from the same dialog box shown earlier in Figure 2-7.
Click OK.
In the Print Photos dialog box, click Print.
All the options we talked about so far in this chapter give you a picture on paper, but even if you follow all the steps up to this point to a T, you may still not get the color right. You need to do more than adjust the settings in the Print Photos and Print dialog boxes to print the most accurate color you can on your printer. To do so requires using printer profiles that are created for every printer, paper, and ink set you use.
Warning
Printer profiles are created by printer developers for use with their inks and papers. If you decide to modify your printer and use large ink bottles or use lower-cost inks from third-party suppliers, the profiles shipped by your printer developer aren't optimized for the change in ink pigments. Likewise, third-party papers aren't optimized for the printer profiles shipped by your printer developer. In order to get accurate color when you use inks and papers different from those recommended by your printer developer, you may need to develop custom profiles for each ink set and each paper. You can find several sources of services that create custom profiles for you by searching the Internet.
In Book III, Chapter 4, we talk about creating color profiles for your monitor and selecting a color workspace. The final step in a color-managed workflow is to convert color from the profile of your color workspace to the color profile of your printer. Basically, this conversion means that the colors you see on your monitor in your current workspace are accurately converted to the color that can be reproduced by your printer.
When using the Print dialog box (or the More Options section of the Print Photos dialog box), you can manage color in Photoshop Elements in one of three ways when it comes time to print your files:
Printer Manages Colors: This method permits your printer to decide which profile is used when your photo is printed to your desktop color printer. Your printer makes this decision according to the paper you select as the source paper used to print your photos. If you choose Epson Premium Glossy Photo Paper, for example, your printer chooses the profile that goes along with that particular paper. If you choose another paper, your printer chooses a different color profile. This method is all automatic, and color profile selection is made when you print your file.
Photoshop Elements Manages Color: When you make this choice, color management is taken away from your printer and is controlled by Elements. You must choose a color profile after making this choice in the Print dialog box. Desktop printers that fall in the medium-to-more-expensive range often have many color profiles they can install.
No Color Management: You use this choice if you have a color profile embedded in one of your pictures. You'll probably rarely use this option. Unless you know how to embed profiles or receive files with embedded profiles from other users, don't make this choice in the Print dialog box.
Each of these three options requires you to make some kind of choice about how color is managed. You make choices (as we discuss later in this chapter, when we walk you through the steps for printing) about whether to color-manage your output. These selections are all unique to the Print dialog box for your individual printer.
The third option in the preceding section mentions printing a file with converted color when a profile is embedded in an image. If you choose one of the first two options for converting color (either you select a profile or you let the printer select one), the image on your monitor doesn't change. The conversion happens at print time.
You can physically convert the color in your image to a given printer profile, and as you do so, you actually see how the color is converted before you print your file. In a way, you're proofing color before wasting paper and ink. If you want to print files with accurate color, we recommend using this method.
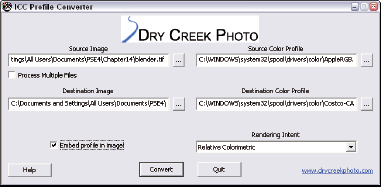
In Windows, you can download a free utility from Dry Creek Photo (www.drycreekphoto.com) that converts color from a workspace to a color profile. Suppose that you want to print some pictures at a discount store, such as Costco, and you want to be certain to use the correct profile for the photo equipment that prints your pictures. You want to convert color from your color workspace (in this case, sRGB will work best for you) to the profile used for the photo printer and paper you want to order.
Follow these steps to prepare a file for a photo service, such as Costco, or when printing to your own desktop printer that applies profiles for the papers you use:
Make all the necessary edits you need to make in Elements and save your files in TIFF format.
You must use TIFF format to use the converter we mention in Step 6.
Download color profiles from your provider's Web site.
Almost all service centers post color profiles for their printing equipment. You can visit the Costco Web site at
www.costco.comand click the Photo link on the home page to go to the Photo Center. You're prompted to set up an account, and then you see a page where profiles are listed. Costco makes the profiles available for stores in its geographic regions, and usually you find profiles for printing on the store's equipment and profiles best suited for different papers. Note: If several profiles are available for downloading, be certain to use the right profile for the paper you want your pictures to be printed on.If you use a photo lab that wants you to convert color and embed profiles, you can visit independent lab Web sites and download profiles, as well.
If you want to convert color to your own printer, use a color profile installed for your printer.
Copy the profiles to your system color folder:
C:WINDOWSsystem32spooldriverscolor.This folder is where all your color profiles are stored. Note that the path is the same for Windows XP and Windows Vista.
If you're converting color for your own printer, this folder contains all the color profiles installed by your printer software when you installed the printer driver.
Download a converter by going to
www.drycreekphoto.com/tools/profile_converterand clicking the ProfileConverterSetup.zip link.You need a utility to convert files that use the Adobe RGB (1998) or sRGB color space to the color space used by machines at your service center. Fortunately, the Dry Creek Photo converter is a great free tool.
Tip
The Dry Creek Photo Web site is one of the best sources of information available for color management and color profiling. In addition to offering custom color-profiling services, Dry Creek Photo hosts a number of different color profiles for many different commercial printers.
After downloading the file to your hard drive, double-click the Setup file and follow the brief steps in the install wizard.
Choose Start
The simple program interface opens, as you see in Figure 2-9.
Click the Source Image ellipsis (. . .) and select the source file.
The source file is the file saved in TIFF format that you want to print.
Click the Source Color Profile ellipsis and select the source color profile.
This color profile is currently embedded in your source file.
Click the Destination Image ellipsis and select the folder where you want to save your file.
Click the Destination Color Profile ellipsis and select the color profile used by the equipment where you are placing your order.
Note
You saved your color profiles to the Windows color folder, so be certain to look in this folder for the target printer color profiles.
If you want to process multiple files, select the Process Multiple Files check box.
Be certain to select the Embed Profile in Image check box and then click the Convert button.
After you click Convert, the profile converter handles the profile conversion and saves your files to the target folder.
Printers are installed on your computer with printer drivers that are designed to offer you settings and controls for options unique to your printer. We can't hope to cover all printers and the variations you find with each device.
What we can do is give you some general idea for printing by showing how it's done with Epson printers — one of the more-popular desktop printer models out there. This gives you a basis for understanding some of the settings you need to adjust when printing color to desktop printers and submitting photos to some service providers.
Tip
If you own a different brand of printer or use a service that uses other printers, what's important to remember in reviewing this section is the process involved in printing your files. Regardless of what type of printer you own, be aware of when a color profile is used and how color is either managed or not managed. You may have different check-box selections and menu commands, but the process is the same for any printer printing your photos.
Over the past few years, at least half of the many service-provider troubleshooting tech calls coming from clients involved problems with accurate color output from Epson and some other ink jet printers. We're not talking about subtle changes between monitor and printer, but huge, monstrous color changes on output prints. As it turns out, almost all the strange output results originated from just one minor error that occurred when the file was set up to print — it involved when and how to manage color in the Print dialog box.
Note
Color profiles are also dependent upon the ink being used. Refilling cartridges with generic ink can (in some cases) result in colors being shifted. Similarly, if the nozzles aren't clean and delivering ink consistently, you can get some very strange results.
We've come up with settings that will work well for you to get accurate results without stress or frustration. Just remember to use the settings exactly as described, and you can achieve superior results with either desktop or professional printers.
When you install your printer driver, the installation utility also installs a number of color profiles. You can choose the profiles in the Photoshop Elements Print dialog box and control all the printing by using the profile provided by your printer manufacturer.
Note
You can also print from the Organizer by selecting one or more image thumbnails in the Organizer window and then choosing File
You have a choice for how these profiles are used. You can
Choose to let your printer manage color. The profiling selection is automatic, and you don't have to worry about making other choices in the Print dialog boxes.
Choose to let Photoshop Elements manage color. In this case, you need to make some choices about the color profile to be used and make choices for the color-management process.
Note
We're talking about two very different issues here. One issue is color management, which ultimately comes down to whether Elements manages your color, your printer manages color, or whether you use no color management at all. The other issue is choosing a color profile. Therefore, you have a series of combined options to choose from. You can choose a profile and either turn color management on or off, or you can elect not to make a profile choice and decide whether color management is on or off. The choices you make are critical to getting color right on your output.
All the methods are described in the following sections.
The automatic profile selection method exists, and depending on what model of printer you have, you may be required to make this choice.
Your options all depend on whether the printer you buy installs color profiles on your computer. If you buy some low-end color printers that cost less than $100, the installer software typically doesn't install color profiles. When no profiles are installed, the printer manages the color through built-in profiles contained in the printer's memory.
High-end models (above the $100 price range) often install individual color profiles. You might see the profiles for various papers in the Printer Profile pop-up menu in the Elements Print dialog box. If you have one of these high-end printers, you might want to choose the profile that matches the paper you're using and let Elements manage the color.
As we discuss in Book III, Chapter 4, you have two choices for your color workspace. Those choices are sRGB or Adobe RGB (1998). The workspace is used to see color on your monitor. We also talk (in Book III, Chapter 4) about calibrating your monitor so the colors you see appear as close to real-world color as you can get.
When you print a picture, the color from your workspace (either sRGB or Adobe RGB [1998]) is converted to your printer color. So, you want to take all the color you see in an sRGB workspace, for example, and fit that color into the printer's profile so the print looks as close as possible to what you see on your monitor. Elements takes care of this color conversion. The only thing you need to worry about is making the right choice for how that conversion takes place.
Follow these steps to print from the native color space:
Choose File
The Print dialog box that opens contains all the settings you need to print a file.
Select the orientation of your print.
Your choices are either Portrait or Landscape. Click the proper orientation from the icons in the lower-left corner of the Print dialog box. (See Figure 2-10.)
Choose your printer.
Select the printer from the Printer drop-down menu.
Set the print attributes.
Select the number of copies, position, scaling, and output items you want.
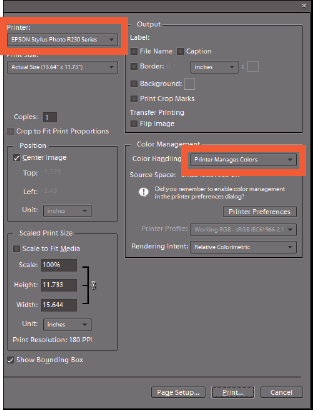
In the Color Management area of the Print dialog box, as shown in Figure 2-11, make your choices for how to manage color when you print files.
From the Color Handling drop-down menu, select Printer Manages Color.
This choice uses your current workspace color and later converts the color from your workspace to the printer output file when you open the printer driver dialog box.
Click Print in the Print dialog box.
The file doesn't print yet. First, the Windows system Print dialog box opens, as shown in Figure 2-12.
Verify that your target printer is still selected in the Windows Print dialog box and then click Preferences.
The printer driver dialog box opens.
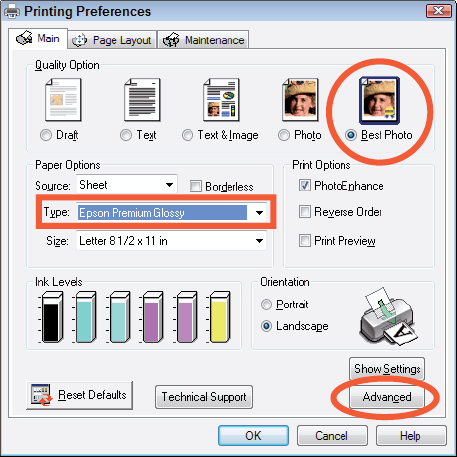
Each printer displays a different dialog box after you click Properties in the Windows Print dialog box. Figure 2-13 shows you the Epson Stylus Photo R230 Series Properties dialog box.
Set print attributes.
In our Epson example, select Epson Premium Glossy (or another paper from the Type drop-down list that you may be using) and then click the Best Photo radio button. (Refer to Figure 2-13.)
Now, it's time to color-manage your file. This step is critical in your print-production workflow.
Click the Advanced button and then, in the Warning dialog box that appears, simply click Continue.
The Advanced Settings dialog box opens, as shown in Figure 2-14.

Figure 29.12. Click Print in the Elements Print dialog box to open the Windows Print dialog box shown here.
Make your choices in the Advanced Settings dialog box.
Here are the most important choices:
Select a paper type. You selected paper already? The second drop-down menu in the Paper & Quality section of the dialog box determines the application of inks. Choose the same paper here as you did in Step 8.
Turn on color management. Because you're letting the printer driver determine the color, you need to be certain that the Color Controls radio button is active. This setting tells the printer driver to automatically select a printer profile for the paper type you selected.
Set the color mode. Don't use Epson Vivid. This choice produces inferior results on photos. Choose Best Photo, the Epson Standard, or Adobe RGB, depending on your printer.
Tip
If you frequently print files using the same settings, you can save your settings by clicking the Save Setting button.
To print the photo, click OK, and then OK again in the Print dialog box.
Your file is sent to your printer. The color is converted automatically from your source workspace of sRGB or Adobe RGB (1998) to the profile the printer driver automatically selects for you.


Another method for managing color when you're printing files is to select a printer profile from the available list of color profiles installed with your printer. Whereas in the preceding section, you used your printer to manage color, this time, you let Photoshop Elements manage the color.
The steps in this section are the same as the ones described in the preceding section for printing files for automatic profile selection when you're setting up the page and selecting a printer. When you choose File
From the Printer Profile drop-down menu in the Color Management section of the Print dialog box, select the color profile designed for use with the paper you've chosen.
In this example, we use a heavyweight-matte-paper color profile, as shown in Figure 2-15. (Note that custom color profiles you acquire from a profiling service come with recommended color-rendering intents. For this paper, Relative Colorimetric is recommended and is selected on the Rendering Intent drop-down menu, as you can see in Figure 2-15.)
Click Print.
The second Print dialog box opens.
Click the Properties button.
You arrive at the same dialog box shown in Figure 2-13.
Click the Best Photo radio button. From the Type drop-down list, select the recommended paper choice.
Custom color profiles are also shipped with guidelines for selecting proper paper.
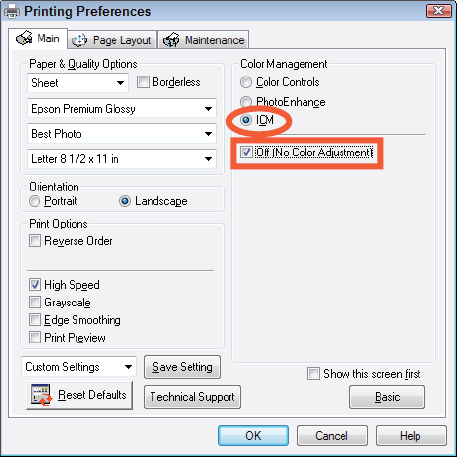
Click Advanced and click Continue to arrive at the same dialog box shown earlier in Figure 2-14.
The paper choice selection is automatically carried over from the previous Properties dialog box (see Step 2 in the preceding section). The one setting you change is in the Color Management section.
Click the ICM (Image Color Management) radio button and check Off (No Color Adjustment) as shown in Figure 2-16.
Because you selected the color profile in Step 1 and you're letting Elements manage the color, be sure the Color Management feature is turned off. If you don't turn off Color Management, you end up double-profiling your print.
Tip
The choice to manage color or not to manage it is simplified in Photoshop Elements. In the Color Management area of the dialog box, a message is reported each time you make a selection from the Color Handling drop-down menu. Right below Source Space, you see a message asking if you remembered to turn Color Management on or off. Each time you make a selection for the Color Handling, pause a moment and read the message. This is your reminder that you need to follow the recommendation to properly handle color.

Printing with a custom profile is very simple. Just remember that you must use the profile with exactly the same settings that you used to print the test target when the profile was created. For custom profiles, you always use No Color Management throughout the output process.
Let us make this concept even clearer. When you generate your test target for the profiling service where you may order a custom profile created for your printer, the service requires that you print the target without color conversions of any kind. The target has to reflect the actual colors generated by your printer from a known sample file, with no modifications whatsoever, for a known printing condition and media type. The resulting profile tells the color engine exactly how to modify the output data to match the colors as closely as possible to your working space or a different previously embedded color profile.
For all this to work properly, the printer can't be allowed to modify the printing data in any way. All the work has to be done by Photoshop Elements. So, assuming that you have a custom profile ready to use, here's the setup:
Use a profile converter to convert color.
In Windows, use a utility, such as the Dry Creek Photo Profile Converter. (For details, see "Converting color to a printer profile," earlier in this chapter.)
Tip
If you've obtained a custom profile from a media supplier, you must use the specific media and intent settings it recommends for your printer, although all other instructions in this section are the same.
Open the converted file in Elements and choose File
In the Print dialog box, select No Color Management for your printer profile, as shown in Figure 2-17.
Click Print.
Turn off Color Management.
Use the same settings for printing when you let Elements determine color. Be certain to turn off color management, the same way we show you in the preceding section (see Figure 2-15).

On provider Web sites, you can usually find guidelines for acceptable file formats and the recommended resolutions and dimensions of your images. If you don't see these guidelines on Web sites, be sure to call and inquire about which file attributes are acceptable.
As a general rule, here are some things you should consider when you're submitting files, if guidelines aren't provided:
Color workspace: Always ask a provider what workspace it prefers to use to convert color. Online services generally recommend that you use sRGB as your color workspace.
Resolution: For photo-printing machines, be certain to submit files at 300 ppi (pixels per inch). See Book III, Chapter 1 for more information on image resolution.
Dimensions: As a general rule, you should size images to the print size. For example, if you want 4-x-6-inch prints, be certain that your images are sized to 4 × 6 inches at 300 ppi.
File format: Some centers may take only JPEG images. If TIFF isn't acceptable, locate the converted images you saved from the Dry Creek ICC Profile Converter and follow these steps (in Windows):
Open the TIFF file or files in Photoshop Elements and choose File
Be certain that the ICC Profile check box is selected in the Save Options in the Save/Save As dialog box. Select JPEG for the format and click Save.
Notice that the profile used with the Dry Creek ICC Profile Converter is listed as the ICC Profile. In Figure 2-18, you can see a profile embedded for a Costco print center. (See the section "Converting color to a printer profile," earlier in this chapter, for more on the Dry Creek Converter.)
Media storage: If you walk into a FedEx Kinko's store and go to the self-serve photo-printing machines, you don't see support for any external USB hard drives or removable USB drives. All the print centers support a wide range of media cards used by digital cameras. Be certain to use your memory cards and not USB devices when placing orders. If you use CompactFlash II, memory sticks, or other media sources used by digital cameras, copy your files to these sources when you place orders as a walk-in customer.
Tip
Vendors that host Web sites with downloadable profiles and order information are likely to accept file uploads online. This capability saves you the time spent fighting crowds when you're placing orders. In some cases, you can have service centers mail your images back to you so that you don't need to wait when you're picking up orders, either. This online ordering stuff is a matter that we talk about in the following section.

Photoshop Elements supports the Adobe Photoshop Services program, which is a joint effort between Adobe Systems and Kodak EasyShare (formerly Ofoto), a division of Kodak. The Services program offers online ordering of prints and sharing of photos and projects, and it has a huge array of different print products for consumers and professionals.
As of this writing, you get ten free prints, so it's worth taking a little time to check out the service — especially if you want to order prints and have them mailed directly to your home or office. No lines, no hassles, no dealing with high gasoline costs — this service offers great prints and an abundance of convenience.
To use the service, follow these steps:
Select files in the Organizer much as you'd select files for printing.
In either editing mode or the Organizer, choose File
The Kodak EasyShare wizard opens, as shown in Figure 2-19. The first screen shown in the wizard is a form for you to create an account.
Warning
If you try to place an order from your office where the IT department prevents you from connecting to some external sources, you may need to have your firewall settings adjusted. Talk to someone in your IT department to help you make a connection.
If you haven't set up an account already, fill in the information and step through the wizard by clicking the Next button on each page. If you have set up an account, supply your logon information.
The selected files in the Organizer are automatically loaded in Step 1 of the wizard's order page.
You can modify your order by deleting files from the order and specifying different print sizes and quantities.
One nice feature in the service is the option to send duplicate prints to another party. You can keep an address book on the provider's Web site and specify whom you want to receive an order. This feature is helpful if you're away spending your children's inheritance on a Caribbean cruise and want to send photos of the great time you're having to all your kids. Just pop open your laptop on the pool deck, load the digital camera images, and connect via a wireless connection. Before you return to Buffalo in midwinter with a suntan, your kids will frown as they fan through the prints they received a week earlier.
Continue stepping through the wizard to upload your files and confirm your order, click the Finish button on the last pane, and your order is complete.

Photoshop Elements provides you with other options for printing things, such as video images and contact sheets; adding borders and trim lines; and inverting images for heat transfers, such as the ones you may use for iron-on T-shirt designs. You can find these options in the Print dialog box. Most of these print options are intuitive and easy to use. Just poke around, experiment, and have fun. When it comes time to print, follow the recommendations we offer here for getting your color right.