In This Chapter
Understanding the Guided panel
Making basic photo edits
Controlling lighting and exposure
Correcting color
Using guided activities
Merging photos
Automating actions
Using photographic effects
Wouldn't it be nice if you could have a mentor sitting behind you who could walk you through the necessary steps each time you encountered a new feature in a program?
Photoshop Elements doesn't provide you with a robot mentor to instruct you on the best way to perform an edit, but it does offer you the next best thing in the form of the Guided panel.
The Guided panel provides you easy control over some important editing tasks that you perform routinely when working on images. In this chapter, we show you how to use the Guided panel and all it has to offer you.
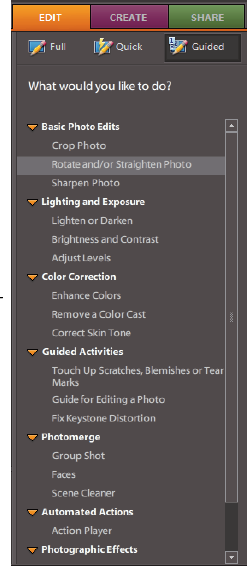
You see all the guided actions and activities in the Guided panel in Full Edit mode. Click Guided in the Panel Bin, and the Guided panel opens to display the items shown in Figure 4-1.
As you can see in Figure 4-1, the Guided panel has seven categories. Below each category title, you find some items that relate to the respective category. The categories include
Basic Photo Edits: Here you find the kinds of edits frequently used on photos. Cropping images, straightening photos, and sharpening photos are part of this group.
Lighting and Exposure: Almost all photos you either take with cameras or scan from printed pictures require some lighting adjustments. You find lighten, darken, as well as brightness and contrast controls here. In addition, it offers help to use Levels for more brightness and contrast adjustments.
Color Correction: Another frequently used edit involves adjusting color. You can enhance colors, remove color casts, and correct skin tones using these items.
Guided Activities: This item helps you make adjustments for enhancing images with instructions for removing scratches, blemishes, tear marks, and correcting distortions. The Guide for Editing a Photo walks you through several edits for cropping, brightness adjustments, enhancing, and touchups.
Photomerge: Photomerge is used for merging photos. The sub categories include help with merging group shots or pictures with faces. It shows you how to remove obstructing objects from a group of merged photos using the Scene Cleaner.
Automated Actions: A host of different sequences are assembled together as actions. You can, for example, choose one or a group of photos and apply a sepia tone with just one mouse click. The action then applies several editing steps automatically to create a good result.
Photographic Effects: Using this guide you can easily apply a variety of different filters that produce many different effects, such as line drawings, transformation of your image into an old-fashioned photo, or saturated film effects.
The Guide helps you perform the kinds of basic edits frequently used in most of your Elements editing sessions. When you choose Crop Photo, for example, the Guide panel opens with the Crop tool selected and a crop frame drawn on the photo. Instructions that make it easy for you to crop an image appear in the Guided panel.
Similar steps are also provided for straightening a photo. You might use this feature frequently when scanning photos.
The last item listed under Basic Photo Edits is Sharpen Photo. This is another edit you make frequently when working on your photos in Elements. To get a feel for using the Sharpen Photo item in Guided mode, do the following:
Open a photo in Full Edit mode.
Open the Guided panel by clicking Guided in the Panel Bin.
Click Sharpen Photo.
The panel changes to display the options you have for sharpening a photo.
Change the view in the Image window.
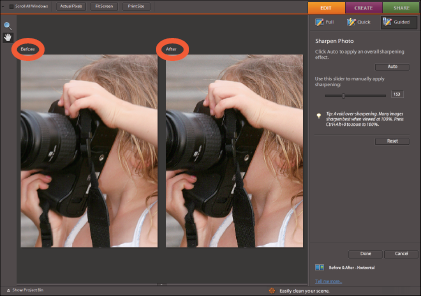
By default, you see your photo appear in the Image window in a maximized view. You can view your photo with a before/after effect where the original photo appears unedited on the left side of the window and the edits you apply appear on the right side of the window. To create a before/after effect, click the up-pointing arrow where you see After Only. When you click the up-pointing arrow, the icon changes to two icons adjacent to each other and the name changes to Before & After – Horizontal, as shown in Figure 4-2.
Tip
If you want to view the before/after images vertically, click the Before & After – Horizontal icon, and the view changes with the Before image appearing vertically on top of the After image.
Adjust the sharpening slider.
You have the option of clicking the Auto button, and Elements makes a best-guess adjustment to sharpen the image. To manually sharpen the image, move the slider left and right.
Click Done to apply the edits.
The advantage you have in using the Guided panel is that some helpful information is offered to guide you through the edits. Note that in the panel shown in Figure 4-2, you see a tip informing you that it's best to view your photo in a 100% view when you apply sharpening to a photo.
One of the most important and most-frequent edits you make on photos is adjusting lighting and exposure. When you click Lighting and Exposure and view the options, the first two items you see deal with handling Lighten/Darken and Brightness/Contrast issues. Clicking one of these items changes the panel view to one where you can move sliders similar to those you have for sharpening adjustments. The tweaks you can do here are pretty straightforward and, with the help offered in the panel, it's intuitive and easy to make these kinds of adjustments.
Things get a bit more complicated when you start using the Levels adjustment. We go into quite a bit of detail about Levels in Book VIII, Chapter 2. Be sure to read that chapter when you want to learn more about using this important dialog box.
Note
When you use Levels, it's commonly used on Adjustment Layers. You find more information on creating and using Adjustment Layers in Book VI, Chapter 1.
Creating an Adjustment Layer and applying settings from the Levels dialog box can be a little confusing when you first start correcting lighting and exposure. The Guided panel, fortunately, breaks down the complicated steps into easy-to-follow instructions to assist you in making the edits.
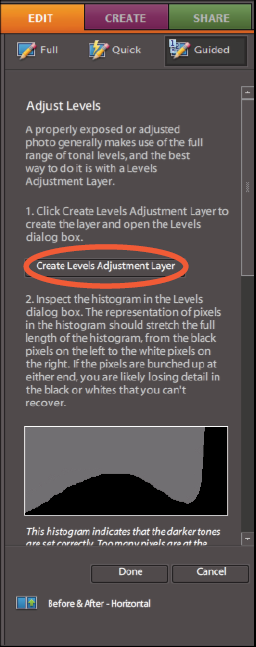
When you click Adjust Levels in the Guided panel, the panel view changes to what you see in Figure 4-3. Here you find helpful information explaining how the Levels dialog box is used and what the histograms mean. When you start with this edit, it's a good idea to read all the help information before making the adjustments.
After reading the information contained in the panel, click the Create Levels Adjustment Layer button and the New Layer dialog box opens, as shown in Figure 4-4.
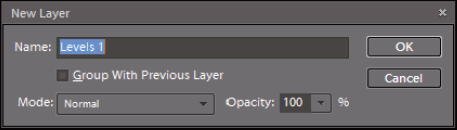
Type a name for the new Adjustment Layer and click OK and the Levels dialog box opens, as shown in Figure 4-5.

From the information you obtained in the Guided panel, move the sliders in the Levels dialog box to make your corrections.
The three items you find in the Color Correction panel help you improve the color in your photos. When you click the Enhance Colors item, the panel changes to provide you sliders to adjust hue, saturation, and brightness. Click the Remove a Color Cast link and you find an eyedropper tool where you can sample a medium gray tone, and Elements corrects color in the image. For more information on removing color casts, see Book VIII, Chapter 2.
One of the most important color adjustments you can make is adjusting skin tones. The Adjust Skin Tones panel shown in Figure 4-6 provides you with an eyedropper tool. Click an area in the image representing a neutral skin tone, and the color is adjusted to match that neutral tone for the entire image.
Tip
When adjusting skin tones it's a good idea to select only the areas you want to correct for color adjustments. Look over Book IV, Chapter 1 to learn how to make selections.
You can tweak the color for skin tones by moving the sliders in the panel.

Guided activities provide you with several different options. When you click Touch Up Scratches, Blemishes, or Tear Marks, the Touch Up Photo panel opens, as shown in Figure 4-7.
Move the sliders respective to the edits you want to make. As with other panels, you find some help information to guide you through the steps. We cover much more on touching up images in Book VIII, Chapters 1 and 2.
If you move down the Guided Activities list and click Guide for Editing a Photo, the Guided panel changes to first display the Crop panel. You make a choice for cropping an image and click the Next button. You move on to Lighten or Darken a Photo. Click Next and you move on to the Touch Up Photo panel, and so on. This panel is one that takes you through the entire editing process, and what you find in each step is a duplicate of many of the other panels discussed in this chapter.

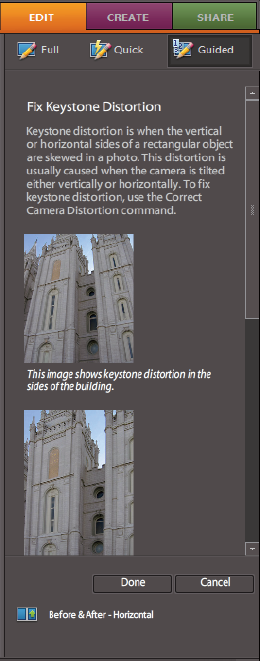
The Fix Keystone Distortion panel helps you correct problems with architectural photography with parallax distortion. To understand the distortion problem, look over Figure 4-8. The image previews show you a sample photo (at the top of the panel) and the result of applying the correction (in the bottom photo in the panel).
We devote a complete chapter to Photomerge in Book VIII, Chapter 3 so we won't go into the steps to produce a photo merged from other photos in this chapter. The Photomerge panel helps you walk through all the steps we explain there.
You select several photos you want to merge and then use the Photomerge panel to align and merge the photos. The content of your images can be scenes or faces. The Scene Cleaner is used to remove items that distract from the merged scene.
The Action Player is like having a tape recorder play a recorded series of steps to produce a result. You might have one effect that requires creating a layer, adjusting brightness on the new layer, changing layer opacity, adjusting hue/saturation and brightness, adding some noise, applying a filter, and flattening the layers. Rather than perform each step manually, you can use the Action Player that applies multiple edits with one mouse click.
To see how the Action Player is used, follow these steps:
Open a photo in Full Edit mode.
Click Guided to open the Guided panel.
Click Action Player to open the Acton Player panel.
Choose an Action.
From the first drop-down list choose an action. In our example, we chose Special Effects.
Select the action to run.
From the second drop-down list, choose an action you want to run.
Click Play Action.
Elements performs all the steps necessary to create the result. In our example, when we choose to run Sepia Toning with Grain, the action creates the image shown in Figure 4-9.
Click Done.

Photographic effects are like applying filters that we cover extensively in Book VII, Chapters 1 and 2. Whereas the Filters panel provides you with many different options to apply a filter, the Guided panel offers you filter effects and then takes you through steps for adjusting brightness values, changing hue/saturation, and making other adjustments to perfect the result.
You can choose from three different options for applying Photographic Effects. Line Drawing converts your photos to a pen-and-ink drawing. Old Fashioned Photos gives your images a vintage appearance, and Saturated Film Effect provides you a way to simulate colors of the saturated film used in film cameras (as opposed to digital cameras).
To experiment a little, let's take a look at the Old Fashioned Photos option and follow these steps to produce an image with a vintage appearance:
Open an image in Full Edit mode.
Click Guided to open the Guided panel.
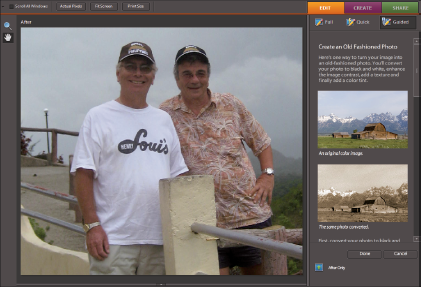
Click Old Fashioned Photo to open the Create an Old Fashioned Photo panel, as shown in Figure 4-10.
Note
This panel offers you several buttons to click to convert the photo. Scroll the panel and read the help information; then click the buttons to make the choices you want.
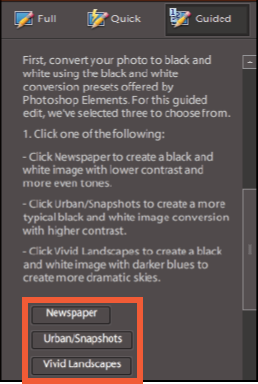
Select the option for conversion to black and white.
Scroll the panel and look over the options you have for converting the photo to black and white. Click one of the three buttons shown in Figure 4-11.
Add Tonality and Texture.
Scroll the panel until you see the Adjust Tonality and Add Texture buttons as shown in Figure 4-12. Click both buttons.
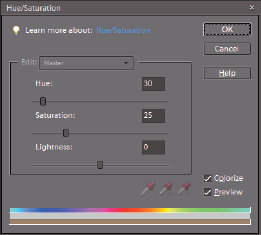
Adjust Hue/Saturation.
Scroll the list and click the Adjust Hue/Saturation button. The Hue/Saturation dialog box opens, as shown in Figure 4-13. To change the color, move the Hue slider. Move the Saturation and Lightness sliders to apply more or less saturation and change the brightness values.
Note
Your first step in the process is converting to black and white. The color mode remained in an RGB mode. Notice that the Colorize check box is checked in Figure 4-13. Be sure to keep this check box checked to add a color tint to the photo.
Click Done.
The result of applying all the edits is shown in Figure 4-14.