
Chapter 18. Guns and Explosions
One of the most widely successful video game genres is the venerable first-person shooter. Ever since the breakthrough games of Wolfenstein 3D and Doom, the first-person shooter has received the lion’s share of research and development budgets. It is amazing that the physics of aiming a gun and of a bullet traveling through the air are rarely modeled accurately. In general, game designers treat guns like laser beams so that wherever you point them, the bullet goes in an infinitely straight line. In this chapter we’ll discuss how to more accurately model both aiming and the trajectory of bullets, which is known as ballistics.
Projectile Motion
There are actually four subtopics of ballistics. Internal ballistics is the study of what happens to the bullet inside the barrel of the gun; transitional ballistics is the study of what happens as the bullet exits the barrel. Once the bullet has fully exited the barrel, it is in the realm of external ballistics. At this point the only acceleration is that of gravity, and the same forces discussed in Chapter 6 take over. The last topic is terminal ballistics, which is the study of what happens when the bullet hits its target. The last two topics are the ones we’ll discuss here. The other phases are more important to firearm manufacturers and not so much to the shooter. If you don’t recall the material in Chapter 6, we highly recommend that you review it before continuing.
While we aren’t very concerned about what happens in the barrel of the gun, there are a few tidbits we do need to know about the system. The first is where the barrel is pointed. This is referred to as the gun’s aim, and is almost universally controlled by where the mouse is on the screen.
The next is the initial velocity of the bullet. The bullet here refers to the actual metal projectile that leaves the barrel; the thing that you load into the gun is called a round and contains a casing, gunpowder, a primer, and, of course, the bullet. The initial velocity is usually measured just after the bullet leaves the muzzle (the end of the barrel) and is appropriately called the muzzle velocity. Every kind of ammunition is tested at the factory and given a muzzle velocity. You can add realism to your game by giving different ammunition different muzzle velocities. This way, a handgun round won’t have the same range as a rifle round. Ammunition also comes with a bullet weight measured in either grams or grains. One grain is equal to 0.0648 grams and is an old unit based on the weight of a single seed of wheat!
Last, but not least, we need some approximation for the way air resistance will affect the flight of a bullet. This is where things start to get interesting for people studying ballistics, but we’ll stay away from exotic aerodynamics and use our existing drag model. First, we should review the current state of first-person-shooter physics.
Firearms in games present a unique problem to the game developer. If you have ever been to the firing range, you know that in reality it takes a good deal of practice and concentration to hit a target reliably. Considering that target shooting is hard enough to be an Olympic sport under very controlled circumstances, the ability for in-game characters to spring from cover and shoot five enemies with five bullets is somewhat superhuman. We have all played games where you find yourself shooting a target very far away, and the procedure is as simple as pointing the crosshair where you want the bullet to go and clicking the mouse button. In reality, the skill needed to get a bullet weighing a few grams to hit something a few hundred meters away is so complicated it is amazing that anyone does it with regularity. For those developers wishing to actually model firearm performance in their game, there is a double-edged sword to consider.
The physics of what happens to the bullet in its flight are not simple to boil down. However, the behavior of the bullet as it flies downrange is important in the practical art of marksmanship. There has been considerable work done to find a way to compare ammunition so that a hunter or marksman can predict the performance of a particular ammunition. The result is a pseudophysical factor called the ballistic coefficient (BC). The BC is a ratio that determines the ability of a particular bullet to retain its downrange velocity compared to some standard bullet. The most common form is that of the G1 reference projectile. However, this number has limited use, as it does not take into account modern bullet shapes that provide very low drag. There are updated models whose designations are G2, G3, and ECT. If you are interested in the details of highly accurate ballistic modeling, there are a few free programs that can provide you in-depth models such as Remington’s Shoot! and the GNU Ballistics program. Given that most first-person shooters don’t yet include wind effects or bullet drop, we’ll limit ourselves to a simplified method of turning the existing parameters in the Chapter 6 projectile algorithm.
Taking Aim
When discussing aim, we’ll primarily be talking about rifles or carbines here, as handguns are not usually used for long-distance shooting. Similarly, shotguns, given that they fire many small projectiles, are generally not carefully aimed but instead pointed. Both of these weapons are what are known as point-blank weapons. Rifles have a point-blank range, which we will discuss, but for handguns and shotguns this really refers to the fact that at the ranges where these weapons are effective, you can reasonably expect to hit where you the point the gun. That is not to say that these weapons don’t need to be aimed to be effective, but in the fast-paced combat central to most first-person shooters it would be tedious to have the player use the sights on a handgun to effectively hit anything. Instead, most games use a “shoot from the hip” or free aim model, where the gun is not even in line with the camera. The careful programmer might still check to see if the target is within the effective range of the bullet before counting it as a hit even when auto-aiming in this manner. The effective range is the distance the bullet can travel before hitting the ground. Determining this is a straightforward application of the equations in Chapter 2 and Chapter 6.
To discuss firearms, we’ve adapted the code from the Cannon2 example in Chapter 6 to run in a Java program called
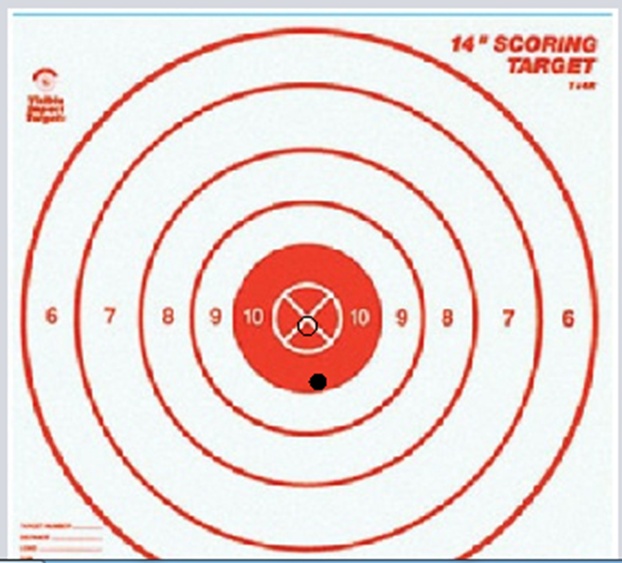
Marksman. In our example, the player is looking through a scope at a target of 1 meter by 1
meter. We’ve provided him an adjustable level of zoom so that as the range increases, he can
still see the target. The aiming point is shown as an empty circle, and the bullet hole as a
black filled circle. The method we’ve used to determine where the user is aiming in the model
world converts the pixel-based location of the mouse to a coordinate in the model world. This
distance and the range are then used to find the angles required to aim the gun. The code to
do this is shown next, where alp and gmm are the angles of inclination and bearing. These are measured
from horizontal and the line of view:
alp = 90-Math.toDegrees(Math.atan(((200-aimY)*(targetH/(drawH)))/range));
gmm = Math.toDegrees(Math.atan(((200-aimX)*(targetH/(drawH)))/range));
where targetH/drawH is just the ratio of the target
height to the height of the target in pixels on the screen. This allows the mouse coordinate
given in pixels to be converted to meters. The arctangent then converts the ratio of these
distances to an angle for the gun. The constant 200 refers
to the pixel coordinate system, which is 200 pixels away from the center of the target. If you
were to adapt this for a full 3D rendering system, you could remove a lot of these conversions
we have to do.
At the 10-meter range shown in Figure 18-1, we are within point-blank range and the bullet hole lines up with the sights.

In Figure 18-2, with the target at 100 meters, we see that for some reason the bullet is not hitting the target where we have pointed the weapon. At 300 meters, the bullet hole isn’t even on the target. You can see that by simply accounting for projective motion and idealized drag, we are already having trouble hitting the bull’s eye. The process by which these differences are accounted for is called zeroing the sights.
Zeroing the Sights
The idea of zeroing the sights is probably the most important thing to model if you want to have realistic gunplay in your game. As we mentioned before, when players are running from room to room, they probably don’t want to be thinking about the wind and the range. However, for a hunting simulation or a sniper game, it may be appropriate to introduce this.
When a person is looking through a scope, her body and the rifle become a rigid body so that to change the aim of the weapon, she must rotate her entire body. This is convenient for us, because the player generally controls the shooter’s position with his left hand via the keyboard and the direction of aim with the right hand. Other methods of aiming, briefly described previously as free aim, don’t really have a counterpart in the real world, so we’ll be limiting ourselves to this solid-body aiming.
Bullet drop: Gravity and air resistance
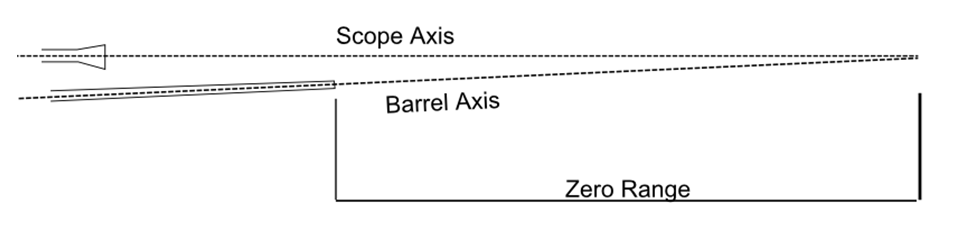
If you are aiming a rifle horizontally, you might expect that the bullet leaves the muzzle horizontally, and that gravity and air resistance cause it to drop from there. Figure 18-3 shows a rifle and scope combination that is mounted perfectly parallel. Ignoring all other factors for a minute, we see that the bullet will never hit where the scope is pointed. It will always be a few centimeters low.

By adjusting the elevation control of the scope, we can make the rifle hit where the scope is pointed. (See Figure 18-4.) The range at which the bullet will cross the line defined by the scope is called the zero range. If a target is at the zero range, you simply point the crosshairs and pull the trigger.
If we remove the target and graph the trajectory, it would look something like Figure 18-5.
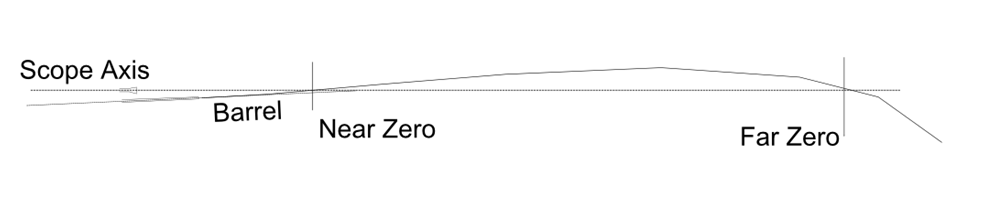
Here we can see there is a second point in which the bullet will cross the line made by the scope’s crosshairs. This is called the far zero, or second zero. This is generally where the thing you will be shooting at will be. This diagram is often available from ammunition suppliers. More often, they provide ballistic tables of downrange heights. It is important when using these charts that you remember they assume the scope to be horizontal and that the bullet starts with a negative height below the scope line. Table 18-1 shows data from Remington’s website and assumes the rifle was zeroed at 100 yards; it tells you how far the bullet is below the horizontal at every 50 yards past that 0. You can tune the drag coefficient in the projectile simulation to match these elevations.
|
Range in yards |
100 |
150 |
200 |
250 |
300 |
400 |
500 |
|
Drop in inches |
0 |
−4.6 |
−13.8 |
−28.6 |
−50.1 |
−115.47 |
−219.1 |
From this table you can see that the bullet drop is over two feet at 250 yards. This means that if the target is at 250 yards and your scope is zeroed at 100 yards, then you would have to aim two feet above your target to hit it. That might be high enough that you can’t even see the target in the scope anymore!
To counteract this problem, most rifles come with scopes that have elevation adjustments. This is a knob on the side of the scope that can be rotated to discrete settings called clicks. Most scopes use a 1/4 minute of angle adjustment per click although some use 1/8, 1/2, or even full minutes. A minute of angle is simply 1/60 of a degree. Therefore, when adjusting for elevation, the shooter can turn a knob on the scope, and as she hears the clicks, she knows that she has adjusted her scope however many minutes of angle. Now when she re-aims the crosshairs on the target, the barrel will have a slightly different angle than it did before, essentially aiming higher to accommodate the longer distance.
To achieve high accuracy in the field, the shooter would know that she zeroed her rifle to a certain range. Then, when attempting a shot, she would estimate the range to her target and adjust the scope however many clicks up or down. The biggest cause of error is an inaccurate estimate of range. Modern shooters often use laser range finders to determine exactly what elevation offset is required. In long-distance shooting situations, you can provide the range to the users and let them adjust the rifle’s scope from the current zero range to a new zero range.
Most games today don’t model even the effect of gravity on a bullet, so adding elevation adjustment to a sniper or hunting portion of your game will add much-needed accuracy.
Wind
Just like in the Chapter 6 projectile example, our target shooting game’s bullets are affected by wind. Just as
before, a bullet’s susceptibility to wind largely depends on its lateral drag coefficient.
In our simulation, you can tune the bullet’s susceptibility to the wind by adjusting the
factor Cw. This, again, will apply only to rifles
shooting at long ranges. At 20 meters, the wind will have little to do in determining
where a bullet will hit. At 600 meters, it can cause the bullet to be off by a meter! The
adjustment for wind is similar to the adjustment for elevation. By turning a knob, you can
adjust your scope or sights to be slightly to the right or left of the barrel’s
centerline. This angle, called gamma in our simulation, enables you to cancel out the
effect of wind.
To deal with wind in the field, we require simple calculations that depend on the particular performance of the shooter’s ammunition. It may work something like this: if the wind is blowing directly across your shot, the adjustment in inches is going to be half the wind speed in miles per hour. Of course, there are many other rules of thumb that differ for each caliber of ammunition, but for our simulation you can tune the wind drag coefficient to whatever value you want your shooter to encounter. He will have to spend some time at the range, just like a real shooter, figuring out how much the wind affects his shots. As the wind changes, he will have to adjust in real time and either aim to the left or right of the target or readjust the windage settings for the scope.
Breathing and Body Position
Although most games don’t model gravity and wind when calculating bullet trajectories, many do attempt to regulate the accuracy with which you initially fire the bullet. Most commonly, game developers accomplish this by approximating the crosshairs with four lines that do not intersect. When fired, the bullet will land anywhere within the circle described by the inner endpoints of these four lines. Different weapons have different accuracies, and the lines can move in or out to reflect that. Usually the first shot is the most accurate, and once the weapon is fired you must “resight” the target, and this takes time. Therefore, shots fired in quick succession usually become less and less accurate.
In our simulation, we modeled a few things that affect accuracy in the real world and
will give you some suggestions for other factors you could easily include. As our game was
most interested in long-distance shooting via rifles, the most common source of error is
breathing. As discussed before, when a shooter is looking through a scope on a rifle, she
essentially becomes a fixed body. As she breathes, the rifle is essentially breathing too.
When making difficult shots, it is very common for the shooter to take a breath and hold it
while firing. In our simulation, we’ve modeled this with a breathing class that adjusts the point of aim up and down with time to mimic
how a scope moves when the shooter is breathing deeply. This works via a timer started in
our initComponents() function that fires every 100 ms. In
the code that follows, you’ll see that this leads to a breath every two seconds.
        timer = new Timer(100, TargetPanel);
        timer.start();
That function causes the aim point (aimX, aimY) to be
moved independently of the cursor via the following algorithm:
        if (direction == true) {
            breathHeight = breathHeight + 1;
            if (breathHeight == 5) {
                direction = false;
                breathHeight = breathHeight + 1;
            }
        }

        if (direction == false) {
            breathHeight = breathHeight − 1;
            if (breathHeight == −5) {
                direction = true;
            }
        }

        if (breathing) {
            aimY = aimY + breathHeight;
        }
Here we are simply moving it up to some limit—in our case, 5 pixels—and then moving it back down. A better implementation would increase the unsteadiness as the user zooms in, as shakes are magnified also. There is no limit to the innovative functions you can use to move the aiming circle away from the cursor to simulate the reality of having to aim a gun. Yet this is certainly an area of first-person shooters that is lacking in variety.
When he is ready to fire, the user can left-click to hold his breath, the variable
breathing becomes false, and the crosshairs will stop moving. This simple addition makes the game
much more challenging and engaging. It should be noted that if the shooter holds his breath
too long in real life, the aim will again become unsteady as his body reacts to not having
fresh oxygen. Another improvement to this algorithm would be for the aim to become unstable
after the left mouse button is pressed for some amount of time.
Many games also change the accuracy of a weapon depending on body position. There are three basic types of shooting positions: standing, kneeling, and prone. Standing is—you guessed it—standing up. Kneeling is some form of squatting rather than just kneeling on your knees. Prone is laid flat on the ground. Because the rifle is locked to your body, the less unstable your body is, the less unstable the aim. When standing, your body’s muscles have to do a lot of work to remain upright. When kneeling, they do less so, and when prone, your muscles don’t have to worry about keeping you standing at all.
You can add these parameters as random twitches in the aim and tune them to change the relative advantage of each position. However, prone should always be more stable than kneeling, and kneeling more stable than standing.
Recoil and Impact
Now that we’ve aimed, fired, and figured out where the bullet is at any given moment, let’s talk about the last phase, terminal ballistics. To really understand what happens at the end of a bullet’s flight, let’s revisit the beginning. Earlier we talked about recoil as the result of Newton’s conservation of momentum. Everyone has seen a cheesy movie where the hero shoots the bad guy and the bullets cause the bad guy to be blown off his feet. There is a big problem with this! If the bullets were powerful enough to knock the person they hit off his feet, then the person shooting the gun would also be blown off his feet! In reality, the force felt by the person being shot is nearly the same as the force felt when the weapon recoils. For a 9 mm bullet weighing 7.45 g and leaving the barrel at 390 m/s, the gun will experience recoil such that its momentum is equal to the moment of the bullet.
One interesting way to incorporate recoil into a video game is in space. On Earth, a gun’s recoil is pretty quickly transferred to the ground by friction between the player and the big bad earth. In space, the shooter has no planetary body to push against, so the recoil of the gun becomes the recoil of the gun/person system. Next time your character needs to move from one ship to another in a micro-gravity environment, you can make her spend some ammo to get herself moving.
Now, if you get shot you will probably fall down pretty quickly, but this has more to do with biology than physics. However, ignoring living targets, if you want to simulate the damage done by a bullet hitting something, it is more important to look at the bullet’s kinetic energy. In fact, bullets and artillery shells are called kinetic weapons, as their primary means of destroying a target is by transferring their kinetic energy to the target. This is different than, say, a bomb that transfers its chemical energy into heat and kinetic energy after impact.
Explosions
Accurately modeling explosions involves multiphysics fluid simulations like the kind discussed in Chapter 14 through Chapter 16. One of our pet peeves is that video games usually have a collection of barrels lying around that, if shot once, explode violently enough to blow up nearby vehicles. While this makes for an easy out against multiple enemies, it is actually pretty hard to get everyday objects to blow up. Shooting a gas can with a handgun will almost never result in a fire, much less an explosion. Indeed, even shooting a propane tank with a rifle won’t give you fireworks. It would take something like a tank of 1/4 propane mixed with 3/4 oxygen to explode, and those aren’t usually lying around. Regardless, when we play video games we’re often thankful that we have an occasional red barrel to shoot, so we’ll review how to make the resulting explosion more accurate even if the ignition is improbable.
Particle Explosions
For most in-game explosions, it will be sufficient to implement a particle-type explosion that we covered way back in Chapter 2. Now, in Chapter 2 the particles were simply dots, but they don’t have to be limited to such simple sprites. In some cases, such as sparks from a bullet hitting a metal container, it would be very accurate to model explosions as particles; however, by making our particles look like bits of cars, we can also make it appear that the car itself exploded. The reason this is easier is because the particle explosions don’t have any angular motion. Although you can assign different parts of the cars to different particles, when they fly off due to the explosion, they won’t be rotating. The good news is that a particle explosion will still give you a realistic distribution of fragments of something on the ground.
To talk about how to link bullets and particle explosions in detail, we’ll consider something more physically accurate than a bullet blowing up a car. Let’s consider a bullet hitting some loose gravel. This will generally cause the gravel to be thrown up into the air from the bullet collision. Instead of trying to calculate the complex collisions during impact, we’ll generate a particle explosion based on the code in Chapter 2:
void CreateParticleExplosion(int x, int y, int Vinit, int life,
                             float gravity, float angle)
{
     int   i;
     int   m;
     float f;

     Explosion.Active = TRUE;
     Explosion.x = x;
     Explosion.y = y;
     Explosion.V0 = Vinit;

     for(i=0; i<_MAXPARTICLES; i++)
     {
          Explosion.p[i].x = 0;
          Explosion.p[i].y = 0;
          Explosion.p[i].vi = tb_Rnd(Vinit/2, Vinit);

          if(angle < 999)
          {
               if(tb_Rnd(0,1) == 0)
                    m = −1;
               else
                    m = 1;
               Explosion.p[i].angle = -angle + m * tb_Rnd(0,10);
          } else
               Explosion.p[i].angle = tb_Rnd(0,360);

          f = (float) tb_Rnd(80, 100) / 100.0f;
          Explosion.p[i].life = tb_Round(life * f);
          Explosion.p[i].r = 255;//tb_Rnd(225, 255);
          Explosion.p[i].g = 255;//tb_Rnd(85, 115);
          Explosion.p[i].b = 255;//tb_Rnd(15, 45);
          Explosion.p[i].time = 0;
          Explosion.p[i].Active = TRUE;
          Explosion.p[i].gravity = gravity;
     }

}
As you can see, the initial velocity V0 controls the
strength of the explosion. In Chapter 2, we chose this value randomly.
Now that we have a bullet flying through the air, we can make a better estimate of how
strong of an explosion to create. As you recall from earlier in the chapter, a bullet has an
energy associated with it at any time, t, in its flight.
This energy is its kinetic energy and is equal to half the bullet mass times its velocity
squared.
In our projectile simulation, it is simple to calculate this energy as the bullet flies through the air. It should be noted that a big bullet moving slowly is just as powerful as a smaller bullet moving quickly. Our upcoming code is going to assume that 100% of the kinetic energy is delivered to the target. This would not be true if a bullet shot straight through something. A way to visualize this is to imagine two targets, both hanging from the ceiling. One is made from paper and one is made from steel. When shot at, the steel target swings from its support, while the paper target stays still. This is because the bullet is passing straight though the paper and not transferring its kinetic energy to the target. To make things simple, we’ll transfer all of the bullet’s kinetic energy to the gravel. In equation form, this would look like:
| 1/2 mb v2bullet = Σ1/2 mg v2gravel |
Note that this is the sum of the individual bits of gravel’s velocities. In, Chapter 2, each particle was just given a random velocity anywhere from
Vinit/2 to Vinit.
This could lead to creating a set of particles whose energies exceed the input energy. To
prevent this, we’ll add a variable to our explosion class like so:
typedef     struct _TParticle
{
     float          x;              // x-coordinate of the particle
     float          y;              // y-coordinate of the particle
     float          vi;             // initial velocity
     float          angle;          // initial trajectory (direction)
     int            life;           // duration in milliseconds
     int            r;              // red component of particle's color
     int            g;              // green component of particle's color
     int            b;              // blue component of particle's color
     int            time;           // keeps track of the effect's time
     float          gravity;        // gravity factor
     BOOL           Active;         // indicates whether this particle
                                    // is active or dead
     float          mass;           //for calculating the particle's energy
} TParticle;

#define     _MAXPARTICLES 50
#define    _MASSOFPARTICLE .25

typedef struct _TParticleExplosion
{
     TParticle          p[_MAXPARTICLES];  // list of particles
                                           // making up this effect
     int           x;  // initial x location
     int           y;  // initial y location
     float         KE;  //Available kinect energy
     float
     BOOL          Active;      // indicates whether this effect is
                                //active or dead
} TParticleExplosion;
Notice that V0 is no longer required, as the
available kinetic energy will govern the strength of the explosion. Assuming that the
bullet’s kinetic energy is given as a variable KEb, our
new CreateParticleExplosion function would look like the
following:
void CreateParticleExplosion(int x, int y, int KEb, int life,
                             float gravity, float angle)
{
     int     i;
     int     m;
     float   f;

     Explosion.Active = TRUE;
     Explosion.x = x;
     Explosion.y = y;
     Explosion.KE = KEb;

     for(i=0; i<_MAXPARTICLES; i++)
     {
          Explosion.p[i].x = 0;
          Explosion.p[i].y = 0;
          Explosion.p[i].m = _MASSOFPARTICLE; //Mass of a single gravel
          Explosion.p[i].vi = tb_Rnd(0, sqrt(Explosion.KE/(_MASSOFPARTICLE*               _MAXPARTICLES));
          Explosion.KE = Explosion.KE - ((1/2)*(Explosion.p[i].m)*                        (Explosion.p[i].vi));

          if(angle < 999)
          {
               if(tb_Rnd(0,1) == 0)
                    m = −1;
               else
                    m = 1;
               Explosion.p[i].angle = -angle + m * tb_Rnd(0,10);
          } else
               Explosion.p[i].angle = tb_Rnd(0,360);

          f = (float) tb_Rnd(80, 100) / 100.0f;
          Explosion.p[i].life = tb_Round(life * f);
          Explosion.p[i].r = 255;//tb_Rnd(225, 255);
          Explosion.p[i].g = 255;//tb_Rnd(85, 115);
          Explosion.p[i].b = 255;//tb_Rnd(15, 45);
          Explosion.p[i].time = 0;
          Explosion.p[i].Active = TRUE;
          Explosion.p[i].gravity = gravity;
     }

}
As you can see, we’ve altered the statements that set the initial velocity of the particles to be a random-number generator in a range anywhere from 0 to a velocity that would consume the entire explosion’s kinetic energy. The next line reduces the available kinetic energy in the explosion by the amount just assigned to the particle. This way, you can be sure that the outgoing explosion is never more powerful then the input. A more interesting way to handle this would be to first initialize the particles with some given mass distribution and to assign the velocities not randomly, but with a normal distribution. Numerical recipes in C can help you accomplish this.
Even though the preceding code does not take into account some of the more subtle aspects of the transfer of kinetic energy, it will ensure that a small, slow-moving bullet produces a smaller explosion than a big, fast-moving one. This is something that is lacking in today’s video games.
Polygon Explosions
While particle explosions are appropriate for small, uniform objects, they fail to give appropriate realism when something is blown into identifiable chunks. This is why in video games you rarely see a car explode and the door fly away to land next to you. Instead, games usually handle objects like this with a particle explosion that obscures the object while it is re-rendered in its now-exploded state with the missing pieces having been apparently blown to smithereens.
If you do want to model a full explosion of solid bodies, you can reuse the particle code for the translation aspects. Essentially the particles will now describe the center of gravity of each solid body. You will have to add in an initial angular velocity and let the simulation, as described in Chapter 12, handle their motion after that initial angle.
While we don’t have room to go over another example here, we’ll talk a little about the input energy to such an explosion to help you bridge the gap. While we are on that subject, let’s recall that a bullet just doesn’t have the energy required to blow something apart. Even when you hit something with a tank-mounted gun, it really isn’t the kinetic energy of the bullet that blows apart the thing you hit, but some secondary explosion. In the case of a tank hitting another tank, the molten slag from the impact is usually peppered all over the inside of the tank, causing the fuel or ammunition to explode. That is where you get the big booms—it’s the conversion of chemical energy to heat, light, and pressure!
The most common method of quantifying the chemical energy in weapons is called TNT equivalency. This is how much TNT it would take to cause the same explosion regardless of what you are actually exploding. Now, explosion modeling of, say, gasoline and air is pretty complex, so let’s stick with TNT. A kilogram of TNT contains 4.184 Mega joules of energy; a 9 mm round has 400 J. You can see from that comparison why it is hard to blow something up by shooting at it, but easy to do with a block of TNT.
For the purposes of this discussion, let’s say you have an open box (five polygon sides) into which your player just tossed a 1 kg block of TNT. When the TNT is detonated, you can give each polygon side an initial velocity (translational and angular) and let the kinematic equations take over. Those velocities can be based on two simple rules.
The velocity vector can be defined by two points: the center of the block of TNT and the center of area of the polygon.
The sum of all the kinetic energy must be less than the available chemical energy in the TNT. This can be prorated by the square of the distance from the polygon to the block of TNT.
The use of the center of area in our first rule will impart some rotation into our polygon, as it will cause a moment about the center of gravity unless the two coincide. If this is the case, as it would be for our box, aerodynamic drag and unevenness of the explosion will still cause rotation, so you should either model these explicitly or impart some rotational velocity manually.
Now that we have a velocity direction, we need to define its magnitude. The force on objects near an explosion is caused by the rapid expansion of gasses due to the heat generated by the detonation of the explosive. However, not all the chemical energy is transferred to the objects—a lot of it is converted into heat, light, and sound. Typically, only one-third of the available chemical energy is converted in the initial detonation. Let’s call this the efficiency of the explosion, which we’ll denote by ζ. Therefore, we can write the relationship between velocities of the polygons as follows:
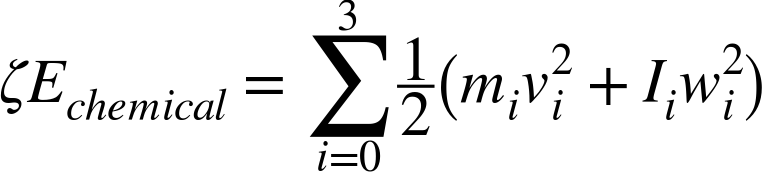
Here, we can tune ζ to give the polygons realistic velocities in the event of an explosion (i.e., not sending them off at the speed of light). If the energy from the explosion is divided up equally, you can see that lighter objects will have higher velocities, as you might expect. You can also adjust the amount of explosion energy available to each object by weighting the object’s imparted energy by its distance from the explosion. This should also be tuned in the program, but in general, pressure from an explosion decreases with the cube of distance and exponentially with time.
If you want to model more complex explosion-structure interactions, there are many good references for how, say, buildings, react to bomb blasts. FEMA, as well as the Army and Navy, have several papers on the subject, such as FEMA 426 Reference Manual to Mitigate Potential Terrorist Attacks Against Buildings. The general concepts laid out in such documents can increase the realism of the building damage due to explosions.