
Editing a Worksheet
NO MATTER HOW GOOD WE THINK we are, we all make mistakes. Typos are a given when you are dealing with large amounts of data. So, how do you fix them? Obviously, you can click in any offending cell and retype the entry correctly, but that’s not always the fastest method.
If you don’t want to have to retype the entry, you can edit the existing entry by following these steps:
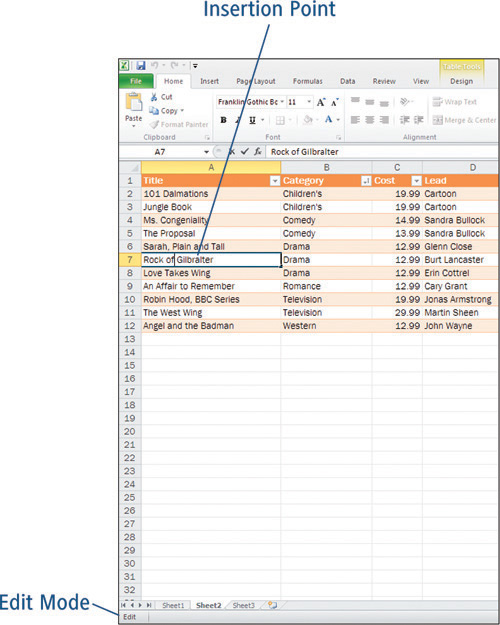
1. | Double-click the cell, or press F2, to select the cell in Edit mode. The insertion point blinks inside the cell at the end of the entry and the status bar indicates that you are in Edit mode, as shown in Figure 1-17. |
2. | Use the arrow keys to place the insertion point at the point of the error. |
3. | Type your changes in the cell. Don’t forget to remove the incorrect data. Use Delete to erase the characters to the right of the insertion point and use Backspace to remove the characters to the left. |
4. | Press Enter to accept the changes. |
Tip
You can edit the contents of a cell by clicking in the Formula bar and making the change there.
Using Undo and Redo
Picture yourself concentrating really hard on your spreadsheet when someone sneaks up behind you and startles you into clicking on some unknown command button from the Ribbon. You don’t have any idea what happened, but you know that it’s not right. That’s why the Undo command was created.
To correct your last mistake, choose Undo from the Quick Access Toolbar (see Figure 1-18) or press Ctrl+Z.
Figure 1-18. Reverse one or more mistakes using the Undo command.
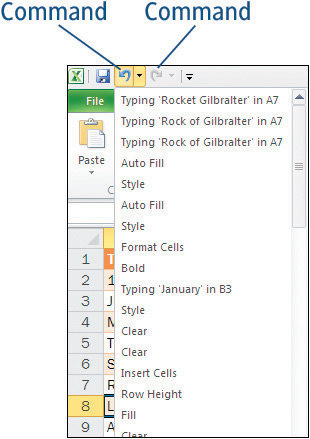
To correct several mistakes at once, click the Undo down arrow and find the action in the list. Excel will undo all of the actions above the one you are selecting, so choose carefully.
If you undo an action and then decide that you want to restore it after all, choose Redo from the Quick Access Toolbar, or press Ctrl+Y. Unlike the Undo command, the Redo command only restores the last action.
Caution

| If you close your worksheet before you caught your mistake, you cannot use the Undo command to reverse the error. Check your work before you close your files. |
Inserting and Deleting Cells
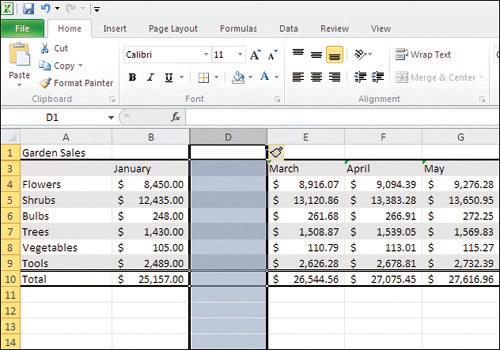
You might find yourself in the position of having forgotten crucial data for your spreadsheet. Perhaps you entered January’s data and moved right onto March without entering data for February. You can insert a new row or column between the two existing data sets to correct that problem. Figure 1-19 demonstrates this situation.
To insert an entire row, select a row where you want your new row to be. Choose Home > Cells > Insert (arrow) and choose Insert Sheet Rows. Excel inserts a new blank row and shifts the selected row and all rows below it down to make room.
To insert an entire column, select a column where you want your new column to be. Choose Home > Cells > Insert (arrow) and choose Insert Sheet Columns. Excel inserts a new blank column and shifts the selected column and all other columns to the right to make room.
Selecting and Inserting RowsTo insert multiple rows or columns, select an equal number of rows or columns first and follow the previous steps. For instance, if you want to insert two columns, you must first select two columns. |
You don’t always need to insert an entire row or column. You can also insert a single cell, or range of cells, into your worksheet.
1. | Select a cell, or cells, adjacent to where you want to place the new cells. |
2. | Choose Home > Cells > Insert (arrow) and choose Insert Cells. |
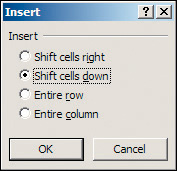
3. | On the Insert dialog box (see Figure 1-20), choose the option that will place your new cells where you want them to be. Figure 1-20. Choose the option that will place your new cells in the correct location.
|
4. | Click OK and Excel will shift the existing cells to make room for your new cells. |
Deleting Cells Is EasyYou can delete cells just as easily in Excel. The Ribbon path for deleting cells is Home > Cells > Delete (arrow). Then choose Delete Cells, Delete Sheet Rows, or Delete Sheet Columns to suit your needs. |