5. Paper Prototyping Development Techniques
Finished products are for decadent minds.
—ISAAC ASIMOV, SECOND FOUNDATION
This chapter discusses tools and techniques for developing paper prototypes. This is most useful for analog game development (for example, board and card games), but in some instances it can be useful for digital game development. For instance, during the development of Superman Returns for the Nintendo DS, the design team created numerous playable paper prototypes of the multiplayer aspects of the game.
Digital prototyping requires a lot of specialized knowledge, and the tools for such an activity are not standardized. Any concepts I put forth here as good places to start for digital prototyping would be essentially obsolete by the time this book went to print, and thus are a waste of space for you, the reader.
No one software package exists that a designer should use over all others to make prototypes. Instead, you must have a mercenary approach—whatever gets the job done is the best idea. First prototypes should be rough. If you spend too much time making your prototype pretty, you’ll hesitate to eliminate portions of your game that do not work, because the sunk costs of making the change are too high. Pen on note cards is a perfectly acceptable first prototype.
Once you have solidified the games rules, go back and make more elaborate prototypes with better layout and art. Since first prototypes are largely MacGyvered together, make prototypes after you have established and tested a set of basic rules. Remember that these nicer prototypes will be seen by many playtesters. It helps to have something that looks nice when you are presenting to playtesters because research has shown that humans often stick with their split-second first impressions.1
1 Willis, J., & Todorov, A. (2006). “First Impressions: Making Up Your Mind after a 100-ms Exposure to a Face.” Psychological Science, 17(7), 592–598.
Software and Materials
In other sections of this book, I shy away from specifying that you use particular software packages. Software changes over time, which can easily make obsolete any particular technique I share. However, I’ll identify ones that illustrate possible ways to solve particular workflow problems when you are making paper prototypes. The paradigm shift that occurs when you realize you can automate creating paper game materials (Figure 5.1) is invaluable and vastly timesaving.

USED WITH PERMISSION.
Figure 5.1 This roguish young designer is paper prototyping a game mode for a very large and expensive project using sticky notes, dice, and candy.
The software I find most helpful for creating paper prototype materials includes the following:
• Adobe Illustrator is a drawing and layout program that is useful for making game boards and player aids. It’s considered one of the more essential programs. However, you can get by with other drawing programs if need be.
• Adobe InDesign is a layout program largely for making books and other publications. One of its best features for game designers is its ability to read data from a spreadsheet and convert that data into individual pages of cards or tokens.
• Adobe Photoshop is a raster graphics editor generally used in conjunction with Illustrator. It is the industry standard for image manipulation and provides many of the tools needed for image manipulation.
• Any word processor can be used to codify the design and rules. Microsoft Word is still a standard because of its bevy of formatting bells and whistles, but Apple’s Pages, Google Docs, and others are perfectly acceptable.
• Spreadsheets are useful for defining the features of lists of cards that can then be read in and integrated using InDesign. Microsoft Excel and Google Sheets are industry-leading spreadsheet software.
Here are some hardware and other materials that will be helpful:
• A printer, especially one with cheap ink. Designers tend to go through a lot of ink.
• Copious amounts of blank paper and note cards. This should be self-explanatory.
• An X-Acto precision knife. This is necessary for precise cutting of game boards, tokens, and cards. Use an abundance of caution while using X-Acto knives. They are sharp and can be dangerous.
• A self-healing cutting mat. These are helpful to use under your work when you are using X-Acto knives. If you don’t use one, you are apt to cut through your work and into the table or material beneath. The self-healing mats take a lot of abuse.
• A guillotine cutter. This will likely not be a weapon in your arsenal at first. Scissors are a vastly cheaper option. However, when you need to cut numerous cards, this saves a massive amount of time.
• A metal ruler with a cork back. This helps you measure and cut cleanly with the X-Acto knife. If you use a wood or plastic ruler, it is possible that your X-Acto blade will cut into the ruler, making the straight edge no longer straight. Then you have a ruined ruler.
• Full-page labels. Companies such as Avery and DigiOrange make full-page (8.5”×11”) labels that you can run through a normal printer. This allows you to print something clearly, carve it out with the X-Acto knife, and then stick it to a game board or die. You can also apply these to chipboard to make printed tiles.
• Package of 8.5”×11”chipboard. Along with the labels, you can use this to make heavy tiles or markers.
• Counters such as glass beads, centimeter cubes, pawns, or Meeples. You can purchase glass beads in a variety of colors in most craft stores. Craft stores are often great places for inspiration when it comes to board game materials.
• Dice, various sides. Blank dice can be purchased online. Usually, you will only need a few dice. Games that rely too heavily on dice often do so at the detriment of meaningful decision-making.
• Card sleeves. When prototyping cards, it’s rarely sufficient to use regular printer paper for cards because the paper is too thin to shuffle and manipulate. However, printing on cardboard like you’d use for a finished product is expensive. Instead, it is often easiest to print a prototype card on normal printer paper and pair it with a card in an opaque-backed card sleeve, such as those used for Magic: The Gathering (Figure 5.2). The card backing gives the card the desired thickness and heft, and the sleeve keeps your printed materials easily accessible.

Figure 5.2 Here a printed card prototype is put into an opaque-backed sleeve with a Magic: The Gathering card as support.
Art
Some designers are comfortable with art. Others are not. Unless the game requires finished art (games like Dixit and Mysterium are notable examples of this), then using clear iconography, text, and shapes (Figures 5.3 and 5.4) is likely better than trying to make a prototype look like it has finished art right away.

USED WITH PERMISSION.
Figure 5.3 The Portal Games Twitter account posted this prototype snapshot of an Imperial Settlers expansion in early prototype form.

USED WITH PERMISSION.
Figure 5.4 A personal prototype.
When designers make prototypes that they will share at some point, they must pay attention to usage rights. Some designers use a Google or DeviantArt image search to find relevant imagery and then cut and paste those images into their game prototypes. This is fine when you just plan on playing among friends. However, if you plan on sharing the game publicly, using the art in this way may be illegal. If you plan on sending the game to a publisher, be aware that they may be wary of even looking at a game that does not respect intellectual property.
Luckily, it is easier than ever for someone with limited art experience to create attractive and clear prototypes. The Noun Project (thenounproject.com) is a massive online iconography library with a variety of flexible usage right options. Most icons are available in multiple formats. Many are freely useable with attribution or are available without attribution for a small price. Other sites, such as game-icons.net, focus on more cultivated collections.
Cards
If your game involves cards, you’ll want to design the layout of those cards before figuring out exactly what they do. Your first cards will likely just be note cards that you scribble on. But eventually you’ll want to move on to a more readable and professional version.
You can lay out each card individually in Photoshop or a similar program. This is certainly possible for a small game, but if your game has many cards, this can become tedious quickly, especially if you need to make a change that affects multiple cards. Luckily, you can automate this process, but you must understand the proposed design and layout.
First, decide what information must be on the card. As an example, look at the Magic: The Gathering cards in Figure 5.5.

Figure 5.5 Three cards with mechanically different effects use similar template elements.
Each of the three cards, which in terms of mechanics are wildly different, can be fully described by a set of replaceable fields:
• Title (upper left)
• Cost (upper right)
• Art (below title and cost)
• Type (center left)
• Set/Rarity Icon (center right)
• Text (below type and set/rarity icon)
• Card #, Set #, and Artist Credit (lower left tiny text)
• Yes/No. Does a power/toughness exist for this card?
• Power/Toughness (lower right of card if applicable)
• Card color (background)
By breaking down the card elements like this, you can define each card as a row in a spreadsheet, as in Figure 5.6.

Microsoft Excel, © Microsoft Corporation.
Figure 5.6 Each card is a row. Each field type is a column.
When a new card is added to the game, you add a new row to the spreadsheet; the spreadsheet makes it easy to see if you’ve missed any of the essential fields. But more importantly, InDesign (and, more recently, Photoshop) can read in a specific format of spreadsheet and use that to generate cards dynamically.
InDesign Data Merge
Software changes often. It may be that by the time you read this, there will be a new piece of software for easily creating cards from data. Nonetheless, I’ve provided the InDesign process here to show you one way you can reduce the upfront time investment you need to produce prototype cards and to get you to the important work of testing the game with real players.
InDesign’s data merging has a few technical requirements for it to read the spreadsheet. The first is that it must be saved as a CSV (comma-separated value) file. A CSV file is just a text file in which each column is separated by a comma and each row is separated by a line break. This type of file skips all the proprietary cruft that comes with an Excel or other proprietary spreadsheet. It also, however, means that all formatting is stripped out.
Tip
In some spreadsheet programs, a cell starting with an @ symbol is a special type of directive. You don’t want to do that here. If you get an error, start your cell with an apostrophe (’) before the @. This tells the spreadsheet that the cell is text, and the apostrophe will disappear.
The first row contains the column headers. In the example in Figure 5.7, some of the column heads start with the @ symbol, which tells InDesign that the values in that column are not text, but instead are references to outside files. You do this when you want the cell to point to a particular image file. In this example, the @Difficuly field refers to different images that are swapped out on different cards. All the other fields are text and are just imported as-is.

Microsoft Excel, © Microsoft Corporation.
Figure 5.7 List of the cards in the spreadsheet.
In my formative years, one of my math classes was given a game named Twenty Four. In this game, players turn over a card with four numbers on it. The first player who figures out how to use those four numbers to equal 24 using addition, subtraction, multiplication, and division wins the number of points equal to the number of dots listed on the corners of the card. Players had to use each number once and only once.
As an example, a card shows the numbers 9, 3, 8, and 6. Here are a few ways to solve this:
9 + 3 = 12
12 – 8 = 4
4 × 6 = 24
Or:
6 – (9/3) = 3
3 × 8 = 24
Let’s make our own cards for this game.
1. Figure out what the data categories are for each card. Here are the items that will change from card to card:
• First number
• Second number
• Third number
• Fourth number
• Difficulty
2. In a spreadsheet of your choice, create the columns and rows for the cards using the items/fields you identified in step 1 (Figure 5.7).
You must know which columns will be text and which will be images.
3. Treat Difficulty as an image.
In actual production, you might treat the numbers as images. For example, in the published versions of the Twenty Four game, the designers used a specialized 9 to distinguish it from a 6. However, for simplicity’s sake, you’ll just use text for this prototype’s numbers.
4. Save it as a CSV file.
5. Open the file in a text editor to ensure it is in CSV format. It should have only the data, commas, and line breaks. If any extraneous markup shows, go back to ensure you are saving the file as a CSV and not as an Excel file or another file type (Figure 5.8).
Now you need to design the card.
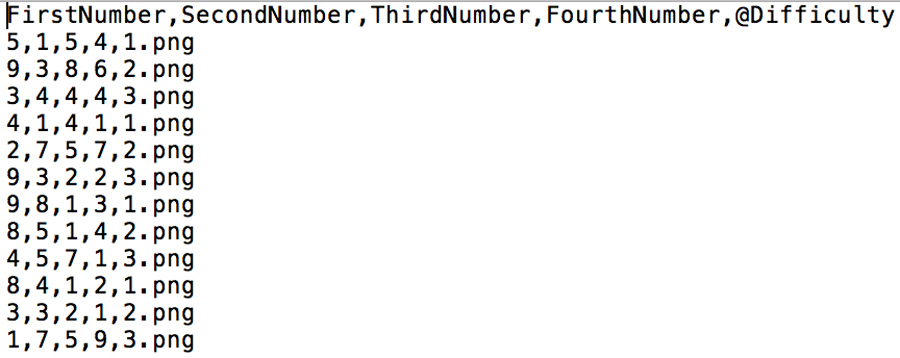
Figure 5.8 The list of the cards as a CSV.
6. Start InDesign and create a new document.
For this prototype, you want to print standard-sized cards, such as those used in Magic: The Gathering, so they fit in standard card sleeves. This will be another divergence from Magic: The Gathering since the Twenty Four game is printed on square card stock.
Note
A measuring standard used in publishing is known as PostScript picas. An inch has six picas.
7. Set the width of the page to 2.5” and the height to 3.5”.
If the intent is set to Print, InDesign renumbers these values to picas: 15p0 and 21p0.
8. Set all margins to 0.
9. On your card, draw whatever design you want to be standard to all cards.
10. Create a text box where you want the first number to go.
11. Tweak the font, alignment, and size until you get it to look how you would like.
Note
When I was developing an American football game, the names on the jerseys were generated automatically in a similar way. Until that feature was fully developed, every player’s name used the placeholder WWWWWWWWW since W was the widest letter.
Your placeholder should be the size of your largest text entry. I placed an 8 as a representative number (Figure 5.9). If your longest card title is “Wand of Nebuchadnezzar,” then your card template should support a title of that length. If your title is longer than your placeholder, when you merge your files, those titles will be cut off. If I were supporting cards that had numbers up to 12 on them, then I would make sure 12 fit on every card. Instead, I used 8 since it is the widest number in the font I chose.

Figure 5.9 The first value on an empty card.
12. Copy and paste that field, rotating it for the remaining positions (Figure 5.10).

Figure 5.10 Using the widest character to measure space.
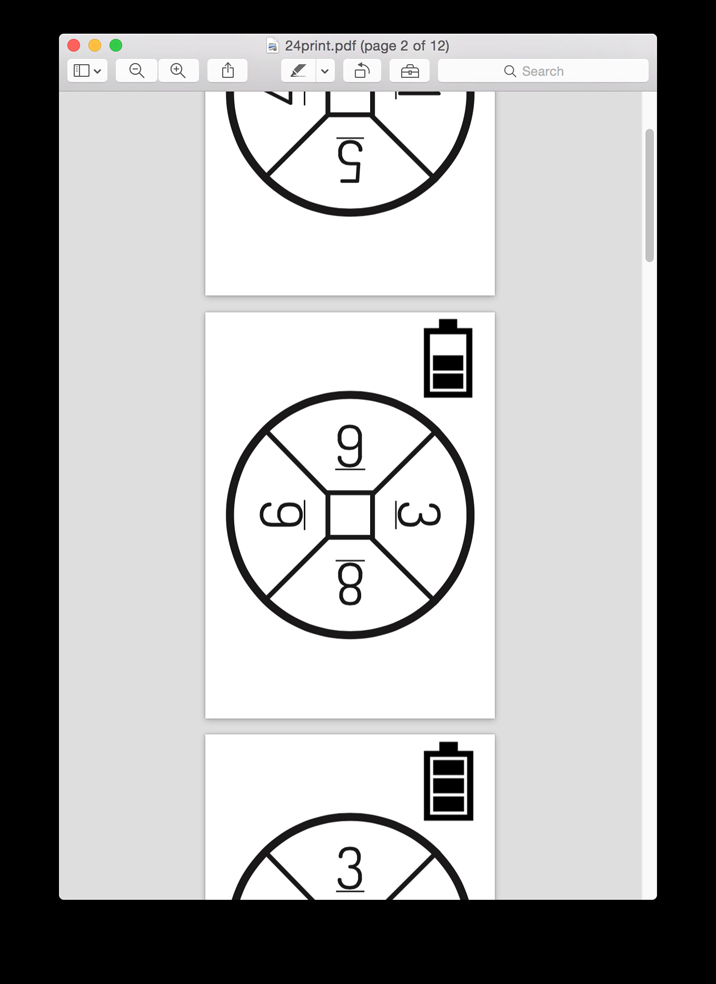
The last item you need to place is the difficulty. Since the difficulty is an image, you need to first create the images. I created a series of battery icons (Figure 5.11) and cropped them down to the right size in Photoshop.

THENOUNPROJECT.COM
Figure 5.11 Difficulty.
13. Create the images and save them in your InDesign file.
I saved mine as 1.png, 2.png, and 3.png.
14. Using InDesign’s rectangular frame tool, draw a frame that you would like to contain one of the images.
15. AutoFit to make sure your source image sizes down to the frame’s size.
The Data Merge options are fairly well hidden.
16. Choose Windows > Utilities > Data Merge.
This menu gives you explicit instructions but does not really tell you where the panel menu is. It is the button to the right of the Scripts tab (Figure 5.12).

ADOBE INDESIGN.
Figure 5.12 The Data Merge panel.
17 From the panel menu, choose Select Data Source, and then choose the CSV you created earlier.
If all went correctly, the window should show your column headers. Each header should have a T if it is a text field or a little picture frame if it is a linked image field (Figure 5.13).

ADOBE INDESIGN.
Figure 5.13 Fully linked.
18 Delete the 8s you used as placeholders.
19 Drag each header label to the field to which it will go on the card. Do this to the four number fields and the difficulty field. Your template card will look similar to Figure 5.14.

Figure 5.14 Our linked template.
20 Click the lower-right icon (the arrow pointing to a window) in the Data Merge window to create a merged document.
21 Select to merge all records.
This will create a new InDesign file that has a separate page for each row in your linked file, essentially making a new card on every page.
22 Export this new document as a PDF.
This PDF should have one page for every card in your spreadsheet (Figure 5.15).
ADOBE INDESIGN.
Figure 5.15 A PDF with one card per page.
23 Open the PDF in Adobe Reader and choose to print multiple document pages per printer page (Figure 5.16). If you choose to print 2×3 pages, you can fit six cards on a normal 8.5”×11” page.

ADOBE INDESIGN.
Figure 5.16 Adobe Reader Print dialog.
Now you have dynamic, customized, and clear cards! Once they are printed, you can put them into card sleeves backed by a normal playing card for maximum ease of use.
Summary
• Paper prototyping isn’t all low-tech. The smart use of software tools can greatly speed up prototyping cycles.
• You should ensure that you have the proper rights to use images publicly. Many sources of royalty-free images are available online.
• InDesign has a powerful tool named Data Merge that allows you to prototype cards quickly.
• To come up with a card template, decide what types of elements will be represented on at least one card. These will be the necessary fields.
• Size up the fields used in the card template by filling them with the widest possible text the card could contain. This allows you to spot any possible overflow.