

Framing and Composition
Before beginning any video shoot, you should have a clear objective or objectives in mind. In electronic news gathering (ENG) work, the goal is to represent the reality of an event or story accurately, interestingly, and in an appropriate context. This involves a lot more than simply pointing a camera at a scene or subject. A news shooter must carefully select what to show and what to leave out. The ideal is to depict what he or she sees to be true at the location, both factually and emotionally.
In electronic field production (EFP) work, the goal is usually dictated by the client or producer. The videographer is directed to tell a particular story in a way that will be understood by the intended audience. In a corporate video setting, the goal might be to communicate effectively the advantages and disadvantages of a new health plan to the employees. In a music video created for entertainment, the goal might be to capture visually a mood or statement intended by the musician’s composition or song. In a short narrative project, the goal might be to elicit laughter or tears or to capture the viewer’s imagination in a fanciful story. No matter what type of presentation, you must plan all the elements of the story in light of the intended outcome.
Before deciding what type of shot to make—how to frame it, how to move the camera, or what focal length to use—you must know the message that shot is to convey. After all, the camera cannot think for itself. Every aspect of camera placement, focal length, camera height, and composition of the frame plays a part in the viewers’ ability to understand what they are seeing. Filmmakers spend years in school and even more years on the job developing these skills. Entire books are written to explain the complex relationships of visual elements. But one thing is certain: Everything you place in your viewfinder must be there for a reason.
IDENTIFYING THE STORY LINE
Before you begin a shoot, ask yourself what you are trying to do. Reduce the task to its most basic description. If you can encapsulate the story in one sentence, you are well on the way to reaching your goal. A typical ENG example might be as follows: Students at a technical school come from other careers to study microelectronics and enhance their employment prospects. Every aspect of this story is contained in this one sentence. By giving yourself this starting point, you can expand the sentence until you have covered all the points in as much detail as is practical. For an average TV news story, length is the factor that determines how much you can put into that story. Because TV news is more of a headline service than an in-depth documentary service, a story such as the technical school would probably last only 90 seconds on the air.
This example can easily be translated into EFP terms. If the owners of the technical school want to make a one-minute commercial for the school, the basic ingredients of the story will be the same. In both cases, because of the limited on-air time, the videographer must make every shot count. Once you have a goal and a relative time constraint in mind, you need the means to reach that goal.
PART ONE: FRAMING—THE RANGE OF SHOTS
Just as a musician uses a finite number of notes to create a finished song, a video shooter uses a finite set of shots to create a story. The musician can vary the way each note is played, and there are infinite ways to combine notes. Similarly, the uniqueness of the videographer’s art comes from the execution of camera shots and movements. Each type of image and camera move has a specific purpose and design. Before discussing the composition within any frame, it is helpful to catalog shots as they might be called for by a script or a director. Each type of shot sets a tone for the type of information contained in the frame. After understanding the type of shots required and their position relative to other shots in a story, we will examine their composition.
A photographer has three basic types of shots available for use in any project. The first type is determined by how wide or narrow the perspective is: long shot, medium shot, close-up, and so on. The second type is described by some type of physical movement or action of the camera or lens: zoom, pan, tilt, and so on. The third type is a group of specific-use shots that serve particular functions in the production process: cover, cutaway, insert, and so on.
SHOTS BY PERSPECTIVE
Early television studio cameras were equipped with a turret lens—a round plate that had a selection of lenses (usually four), each with a different focal length (e.g., 10 mm, 35 mm, 50 mm, 100 mm). The camera stayed at one position and a crew member rotated the turret to use a lens of a different focal length to get a closer or wider shot. Today’s cameras have variable focal length lenses, or zoom lenses, that effortlessly go to any focal length in the range of the lens. Nevertheless, the old terminology of early film and TV is still used to describe the content of the frame. (See Figure 4.1.)
The Long Shot
The long shot (LS) is sometimes called the wide shot (WS) and is also known as the establishing shot, the master shot, or the cover shot. It is generally the first shot a photographer should take. It is the most important shot in terms of establishing the setting and action. Typically, it shows the subject from head to toe. One variation, the extreme long shot (ELS or XLS) or extreme wide shot (EWS or XWS), shows the full subject relatively small compared to the surrounding environment. (See Figure 4.2.)
The long shot is made with a short focal length and, therefore, a wide angle of view. This shot should include all the visual elements of the story or scene, if possible. In the example of the technical school story, the wide shot would be used to cover or visually explain that original one-sentence description of the story. The wide shot would include the students, instructor, classroom, and electronic equipment. Every key element should be there. The shot should show relationships and activities that yield information: the older-than-expected students, the instructor in an active teaching role, and the equipment that is the subject of the lesson. These visual elements give the viewer information that reinforces the comments of the announcer or newscaster. Usually, each story contains more than one wide shot.
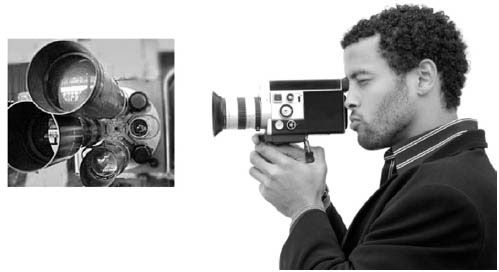
FIGURE 4.1
An older turret lens with four lenses mounted on the turret plate, compared with a newer variable focal length, or zoom, lens.
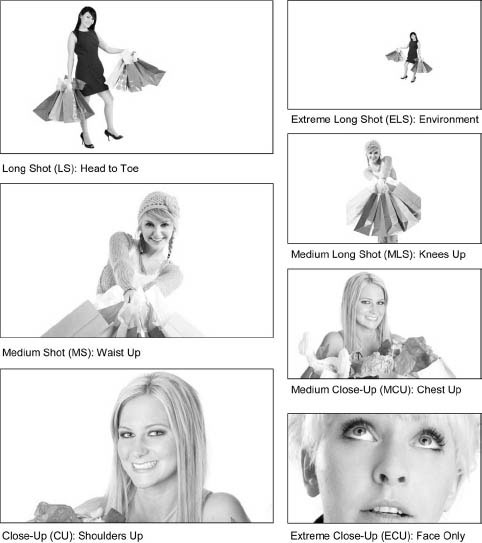
FIGURE 4.2
The three basic shot sizes are on the left: LS, MS, CU. Four common variations are on the right: ELS, MLS, MCU, ECU.
Just as a writer expands a single sentence into several paragraphs to make a complete story, a videographer expands a story idea into visual sentences and paragraphs. A story can be broken up into its component parts. It has a beginning, a middle, and an end. These parts are a series of ideas or facts that combine to form the overall statement used to achieve the goal of the project. Visually, the story must be broken down into those same parts. Think of each part or sequence as a story unto itself. In this analogy, the wide shot would serve as the subject of the visual sentence, or as the beginning of the story. There are two characteristics common to any wide shot.
Establishing the Scene The beginning of any sequence starts with a shot that establishes the idea of that sequence (or paragraph of the script). The long shot reveals the relationship among all the key elements of what the viewers will see in the piece. (See Figure 4.3.)
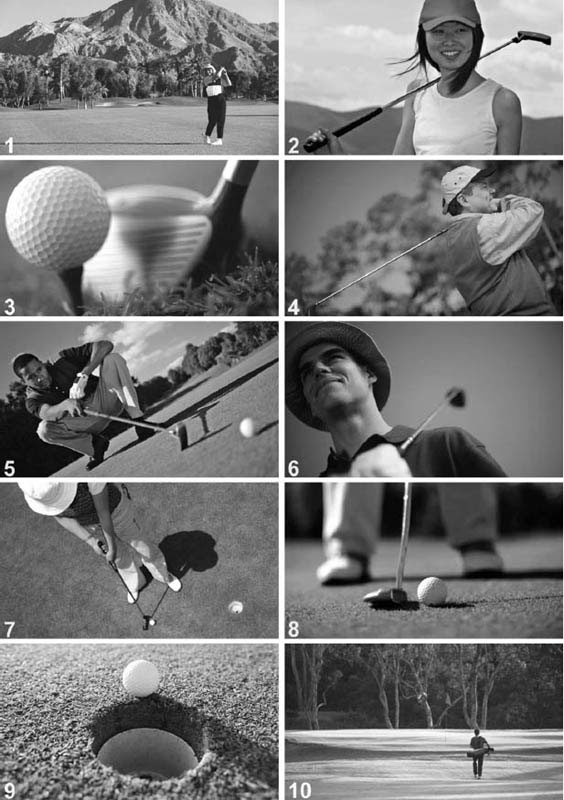
FIGURE 4.3
This sequence of shots about diversity in golf opens with (1) an ELS to establish the topic and setting, then uses (2) an MS of a young player to reveal the wide spectrum of golfers, followed by (3) a CU of a club hitting a ball, with a cut to (4) an MS of a golfer finishing his swing. Then (5) a canted angle of a golfer lining up a putt adds variety, as does (6) a low-angle shot and (7) a high-angle shot, followed by (8) a CU of a putt, then (9) an ECU of the universal frustration of the ball almost going in but not quite, ending with (10) an ELS as another golfer pushes on.
Within a typical sequence of shots, the wide shot should contain the objects or subjects that will be recorded in the remainder of the sequence. If we are going to see a man using a lathe while the reporter talks about him and his current job, then the first shot should show the man, the lathe, and his location. In the opening shot of the sequence, relate as much information as possible to the viewer. Questions that should be answered in this example’s first shot would include:
• What is the setting of this scene?
• How large is the setting or location?
• What are the important objects?
• What is the main character doing in relation to the objects in the setting?
• What is the machinery or equipment doing?
The shots that follow in the sequence further detail the answers to these questions. Without the wide shot, those details could appear unrelated and therefore seemingly irrelevant or even confusing to the viewer. Ideas that must be expressed in a story can often be said in a very short time, not leaving enough time for a visual sequence to develop. Most of the time, a wide shot takes care of this problem, because it gives a maximum amount of information in a short period of time. Again, a wide shot expresses a complete thought or idea.
At other times, a wide shot can simply be used to establish the location for the sequence that follows, such as showing the outside of the school building. In other story lines it might show the skyline of a city to let the viewers know what part of the country they are seeing. In these cases the long shot stands alone and simply says, “Here we are in/at….”
Creating the Third Dimension The information included in a wide shot is only one of several components required for a good image. If the framing is off, or the shot is too busy or otherwise aesthetically unpleasant, you have not maximized the impact it can have on the viewer. Because the TV is a two-dimensional surface similar to a piece of paper or a canvas, the third dimension must be created using the z-axis. The illusion of depth is what makes a two-dimensional picture come alive. The wide shot is the best place to create the depth of the scene. More on how to do that a little later.
The Medium Shot
The medium shot or MS is the workhorse of most TV stories. It can be defined as the development shot. It concentrates on the subject with little attention given to anything else. If a wide shot shows someone from head to toe, then a medium shot shows a person from about the waist up. A photographer might use two variations: the medium long shot (MLS) shows a subject from just above or below the knees, and the medium close-up (MCU) shows him or her from about the chest up. (See Figure 4.2.)
In most cases, depth and relationships within the frame are brought out with subtleties of lighting or just a portion of other elements in the medium shot. Lighting can play a major role in bringing out the textures in a medium shot to enhance the feeling of three-dimensionality. Medium shots are usually made with a narrowed field of view or a midrange focal length—not wide, but not telephoto either.
As with all shots, you should maximize information when using the medium shot. You do not need to show a subject’s relationship to the surroundings, but you must show more detail of who or what the subject is, or what the subject is doing. In the technical school story, one medium shot might be a student assembling a circuit board. The important elements of the shot are the subject’s face, arms, hands, and the circuit board. An important difference between the execution of the wide shot and the medium shot is the number of angles available for the medium shot that are not always available for the wide shot. By keeping the same focal length and distance from the subject, the shot can be taken from the front or side, level or canted, high or low angle, and so on. (See Figure 4.3.)
Where one long shot will suffice to start off the story or segment of a story, many medium shots are needed to supply the bulk of the storytelling material. The wide shot can contain many elements or subjects. Our tech school scene has the teacher and maybe a dozen students. Each of them can be used for the developing medium shots. Think of the wide shot as a completed jigsaw puzzle. We are now dividing up the puzzle into different sections for closer examination. These sections are the medium shots.
The key element in the medium shot is variety. If you can shoot the subject from several different angles, you can quickly make quite a few medium shots. The more angles and the greater variety of shots you have, the more creative choices you have in editing the finished story.
The Close-up Shot
The close-up or CU shot gives the intimate details of the subject. If the medium shot shows a person from the waist up, the close-up includes just the head and shoulders. In our jigsaw puzzle analogy, the section of the puzzle that made up the medium shot is now going to be taken apart to its individual pieces. The close-up is made with the lens at a telephoto focal length. Now the individual subject is going to be examined part by part. A close-up shows the emotions in the face or the details of an action, such as a golf putt. (See Figures 4.2 and 4.3.)
The close-up can be thought of as the final shot of a sequence or the fully expressed idea initiated in the long shot. In our technical school example, the close-up might be a shot of the student’s hands positioning a chip or some other element onto the circuit board. The elements in the shot are the hands, the board, and the part being fitted to the board.
Depth in a close-up is completely reduced to the texture of the objects being photographed. The detail of the close-up subject usually gives the depth necessary for a good picture. The number of angles from which a close-up can be shot is often more limited than either the wide or the medium shot. The variety lies in shooting the many different elements of a subject in close-ups, such as face, hands, or even feet (they may operate some tool with a foot pedal). Other possible close-ups in the technical school example might be of a supply of parts or a book of instructions. In other words, you can shoot a detailed close-up of every element contained in the medium shot. It is always a good rule to include some form of relationship with the medium shot, however. The CU of the electrical parts works better if a hand comes into the frame and removes a part for use, or in the case of a CU of a textbook, if a hand reaches across it to turn a page. Movement, especially by humans, is always interesting.
The Extreme Close-up Shot
The extreme close-up (ECU or XCU) adds drama or extra emphasis to a series of shots. In our example of a person, the ECU would be a shot of the subject’s face or even just the eyes. (See Figure 4.2.) This shot is made at the very far end of the telephoto lens, zoomed all the way in. In many story lines, this shot could be out of place because of its dramatic emphasis, but when used correctly it can greatly improve the quality of the piece. This type of shot brings the viewer into a world not normally seen in such detail. The extreme close-up presents a larger-than-life image that can be quite interesting for a viewer.
The subject should be chosen carefully and the purpose of this shot should be clear. For example, in the technical school story, the ECU could show the tip of the soldering iron as it melts some solder onto the part just put in place during the close-up shot. Seeing the solder actually run and the smoke billow out from around it adds a sense of drama and visual excitement to a rather mundane classroom setting. An ECU of the student’s eyes in a story like this might not be appropriate unless the student is wearing glasses and the reflection of the smoking solder can be seen in that reflection, thereby tying the shots together.
The ECU need not be related to the action; it could be simply a detail shot—for example, a single stamp in a story about stamp collecting, or a hole in a leaf as part of a story on crop damage. If used properly, this shot can be the most memorable—and therefore most expressive—in any piece, but it must be used at the correct time, have a good relationship to the surrounding shots, and show an appropriate subject. By using the ECU, video pieces can demand a great deal of attention from the viewer.
CAMERA MOVEMENT SHOTS
This category of shots is defined by moving the camera or changing focal lengths as the shot is recorded. In general, these shots can add dynamics, drama, and interest to the story when the shot’s perspective changes as the viewer watches. Caveat videographer: Avoid moving the camera or moving-lens shots for the sake of movement alone. Unmotivated movement appears cheesy and fake and grows annoying because it does not stem from the subject. Instead, it is merely slapped onto the shot for no apparent reason—perhaps a failed attempt to cover up for the lack of a dynamic subject in the first place?
The Zoom Shot
For a zoom, the glass inside the lens is rotated, either by hand or by an electronic servo that operates by the push of a button. As the glass rotates, the image is either magnified to appear to move closer (zoom in), or it appears to move away as it becomes smaller (zoom out). (See the Chapter 8.) As probably the most overused and misused shot in the field of videography, the zoom is the ruin of many ENG packages and EFP projects. The first thing any amateur shooter does is work the zoom control until it is worn out. The best way to teach an amateur photographer to shoot is to tape the zoom servo to off. A zoom should be considered a link between two static shots or a means of maintaining proper framing or perspective. Just as in any two individual shots, the ending shot of the zoom should contain different, or at least more or less, information than the beginning shot.
One common mistake many videographers make when starting out is zooming to or from the middle of the frame, keeping equal distance on all sides of the subject as they zoom. To add more visual interest to the movement, try keeping two sides of the frame static in reference to the subject as you make the zoom. (See Figure 4.4.) That means you will zoom into or out of one of the four corners of the screen, while adding a little pan to the movement. This makes the shot pivot on the subject, adding more emphasis to that subject in the frame, which is what you want your viewers to notice.
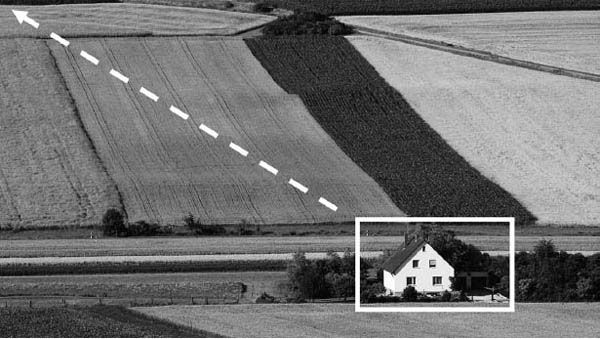
FIGURE 4.4
A zoom out from the farmhouse, combined with a tilt up and pan left, reveals its location amidst fields. A good zoom always incorporates some smooth panning and tilting of the camera.
The two most appropriate uses of a zoom are to show relationships and to emphasize a subject within a larger picture. The first is a zoom-out, and the second a zoom-in. If the topic is a profile of an unemployed worker, you might shoot a scene at the unemployment office. By starting on a tight shot of the subject waiting in line and then zooming out to a wide shot that reveals the multitude of people there, you can show the subject’s relationship to the surroundings by revealing those surroundings after establishing the subject. This would also give the viewer the perspective of this individual being buried in a mass of people. The relationship between the individual and the rest of the room is well established. Alternately, you might want to emphasize that individual after first establishing the situation. A zoom-in from a wide shot of that room to a tight shot of the very tired-looking subject emphasizes this person. The shot draws the viewer’s attention from the overall picture to the plight of one individual who is part of the situation.
The basic “rules” for the zoom shot are:
• Always zoom from something that’s important to something else that’s important.
• Make sure the beginning and ending shots can stand alone as static shots.
• Zoom out to show a spatial relationship.
• Zoom in to emphasize a particular element contained in the wider picture.
Always keep in mind the time it takes to zoom. A zoom that is too slow might not be able to be used by an editor; a zoom that is too fast might not allow the viewer time to perceive and understand what is taking place. If you have the time and enough tape or gigabytes, shoot a zoom three times: once slow, once medium, once fast. Then choose the zoom with the best speed when the piece is edited. A good rule of thumb is not to make any movement last more than five seconds, and generally to try to limit zooms to about three seconds. This is enough time to execute most shots and still be short enough to fit with almost any editing pace.
When shooting for special effects or for an “artsy” look, a slow zoom can give the feel of gentle movement and can add to the pace and flow of an edited piece. In a faster-moving piece, a snap zoom can be done by putting the auto-zoom servo on off and manually wrist-snapping the zoom ring from one extreme to the other (assuming you have a professional-quality camera with a zoom ring). This produces a very dramatic result and should be used with that effect in mind. Too much of any one technique may be bad for the piece. The more noticeable or dramatic the technique, the easier it is to overuse it.
The Pan Shot
A pan is the horizontal pivoting of the camera: left and right. In many ways, the pan is like the zoom in how it is used; its two major uses are to show relationships and to show more information than is contained in just one static shot. A pan from a raging brush fire to a nearby house can show the danger the house faces due to its proximity. This type of shot does not work well if the pan lasts too long or if the angle of the pan is too great. If the pan lasts too long, it might not fit into the edited story; if the angle is too great, the relationship might be lost because too much ground is covered between subjects. Panning too fast can blur the picture to the point where nothing is recognizable during the pan. Generally, this is not acceptable. Try to pan slowly enough so that you can obtain a good freeze frame from your video at any point in the pan. You may need to rehearse a pan several times—if you have the time—to find the right speed. Again, try to stick with the three- to five-second rule. There are, of course, many times when a long pan is desirable. (See Figure 4.5.)
For a shot of an extremely long line of people, a long pan can be more effective than several static shots or a zoom. The same is true for long angles of pans. While about 30 degrees to 90 degrees is as far as you should normally pan, 180 degrees or even 360 degrees can be made to work in the right situation. For instance, when showing how a small town has decorated the entire main street for Christmas, a 180-degree pan from one end of the street to the other might be very effective. In the middle of a neighborhood totally destroyed by a tornado, a 360-degree pan could give a viewer a very dramatic overview of the destruction. Again, as with the zoom, the purpose of the pan should be to impart as much information to the viewer as possible in the least amount of time.

FIGURE 4.5
Within this panorama of Niagara Falls, a good pan could be from the composition on the left to the one on the right. Together they form a complete picture of the area. (Courtesy of www.niagarafallslive.com)
The Tilt Shot
A tilt is like a pan, but it is the vertical—not horizontal—pivoting of the camera: up and down. The same basic rules apply for its length, speed, and purpose. The shot must start on one properly framed picture and end on another, showing a relationship to, or more information about, the overall subject. (See Figure 4.6.) For example, an ENG package about earthquake damage might begin with a shot of a reporter at the base of a hill; then, as the reporter speaks, the camera tilts up to reveal a house perched precariously at the top of the hill.
The Dolly and Truck Shots
In all the shots previously discussed, the camera is in a fixed position while shooting. The dolly and trucking (a.k.a. tracking) shots require the camera to move while the shot is being recorded. For the dolly shot, the camera moves in closer to, or backs away from, the subject. For the truck or tracking shot, the camera moves left or right, rolling on wheels or sliding on tracks or riding on some kind of truck or cart device.
For EFP work, dollies and trucks should be done on a dolly mechanism or a wheeled tripod. On uneven surfaces, tracks or a platform can be put down for the tripod or pedestal to move. This makes the shot time consuming to set up, rehearse, and execute, not to mention more expensive to the overall production. For ENG work, the use of such extra equipment is usually out of the question. Therefore, dolly and trucking shots become walking shots for most ENG work. Sometimes someone with a bit of ingenuity can improvise a dolly or truck using a grocery cart, wheelchair, bicycle, golf cart, or car if there are crew members to help.
The point to keep in mind when using the dolly or truck shot is that the perspective of the shot constantly changes as the camera position changes. This is the purpose of a dolly or truck. These are similar to zooms and pans in that they move from one shot perspective to another in real time, but the difference is the type of perspective change. This change can add a sense of drama by, say, moving closer to the subject in a dolly-in shot, or moving away in a dolly-out shot. The advantage of the dolly shot is that the focal length can stay the same as the shot changes. If the focal length is short, the depth of field will be great; moving the camera in to a closer shot does not lessen that depth of field but exaggerates the perspective. In a zoom, the depth of field steadily decreases (as focal length increases) while you zoom in, and the perspective is compressed. The resulting size of the subject might be similar between a zoom-in and dolly-in, but the visual perspective is quite different. (See Figure 4.13 later in the chapter.)
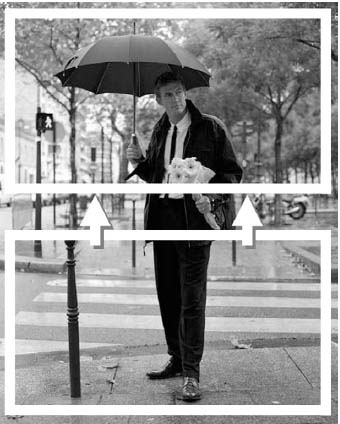
FIGURE 4.6
For this scene, the shooter could crane or tilt up from the man’s shoes to reveal him standing forlornly in the rain, perhaps having missed the bus for a date.
The dolly or truck can also be a point-of-view shot. In ENG, the walking shot gives the feel of a point of view, if not of a specific character then certainly of the viewer, as if he or she were actually present. This point-of-view idea can work in many stories. For example, in the earlier shot of the long line of people, a trucking shot along the line would give the viewer a firsthand look at what it would be like to be walking along that line.
Another use of the dolly or truck shot is to replace a pan shot to maintain perspective. Instead of panning a long row of TV sets in a showroom, a trucking shot can keep each set in the same proportion (size and angle to the camera). The desired feeling is not so much the relationship of the sets to each other and to the room, but the vast number of sets.
Dolly and truck shots have a beginning, middle, and end, just like all camera-movement shots, and each part must be a good shot. For any moving subject, such as a walking on-camera host, the dolly or truck can keep the subject framed while revealing changes in the background that impart new information to the viewer.
To get a feel for the effect of a dolly or truck shot, try dollying a shot for which you would normally zoom, or trucking a shot for which you would normally pan. Often, you will notice that dollies and trucks have greater impact and are more pleasing than zooms and pans. The only drawback is that trucks and dollies require more time and sometimes more skill and equipment than zooms and pans. A walking shot can be too shaky to look good in many segments because it looks out of place with all tripod shots in the rest of the story. While most ENG work should be done on a tripod, spot news is actually a good place to learn the effect and importance of a dolly or truck shot because of its hurried, go-with-the-action nature. Still, you can zoom and pan a lot faster than you can dolly and truck.
The Crane Shot
A crane (a.k.a. pedestal) shot is like a dolly or truck, in that the entire camera moves rather than pivots, but instead of moving in and out (dolly) or side to side (truck), the camera moves up and down. (See Figure 4.6.) For this type of movement, the camera may be mounted on a tripod or pedestal or body rig that allows the camera to be raised or lowered, or it may be mounted on a crane device that allows more dramatic, swooping movement than a simple tripod, pedestal, or body stabilizer. In the absence of a mounting device, the videographer must squat and stand while holding the camera to achieve a pedestal or crane shot. For this shot, the same guidelines apply as for dollies and trucks: keep the movement smooth; move neither too fast nor too slow; keep the principal subject framed; be aware of the change of perspective on the background; use the movement sparingly—only when motivated for dramatic effect or to reveal the most appropriate visual information in the most effective and timely manner.
SPECIAL-USE SHOTS
This category of shots is defined by the function of the shot and not by the focal length, framing, or camera movement. These shots usually serve as transitions from one part of the visual story to another or as aids in the editing process to maintain continuity. The following shots allow the editor to take the viewer smoothly through the flow of the story while not affecting the visual style.
The Cover Shot
The cover shot or establishing shot is a wide shot (a.k.a. long shot, discussed previously) that reveals an entire location in a broad perspective. This shot is usually used at the beginning of a sequence to establish the time and place of the scene or story. For example, a cover shot of a farmhouse surrounded by fields might introduce a story about the shrinking of the family farm. (See Figure 4.4.) However, a cover shot may also appear in the middle of a sequence to reestablish the location or to introduce a new location. For example, if the story is about more than one farmer and takes place across multiple farms, a cover shot in the middle establishes the new location of a different farm as the story shifts to a different farmer. A cover shot sometimes ends a story, as well, providing a final visual statement to wrap things up. In the farm example, a closing beauty shot of a rustic landscape might leave the audience with a warm, pastoral feeling.
The Cutaway Shot
As its name implies, the cutaway shot is used to cut away from the action. When an editor is putting together a series of shots and wants to avoid a jump cut (a break in continuity), a cutaway is used to take the viewer to a different subject so that time or subject position can change on the first subject without disturbing the continuity within the overall flow of shots. (See Figure 4.7.)
The most basic example of this is during an interview in which two different soundbites are butted (used back to back). The interviewee’s head is not in the same exact position from one shot to the next, and therefore the edit can result in a jump cut: The interviewee’s head jumps instantly through space and time to another position. This is a break in continuity for the viewer, who is used to the illusion of real time within a story.
In TV news, the solution to the problem is a cutaway shot to the reporter listening to the interviewee. This shot (picture only—the interviewee’s audio continues) is often called a reversal; it reverses the viewer’s perspective from the person being interviewed to the reporter. It is inserted over the edit so that the audio is not disturbed and the bridge in time is not noticed by the viewer. This type of shot is often used in an action sequence in which time compression is necessary; that is, when the subject must get from one part of the scene to another in less time (or more) than it really took. In a sports story in which the beginning and end of one boxing round is to be shown, the editor must cut out the middle of that round. To avoid the appearance of the boxer instantly jumping from one part of the ring to another, the editor uses a shot of the crowd for a few seconds between the first and second shots of the fight. The audience’s attention is momentarily diverted by the crowd cutaway. This type of cutaway is sometimes called a reaction shot; it shows the reaction of a person or persons to the action. Both reaction shots and reversals are specific forms of cutaways.
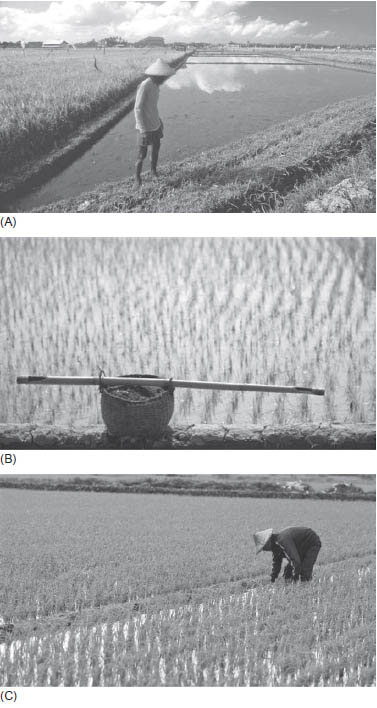
FIGURE 4.7
In this series of three shots, if shots A and C were cut together, the result would be a jump cut because the rice farmer would appear standing in one location facing screen right in the first shot, but would then “jump” to a bending position in another location facing screen left in the next shot, wearing different clothing. To avoid this jump cut in time, location, position, and wardrobe, shot B is inserted between shots A and C—a “neutral” shot of a farming tool on a basket next to a rice patty. By cutting away from the farmer in shot A to the neutral shot in B, the editor can cut back to the farmer in shot C in a new position while maintaining continuity.
The generic cutaway is any shot away from the action or subject but related to it. It can be a wide, medium, or close-up shot. A good cutaway should fit with the other shots, just as all shots in a story should blend together. In the two examples of reversal and reaction shots, the cutaways are shots of people involved in some way with the subject, either listening or watching. These usually make the best cutaways, but sometimes they are not available to record. Often you have to find another related shot. It might be the scoreboard at a sports event, or the clasped hands of a couple being interviewed, but it must always relate to the subject.
The cutaway is used within a sequence of shots involving the same subject in the same location; it is not a transition shot. To go from a shot of the mayor in an office to a shot of the mayor at a fundraiser is not necessarily a jump cut. The audience knows there is a change of time with this edit and perceives it as natural. In the movies and higher-quality video productions, very few, if any, cutaways are used, and no one misses them. The reason is that the sequences are so well thought out that the action flows naturally from one shot to the next. Even in shooting news, with a little practice, you can learn which shots to get and how to piece them together so that no cutaways are needed.
In some instances, cutaways slow down the pace of a story without adding any new information to the subject. In many cases, the reporter cutaway can be eliminated by editing in shots of what is being discussed, or B-roll. (See Chapter 2.) If the mayor is talking about cutting spending on street maintenance, then why not show shots of the types of maintenance being cut? If you find creative ways not to use cutaways or to use cutaways that illustrate the story, your video pieces will generally look much better and be more interesting.
The Insert Shot
A special type of cutaway shot is the insert shot. Where any cutaway literally cuts away from the action to a different shot, an insert specifically cuts into the action, focusing attention on an item within—or related to—the previous shot. An insert is usually a close-up that reveals some element within the longer shot in a closer perspective. In the boxing example, some tight shots of the boxers’ fists flying and feet dancing and faces grimacing would be inserts. In another example, if a business woman looks at her watch, a common insert would next be a close-up of that watch to show her point of view (POV) as she looks at the time. As is the case with all edits, continuity should be maintained with insert shots.
The Transition Shot
The transition shot is an editing tool that allows visual continuity and flow while avoiding abrupt changes in the sequence of shots. Unlike a cutaway or insert, which covers jump cuts in the middle of a single action such as an interview, a transition shot gets the subject or flow of action from one location or action to another. Any two shots edited together that are very similar in composition can create a jump cut. You can’t go from the subject talking on the phone to the subject typing at the computer in the same location. A transition such as an ECU of the phone receiver being hung up or an ECU of fingers on the keyboard would bridge the two action shots. The former ends the phone action shot, leaving the subject free to start the next action, and the latter begins a new action. You would use one or the other, not both, because by themselves they are similar shots; they are both ECUs of the same hands.
A subject moved from one location to another in an edit sometimes results in a jump cut if the shots are too similar. The simplest example of a transition shot to use in this case is a cleared frame. Keep the camera recording as the subject moves out of the frame. You are left with an empty picture for a second or two and are now free to establish the character anywhere else you wish. The reverse of this is also true. Start with an empty frame for your next location and let your subject walk into the shot. In some cases, it might be easier to pan to or away from the subject to get the subject in or out of the picture.
One very common transition shot in both ENG and EFP is the building or room exterior shot. This is a cover shot (see earlier) that has the specific function of starting the next sequence of shots. This is useful as a transition for a subject who is changing geographic locations, because it not only avoids a jump cut across locations but also establishes the setting for the following series of shots. Typically, exterior shots are followed by interior shots that reveal the subjects in their new location.
Close-ups make excellent transition shots. Because viewers see so little of the scene or subject in a CU, it leaves viewers at the end of an expression or thought. Starting a sequence of shots with a CU begins the action or thought before revealing the subject, which also works. The close-up of a sculptor’s hands shaping clay, for example, or even the ECU of the tool working the clay, can be the end of one sequence or the beginning of another. If the ECU ends a sequence, you could then cut to a wide shot of the artist placing the sculpture on a shelf at the end of the day. This jump in time is blended into the story by causing the viewer to concentrate on only one small aspect of what the sculptor is doing before coming back to another time in the same location. Use of this method makes it possible to maintain the level of action and information without wasting time on neutral transition shots, such as the subject leaving the frame. Each story has many ways of being told; the style and pacing often determine which type of transition shots work the best. It is a good idea to shoot for many different possibilities and make the final decision in the edit room.
PART TWO: COMPOSITION—AESTHETIC CONSIDERATIONS
Standing back and pointing a camera with the lens at a wide angle does not make a wide shot. The image created in the viewfinder must be recognizable by the viewer and contain some form of meaning. A jumble of elements all competing for attention with no unifying theme, direction, balance, or point of interest causes the viewer to look elsewhere.
Many aspects are involved in making a good picture. You can spend an entire school term just learning all the ways to create a well-balanced, pleasing image. Elements such as size, color, relative position, brightness, darkness, and angle all contribute to the aesthetic forces within any frame. Some of these elements are discussed in Chapter 10 on lighting. However, several rules and guidelines exist that will help you establish a working knowledge of good framing and composition.
CREATING THE THIRD DIMENSION
One of the first things you try to accomplish in any picture is a sense of space. Lighting is a great way to create volume (and it is covered in Chapter 10), but any shot you make needs to address the issue of three dimensions. The three ways to avoid a flat picture and create volume are:
• Use of the foreground
• Use of the vanishing point
• Use of selective focus
Adding dimension or depth is the first tool to improve the viewer’s perception of a shot.
Use of the Foreground In the simplest form, the use of the foreground is the establishment of an area or object near the camera and placing the subject in the midground while lining up a good background. The picture has a feeling of depth because the objects are at very different distances from the camera. (See Figure 4.8.) This technique composes the subject along the z-axis (depth), in addition to the x-axis (horizontal, or width) and y-axis (vertical, or height).

FIGURE 4.8
The straight-on shot (left), although revealing the lighthouse subject and its surroundings, is somewhat flat and uninteresting because all the planes of depth are relatively equal. Choosing a different angle and point of view with a foreground element (right) gives the picture greater depth because objects are both near to and far from the camera, utilizing different planes of depth. Also, the foreground anchor serves as a frame-within-the-frame for the lighthouse.
Many times it helps to exaggerate this effect (forced perspective) by placing the foreground object extremely close to the camera. Unlike backgrounds, if a foreground is out of focus, it should still be a recognizable form, such as a tree limb or a fence. (See Figure 4.9.) If the foreground object is too out of focus, it may help in framing but not in adding editorial content or contextual information to the frame.
As a general rule, the subject must not be minimized by the foreground or overpowered by the background. Lighting or, as we shall learn later, placement in the picture can make the subject stand out even with the other elements present. The subject need not be the brightest area of the picture or the largest, if additional factors are present. Other elements can often serve to give the most emphasis to the subject, no matter how small it is.
Use of the Vanishing Point In many shots for which a foreground is not practical or desirable, the use of angles can give the feeling of continuance to the picture. In a drawing or on the screen, diagonal lines seem to converge at some point, implying a third dimension of depth or movement to a distant point. For example, when you look down a straight line of railroad tracks, you can see that, at a certain point, the two rails seem to come together. This is the vanishing point. (See Figure 4.10.)
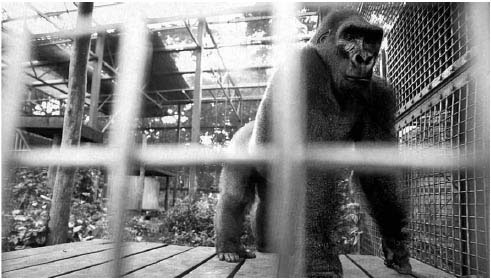
FIGURE 4.9
The captivity of the gorilla is emphasized by a slightly defocused and exaggerated foreground element—the bars of the cage.
Break down the picture into horizontal, vertical, and diagonal lines. The best examples of this occur when shooting buildings, because the lines are easy to see. As the camera’s position and resulting perspective change, so do the lines. When you walk around a rectangular structure, notice that from straight-on at the front, all lines are horizontal (top-bottom) or vertical (sides), with no diagonals. However, as you walk to the side to include both the front and side of the building in your perspective, the parallel top and bottom lines of the front and the side appear to be diagonal lines. At the point where the horizontal lines appear diagonal in the field of view, you can easily create depth in a two-dimensional picture. This is called keystoning: framing an image, such as a building, so that the parallel top and bottom lines become diagonal, converging toward a vanishing point and creating depth. (See Figure 4.11.)
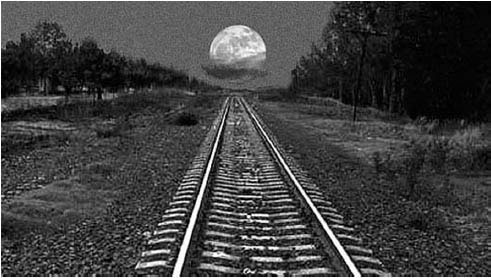
FIGURE 4.10
Even though this railroad track is the same width all the way to the horizon, it appears to narrow as it recedes into the background, thus creating a vanishing point. Moreover, these leading lines lead the viewer’s eyes to the moon just above the horizon where the intersecting lines meet.
FIGURE 4.11
Shooting a building from a corner angle creates a keystoned image, adding depth along the z-axis as the parallel top and bottom lines converge diagonally toward a vanishing point.
Besides creating volume, these converging lines, known as leading lines, can take the viewer’s eye to a subject or important element of the picture. Our eyes naturally follow these leading lines, extending them even if they don’t continue on their own. By creating a focal point, you can lead the viewer to the main element of the shot. (See Figure 4.12.)
Use of Selective Focus Another way to create a sense of volume within the frame is to have well-defined areas of focus. This technique is particularly useful when working with longer focal lengths that tend to flatten a shot by compressing perspective. A shot of a subject walking down a crowded street, as seen through a telephoto lens, would not highlight the subject if all the faces in the shot were equally in focus. By finding ways to decrease depth of field (shooting with a lower f-stop, or standing back and zooming in), you can bring the subject into sharp focus and have both the background and the foreground drop out of focus. This shallow depth of field creates the look of depth and better expresses the distances between elements in the frame. Even without a foreground, this technique can greatly enhance the three-dimensional qualities of any picture. (See Figure 4.13.)

FIGURE 4.12
The angle here causes the train to be keystoned and the other parallel lines to converge on the vanishing point and lead the eye to the central element of the image—the exit to the outside world.
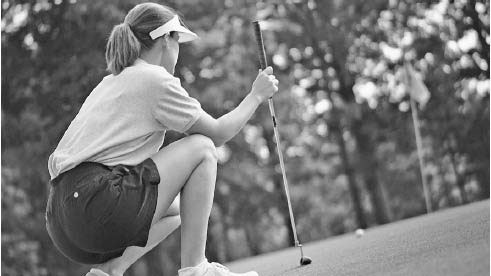
FIGURE 4.13
By defocusing the background, the subject in the foreground easily draws the viewer’s eye and creates depth perspective, enhanced by the canted angle.
EFFECTS OF FOCAL LENGTH
As focal length changes—the lens is zoomed in or out—many things change in the resulting picture. The most basic change is the size of the subject: It gets larger as the focal length increases (zooming in). This magnification of the subject also has other effects in the overall picture. As the field of view narrows (the focal length increases), the quantity of background decreases as its size increases. Because the field of view is in the shape of a cone, as you zoom in, the rate of size increase for the background is much faster than either the foreground or midground of the picture. This visual effect is known as compression. Objects at different distances from the camera and in line with each other appear to become closer to one another as the field of view narrows (the background seems to be moving forward), even though their sizes relative to each other never change.
This phenomenon can be used to great advantage by the photographer. For example, in a movie where the hero is running down the street toward the camera while being chased by a truck, a telephoto lens (long focal length) makes not only the hero appear large but the truck as well. The compression of perspective in the shot can make it look as though the truck is only inches from the hero when in reality the truck could be 100 feet away. The same shot done with a wide field of view would show the truck’s position more clearly and not have the same dramatic effect. The drawback to the zoomed-in shot, however, is the perceived speed at which the truck is closing in on our hero. Because of the compression, even if the truck is rapidly gaining on him, the truck’s size barely changes. Image size doubles in reverse proportion to the distance change. For the truck to double in size, it would have to come half again as close to the camera as it is. For a telephoto shot, that could be quite a distance.
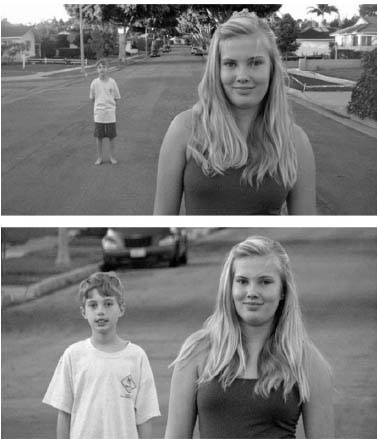
FIGURE 4.14
In both pictures, the girl in the foreground is framed in a medium shot and the boy in the background is the same distance from her. Only the photographer’s distance and focal length changed. For the top image, the shooter stood close and used a wide angle to exaggerate distance. For the bottom image, the shooter stood farther away and used a telephoto angle to compress distance. Notice the shallower depth of field in the telephoto shot (bottom), with the background out of focus.
In contrast, at a very wide field of view just the opposite effect of compression occurs. In wide-angle shots, things in line with the camera tend to appear much farther apart than they really are. If the object of our truck chase is to see the speed at which the truck is closing in on our hero, the wide shot would do it. With both elements close to the camera (our hero is still the same size in the frame), the oncoming truck could easily double in size within a second or two (halving the already short distance to double in size), thus exaggerating the speed. These effects can be used to bring even static objects closer together or farther apart in a picture. (See Figure 4.14.)
DISTANCE
In place of focal length change, you can substitute camera distance to change the size of the subject. By simply moving the camera closer to the subject, you increase its size in the frame. In the early days of photojournalism, when each lens had one fixed focal length, the shooter had to walk to or from the subject to change the size of the image. Many people still refer to a wide shot as a long shot because you had to walk a long way back to get a wide shot with a fixed focal length lens.
With today’s zoom lenses and wider angles of view, you need not walk as far or as much. The thing to keep in mind is the perspective of each type of focal length, especially when shooting medium or close-up shots. Zooming in creates less depth of field and less of a three-dimensional view; the perspective is compressed, or flattened. (See Figure 4.14.) When the videographer walks closer to the subject, the perspective stays the same for the midground and background, but the foreground begins to distort in an effect called exaggerated or forced perspective. (See Figure 4.15.) The depth of field does not change, but the three-dimensional effect is made more prominent by the rapidly increasing size of the foreground (the opposite effect of zooming in). Again, the objects double in size as the distance to them is cut in half. Unlike zooming, this effect is achieved by moving the camera closer to the subject while maintaining a constant focal length.

FIGURE 4.15
A wide-angle lens (in this case an extreme wide angle, or fisheye) exaggerates the depth perspective to the point of bending the straight lines of the goal in the foreground and the horizon in the background.
BALANCING THE PICTURE
Up to now we have discussed composition as it relates to the camera, lens, and subject size and distance. The final aspect of composition is the arrangement of the elements within the frame. Before you push the record button, you need to ask yourself, “How can I maximize the impact of this shot?” Too many videographers in television never ask that question. Flipping on almost any newscast, you can see the results of “point-and-shoot” news photography. Shots are framed for a subject with no regard for the rest of the picture. A photographer’s eye should be trained to look at the entire frame and all the visual elements within it, not just what initially attracts our attention while looking at a scene.
Too often balance is thought of in terms of being centered, or using symmetrical balance: having the same amount of space on all sides of the subject. Much of the time this is not the case. Balance is far more complex than that. Often, asymmetrical balance makes a better composed image: having objects of different sizes, contrast, and so on balance the image. Imagine two elephants balancing on a seesaw. They are symmetrically balanced; they have the same shape, mass, weight, color, contrast, line, and texture on both sides of the fulcrum. Now consider a balanced seesaw with an elephant on one side and a mosquito on the other. Obviously, the mosquito must be much, much farther away from the fulcrum to balance the elephant. The two sides of the image have different mass, weight, and so on; yet, the seesaw is balanced—asymmetrically.
As we learn in Chapter 10 on lighting, a little of something can go a long way. A very small but bright object can upset the balance of a picture quite easily, but can also be positioned to add balance to a picture. While there are some basic rules that can lead you to balance the composition of elements within a frame, there is no substitute for what your eye tells you as you look through the viewfinder. Some arrangements just feel better than others when you look at them.
Frame Dynamics A well-designed garden maze ensures that anyone seeking the center has to make several circuits before finding that center, and then search for an exit once there. A well-designed picture should do the same thing. It has one entrance for the eye, one main subject, and several points of departure away from it. There are three basic patterns to the movement of a viewer’s eye:
• Circle: The classic symbol of unity forms the simplest compositions, allowing the eye to circle the image.
• Pyramid: The eye starts at the bottom left, traverses up to the pinnacle, down to the right corner, and finally back to the left to complete a strong and unified composition.
• Irregular shape: Allows the eye to move in a dynamic and asymmetrical flow, adding energy and tension to the image.
Western culture has programmed our eyes always to start from the left side of any scene. In theater, the left side of the stage is said to be the strong side for entrances. That does not mean that side of the frame is where the subject should go. The eye starts there, but your composition can take it to wherever the subject is in the frame. It is also possible to have the eye start in other places. The white foam of an ocean wave can catch the eye first and then send it to the surfer on that wave. (See Figure 4.16.)
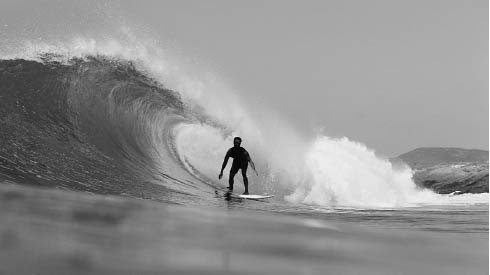
FIGURE 4.16
The white foam and large curvy wave catch the viewer’s eye and then direct it to the vertical surfer on the wave.
Lines As we have seen with the vanishing point, where our attention is directed to the point of convergence, lines can play a very large role in leading our eyes. Diagonal lines create vitality with their implied movement. The eye is drawn to anywhere in the frame where two lines cross or one line suddenly changes direction (e.g., a corner). An isolated vertical line, such as a tree, pole, or even a standing person, is noticed first in the picture and takes precedence over any horizontal or diagonal lines in the scene. (See Figure 4.17.) To achieve a pleasing composition, a horizontal line must cross this vertical element at some point. When a vertical line is not interrupted, it simply splits the screen, creating two disconnected sections of the frame.
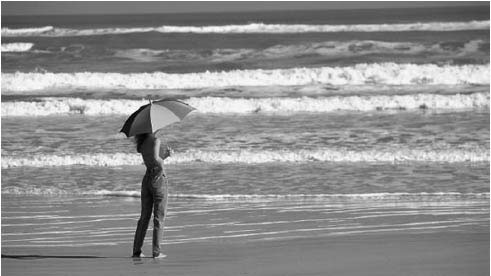
FIGURE 4.17
A lone vertical element—the beachgoer—dominates the picture, intersecting with the horizontal element—the ocean’s waves and horizon line.
Color A very important tool in the design of a frame is the color of elements within it. This can be a difficult task for the videographer using a black-and-white viewfinder, though color viewfinders are found on most cameras today. A red rose may stand out as the dominant element in the frame when viewed in color, but in the viewfinder it may be next to impossible to pick it out in the field of grays. In the absence of a color viewfinder or screen, a shooter needs to use one eye to see color and one to look through the viewfinder, combining the two versions to realize the actual outcome of the video. Composition includes giving weight to brighter colors.
Videographers should also know the concept of complementary colors, or contrasting colors. A color stands out more vividly in relation to its opposite. Continuing the example of a red rose, this flower is seen most vividly when set against cyan elements in the shot because cyan (blue-green) is the opposite of red. A simple way to remember contrasting colors is to create a quick color wheel. (See Figure 4.18.) When you shoot an object, such as a rose, note its dominant color, such as red, and then look for ways to set that object against elements with contrasting colors, in this case cyan leaves or flowers.
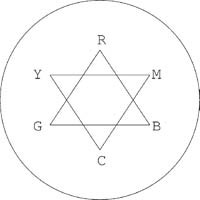
FIGURE 4.18
This simple color wheel can be created easily by writing the three primary colors of light, RGB (red, green, blue), in a triangle, and then writing the three secondary colors, YMC (yellow, magenta, cyan), in their respective places between the primary colors in an inverted triangle.
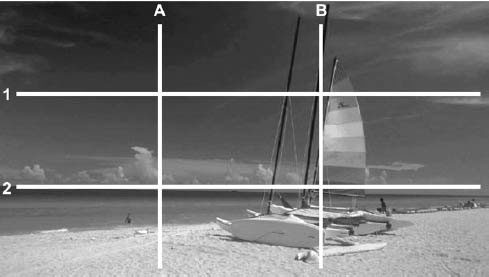
FIGURE 4.19
Use of the rule of thirds makes this sailboat and seascape a balanced picture. The sea is in the lower third of the frame, the boat is at B2, and the open sky is at A1.
Rule of Thirds This very important principle of image composition provides an easy way to frame objects by using a nine-square grid as an overlay to the picture. The concept, called the rule of thirds, divides the screen by thirds vertically and horizontally. (See Figure 4.19.) It is based on the ancient Greek discovery called the golden rectangle, or as Da Vinci called it, the divine proportion. An accurate golden rectangle has an aspect ratio of 1.618:1 (the Greek letter phi, π, is used for the number 1.618). That ratio is found by dividing the longest side of the rectangle by the shortest side. A true golden rectangle is more like the aspect ratio of a movie screen. Today’s high-definition television has a movielike aspect ratio of 16:9, or 1.778:1. This is wider than the old NTSC TV aspect ratio of 4:3 (1.333:1), allowing wider image composition.
As you look at any composition, fit the elements of the scene into the grid, positioning them on the four intersections of the lines. Try this idea with a sunset and a very flat horizon, such as the ocean or a large field. You’ll find that long or tall objects, such as the horizon line and maybe a telephone pole, look better lined up along the lines of the grid and not centered in the spaces of the squares. You’ll also find that smaller objects like the sun look better placed at the intersection of the lines.
Figure–Ground One way to organize the elements of the frame is to use the concept of figure–ground, figure being the main visual element or subject of the picture—the shape that you notice first—while ground gives it the context in which to exist. Figure can only exist with a ground on which to place it. You cannot see figure and ground at the same time. Photographers who point and shoot run afoul of this concept all the time. A figure is any element in the frame that achieves prominence over the rest. By concentrating on just the element you want to be the subject of the shot, you cannot see the entire frame—a version of not seeing the forest for the trees.
The best example of this is the infamous tree positioned so it comes perfectly out of the top of someone’s head. In another version, a lamp or other object sits atop the subject’s hair. (See Figure 4.20.) In these cases, sometimes called dimensional mergers because the foreground and background dimensions “merge” in an often humorous way, the photographer is so focused on the subject that the other aspects of the frame are literally not seen. But the viewers are not concentrating in the same way; they are just discovering the shot and see it first as simply figure and ground. The lamp and head appear to be one continuous form. Signs can work the same way. If they are too large or too overpowering in the shot, they become the figure and the person standing in front of them becomes the ground. This is not effective communication.
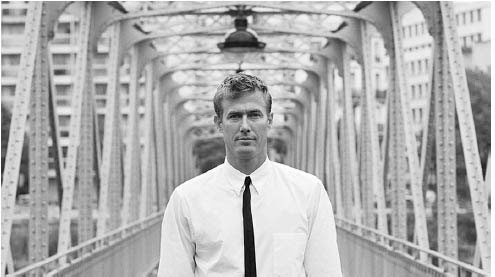
FIGURE 4.20
The subject is composed well in relation to the leading lines (sides of bridge), but the lamp is positioned so it becomes part of the figure instead of the ground, appearing to stand atop his head.
It is easy to control figure within ground just as you would any object you wish to highlight. Through lighting, color, focus, position, and so on, you determine which object will be figure and which will be ground, despite the complexity of the shot.
Balance A balanced shot is one in which the elements within the frame are at equilibrium with all the forces of the frame. And there are many. The frame is like a scale; elements and groups of elements have visual weight determined by size, shape, contrast, direction, or just plain interest. Large dominates small; a black bean dominates when seen in a group of all white beans; a regular shape such as a circle dominates within a group of irregular shapes; and certainly a snake sliding across the floor dominates any picture regardless of composition.
Balance is determined by two factors: the visual weight and the visual pattern’s direction of movement. Position in the frame has a lot to do with an elements’ relative weight. A large object near the center of the screen can be balanced by a small object close to the edge of the frame. Objects at the center or on the vertical centerline of the frame have less weight than the same object at the sides of the picture. A face in the left third of the screen can be balanced by look space or lead space in the right two-thirds of the screen (assuming the person is looking screen right). An element at the top of the frame is heavier than when it is at the bottom. Because of our left–right conditioning, an object on the left side of the frame has greater visual weight than one on the right side. A picture can be balanced by total symmetry, but these compositions rarely hold visual interest; they are boring. By using a more dynamic framing scheme, such as asymmetrical balance, the rule of thirds, and figure–ground, combined with the concepts of eye movement, you can design an image that holds the viewer’s interest and therefore imparts more information.
The movement, or implied movement, within the frame is the other part of the balancing act. Converging lines create movement to the point of convergence. Your eye follows a curved line in a field of all straight lines. One of the most important movements with which you will deal in video is the movement created by the human face. The direction in which a person looks or walks creates a very strong movement in that direction; it is a force that needs to be neutralized in some form within the frame, usually with lead room—empty space in the two-thirds of the screen in front of the person.
COMPOSING SPECIFIC SHOTS
Just as shots can be described by their focal lengths to communicate the size of the subject within the frame (LS, MS, CU), there are specific shots that can be called by their common names. Their execution is done by convention. The most common specialty shot is the interview. When a producer or reporter says, “Let’s set up for an interview,” they have a specific style of framing in mind. The conditions of the location or situation or artistic inspiration can change this, but for the most part an interview shot looks the same from Maine to California, from small town local news to the networks.
The Interview Shot
The basic framing of the interview shot is the head and shoulders of the subject, hence the name talking head. The standard reference point for where the bottom frame line would cut the subject is the “necktie knot.” If the subject, man or woman, were wearing a tie, the bottom of the frame would be just below the knot. A looser version of this shot cuts them off at the top of the breast pocket. A shot tighter than the necktie is sometimes called a “choker.” To simplify all the compositional information we learned earlier, there are two basic rules for framing the talking head and having it look good every time:
1. Never let the subject’s eyes go below the horizontal centerline of the screen. If the focal length changes from the waist up to a close-up of the face, the eyes of the subject should always be in the upper half of the screen, somewhere on or near the upper third (using the rule of thirds). (See Figure 4.21.)
2. Keep the tip of the subject’s nose on the vertical centerline of the screen. If the subject is talking to a reporter off camera, you will notice that this rule puts the subject’s head slightly off center, somewhere on or near either the left or right third (again applying the rule of thirds). Because the subject is not talking to the viewer directly, this type of framing leaves look space in front of the subject. This space helps balance the shot asymmetrically; it counters the movement created by the direction of the subject’s eye line, and it also implies that someone is there just out of the frame. That implication becomes yet another force in the dynamics of the picture. You can start to see how these simple rules support the concepts of composition.
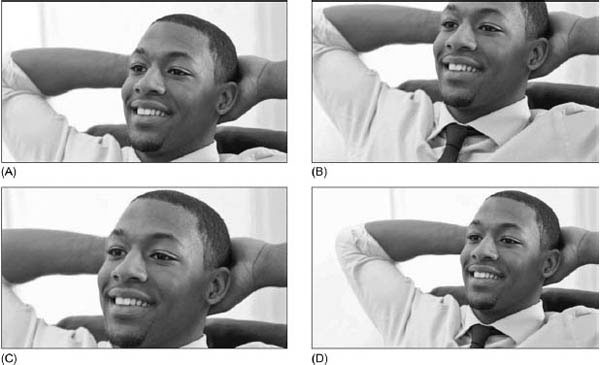
FIGURE 4.21
(A) The subject is framed with his face too low—his eyes are not at the upper third. (B) The subject’s face is framed too high, as if he is pushing out of the top of the frame. (C) The subject’s head is framed dead center, leaving no room in the direction he is looking (look space). (D) A properly framed head for this focal length—his eyes are at the upper third and the look space in the left two-thirds balances his head in the right third.
You may at times want to include the interviewer in the shot. If this is the case, you must pay close attention to the balance of the picture; you don’t want the reporter to be the figure and the subject to become the ground. If only a portion of the reporter’s head is in the frame, make sure the subject is not centered, but off to the other side. As more of the reporter is seen, make sure you are using the tools of composition (e.g., rule of thirds) to keep the subject the main point of interest.
As mentioned earlier, the standard framing for the talking head should be tight enough to show the subject’s face clearly on the average TV screen. In the case of chokers, as on a probing interview on 60 Minutes, the framing may be extremely tight. You will notice that as the top frame line closes in on the face using the rules stated earlier, it begins to cut off the top of the head. One of the biggest fights you will ever have over composition with coworkers will be over this effect. Untrained producers will call for head room or scream that the top of the head is cut off; they can’t see all of the subject’s hair. Take refuge in the concepts of good composition. By allowing the face to slip to the bottom half of the frame (eyes below the midpoint) you add weight to the hair of the subject (top of the screen is heavier), and thereby throw the picture out of balance.
The edges of the frame have a force all their own. As an object begins to near or partially exit any side of the frame, the frame acts as a pull on that object. For a talking head, the face is the center of interest and therefore the main element. When it sinks toward the bottom of the frame, it appears to fall out of that frame. The hair being cut off by the top of the frame produces a feeling of the subject rising, but because the hair is not a major element or focus of the picture, its force carries little weight and is easily countered by the grouping of eyes, nose, and mouth—the figure of the scene.
Be careful when framing subjects too tightly, though. An interview with a welfare mother who has had her food stamps stolen could be a close-up of her face to show the viewer her emotion. However, the same type of shot in an interview with a city official regarding an upcoming change in street signs would not have the same meaning. Reserve the close-up of faces only for emotional or dramatic subjects. Children are the biggest exception to this rule—they almost always look good in close-ups.
Use caution not to overdo the facial close-up. It is basic conditioning to zoom in for a tight face shot when the grieving mother of a dead child starts to cry. While some may argue that the emphasis is needed to convey the full impact of emotion to the viewer, there is also the argument that this type of shot is an uncaring, vulgar invasion of the woman’s privacy. It may indeed be more dramatic to zoom out from such a scene to give the subject some space, if only symbolically.
TV is the best medium for conveying emotions, especially in news photography. Ethical principles suggest that the emotions portrayed should be true to your subject (accuracy), but they also should not be offensive to your viewing audience (do no harm). Some subjects deserve more respect than to have their worst moments seen larger than life in everyone’s living room. The moral values or degree of good taste you express in your shooting should be the same as you would express any time in your life. The tight head shot can be a powerful tool both artistically and emotionally, but you must be careful how and when you use it.
Effects of Background and Focal Length In some cases, the background can be of such importance that the framing or placement of the subject in the frame is dictated by that background. The best setup for an interview with a farmer about a new experimental crop might be a wide shot of the field that includes the standing farmer (remember how a single vertical figure can dominate). The farmer may be framed head to toe, and if you place the farmer on the rule of thirds, the impact is enhanced from both a visual and informational point of view. (See Figure 4.22.) An interview background should add to—not distract from—the interviewee (figure–ground principle). If an appropriate background cannot be found, then choose a neutral one, or use a focal length that produces a depth of field shallow enough to take the background out of focus.

FIGURE 4.22
This farmer is framed head-to-toe in the left third of the image, with the right two-thirds and background being the field where he is growing an experimental new crop.
When setting up an interview shot with a specific background, first choose the background. Add the subject to the shot. If the subject does not conform to the framing rules mentioned at the beginning of this section, do not bend the rules, but “tweak” the camera location and/or focal length to satisfy the framing concepts. A very common misuse of background and subject occurs when the photographer tries to put a sign over the shoulder of the subject. If the sign is too high, many new photographers shoot the interview from a low angle or frame the shot so that the subject’s eyes are below the middle of the screen. Both generally produce a very uncomfortable shot and overemphasize the sign (again, figure–ground). Never let the eyes of the interviewee or the interviewer go below the horizontal midpoint of the screen. Simply move the camera and subject farther from the sign so that the sign can be placed in the deep background to maintain good framing. Do not force bad framing on your subject just to get a “good” background. A little experimentation usually shows a way to make both satisfactory.
The Reporter Stand-up Shot
The stand-up shot is a specialized version of the interview shot used especially in TV news. For EFP, this concept can be used for any on-camera appearance by a narrator who is talking directly to the audience. Because of this direct address to the audience, the framing of the stand-up is very important. A general rule for this shot is never to frame the subject looser than the waist up or tighter than the breast pocket top. This allows the viewer to have good eye contact with the talent and feel a personal link, which helps establish credibility.
If the shot is framed too loosely, the importance of the subject can be reduced or even lost in the background and the impact is greatly reduced. (See Figure 4.23.) Again, there are ways around this, if careful attention is given to the rules of composition. The talent must be the focus of the shot, or why else have him or her in it? Background is important, but very much a secondary part of the picture. The subject’s monologue should help design the shot and determine the type of background used. If the script is general, then the background should be as well. If the script deals with a power plant, however, perhaps the power plant should be in the background.
Many of the same rules that apply to the interview shot apply also to the stand-up shot, such as placing the subject correctly in relation to the background and keeping the subject’s eyes above the middle of the screen. As in the interview, the best camera elevation is a normal angle, or eye level. This places any visible portion of the horizon at the eye level of the subject. The horizon line running through the picture directly behind the eyes of the on-camera subject draws added interest to the subject’s face. This is good. (See Figure 4.24.) Any other angle tends to be either unflattering or can add or subtract too much importance from other elements in the picture.
Sometimes, however, a different angle does work; for example, if you are shooting a reporter in front of a field of flowers. When the camera is at eye level, the background covers about half of the frame, but the sky might be overcast and “blowing out” (overexposing) the upper portion of the frame behind the top of the head. If you raise the camera above eye level to a high angle, or below eye level to a low angle, the viewer has a different perspective on the background. In this example, because of the brightness of the sky, a high angle can place the horizon line at the very top of the frame, leaving the reporter framed against nothing but flowers. (See Figure 4.25.) This composition can be more dramatic.
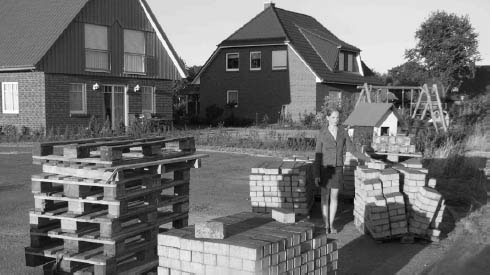
FIGURE 4.23
Can you find the model in this picture? She blends into the objects of the scene, becoming part of the background. There is no separation.
FIGURE 4.24
Any time the camera is at eye level with the subject, the eyes are at the horizon line. This draw’s attention to the subject’s eyes, which is desirable.
The difference between the stand-up and the interview shot is that the subject is talking directly to the camera. The need for the implied second person, the listener, is gone. This allows you more latitude to frame the subject in different areas of the image and to fit the background in around the subject. For any off-center positions, the talent’s inside shoulder (closest to the middle of the picture) should be angled slightly away from the camera to help add a three-dimensional quality to the shot and visually direct the viewer’s eye to the return journey to the background as part of the overall eye movement. Again, the subject is always the dominant element in the frame, even if he or she is part of the background. A good rule of thumb to simplify stand-up framing is never to let the talent be more than six feet from the camera if you are using wide or medium focal lengths.
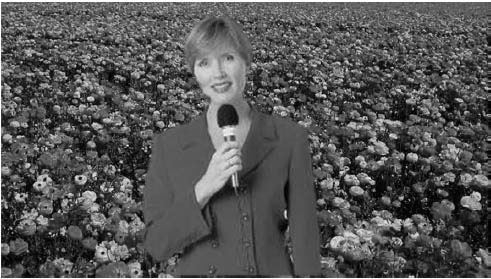
FIGURE 4.25
The reporter is framed from a slightly high angle so the field of flowers fills the background. (Composite image)
The stand-up shot has many variations. The most common is the walking stand-up. As with any shot, it should have a purpose. The reason for a walking stand-up shot can be as simple as adding a little movement to an otherwise static composition, or as complex as moving from one animal to another in a story about the county fair. The movement should be slow and comfortable. A relaxed walk not only provides the necessary movement but also visually adds to the conversational tone appropriate for a stand-up. The subject should already be walking when the shot starts and can either stop partway through it or continue to walk throughout the shot. The correct framing needs to be maintained on the walking subject. Depending on other compositional tools, it might be necessary to zoom out as the subject approaches to maintain her in the waist-up framing. Other frame dynamics might work, such as having the reporter grow in size as she approaches the camera, thus drawing the viewer’s eye. This works as long as the reporter is the center of attention right from the start of the shot.
As a general rule, the zoom-in is used much more frequently than the zoom-out in the standup shot. The zoom-in, or push, adds emphasis to a stationary subject, whereas the zoom-out, or pull, usually deemphasizes the subject by bringing attention to the ground of the shot. A zoom-out can also be effective when there is some additional information to be imparted by expanding the shot. Keep in mind that doing this generally renders the reporter insignificant, leaving only his or her words to convey continuity in meaning. His or her physical presence has been diminished by the new subject of the shot. An example of this is a reporter doing a stand-up in an area that is very dry due to a recent drought. The shot starts as a waist-up shot; as the talent talks, the camera zooms out to show the reporter at the end of a lake’s dock with no water in sight. The dry lake bed becomes the new subject of the picture and the reporter fades to ground.
Another factor in stand-ups is direction. The audience is being spoken to, and therefore the direction of the stand-up should always be toward the camera or audience. If the talent is entering the frame from off camera, the direction should still be toward the camera and not at a right angle to it. This usually requires some camera movement to get the talent into the frame in the least amount of time, but the feeling of positive motion (motion toward the camera) is worth the movement. Walking into a static shot is time consuming and usually awkward due to the transition period of being half in the frame and half out of the frame. If the transition can’t be made quickly, find another way of doing it.
The only time a talent should have negative motion (motion away from the camera) is when taking the viewer to another location or showing the viewer something behind the place where the stand-up starts. This can be very effective if the shot is well thought out in advance. The audience does not like to have subjects turn their backs to them without good reason. The main goal is always to communicate—every shot, every subject.
FOLLOWING THE ACTION
Following the action combines all shots and camera moves. Spot news is the best example of this concept because of the severe time constraints on getting the visual story and the level of action during the shooting. As a story unfolds under the fast-paced conditions of spot news, the shooter tries to stay with the subject or the important aspects of the story. To do this, the news photographer’s position and camera zoom must be used to maintain good framing and get all the different shot types necessary to tell the story. Because of the fast pace, the camera should never stop rolling. Often a zoom is necessary or a camera position must change, but the important idea is that the action must always be followed. The action can be allowed to leave the frame (a transition shot), but it must be picked up again with a minimum of lost time.
Sports coverage is the easiest example of following the action (or “staying with the ball”). The action should determine how the shot is framed and what the camera must do. If the action involves more than one subject, such as in basketball, then frame for them all. If it involves only one subject, such as a football running back, then stay with that subject in the best framing to describe the action visually. In some cases it might be best to hold the same focal length and let the action take place while panning to keep the action in the frame. Too much camera movement or zooming can ruin the visual presentation of an event.
All the rules in the previous sections apply to following the action, especially the rule that too much of anything is bad. A videographer needs to do what is necessary to get the shot. But if the piece overuses pans and zooms, it might be too annoying to watch while yielding little information to the viewer.
One important rule for composition is always to lead the action in the frame. A runner on a track, an ice skater on an ice rink, or a paramedic rushing a gurney to an ambulance should not be framed in the center but slightly off center, on or near either the left or right third (again, rule of thirds), with the empty side of the picture in front of them for proper lead room and image balance (asymmetrical). (See Figure 4.26.)
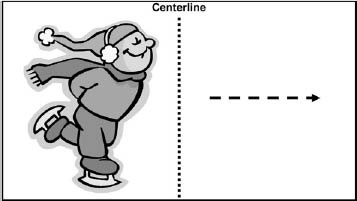
FIGURE 4.26
As the camera follows the skater, he is left of the centerline (framed on the third), leaving him lead room to the right into which to skate.
Through the use of the empty space in framing an action, you give the impression that the subject has someplace to go, and the dynamics of the frame make the figure’s movement in that direction seem natural. The subject should not be running into the side of the frame, creating a look of falling out of the picture. There should always be space left into which the subject can run, even before he or she starts any movement; for example, a runner in the starting blocks should have the space ready to fill before the gun sounds.
BREAKING THE RULES
Rules are simply guidelines to help understand the basics of portable video. Once you become proficient with the basics, you will begin to see the ways you can break the rules and still achieve truly great results. The talking head is a perfect example. By ignoring the basic rules of framing, it is possible to put the interviewee anywhere in the frame if you know what you are doing. For example, conventional framing of a person looking off-camera places the person with eyes at either the top left or top right third, filling the other two-thirds with look space. Nonconventional framing might place that person’s eyes on one of the bottom thirds, but only if the resulting headroom reveals something of importance to the story in the space above the subject’s head. Or the frame might place the subject on the “wrong” third—still on a third, but with the look space to the subject’s back instead of to the front of the eyes. (See Figure 4.27.) Again, this should only be done if this space behind the subject reveals something of importance to the story.
FIGURE 4.27
The top image demonstrates conventional framing with the talent in the left third balanced by look space in the right two-thirds. The bottom picture demonstrates nonconventional framing with the normally expected look space behind, rather than in front of, the subject, in this case to draw attention to the building. The subject’s face is also on the lower third rather than the upper third. All this might suggest that the subject had to step outside to take an unusual cell phone call, further emphasized by the canted camera angle.
SUMMARY
Good framing and composition of images begins with a solid understanding of the story line. When a videographer knows the story he or she is shooting, he or she can create and capture the best images for each moment in the story. Some stories can be framed with nothing more than the three basic shot perspectives: LS (WS), MS, and CU. Of course, many other shots are available, including the ELS (XLS), MLS, MCU, and ECU (XCU). Experienced photographers know how to use them all. Additionally, shots can involve camera movement, including the zoom, pan, tilt, truck, dolly, and crane/pedestal. Special-use shots can also be helpful, including cover, cutaway, insert, and transition shots.
In addition to framing, the aesthetics of composition are also crucial to successful shooting. These include creating the third dimension along the z-axis by using foreground, midground, and background elements; applying the vanishing point, keystoning, leading lines, and selective focus; understanding the effects of focal lengths and distance; balancing images asymmetrically by knowing the frame dynamics of line and color and by applying the rule of thirds and the figure–ground principle; using appropriate look space or lead room along with not too much head room; and composing often-used shots well, including the interview shot, reporter stand-up, and following action. Once a shooter has mastered all the guidelines of framing and composition, he or she is free to break the rules purposively for heightened effect.
These guidelines cover the basic tool chest for recording images for ENG and EFP. By applying these conventions, and by knowing when to break them with purpose, you can create video pictures that are both powerful and pleasing. Shots that attract and hold the audience are the most effective means to communicate the message of any story.