

Light: Understanding and Controlling It
If you ask an experienced photographer or videographer what the key is to creating good images on film or video, they will probably tell you it is the control of light. In both film and video, the images are made by light reflecting off of the subject of the image. Manipulating light for the camera is truly an art, and one that is crucial for high-quality video.
Lighting is probably the most overlooked, misunderstood, and feared aspect of electronic news gathering (ENG) and electronic field production (EFP). Very often, light kits are low-priority items in budgets for field gear, and subsequently, especially in days of lean budgets, well-equipped light kits are never purchased. Existing kits often go for months without replacement bulbs, again a result of the low priority assigned to lighting in the field. In ENG, lighting that goes beyond a camera-mounted light and one basic light for live shots doesn’t always happen. Today’s cameras boast of their low-light capabilities, creating the impression that lights simply aren’t needed anymore. That impression, coupled with the limitations of trunk space, crew members, and setup time, means that even for EFP the portable light kits are often left at the station, in the studio, or in the vehicle. And that is a huge mistake.
It seems odd that lighting equipment gets such casual treatment; after all, without light there would be no photography—video or otherwise. Especially when using relatively inexact video cameras, you must pay constant attention to the lighting factor to produce a realistic image.
Portable video practitioners may treat lighting casually because much of their work is done outdoors. Available sunlight provides enough light to allow the video cameras to see the desired scene and record the action. But seeing is not always good enough. With some additional lighting effort and consideration, the camera will not only see the scene and the action, but it will also detect additional mood, dimension, interest, focus, and indeed understanding in a good video segment.
This chapter looks at the very nature of light. Its qualities, its quantities, and the instruments that create and shape it are all discussed. We will also discuss the basics of lighting theory and technique and how they relate to the content of all video productions—both ENG and EFP—to go beyond simply making the subject visible to the camera.
PART ONE: THE PHYSICAL PROPERTIES OF LIGHT
WHAT IS LIGHT?
Without light, there would be no picture. A good knowledge of the physical and artistic characteristics of light is a prerequisite of understanding video photography in any form.
Photons and Light Waves
Light is just one part of the total electromagnetic radiation spectrum, but, unlike other forms of this type of energy, light is visible radiant energy. Actually made up of very small energy particles called photons, light follows the common rules associated with all wave physics. The big difference between light and X-rays or radio waves is light’s inability to penetrate solid objects. Light is easily deflected. In fact, except for the light source itself, reflection is the only way light can be seen. Shining a bright light into a dark night sky produces no evidence of that light from the side or below, unless some dust, fog, or other material crosses the path of the light and reflects it. Light is visible only when we see its effect as it strikes an object.
The photons released by the light source all travel in a straight line away from the source at the same speed. The sun is the best example of a light source. Points at the same distance away from any side of the sun receive the same amount of light.
Photons travel in that straight line until they encounter something. In space, that may be quite a long time, but once they reach Earth, it doesn’t take much to start blocking them. Our atmosphere, which is actually very thin by the standards of physics, blocks a great deal of sunlight striking Earth. Some of the light is absorbed by the air and converted into heat; some is reflected by the air, which is how our beautiful skies appear blue. The same is true as light strikes the surface of the planet. Everyone notices that a black car sitting in the sun gets a lot hotter than a white car. The black car is absorbing the light and its energy, while the white car is reflecting most of it. Photography concerns itself with both the reflected light and the absorbed light. Knowing that light always travels in straight lines and how light is absorbed or reflected is the key to understanding modern photography and the way today’s video equipment works.
Spectrum
Like all electromagnetic radiation, light can be classified by its wavelength or frequency. In addition to its speed (186,282 miles per second), light waves can be measured in units called nanometers (nm). Visible light, or white light, contains all the wavelengths between 400 and 700 nm. Wavelengths shorter than 400 nm go from ultraviolet and X-ray to gamma and cosmic (the shortest). Wavelengths longer than 700 nm go from infrared and radar to broadcast signals such as TV and radio transmissions (the longest). (See Figure 10.1.)
Shining a light through a prism reveals the various frequencies that make up that light; these frequencies are bent at different rates according to their wavelengths. The resulting light on the other side of the prism appears as a rainbow. This represents the spectrum of frequencies contained in that light. In nanometers, the colors in the rainbow range from violet (~400 to ~430 nm) to green (~492 to ~550 nm) to red (~647 to ~700 nm). Lights that have a continuous spectrum have all of the wavelengths between 400 and 700 nm present. Not all light sources have continuous spectrums, and not all wavelengths within any spectrum are present in equal amounts. Sunlight has much more energy in the shorter wavelengths (blue, indigos, and violets), whereas filament light (e.g., the common incandescent household lamp) has more energy in the longer wavelengths (oranges and reds).
THE COLOR OF LIGHT
Our brains adapt to the colors and light that our eyes see. We tend not to notice the difference in the relative colors of light sources. The light in our homes at night seems to be the same color as light in our yards at noon. To an optical prism or an “objective” camera, the color of light in those two situations is very different. If we shoot indoors at night using household lamps with the video camera set up for daylight shooting, the video will look orange. If we shoot video outdoors with the video camera set up for indoor lighting, the video will look blue. We need to understand what color the video camera is set for and adjust it when the color of light for our shooting is different than the “default” setting. Thus, the understanding of light is crucial for us to create the end product with accurate colors that we desire.

FIGURE 10.1
Although the visible light band is narrow, within this band are differences in wavelength that determine the color of light. (Graphic courtesy of Manny Romero)
Primary Additive Colors
The color emitted by a light is referred to as its hue or tint. When all the wavelengths are combined, we get white light. But when only specific individual colors (frequencies) are combined, the result is yet another color. For example, combining a pure green and a pure red light produces yellow light. Within the visible spectrum, red, blue, and green are known as the primary additive colors. Combinations of these three colors in various ratios can be made to create all other visible colors. This gives a very basic explanation of why three-chip cameras divide the light coming through the lens into red, green, and blue. Mixtures of the information from these chips can be regenerated into the full-color image the camera is shooting. If these primary colors of light are combined in equal amounts, the result is white light.
Subtractive Primary Colors
The primary colors that an artist uses for painting are magenta (reddish blue), cyan (blue-green), and yellow. These three primary colors are called the subtractive primary colors. Mixing materials such as dyes or pigments of these colors will yield different results than mixing the colors of light. Mixing the three subtractive primary colors of magenta, cyan, and yellow paint together yields black, not white.
Color Temperature
Although our eyes generally perceive most light as being white, it generally is not, technically speaking. Although the additive properties of a light’s spectrum allow objects of any color to be perceived correctly once our eyes and brain have made the necessary adjustments, the amounts of each frequency in the spectrum may vary by quite a bit. Light sources with a predominance of higher frequencies (more energy) tend to be blue, and those with lower frequencies (lower energy) tend to be red. Thanks to Lord Kelvin (who first defined the absolute temperature scale in 1847), we have a very convenient way of quantifying the color of a light source. The thermometric scale he invented is used to measure the temperature of a light source in degrees of Kelvin (K). This measurement is known as the color temperature of the light. Low temperatures (around 2,000°K) are very red, and high temperatures (around 9,000°K) are very blue. (See Figure 10.2.)
Because all artificial light is created by heating or applying energy to a known material, such as a tungsten filament inside a light bulb, it is possible to predetermine the color temperature of that source.
Indeed, even the sun acts as a huge filament burning at a constant temperature. This consistency allows a videographer to judge with some certainty what color of light exists within any scene.
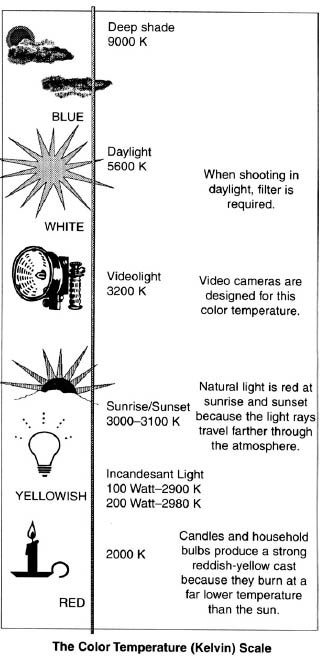
FIGURE 10.2
This represents how video cameras respond to different kinds of light. (Graphic by Manny Romero)
THE DIRECTION AND SIZE OF A LIGHT SOURCE
Two additional factors that determine the quality of light are its direction or angle to the subject and scene and the spectral quality or harshness of the light source. Again, our eyes tend to make up for a lot of the things the camera simply cannot do. Because we have two eyes, we see in “stereo,” creating three dimensions, so depth perception is generally not a problem. The camera, with one “eye,” does not. And, for the most part, we see details equally well in the shadows of a scene or face as we do in the areas that are lit. Again, the camera does not.
The Angle of Light
In the two-dimensional world of the TV screen, the only way we can perceive depth—the third dimension—is by the shadows present. The shadows or dark areas of the picture convey a multitude of information about the subject or scene. Shadows can let us see the texture of a surface. They can give us the time of day or even the season of the year. They can relate the mood of the situation. They can define the area of main interest within the frame. But above all, they define the space we are seeing.
With the source of light behind the camera and very close to the lens, a scene is almost without shadow. This look is referred to as flat lighting. It is hard to perceive depth, texture, or spatial relationships in the picture. As the light source moves away from the lens, we start to see how the shadows fall both on the objects creating them (attached shadows) and on their surroundings (unattached shadows).
These shadows are the chief determinant of the quality of light. When any great videographer refers to the quality of light, he or she is talking about the direction of the light or, more simply, the shadows created by it. Flat lighting, lighting with little or no shadows, of an area of a scene or a face within a scene may be desirable at times, but flat lighting an entire scene should be avoided. Later, we will discuss the manipulation and meaning of shadows in more depth, in the section on lighting styles and technique (part three of this chapter).
Hard and Soft Light
It is impossible to describe the quality of light without talking about both the shadow and its edge: the area of transition between what is lit and what is not. One simple factor determines the difference between hard and soft light: the size of the source in relationship to its distance from the subject. This factor is often referred to as a light’s ability to wrap. Hard light is created by very small sources of light as seen from the area being lit.
The sun is an excellent example of a hard source. It may be many times the size of the Earth, but because of its distance, it appears to us as a very small object. The shadows created by it on a cloudless day are razor sharp. As you look at your own shadow on the pavement, you see a perfect outline. Now, let a small cloud move in front of the sun. The sun is no longer—technically speaking—the light source: it is now the cloud. To us, the cloud is much larger than the sun. Now look at your shadow on the ground. It’s fuzzy and the shape is ill defined. We now have an example of a soft light source. That fuzzy nature of the shadow is the result of the light wrapping around the object (you). The source is larger than the subject—either wider or taller or both. That defines soft light.
Keep this distance relationship in mind as you go through the rest of the chapter, and certainly when you are on location setting up lights. Lighting instruments that are called soft lights are only soft at certain distances from the subject. A soft light set up 30 feet from the subject is not going to be nearly as soft (have as much wrap) as when that light is 10 feet from the subject.
THE QUANTITY OF LIGHT
Intensity
The intensity or amount of light has traditionally been measured in units of foot-candles (fc). One foot-candle is the amount of light given off by one candle, one foot away. Today, it is common to see the units of light quantity being expressed in lux. One lux is the amount of light at one meter from a candle. One foot-candle equals 10.764 lux. Because foot-candles are still the more common way of measuring light in this country, we will continue to use the term in this book. However, when you see a camera’s low-light performance ratings listed by its manufacturer, it will often be in lux (the Canon XH A1 lists 0.4 lux as minimum illumination, but this number is very low because the camera has a Low Lux/Night shooting mode), because most cameras are manufactured in countries that use the metric system.
Light Meters
Light meters are indispensable in film work but are rarely seen on a video shoot. This is because almost all video cameras come with auto-iris controls and many videographers adjust light based on what they see in the monitor or viewfinder. However, one way to judge your camera’s performance and your light placement is to measure it with an incidence light meter (one that measures the light falling on an object and not reflected from an object). Try all the different lights in your kit one by one and measure the foot-candles at various distances and angles to the light. You will quickly see how much light is given off and how the lights can be aimed or manipulated to put the desired amount in the desired place. You will also see how much light your camera needs to make a good picture. This experiment is particularly good for adjustable lights.
The meter can check the ASA rating (the speed) of your camera or show how many foot-candles it takes to get a good exposure at different f-stops. To do this, set up a gray scale in the light you wish to use. If you don’t have a gray scale, use a plain gray card of any form, or even a dull white one in its place. Zoom in the camera so the card fills the frame. Put the camera in auto-iris mode and read the f-stop off the lens. Now measure the amount of light falling on the card with the meter. Adjust the meter’s ASA setting until the amount of light measured gives the same f-stop that the camera shows. That will be the ASA rating for that camera when it’s on the filter you currently have dialed in. An advanced professional can use a light meter to light a scene without the camera present, to light by a certain formula (e.g., a key/fill/back ratio of 2:1:1) without a lot of trial and error, or to achieve a certain amount of light to work the lens at a specific f-stop (e.g., 200 fc on the subject requires an f8). The light meter can be invaluable in doing site surveys when looking at the quantities of available light.
The Inverse Square Law
A lamp placed near us gives off a certain amount of light. If the lamp is moved closer, there is more light; if the lamp is moved away, there is less light. The actual relationship between distance and illumination is often critical in location video work to achieve the desired quantity of light on a subject. This relationship is described by a law of physics known as the inverse square law, which states that the amount of light diminishes by a factor equal to the inverse square of the distance change. When the distance between a light and the subject is doubled, the amount of light falling on the subject is reduced to one-quarter of the original amount. As an example, if a light placed 10 feet from the subject produces 100 fc, moving it back to 20 feet away would result in the subject’s foot-candles being reduced to 25 (a distance change by a factor of 2; square that to get 4, and then invert it to get ¼, thus one-fourth the amount of light). If you move the light to only 5 feet from the subject, you would get 400 fc (a distance change factor of ½; square that to get ¼, and then invert it to get 4, or four times the amount of light).
This relationship is of particular importance when lighting subjects that move around within a scene, such as a walking stand-up by a reporter or other on-camera talent. As the subject moves closer to the camera, he or she is also moving closer to the light. If the light is already close to the subject, that distance might be cut in half during the walk. As we have just seen, that would increase the amount of light on the subject by four times from the start of the walk to the end of it. The result is not an aesthetically pleasing picture. One way to minimize this effect is to have the lights set as far as possible from the area of the walk. If the subject started at 50 feet from the light and moved to 40 feet from it, the multiplying ratio would only be 1.6 times the amount of light at 40 feet—a much better, and more acceptable, rate of change than four times the brightness. We’ll discuss other solutions to this problem later in this chapter.
Absorption and Reflection
Earlier, we talked about light’s ability to be absorbed and reflected by different colors. These characteristics now come into play when dealing with quantities of light. It is virtually impossible to light a black object. The more light you put on it, the more light is absorbed. What you will quickly notice in doing such an exercise is that it’s the reflected light that we really see. If the black object has a shiny surface, we’ll see the light’s glare. The object never gets any brighter as we add light, but the glare gets worse. The reverse is true for white objects. A small amount of added light shows up right away: it’s almost all being reflected by the surface and the white color.
These properties of light have to be considered when lighting a scene or subject. A dark wood-paneled room is going to require more light to give a good image than a room with white plaster walls. But there is more to absorption and reflection than just the color of the surface. Factors such as texture and the angle of the incoming light can change things dramatically.
Texture
A very smooth surface will reflect more of the light striking it than a rough surface. The light striking a very smooth surface is efficiently reflected back. As the surface of the object becomes rougher, more and more of the reflected light is restriking raised areas of that surface as it’s bouncing up from the recessed areas. The overall amount of reflected light is therefore greatly reduced. If you have a scene with red velour curtains and vinyl seats of the same tone of red, the seats are going to appear much brighter than the curtains. This is because the added texture of the velour is absorbing more of the light.
Angle of Incidence
Another law of physics that applies to lighting is the one governing reflection. As we learned earlier, light travels in straight lines, much like a bullet. As a beam of light strikes a surface, some of it is absorbed and turned into heat, and some is radiated back from the pigment of the surface revealing its color. Some of it is reflected in the form of what we called glare. The smoother the surface, the more glare you will get. Unlike the portion of the light coming back as the color of the object, glare is somewhat subjective as to where it comes from. A smooth surface acts like a mirror. The light striking it is reflected at a predictable angle. If the beam of light strikes the surface at an angle of 45 degrees measured from the surface in the direction of the light source, the beam will be reflected at a 45-degree angle to the surface measured from the opposite direction on the surface. Here is a rule of physics that will always help you with lighting: The angle of incidence (incoming light) is equal to the angle of reflection (outgoing light). (See Figure 10.3.)
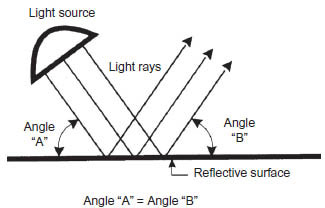
FIGURE 10.3
Light is reflected at a predictable angle.
This law of physics will come into play in almost every lighting setup you do. You may have placed the light in the perfect place to create the perfect shadows but discover that the surface of the object being lit is producing nothing but glare in the direction of the camera. What to do? By remembering the relationship of the light source and where the reflection will be visible, you can readjust whichever element is easiest to eliminate from the picture. In other words, move the light to send the reflection to a point other than at the lens, slightly change the position of the object, or move the camera location or height.
Glare can also work in your favor. Let’s go back to that black object we were trying to light earlier; let’s say it’s a statue of a black cat. By placing one light behind the statue, we can create a glare around the edges of it, giving it form and separating it from the rest of the picture. Now by placing a white surface such as an art card at the side of the statue, the card’s reflection on the surface of the cat will be seen by the camera. That reflection will show the contours of the statue. The cat will appear to be lit, but in reality it was all done with simple reflections.
To summarize, the quality of light is dependent on two things: color and shadow. Just as the video signal is divided into chrominance and luminance, light is also divided into its color and black-and-white elements. Color (quality of light) depends on which sources you use and what, if any, filter you place in front of them. Shadow (quantity of light) depends on the size of those light sources and where you place them. As you go about the job of dealing with light, you should always keep these two factors separated. Each must be dealt with in its own way.
PART TWO: CREATING LIGHT
LIGHT EMITTERS
Even though today’s cameras can shoot in nearly any type of light, not all light sources will produce the quality of light you desire. With an understanding of each type of light source, you will be better able to judge the performance of your camera, particularly when it comes to reproducing realistic colors.
The Sun
The single best source of light for portable video, the sun, is also the cheapest and, in many locations, the most readily available as well. The sun can be the hardest light source to manipulate, but usually helps make the subject’s skin tone appear natural. This is not surprising, because the sun is our natural supplier of light—the light by which we judge reality. Almost everyone has bought clothing in an artificially-lit store only to perceive its color quite differently in the sunlight. Mismatched sock wearers often realize the color disparity only after the sun reflects off the socks. Since the sun follows its own schedule, it is necessary to go to great lengths to control sunlight.
As Edison and other early filmmakers quickly discovered, the sun is a great source of illumination for making movies. Unfortunately, this cheap and easy source of natural light has some annoying qualities in addition to the beneficial ones. First, it is not always visible in the daytime. Clouds, smog, mist, trees, buildings, mountains, billboards, and even large people can prevent sunlight from reaching the subject of the video camera. Second, the sun changes position in the sky continuously throughout the day. As the sun moves, its color temperature changes. At early morning, the sun rising in the east strikes the subject in a scene at a low angle. Despite having a constant color temperature before it reaches Earth, sunlight displays varying color temperatures at different times of the day. In the morning, when the sun is low in the sky, its light must travel through a great deal of atmosphere to reach your position. The sun’s shorter wavelengths are absorbed faster than the long ones, thus leaving only the redder frequencies. If there are few pollutants or dust particles in the air, the sunrise will be a beautiful yellow or gold color. With dirty air, the rising sun first shows up as a red disc on the horizon, giving the scene a pink glow. By noon, the sun is shining almost straight down. The amount of atmosphere it is going through is considerably less. Midday light has regained those bluer frequencies to the point where they dominate. In early morning, sunlight measures about 3,500° to 4,500°K. Noontime sunlight is 5,600°K or higher, and in the late afternoon, the color temperature is similar to early morning (although often a bit lower), about 2,500° to 3,000°K. Sunsets are often more red than sunrises because of atmospheric changes created by the midday sunshine adding more moisture and dust to the air. This low-angle sunlight yields less light than the higher-angle sunlight characteristic of midday.
Color temperature changes occur throughout the day: You need to white balance every time anything changes, not only for time of day but also for such things as clear or cloudy skies. The same idea holds true for white balances in sun and shade. This is where many new videographers make mistakes. The temperature on a sunlit street may be 5,600°K, but in the deeply shaded courtyard of an apartment complex, the indirect daylight can be 6,500° to 7,500°K—very blue. Without correction, your video will be very blue, too. Many videographers prefer to balance their camera for 6,500°K and not change it as they go from full sun to full shade. Color reproduction in the shade will read true and the colors in full sun will appear slightly warm or orange, which can be good for skin tones and take some of the coldness or blue tint out of direct sunlight on the subject.
Because of differences in the angle of the sun and the quality of light at different times of the day, when more than one shot is required to complete a particular scene, it is best to shoot the scene at the same time of day with similar amounts of cloudiness. Many directors of TV commercials favor the early morning light (one hour after sunrise) because of its golden glow, and will shoot an entire commercial with that type of light. Other directors and videographers prefer the last hour before sunset (both are referred to as the golden hour). This may require several shoots at that location on successive days. Some videographers attempt to manipulate the overall light appearance by performing the white balance procedure while the camera is aimed at a light blue card. This procedure tends to give the video that golden hue. The color of the scene can also be manipulated by filters on the lens, just as in film photography. Despite the fact that early morning and late afternoon color temperatures are lower in degrees Kelvin, it is incorrect to call the reddish-orange color at 3,000°K cooler than the noontime blue of 5,600°K. Although videographers refer to blue and green as cooler colors, and gold, red, yellow, and pink as warmer, the technical concept of color temperature needs to be separated from the emotional response to colors. The term warm light refers to a cool-color temperature or a slight pink or golden look. Cool light refers to a warm-color temperature or a slight bluish look.
Traditional standards of photography contend that sunlight reflected off objects yields the most natural (and hence most eye-pleasing) light. Therefore, objects or subjects need to be placed in such a way that sunlight is reflected from the objects into the lens. This can be accomplished most easily by positioning the camera between the sun and what is to be shot. If the subject is between the camera and the sun, there are two possible results: a strongly backlit shot or direct sunlight shining into the lens. Both effects can be undesirable if handled incorrectly by a novice camera operator; however, as we’ll see later, they can be used to great advantage by a skilled operator.
Artificial Light
There are three broad categories of household or office artificial light sources: incandescent, fluorescent, and diode or LED. While most modern video cameras can white balance for these types of sources, they are inconsistent in color temperature and therefore unreliable to a professional video maker. Light from typical house lamps is usually too dim and, like the fluorescents, not the best color for video shooting. The light from typical office ceiling fluorescents is highly diffused but “top heavy.” It eliminates the shadows necessary to give subjects the appearance of depth, leaving only the shadows of the eye socket on a subject—not a flattering appearance. Also, fluorescents give off colored light that cause subjects to appear greenish or unnatural. Household LED lights can be of many colors. For these reasons, common (household and office) artificial lights are usually avoided by video professionals.
Today’s low-light cameras allow the videographer to shoot almost anywhere without the need for additional lighting, but they still do not satisfy some of the basic needs of high-quality photography. When a news videographer can shoot a news story with available light it is a major blessing, because it saves time and gives a natural look to the shots. In EFP, videographers are helped by using natural light, but professional videographers want to have very precise control over the light on their subjects. We come back to the definition of photography: manipulating light, shadow, and color to achieve a specific artistic or editorial result. Professional video practitioners use specially designed lights that give a better color temperature for more natural skin tones (either 3,200° or 5,600°K) and enable them to have control over light quality and intensity.
Incandescents
Household incandescent lights, which are rapidly becoming obsolete, make use of a filament, usually made of tungsten, to create the light. Whereas it is easy to measure the temperature of the light coming off a known material, other factors can greatly change the ultimate color of the light. For example, older household incandescent bulbs give off light that is about 2,800°K. Because these bulbs are manufactured by many different companies using varying designs, these bulbs vary greatly in their color temperature. As the atoms of tungsten are given off when the filament is heated, they stick to the inside of the glass bulb. Over time the glass darkens and the color temperature drops. Other factors, such as whether the glass bulb is clear, frosted, or tinted, can change an incandescent lamp’s color.
Tungsten/Quartz
Professional tungsten, halogen, or quartz lights are the most common light sources used in video production. Although they use a tungsten filament within a halogen-filled sealed quartz globe to produce light, these professional lights are quite different from common household light bulbs. They are often simply called tungstens. In video production, tungsten, quartz, or halogen all refer to the same type of light. Tungsten filaments give off a very constant 3,200°K over their life span, which may only be around 75 hours of use. Most tungsten bulbs are used in some sort of housing that enables the user to control the light. (See Figure 10.4.)
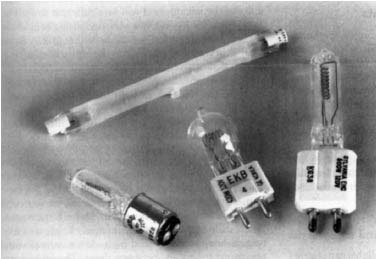
FIGURE 10.4
Some common tungsten bulbs used for video lights.
One form of the tungsten bulb comes with its own reflector and focusing lens. This type is called a parabolic aluminized reflector (PAR). It is often referred to as a sealed beam light. Unlike the bare-bulb tungsten lights, PAR lights can come in different color temperatures, such as daylight (called a PAR 64), for use outdoors.
Lamps
The bulbs used for professional lighting are often referred to as lamps or globes. They come in a variety of shapes and sizes; they can be 110, 220, 30, or even 12 volts, and the globe can be clear or frosted. They are usually described by a three-letter code such as DYS, which refers to a 600-watt, 120-volt bulb with a particular connecting pin configuration.
Lamp handling requires a note of caution. Lamps become extremely hot during use and remain hot for some time after operation. They should not be handled when hot; not only can they cause severe burns, but the lamps are also extremely fragile when hot and that causes the filaments to break easily. Lamp handling, even after a cool-down period, must be done with care. Handling a lamp with bare hands can leave a slight oil deposit on the quartz glass that will hasten the lamp’s burnout. The area of glass that was touched can be weakened, leading to a possible bulb explosion when the lamp is turned on. If lamps must be handled, do so with cloth or plastic gloves, but only when the lamp is cool. It is wise to carry some heat-proof gloves in your lighting kit to avoid any possibility of burns or lamp-glass contamination from the oil on your skin. Some companies will supply you with small plier-type tongs designed for lamp removal and installation.
Always carry spare bulbs with you on a location shoot. Every light kit should have them. Even though most lamps are rated for about 75 hours of use, a burned-out lamp after fewer hours is not uncommon—often occurring in the middle of a story or production shoot. Make sure the replacement lamp is designed and rated for the housing into which you are putting it. If you replace a burned-out lamp with one that has a higher wattage rating, you may damage the housing or even start a fire. Using a replacement lamp with a lower voltage rating than is required can cause a nearly instantaneous burnout of the new lamp.
Fluorescents
Fluorescent bulbs, part of a larger group of lighting devices called gas discharge lamps, give off light by electrifying a metal vapor inside a glass tube. Contacts at each end of the tube allow electricity to flow through the gas, causing it to glow. Much like filament lights, many differences exist between consumer tubes and those used in film and TV production. A consumer-grade tube’s color temperature may vary from brand to brand, but most are around 4,200°K. The real problem with fluorescent lights is their spectrum. Unlike the smooth mix of frequencies from a filament bulb, fluorescent tubes often have a higher degree (a spike) of green in their output and can actually be missing some frequencies altogether. While our eyes compensate for this, the camera does not. Video shot with fluorescents can give a very ghastly green pallor to the skin tones. White balancing may not fully compensate for this effect because of the missing hues and large amount of green in the light. Professional tubes compensate for this and can come in either 3,200° or 5,600°K, which will match the professional tungsten lights or daylight, respectively. The consumer versions of these lamps are called warm white (about 3,200°K), cool white (about 5,600°K), and daylight (about 6,500°K). If you’re doing quite a bit of shooting in a space that has fluorescent fixtures, you may want to change the bulbs to one of the color-correct types. (See Figure 10.5.)
Color-Correcting Fluorescents
Because the typical fluorescents found in the home and office can vary greatly in color temperature, great lengths are taken to avoid them or correct them in color-critical productions. Professional lighting handbooks have long charts and tables to deal with the wide variety of these lamps in correcting them to different film stocks. There are specially designed filters called minus green gels that can be put over fluorescent bulbs to reduce the green spike in their spectrum. A plus green filter can be placed over tungsten lights that, when used with a matching lens filter, allow the camera to compensate for the added green of the fluorescent light.
Light-Emitting Diodes
Light-emitting diodes (LED) have been around for a long time in watches, clocks, and many types of household electronic equipment. In the past five years, many LED lights have been brought to the professional video marketplace for use in professional video lighting. (See Figure 10.6.) These lights are an array of many individual LEDs placed together to give a soft light from a housing that can vary in shape and size. These lights do not create much heat, use a small amount of electricity for power, and have a long lifetime. The main disadvantage of professional LED lights is that they are expensive.
Mixed Light
Situations with mixed sources of light can cause problems. Imagine the face of a subject whose right side is lit by a tungsten-halogen lamp and whose left side is lit by a fluorescent bulb. If the camera is set for 3,200°K, the right side would look normal and the left side could be a sickly greenish blue. Video cameras compensate for only one color temperature at a time, so it is best to avoid mixed lighting situations. In the previous example, it would be best to turn off the fluorescent and add tungsten-halogen light to the left side of the face. This may not always be possible, however, because some lights must stay on to prevent disruption of others (e.g., shooting at just one desk in a large office workspace).
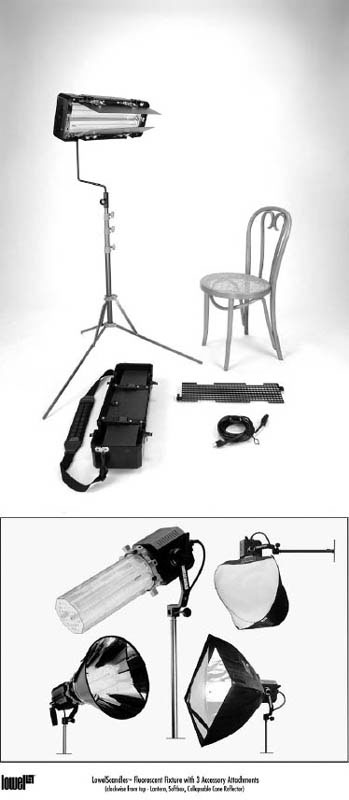
FIGURE 10.5
The top picture shows a small fluorescents kit for field use. The lower picture shows a fluorescent that can be used with a variety reflectors to guide the light.
The biggest advantage of modern video cameras regarding color temperature is that they white balance under any light if the lights are evenly blended. As long as the scene has a consistently even mix of any number of light sources that are within a limited range, the picture should be close to the true colors. When the mix changes because the distance from any of the light sources varies, the ratio of relative intensities changes, such as when the subject moves closer to the windows in a fluorescent-lit room. Mixed-light white balancing works best when each light source is about the same intensity and close in relative color temperature. It is hard to mix tungsten and daylight (3,200° and 5,600°K), but tungsten and household incandescent or fluorescent are much closer in temperature (3,200° and 2,800°K or 4,400°K). In our earlier example of the face, a possible solution would be to aim the tungsten light on the front of the face. Although fluorescent light would still be mixed in, the resulting white balance would reveal fairly true colors. The background will be a different story. The face would look good, but someone sitting behind the subject at another desk would have that green cast to their skin tone and possibly to the entire background of the scene as well. One trick is to use as little tungsten light as possible on the subject, thereby reflecting more of the fluorescent light in the white balance. The tungsten is just enough to give some red hues to the skin and minimize the greens without throwing the background too far out of color balance.
Carbon Arcs
The most famous light in Hollywood is the big carbon arc light, which has been used on movie sets ever since filmmaking was invented. These large round lights, called studio arcs, are intensely bright and use two carbon electrodes and high, direct current voltage to create an arc between them. The important word here is large. The arc lights still used today are very big in size and weight and produce not only large amounts of light but also large amounts of heat. They are mostly used outdoors in movie productions and seldom used in video production.
Hydrargyum Medium Arc-Length Iodide Lamp
Another type of arc lamp uses alternating current instead of direct current. The most common arc of this type is the hydrargyum medium arc-length iodide (HMI) lamp. The light is created by a mercury arc between two tungsten electrodes sealed in a glass bulb or globe. HMIs are a daylight temperature light. As they age, the temperature tends to decrease, however. A new light may be as high as 6,000°K, but a very old bulb may be as low as 4,800°K. HMI lights have been very popular in both filmmaking and video as well. Unlike tungsten lights, there is much more involved in HMI operation. (See Figure 10.7.)
HMI lights take a very large amount of power to start the arc in the bulb, up to 60,000 volts for the one-second starting surge. After the surge, it takes about one minute for the light to come up to operating strength and color temperature. HMIs operate using a 220-volt AC circuit and require a ballast not only for the starting surge but to regulate the voltage to the lamp. Each light runs at a specific voltage, and no two bulbs operate at the exact same voltage. The ballast for most small HMIs, such as the kind you would use for a video production, runs on a normal 110- to 120-volt power supply and increases the voltage to 220. Even though HMI lights can be small enough to use on top of the camera, the ballast must be attached to the light, usually by a cable. Some mini-HMIs are available with built-in ballasts and can be powered by the camera’s battery just like a normal tungsten camera light.
Ballast comes in two forms, magnetic and electronic. The older magnetic styles are very heavy and bulky, even for a small 200-watt HMI. The more modern electronic solid-state ballasts are very lightweight and compact but still make the smallest HMIs more space consuming than tungsten lights.
HMI lights have many advantages. Because the light is at sunlight temperatures, color perception is at its best. They come in sizes ranging from 28 to 12,000 watts. You get much more light from an HMI lamp than from a tungsten lamp of the same wattage—roughly five times as much, in fact. A 1,200-watt HMI puts out the equivalent of 6,000 watts of incandescent light in a similar fixture. The lights may cost more to buy, but they are cheaper to run per foot-candle of light output, a major consideration if only a limited amount of power is available. HMIs also come in a DC-battery version for portable use. HMIs come in almost any type of housing, so there are few situations where they cannot be used.

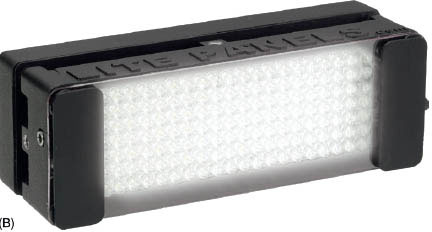
FIGURE 10.6
(A) This one-foot-square LED panel gives even light without generating heat. (B) This small LED light panel can be placed on the camera or close to the subject for an even, soft light.
Industrial High-Intensity Discharge Lamp
High-intensity discharge (HID) refers to another type of arc discharge that produces light through vapor or gas pressure in a glass globe. The three most common types of HIDs are mercury vapor, metal halide, and sodium vapor. For video use, the metal halide is the only one of interest. Metal halide lights are used in sports stadiums, parks, airports, and malls to light large areas at night. The color temperature is closest to daylight and similar to HMIs. Metal halides tend to be yellow-green, but the camera can be easily white balanced in their light. The other two types of HIDs are used primarily for industrial night lighting or city street lighting rather than video work because it is difficult to get a good white balance using them.
Advantages and Disadvantages of Artificial Light
Artificial light is, for the most part, a necessary evil in portable video. There are many disadvantages to using artificial lights:
• Expense
• Weight and size
• AC power requirements necessitating extension cords
• Excess heat
• Artificiality or sickliness of subject’s appearance if the subject is not properly placed and the camera is not white balanced
• Artificial light draws lots of current and can blow fuses or trip circuit breakers
This might seem like enough reasons to justify leaving the light kits in the studio, but there is one compelling reason to bring them: if you do not, you will miss quite a few important shots. Even today’s video cameras are not sensitive or accurate enough to allow us to always use available light.
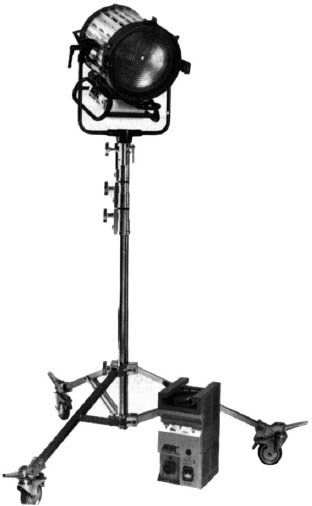
FIGURE 10.7
HMI light. (Courtesy of Arriflex Corp.)
There are also more subtle reasons for using artificial light:
• You must often add light to maintain a realistic appearance; existing light may create an unrealistic appearance on the camera, and you must compensate with added light to make the subject appear more normal on video.
• The existing light may be undesirable: too harsh in some areas, too dim in others. Added light can give the proper balance.
• Added light can enhance the shot aesthetically. You can highlight important visual elements and deemphasize the less important ones.
• You may sometimes want to create an artificial environment to achieve the mood of the story. This is particularly true in EFP work, especially when making commercials or dramatic presentations. Though less common in ENG, recreating the environment with the addition of artificial light is an accepted practice.
In many shooting situations, the light kit helps the portable video camera operator achieve proper exposure and maintain the necessary control over the environment. Artificial lights are tools that a good ENG or EFP practitioner uses to help get the shot that will make the video piece a professional product both for exposure and for creative reasons.
LIGHTING EQUIPMENT
Lighting equipment comes in three categories: housings, mounts, and modulators.
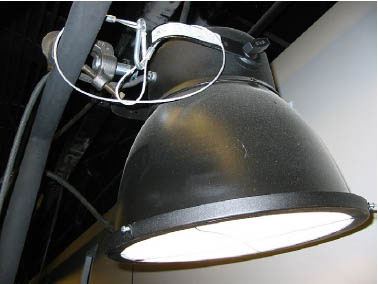
FIGURE 10.8
Scoop light.
Light Housings
To gain control over artificial light sources, the bulb must be housed in something more than a simple socket. The light housing or fixture provides the primary control over how the light reaches the subject or scene. The housing can direct, focus, or limit the illumination coming from the bulb. The housing can also dissipate the heat a bulb produces. Almost every year, new and improved housings are developed. The lights available in 1980 seem old and outdated when compared with the lights available in 2012. Like cameras and video recording devices, lighting equipment changes with new designs and improvements. On the other hand, the basics have not changed in decades. A light made in 1950 still has plenty of uses in today’s digital video world. This is another reason that lighting equipment is the best investment you can make: it simply never loses its usefulness despite all the new designs entering the marketplace.
Light housings fall into two broad categories: floods and spots. Although dozens of variations exist within these two groups, a few simple types usually account for most lights available in a typical video production.
FLOODLIGHTS
Floodlights are simple lights that provide even illumination of wide areas. The flood’s primary use is to provide overall illumination for a scene or to fill shadows created by other lights. The housings are simple, with little means of controlling the light.
Scoops (See Figure 10.8.) As its name implies, the scoop is simply a large metal bowl, 8 to 18 inches in diameter, with a bulb in the bottom of it. Because of its size, although it weighs practically nothing, a scoop is mostly used in studios. The lights just take up too much space in a vehicle and on location. However, they are cheap. You can get the type that has a traditional screw-in socket, the same as a household socket, and use photoflood bulbs purchased online or at a camera store. These bulbs come in 3,200° and 5,600°K colors and up to 500 watts in power.
Broads Broad lights have a small reflector behind a linear-filament (or tubular) bulb. (See Figure 10.9.) They are usually between 250 and 1,000 watts. Broads are easier to control than scoops. Most have small barn doors to regulate the light spread. The light from a broad is fairly hard, producing well-defined but low-density shadows. Because of their small size, broads can be easily placed anywhere in a room as long as there is no danger of heat damage to the surroundings. Small broads are often called nook lights and are used to light backgrounds.
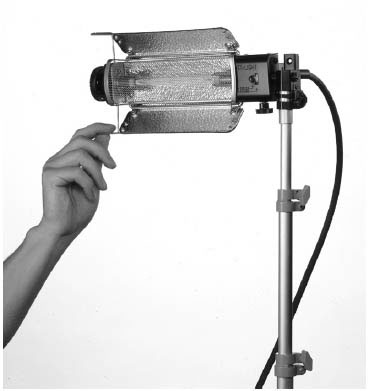
FIGURE 10.9
Small broad light with barn doors.
Floodlight Bank This light is made up of several lights in a rectangular housing. The overlapping of the lights creates the soft effect of a floodlight. Sometimes called modules, they can contain from 4 to 12 lamps, usually laid out in banks that can be switched on individually. They are also referred to by the number of lights in the module, such as a ninelight. Only small versions of this type of light are used in most location video productions, because the size and power requirements are too great for small-scale location shooting.
SPOTLIGHTS
Spotlights are used to light specific areas of a scene. These lights can be easily controlled and focused. Traditionally, the main source of illumination in most scenes is provided by a spotlight of some sort. The sun is the best example of a spotlight. The opposite of floodlights, spots use a very compact source of illumination to produce well-defined, dense shadows. A spot is made up of a small bulb and some form of parabolic-shaped reflector to concentrate the radiant light into a direct beam.
Open-Face Spot The open-face spot is the most commonly used light in all of video production, because it is the most economical and efficient light to use. (See Figure 10.10.) Almost all open-face spots have the ability to focus from a spot position (called “pinned”) to a flood position. The focus ability is accomplished by moving the bulb closer to the internal reflector (flood position) or away from the reflector (spot position). This takes the bulb into and out of the reflector’s parabolic focal point. While the flood position is not as even and uniform as that of a broad or other floodlight, this housing allows most users to get double duty from one light housing. The disadvantage of this type of light is the quality of its light pattern. The light beam is uneven in intensity, and the lack of a focusing lens can prevent getting distinct, hard-edge shadows. For most work in EFP and almost all work in ENG, these drawbacks are minimal.
Fresnel Spot The Fresnel spot (pronounced fre-nell) (see Figure 10.11) can also be adjusted from spot to flood like the open-face lights. But it differs from the open-face light in two ways: a Fresnel has a glass lens at the front through which the light passes, and has a different method of focusing the light. Unlike the open-face light, the Fresnel light moves the bulb and reflector closer or further from the lens as a single unit. A Fresnel also yields a much narrower spot (around 10°). The focus of the lens gives shadows a hard, well-defined edge but leaves a soft outer edge of the overall beam, so that the blending of several lights to cover a large area is possible without unevenly lit spaces. Fresnels come in tungsten and HMI sources and range from 100 to 10,000 watts. The one disadvantage is the loss of light because of the lens. A 1,000-watt Fresnel only puts out the light equivalent of a 650-watt open-face light. However, this system is designed for maximum light control.
Ellipsoidal Spot The ellipsoidal spot (sometimes called a focal spot) is the most specialized in its application. Here, the lens moves back and forth in front of a fixed bulb and its ellipsoid-shaded reflector to focus the edges of the light pattern on a particular surface. The light is intense and directional. Often stencils (called gobo patterns) are inserted in the light housing to throw a well-defined shadow (e.g., those created by venetian blinds, prison bars, or tree limbs) on the surface of a wall. (See Figure 10.12.) Generally, this type of light is too expensive, big, and limiting to use for portable video. It is usually used in theater productions and dramatic applications in the studio, but if you have the time and budget, it can add greatly to the look of your field productions.
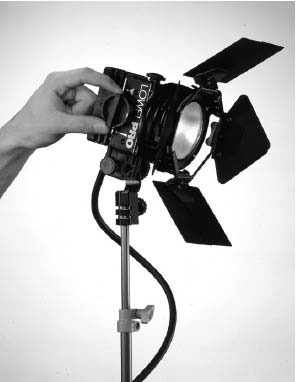
FIGURE 10.10
A Lowel Pro light. The dial allows the open-face light to be focused.
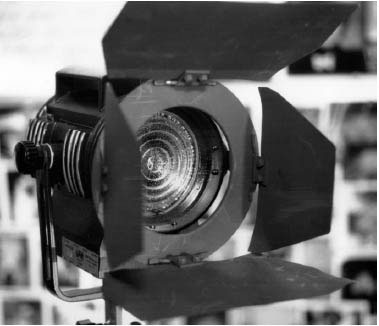
FIGURE 10.11
An LTM Pepper light with a Fresnel lens and barndoors.
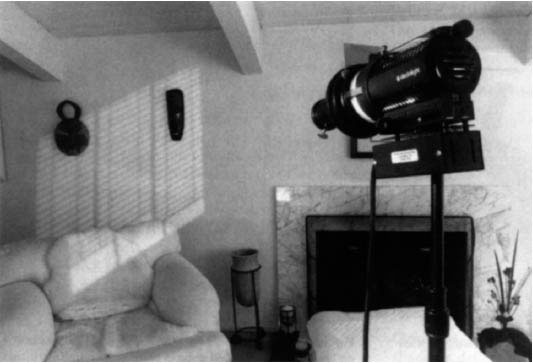
FIGURE 10.12
A Dedo light with projection lens. The window-blind pattern or gobo gives the effect of sunlight coming through a window.
Several companies make projection lenses that attach to Fresnel-type lights making them an ellipsoidal spot. This relatively inexpensive solution can add greatly to the production values of any shoot by allowing the videographer to project symbolic patterns on surfaces.
Mounts
Most TV studios have a system of crosshatched pipes suspended from the ceiling called a lighting grid on which lights are hung. Lights designed for studio use ordinarily have a C-clamp for this application. In the field, lights are most often attached to tripod stands, some of which have small wheels to allow for easy repositioning. Lights made for stands have receptacles that fit over the standard ⅝-inch stud on the top of tripod stands called kit stands (compact) or baby stands (heavy duty). Larger lights, like many HMIs, have a 1 ⅛-inch stud on the light and slip into a receptacle at the top of large stands called rollers, juniors, or combos.
Gaffer Grip Small lights are more flexible than large lights to mount, since their weight does not require a sturdy tripod. Small lights, such as open-face spotlights, are often attached to poles, cameras, or kit stands, or on items like shelves and bookcases by means of a large clamp called a gaffer grip. (See Figure 10.13.) Some companies offer wide varieties of clamps, mounts, and special poles for securing lights in the field.
Grip Arm There are many variations of this device in lighting. A standard grip arm is a metal rod that attaches to a stand by means of a grip head and is used to hold other light modifiers. These arms can be of various lengths and flexible instead of rigid. (See Figure 10.14.)
If you have ever seen a production lighting crew at work, or even a network news crew, you would have seen a box containing a multitude of clamps and other devices made to mount lights and accessories in just about any fashion anywhere. It’s called a grip kit. Such things as C-clamps, pipe clamps, door brackets, furniture clamps, vice grips, putty knives, and more, all with the standard ⅝-inch stud attached, can be found in the box. (See Figure 10.15.) A good location crew—even if that’s just you—should be able to set up lights using something other than the standard kit stands. In a room where the camera may be panning 360°, or there are too many toddlers running about, you may need to mount the lights out of the camera’s view and harm’s way using the furniture or other stationary objects as stands.
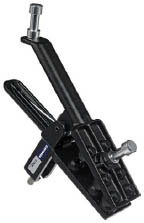
FIGURE 10.13
An alligator gaffer clamp.
In a situation in which there are excess crew members, it may be possible to have a crew member, or grip, hold a light for you while you are shooting. It is not recommended, because the lights get hot and the holder often cannot hold the light steady, but if all else fails, have a crew member don the heatproof gloves, avoid puddles of water, and stand as still as possible.
Gaffer Tape The most popular item to have in a grip kit is gaffer tape. Lights (if you’re careful) and grip equipment can sometimes be taped to poles, trees, or equipment cases with gaffer tape. Gaffer tape is usually silver or black (preferred) and, although it is sometimes referred to as duct tape, it is not the same thing. Gaffer tape is expensive and has a cloth backing, and while it has good bonding strength, it is much easier to remove than duct tape. Gaffer tape is strong, but not nearly as reliable as the gaffer grip. Exercise a considerable amount of caution when using tape to mount lights. Do not forget that lights generate heat on all sides. They can scorch paint and material and can cause a fire. Falling lights break and often explode. If you stick tape to anything, you’d better be able to remove it without removing part of what it’s stuck to. Good tape may stick too well to most surfaces. Removing it may also remove paint, wallpaper, floor tiles, or even wood veneer. Removal may leave tape gum deposits on the surface. The owners of the property may not take kindly to your ruining their decor.
Modulators
Although some lights have built-in adjustments to allow for focusing the light beam, many that are used for field production do not. When using remote lighting, you must have control over both the amount and size of the light beam. You must also control where the light does and does not fall on the scene you are lighting. In addition to selecting the appropriate fixture for size and function, you must often use additional equipment to maximize light control.
Shaping the Beam
Barndoors The barndoors are rectangular pieces of metal (both two- and four-door) with hinges and are attached to the front of lights to direct the light beam more selectively. Barndoors give you control to prevent light from falling on areas that do not require it or areas that simply should remain in shadow.
Snoots Shaped like a tube or coffee can, a snoot contains the light beam in a narrow, circular pattern. Barndoors can be added to the front of the snoot to further control or shape the light. They are useful for lighting very selected areas far from the light itself.
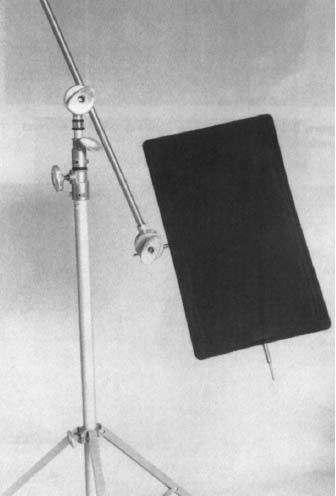
FIGURE 10.14
A grip head and arm attached to a light stand and holding a flag or solid gobo in place.
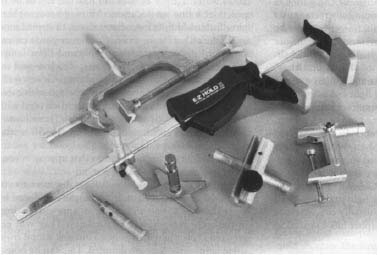
FIGURE 10.15
Just some of the many clamping devices or “grips” used to attach lights to almost anything.
Gobos The gobos are similar to barndoors in that they shade or deflect light away from areas that should not be lit. The most popular form of gobos is called a solid or flag. They are commonly rectangular pieces of metal or black cloth in a frame that may be attached to a light mount such as a stand with the use of a grip arm. They are not attached to the light itself. Gobos come in a wide variety of shapes and sizes. Small round ones are called dots and targets and are used to shade areas within the light-beam’s pattern instead of at the edges. Narrow ones are called cutters, fingers, and sticks; these are used when a long, thin shadow is needed in the scene. As they increase to a size big enough to control large light sources such as windows, they are referred to as teasers. They are also referred to by where they are placed, such as toppers, bottomers, and siders. Gobos or flags are the most effective way of controlling light in the cramped spaces of location shooting, but they usually require more time to set up than the videographer has to spend in ENG situations. A thick black aluminum foil, known as black wrap, is also used to shape light by deflection.
Shaping the Quantity
Dimmers In the TV studio, lights can be dimmed by use of faders (lighting controls that electronically reduce light output), but those are rare in most ENG and EFP situations. Some manufacturers make field faders or dimmers that work with lights up to about 1,000 watts. Larger devices are just too big to be of practical value on location. Many videographers have fashioned their own dimmers out of items found at the local hardware store. Consumer-grade extension cord dimmers made for table and floor lamps can handle lights up to 300 watts, which would include many lights used in location lighting. Other wall-mounted household dimmers can be wired with cable and made to work as a dimmable extension cord, with careful attention to safety standards. These homemade dimmers can handle lights up to 500 watts. Carrying consumer dimmers is also good for reducing the output of any table lamps that appear in your shots, which are often too bright.
A word of caution about using dimmers to cut down the amount of light: If the output is reduced by more than 20 percent, you will notice an appreciable drop in the color temperature of the light; they will get very red. You might also notice a buzzing sound from some lights after they are dimmed. This can be objectionable if the mic picks up the sound. Also, standard dimmers designed for incandescent lights do not work on fluorescents or HMI lights, although many HMI lights have built-in dimmers.
Scrims A wire-mesh screen called a scrim can be used on the front of a light to effectively reduce the amount of light from that instrument. (See Figure 10.16.)
Scrims come in predictable strengths labeled single (cuts the light by one-half stop) and double (cuts one stop). They also come as full and half. The full covers the entire light and the half just half the light. The half is used to even out the amount of light falling on surfaces that are at an angle to the light. If you wish to throw a slash of light across the wall in the background of a shot, and the only place for the light to be placed is off to the side of the room, you line up the light to form the slash. However, the part of the slash closest to the light is a lot brighter. To even it out you need to position a half scrim over the light with the wire mesh on the side of the light closest to the wall. You have reduced the closest half of the beam, now leaving the entire slash of an even intensity across the wall.
Screens and Nets Similar to scrims, screens and nets (both refer to the same item) are used out in front of the lights, as opposed to attaching onto them. Made of either metal or fabric mesh, they also come in full and double strengths (again, one-half and one stop, respectively). They are either square or rectangular and usually held in frames, with the smaller ones being open ended or held in a three-sided frame. This reduces the chance of seeing the shadow of the frame when it only partially covers a light. Like gobos, nets are held in place by grip arms or similar means.
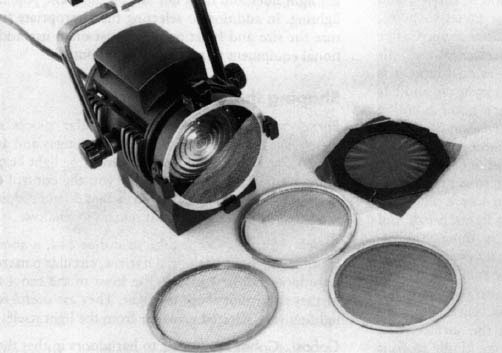
FIGURE 10.16
A Pepper light with scrims and a gel holder. A half double scrim is on the light.
Neutral Density One way to reduce the amount of light coming from a fixture is to place a neutral density (ND) gel in front of the light. This grayish gel is calibrated to know exactly how much light each one is cutting. The three most popular grades are referred to as N3, N6, and N9. N3 (½ ND) allows a 50 percent transmission of light, which is a one-stop reduction. N6 (¼ ND) has only a 25 percent transmission, or two stops less light. And N9 (⅛ ND) has a 12.5 percent transmission, or three stops less light.
These gels do not diffuse or change the color of the light in any way. ND gel also comes in large sheets and rolls for covering windows in rooms or cars to reduce the light coming through those windows and to match interior light levels. ND gel can also be combined with color-correcting gel to match interior light temperatures as well.
Shaping the Quality
One of the quickest and easiest ways to increase the quality of light is, as we learned earlier, by increasing the size of the source. There are many ways of doing that.
Umbrella Lighting The most common way to produce a very soft-quality light is to attach an umbrella to it. Umbrellas are a must in any portable lighting kit. They are attached to the light housing so that the light is aimed directly into the umbrella. (See Figure 10.17.) The light housing is aimed away from the subject, but the shiny underside of the umbrella reflects the light onto the subject.
Broad lights make the best umbrella sources, but spotlights in a flooded position can be used. The reflective surface then returns the light past the housing and onto the subject. Umbrellas are made with silver reflective surfaces to bounce the light, but some are made of silk so the user may face the umbrella in either direction to get reflected light or diffused direct light. Others have a blue reflective surface to turn tungsten light into a daylight color.
Soft Boxes Several companies make boxes that cover almost any light fixture. They have a diffusion material over the front of them to soften and increase the size of the source. Generally referred to as soft boxes, these tools are very common in both the film and video industries. (Figure 10.18.) Their design allows them to be more easily controlled than other forms of soft light by attaching baffles (rigid material attached to the front sides of the box that help shape the light beam) and egg crates or louvers (a grid of material placed over the front of the diffusion surface that contains the spread of the light by forming the beam into a shaft of light).
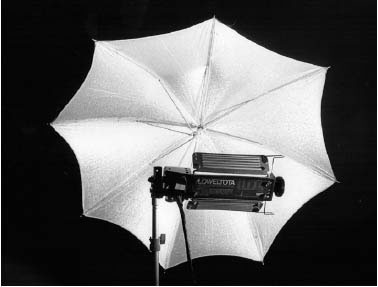
FIGURE 10.17
Broad light with an umbrella.
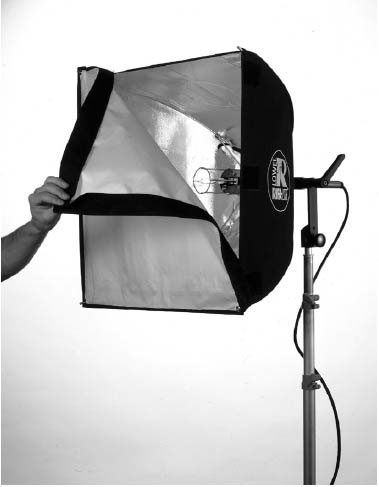
FIGURE 10.18
The Lowel Rifa light comes with a soft box to diffuse light.
The next position for diffusion is just in front of the light. By stretching diffusion material over the front of the open barn doors, or on a small frame made to fit close to the light, the effective source can be made larger still. But with this arrangement, it is harder to contain the light’s beam. Remember, too, that anything that comes in contact with a light must be made of fireproof material. (Figure 10.19.)
The actual diffusion material is usually some type of flameproof gel, spun glass, or frosted glass. Frosted glass is usually placed over the opening of the light housing. Its use is limited in field production because of its breakable nature. Several companies make a multitude of diffusion materials. Don’t be fooled by some of the names, such as tracing paper, soft frost, and shower curtain. These products are designed to be used with hot lights. Do not use homemade or nonprofessional materials anywhere near a light. Some of the most popular materials are opal, tough frost, tough spun (spun glass), 216, and brushed silk. Competing companies can have different names for the same material.
Silks and Butterflies Just like the cloud over the sun, the further out front the diffusion material is from the source, the more diffused the light. Silks have the same type of frames used by nets and gobos, either three- or four-sided. Silks are a very white silk material that passes light at a known rate. A full silk transmits 50 percent of the light. They also come in half, quarter, and eighth strengths. When the size of a silk becomes larger than a 4-foot square, the silk is usually called a butterfly (6-foot square) or overhead (12-foot square or more). These larger sizes need to be attached to more than one stand and, if used outdoors, carefully weighted to avoid wind gusts blowing them over. (Figure 10.20.)
Reflectors Unlike flags, reflectors have a light-colored surface that reflects light into desired areas rather than blocking it from certain areas. Reflectors can be stiff boards, metal, or even light-colored cloth, and can come in sizes ranging from a six-inch square to panels six-feet square. Far and away the most popular form of the reflector is the circular flex-type cloth using a highly reflective silver material on one side and a bright white material on the other. These reflectors can be mounted, but are generally handheld by the cameraperson or other crew members and are usually used to reflect light onto nonmoving subjects, such as a reporter appearing on camera. No lighting kit should be without this inexpensive but invaluable tool. (See Figure 10.21.)
White Cards One of the simplest forms of bounced light comes from the common picture-mounting material called foamcore. This is a thin layer of Styrofoam sandwiched between two layers of very white, heavy paper to form rigid cards in sizes ranging from a couple of feet square to 6 × 8-foot sheets. These inexpensive cards can be cut to size, mounted by almost any means because they weigh very little, and used to reflect any light source from tungsten to the sun.
Walls and Ceilings Finding material to bounce light off is easy to find. Start by looking around the room you will be shooting in. Because white is the most popular color for most walls and ceilings in both homes and offices, they make good bounce surfaces. Of course, any surface can be used to reflect light to some degree. The one word of caution is to be conscious of the color of the surface. A light blue wall will reflect that blue onto the subject. Try to always use just white surfaces, and always remember to white balance for that bounced light because it will not be the same temperature as the direct light.
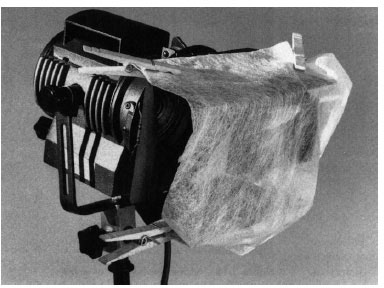
FIGURE 10.19
Spun glass can be stretched across the front of a light and held in place by clothespins to create a diffused light source.
Shaping the Color Quality
In addition to changing the amount of light that comes from an instrument, we can also manipulate the color of light by placing a colored, heat-proof, cellophane-like material over the front of the lighting instrument. This modulator is called a gel and is common in EFP work. Many lights have gel frames that attach to the housing. Color gels can be divided into two categories: color correction and color elimination. The most common correction gel used in video production is the daylight blue, which converts tungsten light to a daylight temperature.
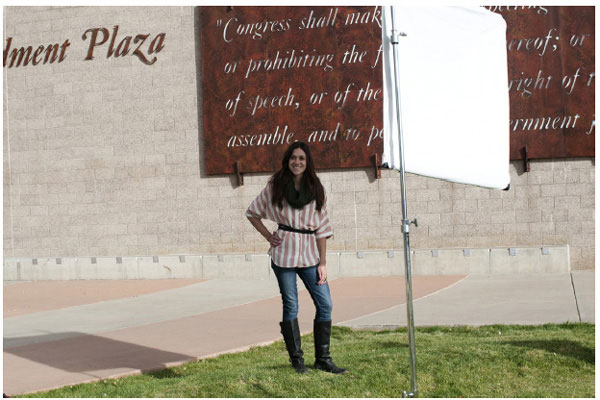
FIGURE 10.20
A full, open-ended silk used to soften and reduce the direct sunlight falling on the subject.
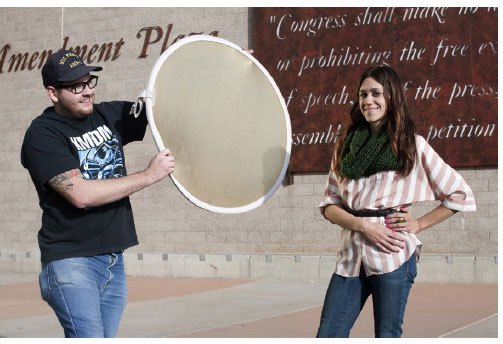
FIGURE 10.21
A collapsible reflector provides enough light to fill in the subject’s shadows.
Daylight blue gel is often called a CTB (color temperature blue) and comes in several strengths: full, half, quarter, and eighth. Another use for this gel is matching the color temperature of a TV screen. (Figure 10.22.) Most color TVs have a temperature of nearly 9,000°K. For the camera to see true colors on any TV set picture in the shot, you will need to correct any lights you’re using to a high-color temperature (or make the TV’s picture very red to compensate for the lights). A full CTB gel on a tungsten light will raise the temperature of the light to match daylight.
Another popular and useful gel is the CTO (color temperature orange). It also comes in various strengths. This gel shifts the light from high temperatures to low. A full CTO changes daylight to a tungsten temperature. This gel can be used on HMI lights to match tungsten ones or used in large sheets to cover windows converting the daylight streaming in to the same color as your video lights. Most often, this gel is used in lower strengths to simply warm the light after you have white balanced for the uncorrected sources. By white balancing for the main light in the scene, you can add a quarter or eighth CTO to give skin tones a slightly redder (warmer) tone.
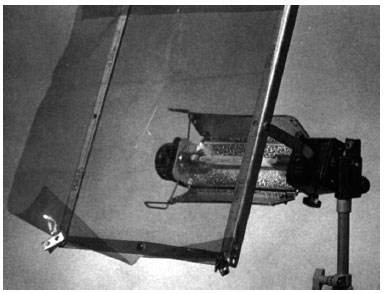
FIGURE 10.22
Light with daylight blue gel in frame.
Color-elimination gels remove all or most of the color from a light source except the color of that gel. A green gel casts only green light (unlike CTOs and CTBs, which only shift the temperature of the light). For instance, a primary-green gel covering a light allows the transmission of virtually no red wavelengths. A white sign with red lettering will appear as a green sign with black lettering under this light. The red pigment contains no green and therefore can’t reflect that color, and the green light is simply absorbed and leaves the lettering to appear as black. This type of gel can come in any color or shade of color. Except for the primary-color gels, most color-elimination gels do transmit a little of all wavelengths so objects will retain some of their natural color. Using a light-green gel (nonprimary) on lights used to illuminate foliage in the shot can make the leaves stand out without discoloring areas around them.
Some Technical Considerations
Nothing is worse than setting lights for a shoot only to have them suddenly go out due to a blown fuse. If you’re in a commercial building, that event cannot only be bad for you but for other tenants, workers, and customers. To add to the misery, you may not know where the circuit breakers are located, and it may take a maintenance person to open it. Valuable time can be lost and bad feelings can start to grow. Before you attempt any location lighting, you must have a thorough understanding of the amount of power required and whether or not you have that amount available for use.
Volts and Amps
Most of the lights you will be using out in the field run on 110 to 120 volts AC—normal household current. Only battery-powered lights use direct current (DC), which is why the bulbs from indoor lights are not interchangeable with battery-powered light bulbs. You should be able to figure out how much current is needed to power your indoor lights. The amount of current available is measured in amperes (amps) and multiplied by volts, giving you the power expressed in watts. The equation would therefore be:
![]()
It can be remembered as: West VirginiA. Because each of your lights has a watt rating, you can figure the amps needed for each light. This equation would be:
![]()
To build in a safety factor, it is a good practice to use 100 as the voltage, even though it may really be 120. Any long extension cable runs can increase the amount of amps and, unless you figure that in, it can put you in danger of an overload. If you wish to put up two 600-watt lights in a room, you would divide 1,200 watts by 100 volts to find that 12 amps of power are needed to safely run the two lights.
Most homes and offices have electrical outlets divided into many separate circuits. In an older house, each circuit may be only 15 amps, yet have several outlets (in different rooms) on that circuit. Most modern homes and offices have more circuits with fewer outlets per circuit, and each circuit has 20 amps. This means you should never have more than 2,000 watts on any one circuit. Finding more than one circuit may be difficult. The first place to start is by finding the circuit breaker box for the area you are working in—a good idea if you plan on using more than one light. The circuits may be labeled in the box. If they are not, and you need more than 20 amps, try to find outlets as far from each other as possible to increase your chances of getting two separate circuits. Make sure that you have some heavy-duty extension cords to route your lights to other circuits. Also, you should check to see if anything else is being used on the circuit you are using. A coffee maker or toaster in use can limit the amps available to you. If you know you will be working in an older home where fuses may still be in use, have spare fuses available.
Avoiding Overloads
For on-location shoots that require a lot of power, you may want to rent a generator. Many types of generators made for TV and movie work can supply power with little or no noise. Electricity is dangerous, and should be dealt with accordingly. Make sure all fixtures are grounded, do not stand in water while touching anything connected to the power, and do not overload any system you are using. Some lights are only meant to be used with bulbs under a specific wattage. Many extension cords are made to carry only a certain number of amps. The length of the cable also determines how much of a load can be carried. A 2,000-watt light with 200 feet of cable would need an 8-gauge wire (sometimes just called #8). The lower the number, the more amps it can carry. A 500-watt light could use a 16-gauge cable to go 100 feet. The more wattage you use, the smaller the gauge number should be; the longer the cable run, the smaller the gauge number. Note that the smaller the gauge number, the thicker the cable. All the cables should be three-wire cables. An overheated cable or light housing can easily start a fire.
PART THREE: BASIC LIGHTING TECHNIQUE
THE STARTING POINT: EXPOSURE
In every shooting situation, indoors or outdoors, the first thing a good videographer looks at is the amount of light available. There may be enough to shoot in or you may need to add some of your own. How much is enough? Relying on auto-iris to set your exposure can lead to some undesirable shots. Knowing how to set the proper exposure on any scene without the help of the automatic functions is a requirement in the professional world.
Base Lighting
One of the drawbacks to early video photography was that the video camera required a large amount of light to record a good image. In the past, film cameras used extremely light-sensitive film stock or developing procedures that maximized a small amount of light. The light sensitivity of older video cameras was limited by the quality and sensitivity of the pickup tube, a component not subject to easy replacement or change. Therefore, the first requirement in video lighting was to provide the camera’s pickup tube with a quantity of light large enough to enable the camera to function properly. This minimum level is called the base light.
Today’s CCD and CMOS chip cameras require very little base light to make a good picture. However, “very little” does not mean no light. Base light should be thought of as the minimum light required for shooting. The scene always looks better, especially in EFP work, if the light levels are somewhat above the base. The first requirement in lighting a scene is to make sure you have enough base light on every area of the scene for which you wish to see detail. Areas with less than base light (like shadows) appear gray or black in the picture, which may be desirable. By knowing your camera’s ASA or lux rating, you can determine the base-light level in foot-candles or lux for any f-stop you use. Lux is a measure of light quantity used in countries that use the metric system and has become the standard measurement for judging video camera sensitivity. One foot-candle equals 10.74 lux. A typical professional video camera available for ENG or EFP applications, the Sony DVW790WA, requires 2,000 lux at f9 for an acceptable image. (Less light is required if you use a lower f-stop setting.)
Finding the Correct Exposure
Exposure is both a scientific and subjective issue. A light meter can show you how much light you have on your subject and therefore help guide you to the proper exposure. You can put the camera on automatic iris and let it tell you what the exposure should be. But just as filmmakers decide what subject and where to measure the light to achieve the end result they want for the film’s look, a videographer must also choose to go beyond the auto-iris to get aesthetically pleasing results. The proper exposure for a piece of white paper shot full frame may be without argument, but the correct exposure of someone sitting in front of a window may be quite subjective.
The problems of not enough light are easy enough for most beginners to notice. A low-light picture is often muddy, dull, and seems to be of all the same shade of gray in the viewfinder. Most of the newer portable cameras have a signal of some kind that alerts the camera operator to a potential low-light problem. This indicator is sometimes an LED that glows when there is insufficient signal level output from the camera. A slightly different version of this type of indicator is a white line across the picture that indicates either too much signal (requiring a reduction in iris opening), a proper operating range (requiring no iris setting change), or too little signal (necessitating an increase in iris opening or a general increase of light on the scene). Many other aids that help find the right exposure are visible in the viewfinder of different cameras, such as the zebra stripes in many prosumer and all professional cameras.
The problems of too much light being let into the camera can be difficult for many first-time video shooters. They may think the picture is better when everything is bright and you can see details in all the shadow areas of the picture. It usually is not. Overexposure usually shows up as the loss of detail in the brighter areas. Areas of the picture or subjects within the picture that become overexposed start to lose texture and definition. The writing on a white piece of paper starts to disappear as the paper is overexposed. If that paper is on a desktop in your shot, you may indeed have to overexpose it to get the proper exposure for the entire picture. As we shall see a little later, it’s the contrast ratio that helps determine what the proper exposure should be.
Use of High Gain
Use of the high-gain circuit increases the sensitivity of the pickup device, thus increasing the range of light in which the video camera can supply an image. However, use of this additional amplification enhances the noise, or graininess, in the video as well. The resulting picture often appears somewhat grainy, and darker areas of the frame are muddy and have confetti-like specks of color.
Obviously, some ENG stories must be shown despite minor video flaws. Unfortunately, too many important news stories occur at night. Shooting these stories requires as much boost to the lighting situation as possible. The battery-powered portable light that is often used gives acceptable illumination only on subjects 6 to 20 feet from the camera. When shooting outdoors at night, these battery-powered lights offer only a little help on large scenes, but they are still necessary. The 6- or 9-dB gain is quite often used when more light is needed but cannot be added. Because of the graininess of the resulting video image, the 12- or 18-dB gain should be used only on very important shots that cannot be done any other way. Some new professional digital cameras have gain controls up to +48 dB, which should only be used for very special shots in very low-light situations.
These large gain enhancements may be used at night to record objects at a distance or in special situations—for example, when the lights would interfere with the actions of a SWAT team’s operation, or when shooting a nature film about nocturnal animals. The resulting video will be noisy and the video level (the amount of video signal) will probably be low, but there is a common procedure to improve the look of the picture. When the tape is played or edited, the chroma level can be lowered on the shots done at low light and high gain. Lowering this level causes the colored, confetti-like speckles in the darker areas of the picture to lose their color. This technique produces a nearly black-and-white picture, but since our eyes see very little color at night, the loss of some chroma is not objectionable. However, the brighter areas of the picture retain some chroma, and the perception of overall noise in the picture is greatly reduced.
Contrast Ratio
Unlike the human eye, video cameras are severely restricted in their ability to perceive large variations of brightness within a given scene. When extremely bright objects are framed with very dark objects, many video cameras do not reproduce details well in either the light or dark areas. Excessively bright areas, such as a pure white shirt, may tend to glow and appear otherworldly. Very dark portions of the screen may be muddy and lack detail, resulting in an unappealing, two-dimensional image.
In an overall scene, most video cameras can properly show bright areas that are no more than 20 times brighter than the darkest areas of that scene, a contrast ratio of 20:1. The typical film used in motion pictures has a contrast range of about 200:1, and our eye sees at about 1,000:1. This is the primary reason that film looks better than tape. In a film shot, the brightest part of the frame can be 200 times brighter than the darkest part and the detail in both areas should be visible. This allows very dramatic lighting to heighten suspense and drama. Our eyes see the best of all and are able to see very bright and very dark objects in the same “frame.” As technology improves the contrast range of video, the ability of video cameras to deal with high contrast ratios within a frame will increase. But for the present, it is still a good rule of thumb to stick with the 20:1 rule for video contrast. For example, if when using a reflective or spotlight meter you measure the reflected light from the brightest area of the picture and it is equal to 400 foot-candles, then any area of the picture reflecting less than 20 fc of light is beyond your camera’s contrast range (400:20 is equal to 20:1).
A typical piece of white paper reflects 60 percent of the light that strikes it, whereas black paint reflects only 3 percent. White plaster, however, reflects 90 percent. If you have 200 fc of light falling on a white plaster wall in a scene, it will reflect 180 fc. A dark brown chair in that scene reflects only 6 fc, which is beyond your 20:1 contrast range. If you expose for the wall, the chair becomes underexposed, even though the same amount of light is striking it. Therefore, you must keep in mind not only the amount of light striking the objects, but also their ability to reflect that light. Going back to our earlier example of the white paper on the desktop, if the shot is of a person sitting at a dark wood desk in a dark suit, then the proper exposure for the overall shot would have the paper overexposed, because it falls outside the contrast ratio of the main subject. The darker areas would need to be seen more than the paper.
These considerations demonstrate why it can be very difficult to expose for two subjects in the same scene when one is in the shade and one is in the sun. When using a TV camera, you try to expose for the brightest area, but the difference in brightness between objects in both sun and shade can be well over 200:1. Exposing for the brightly lit person sends the other into darkness, and exposing for the darker one causes a total loss of detail in the bright one.
In a practical sense, videographers must watch out for bright/dark combinations in every shot. The contrast ratio problem becomes more apparent when the brightest and darkest areas of the scene are right next to each other or where one is much larger than the other. If your subject is wearing a bright white shirt and dark trousers, suggest lighter trousers or a pastel shirt. White blouses can be less harmful to the overall look if partially covered by a scarf or jacket. A small area of overexposure is much less noticeable.
A dark-skinned subject wearing a light-colored shirt and light background can make a proper exposure difficult. In daytime shooting, extra light is often necessary to brighten the subject’s facial features. You must pay close attention to lighting and background to avoid having a dark-skinned face blend in with the background.
Do not forget that an extremely dark or extremely light portion of the screen can often be compensated for by an iris adjustment. The problem arises when two extremes appear in the same shot. If you cannot get detail in both areas of the picture at the same time, find a way to adjust the shot to reduce the amount of too light or too dark areas, or adjust the lighting to reduce the contrast ratio. (See Figure 10.23.)
In ENG work, you are often forced to work with shots that have more than a 20:1 contrast ratio. For example, in an interview with a tall plane-crash eyewitness who is wearing a hat and where the sky is overcast, the white sky reflects large quantities of light, but the shaded face of the subject reflects very little light. The contrast ratio between sky and face will be far in excess of 20:1. The iris must be pushed, or opened, beyond what the overall picture requires, to get the face to show on tape with some detail. In this case, the background will be overexposed. If the background is overexposed, the edges of the subject’s face may be undefined, making the subject look abnormal.
There are some possible solutions in this case, however:
• Try to find a dark background—for example, against a wall, fire truck, or tree.
• Frame the subject’s face as tightly as possible to reduce the amount of background in the shot, thereby reducing the overall contrast in the shot.
• Anticipate these conditions and use a camera-mounted battery light with a dichroic filter (converts 3,200°K light to 5,600°K) to brighten the face. Even without the filter, the extra light on the subject’s face will help the contrast, despite being too red; for ENG work, a reddish face is certainly better than no face at all.
In ENG, if you do not get the shot, a competitor probably will. It is your job to find a way to make the shot work with few technical distractions. In some ENG situations, you may have to shoot despite adverse lighting conditions because the story is too important to miss. The audio may be usable, even if the video is not. As video cameras get better, it is possible to drive the contrast to greater extremes and still get a good picture. In fact, in many EFP projects, overexposure of certain areas of the frame is a specific style. Overexposure can be used as a creative force if done with purpose. A shaft of sunlight coming through a window can blow out (overexpose) part of the picture or even part of the subject to show the intensity of that light or draw the viewer’s attention to the light and thus to the subject.
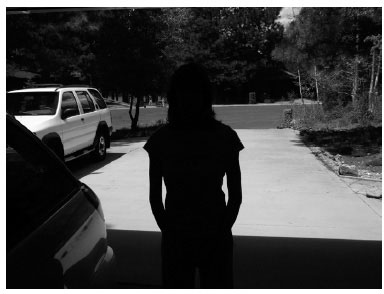
FIGURE 10.23
In this scene, the proper exposure for the overall frame leaves the subject in the dark. Light should be added to the subject.
Increasing the Quality through Contrast
High-quality professional video cameras can “see” a 100:1 contrast ratio or more, but limitations of transmission and a low home TV set contrast ratio force the videographer to keep contrast ratios low. Most home TV sets have only a 10:1 ratio because of high levels of room light. This is one more reason for keeping the lighting ratios within about 20:1 for the overall scene, and even less for the subject itself—but some contrast is always necessary. There should be light and dark areas in the picture and the topography of the subject’s face must be clearly distinguishable. Having shadows—the modeling effect—adds texture and more of a three-dimensional feeling to a picture, which makes it is easier to see on the home screen and therefore easier to watch.
There are some things you can control to make your video pictures look realistic. For example, you may think you are changing the picture too much by setting up several lights. You probably are not, however, if the end result is a picture with light levels high enough to properly expose the picture, a contrast ratio in the proper range, and a picture that looks natural and pleasing to the viewer. Because the camera does not see things in the same way you do, you must help it to see that way by adding or adjusting lights.
THE ART OF CASTING SHADOWS
You should now know what light is, how it changes, what creates it, and the tools for controlling it. Now you need to know how to use light to your advantage beyond just providing enough light for the camera. Too often, ENG and even some EFP shooters rely on just a camera-mounted light to give them exposure. This is certainly necessary in adverse conditions, but it lacks character and artistic purpose. The purpose of good lighting is to cast shadows. The absence of shadows—flat lighting—adds nothing to a viewer’s visual understanding of the shot or scene. The world around us is literally defined by shadows. Without them we could no longer see depth or texture. We couldn’t even tell the time of day without a watch (or cell phone). During a shoot, you will need to light many different scenes indoors and outdoors, both to control contrast for the camera and to help the viewer see what story the pictures are telling. Although each lighting situation is unique, there are some fundamental guidelines you can follow that will help you light any scene.
BASIC THEORY
The History of Lighting
Most of what we know about lighting comes from a single period of art history. In the early 1600s, a painter named Caravaggio developed a style of painting that used shadows to express depth on a two-dimensional canvas. An admirer of his went on to perfect this style and become one of the most famous painters in history: Rembrandt van Rijn (1606–1669). This painter, commonly known simply as Rembrandt, created a way of working with light and shadow that transcended his own time and medium and survived well into modern times. The technique is called chiaroscuro, an Italian word meaning “light–dark.” Rembrandt’s paintings have very clear—but not necessarily visible—sources of light that only illuminate selected parts of the frame. Even his outdoor scenes made use of clouds and their shadows to provide areas of light and dark within the picture. Rembrandt’s style depicted light sources as being natural. Light in his paintings—as in life—could only come from a naturally occurring source. No one has ever found a better way of lighting since. There are three main characteristics of chiaroscuro lighting, as discussed next.
The Source and Intensity of Light There is only one apparent light source that selectively lights only parts of the scene. The overall illumination is low—called low-key lighting—and the overall background is darker than the subject of the shot.
Shadow Direction and Fall-off Dense, attached shadows make the direction of the light readily apparent. The quick fall-off, or diminishing of the light’s intensity before reaching the background, allows darker areas of the frame to dominate, thus directing the viewer’s eye to the lighter areas, that is, the subject.
Object Texture This highly directional light source accentuates the texture and form of objects in the frame. Faces, clothing, furniture, walls, and even dust in the air take on a three-dimensional quality.
Chiaroscuro lighting can convey both high and low emotional intensity. The quantity of dark and light areas helps determine what the perception will be. This type of lighting uses a low-key technique, usually a Fresnel spot with barndoors, and very little fill. The background is usually lit with other very directional, narrow-beam lights to control the amount of the scene receiving light. Chiaroscuro lighting intensifies the three-dimensional properties of the subjects, clarifies the space around them, and gives an emotional quality to the scene. The particular emotional quality should be selected based on the subject you are photographing in ENG work and on what the script calls for in EFP. Each lighting setup should have a predetermined goal beyond making a good exposure for the camera. Chiaroscuro lighting is the basis for almost all the motivational lighting you will do. (See Figure 10.24.)
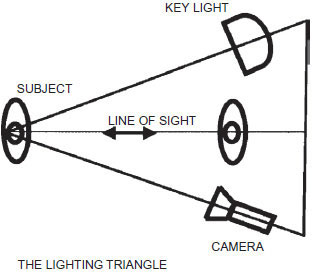
FIGURE 10.24
This is the basic lighting triangle formula that will give a chiaroscuro look. This idea can be applied to almost any situation.
The Rembrandt Way
Chiaroscuro lighting is now more popularly known as Rembrandt lighting. Try these five points as a guideline to Rembrandt lighting:
• Place the key light, or angle the subject, so the shadowed side of the subject is closest to the camera (so it appears the subject is looking into the direction of the light but not at it).
• Move the subject away from the background.
• Look for a dark background.
• Make the subject the brightest and/or biggest area of the shot.
• Have the darkest area of the background directly behind the subject.
The Rembrandt style can work for everything—not just for setting up lights but in simply positioning subjects in any shot. Our plane-crash witness mentioned earlier can have a chiaroscuro feel by positioning his head in the shot against the dark foliage of a tree and having him face in the direction of the flashing fire truck lights. The red lights become the subliminal key light source giving texture to his face, even though they do not overpower the diffused daylight. The dark tree makes his face the brightest area of the picture. This is simple and quick, yet it meets the artistic standards of Rembrandt on a very basic level. (See Figure 10.25.)
Zone Lighting
Along the same lines as chiaroscuro lighting, zone lighting selectively lights only certain areas of the picture, which are divided into zones by distance from the camera. This is usually the foreground, midground, and background. The subject is usually in the midground. Each of these areas is lit separately, with dark or shadow areas separating them. This technique helps to create a three-dimensional look and to draw the eye to whatever you wish to emphasize in the frame.
FORMAL LIGHTING
Three-Point Lighting
The technique of three-point lighting has been used for years in both professional TV and photography studios. It is based on the principles of chiaroscuro, but doesn’t try to disguise the artificiality of the light. This method of lighting is simple but effective for many situations that call for lighting a particular subject or object. Three carefully placed directional lights—the key light, the fill light, and the backlight—can light a subject in a way that provides an appropriate level of base light for the video camera; gives sufficient shadow for definition of shape, size, and texture; and separates the subject from surrounding objects and the background. The three-point technique is appropriate in most ENG or EFP situations to satisfy basic lighting needs. Figure 10.26 displays a similar shot under three different lighting conditions. Figure 10.27 gives guidelines for light placement in a situation in which the subject is facing the camera.
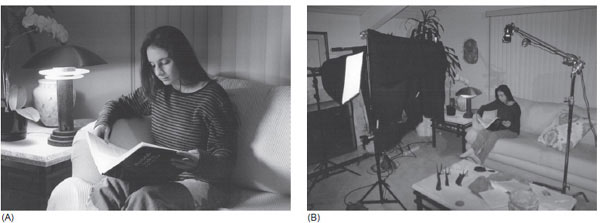
FIGURE 10.25
(A) A simple example of Rembrandt lighting: dark shadows and background, with a single motivating light source opposing the direction of the subject. (B) The lighting setup used to create the Rembrandt scene.
Key Light As the name implies, the key light is the most important light and therefore is placed first. The key light should be the brightest and most directional. A key light placed on the camera–subject axis (right over the top of the camera) produces a very flat, shadowless picture. In most cases, this is not flattering to the subject.
Start with these guidelines for placing the key light:
• Place it anywhere from 10 to 90 degrees off the camera–subject axis, depending on the effect or look you are creating.
• For a subject not facing directly toward the camera, focus the key light on the opposite side of the subject’s face from the camera position.
• Elevate the light above the subject at about a 45-degree angle from the camera–subject plane.
The key light creates a strong shadow, sometimes called the draw, on the subject’s face. This is known as the modeling effect. The videographer is responsible for bringing the viewer’s attention to the most important aspect(s) of the screen. Since the audience is naturally drawn to the brightest part of the screen, and since the key light illuminates an area brightly, the key light is used to focus the viewer’s attention. When subjects are not looking directly into the camera, the key light should be the light that the subject faces toward, but not directly at—referred to as the short side of the face (eyes and mouth), it is lit by the key. Focusing the key light on the long side of your subject (the ear side) makes it seem like the subject is looking away from the light. This gives the appearance of subject discomfort or avoidance, which can be misleading, distracting, or unpleasant for the viewer. It also casts the draw, or shadow, out of view for the camera, thus losing the three-dimensional effect. For examples of the three point priniciple, see Figure 10.28.
Fill Light The next light to set when using the three-point lighting technique is the fill light, located at an angle about 10 to 45 degrees from the camera on the opposite side of the camera from the key. Again, the light should be placed above the subject to give a more normal appearance. In studio TV, the fill light is often a scoop or a Fresnel spot adjusted to give a wide or flooded-out beam. These types of lights are preferable because they are less harsh and soften shadows created by the key light without eliminating them. Unfortunately, portable kits rarely contain scoops or other diffused lights. Typically, portable kits have small spotlights without lenses. Since the key and fill lights are usually of equal strength in portable kits, the fill is often placed at a slightly greater distance from the subject, resulting in a less intense light for fill (remember the inverse square rule!).
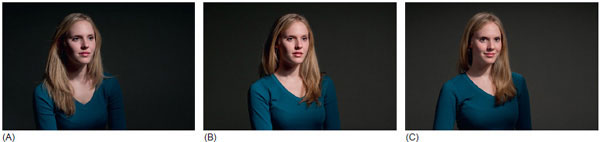
FIGURE 10.26
(A) A key light only.
(B) Key and fill lights.
(C) Key, fill, and backlights.
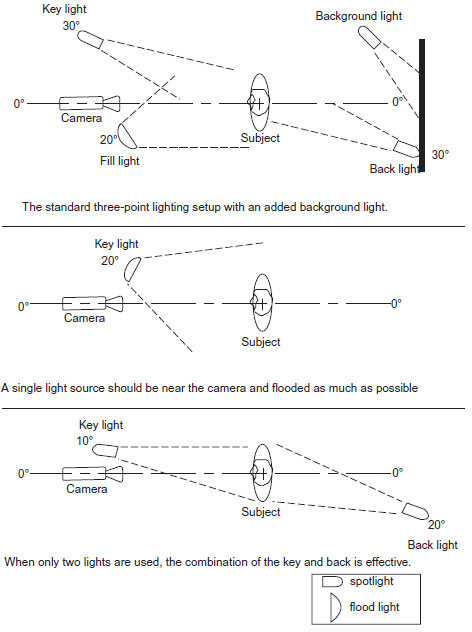
FIGURE 10.27
Light placement when the subject faces the camera.
Many portable kits have adjustable lights that allow the light to be pinned to a narrow beam to give sharp, bright light or flooded to give a softer, less bright light. For example, the fill light could be set at a distance from the subject equal to the key light and set in the flooded or wide position, and the key could be pinned. As a general rule, your key light should be twice as bright as your fill (a 2:1 ratio), but a key that is four times as bright as the fill (a 4:1 ratio) is not uncommon. The combination of properly set key and fill lights should give enough base light for the video camera to operate at an acceptable level and create a perception of depth, giving your subject a three-dimensional quality.
Backlight The third light in the three-point lighting technique is the backlight. The primary purpose of this light is to separate the subject from the background by highlighting or framing the subject with a rim of light. The backlight is most often a spot, both in the studio and in the field. It is focused on the back of the subject and aimed so it’s not shining into the camera lens. Barndoors are very useful on backlights. The light is placed directly opposite the key light, behind and above the subject at an angle of about 45 degrees. It is not unusual for a backlight to be as strong as the key light for a key–fill–back ratio of 2:1:2. A more subtle 2:1:1 is the most common choice. Because the effect of a backlight as seen from the camera position is more reflection than illumination, the strength of the backlight must be considered in relationship to the subject or object being lit. A person with golden blond hair will reflect a great deal of the backlight toward the camera, so only a little is needed. A person with a lot of very black hair can absorb a great deal of light and may need a very strong beam from the backlight. There’s a saying among cinematographers that a backlight should be felt and not seen. It is best to judge the strength of the backlight with your eyes and get the brightness just to the point where it is noticeable. See some guidelines for light placement in Figure 10.29.
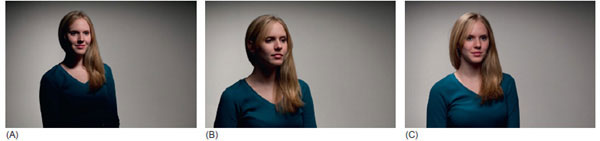
FIGURE 10.28
Some examples of interview lighting using the three-point lighting principle: (A) a single hard source creates a hard shadow line on the subject’s face, (B) a single soft source creates a more relaxed feel and a softer shadow line on the subject’s face, and (C) a soft key light and a backlight create an easy but formal look.
Adding to Three-Point Lighting
Other light placements are common in the photographic world, and a good TV videographer should take advantage of their availability. With a minimum of setup time, you can properly light most ENG and EFP assignments using the basic light kit. Three lights are more than adequate to light any medium-sized meeting room or interview. With the addition of a couple of extra lights and some accessories, creativity need not take a back seat to expediency.
Background Light The background light, or fourth light, is often used to locate the subject in the set; that is, to show the relationship of the subject to the background. The placement of this light can vary, but the idea is to illuminate part of the background to show its texture, shape, and depth relative to the subject. It may be extra trouble to purchase, carry, and set a fourth light, but it becomes very important when you must videotape a subject with dark hair or a dark shirt against a dark background. The fourth light can give the viewer a better understanding of volume of the location that is shown within the shot. (See Figure 10.30.)
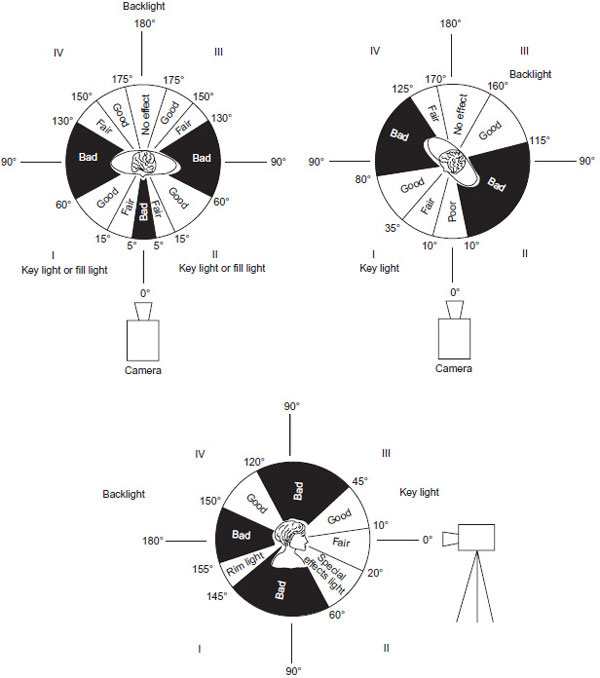
FIGURE 10.29
Use these lighting zones as general guidelines. They may not apply to recreating natural lighting, special effects, or creative lighting, but do deal with formal portraiture lighting.
One way to use a background light is to light the area directly behind the subject if the subject is centered, or on the empty side of the frame if the subject is not centered. But it should not light the entire background, only a portion of it. Many times a well-placed background light can be substituted for a backlight to achieve subject/background separation. This is also the light that can add special effects to the scene. For example, you can make the background interesting by using a cookie or another shadow-forming device placed in front of a narrow-beam background light. A very common technique in movies is to use a Venetian or mini-blinds effect. A slotted pattern on the background light gives the effect of window light coming through blinds. The light serves its purpose by giving highlight and detail to the background while also making it seem natural. Experiment with background lights using different patterns and also different directions.
Kicker Light An additional light often used in EFP is the kicker light (see Figure 10.31). It is a light set from a low angle to the side of the subject and slightly behind. Its purpose is to highlight the subject’s hair or face. The kicker is often used in hair product commercials to add a glamorous look. In drama scenes, the kicker is used to denote time of day. A very soft, flat kicker on an actor’s face represents early morning or late evening, while a hard, spotted kicker says midday.
Eye Light In some dramatic EFP presentations, you can use a small, highly directional light to illuminate a subject’s eyes. The eye light is usually a lower-wattage lamp aimed at the eyes from the camera position. It is used to direct audience attention to the facial expression of the subject. This light in a more subtle form is sometimes called an obie light. The name comes from the silent movie star Merle Oberon, who had her cameraman use a light mounted on top of the camera to shine directly on her face and nowhere else. This flattened her lighting and minimized her wrinkles. Today, the eye light or obie is used to fill shadows in facial creases and give a reflective sparkle in the subject’s eyes.
FIGURE 10.30
Putting light on the background opposite the subject adds interest, separation, and motivation for the key light and the mood. The light pattern on the wall was projected with a small ellipsoidal light with a gobo in front of the lens.
Lighting with Color
For most work in EFP and ENG, keeping the color of light the same from all sources in a scene is the standard. However, for creative work, you will find yourself mixing colors of light more and more. By knowing what color any particular light source is, you can predict how it will look on the screen when added to your shot. If you are doing an interview inside a room during the day, but for some reason you want it to look as though it were night, you may light the subject with tungsten, balance for that, and let some daylight spill into the background. The area lit by sunlight will appear blue, similar to that of moonlight (as used in TV and movies), especially if the daylight is of a much lower intensity than your key light. You may use daylight from a large window as your key on a subject, but tungsten as the backlight to give the hair a warm glow. Once you have mastered the idea of color temperature, you can balance the camera for any key light and paint the rest of the picture with color created by temperature or gels or both. You will quickly find that the use of CTO and CTB gels on backlights, background lights, and even kickers gives your pictures a creative edge.
FIGURE 10.31
The kicker gives a stronger jaw line and a more natural look.
NATURAL LIGHTING
Popular lighting styles have changed as cameras have gotten better over the years. It is no longer necessary to bombard a subject with a huge amount of light to get proper exposure. Artificial light has become something that is simply added and manipulated primarily to suit the needs of the videographer, not the camera. Three-point lighting looks like something from the studio. Since location shooting is all about being on location and having it look that way, finding alternatives to this formal approach to lighting makes sense. Using some of the techniques mentioned next, you can create a pleasing natural light with soft shadows that meets your lighting requirements without disturbing the natural look of your location shoot. It also takes you a step closer to the style of the master, Rembrandt.
Adding to Existing Light
Too often, hundreds of pounds of delicate lighting equipment are bounced around in a truck then laboriously set up, only to result in a scene that looks as if it could have been shot in the studio. The addition of artificial lighting often gives an artificial look to a remote scene and destroys the natural appearance of a location setting. If the subjects can easily perform or be interviewed in the studio, why bother hauling out the remote equipment? One reason for a remote shoot is to preserve the natural environment of the subject. Sometimes there is the need for minimum base-level lighting. Some situations simply demand additional light. The best way to fulfill the technical requirements of the video camera is to add to the existing light without overpowering it. Unlike studio scenes, in which three-point lighting is the standard, many locations only need to have the existing light levels raised to produce a pleasing, well lit scene.
FIGURE 10.32
To create a natural look, this interview setup was done with two lights. The key light was a 3 × 3-foot foam core with a 1,000-watt broad light bounced off it, and the backlight was a 100-watt Fresnel. The window light was blocked by a Duvetyne curtain to allow the use of uncorrected tungsten lights and to allow the camera to use a larger f-stop. The slower lens setting allowed better use of the practical, or incandescent, light on the table and a more out-of-focus background.
Preserving Color Temperature You can assess the color of any scene by remembering the previous discussion about color temperature. Whether it’s daylight streaming through the windows (5,600°K), ambient reflected daylight coming in (6500°K), incandescent household lamps (2,800°K), or even daylight-balanced compact fluorescents (about 5600°K), you should now know how to adjust your lights to match the natural light in the scene. You may wish to use the natural light as the key and use your lights as the fill, back, or background sources.
Preserving a Natural Look Preserve the natural look of the location by keeping the direction of the natural key light the same as it was without enhancement. If there isn’t enough natural light to satisfy base requirements, add your light source near to or in line with the existing light source. If your additional lighting produces shadows that are too dark, fill light may be necessary. The fill light should be as subtle as possible, such as using bounced light, but bright enough to fill the shadows. The light at the location is often nondirectional or flat, as in an office building, so the additional lighting you provide should also lack directionality for the most part—that is, it should have no shadows. In these situations, it is necessary to find natural elements of light and dark to gain a three-dimensional look. (See Figure 10.32.)
Creating a Natural Look
Soft Lighting Except for standing outside in the sun, humans are almost never seen in any kind of direct light. We don’t put spotlights in our homes or offices that shine in our faces. So any time we light someone like that, the visual message is artificial and conspicuous. The goal of a natural look is a type of lighting simply referred to as soft lighting. Shadows are undefined or have very hazy, soft edges. It is hard to recreate this type of light with standard lighting equipment alone. You can create soft light effects using hard lights by adding umbrellas, boxes, or a diffusing material, such as spun glass, in front of them, or by bouncing the light off another surface like we discussed earlier in this chapter. Larger diffusing material can even be hung from the ceiling in front of the lights to produce a wall of light. Any of these methods will yield a natural soft light on the subject or scene, but remember that the amount of light reaching the subject will be greatly reduced and the color temperature lowered by the diffusing material. Light from an umbrella source is only one-half to one-third of what it would be if the light came directly from the fixture.
Bouncing light is the best method of adding soft light in situations where the room is small. If a room’s ceiling is light colored, relatively smooth, and no higher than 8 to 10 feet from the floor, you can aim a light at the ceiling and the reflected light will enhance the base illumination level. Almost any type of light can be used for this purpose, but very weak lights will lose much of their lighting power before reaching the subject. How much of the ceiling you light can make a big difference in the resulting look. Lighting only a small portion can produce a very “top-heavy” light with dark eye sockets on any subject too close to that part of the room. Lighting the entire ceiling is better most of the time, but you have to make sure the direct light doesn’t hit the walls or it will show up in the shots.
Direct Light You can also achieve a natural look with direct lights. By aiming them not into faces but from other directions or onto other parts of the scene, the direct light will create its own ambient or reflected light. As an example, a person sitting at a desk can be lit from behind by a strong direct light in the kicker or backlight position. The light can look like daylight from an off-camera window (very strong), or light from an unseen lamp (diffused) hitting the subject. As that light also hits the desk top, some of it will be reflected back onto the subject, or you can add more fill of your own. In Figure 10.33, the key light—the direct light—is actually behind the subject, which is not an abnormal scene in real life.
Backlight There is an entire theory of natural lighting that uses a key behind the subject; it’s called backlighting. This type of shot creates difficult problems for cameras and videographers, but the results are well worth the trouble. This style is used most often outdoors, using the sun as the backlight key. To make the shot work, most of the objects in the shot need to be backlit as well. A subject with too much of the background directly lit may not show up well on camera. This type of backlit scene may need to be done with a manual iris to achieve the proper exposure on the subject. Most backlit scenes will have an area of overexposure. When you use this style, try to overexpose as little of the picture as possible. In both ENG and EFP applications, a backlit shot can produce warm or pastel colors and good textures as long as the background is also shaded and as little as possible of the sky is in the shot. This effect may be desirable for many reasons—for example, to soften the features of a subject’s face. (See Figure 10.34.)
A backlit scene is lit with ambient or reflected light—nature’s soft light. This reflected sunlight tends to be more blue than direct sunlight, but white balancing in this reflected light corrects the problem. In effect, by using this reflected light you are getting the best qualities of sunlight without the drawbacks. You can get great skin tones without the horrible dark shadows caused by harsh, direct sunshine.
At certain angles, sunlight can reflect off an object’s surface, creating glare. This is when backlighting can be troublesome. Paved surfaces such as concrete can be very hard to include in backlit shots. That is why in backlit TV commercials they wet the streets down with water to darken the surface. Wet concrete actually reflects less light as long as there are no puddles.
Lens flares, caused by backlights striking the lens, could be desirable. The rows of flares created by the light can be used to add dynamics to the shot and help emphasize the sun or light source. A story on solar power practically requires a shot of the sun, and such effects can add interest.
FIGURE 10.33
The only light source for this scene is from behind the subject. Reflected light from the book and table fill the subject.
FIGURE 10.34
This subject is backlit but you can get a good image by exposing for the softer reflected light even though there is an area of overexposure.
Source Lighting
Source lighting is the best possible natural lighting; you see it very often in feature films. (See Figure 10.35.) All the artificial light sources are cleverly placed so the viewer is unaware that any are used. The scene looks as though it is lit only by the natural light sources in the picture or perceived to be just outside the camera’s view; this is why it is called source lighting. This is modern-day chiaroscuro lighting.
It may actually take many lights to make a scene appear as though it has no added light. A room with windows should look as though the only light comes from those windows. To make a scene look like this, you can use artificial lights to fill in the shadows or accent certain highlights (thereby controlling the contrast ratio).

FIGURE 10.35
Natural light, like the illumination provided by the windows, is what photographers and videographers seek to recreate.
You can also use artificial lights to make the lighting appear as though it is coming from table lamps in a room, the light from a fireplace or candles, or any natural light source that happens to be there. These natural sources of artificial light are called practicals. They generally do not provide the amount or quality of light necessary for shooting but simply provide the motivation for how a scene is lit. It is helpful to the viewer if the light source is incorporated into the shot or shown in a setup shot so that there is at least a subliminal awareness of where the light is coming from—but it’s not necessary.
Balancing the lighting contrast ratio of the subject in the room to the daylight in the windows can be very difficult in source lighting. In EFP work, as in the movies, large sheets of neutral-density gels can be taped to the window to cut down on the amount of light coming in. These can also be combined with color-correction gels to bring the color temperature down to the temperature of tungsten, if that is easier than changing all of your artificial sources to daylight temperatures. It will take some practice to become proficient at balancing contrast ratios, but you can follow these rules to start:
• Choose a natural light source and make it your key light.
• Color correct so all light sources match (if desired).
• If the key is too weak, add light from the same direction as the key, and light only the areas originally lit by the natural key.
• Add fill light to bring down the contrast ratios.
• Make sure the shadows caused by the fill lights are not evident in the shot; only the key light and effects lights should produce any noticeable shadows.
Lighting on the Run
News videographers will often use a small spotlight mounted on the video camera to provide enough light to properly expose the subject or scene being shot. (See Figure 10.36.)
This method usually is used outdoors at night when no other light source is available. However, it can also be used when the subject is moving in low-light situations and the videographer must keep the subject lit. This technique is also used in crowded situations when stationary light placement is impossible and in rushed situations in which the videographer has only enough time to shoot the scene and move on to the next location or get back to the station.
Speed is very important in many ENG situations. The run-and-gun method of news coverage requires a news videographer to have that camera light in place at all times so that subjects can be grabbed at a moment’s notice for a quick-shot-off-the-shoulder interview or “bite.” If there is no light, or if existing light is poor, the camera light or sungun is the best chance for a proper amount of illumination.
Using a Camera-Mounted Light
It has many names: sungun, peewee, beanie, headlight, Frezzi, or news light. But those terms all refer to the same thing: the camera-mounted light. Although the camera-mounted light is expedient, it has both practical and aesthetic drawbacks and is therefore not recommended for general EFP work. These lights can be as inexpensive as $20, or you can pay more than $500 for a professional version. There is an art to using one, but be forewarned:
• Any light mounted close to the lens of the camera will shine almost directly into the eyes of the person being interviewed, causing that person to squint or be uncomfortable. Often, the subject will turn away from the camera because of this.
• The light may be reflected off the subject’s skin or glasses, causing a hot spot in the picture.
• A camera-mounted light aimed directly at a subject will yield a flat, washed-out image that prevents the desirable depth effect that can be obtained from three-point or natural lighting.
• The light used on a subject close to a background (e.g., a person against a wall) may cast an undesirable shadow on the background surface.
• The camera light can create overexposed foregrounds and underexposed backgrounds.
FIGURE 10.36
Cameras used for news gathering should have a camera-mounted light available. These small lights typically run on 12 volts DC and can receive power from the camera battery.
Today, many camera lights run off the same battery that the camera is using. They are also 12-volt lights and generally are no more powerful than 20 or 25 watts, although some are as high as 75 watts. Since the average camera uses about 20 watts of power, using a 20-watt sungun attached to it will drain your battery twice as fast as shooting without the light. A 75-watt light will drain it three times as fast. If you do much shooting early in your workday using that light, you may not have batteries available for later shots. A videographer working a night shift may have only two or three batteries to use, so it is important to conserve them and use AC lights whenever possible. It is advisable to use a separate battery belt or other power source for the sungun if you have one available.
If a dichroic filter is available for your battery light, daytime shadows on subjects can be filled with that light if the subject is close enough. When a reporter is standing in the shade, or backlit, the shot can be improved with a battery light with a dichroic filter. The effective distance for this application is only about four feet in open shade, so its use in this way is limited. And since most 12-volt lamps are 25 watts, they are ineffectual compared with direct sunlight.
Many videographers add a bit of diffusion to their sunguns to help minimize their harshness. The diffusion gives a more even spread to the light beam. This also allows the camera light to be used as a colorizing fill light. In fluorescent situations, for example, a little boost from a diffused sungun can give the subject a better skin tone and fill the eye socket shadows without washing out the entire shot or drawing attention to the fact that light was added.
A recent innovation in camera-mounted lights has come from a light that is a small panel of LED lights. (See Figure 10.37.) These small but potentially bright LED light panels come in both flood and spot styles and can be either 3,200°K or 5,600°K. One model even has infrared lights for shooting in darkness; another model is shaped in a ring and can be mounted with the camera lens in the center.
One-Light Setups
In ENG work, speed may be crucial to getting the story. A good videographer is always looking for shortcuts to quicken the pace of production while keeping a competitive edge. The biggest drawback to using the camera light is the look: it is expedient, but it also screams “down and dirty.” To avoid this look, many videographers have set up a one-light package they can easily carry with them and set up quickly. An example of a basic one-light package is a single light with an umbrella (to diffuse it), a stand, and an extension cord. The umbrella light gives a pleasingly soft high-quality light that can be easily directed. You can create soft-edged shadows or place it over the top of the camera to simply raise the base light of a scene. The light works well even in rushed setups because it can be placed almost anywhere. Using one light in this way may cause flat lighting in some situations, but if all you need is base illumination, you’ve got it, and this technique is still a step above the “light aimed at the face” sungun look.
FIGURE 10.37
Camera with LED litepanel.
LIGHT AS AN EDITORIAL TOOL
Just as the painters of the Renaissance found, light can be used for so much more than mere illumination. Light, or more accurately the shadows it creates, can be very informative about a scene. Even in news situations, the videographer still needs to interpret and communicate what he or she sees using the camera and all the tools at hand. A common question asked at lighting seminars is, “How would you light that shot?” The answer given by seasoned professional videographers is often: “Show me the script first.” Lighting must match what’s going on in the scene whether it’s news, documentary, a commercial, or fiction.
High Key/Low Key
Lighting styles fall into two broad categories: high key and low key. High-key scenes are bright with a low contrast ratio. They have few shadows, and the modeling effect is very subtle. This type of lighting is usually thought of as upbeat, happy, positive, successful, and energetic. It’s the lighting style used for TV situation comedies and game shows. Low-key scenes are mostly dark, with many dense shadows and little fill light. The key light seems to be the only light being used. This lighting is thought of as serious, sad, concerned, negative, failing, and low energy. It’s the lighting of dramas. (See Figure 10.38.)
The best place to see examples of these two types of lighting are on the network news magazines like Dateline, 20/20, and 60 Minutes. A story about a swindler and his victims will have most of the interviews done with dark backgrounds and subjects with well-defined attached shadows modeling their faces: the serious, somber tones of low-key lighting. A story profiling a popular singer will have interviews with bright lighting, very thin shadows, and bright backgrounds (usually looking out windows): the cheery, glowing tones of high-key lighting.
Time of Day
One of the oldest tricks of lighting is to show time of day. The long shadows of early morning and late afternoon are unmistakable. Add color to them—gold for morning and orange for evening—and no one will miss the meaning. This not only applies to outdoor shots but, more important, to indoor setups. By placing a light outside a window, shining it into the room at a low angle, and adding color, you can achieve the “time-of-day” effect quite easily. You can also keep the light in the room and, by adding gobos in the shape of windows, create both the look of window light and the time of day. (See Figure 10.39.)
FIGURE 10.38
(A) Here, the interview is lit in a high-key fashion and conveys a somewhat neutral tone. (B) In this photo, the interview is lit in a low-key style. The dark areas dominate and create a serious mood.
Mood Lighting
Once your basic lighting setup is completed, use the remaining time before the actual shooting to experiment with mood lighting. By simply modifying the setup, you can easily manipulate the mood of the shot. When lighting in the field, do not forget that adding light to a scene starts to change the mood of the scene. The more subtle and indirect the lighting, the more natural people tend to appear and behave.
The mood you are trying to convey in the shot will dictate the type of lighting for the shot. Imagine that you must shoot an interview with a welfare mother in a darkly lit apartment. The easiest way to bring up the base light level would be to use the camera-mounted light. But a sungun interview with bright light shining in the woman’s eyes would look like a harsh, uncaring invasion by the media into the woman’s life. If that’s the look you want, okay. But you can make a better shot while more accurately portraying her situation. You can shoot this interview using just one light, but its placement is crucial.
One possible solution might be to place a diffused light at a 90-degree side angle to the camera. Attach barndoors to the light or flag it to keep the light off the background behind the woman so it remains dark. The dreary apartment retains its character and the woman is lit, but she is less likely to be distracted by the light. Your audience will focus on the woman and her story, rather than the bright lights in her eyes or a distracting background flatly illuminated by the camera-mounted light. The subtle lighting allows the woman to be the most important element in the story, not the expensive equipment that has intruded into her life, or the furniture or belongings behind her. Strong shadows on her face can convey the serious tone of the subject matter. Good lighting is lighting that is not noticed. Good lighting techniques enhance the mood and bring out the subject for the audience. Good lighting does not challenge or distort the existing mood of the scene or direct attention from the subject.
There are many styles to creative lighting. Most are derived from master painters—like Rembrandt—whose work can be seen in art history books or art museums anywhere. If you want to be more than just a basic videographer, study the styles that make up the creative world of lighting.
FIGURE 10.39
By adding a light outside the window at eye level, this scene appears to take place in either early morning or late afternoon light. Coloring the light can determine which it is: gold for morning, orange for evening.
FIGURE 10.40
Highlighting an object in the background can be both editorial (the object is part of the story) and artistic (the object adds a dynamic to the frame design).
Directing the Viewer
Across the broad range of lighting styles, there is one element that should always be present: showing the viewer what’s important. Most of the time, the important part of the shot will be the subject. It can also be any aspect of the frame you wish to draw attention to. You can show the viewers which elements you want them to notice by lighting only selected areas of the frame. The subject, such as the interviewee, is the obvious choice, but additional aspects such as background items can add both to the editorial meaning and the aesthetic value of the shot. (See Figure 10.40.)
An interview with the CEO of a large corporation can be enhanced by shooting him or her in front of the desk rather than seated behind the desk. The shot at the desk would leave little background in the frame, and thereby eliminate added visual editorial content that may be distracting. Place the CEO in a chair far from the desk—but with the desk in the background and shoot the CEO with a close-up. Selectively lighting the desk and its large chair to make it stand out while leaving the remainder of the background dark will emphasize the CEO’s powerful position. The audience will see, literally, the position of power (the large desk and chair isolated by the light), while seeing the CEO in a close shot. You have maximized the information given to the viewer visually while the viewer listens to the dialog.
As you set up for a shot, look around for elements that can add to the understanding of the picture. Even in noninterview shots, look for items that are important to the story. Selectively, make those items brighter than the rest of the shot. A story about a teenager’s success on the baseball field might contain a shot of his room with a wall of trophies. You should find a way of lighting the trophies (light from a window?) while letting the rest of the room remain slightly darker. Try a wide shot of the room to show the trophies to the viewer. This added visual emphasis helps the viewer understand the scene quickly and easily.
To Light or Not to Light?
In ENG work, news videographers and backpack video journalists repeatedly face the dilemma of mood preservation versus mood contamination. In ENG you don’t have the time to recreate the mood with better lighting, but the existing light levels or color may just not be quite right. When do you forgo the existing mood and turn on the lights? Only experience can answer that question. Fortunately, newer cameras and lenses require lower base-light levels than their predecessors, which should allow news lighting to continue to become easier and more subtle. In the meantime, one good rule of thumb for natural-light interviews is to shoot when you see the whites of your subject’s eyes. If there is not enough existing light to see the white areas of the eyes as white and not a dark gray in the viewfinder or LCD viewer, then you need to add more light. Keep in mind that this is a very general rule. Once again, contrast will be your most important factor. Contrast will determine separation of subject and background. Often the subject is too dark or too backlit against a bright background; you will be unable to see their eyes clearly. You may be able to overexpose the scene but still not see their eyes. More light must be added to the scene to keep the subject from appearing corpselike or as a silhouette—effects you do not want, except in special situations. Decide what the subject of your shot will be, then expose for it. If the rest of the scene is overexposed, add light to your subject so you can close down the iris a bit for the overexposed portion or just change the shot.
Adding a decibel boost (gain) will increase the sensitivity of the pickup device, thereby increasing the range of light in which your camera is effective. This should only be done in the most extreme cases. If a decibel boost gives that added detail to a shot to be able to see the subject, then do it. Remember that every decibel boost increases the noise or graininess of the picture. At 18 dB, the picture quality is quite poor. Any decibel boost for EFP use is strictly out, except for nature programs when shooting nocturnal animals or documentaries that require nighttime or darker scene shots. In ENG situations use this gain switch for signal boosting only when you can’t get a good shot by adjusting or adding to the existing light. Choose to use the gain boost very carefully.
SUMMARY
Regardless of the lighting style you choose, approach the setup with the following principles in mind:
• Survey the available light, subjects to be lit, and lighting equipment on hand.
• Decide on the appropriate color temperature.
• Consider light direction and balance.
• Light for your wide shot first, then your tight shots.
• Build your lighting by setting one light at a time:
![]() Start with your key light; place and adjust it with no other lights on until you are satisfied with the results.
Start with your key light; place and adjust it with no other lights on until you are satisfied with the results.
![]() Place and adjust your fill light; make sure that its placement and intensity are acceptable for the situation.
Place and adjust your fill light; make sure that its placement and intensity are acceptable for the situation.
![]() Complete the basic setup with a backlight.
Complete the basic setup with a backlight.
![]() If necessary, add background lights and/or a kicker, eye light, or special effects lights.
If necessary, add background lights and/or a kicker, eye light, or special effects lights.
When you build your lighting setup one light at a time, problems surface early and can be more easily corrected without the confusion of other lights in incorrect positions.
Keep in mind that turning on any light can change everything, especially in ENG. You may have contaminated the scene. The choice then becomes how much effort you put into rectifying the damage.
In EFP situations the script will always determine the solution. Usually you are satisfying a client, and your lighting has to do that as well. How well you light will determine how well you are communicating the ideas of the client through the script. The end justifies the means. To compete in the world of production, you need the highest skill levels you can possibly obtain, and lighting will be the highest skill of all.
For news, the answers are not at all obvious. The camera light says “news crew,” so the viewer knows there’s a news videographer there recording the scene. But that light can cause some people to act unnaturally, appear unnatural, or even perform for the camera. If you choose not to use the light, it may yield more “real” results. Turning out all the existing lights in an office and setting up your own to selectively light certain areas for emphasis may be problematic, but doing so may also lead to a better communication of real information. Lighting is a production variable that takes time, effort, and experience. Lighting skill and technique enhances your video and can give it a professional look. Patience, experimentation, and hard work can make lighting a strong part of your video skills.