In This Chapter
Creating blue-screen effects with Videomerge
Using keys for more precise compositing
Animating clips and objects across the screen
Tracking moving objects in video
You can hardly watch a movie or TV show today without seeing impossible scenes. These scenes may involve superheroes flying among skyscrapers in a major metropolis, giant monsters chasing hapless humans through a jungle, or even a TV weatherman hovering in outer space as he describes the swirling weather patterns down on planet Earth (just off the coast and poised to ruin your weekend, of course). Scenes like these are created using a bit of movie magic called compositing.
Guess what? You don't have to be a Hollywood movie mogul with a multimillion-dollar budget to use compositing. With some simple videography tricks and Adobe Premiere Elements, you can create composite scenes with the best of 'em. In this chapter, I show you how. This chapter also shows you how to use the powerful animation features that come with Premiere Elements; these features allow you to move video scenes, titles, and other graphics across the screen. The last section in this chapter shows you how to use Motion Tracking mode in Premiere Elements. This mode tracks moving objects in video images, and then lets you apply effects, clip art, or mattes to those objects.
Modern movie viewers have come to expect sophisticated visual illusions — starships flying into a space battle, lovers standing on the bow of a long-gone ocean liner, or a weatherman standing in front of a moving weather-satellite graphic. Compositing is a tool to make such scenes possible.
Note
Fundamental to the process of compositing is the careful layering of images. A subject is filmed in front of a solid-colored background — usually a blue or green screen — and then the image of the subject is superimposed over a different background. Premiere Elements includes all the tools you need to make your own compositing effects, and thanks to the new Videomerge effect, compositing is now easier than ever.
Compositing works best if you start with good source footage. In my professional video studio at work, we use a fabric blue screen illuminated by expensive lights designed specifically for pro video. But you don't need a pro-caliber budget to do compositing; in the examples shown in this book, I used a roll of cheap vinyl picnic table covering from a local party store.
Shooting a subject against a solid-colored background is easier said than done. The backdrop needs to be as smooth and evenly lit as possible. Here are some techniques you might use:
Use the sky as your backdrop. Position the camera low and shoot upwards at your subject. Unless there are clouds, you can be sure that the sky is evenly lit, and your subject isn't going to cast shadows on it.
Note
When you use the sky as a background, make sure that backlighting doesn't cause your subject to be too dark. As described in Chapter 3, you can compensate for backlighting by putting additional light on the foreground subject.
Shoot against a solid-colored wall. An interior wall in your home might work, so long as that wall doesn't have fancy wallpaper or trim.
Use a solid-color background material. The color should contrast with the subject. In Figure 11-1, I've shot my cat in front of a blue tablecloth.

Adobe knows that sometimes you don't care about the technical complexities of moviemaking. You know what edits you want to make, and you want to make them fast. Videomerge is a new feature in Premiere Elements that helps you do compositing quickly. Videomerge is pretty easy to use:
Put a background clip in the Video 1 track of your Timeline.
The background clip is what you want to appear behind your subject. The background might show the beach, outer space, or a soccer game.
In the Timeline, position the CTI (Current Time Indicator) where you want the compositing effect to begin.
The background clip should appear in the Monitor.
In the Task pane, find the clip you want to use as the overlay clip.
The overlay clip contains the subject that you want to superimpose over the background.
Click-and-drag the overlay clip and drop it on the video image in the Monitor.
Choose Yes in the Videomerge dialog box.
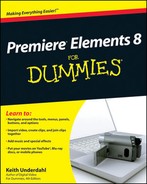
Videomerge identifies the predominant background color in the overlay clip and makes it transparent. The overlay clip is inserted into the Video 2 track in the Timeline, as shown in Figure 11-2.
Make sure the overlay clip is selected in the Timeline, and then choose Window

Properties for the overlay clip appear on the Edit tab.
Click the arrow next to Videomerge to expand Videomerge settings.
If parts of the background aren't as transparent as you would like, place a check mark next to Select Color.
When you enable Select Color, the overlay clip's background appears.
Click the eyedropper tool to select it, and then click somewhere on the overlay clip's background.
If the background color is uneven, choose a color that is near the middle of the range of background colors. You may need to try clicking in a few different areas before you find a Videomerge color that works best.
Choose Soft, Normal, or Detailed in the Presets menu.
Soft makes Videomerge more forgiving of uneven background color. Use Detailed if Videomerge is causing some subject detail to disappear. In all other cases, choose the default setting of Normal.
Adjust the Tolerance slider to fine-tune the Videomerge sensitivity.
Watch the video image in the Monitor as you make adjustments, to see how the image is affected.
Click Done at the bottom of the Edit tab when you finish adjusting Videomerge.
Note
The traditional way to do video compositing is to use effects called keys. A key identifies a specific color (or range of colors) in a video image, and then makes that color transparent. Underlying video clips show through in the transparent areas. Keys provide more advanced control over compositing than Videomerge. If you find that Videomerge doesn't work quite as well as you hoped, try using keys as described in the next section.
Videomerge makes compositing easy, but it's pretty basic. If you want more precise control over compositing, you can use one of the pro-quality keys that comes with Premiere Elements. To view a list of the keys, choose Window
Alpha Adjust: This key works a lot like the opacity controls (described later in this chapter); it's for still graphics that have an alpha channel. Use this key to adjust opacity of the whole graphic, or to ignore, invert, or mask the picture's alpha channel.
Blue Screen: Use this key when you've shot video with the subject in front of a blue screen. The blue screen must be well lit and brilliant for this key to be effective. Shadows reduce the effectiveness of this key.
Chroma: Chroma is just a fancy word for color. This key enables you to key out (for example, remove) a specific color or range of color. With some fine-tuning, you can use this key with almost any clip.
Mattes: Use matte keys (such as Garbage Matte) to manually remove undesired objects from video images. An easier way to do this is to use Motion Tracking mode, which I describe later in this chapter.
Green Screen: This key works just like the Blue Screen matte except it uses (surprise) green rather than blue.
Luma: The Luma key is sort of like the Chroma key, except that instead of keying out a specific color, it keys out a specific brightness.
Non-Red: This key works like the Blue Screen and Green Screen keys, but it keys out both blue and green screens. Try this key if you get rough edges (called stair-stepping) with the Blue or Green Screen keys.
RGB Difference: The RGB Difference key is basically a less-powerful chroma key. Videomerge (described earlier in this chapter) is basically an RGB Difference key.
Applying a key to a clip is pretty easy. Follow these steps:
Place an overlay clip in track Video 2 or higher.
Video 2 and higher-numbered tracks are all superimpose tracks because that's where you superimpose images over the background.
Click the overlay clip to select it, and put the CTI on the clip.
Choose Window
Drag-and-drop a key from the Edit tab to the overlay clip.
Choose Window
The key you applied in Step 4 appears in the properties list.
Click the arrow next to the key to expand its controls.
If the key uses color information — like the Chroma key, for example — you may need to choose a base transparency color. If you don't need to choose a base color, skip to Step 8.
Click the eyedropper next to Color in the key controls, and then click a color in the Monitor that you want to key out.
Adjust any other settings that may be available.
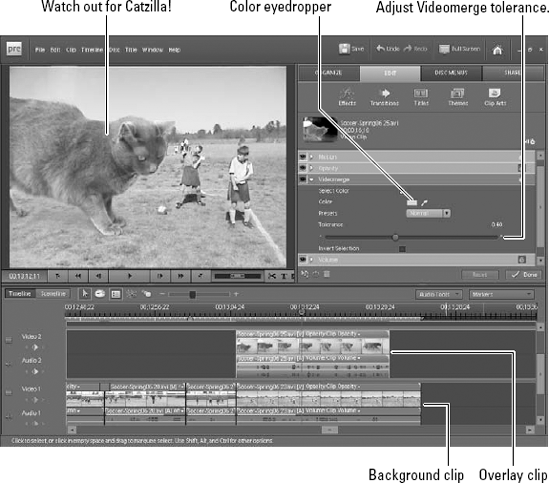
Each key is different, so experiment with the settings to achieve the best result. In Figure 11-3, I adjusted the Similarity and Blend settings.
Note
Here's how keys work: The key recognizes certain colors, such as the special shades often used in blue or green screens. Anything in the video that matches this shade — including that wacky blue tie your subject is wearing — is made transparent by the key. Everything else is placed on a virtual "glass slide" and superimposed over the background. Pretty slick, eh?
Compositing usually means making portions of a video clip transparent by using Videomerge or a key. But you can also make an entire video clip more transparent. Another way of saying more transparent is less opaque. If you can see through a clip, it's transparent. If you can't see through the clip, it's opaque. In the jargon of Premiere Elements, you adjust opacity rather than transparency. To adjust the opacity of a clip, follow these steps:
Add a clip to the Video 1 track in the Timeline.
Video 1 is the background layer that shows through when you make superimposed clips transparent.
Add a clip to a superimpose track, as shown in Figure 11-4.
Video 2 and higher tracks are all considered superimpose tracks.
Click the clip that you want to adjust, and position the CTI over it.
The clip is selected, and its image appears in the Monitor.
Make sure that the words
Opacity:Clip Opacityappear next to the clip's name in the Timeline.If you see the word
Motioninstead, clickMotionand choose OpacityTo make the clip transparent, drag the Opacity rubberband down.
As you drag the rubberband down, the clip becomes more transparent. As you drag it up, it becomes more opaque.
Tip
You can adjust opacity over time using keyframes. See Chapter 12 for more on controlling opacity, keys, and other effects by using keyframes.

I know what you're thinking — Why do I need to animate a video clip in which the subjects are already moving? You may not need to animate the actual subjects in the video, but you can move the video image across the screen. For example, a small picture-in-picture image could sail across the screen to give a hint of action that will happen later in the movie. But wait — there's more. You can move a clip across the screen along a fixed path or a zigzag pattern, rotate clips, and distort clips. To begin animating a clip, follow these steps:
Click the clip in the Timeline that you want to animate to select it, and make sure that the CTI is somewhere over the clip.
Just about any clip that you animate should be in a superimpose track — that is, the clip should occupy any track above Video 1.
Choose Window
Click the right-pointing arrow next to the Motion heading to expand the Motion controls.
Now you're ready to start animating the video clip. The next couple of sections show you how to use the clip Motion controls in Premiere Elements. You can use the Motion controls to move or resize video clips.
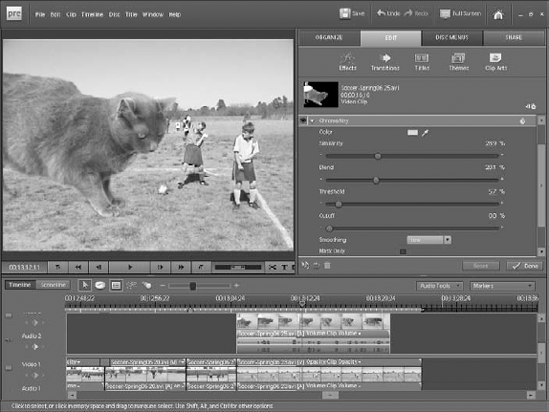
Motion controls give you command over the size and position of clips. To adjust basic Motion controls, click a clip's image in the Monitor, and then click-and-drag corners of the video image to resize it (see Figure 11-5). To move the clip, click-and-drag the circle in the middle of the clip. For more precise control, use these controls under Motion in the clip properties:
Position: The position of the clip is expressed in pixels along an X (horizontal) and Y (vertical) axis. Zero for the X axis is the left edge of the screen, and zero for the Y axis is the top of the screen. The default position for any clip is right in the middle.
Scale: The default scale for any clip is 100, which means it takes up the whole screen. Reduce the scale to shrink the image size.
Scale Width: If you remove the check mark next to Constrain Proportions, you can adjust height and width independently. With Constrain Proportions unchecked, the Scale control adjusts height, and the Scale Width control adjusts width. Just keep in mind that adjusting height and width independently distorts the video image.
Rotation: Use this control to rotate the clip. Click-and-drag left or right on the clock-style rotation control to spin the image on its axis.
Anchor Point: All the other controls work off the clip's anchor point, which is usually in the center of the clip. Adjust this control to move the anchor point to the corner or any other part of the clip.
Anti-flicker Filter: If you notice flickering lines at the top or bottom of a resized image, adjust the Anti-flicker Filter slider to correct the problem.
As you play with the Motion controls, you'll quickly see how easy it is to change the on-screen position, size, and orientation of a clip. But what if you want the clip to move across the screen after you've shrunk it? To do this, you must use effect keyframes. Effect keyframes are reference points used by Premiere Elements to define the starting and ending points for effects and other changes. I explain keyframes in greater detail in Chapter 12, but to control motion with keyframes, follow these steps:
Click the clip you want to animate in the Timeline to select it.
Move the CTI to the beginning of the selected clip.
The easiest way to do this is to first position the CTI somewhere over the clip, and then press Page Up on your keyboard.
Choose Window
Click the Show/Hide Keyframes button (see Figure 11-5) to reveal a mini-timeline for the clip.
In the Motion controls for the selected clip, click the Toggle Animation button next to the control you want to animate.
For example, Figure 11-5 shows the Position and Scale controls being animated.
Adjust the Scale, Position, and any other Motion controls you want to change.
These settings represent what the clip looks like and where it's positioned at the start of the animation.
Click the Timeline window to make it active, and press Page Down to move the CTI to the end of the clip.
Adjust the Scale, Position, and any other Motion controls for the clip.
These settings represent what the clip looks like and where it's positioned at the end of the animation.
Premiere Elements automatically creates keyframes at the beginning and end of the clip and automatically calculates how the clip should move and change to steadily go from one keyframe to the next.
Tip
In Figure 11-5, the animation in the clip begins on-screen in the lower-right corner, and the clip then expands to full size to fill the screen. You can add additional keyframes along the clip's path to make more dynamic changes.
You're watching a video clip and realize, "The only thing that would make this scene better is a silly hat." You could reshoot the scene and make your subject wear a silly hat, but that's a lot of work and silly hats are expensive.
An easier solution is to use Motion Tracking mode in Premiere Elements. Motion Tracking mode identifies moving objects in video images. You can then apply effects or clip art images that move with those objects across the screen. To use Motion Tracking mode, follow these steps:
Position the CTI over a clip containing objects you want to track, and click the clip to select it.
Motion Tracking mode works only on analyzed clips. See Chapter 5 for more on auto analyzing clips.
Click the Motion Tracking mode button on the Timeline.
Yellow boxes appear around moving objects in the video image, as shown in Figure 11-6.
Click the box around the object you want to track.
The box turns blue, and a list of clip art appears in the Task pane.
Find a piece of clip art you want to use, and drag and drop it onto the blue box in the Monitor.
Use the handles to move and resize the clip art.
Click Add Object above the Monitor.
Play the Timeline to preview the motion tracking effect.
If you aren't happy with the result, select the clip art clip in the Timeline and fine-tune its size and position by using Motion controls and keyframes, as described earlier in this chapter. Motion Tracking mode can also be used to apply effects to certain areas of a video image. For example, if your Old West scene is spoiled by an airplane flying in the background, use Motion Tracking mode to apply a garbage matte that hides the airplane.
