
Making movies with Adobe Premiere Elements is so much fun that it's easy to forget the most important part: Sharing your movies with others. Entertaining and informing others is one of the main reasons for manipulating raw video clips into interesting and creative movies.
You can share your completed movies with the world in many different ways. This chapter shows you how to share your movie projects in the online world of the Internet. I help you identify some of the special problems involved with putting movies online, help you choose a player program for your movies, and show you how to export your movies in a variety of Web-friendly formats directly from Adobe Premiere Elements. I also show you how to upload your movies to YouTube.
I'll never forget the first time I left a vinyl record sitting next to a window in direct sunlight. I came back a few hours later and the record was warped beyond repair. Ruined! If only I had a backup!
Today most media is stored on computer hard drives rather than on vinyl LPs. Computers don't warp if you leave them out in the sun, but the digital age has made us no less vulnerable to data loss. An unexpected hard drive failure can mean that all your stored music, photos, and movies are gone forever. But if you have a Photoshop.com membership, you can use this service from Adobe to back up photos and videos online. Follow these steps:
When you're done editing, click the Share tab on the Task pane.
Click Online, and then select
Photoshop.comin the list of online sharing options.Click Next and enter a title for your movie, as shown in Figure 15-1.
Choose how widely you want to share the movie:
Everyone: Anyone on the Internet can view your movie.
People I Invite: This option lets you pick and choose who can view the movie, and it automatically generates invitation e-mails.
Private: Only you can access the movie through your
Photoshop.comaccount.
If you chose to invite specific people to view the movie, type a message in the Email Message box, and then place a check mark next to contacts who should receive the invitation.
Premiere Elements maintains a contacts list for movie invitations. To add contacts, click the Address Book button (it looks like a person and is at the upper-right corner of the contacts list). In the Address Book dialog box that appears, click Add Contact and then type a name and e-mail address for the person you want to add. Click Done to close the Address Book.
Click Share to begin uploading your movie.
The sharing process may take awhile, because the movie is encoded in the Photoshop.com video format before it is uploaded. When the upload is complete, a link appears to take you online to view your movie.

Today, digital video and the Internet go together like Kirk and Spock. But back in the early days of digital video and the online world, the relationship was more like Spock and Dr. McCoy, which is to say challenging and complex. If you wanted to share movies online, you had to pay for dedicated Web server space, and you needed knowledge of how to build and maintain Web sites. Then in 2005 along came YouTube, and online video was revolutionized. YouTube introduced several important innovations:
Free Web server space: There's no charge to upload videos to YouTube, and watching videos is free too.
Simple upload interface: You don't need to be a trained Internet engineer to use YouTube. The upload page uses simple options to help you upload any video file from your computer.
Flash video conversion: You can upload videos to YouTube in almost any common video format. YouTube automatically converts your videos to the Adobe Flash format. The Flash Player browser plug-in from Adobe is free, and it's installed on nearly all modern computers.
Because you have Adobe Premiere Elements, there's even more good news: Premiere Elements can upload your videos directly to YouTube. The only limitations — besides good taste and the YouTube terms of use — are that videos you upload can be no longer than ten minutes and no larger than 100MB.
Note
YouTube is a tremendous information resource, but certain kinds of information can be controversial or even illegal in some countries. A few countries have blocked access to YouTube at various times, and certain kinds of videos may be blocked in some countries. Likewise, some corporate networks block YouTube videos. Keep in mind that in rare cases your intended audience won't be able to watch your YouTube videos.
Uploading videos to YouTube is free, but you must have a YouTube user account. You can create an account in Premiere Elements during the upload process, or you can visit the YouTube Web site directly and create an account at any time:
Visit
www.youtube.com, and click the Sign Up link in the upper-right corner of the Web page.An account creation page appears.
Enter a valid e-mail address, and provide a password.
Create a password that is at least eight characters long and includes numbers, uppercase letters, and lowercase letters. The e-mail address you enter must be valid because YouTube will send you a confirmation e-mail as part of the account creation process.
Provide a unique user name.
Click the Check Availability link to see if your user name is available.
Enter other requested information, and review the Terms of Use and Privacy Policy files.
YouTube asks for your general location, date of birth, and gender. Make sure that you review the Terms of Use and Privacy Policy links carefully.
Click Create Account.
Open your e-mail account and click the Confirm your email address link in the YouTube confirmation e-mail.
If you don't receive a confirmation e-mail, check the anti-spam settings for your e-mail program or account to make sure that the confirmation e-mail isn't erroneously sent to spam prison.
You can upload virtually any video file on your computer to YouTube by visiting www.youtube.com, logging in to your account, and finding the Upload link on the YouTube Web page. But why go to all that hassle when you can easily upload YouTube videos right from within Premiere Elements? When you're done editing your movie in Premiere Elements, make sure your computer is connected to the Internet. Then follow these steps:
Click the Share tab, and then click Online in the list of sharing options that appears.
Click YouTube in the list of online sharing choices.
Review the file size and duration of your movie on the Share tab. Premiere Elements limits YouTube file sizes to less than 100MB and durations to ten minutes or less. If your movie is longer than ten minutes, you either need to break it up into segments and upload each one separately, or do more editing to shorten the movie's duration. If you really need to share a longer movie, you may need to share the movie using another method, which I describe later in this chapter.
Choose an option in the Presets menu.
If your movie has a 4:3 aspect ratio (see Chapter 3 for more on aspect ratios), choose Flash Video for YouTube. If your movie has a 16:9 aspect ratio, choose Flash Video for YouTube (Widescreen).
Click Next, and enter your YouTube account name and password.
Place a check mark next to Remember Me to make logging in easier.
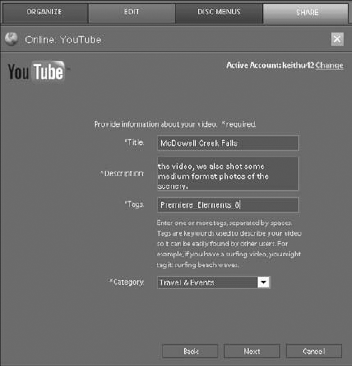
Click Next again, and enter a title and other descriptive information about your movie, as shown in Figure 15-2.
This is the information that YouTube users will see when they watch your movie. It also helps the YouTube search engine find your movie.
Decide whether you want to share your movie with the public.
If you choose Yes, anyone can find and view your video on YouTube. If you choose No, you can still share your video with select friends, but those friends must log in to a YouTube user account, and you have to manually allow them to view your video in your YouTube account control panel. Click the Account link at YouTube to manage your privacy settings.
Click Share.
Premiere Elements renders your movie in the Flash format and then uploads it to YouTube. The rendering and upload process may take awhile, depending on the complexity and length of your movie.
When the movie finishes uploading, a screen appears with a link to your video at the YouTube Web site. You can e-mail that link to other people to share your video. If you go to YouTube and find that your movie isn't yet ready for playback, don't worry. The video needs to be processed by the YouTube server before it can play, which usually takes a few minutes.
YouTube provides an easy way to share your movies online, and you can't beat the price (it's free). But YouTube isn't your only option, and Premiere Elements can output movies in the most popular Web-friendly video formats. These formats include Adobe Flash, Apple QuickTime, and Microsoft Windows Media Video.
Sharing video online presents technical challenges that you need to know about. The good folks who built the foundations of the online world many decades ago envisioned it as a staging ground for efficient global information exchange, but sharing full-motion video over the Internet wasn't part of the original plan. Video, and especially streaming video, is at odds with the fundamental design of the Internet for two key reasons:
Bandwidth: High-speed broadband Internet connections have become far more commonplace in recent years, but the term "high speed" is relative. Large video files can still take awhile to download, and some of your audience members may not have the patience to sit around waiting for downloads to finish. Large movie files can also quickly eat up the monthly bandwidth allotment for your Web server space, especially if your movies become popular with other Internet users.
Packet delivery: Data is transmitted over the Internet in packets rather than in steady streams. This makes data transfer over the Internet reliable, but not fast.
Note
Data is broken into packets for transmission over the Internet. These packets travel many different pathways to the destination, where they are reassembled in the correct order to form a Web page, e-mail message, or any other file that is shared online. Contrast packet delivery to, say, a radio or television broadcast, which transmits data in a continuous wave. Packet delivery is reliable because it doesn't require an unbroken connection between the sender and receiver. Confused? Imagine you want to give your phone number to someone across a crowded room. You could try yelling across the room (a broadcast), but the receiver might miss a number or two because of the crowd noise. A more reliable method would be to write your number on a piece of paper and send it across the room via messenger. The paper method is slower, but at least you know the recipient will get the correct phone number.
So what's the point of all this technical discussion about bandwidth and packets? Video for the Web must be highly compressed, the frame size must be reduced, and you must accept some sacrifices in quality. Video can be distributed over the Internet in one of two ways:
Download: Users download the entire movie file before it is played. Most current video player programs can start to play the movie before it is all downloaded. The program calculates when enough of the movie has been received so that playback can begin and continue without interruption. This is called progressive playback or progressive download, and it does a fair job of mimicking streaming video.
Stream: The movie plays as it downloads to the user's machine. Some of the video is buffered (portions of the data are temporarily stored in computer memory) to provide uninterrupted playback. The predominant formats for streaming video are Apple QuickTime Streaming, RealMedia, and Windows Media Streaming Video. In each case, special server software is required to host streaming media.
Regardless of which distribution method you choose, the export process for the movie from Adobe Premiere Elements is still the same. You export the movie as a file that resides on your hard drive. Whether that file is later streamed is determined by whether you use streaming server software on your Web server. See Chapter 19 for more on choosing a Web server.
Tip
You may want to produce a lower-quality movie for people who are impatient or have slow dialup connections, and make a higher-quality movie for folks with fast broadband access. You may also want to offer versions for several different players. For example, you can offer both Apple QuickTime and Windows Media versions. Face it: Some people are very touchy about using software from certain companies.
Apple QuickTime is popular for sharing movies online because it provides a good balance of file size and quality. Before you can export to QuickTime format, you must have QuickTime Player 6 or later installed on your computer. To download QuickTime, visit www.apple.com and click the Downloads link. Once QuickTime is installed, exporting a QuickTime movie is simple. When you're done editing your movie, follow these steps:
Click the Share tab, and then choose the Personal Computer option.
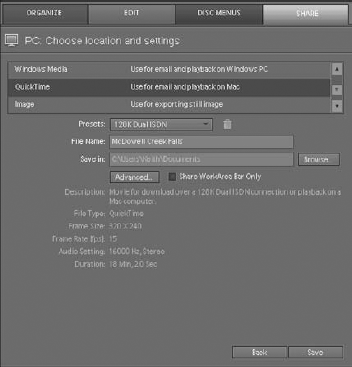
Scroll down the menu at the top of PC sharing options and choose QuickTime, as shown in Figure 15-3.
Choose a preset from the Presets menu.
When you choose a preset, a description of the preset appears at the bottom of the Share tab. The presets offer different combinations of frame size, frame rate, and audio frequency to suit a variety of bandwidth needs. The highest quality preset is the LAN preset, which has a frame size of 640 × 480, a frame rate of 29.97 fps (NTSC) or 25 fps (PAL), and an audio frequency of 44 kHz, which is roughly CD-quality. The 128K Dual ISDN preset shrinks the picture size to 320 × 240, cuts the frame rate to 15 fps, and reduces audio quality to 16 kHz. If neither of the presets matches your needs, click the Advanced button to customize export settings. I describe advanced QuickTime settings in the next section.
Enter a filename for your movie in the File Name field.
Click Browse and choose a location in which to save the movie.
Click Save.
When you click Save, Premiere Elements begins to render and save the movie. A Rendering progress bar appears to let you know the progress of the export. The progress bar also estimates the remaining time; saving the file might take awhile, especially if this is a long project.
When you export a QuickTime movie, you may want to customize your export settings rather than use a preset. To customize the settings, click Advanced on the Share tab when you export a QuickTime movie (see the preceding section for the basic steps of saving a QuickTime movie). The Export Settings dialog box appears, as shown in Figure 15-4. Click the tabs in the Export Settings dialog box to access advanced Video and Audio settings.
When you're done adjusting settings in the Export Settings dialog box, click OK and continue saving your movie as described in the preceding section. The next few sections describe advanced QuickTime export settings in detail.
QuickTime videos are videos, so it makes sense that advanced video settings are the first thing you see when you open the Export Settings dialog box. The QuickTime video settings are pretty easy to sort through. Review these settings on the Video tab of the Export Settings dialog box:
Codec: This is the compression/decompression scheme used to compress the movie to a smaller file size (see Chapter 3 for more on codecs). There are many choices in the Codec menu, but for online use, the H.264 codec is usually best. If people have a hard time playing your QuickTime movies — jerky playback is one common problem — try using one of the Sorenson codecs instead.
Quality: This setting controls how the video image is compressed. It should come as no surprise that higher quality results in larger file sizes.
Frame Width/Height: These boxes control the size of the video image. Try to maintain the aspect ratio of 4:3 to prevent distorting the video image (16:9 widescreen videos will be letterboxed in QuickTime Player). Chapter 3 explains aspect ratios. Larger video sizes mean larger files. (Is there an echo in here? Is there an echo in here?)
Frame Rate: Broadcast-quality video usually has a frame rate of 25 or 29.97 frames per second (fps). You can save file size and bandwidth by using a frame rate of 12 or 15 fps. To ensure smooth playback, choose a frame rate that is one-half or one-third of the original frame rate.
Field Order: For online movies, you usually choose None (Progressive). However, if you find that the movie you output has combing or other interlacing problems, choose Upper or Lower. Some experimentation may be necessary. I explain interlacing in Chapter 3.
Pixel Aspect Ratio: Square Pixels is the most common choice here, but if your video image appears stretched or squeezed you may need to choose one of the rectangular pixel options. Choose the option that matches the format of your original source footage.
Set Bitrate: Place a check mark next to Set Bitrate and adjust the Bitrate slider to change the video bitrate. A higher bitrate means higher video quality, and of course, larger file sizes.
Set Key Frame Distance: Compression key frames help video compress more efficiently. A longer interval between key frames often reduces file size and quality. Enable the Set Key Frame Distance check box to change the interval between compression key frames.
Frame Reordering: This option makes compression a lot more efficient, but it may also cause playback problems for some people, especially those who have older versions of QuickTime.
Note
Despite the name similarity, compression key frames are entirely different from effect keyframes. A compression key frame is a picture of the entire video image. When video is compressed, a key frame might only occur once every one, five, or even ten seconds. All the frames between those key frames — the in-between frames are called delta frames — contain information only about things in the video image that have changed.
Apple QuickTime's audio settings are simple. You can choose an audio codec from the Codec menu (the AAC codec works well), select mono or stereo output, and specify a frequency. A frequency of 44 kHz provides CD-quality audio, but keep in mind that high-quality audio can inflate file size in a big hurry.

Tip
If your exported files are too big, start here to whittle down the file size. A simple reduction of the audio frequency, as well as switching from Stereo to Mono, can make a big difference in the file size.
Another Web-friendly export option in Adobe Premiere Elements is Windows Media. This export option produces Windows Media Video (WMV), an efficient export format for online media. WMV-format video supports progressive download (also called hinted download), which means it starts to play as soon as a sufficient amount of data has been received to ensure continuous playback from start to finish. Windows Media Player is free and preinstalled on all Windows PCs, and a free program called Flip4Mac is available on the Apple and Microsoft Web sites to allow Macintosh users to view unprotected WMV files as well.
Exporting Windows Media video is a lot like exporting QuickTime movies. To export Windows Media video, follow these steps:
When you're done editing your movie, click the Share tab.
Choose the Personal Computer sharing option.
Even though your ultimate plan might be to share it online, don't choose the Online option. The Online option gives you access only to Flash video formats.
Scroll down the menu at the top of PC sharing options and choose Windows Media, as shown in Figure 15-5.
Choose a preset from the Presets menu.
When you choose a preset, a description of the preset appears at the bottom of the Share tab. The presets offer different combinations of frame size, frame rate, and audio frequency to suit a variety of bandwidth needs. The highest quality presets are the HD 1080i and 720p presets (available only if you're working with a high-def movie). These presets offer essentially broadcast quality playback, but the files sizes are usually way too big for online use. The highest quality Web-friendly preset is Local Area Network (LAN), which includes a frame size of 640 × 480, a frame rate of 30 fps (NTSC) or 25 fps (PAL), and an audio frequency of 44 kHz, which is roughly CD-quality. Contrast this with the lowest-quality preset, which is the DialUp 56K Modem preset. This preset has a frame size of 176 × 144, a frame rate of 10 fps, and 16 kHz audio. Obviously, the LAN preset gives much better playback quality, but it also yields a much bigger file size. In Figure 15-5, I have chosen the Cable Modem/DSL preset, which falls somewhere between the LAN and DialUp presets in terms of quality and file size.
If none of the presets exactly match your needs, click the Advanced button to customize your export settings. I describe advanced Windows Media settings in the next section.
Note
As with QuickTime, presets that offer a higher frame rate, a larger frame size, or greater audio quality tend to produce larger movie files. To customize your Windows Media export settings, click Advanced. I describe advanced settings in the following section.
Enter a filename for your movie in the File Name field.
If you plan to export your movie in several different sizes to accommodate a variety of online viewers, make sure that the filename reflects the preset used for this version. For example, if one version of a movie shot at a jazz festival uses the Cable Modem/DSL preset, you might name the file
JazzFestDSL.A second version which uses the 56K Modem preset might be calledJazzFest56K.Click Browse and choose a location in which to save the movie.
Click Save.
When you click Save, Premiere Elements begins to render and save the movie. A Rendering progress bar appears to let you know the progress of the export. The progress bar also estimates the remaining time; saving the file might take awhile, especially if this is a long project.

The Windows Media export presets should cover most of your needs, but if you're the kind of person who likes to tinker, click Advanced on the Windows Media sharing screen. This gets you under the hood, which looks like Figure 15-6. The Export Settings dialog box has tabs for Video settings, Audio Settings, and Audiences. Try not to scrape your knuckles on these settings:
Video Codec: Several Windows Media codecs are available on the Video tab. You can choose older versions of the Windows Media codec (such as 7 or 8) to make your movie compatible with older versions of Windows Media Player. If a user tries to view a Windows Media Video 9 movie with Windows Media Player 7 or 8, the movie may play improperly or not at all. Windows Media Player 9 has been available since 2003, so there's usually no reason to use an older codec.
Allow Interlaced Processing: The Video settings also allow you to specify interlaced processing. Choose this if your exported videos have interlacing-related combing (see Chapter 3 for more on interlacing) or other interlacing-related problems.
Bitrate Settings: Next to Encoding Passes, choose Two Encoding Passes. This choice increases the time it takes the movie to export, but it also helps the movie compress more efficiently. Choose One Encoding Pass only if you're in a hurry to export the movie. For the Bitrate Mode, the Variable Unconstrained option is your best bet for efficient compression and higher quality.
Frame Width/Height: These boxes control the size of your video image. Try to maintain the aspect ratio of 4:3 (16:9 widescreen videos will be letterboxed in Windows Media Player) to prevent distortion of the video image. See Chapter 3 for more on aspect ratios. Remember, larger video sizes mean larger files.
Frame Rate: Broadcast-quality video usually has a frame rate of 25 or 30 frames per second (fps). You can save file size and bandwidth by using a frame rate of 12 or 15 fps. To ensure smooth playback, choose a frame rate that is one-half or one-third of the original frame rate.
Pixel Aspect Ratio: Square Pixels is the most common choice here; however, if your video image appears stretched or squeezed, you may need to choose one of the rectangular pixel options in this menu. Choose the option that matches the format of your original source footage.
Keyframe Interval: Compression key frames help video compress more efficiently. A longer interval between key frames often reduces file size and quality. Adjust the Keyframe Interval to change the interval between compression key frames.
Average Video Bitrate: Adjust this slider to change the average video bitrate. Surprise: Higher bitrates yield better quality and larger file sizes.
Audio settings: As with video, you can choose a specific audio codec and bitrate settings on the Audio tab.
Audiences: On the Audiences tab, you can choose whether the exported movie will be compressed or uncompressed.
Note
You should always choose Compressed unless file size is absolutely not a concern. When is it not a concern?
When you're done reviewing and adjusting Windows Media export settings, click OK to close the Export Settings dialog box. Continue saving and exporting your Windows Media movie as described earlier in this chapter.
