
Reviewing the video transitions that come with Premiere Elements
Selecting effective transitions
Adding transitions to your movies
Fine-tuning video transitions
Anyone with a DVD recorder and a cable can dub desirable bits of video from a camcorder to disc. This is movie editing at its most basic; it's also inefficient and crude. By using a program like Adobe Premiere Elements, you can fine-tune your edits frame by frame, apply your own musical soundtrack, dub in narration, and add special effects.
In previous chapters I show you how to capture video onto your computer's hard drive, sort through clips, pick out the parts you want to use, and assemble those clips in the Timeline. If you've done those things, you're ready for the next step in your video-editing adventure: dressing up your project with transitions between scenes. You can use Premiere Elements to add transitions that fade in or out, pull open like a stage curtain, spiral down into a vortex, and more. Transitions provide visual breaks between scenes that help the viewer understand changes in the movie's setting or mood. This chapter shows you how to choose, apply, and customize transitions.
One of the trickiest aspects of movie editing (for me, anyway) is making clean transitions between clips. Sometimes the best transition is no transition at all, but a simple, straight cut from one clip to the next. Other times you need a fancy transition, say, one that rotates the old clip into a vortex — spinning, spinning toward the center until it's a tiny black dot in the middle of the screen — and then it disappears entirely. Most of your transitions probably fall somewhere in between.
Adobe Premiere Elements comes with more than 100 unique video transitions that you can use in your projects. These transitions are subdivided into 16 categories and range from simple dissolves to complex 3D motion effects. The following sections describe the transitions in each category. To find these categories, click the Edit tab, and then click Transitions (or choose Window
3D Motion: This category consists of ten transitions that apply various kinds of three-dimensional motion to one clip as it disappears to reveal the next one. Most of the transitions here involve getting the exiting clip to swing like a door or spin in a spiral. Figure 9-1 shows the Doors transition, where the incoming clip appears to close in from either side like a pair of doors.
Dissolves: My favorite transition, the Cross Dissolve, can be found in the Dissolve category. It's my favorite not because it is fancy but because it's not. The Cross Dissolve is subtle; one clip blends smoothly into the next. It's softer than a straight cut — and if I want the program to be about what's in the clips (and not about fancy transitions), this is the one I choose. You'll notice that Cross Dissolve is also the most common transition used in professional video products as well. Cross Dissolve is just one of seven Dissolve transitions available with Premiere Elements.
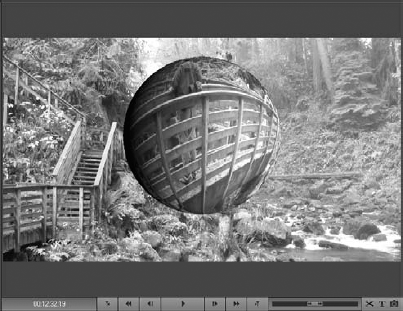
GPU Transitions: If your computer has a powerful dedicated video card as I recommend in Chapter 2, you can use the five GPU transitions offered by Premiere Elements. These transitions leverage the graphics processing unit (GPU) in your video card to display advanced visual effects. Figure 9-2 shows the Sphere GPU transition, which wraps the outgoing clip around a 3D sphere that then rolls off the screen.
Iris: The seven Iris transitions are all variations on a theme of one clip starting as a point in the middle and growing to fill the screen. Different Iris patterns include circles, squares, stars, diamonds (I know, it's starting to sound like a breakfast cereal!), and more. Like many transitions, Iris transitions can be customized by changing the shape and quantity of irises in the transition.
Map: The Channel and Luminance Map transitions can be customized to use colors from incoming and outgoing clips to create interesting blended images. The Map transitions work best when you heavily customize their settings. (I show how to customize transitions later in this chapter.)
NewBlue transitions: The four NewBlue categories contain a total of 29 snazzy transitions from NewBlueFX, a third-party developer of transitions and plug-ins for Premiere Elements and other editing programs. If you want a highly individualized movie, check out some of the NewBlue transitions such as Magic Carpet, Bouncing Cubes, or Wave.
Page Peels: The five Page Peel transitions simulate the turning of a page or opening of a book. Use these to make the transition from your "Once upon a time..." screen to the story!
Picture Wipes: This category contains three specialized transitions called Stars, Travel, and Wedding. These transitions incorporate themed graphics.
Slides: The Slide category is a descriptively named group that contains 12 transitions. All the transitions in this group are variations on sliding a clip one way or the other. These subtle transitions are also among my favorites. Slide transitions are similar to Wipe transitions, which I describe later.
Special Effects: The Special Effects category contains six advanced and varied transitions that apply various combinations of color masks and distortions while moving from one clip to the next.
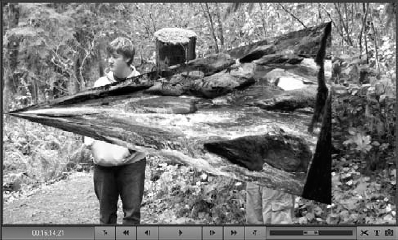
Stretches: The five transitions found in the Stretch category are pretty cool, even though technically some of them squeeze rather than stretch the clip image during transition. In Figure 9-3, the outgoing image is squeezed down a funnel, using the Funnel transition.
Wipes: Wipe style transitions have been around for a while: One clip appears from the edge of the screen and appears to wipe over the preceding clip like a squeegee. Wipe transitions differ from Slide transitions, because in a wipe the outgoing image remains static while the incoming image wipes over it. In Slide transitions, the incoming image slides in while the outgoing image slides out. Premiere Elements includes no less than 17 Wipe transitions.
Zooms: There are four Zoom transitions, and as you would imagine, they all simulate different camera zooms. An outgoing transition can zoom out into the distance where it disappears, or the camera may appear to zoom in on the incoming clip.

Tip
When automakers choose paint color names, they tend to go crazy. What you and I might call Pink becomes Moulin Rouge or Indian Ceramic in car brochures. Fortunately, Adobe Elements keeps things simple by assigning descriptive names to video transitions. Slides slide, wipes wipe, and zooms ... well, you get the idea. Still, if you aren't exactly sure what Iris Diamond does, hold your mouse pointer over the transition. The transition's icon plays a small preview of the transition so you can easily see what it does.
With so many unique transitions to choose from, selecting just the right one can be challenging. When you consider that most transitions can also be fine-tuned and customized, the endless possibilities may have already started your head spinning. So how do you choose? Because video production is such a creative and personal endeavor, I couldn't possibly recommend a perfect transition for every situation. I do, however, have a few basic transition rules to follow as you develop your own editing style:
Use transitions sparingly. You don't need to apply a transition between every single clip in your Timeline. That's too much. I try to save transitions for changes of scene. Simple changes to the camera angle or position in the same scene (for example) usually don't warrant a transition. Watch a typical feature-length movie and you'll probably see just a small handful of simple transitions, even though the movie may be a couple of hours long.
Keep 'em short. Later in this chapter, I show you how to control the length of a transition. Most transitions should be short in duration, usually one second or less.
It's all about the pictures. Editing can help shape the mood and flow of a movie, but ultimately the focus of your project is the video content. The desire to show off your editing skills with fancy transitions can be tempting — but generally speaking, transitions should complement and enhance the video images, not overpower them.
Thinking of the mood you want to set may help you narrow down your transition choices. For example, you want to avoid transmogrifying the scene with a high-tech Distortion transition if you're editing a movie that celebrates your grandparents' golden wedding anniversary. Remember, ultimately the movie is about your grandparents, not your incredible movie-editing abilities.
Follow your inspiration. You should be familiar with the various transition styles that are available in Premiere Elements, even the ones you seldom, if ever, use. In a moment of late-night, caffeine-induced inspiration, it might come to you: "This is the spot for that fancy, spinning, 3D transition!"
Premiere Elements also offers a couple of audio transitions. In this chapter, I talk mainly about video transitions, so for more on working with audio transitions, slide, peel, or dissolve your way over to Chapter 8.
The tricky part of adding transitions to a movie project in Adobe Premiere Elements, in my opinion, is choosing a transition that looks good without detracting from the overall flow of the project. In the preceding section, I talk about choosing an effective transition. In this section, I show you how to actually put some transitions to use.
If you're new to video, you may be surprised by how many different transitions are possible between two clips. As I mention previously in this chapter, Adobe Premiere Elements comes with more than 100 built-in transitions, and you can add even more through third-party plug-ins.
Premiere Elements stores all its transitions under the Edit tab of the Task pane. Click the Edit tab, and then click Transitions, or choose Window
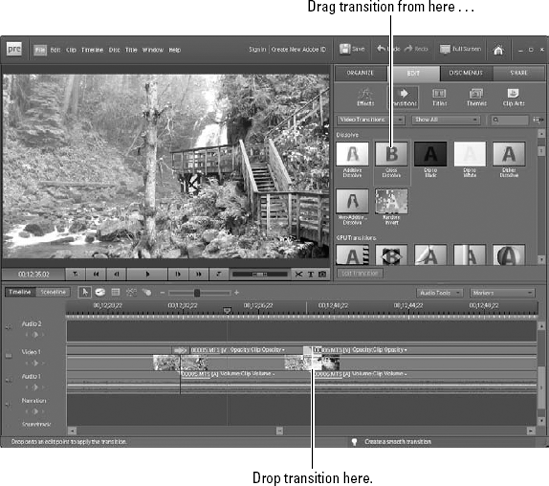
The software designers at Adobe must really like drag-and-drop because, as with so many other editing actions in Premiere Elements, drag-and-drop is the best way to apply a transition. Simply choose a transition and drag it from the Edit pane to the desired spot on the Timeline, as shown in Figure 9-4.
Note
When you add a transition to the Timeline, the In and Out points of adjacent clips are automatically extended to facilitate the transition. Thus, each clip needs some unused frames that were trimmed off when you edited the clip into the Timeline. For example, if a transition lasts one second, the preceding clip must have at least a half-second of trailing material, and the following clip must have a half-second of leading material. Keep this in mind when you set In and Out points as you edit clips into the Timeline (see Chapter 6 for more on setting In and Out points).
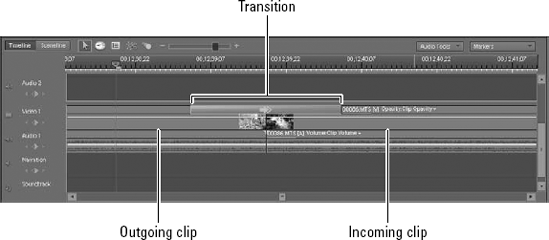
If the clips lack sufficient leading or trailing material, you are somewhat limited in how you can position the transition. The default method in Premiere Elements is to drop it so that the transition evenly overlaps both adjacent clips, as shown in Figure 9-5. In the figure, the transition is 30 frames long, which means that 15 frames are added onto the end of the outgoing clip and 15 frames are added to the beginning of the incoming clip.
If neither clip has enough material, Premiere Elements won't let you drop the transition right on the edit line — your Timeline won't look neat and pretty like Figures 9-4 and 9-5. Instead, Premiere Elements may only allow you to drop the transition entirely on one clip or the other. You may even see a warning message advising you that some frames will be repeated.
If you find yourself in a situation in which you have too little media to accommodate a transition, you have a couple of options:
Skip using a transition at this point in your movie. Maybe this problem is a sign that you don't really need a transition.
Shorten the length of the transition. If the clips have some leading and trailing material, but not quite enough for the current transition length, you might be able to make the transition work if you make it shorter. I show you how to adjust transition duration later in this chapter.
Shorten the length of the clip(s). Choose the Selection tool in the Timeline (see Chapter 7 for more on ripple edits) and drag the edges of the leading and trailing clips until you've trimmed about half a second from each clip. Because a ripple edit basically trims material off the clip and changes the In and Out points, this should create enough leading and trailing time to facilitate the transition.
Note
If you want to apply a transition between two clips, those clips must be in the same Timeline track. Fortunately, Adobe Premiere Elements allows you to use transitions in any video track. Many other consumer-oriented video-editing programs allow you to use transitions in only one track.
More often than not, you just plop a transition down on the Timeline and use it as it sits. Sometimes, however, you may want to fine-tune the transition.
You can change the length of a transition by clicking-and-dragging on either side of the transition. For example, you can shorten the duration of a transition to speed it up, or lengthen the transition if you want it to occur more gradually. To change the duration of a transition, first click the Selection tool in the upper-left corner of the Timeline (the Selection tool looks like a single large arrow), and then click-and-drag one side of a transition to lengthen or shorten it.
You can also modify the duration of a clip by using the Edit tab. After you apply a transition, double-click the transition in the Timeline to open transition controls, as shown in Figure 9-6. You can also open the transition controls by clicking the transition once to select it, and then choosing Window
The default duration for most clips is one second, but you can make the transition as short or long as your source clips and common sense allow. To adjust the duration of a transition using the Edit tab, enter a new number in the Duration field. You can also click-and-drag left or right on the Duration field to adjust the time. In Figure 9-7, I have changed the duration of the transition to 25 frames, which is a little less than one second in NTSC video.

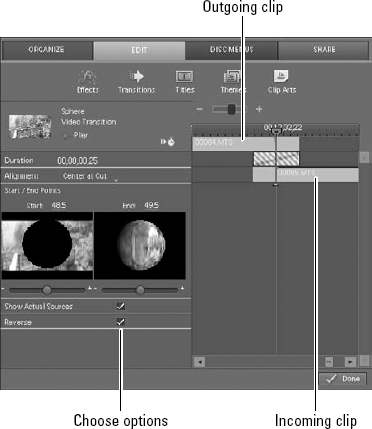
Figure 9-7 shows a number of different controls in the Effect Controls window. Some key settings and features include
Split-track Timeline: Click the Show Timeline button in the Edit pane (refer to Figure 9-6) to reveal a small Timeline window showing just the current transition. If you've used older versions of Adobe Premiere, you may notice that this looks similar to the split-track Timeline that was used in the old A/B Editing workspace, found in Adobe Premiere 6.5 and earlier.
The split-track Timeline shown in Figure 9-7 is useful because it shows how much leading and trailing material is available for each clip. You can roll-edit the transition in this Timeline by dragging it back and forth.
Alignment: Use the Alignment menu under the Duration field to control alignment of the transition. By default, a transition uses the Center at Cut setting, but you can also make the transition start or end at the location of the original cut between clips if you want to change the starting or ending frames of the transition.
Preview window: Click the Play button above the preview window in the upper-left corner to see a visual representation of the transition. Some transitions, such as slides or wipes, allow you to change direction — simply click the arrows around the edges of the preview window to change the transition's direction. Some transitions have arrows around the preview window because they are directional transitions. Click an arrow to change the transition's direction.
Start/End controls: The Start and End boxes represent the outgoing clip (Start) and the incoming clip (End). Use the slider controls underneath these boxes to change where the transition starts or ends.
Show Actual Sources: If the Start and End boxes aren't clear enough for accurate editing, deselect this option to replace the clip thumbnails with a giant "A" (for the outgoing clip) and "B" (for the incoming clip).
Reverse: Enabling the Reverse option can reverse the direction of many transitions.
Other options: Some transitions have additional options which will be listed under Reverse. Some common options include borders and edge smoothing (called anti-aliasing). Experiment with other options to customize the appearance and function of your transitions.
More than 100 transitions come with Premiere Elements, all with different settings to adjust, so your Effect Controls window may not look exactly like Figures 9-6 or 9-7. Play around a bit to find the transitions and combinations of settings that work best for you!
Tip
Some transition options allow you to specify a color for transition elements (such as borders). To choose a color, click the color swatch to open the Color Picker window. When you choose a color in the Color Picker, watch out for a yellow triangle with an exclamation point in the upper-right corner of the window. If you see the warning icon, it means that the color you chose won't appear properly on video equipment in your area (NTSC or PAL). In that case, your best option is to choose a different color.
Premiere Elements knows that a lot of people have one type of transition that they use most of the time. It just so happens that the transition I use most often — the Cross Dissolve — is also the default transition in Premiere Elements. But if you want to set yourself apart from the crowd, you may want to change the default transition in Premiere Elements.
Setting the default transition comes in handy when you use Premiere Elements to create slideshows from still photos. (I describe how to create a slideshow in Chapter 17.) If the Cross Dissolve is not your favorite transition, I won't hold it against you. In fact, I'm even willing to show you how to change the default to your favorite transition. To set a new default transition, follow these steps:
Open the Edit tab, and then click Transitions.
Alternatively, choose Window

Locate the transition that you want to use as your default transition.
Right-click the transition and then choose Set Selected as Default Transition in the menu that appears, as shown in Figure 9-8.
Your new default transition should now have a gray border around it.
Tip
You can also change the default duration for transitions. Choose Edit
