Capturing video to edit
Importing video, audio, and other media
Organizing your multimedia files
If you have a word processing program like Microsoft Word, you simply launch the program and start typing to compose something new. Likewise, you can open most graphics programs and start drawing freehand to create a new picture. But Adobe Premiere Elements is different, because you can't just open the program and create a movie from nothing. To really put Premiere Elements to use, you must capture video from your camcorder and import other kinds of media such as music and photos.
This chapter guides you through the process of capturing audio and video, using Premiere Elements, whether you're capturing video from your digital camcorder or importing it from another source. This chapter also shows you how to organize your media. Organization becomes increasingly important as you build a collection of dozens or even hundreds of video clips, audio clips, still images, and more.
Before you can make movies in Premiere Elements, you have to capture or import video from your camcorder. What's the difference between capturing and importing video? They're slightly different processes that depend on the type of camera you have:
Capture: Capturing is what police do to fugitives from justice. It's also what you do with video that has been recorded onto a tape. Premiere Elements can capture video from DV camcorders that use MiniDV or Digital8 tapes, or MiniDV-based high-def (HDV) camcorders. The process of getting video from tapes and turning it into files on your computer's hard drive is called capturing. Recording live images from a Web cam is another form of video capture.
Import: Importing is the process of buying goods produced overseas, and it's what you do with video from tapeless camcorders. Tapeless camcorders may use DVDs, hard drives, or memory cards to store digital video. Because the videos are already saved as files on your camera, those files simply need to be imported onto your computer's hard drive.
Note
Don't worry too much about the difference between capturing and importing; it won't be on the test later! For the sake of simplicity, I often use the term "capture" to refer to the process of getting video from any digital camcorder, as well as digital still cameras, cell phones, and Web cams.
To start capturing video from your camera, launch Premiere Elements and start a new project as described in Chapter 4. Then follow these basic steps:
Connect your camera to your computer's FireWire or USB 2.0 port.
Check your camera's documentation if you aren't sure which port to use.
Turn the camera on to Playback or VTR mode.
Make sure that the camera has a charged battery. Some cameras must be plugged into AC power for video capture.
Tip
Windows will probably detect your camera as soon as you turn it on, and a dialog box will appear asking you what you want to do. It'll probably ask you if you want to capture video or make a DVD by using Windows components rather than Premiere Elements. Click Cancel to close the dialog box.
In Premiere Elements, click the Organize tab in the Task pane, and then click Get Media.
A list of device types appears, as shown in Figure 5-1.
Click the button that most closely matches your camcorder.
What happens next depends on the type of camera you have. If you have a tape-based camcorder, you should click "DV Camcorder" for a standard-definition camera, or "HDV Camcorder" for a high-definition unit. Now visit the next section, "Capturing video from DV or HDV tapes," for your next steps. If your camcorder uses DVDs, a hard drive, or memory cards, or if you want to get video from a still camera or cell phone, see the section titled, "Copying video from tapeless cameras." Visit "Capturing Web cam video" if you have a Web cam.

Note
As I describe in Chapter 4, video capture (particularly from tapes) requires a lot of system resources. Before you start capturing, close all other open applications, disable unnecessary Windows startup utilities, and make sure that your scratch disk has plenty of empty space.
If your digital camcorder stores video on tapes (either MiniDV or Digital8), the process of transferring that video onto your computer's hard drive is called capturing. Premiere Elements supports capture from three different types of tape-based digital camcorders:
MiniDV: This tape format — sometimes also called DVC — was first developed for digital camcorders in the 1990s and is the most common camcorder tape format today. Most MiniDV camcorders have FireWire ports for video capture. Some MiniDV cameras have USB 2.0 ports, but FireWire is required for capture in Premiere Elements. Standard-definition MiniDV-based camcorders use the DV codec.
HDV: This is simply a high-definition video codec that records onto MiniDV tapes.
Digital8: These camcorders record digital video onto Hi-8 tapes. Digital8 camcorders have FireWire ports and use the DV codec, so in Premiere Elements they work exactly like MiniDV cameras.
Note
If your camera uses Sony's short-lived MicroMV tape format, I have some bad news: Premiere Elements doesn't support MicroMV. If you own a MicroMV-based camcorder, use Sony's included software to capture video, and then export it in MPEG2 format for easy import into Premiere Elements.
If you connect your DV or HDV camcorder to a FireWire or USB 2.0 port, Premiere Elements should recognize it automatically. But as with all things in the computer world, what should happen and what does happen aren't always the same thing. Before you try capturing video from a DV or HDV camcorder, I recommend that you manually configure Device Control in Premiere Elements. Device Control allows Premiere Elements to take control of and synchronize with your camcorder. To enable Device Control:
Connect your DV or HDV camcorder to your FireWire or USB port with an appropriate cable, and turn the device on to playback mode.
In Premiere Elements, choose Edit

The Preferences dialog box appears, displaying Device Control options.
In the Devices menu, choose DV/HDV Device Control for FireWire devices.
Click Options.
The Device Control Settings dialog box appears, as shown in Figure 5-2.
Choose the appropriate video standard (NTSC or PAL) from the Video Standard drop-down list.
See Chapter 3 for more on video standards.
Choose the brand of your camcorder from the Device Brand menu.
Choose a type or model number from the Device Type menu.
If your DV device isn't listed, click Go Online for Device Info. Premiere Elements checks Adobe's online hardware database and updates as necessary.
Choose a format from the Timecode Format menu.
I recommend that you keep the default or Auto Detect setting. See Chapter 3 for a detailed explanation of timecode formats.
If you see the word Offline next to the Check Status button, click Check Status to see if Premiere Elements can detect your camera.
If the Offline mode remains, make sure that the camera is turned on to playback mode, the battery is charged, and your FireWire/USB cable is properly connected.
Click OK twice to close the dialog boxes when you're done.

Your computer is ready to capture video. The camcorder is turned on and ready. Premiere Elements is ready. What about you? If you're ready to capture video, follow these steps:
Connect all the necessary cables, turn on your hardware, launch Premiere Elements, start a new project, and perform all the other preparatory steps described earlier in this chapter.
As described earlier in this chapter, click Organize and then click Get Media to open the list of device types (refer to Figure 5-1).
Note
If you want your captured video to be stored in a particular folder or hard drive, choose Edit
Click either DV Camcorder or HDV Camcorder.
Choose DV if you have a standard-definition MiniDV or Digital8 camcorder; choose HDV if you have a high-def camcorder.
Type a name for your video clips in the Clip Name field.
The Clip Name field is located in the upper-left corner of the Capture window. You can give a descriptive name to your clips, or you can just accept the default name.
Decide whether you want to capture video straight to the Timeline.
The right side of the Capture window has options, and one of them is called Capture to Timeline. If you keep this option enabled, your captured video will be automatically dumped onto the Timeline when you're done. This is helpful if you just want to make a movie quickly, but if you want to pick and choose scenes later, uncheck the Capture to Timeline option.
Enable the Split Scenes option if you want Premiere Elements to automatically detect scenes.
This feature creates separate clips for each scene on the tape and makes editing a lot easier later. I recommend that you leave the Split Scenes option enabled.
Auto-Analyzer is one of the coolest features of Premiere Elements. When you're done capturing, Premiere Elements analyzes your clips and then labels them with tags that tell you if the clips are in focus, if they include faces, whether the video is shaky or in focus, and other things. Auto-Analyzer adds a lot of time to the capture process, but if you aren't in a hurry, I recommend that you keep this feature enabled. The information that Auto-Analyzer provides will be useful later.
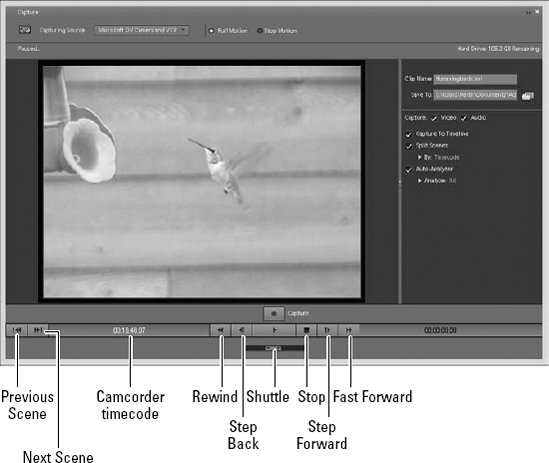
Use the controls located beneath the viewer section of the Capture window to review the tape.
To identify the exact frame at which you want to start capturing, use the left- and right-arrow keys on your keyboard. Figure 5-3 details the various playback controls. The Step Back and Step Forward buttons enable you to move back or forward a single frame at a time.
Click Capture to start capturing video.
Click Pause to stop capturing.
When you stop capturing, Premiere Elements reviews your captured video to detect clips and analyze content, if you enabled those features. A progress bar tells you how long the analysis will take.
When the capture job is done, your clips are loaded into the Organizer, and if you opted to capture directly to the Timeline, clips are placed there too. Visit Chapter 7 for more on deleting and moving clips in the Timeline.
If you got hung up on Step 7 in the preceding section, there is probably something wrong with your DV device, your computer, or both. If your camcorder doesn't respond to the playback controls in the Capture window, follow these troubleshooting tips:
Close and restart Adobe Premiere Elements: While you're at it, restart your computer, too. Make sure that the camcorder's power is turned on to playback mode before you restart Premiere Elements.
Double-check the physical connection to your computer: Is the FireWire cable properly installed and secure? The small ends of FireWire cables, which connect to camcorders, are prone to slipping out; I run into this problem even during professional video projects.
Be sure that the DV device recognizes the FireWire connection: The display or viewfinder on your camcorder may show an indication such as "DV IN" if the connection is detected.
The most common problem to afflict the video capture process is the infamous dropped frame. If something in the computer gets choked up during capture, Premiere Elements may miss, or drop, one or more frames. Dropped frames create unacceptable quality problems for captured clips in Premiere Elements, because essential digital data is gone — poof.
But how do you know whether a frame has been dropped? Glad you asked. If you finish capturing a clip and a Properties dialog box appears, that is a bad sign. Review the statistics in this dialog box. If you see a line that says, This movie appears to have DROPPED FRAMES, you almost certainly dropped frames during capture — and that usually means that you have to redo the capture.
Determining the cause of dropped frames can be challenging, but here are a few possible causes:
A timecode break: A timecode break on the tape can confuse Premiere Elements into thinking it dropped frames when it really didn't. Timecode breaks often occur when you reuse tapes by recording new footage over old footage you no longer want. When you reach the end of the new recorded footage, the timecode may change and thus confuse Premiere Elements. If you have been reusing tapes — not something I recommend — you might want to consider this as a possible cause of dropped-frame reports.
A hard drive error: The most common cause of dropped frames is that the hard drive can't maintain the required data rate during capture. Usually this isn't a problem on computers that match even the minimum system requirements for Adobe Premiere Elements, but it isn't beyond the realm of possibility either. Common causes include
Programs other than Premiere Elements were open during capture.
The hard drive has not been defragmented recently.
Another computer was trying to access the hard drive over your network (if you have one) during capture.
If your hard drive does appear to be the culprit, you can try to correct the problem by methodically repreparing your computer for capture as described earlier in this chapter. Close unneeded programs, defragment your hard drive, buy more RAM, or consider upgrading your drives. If your capture card came with its own capture software, you may want to try using that software to capture, and then import the captured clips into Premiere Elements for editing.
A problem with the DV device: If your Date Rate/Sec graph is a straight line but frames are still dropped, the cause is more likely your DV device or the tape.
Tip
If you have a separate hard drive used primarily for video capture, and you have a network, make sure that the hard drive isn't shared with your network. To check, right-click the drive in My Computer, and then choose the Sharing and Security option from the menu that appears. In the dialog box that appears, disable sharing if the drive is shared, and then click OK.
Early versions of Adobe Premiere Elements only supported camcorders that used MiniDV and Digital8 tapes. But tapeless video cameras are increasingly popular, and Adobe has flowed with the changes. The latest versions of Premiere Elements support nearly all digital camcorders, including those that record video on DVDs, hard drives, or solid-state memory. You can even import video shot with digital still cameras and cell phones.
Note
Solid-state memory is just a fancy technical term for data storage media that doesn't have any moving parts. This includes built-in flash memory as well as removable memory cards like SDHC cards.
Tapeless cameras make the capture process a lot easier. With tapes, you have to play the video in real time while your computer records it to files. But with tapeless cameras, the video is already saved into files, so all you have to do is copy those files from the camera to your hard drive. Follow these easy steps:
Connect the camcorder to your USB 2.0, turn it on to video playback mode, and prepare your computer as described earlier in this chapter.
In Premiere Elements, click Organize; then click Get Media, and choose the type of camera you have.
Choose DVD if you have a DVD-based camcorder (including miniature DVDs), or AVCHD or other hard disk/memory camcorder for most other tapeless camcorders. You can also choose Digital Still Camera or Mobile Phone and Players from the list of device types. The steps for importing video from those devices are the same as for importing from other tapeless camcorders.
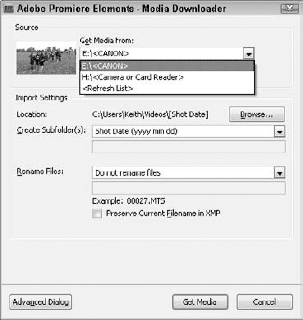
In the Media Downloader that appears, shown in Figure 5-4, choose your camera in the Get Media From menu.
If your camera isn't listed, make sure that it's connected and turned on. You may need to adjust settings on the camcorder itself to specify PC output; check the camera's documentation to be sure.
Select a subfolder option for your video in the Create Subfolders menu.
The default option creates separate folders for each date on which video was shot. This option is useful, but only if your camcorder's internal calendar and clock are set correctly.
Click the Advanced Dialog button.
The advanced Media Downloader dialog — shown in Figure 5-5 — lets you preview clips before you capture them. For some reason, Adobe thinks this step is optional, but I think it's pretty important.
Place check marks next to clips you want to download.
Use the three Show/Hide buttons in the upper-left corner to show or hide video clips, still images, or audio clips.
Click Get Media to import media from your camera.
When the import is complete, clips appear in your Organizer and are ready to use.
After the import is finished, close Premiere Elements, and then open My Computer or Windows Explorer.
Choose Start
Right-click the icon for your camcorder, and then choose Eject from the menu that appears, as shown in Figure 5-6.
Turn off the camcorder's power and disconnect the USB cable.

Some camcorders use SD memory cards for storage, and many computers have built-in SD card readers. You may be tempted to simply insert your SD cards directly into the card reader to try to copy video, but that may not work too well. Use the camcorder and the Media Downloader to ensure that your clips are imported properly and stay organized in Premiere Elements.

If you have a Web cam connected to your computer, Premiere Elements can record directly from that camera. Capturing video from a Web cam is a lot like capturing video from a tape-based camcorder. You should close other open programs to make sure that your computer runs efficiently. Then you can start to capture:
Connect the Web cam to your computer's USB port and make sure that the camera is powered on.
In Premiere Elements, click Organize, click Get Media, and then click Webcam or WDM Device.
In the Capture window that appears (refer to Figure 5-3), make sure that the video image is framed the way you want it to appear.
Give your clip a name in the Clip Name field.
Entering a clip name for Web cam video is important, because Premiere Elements can't automatically generate a name based on information from a camcorder.
Click Capture to start recording, and click Pause when you're done.
That's it! You can now plop your smiling mug (or whatever your Web cam was pointed at) into your movies.
There is no doubt in my mind that all the video you record with your camcorder is indescribably perfect just the way it is. But, if I may be so bold, wouldn't it be even better if you enhanced it a bit with music, or perhaps illustrative stills? Good, I'm glad you agree. Premiere Elements can import all kinds of media, even video produced by other applications. Supported formats include
Video: 264, 3G2, 3GP, ASF, AVC, AVI, DV, FLM, M1V, M2P, M2T, M2TS, M2V, M4V, MOD, MOV, MP2, MP4, MPD, MPE, MPEG, MPG, MPV, MTS, SWF, TOD, VOB, WMV
Audio: AAC, AC3, AIF, AIFF, M2A, M4A, MOV, MP3, MPA, MPE, MPEG, MPG, WAV, WMA
Still graphics: AI, BMP, CR2, CRW, DIB, DNG, EPS, GIF, ICB, ICO, JFIF, JPE, JPEG, JPG, MRW, NEF, ORF, PCT, PCX, PIC, PICT, PNG, PRTL, PSD, PXR, RAF, RAW, RLE, TGA, TIF, TIFF, VDA, VST, WMB
You can import any format in this list and use it in your Premiere Elements projects, although cell phone videos in the 3GP or MP4 formats require you to have Apple QuickTime installed. (A free QuickTime download is available at www.apple.com/quicktime; if you have an iPhone or iPod, you already have QuickTime.) The following sections show you how to import audio from an audio CD or another source and how to prepare still graphics for use in Premiere Elements. After you've done that, you can move to the last section, which describes how to actually import files (stills or not).
Warning
Importing files of any kind (still images, video, or audio files) that don't belong to you can get you in hot water if you don't have permission from the originator or owner of the files. I'm no copyright expert, so the best I can do is advise you that if you have any questions about whether you're using files inappropriately, err on the side of caution. For general information about copyright and the Internet, check out www.whatiscopyright.org. For more specific information about technology law in the United States, check out www.bitlaw.com.
If you want to use audio from a music CD, you have to first rip the track(s) you want onto your hard drive by using third-party software. Adobe Premiere Elements can easily import AAC, MP3, and WMA files. You can rip CDs into one of these formats, using many common media player programs such as iTunes or Windows Media Player. To rip WMA files with Windows Media Player, follow these steps:
Place an Audio CD in your CD-ROM drive and launch Windows Media Player by choosing Start
In Windows Media Player, click Rip.
After a few moments, a list of tracks on the current audio CD appears. Usually Windows Media Player automatically identifies the album, songs, and artist by using an online music database, but if your musical selections are more obscure, Media Player displays the songs as Unknown. You can manually enter song names, the name of the artist, and other information about the song if you want.
To manually enter a song or artist name, click the field, wait for a second, and then click again. Type a name.
Entering a descriptive name and artist name for the song helps you find it later.
Use the playback controls to play the tracks and identify songs that you want to copy.
Place check marks next to each song that you want to copy.
Click Start Rip at the top of the Windows Media Player window.
Windows Media Player shows the copying in progress. When the desired files are copied to your hard drive (Windows Media Player displays the message,
Ripped to Library), go ahead and close Windows Media Player.In Premiere Elements, click Organize, click Get Media, and then click PC Files and Folders.
Browse to the folder containing the song that you copied.
Unless you've changed Windows Media Player's default settings, the copied songs appear in the My Music folder of your Documents folder. Folders are automatically created to organize music by artist and album.
Choose the song you want to import and click Open.
The imported song appears in the Adobe Organizer.
Note
When you import a song, Premiere Elements converts the song so that it has the same sample rate and number of channels as your project. The converted version is saved as a copy in the Premiere Elements media cache (see Chapter 4 to find out where the cache is located). This audio conversion is called conforming, and you'll see a Conforming... message in the Premiere Elements status bar at the bottom of the screen during the process. But don't worry: Conforming your favorite punk rock tracks will not make the music conformist.
Using still photos in your movies seems like a simple enough task, but it isn't. Still photos can get distorted when they're used in videos, appearing stretched or squished. Either that, or they don't fit the whole screen and have to be "letterboxed." The reason for this is that pesky matter of image aspect ratios I talk about in Chapter 3.
Fortunately, changing your still photos to the correct aspect ratio is easy if you have an image-editing program like Photoshop Elements. To resize images in Photoshop or Photoshop Elements, follow these steps:
Determine the image aspect ratio of your project.
Standard video images have an aspect ratio of 4:3, while widescreen images are 16:9. All the high-definition presets in Premiere Elements are 16:9 widescreen. See Chapter 4 for more on selecting project presets.
Open the image in Photoshop and save it as a Photoshop document (PSD) before performing any edits.
Make sure that you save a new copy of the image so that the original is preserved. Photoshop documents can be imported directly into Premiere Elements. If you have a different image-editing program, save the document in TIFF format.
Find your project format in Table 5-1, and then decide which image size you want to use.
The sizes in the Small column of Table 5-1 should be considered minimums. Images that are smaller than these minimums will appear pixilated in your videos. In most cases, it's safe to use the Small size, but if you want to use any of the image panning and zooming effects described in Chapter 17, select a size from the Medium or Large columns instead. Large sizes allow more zooming.
In Photoshop, choose Image
The Image Size dialog box appears, as shown in Figure 5-7.
Make sure that the Resample Image option is checked, and choose Bicubic from the Resample options menu.
In the Pixel Dimensions section of the Image Size dialog box, choose Pixels from the drop-down menu, and then make sure that both the width and height exceed the dimensions you want to use from Table 5-1.
If either dimension is under the size you want to use, select a smaller dimension from the Small or Medium columns of Table 5-1 instead.
Tip
If you're working with high-definition video, you need to start with higher resolution still graphics. The dimensions for the Small high-def image size listed in Table 5-1 require that you start with an image that is approximately 3 megapixels. You'll need a 7 megapixel image to achieve the Medium size, and the Large size requires about 12 megapixels.
Enter a new width or height from Table 5-1.
For example, if you're using the Small size for high-def widescreen, enter 1920 for the width, but make sure that the height isn't below 1080. If the height is below 1080, enter 1080 for the height. The width should still exceed 1920.
Click OK to close the Image Size dialog box.
The image should shrink down to the new dimensions.
Choose Image
In the New Size section of the Canvas Size dialog box, select pixels in width and height menus.
At this point, one of the measurements — width or height — should match the size you want from Table 5-1, while the other measurement is bigger.
Change the Width and Height so that they both match the size you chose in Table 5-1, and then click OK to close the Canvas Size dialog box.
Click Proceed in the warning message that appears.
The image is cropped down to the appropriate size.
Choose Filter
The NTSC Colors filter ensures that the colors in your still graphic are compatible with video displays. You may notice that some colors appear less saturated after using this filter, but the NTSC Colors filter is necessary to prevent other problems in your movies. Photoshop doesn't offer a PAL Colors filter, but the NTSC Colors filter should be adequate for images destined for PAL video.
Save and Close the image.
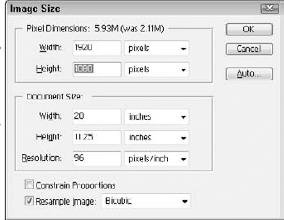
Table 5.1. Still Image Sizes for Video
Project Format | Small (width × height) | Medium (width × height) | Large (width × height) |
|---|---|---|---|
1920 × 1080 | 2880 × 1620 | 3840 × 2160 | |
Standard definition 16:9 widescreen (NTSC) | 960 × 534 | 1440 × 801 | 1920 × 1068 |
Standard definition 16:9 widescreen (PAL) | 1024 × 576 | 1536 × 864 | 2048 × 1152 |
Standard definition 4:3 (NTSC) | 720 × 534 | 1080 × 801 | 1440 × 1068 |
Standard definition 4:3 (PAL) | 768 × 576 | 1152 × 864 | 1536 × 1152 |
Note
You can do a lot of cool things with still photos in Premiere Elements, like zoom in on details or pan across an image while the video plays. Visit Chapter 17 for advanced techniques that help you bring still photos to life in your movies.
Importing still graphics, audio files, and other neat things into Premiere Elements is really easy. If you're importing a still image into a project that is based on NTSC or PAL video, first adjust the image size as described in the preceding section. Then follow these steps:
In Premiere Elements, click Get Media on the Organize tab, and then click PC Files and Folders.
Browse to the file that you want to import.
Note that All Supported Files is selected in the Files of Type menu by default. If you want to search for files of only a certain type, choose the desired type from this menu.
Note
You can also import an entire folder into Premiere Elements. Browse to the folder you want to import, and then click Add Folder in the Add Media dialog box.
Select the file and click Open.
The imported file appears in your Organizer.
If the file you want to import doesn't show up in the Add Media window — and you're certain that you're looking in the correct folder — the file may be of a type that isn't supported by Premiere Elements. (To double-check, see the "Importing Media Files" section earlier in this chapter for my list of supported file types.)
When most people think of Adobe Premiere Elements, they think mainly of video, but this is truly a multimedia-rich program. You'll no doubt work with many different kinds of media in Premiere Elements — audio, video, still graphics, and even text. You'll wind up using files from all over your computer, and possibly even your network. Keeping track of all this media stuff can be a challenge, but Premiere Elements can help in several ways:
Tags: You can apply tags to any piece of media in Premiere Elements. These tags may tell you that the clip includes people, places, events, or other tags that you create. Tags can tell you at a glance if a clip has problems like poor lighting or shaky video, and you can rate clips from one to five stars. Best of all, Premiere Elements can analyze your clips and apply many tags automatically, saving you hours of work reviewing and evaluating every clip in your library.
Organizer: The Organizer window displays nontechnical details of clips, such as tags and ratings. You can sort and filter clips by date, tags, ratings, or media type.
Edit window: If you're the kind of person who likes to read spec sheets, you'll appreciate the Edit window. Like the Organizer, the Edit window lets you sort or filter clips by media type, and you can organize clips into folders. But the Edit window also shows you technical details about each item, including the frame rate, duration, and more.
Note
The first time you launch the Premiere Elements Organizer, you are asked if you want to specify the location of media you want organized. If you already have some videos, pictures, music, or other media that you want to use in Premiere Elements, click Yes. Browse to a folder containing media, click the folder name once to select it, and then click Get Media. The Organizer searches for and imports compatible media in the selected folder.
As you work in a project, any media that you import or capture is added to your Organizer. The Organizer, shown in Figure 5-8, displays a lot of information about your clips. Key functions you can perform in the Organizer include
Filter clips by album: Use the Albums menu to show only clips from a specific album. Premiere Elements creates separate albums for each new project, and you can also create your own albums. (I show you how to create albums later in this chapter.)
Filter clips by tag: Under Keyword Tags, place check marks next to tags you want to display. I show you how to tag clips in the next section.
Apply and use ratings: You can rate clips from one to five stars by simply clicking the appropriate star under a clip. Then use the Ratings option at the top of the Organizer to filter clips by rating.
Change the thumbnail size: Use the thumbnail slider to change the size of thumbnails to show more or fewer clips on-screen.
Sort by date: Click the Date menu, and then enter a date range if you only want to see clips from a certain time period. Use the Media Arrangement menu to sort clips by newest or oldest first.
Show/hide details: Deselect the Details check box at the top of the interface if you don't want to see details under each clip icon. Hiding details lets more clips fit on the screen.

For years, I mentally subdivided my media clips into categories. I tried to remember which clips showed soccer games, which ones showed people, and which ones showed holidays or school events. Adobe must have been reading my mind because they created an excellent tagging system that means users no longer have to remember which clips fit into what categories.
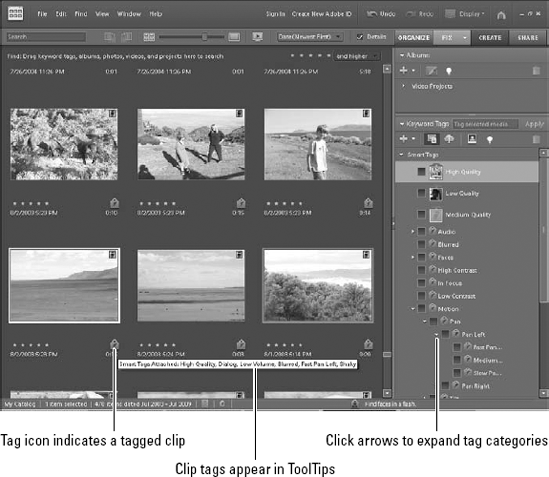
As I show earlier in this chapter, Premiere Elements can analyze clips and apply many tags automatically during video capture. You can also use automatic tagging later, and you can manually change tags or create your own. You can then use these tags to categorize, review, and sort clips in the Organizer, as shown in Figure 5-9. Some important things to know about tags in the organizer include
Tag icons: A tag icon under a clip means that the clip has been tagged, either manually or automatically. With larger thumbnails, the tag icon is purple and appears under the clip, as shown in Figure 5-9. If you make the thumbnails smaller, the tag icon turns yellow and appears on top of the clip thumbnail.
Tag ToolTips: Hover the mouse pointer over a tag icon to reveal a ToolTip, as shown in Figure 5-9. The ToolTip lists tags assigned to that clip.
Tag categories: Click the arrow next to SmartTags on the right side of the Organizer, and use the check boxes next to each SmartTag category to filter clips. If a category has an arrow next to it, click the arrow to reveal subcategories. You can, for example, filter your media so that you only see clips that are high quality, in focus, with dialog, and panning quickly to the left. Alas, it isn't yet possible to view only clips that are high quality, in focus, with dialog, panning to the left, and shot on the second Tuesday of the month during a lunar eclipse. Maybe in the next version of Premiere Elements.
As you can see, SmartTags are pretty, uh, smart. The next few sections show you how to apply and use tags, as well as how to create new albums to help keep clips organized.
Premiere Elements can intelligently analyze your clips. Premiere Elements detects quality issues such as dark or blurry video, and it also detects the content. For example, Adobe Premiere can detect human faces in clip, and even distinguish between close-ups, long shots, or large groups of people.
To automatically apply SmartTags, first select the clips you want to tag in the Organizer. You can select a single clip, click-and-drag around a group of clips, or press the CTRL key on your keyboard and click on individual clips. Each selected clip has a blue border. Then right-click the selected clip (or clips) and choose Run Auto Analyzer, as shown in Figure 5-10. At this point you can probably go take a coffee break. SmartTagging takes awhile, especially if you selected a lot of clips.

Note
You may notice a button on the right side of the Organizer called Start People Recognition. This feature recognizes individuals in images. When you first run it, the Organizer finds a face and then asks you, "Who's this?" Type in "Jane Smith" and the software searches for and finds other images showing Jane. Cool, huh? Unfortunately, People Recognition only works with still images, not video. Adobe isn't trying to tease us; they just include this feature because the Organizer is shared by both Premiere Elements and Photoshop Elements.
The SmartTag feature in Premiere Elements saves you a lot of work, but there is only so much that a computer program can do. Fortunately you can add tags to or remove tags from your clips — even tags of your own creation.
When you use the Organizer, notice the four additional tag categories listed directly under SmartTags: People, Places, Events, and Other. These tags aren't SmartTags because they aren't applied automatically by the Organizer software, but don't call them dumb tags because they're applied manually by you (and like I say in this book's intro, you're no dummy).
The four categories of manually applied tags are overly broad. You can create your own subcategories and tags, and even create whole new categories. To create and apply your own tags, follow these steps:
In the Organizer, click the green plus (+) sign under Keyword Tags and choose New Category.
Type a name for your new category in the Create Category dialog box that appears.
Click Choose Color, and then use the color picker to choose a tag color.
Choose a category icon, and then click OK to create the category.
To create subcategories, click the green plus (+) sign in the Organizer and choose New Sub-Category. Enter a name for the subcategory in the dialog box that appears, and decide where you want to create the sub-category by using the Parent Category or Sub-Category menu.
Click the green plus (+) sign again, and choose New Keyword Tag.
In the Create Keyword Tag dialog box that appears, choose a category in the Category menu, and then type a name for the new tag.
In Figure 5-11, I am creating a tag called
Single Birdwithin theHummingbirdscategory, which I also created.Note
The Create Keyword Tag dialog box includes a button called Place on Map. Unfortunately, as of this writing, the map feature only works for still photos because the Organizer is shared with Photoshop Elements. Some still cameras automatically assign locations to photos by using a built-in GPS function, and the Organizer can use that data.
To apply a tag to a clip, click-and-drag the tag from the Keyword Tags menu and drop it directly on the clip.

When you apply a tag to a clip, a little tag icon appears with the clip details. To remove a tag, right-click a clip's tag icon, and then choose the tag you want to remove from the context menu that appears.
Tip
Although the Auto-Analyzer that applies SmartTags is pretty powerful, you can manually apply SmartTags as well. Simply click-and-drag tags from the SmartTags category and drop them on clips, just like with keyword tags.
Whenever you create a new project in Premiere Elements, a new album is created for all the media you capture or import into that project. These albums are handy because — as shown earlier in this chapter — you can easily view the albums of other projects while you work in Premiere Elements.
Although albums are normally associated with specific projects, you can create new albums if you wish, and then add files to those albums either manually or automatically. To create a new album:
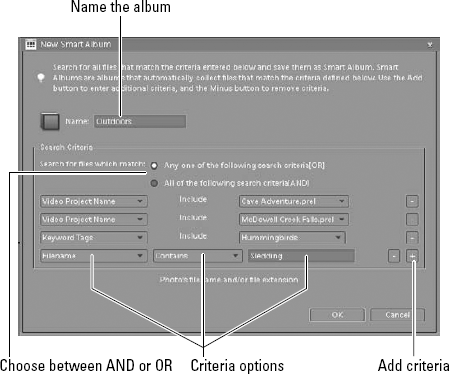
In the Organizer, click the green plus sign (+) under Albums and choose New Smart Album from the menu that appears.
In the New Smart Album dialog box that appears, type a name for the new album in the Name field.
Under Search Criteria, select search options.
Choose a search criteria in the first criteria menu. You can search based on almost any imaginable criteria, including tags, filenames, map locations, media types, video formats, and much more. The remaining fields and menus vary, depending on what you choose in the criteria menu. Figure 5-12 shows examples of several different types of search criteria.
Click the Add Additional Criteria button to add more criteria.
In Figure 5-12, I have created four search criteria. The first two specify files from a couple of video projects. The third criteria searches for clips that have a
Hummingbirdskeyword tag. The fourth criteria searches for any clips that haveSleddingsomewhere in the filename.Choose whether clips in the album must meet one or all of the search criteria.
Note
In Figure 5-12, I've selected the first option, which means that clips can meet any of the criteria. If I only want clips that meet all four criteria, I would choose the second option. The options work like the
ORandANDsearch commands used in Boolean searches.Click OK to create the album.
To manually add a clip to an album, click-and-drag the album from the Albums list and drop it on a clip in the Tagging window.
In the Organizer, click the name of an album on the right side of the screen to only view clips within that album. Click Show All at the top of the Organizer to remove the album filter and reveal all clips.
Tip
The Adobe Organizer lives up to its name because it does a great job of helping you organize all your media files. But the Organizer is really a separate program from Premiere Elements, and sometimes you don't want to launch a second program. The Premiere Elements Task pane gives you access to useful tools to help you quickly gather info about your clips.
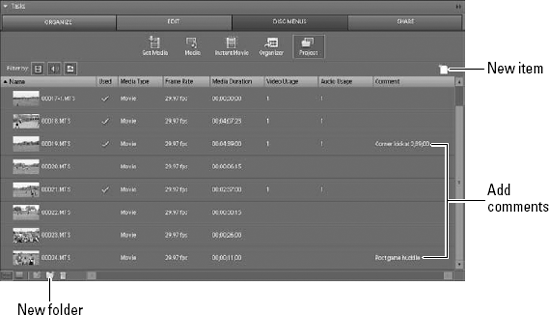
Open a project in Premiere Elements, click the Organize tab in the Task pane, and then click the Project button. You see a window similar to Figure 5-13, listing details for all the clips associated with your current project. This includes video clips you have captured, as well as other imported media files. The Project view gives access to some useful features:
View detailed information about clips. The Project view indicates whether clips have already been used in your movie (and if so, how many times). It also lists the media type, frame rate, and duration.
Organize clips into folders and subfolders. Click the New Folder button at the bottom of the Task pane, and then type a name when the new folder appears. Click-and-drag clips into folders to organize them.
Click New Item to quickly create a title, black video, bars and tone, color matte, counting leader, or a SmartSound audio file.
I show you how to add titles to your movies in Chapter 13. Black video, bars and tone, color mattes, and counting leaders are elements that you often add to the beginning or end of a video for technical purposes. I briefly explain these technical elements in Chapter 14. SmartSound is a handy soundtrack creation tool that I describe in Chapter 8.
Add comments to your video clips. In Figure 5-13, you can see that I've added comments to a couple of clips. For example, next to the clip
00024.MTSI've added the comment,Post game huddle. I may find this information useful later.In List view, click a column head to sort clips by that heading.