Understanding video color
Correcting colors
Adjusting brightness and contrast
Stabilizing shaky video
Anyone who has used a camera — be it a still camera or a camcorder — has probably learned some hard lessons about light and color. A scene that looks brilliant to human eyes often turns out dull and imperfect when it's photographed. You've probably experienced this before; pictures you take are too dark, colors look weird, or brilliant colors get washed out by bright sunlight. Managing light and color is one of the trickiest aspects of photography and videography.
When you shoot video, you can take advantage of the available light and color by using tips and techniques that I suggest in Chapters 3 and 18. But no matter how hard you try to follow the rules of photography and videography, you're going to wind up with video clips that appear less than perfect when you view them on a TV screen or computer. Don't feel bad — it happens to the best of us. Even when I shoot professional video with broadcast-quality cameras under controlled studio lighting, I still spend a fair amount of time post-processing my videos. Post-processing is just a fancy way of saying that I use special tools in Adobe Premiere (Pro or Elements) to clean up the final appearance of colors and light in my movies. This chapter shows you how to use the color-correction tools in Premiere Elements to improve the quality of your video images. I also show you how to stabilize shaky video footage by using the Stabilizer effect.
Remember back in the old days when many personal computers used regular televisions for monitors? In the early 1980s I had a Commodore 64 hooked up to a 13-inch color television set. As PC monitor technology improved, the notion of connecting computers to TVs fell out of vogue. Modern computer monitors offer incredibly high resolution and color accuracy compared to most televisions, even digital high-def TVs.
Note
After decades of high-quality PC monitors, people are once again connecting their computers to TVs. Many new HDTVs have VGA and DVI inputs, allowing easy PC connections. This makes sense for media center PCs used for playing photos, music, and Internet media on a home theater, but for video editing and other traditional PC tasks, it isn't a good idea. Even the most expensive 1080p TVs deliver inferior resolution, brightness, and color accuracy compared to modern computer monitors. This means that you shouldn't use a TV as your computer's primary monitor. But it's also why using a TV as a second preview monitor is important for movies destined for TV viewing; images that look great on your PC monitor may have color issues on a TV.
Another big difference between computer monitors and TVs is the way they render color. Computer monitors utilize what is called the RGB color space. RGB stands for red-green-blue, meaning that all the colors you see on a computer monitor are combined by blending those three colors. Digital TVs, on the other hand, use the YCbCr color space. YCbCr stands for luminance, chrominance (blue), and chrominance (red). Analog TVs use the YUV (luminance-chrominance) color space. This tells you two things:
Y = luminance? Whoever's in charge of video acronyms can't spell.
Brightness in video displays is treated as a separate component from color. Luminance is basically just a fancy word for brightness, and chrominance means color in non-techie speak.
I could go on for pages describing the technicalities of the YCbCr color space, but there are really two important things you need to know about color:
Some RGB colors may not show up properly on TVs. This is an issue mainly when you try to use JPEGs or other computer-generated graphics in a video project, or when you adjust the colors of a video image by using effects and color settings in your video-editing program. The RGB and YCbCr color spaces are fairly similar, but some RGB colors definitely won't appear properly on YUV monitors. RGB colors that don't translate perfectly to YUV are often said to be illegal or out of gamut. You won't get arrested for trying to use them, but they will not look right.
Tip
Generally speaking, illegal colors are ones with RGB values below 20 or above 230. Graphics programs can usually tell you RGB values for the colors in your images. Some graphics programs (including Adobe Photoshop and Photoshop Elements) even have special filters that help you filter out "illegal" TV colors from your images. In Photoshop Elements, open your image and choose Filter

Video colors won't look exactly right when you view them on a computer monitor. Because you'll probably do most of your video editing while looking at a computer monitor, you won't necessarily see the same colors that appear when the video is viewed on a TV. In other words, as you use the video filters in Premiere Elements to adjust colors, keep in mind that the changes you see on your computer screen don't necessarily reflect how the video will look when you output it to DVD. If possible, connect an external video monitor to your computer, as I describe in Chapter 19. Using an external video monitor allows you to more properly preview the final colors of your video.
Correcting and changing colors in video is much more of an art than a science. Every video camera has unique characteristics, every scene is lit differently, and every project has special color needs. I guess this is my way of saying that you won't find a magic formula here to help you make each and every video clip look perfect. When you want to adjust video colors, trial-and-error is an inevitable part of the process. But the following sections can help you start using the color and lighting effects available in Adobe Premiere Elements.
Most consumer-oriented video-editing programs now enable you to adjust color and lighting in video clips. Usually such a tool chest consists of a few slider or dial controls that mimic the adjustment knobs on old TVs, with controls for color, tint, brightness, and contrast. Adobe Premiere Elements goes above and beyond with a collection of advanced color and lighting effects that give you capabilities formerly found only in expensive, professional-grade programs.
To view the selection of effects that Premiere Elements offers up, choose Window
Auto Color: This effect quickly adjusts color and contrast by limiting the range of blacks and whites in the image based upon its midtones. Use this effect to quickly improve color in high-contrast images.
Auto Contrast: This effect adjusts contrast without changing the overall color cast of the image. If you don't like what Auto Color does to the colors in your video image, try Auto Contrast instead.
Auto Levels: This effect adjusts all color levels to soften shadows and highlights, but it can change the overall color cast of the image. This is my favorite effect for making subtle color and light corrections to my video images.
Brightness and Contrast: This effect does exactly what the name implies. If you just want to adjust the brightness or contrast of a clip, this effect can do the job.
Channel Mixer: This effect dynamically mixes color channels in the image, and is most useful when converting an image to a black-and-white or sepia-tone look. In Chapter 17, I show how to make new video look like old-fashioned film using the Channel Mixer effect.
Image Control: You can manually adjust the brightness, contrast, hue, and saturation of any video clip in Premiere Elements, but the Image Control effect makes these adjustments automatically. This is a good catchall effect to use if you want to improve video images in a hurry.
Shadow/Highlight: Use this effect to improve the appearance of heavily shadowed subjects, or to soften extreme highlights in the image. Use this effect if you find that the Auto Levels effect unfavorably changes the color cast in the image.
Note
The Adjust category also includes two gimmicky effects: Lighting Effects and Posterize. These two effects stylize the appearance of video images, but ignore those for now because they don't do true image correction.
In the Image Control category, check out these effects:
Black & White: This effect removes color from your video image and turns it to grayscale. Technically you could call this effect gimmicky, but it is useful for dream or flashback sequences. Alternatively, you may want to try desaturating the colors by using the Channel Mixer effect.
Color Balance (HSL): This effect allows you to adjust hue, saturation, and lightness in the image. It is similar to the Hue/Saturation controls in Adobe Photoshop and Photoshop Elements.
Color Balance (RGB): You can make direct changes to the levels of red, green, and blue in the image by using this effect.
Color Match: This is one of the most powerful effects in Premiere Elements, and can match colors between video clips. I show how to use the Color Match effect later in this chapter.
Color Pass: This effect removes all but one color from a video image. Use this effect to place special emphasis on a particular object by making everything except that object grayscale. The Color Pass effect works best if the object contrasts strongly with the background. Say you have footage of a red balloon against a blue wall: Turn everything else grayscale to make the red balloon burst with color.
Color Replace: Use this effect to replace one color in a video image with another.
Gamma Correction: This effect adjusts the brightness of midtones in an image without affecting shadows or highlights. I show how to use the Gamma Correction effect in the following section.
Tint: This effect modifies only the color tint of the image. Use this to change the overall color cast of the image.
In the preceding section I list the various effects you can use in Premiere Elements to fix and repair color and lighting in your video images. In all, you will find at least 15 different effects to use, each with varying degrees of utility. Instead of explaining how to use them all, this section focuses on two effects that, in my opinion, are most likely to yield good results with the least amount of fiddling. You might experiment with other effects and find that they work quite well for you. But if you are new to color correction, the following two sections will help you get started.
Note
As you correct colors and light, keep in mind that sometimes less is more. I don't mean less light, but rather less editing. Color correction should be done sparingly, or else colors can start to look artificial and cartoonish. Fortunately, Premiere Elements encourages creative experimentation because color corrections and other edits don't make permanent changes to your video clips. If you don't like your changes, simply delete the offending color effect from the clip, or use the Premiere Elements History palette (Window
Tip
The following sections show how to apply color and light changes to an entire video clip. However, you can also apply changes to only portions of a clip, or have your changes vary as the clip plays. If you don't want to apply your adjustments to the whole video, you must use effect keyframes. I show how to use effect keyframes in Chapter 12.
When people are new to color correction, a common mistake is to assume that dull, lifeless images need more color saturation or adjustments to specific color channels. More often than not, a hazy or muddy-looking video image can be brought to life by simply tweaking the levels of the image.
Note
When talking about images — be they video or still — the term levels refers to the amounts of blacks, whites, and midtones in the image. This is called the tonal range of the image. The best-looking pictures have a balanced tonal range that includes both true blacks and true whites.
Many video images lack proper tonal range. The problem can be subtle, and is often imperceptible to the untrained eye. But once levels are tweaked and the tonal range is improved, almost anyone can see an immediate improvement. To fine-tune the levels of your video images, follow these steps:
Locate a clip you want to improve, and place the CTI on a representative frame so that it's displayed in the Monitor.
On the Task pane, click the Edit tab and then choose Effects.
Under Adjust, click-and-drag the Auto Levels effect and drop it on the clip in the Timeline that you want to adjust.
After you drop the effect, the clip is selected in the Timeline. Auto Levels automatically evaluates the clip and applies subtle levels adjustments. You may decide that you like the automatic adjustments, in which case, you can stop right here. But if you want to make your own fine adjustments, proceed with the following steps.
At the bottom of the Edit pane, click the Edit Effects button.
Alternatively, choose Window
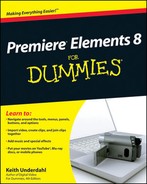
Locate Auto Levels in the list of clip controls, and then click the arrow to the left of Auto Levels.
The Auto Levels controls expand, as shown in Figure 10-1.
Click-and-drag the Black Clip and White Clip sliders left and right to make adjustments.
Note
Note how your changes affect the video image in the Monitor. Be subtle! Remember that video images may look different when they're viewed on a TV or compressed for Internet viewing. Images that look richly colored on your PC monitor may be too dark when viewed elsewhere.
Preview the entire clip in the Monitor window.
Do your changes look okay across the entire clip? In some cases, automatic level corrections can fluctuate wildly throughout a clip, causing an unpleasant color-strobing appearance. If you see rapid fluctuations, increase the Blend With Original setting until the strobing is eliminated.
Choose Done at the bottom of the Edit tab when you finish making changes.
Remember, err on the side of making only minor, subtle levels adjustments.
Reading histograms
Ask anyone who has ever made a PowerPoint presentation: Graphs are cool. If "Sales are up" sounds like good news, it looks like even better news when you say it with a graph.
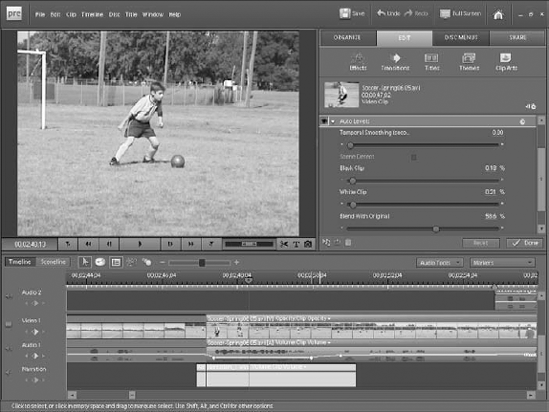
Recently, some genius realized that even photos and video images can be represented by graphs. An image histogram charts the tonal range of the image. The tonal range describes the relative levels of blacks, whites, and midtones in the picture. The figure below shows what a histogram looks like in Photoshop. Advanced digital still cameras — and even some video cameras — can also display histograms.
Histograms can be displayed in Photoshop and Premiere Pro. Premiere Elements doesn't display histograms, but it's still good to understand what histograms illustrate. Darker light values are represented toward the left of the histogram, and lighter values are toward the right. Midtones are shown in the middle.
The histogram shown here is for an image with a relatively even tonal distribution, but notice the lack of values near the black end of the scale. An image that looks hazy and dull often lacks true black values, like this one, and increasing the Black Clip level in Premiere Elements can reduce the hazy appearance and improve the overall quality of the image.
Levels adjustments are tricky if you can't view a histogram. If you need to make more precise levels adjustments of your video, you'll need to step up to a more advanced video-editing program like Premiere Pro.
The Auto Levels effect won't fix images that are badly over- or under-exposed, but it can improve most clips that fall somewhere in between. I perform levels adjustments on almost every video clip I shoot because they're easy to make and provide obvious results.
Tip
Effects can be copied from one clip to another. This is handy with the Auto Levels effect because it helps you maintain an even light and color appearance across the entire project. When you're done making adjustments, click the effect's name in the clip properties window and press Ctrl+C to copy the effect. Select another clip in the Timeline, and then press Ctrl+V to paste the effect to the other clip. Repeat for other clips as needed.
In the preceding section, I explain how the Auto Levels effect can improve the tonal range of any image. For images with basically good exposure — not too dark, not too bright — Auto Levels is the best effect to use. But if you have more problematic images, you may want to try Gamma Correction instead.
Consider the image in Figure 10-2, where the subject has just stepped out of a dark cave into sunlight. When the subject steps into the sun, his face becomes too bright and detail washes out of the image. This is not an example of exceptional videography, but it is the kind of thing that inevitably happens when you shoot your own video, especially outside, where you have almost no control over lighting.

To improve the detail and appearance of the dark cave walls in the background, you could simply increase brightness of the whole video clip, but then the subject's face will turn into even more of a washed-out white blob than it already is. Instead, you should brighten the midtones — in my example, the cave walls — without affecting the highlights — the subject's face — or shadows.
Gamma Correction to the rescue! Find the Gamma Correction effect in the Image Control category. As with other effects, simply click-and-drag the effect from the Edit pane and drop it on the clip you want to adjust. Then use clip properties to adjust the Gamma Correction settings.
The baseline setting for the Gamma Correction effect is 10, but in Figure 10-3, I have adjusted the control to 7. This adjustment has dramatically improved the appearance of the cave in the background, without exacerbating the already too bright face of the subject in the foreground.

Another helpful image enhancement tool provided with Adobe Premiere Elements is the Color Match effect. This effect helps you match the colors in one video clip with the colors in another video clip. This effect is helpful when you have two scenes that were shot with different lighting conditions (or even different cameras) and you want to maintain a common look for both clips.
The Color Match effect uses two clips. The sample clip is the clip that has the colors or lighting that you like. The target clip is the clip you want to make look more like the sample clip. To use the Color Match effect, follow these steps:
Click Effects on the Edit tab, or choose Window
Drag-and-drop the Color Match filter from the Image Control category to the target clip.
Make sure that the target clip is selected, and click Edit Effects under the Edit tab.
Click the arrow next to Color Match to expand the Color Match options on the Edit pane.
In the Timeline, place the CTI (Current Time Indicator) somewhere in the sample clip.
Ideally the CTI should be stopped on a frame of video that shows representative colors that you want to match, as shown in Figure 10-4.
On the Edit pane, choose a method from the Method menu under Color Match.
HSL (hue, saturation, lightness) is the most common method used for color matching, but you can also choose RGB (red, green, blue) or Curves if you want.
Choose what you want to match using the check boxes at the bottom of the Color Match settings.
If you're using the HSL matching method, you can choose whether you want to match hue, saturation, or lightness individually. For example, you may find that each clip is adequately lit, but that one has better color hue or saturation than the other. In this case, disable the Match Lightness option. If you're using the RGB or Curves matching methods, you can choose whether to match red, green, or blue individually.
Click the eyedropper next to Master Sample, and then move the mouse pointer over a representative area of the sample clip.
A color is selected when you release the mouse button.
In the Timeline, move the CTI so that it is now in the target clip.
Click the eyedropper next to Master Target, and choose a target color from the target clip.
Choose a color from a sample point in the target clip. For example, in Figures 10-4 and 10-5, I picked spots on a soccer player's uniform that should be about the same color in each clip.
Click Done when you finish color matching.

As with many other color-correction tasks, the Color Match filter requires a great deal of trial-and-error to achieve the right look.

The best way to fix shaky footage is to not shoot shaky footage in the first place. As I recommend in Chapters 3 and 18, use tripods, keep the camera level with the horizon, and avoid fire hosing (for example, panning back and forth wildly across a scene).
Wouldn't it be nice if you could always use perfect videographic technique! Perfection is, of course, impossible. Everyone who has ever wielded a video camera has ended up with some shots that were a little shaky. Modern camcorders have built-in image stabilization, but that feature can only do so much. If you have shaky footage that you'd like to fix, Premiere Elements can help. The Stabilizer effect helps you correct minor shakes in your video. Here's how to use it:
Click Effects on the Edit pane, or choose Window
Near the bottom of the list of effects, click-and-drag the Stabilizer effect and drop it on a shaky video clip in the Timeline.
Click Edit Effects on the bottom of the Edit pane to open effect controls.
Play the clip in the Monitor to preview it, and watch for problems such as the black bands shown in Figure 10-6.
The Stabilizer effect works by zooming in slightly on the image, and then panning back and forth across the remaining image to make it appear smooth and stable on-screen. But if it pans too much, you see black bands on the sides, top, or bottom of the image, as shown in Figure 10-6.
If you see large black bands during playback, place a check mark next to Limit To Zoom.
Stabilization is reduced when you enable the Limit To Zoom option, but in most cases the black bars are more objectionable than a little bit of camera shake.
Click Done when you finish adjusting the Stabilizer effect.
