Understanding DVD standards and technologies
Getting your movies ready for DVD and Blu-Ray
Recording your movies onto DVD and Blu-Ray discs
In 1997, a new medium for distributing video came onto the market. That new medium was the Digital Versatile Disc, more commonly known as DVD. DVDs packed full-length, high-quality movies in digital format onto compact laser discs that were the same size as audio CDs and CD-ROMs. In 2003, DVDs surpassed VHS videotapes as the most common movie distribution method, and today DVDs are the world standard for video recording.
Standard DVDs support only standard-definition video. That brings us to the next step in video storage evolution: the high-definition DVD. You might remember the Great High Def Format War, which began in 2006 when the competing HD DVD and Blu-Ray formats were released to the public. Fortunately the only guns and explosions in this war were the ones in action movies recorded to HD DVD and Blu-Ray. HD DVD format was the casualty, and Blu-Ray the victor. Blu-Ray discs can store and play high-def movies. If you have a high-def camcorder, Blu-Ray discs allow you to easily share high-def movies with others. Blu-Ray players are increasingly affordable, and Blu-Ray disc burners are starting to appear in some PCs.
If your computer has a DVD or Blu-Ray burner, Adobe Premiere Elements is ready to put that burner to use. This chapter shows you how, with just a few mouse clicks, you can burn your Premiere Elements movie projects onto DVD or Blu-Ray, complete with navigation and scene menus. But first I introduce you to the fundamentals of DVD and Blu-Ray technologies.
One of the nice things about VHS tapes was that when you recorded a movie onto a tape, you could be sure that it would play in any VCR. It was also easy to understand the storage capacity of a tape. A tape labeled T-120, for example, held 120 minutes of NTSC video.
Alas, video discs are a little more complicated. Although most DVD players can play the discs you record yourself, some players are flaky and have trouble with homemade discs. And the storage capacity on a blank disc is usually listed computer-style (gigabytes) rather than human-style (minutes). If a blank DVD says it can hold 4.7GB, how many minutes of video is that, exactly? The next few sections answer common questions about video discs.
Note
DVD and Blu-Ray discs are often called optical discs. No, they can't take the place of your reading glasses. They're called optical discs because data is read optically, using a laser beam. VHS tapes, MiniDV tapes, and computer hard drives store and read data magnetically rather than optically.
A standard recordable DVD has a theoretical capacity of 4.7GB (actually 4.38GB in practice), which works out to a little over two hours of high-quality MPEG-2 video (MPEG-2 is the codec used by DVD video). Two hours is an approximation; as I show later in this chapter, quality settings affect how much video will fit on a disc. If you're willing to sacrifice some quality, you can squeeze a lot more video onto a disc.
Some DVDs are double-sided or have multiple data layers, allowing them to hold more than 4.7GB. Table 16-1 lists the most common DVD capacities.
Table 16.1. DVD Capacities
Type | Capacity | Approximate Video Time |
|---|---|---|
Single-sided, single-layer | 4.7GB | More than 2 hours |
Single-sided, double-layer | 8.5GB | 4 hours |
Double-sided, single-layer | 9.4GB | 4.5 hours |
Double-sided, double-layer | 16GB | More than 8 hours |
You've probably seen double-sided DVDs before. They're often used to put the widescreen version of a movie on one side of the disc, and the full-screen "pan-and-scan" version on the other. Double-sided discs require special manufacturing processes, so (for now) you can't easily make double-sided DVDs in your home or office.
Double-layer discs also used to require a special manufacturing process. Early double-layer discs were actually glued together (I'm not making this up) with a special transparent glue applied in "clean rooms" by technicians clad in white lab coats. Double-layer DVD burners and discs became available in 2004, and most new computers now come with double-layer DVD burners — sometimes called DVD-R DL burners. So if you buy some recordable DVD-R DL discs, you can record discs that will hold 8.5GB. Wearing a white lab coat is optional. A double-layer disc can hold about 4 hours of video at the highest DVD quality, or about 16 hours of video if you ramp the quality back to about what you get on a VHS tape.
Note
The capacities listed in Table 16-1 assume standard-size DVDs, which are about 12cm in diameter. Some companies offer miniature recordable DVDs, and of course, these smaller discs also have a smaller capacity. For example, Verbatim's 8cm miniature DVD-R discs hold about 1.4GB of material.
Blu-Ray discs (BDs) have a lot in common with DVDs. Both types of discs are round, flat, and 120mm in diameter. They're both optical storage discs, and they can both have multiple layers. Most Blu-Ray players can also play standard DVDs (and audio CDs, too). Alas, BDs do not work in standard-def DVD players.
Blu-Ray discs and DVDs may look alike, but BDs are a generation ahead technologically. A single-layer BD-R can hold 25GB of data, which is almost three times as much as a double-layer DVD. A double-layer BD can hold 50GB of data. A variation of BDs is the 80mm BD-R Camcorder disc, which is used in special Blu-Ray disc camcorders. In Chapter 2, I generally recommend against disc-based camcorders. Table 16-2 lists the capacities for Blu-Ray discs.
When it comes to buying a drive to record your own discs, you're going to see a lot of similar — yet slightly different — acronyms thrown around to describe the various formats that are available. The basic terms you'll encounter are
DVD-R (DVD-Recordable): Like a CD-R, you can record onto this type of disc only once. DVD-Rs hold 4.7GB of data.
DVD-R DL (DVD-R Dual Layer): These are also one-time-use discs, but dual-layer discs can hold 8.5GB of data.
DVD-RW (DVD-ReWritable): You can record onto a DVD-RW disc, erase it later, and record something else onto it.
DVD-RAM (DVD-Random Access Memory): These discs can also be erased and reused repeatedly. DVD-RAM discs are compatible only with DVD-RAM drives, which makes this format pretty useless for movies.
BD-R (BD-Recordable): These 25GB discs can be recorded only once, and can be played only in Blu-Ray drives and players.
BD-R DL (BD-R Dual Layer): Like BD-Rs, these can be recorded only once, but two recording layers yield a capacity of 50GB.
BD-RE (BD-R Erasable): These BD discs can be erased and reused.
As you shop for DVD burners, notice that some drives say they record DVD-R, whereas others record DVD+R. The dash (−) and the plus (+) aren't simply a grammatical curiosity. The −R and +R formats are unique standards. If you have a DVD-R drive, make sure that you buy DVD-R blank discs. Likewise, if you have a DVD+R drive, you must buy DVD+R blank discs. Fortunately, most manufacturers now offer dual-format DVD burners that can handle both DVD-R and DVD+R discs. These drives are sometimes marked as DVD+/−R drives.
A great feature of DVDs and BDs is consistent high-quality playback, whether the movie has been played once or a hundred times. Optical discs store data digitally, so they don't suffer from generational loss. (See Chapter 3 for a detailed explanation of generational loss.)
Viewers expect very high quality from DVD and Blu-Ray movies. They're more likely to buy high-quality TVs so that they can watch their movies on crisp, bright displays. Viewers also expect DVDs and BDs to be easy to use, with features like scene markers and navigation menus. This means you're going to have to make an extra effort to prepare your movies for disc:
Make image quality superb. Spend time improving the colors and lighting in your video images. Chapter 10 shows you how to fix lighting problems, improve colors, stabilize shaky video, and more.
Use effective scene markers. If you create scene markers in the Timeline when important new scenes begin, the movie will be easy to navigate in a DVD or Blu-Ray player. Viewers can click the Next Scene or Previous Scene button on their remotes to quickly jump between scenes. I show you how to add scene markers in Chapter 7.
Note
Premiere Elements stores and edits your video at full quality. Both standard and high-def projects can be recorded to DVD. If you plan to record Blu-Ray discs, start with high-def footage from an HD camera.
Until a few years ago, recording your own DVDs was complex and time consuming. Adobe wanted to eliminate most of that complexity from Premiere Elements, so the company created a special Disc Menu workspace to help you prep your movies for disc. To open this workspace, click the Disc Menus tab in the Task pane or choose Window
If you've ever watched a movie on DVD — I'm probably not going out on a limb here — you're probably familiar with disc menus. Menus are graphical screens that appear on your TV. Using the remote control for your DVD or Blu-Ray player, you select a link in the main menu to play the movie, or you can go to submenus for scene selection or special features.
Creating menus from scratch can be time consuming, but not with Adobe Premiere Elements. Premiere Elements comes with a nice selection of menu templates to help you quickly and easily create attractive, easy-to-use menus. When you first open the Disc Menus workspace (Window
Tip
You don't have to choose a template. Premiere Elements can also create an "auto-play" disc with no menus. An auto-play disc automatically starts playing your movie as soon as it is placed in the player. To create an auto-play disc, skip the Disc Menus tab and go right to the Share tab. Later in this chapter, I show how to burn discs using the Share tab.
To select a disc menu template, follow these steps:
Click the Disc Menus tab to bring it to the front.
Choose a category from the Theme menu.
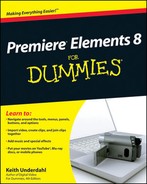
In Figure 16-1, I'm selecting a template from the "Sports" category.
Scroll down the list of templates and click a template to select it.
In Figure 16-1, I have chosen a template named "Soccer Action." Previews of both the main menu and scene menu are displayed.
When you have chosen a menu, click Apply to apply the template to your project.
Alternatively, you can click-and-drag the template to the Monitor window. DVD menus are automatically generated for your project, and the menus appear in the Disc Menus box under the Monitor, as shown Figure 16-2.
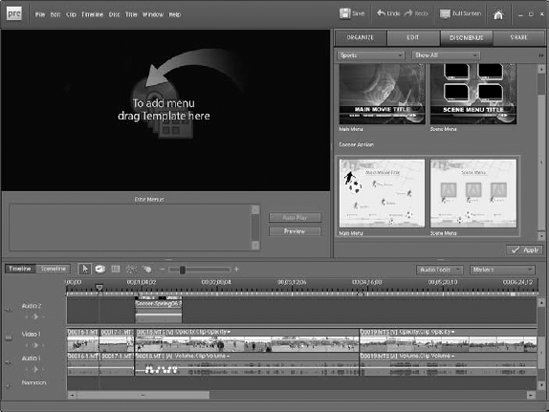
When you create disc menus using a Premiere Elements template, the template inserts default text and links that you may want to edit. The default text is usually generic and may not be relevant to your project. For example, in Figure 16-2, the main menu has the title Movie Title Here. If that name is too ironic and edgy for you, you may want to change it. The following sections show you how to customize your disc menus.
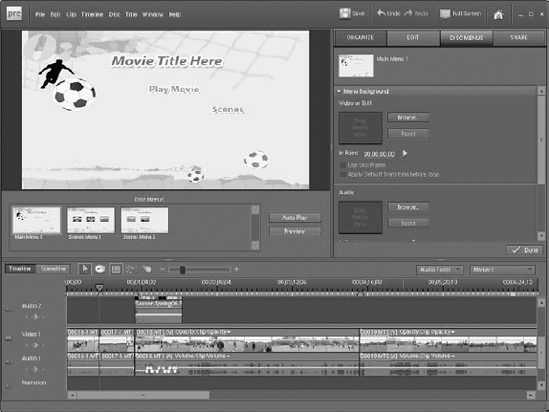
To change text in a menu, double-click it. A Change Text dialog box appears, as shown in Figure 16-3. Enter your new text and click OK. The new text appears in the menu, as shown in Figure 16-4.

You should also take a look at your scene menus, which is where viewers can select specific scenes in the movie. The number of scene menus for your project depends on
How many scene markers are in your Timeline: Premiere Elements considers each scene marker the beginning of a new scene.
How many scenes per page are supported by the template: Different template designs allow different numbers of scenes on each page. The template in Figure 16-4 allows three scenes per page, so a second page accommodates the five scenes in my project.
Customizing your scene menus is an important part of the menu-creation process because link names may overlap, or a scene's thumbnail image may not be exactly what you want. To view your scene selection menus, click a scene's menu at the bottom of the Monitor window.
If you don't like the arrangement of the links in your scene menus, you can easily move or resize them. Click a scene link once to select it, and then click-and-drag it to a new location. Click-and-drag a handle at the corners or sides of a link to resize it, as shown in Figure 16-5.

You normally create scene markers (Chapter 7 describes them) at the beginning of scenes. By default, the thumbnail image on a scene link is the first video frame of that scene, but sometimes the first frame doesn't properly illustrate the scene's contents.
To change the thumbnail (also called the poster frame) for a scene marker, double-click the scene link in the Monitor. In the Menu Marker dialog box, click-and-drag left or right on the timecode under the Thumbnail Offset window. Keep dragging until you find a frame that would make a good thumbnail. In Figure 16-6, I have chosen a frame that is three seconds (00;00;03;00) ahead of the scene's first frame. Click OK to close the Menu Marker window when you have selected a good thumbnail.
You may decide that some of your scene menu links are superfluous, especially if you created the markers a long time ago. Don't worry; removing scene links from your menus is easy. Just double-click the offending link in the Monitor window, and click Delete in the Menu Marker dialog box that appears. The scene is removed from your scene menus.

Have you thought about what will happen when your movie ends? When your movie is over, ideally the DVD's main menu appears. To make sure this happens automatically, insert a stop marker at the end of your movie if you haven't done so already. Adding a stop marker is easy. Follow these steps:
Click somewhere in the Timeline window to make it active.
Press the End key on your keyboard.
This moves the CTI to the very end of your project.
Choose Disc

The Menu Marker dialog box appears.
Choose Stop Marker in the Marker Type menu.
Click OK to close the Menu Marker dialog box.
When you have all your menus set up the way you want them, take a few moments to preview your disc. To generate a preview of your project, click Preview in the Monitor window. A Preview Disc window appears. This window is a fully functional mock-up of the final disc, complete with the same controls found on a typical DVD remote. When you preview your disc, the following things are important to check:
Do the menus look as attractive as you'd hoped? If not, consider choosing a new template.
Click every scene link in the scene's menu. Does each scene seem to start at the correct place? If some of the scene links don't link to the right places, you may need to move markers in your Timeline.
Click Play Movie in the main menu, and then click the Next Scene button to jump to the next scene. Continue clicking Next Scene to review each scene marker. Are the scenes spaced at appropriate intervals? You may need to add or remove scene markers in the Timeline.
Play the final scene in the movie until it ends. Does the movie return to the main menu when it ends? If not, make sure that you've placed a stop marker at the end of the movie, as described in the preceding section.
When you're done previewing your disc, click the Close (X) button in the upper-right corner of the Preview Disc window. If you make any more changes, make sure that you preview the revised project.
When you have previewed your disc and you're certain that it's ready to go, you're ready to — drum roll, please — burn the disc. Don't worry; you don't need matches and a burning permit! The term burn is often used in place of "record" when you record stuff onto DVDs and Blu-Ray discs.
Tip
Before you start burning your disc, keep in mind that the encoding and burning process can take many hours. For this reason, I usually burn discs near the end of a workday. You can click Burn and let the disc burn overnight, when you don't need to use the computer for anything else. Encoding — which Premiere Elements does automatically before the actual disc is burned — requires a lot of computer memory and processing resources, so make sure that you close noncritical programs before you start to burn.
To burn a disc in Premiere Elements, follow these steps:
Choose Timeline
It's a good idea to make sure that transitions, effects, titles, and other edits in the Timeline are rendered before you burn a disc.
When rendering is complete, click the Share tab and then click Disc.
Click DVD or Blu-Ray, depending on the type of disc you're burning.
You can only burn DVDs if your computer has a DVD-R drive. You'll need a BD-R drive to burn Blu-Ray discs.
In the Burn To menu, choose whether you want to burn to a disc or to a folder.
Usually you burn a disc, but you can also create a disc image in a folder on your hard drive. That image can be recorded to a disc by using other software such as Roxio Easy CD Creator or Nero Burning ROM.
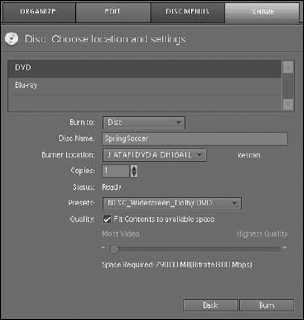
Enter a name for the disc in the Disc Name field.
In Figure 16-7, I have named my disc
SpringSoccer.If you have more than one burner on your computer, make sure that the correct burner is selected in the Burner Location menu.
If you have an external DVD burner connected to your computer's USB or FireWire port, but the burner doesn't show up in the Burner Location menu, make sure that the external burner is properly connected and the power is turned on. Wait several seconds, and then click the Rescan button.
Choose how many copies you want to burn.
You may want to burn a single test disc first, and then burn multiple copies later when you know that the first disc burned just fine.
Insert a blank recordable disc in your burner drive.
If you see a yellow asterisk icon and the words
Media Not Presentnext to the Status indicator, make sure that you have inserted your blank disc and click Rescan. After several seconds, you should see Ready next to the Status indicator, as shown in Figure 16-7.Choose a Preset.
If you're burning a standard-def DVD, you have to make two choices:
NTSC or PAL: Choose a preset that matches your local TV standard. (See Chapter 3 for more on TV standards.)
Aspect ratio: If your movie uses a 16:9 widescreen ratio, choose a widescreen preset. If you're recording high-def video to a standard-def DVD, choose a widescreen preset because HD video is almost always widescreen. Aspect ratios are covered in Chapter 3.
If you're burning a Blu-Ray disc, you have three choices to make:
NTSC or PAL: Choose a preset that matches your local TV standard.
Resolution: Choose a resolution that matches your source footage. If your footage is from an HDV camcorder, the resolution is probably 1440 × 1080. Many AVCHD camcorders record footage at 1920 × 1080, which is the resolution of so-called "Full HD." See Chapter 2 for more on camcorder formats.
Codec: You can burn your Blu-Ray disc using either the H.264 or MPEG-2 codec. H.264 compresses video more efficiently, but if your H.264 discs don't play in some Blu-Ray players, try using the MPEG-2 codec instead.
Choose a quality setting.
Usually I recommend leaving the Fit Contents to Available Space option checked. Premiere Elements automatically detects how much space is available and burns your movie at the highest quality that will fit. You can disable this option for DVDs and manually choose a quality level by using the Video Quality slider. Drag it left to cram more video on the disc, or drag it right to maximize the image quality. The quality slider isn't available when burning Blu-Ray discs.
Pay attention to what is listed next to the Space Required indicator. If you are burning to a folder, make sure that the amount of space shown in the Space Required indicator will fit on whatever kind of media you plan to use when you burn the movie onto a disc.
When you are ready to burn the disc, click Burn.
The Burn Progress window appears. Remember — burning can take a long time. The longest part of the process is encoding, which is where the movie is converted into the format used by DVD and Blu-Ray players.
When the burn process is complete, click Close to close the Burn Progress dialog box.
When the burn process is complete, make sure that you test your disc in as many players as possible.
Note
Some players won't play certain DVDs or BDs. If you find that your discs often don't play properly, try a different brand of blank discs, or try burning the disc by using different software, such as Nero Burning ROM or Roxio Easy CD Creator.