Having (and making) a great effect
Taking an inventory of your effects arsenal
Distorting video images
Putting a picture in a picture
Adobe Premiere was first released in 1993, making it one of the first video-editing programs for desktop computers. Many competitors have come onto the market over the years — Adobe Premiere Elements now shares the stage with other affordable moviemaking programs like Pinnacle Studio, Microsoft Windows Movie Maker, and others.
Not all video-editing programs are created equal, however. Many programs offer special effects, but few offer the quality and variety available with Adobe Premiere Elements — over 90 professional-grade effects. And you can add even more effects available from third-party vendors. What's more, each effect in Premiere Elements is fully customizable, giving you full creative control over the intensity and timing of each effect.
Effects can help you improve video quality or add special touches that amaze and astound your audience. Effects can be added to any video clip, and the changes they make aren't permanent so you can remove them if you change your mind. Although this book can't cover all 90 effects in detail, this chapter does show you the basics of using effects — including the brass-tacks specifics of using several common effects.
Adobe Premiere Elements comes with more than 90 effects. Some effects may not seem immediately useful, but you may be surprised someday to find that a seemingly obscure effect suddenly comes in handy. You can get a look at all the effects Premiere Elements serves up by choosing Window
Note
Just like transitions and other edits, video effects are meant to enhance the content of your movie, not showcase your editing skills. Choose and use effects carefully — and only when they serve your editing style.
The ten effects in the Adjust category let you tweak levels of color and light. They can be useful for fixing color- and light-related problems in your video clips. I describe most of the Adjust effects in Chapter 10. One effect that I don't cover in Chapter 10 — the Extract effect — removes all trace of color from a clip, as shown in Figure 12-1. This effect can be used to create an interesting background for a title screen.

You find five effects in the Blur & Sharpen effects category, including the following:
Antialias: This effect blends edges together through an anti-aliasing process. Anti-aliasing blends colors in adjacent pixels to reduce the "stair-step" appearance that sometimes happens to curves in digital images. Sometimes anti-aliasing smoothes the appearance of the image; other times it just makes the whole image look blurry.
Fast Blur: Use this effect to soften outlines to simulate disorientation, or to suggest speed by "unfocusing" parts of the video image.
Tip
A blur effect can be used like a transition to make it appear that the camera starts out blurry and then focuses in on the clip. This technique can be effective when simulating the view of a person who is waking up from a slumber or coma. Use keyframes (described later in this chapter) to make the image start out blurry and then gradually come into focus.
Gaussian Blur: This effect is similar to Fast Blur, but it also removes noise (specs or visual "static") from the image. Gaussian Blur can't blur an image quite as much as the Fast Blur effect.
Ghosting: This effect creates ghost images of moving objects on-screen, and can often be used to place increased emphasis on the path of motion.
Sharpen: This effect sharpens images that appear too soft or slightly out-of-focus. Be careful when using this effect on clips with a lot of motion — moving objects may appear to have blocky edges.
The Channel category contains only the Invert effect. This effect inverts colors in a clip so that the image looks like a photographic negative. Use this effect to add a psychedelic or "sci-fi" look to a video image.
The Distort category contains ten effects that bend, twist, exaggerate, or otherwise distort your video images so that they look like they are being viewed through a fun-house mirror. The Distort effects include
Bend: The video image is bent both horizontally and vertically in a series of waves. The waves move as the clip plays, giving viewers the impression that they are viewing the scene from underwater.
Corner Pin: The video image is pinned to a corner, hence the name. Use Corner pin to make the video image appear to be on a different plane from the viewing screen.
Lens Distortion: This effect distorts the image to look like it is being viewed through the bottom of a soda-pop bottle or another distorted lens.
Mirror: Give the appearance that part of your video image rests on a mirror or reflecting pool with this effect. You can adjust the angle and center point of the reflection.
Polar Coordinates: If the Bend or Lens Distortion effects don't provide quite enough distortion for your tastes, try this effect. Pixels are adjusted to give the appearance of extreme image distortion, like portions of the video image are being pulled like taffy.
Ripple: Similar to the Bend effect, this effect adds ripples to the video image, like ripples in water.
Spherize: This effect makes it appear as though you are viewing the video through a thickly curved lens.
Transform: Use this effect to turn or skew the image in the two-dimensional plane.
Twirl: Twirl the video image into a vortex.
Wave Warp: This effect warps and waves the video image as it plays.
When the Sun or a bright light reflects on a camera lens, it causes a bright spot called a lens flare. Usually, photographers and videographers try to avoid lens flares, but if you want to add a simulated lens flare to your video — flares can enhance the feeling of being in a hot desert, for example — use the Lens Flare effect found in the Generate category.
The graphics processing units (GPUs) in most modern video cards allow advanced visual effects. The three GPU effects in Premiere Elements take advantage of the power in modern GPUs to display visually complex effects like water ripples, page curls, or lens refraction.
The eight effects in the Image Control category change the way color is viewed in your clips. They can remove a color (or range of colors) from a clip, convert a color image to black-and-white, or adjust the overall tint of the image (which you will find useful if, for example, you want to transform an ordinary outdoor scene into an alien landscape). Chapter 10 shows you how to use the Image Control effects in greater detail.
The effects in the Keying effects category allow you to control transparency in clips and perform compositing effects such as blue screening. (See Chapter 11 for more on using keys in your video projects.)
NewBlue is a third-party video content and effects developer that provides 12 snazzy effects for use with Premiere Elements. Divided into three categories, the NewBlue effects make otherwise complex edits easy. The Old Film effect, for example, simulates the look of old movies, complete with monochrome colors and fake film scratches (thin vertical lines that show up in the film image).
The four effects you find in the Perspective category add a three-dimensional feel to your clips. They include
Basic 3D: This effect turns and tilts your image on a plane. You can move the corners of the video image to give the appearance that the image is on a plane that is not parallel with the viewing screen.
Bevel Alpha: If an image doesn't fill the entire screen, use this effect to smoothly bevel the edges of the image.
Bevel Edges: This is similar to Bevel Alpha effect, except that the edge bevels are rectangular rather than softly rounded.
Drop Shadow: A drop shadow sometimes comes in handy behind titles or picture-in-picture windows.
The Pixelate category contains only the Facet effect, which modifies the pixels in your video image to create a textured appearance.
The two Render effects allow you to simulate the look and feel of real light. The Render effects are
Lightning: The Lightning effect is kind of cool because it creates realistic lightning on-screen. Simulated lightning created by this effect is much safer to work with than the real thing.
Ramp: This effect creates a color gradient on the screen. Adjust the Blend With Original setting to make the original video image show through the gradient. This effect is of limited use, though you may find it helpful when you want to put titles on the screen and want to slightly soften or darken the background image without totally hiding it.
The ten effects in the Stylize effect category create a variety of image modifications:
Alpha Glow: If your image includes a masked alpha channel (usually a still graphic from Adobe Photoshop Elements with a transparent layer), this effect creates a glow around the alpha channel.
Color Emboss: This effect creates an embossed appearance to the clip without changing any of the clip's original colors. This usually gives the video image a cartoonish appearance.
Emboss: The image is given an embossed appearance, and most color information is removed.
Find Edges: Major edges in the image are identified and replaced with black lines, and the rest of the image information is discarded. This effect works well for creating backgrounds for title screens.
Mosaic: The image is blurred in a block pattern for a pixelated appearance.
Noise: Do not attempt to adjust the transmission! This effect adds artificial video noise to the image, as if the viewer has poor antenna reception.
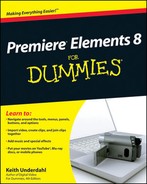
Replicate: Duplicate a single video image, as shown in Figure 12-2.
Solarize: This effect blends the image with its negative. It is similar to the Invert effect, except that you can adjust the blend along a scale from zero (normal) to 100 (full negative).
Strobe Light: Flash your video image on and off, using this effect. Just be careful not to give your audience members seizures!
Texturize: This effect applies the apparent texture from one clip to another clip.
In the Time category, you can find two effects. The Echo effect creates visual echoes (or a double-image) of a picture. Look here also for the Posterize Time effect, which modifies the apparent frame rate of a clip. Use this effect to make it look like you are a cable news channel correspondent broadcasting via video phone from the other side of the world.
The nine effects in the Transform category transform the view of your clip in a variety of interesting and sometimes humorous ways:
Camera View: Use this to simulate various camera angles and views.
Clip: This basic effect trims off portions of the video image. This may come in handy if you want to create a black bar on the side of the screen to insert some bulleted points.
Crop: This effect is similar to the Clip effect, but it adds the zoom feature, which appears to zoom the image off the edge of the screen.
Edge Feather: Use this effect to create a feathered frame around the edge of your video image.
Horizontal Flip: The image is flipped horizontally.
Horizontal Hold: This effect simulates TV horizontal-hold problems.
Roll: The image appears to roll horizontally across the screen.
Vertical Flip: The image is flipped vertically.
Vertical Hold: Use this effect to simulate TV vertical-hold problems. (Just imagine your friends banging on their old TVs trying to figure out why the vertical hold is messed up!)
If the video you recorded is shaky and jittery and you aren't going for an earthquake look, you can use the Stabilizer effect to smooth out some of the video shakes. I show how to use the Stabilizer in Chapter 10.
Videomerge is basically an RGB (red-green-blue) difference key that helps you easily do compositing effects like the ones I describe in Chapter 11. Usually Videomerge is applied automatically when you perform certain kinds of edits. Chapter 11 shows you what those certain kinds of edits are.
To apply an effect to a clip, drag the effect from the Task pane and drop it on a clip in the Timeline. (Choose Window
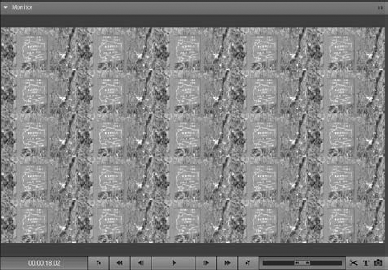
On the left side of the effect controls, next to each effect's title, is a tiny eye. To disable an effect, click the eye to remove it. You can see the eye displayed in Figure 12-3 next to the Camera View effect.
Each effect has its own unique controls. Click the right-pointing arrow next to an effect control to view more specific controls. The Camera View effect, for example, enables you to adjust longitude, latitude, and more.
To enable keyframing so that the effect can change over the duration of a clip, click the Toggle Animation button, as shown in Figure 12-3. I show you how to use keyframes in the next section.
The effect controls window can display a keyframe viewer, which, as you can see in Figure 12-3, looks like a miniature Timeline, complete with its own CTI (Current Time Indicator). To reveal the keyframe viewer, click the Show/Hide Keyframes button, as shown in Figure 12-3.
To add a keyframe for a control at the current location of the CTI, click the Add/Remove Keyframe button. Use the arrows on either side of any Add/Remove Keyframe button to move the CTI to the next (or previous) keyframe.
Some effects have Color Pickers. For example, if you're using the Camera View effect, shown in Figure 12-3, you use the Color Picker to choose a fill color for the background after the camera view has been modified. In Figure 12-3, the current background color is white.
Note
Some Color Pickers have eyedroppers next to them. Eyedroppers are used to choose a color from the video image in the Monitor. To use an eyedropper, click the eyedropper icon, move the mouse pointer over the desired color in the video image, and then click on the color. Your desired color is selected when the mouse button is released.
Effects can have a variety of, er, effects on clips in Premiere Elements. You can blur, recolor, distort, and more. You can apply an effect so that it changes the clip uniformly across its entire duration, or you can customize the effect so that it changes over time. To make an effect change as it plays, you need to tell Premiere Elements what those changes will be and when they should happen. You do this by using reference points called keyframes. Premiere Elements automatically extrapolates changes from one keyframe to the next.
Note
The types of keyframes I talk about in this chapter are effect keyframes. Video codecs (the compression/decompression schemes used to shrink video file sizes) use compression key frames. Although the names sound familiar, the two terms refer to very different things. (See Chapter 15 for a more detailed explanation of compression key frames.)
After you have applied an effect to a clip, you can adjust that effect using keyframes. To set keyframes, follow these steps:
In the Timeline, locate the clip you want to modify.
Select the clip, and then open the effect controls for the clip (Window

Click the Show/Hide Keyframes button to open the keyframes viewer.
Click the Toggle Animation button next to the name of the effect.
The Toggle Animation button enables the use of keyframes for the effect. If Toggle Animation is disabled, the effect is applied evenly across the entire clip.
Move the CTI in the keyframes viewer to the exact frame where you want to set a keyframe.
You can move the CTI using the playback controls in the Monitor window, or you can use the J, K, and L keys on your keyboard. Use the left- and right-arrow keys to move a single frame at a time.
Click the Add/Remove Keyframe button next to an effect control.
You need to add a keyframe for each control that you want to change. For example, if you apply the Camera View effect (refer to Figure 12-3), and you only want the camera view to change after the clip has played for a few seconds, set all the controls to their defaults at the first keyframe. At the second keyframe, adjust the Longitude, Focal Length, Distance, and Zoom controls to the desired settings. These changes cause the clip to play normally from the beginning until it reaches the first keyframe. At that point, the camera angle starts to morph until it gets to the settings you specify at the second keyframe.
Set additional keyframes as desired.
Don't forget to use those Previous and Next Keyframe buttons. They provide an easy way to move from keyframe to keyframe. If you want to remove a keyframe, simply move to the keyframe and click the Add/Delete Keyframe button to remove the check mark.
Note
If you apply multiple effects to a clip, each effect gets its own keyframes. Thus, if you set a keyframe for one effect, don't assume that it applies to the other effects on that clip as well. To view the keyframes for an effect, click that effect in the clip properties to select it.
You'll probably change your mind about some of the effects you apply to your clips. Don't worry; this is perfectly natural. A lot of video editing involves good ol' trial-and-error. You'll try an effect, you won't like it, and then you'll try something else. To get rid of an effect, click the clip in the Timeline to select it, and then choose Window
Temporary disability: You can temporarily disable an effect by clicking the little eye next to the effect's listing in the effect controls. This is a handy option because your effect settings are preserved. Disabled effects are not applied when the movie is rendered or output.
Permanent leave: To delete an effect from a clip, click its title in the effect controls and then click the Trash can button at the bottom of the Task pane. Don't worry! The effect is not deleted from Premiere Elements; you're only removing it from the current clip.
When Adobe decided to create an "Elements" version of Premiere, the goal was to create a program that is easier to use than Premiere Pro. This included the effects editing process, because let's face it: Adjusting multiple effect controls and setting keyframes can be complex and time consuming.
To make it easier to use and modify video effects, Premiere Elements comes with a collection of effect presets. Presets are preprogrammed effect settings that perform common tasks like panning across still images or creating picture-in-picture (PiP) effects. Instead of spending minutes or even hours fine-tuning motion controls, keyframes, and other settings, you just drop a predesigned preset onto the clip. Presets are timesaving tools that even veteran video professionals appreciate.
Using a preset is easy. Just drag and drop a preset from the Effects window to a video clip, just like any other effect. Preset settings are applied automatically, but you can still fine-tune those settings if you want.
You can find Effect presets in the Effects window under the Task pane's Edit tab (Window
Bevel Edges: The two presets in this category quickly bevel the edges of the video image, providing a beveled picture frame appearance.
Blurs: The Fast Blur In preset causes the clip to begin extremely blurry. The picture quickly comes into focus and the clip plays normally to the end. Fast Blur Out is similar, but the image blurs at the end of the clip.
Color Effects: These 13 presets quickly apply color changes to a clip. For example, if you want to quickly give a radically red tint to the clip, apply the Hyper Tint Red preset. The Increase Saturation preset quickly increases color saturation to improve clips that are sun washed or otherwise lack color depth.
Drop Shadows: Drop shadows can be used behind picture-in-picture windows, still graphics, titles, and other things. Premiere Elements includes eight drop-shadow presets.
Horizontal Image Pans: If you've used Apple's iMovie (available only for Macs), you may be familiar with the Ken Burns effects that come with that program. The Horizontal Image Pan presets in Premiere Elements are similar to Apple's Ken Burns effects. They help you pan across still images that would otherwise sit static and lifeless on the screen. Movies by renowned documentarian Ken Burns often use this technique. The historical subject matter of Burns's films usually requires many still images, and panning slowly across those images restores a sense of dynamic motion that viewers expect from video.
Horizontal Image Zooms: Similar to the image pan presets, the Horizontal Image Zoom presets zoom in or out on an image. I especially like to use these presets on titles. Titles that zoom in or out of view are very cool when they aren't overdone.
Mosaics: These two presets are much like the Blur presets, but the image "mosaics" in or out rather than blurs.
PiPs: PiP stands for picture-in-picture, and these are my favorite presets. I show you how to use PiP presets later in this chapter.
Solarizes: As I mention earlier in this chapter, the Solarize effect blends an image with its negative. The two Solarize presets make a clip "solarize" in or out as it plays.
Twirls: Do you want a video image to twirl into view or twirl out in a vortex? Apply one of the Twirl presets to quickly create this effect.
Vertical Image Pans: These presets are just like the Horizontal Image Pans, but they pan vertically rather than horizontally.
Tip
Maybe you're wondering if you can combine vertical and horizontal zooms or pans to create diagonal effects. It sounds like a good idea, but — alas — it doesn't work. These presets change motion settings, so when you apply one preset it displaces motion settings made by another preset. A diagonal effect requires manual adjustment of existing presets. Play with it if you have a few hours to spare.
Vertical Image Zooms: Yep, you guessed it. Vertical Image Zooms are just up-and-down versions of the left-and-right Horizontal Image Zooms.
If you have your own custom effect settings that you like to use on a regular basis, you can save those settings in a preset of your own. For example, if you apply a horizontal image pan preset to an image and then fine-tune the Motion settings so that the image actually pans diagonally, you may want to save your own "diagonal pan" preset. To save a preset, follow these steps:
Adjust your effect settings the way you like them.
In the effect controls, right-click the name of the effect you want to save and choose Save Preset from the menu that appears.
In the Save Preset dialog box that appears, enter a descriptive name for the preset in the Name field.
Choose a Type setting for the preset.
Your options are Scale, Anchor to In Point, and Anchor to Out Point. Anchor to In Point means that the effect will begin at the clip's In point. Anchor to Out Point means the preset will be applied to the end of the clip. Scale simply scales the effect to encompass the entire clip.
Enter a description for the preset in the Description field.
This information is important because several months from now you may forget exactly what this preset does — even if you have given it an exciting and descriptive name.
Click OK to save the preset and close the dialog box.
When you save your own preset, the preset is added to the Effects window on the Task pane. Choose Window
Lots of effects are available with Premiere Elements, and unfortunately I don't have room to describe them all in detail. What I can do is provide detailed instructions on how to apply a few common video effects. You can adapt the techniques described here when using many other effects.
I like to think of each movie project as a delicious recipe. Every recipe starts with a main ingredient, which in the case of a movie is your video footage. Like a salmon filet, video footage may be pretty good all by itself, but it can be enhanced with some creative seasoning. Video effects are like seasonings; you don't eat fresh dill or ground pepper alone, but add just the right seasonings to your source footage, plus a liberal splash of creative juices — butter and lemon juice for salmon — and the finished product will be delectable!
If you're hungry now, go grab dinner or a snack. When you're done, consider the cinematic spice rack in Premiere Elements, which holds almost 100 video effects. But like ketchup and salmon, some things don't go well together. Choose effects that contribute to the desired feel of your movie. Remember, you're trying to make a great movie, not show off your editing skills.
Many video effects help you stylize the video image. Consider the way color tints affect the look and feel of movies like The Matrix or 300. Subtle color casts can give the film a dreary tone (as in The Matrix) or suggest the look of a graphic novel (as in 300). You can stylize the color of your movies by using the Colorize effect, one of the NewBlue effects that comes with Premiere Elements. To use the Colorize effect, follow these steps:
Open the Effects window by choosing Window
Click-and-drag the Colorize effect and drop it on a clip in the Timeline.
Make sure that the clip is selected in the Timeline, and then choose Window
The effect controls for the selected clip appear in the Task pane.
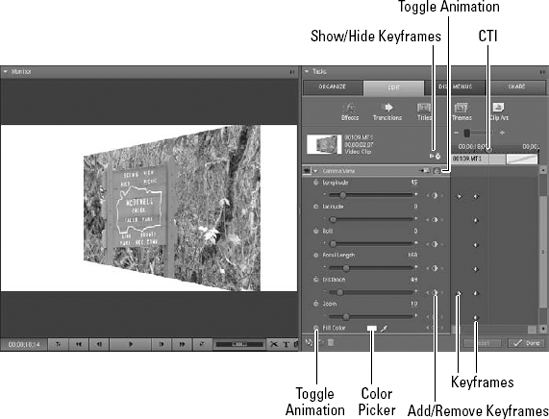
Locate the Colorize effect in the list of clip properties, and click the right-pointing arrow next to Colorize to expand the list of controls, as shown in Figure 12-4.
If you don't see Colorize or other controls on the Task pane, click the clip in the Timeline to make sure that the clip is selected.
Click the color swatch next to Color A, and then choose a color in the Color Picker that appears.
Color A will be the predominant color tint appearing in the video clip. After you choose a color, click OK to close the Color Picker.
Tip
Alternatively, click the eyedropper next to the color swatch in the effect controls, and then select a color somewhere in the Monitor's video image.
Click the color swatch next to Color B, and then choose a color in the Color Picker that appears.
Color B will be the secondary color used in the clip. All other color will be removed from the clip. In the example shown in Figure 12-4, I have selected red as Color A and blue as Color B, effectively eliminating green from the image. Considering that the original scene had a lot of green in the foliage and ground cover, this effect gives the image an almost other-worldly appearance while still seeming natural.
Click-and-drag the Strength sliders for Color A and Color B to achieve the desired color intensity.
As with most video effects, this is where you'll spend a lot of time experimenting.
Play the clip and watch for visual problems.
With the Colorize effect, one problem you may encounter is large areas that seem to have no color at all. Adjust the strength sliders or the Color A and Color B colors until the video image looks how you want it.
Suppose a subject in a movie is sick or disoriented. What is the best way to communicate this to the audience? You could have someone in the movie say, "Hey, you don't look well. Are you sick?" Then the unwell person can stumble and fall down. That may be effective, but an even better way to convey a feeling of illness or confusion is to let your audience see through the subject's blurry and distorted eyes.
You can begin by shooting some footage from the subject's point of view. Hand-hold the camera and let it move slightly as you walk. You probably don't need to exaggerate the movement, but the camera shouldn't be tripod-stable either. As you shoot, pan across the scene — but not too quickly — as if the subject were looking around the room, confused by his surroundings. Occasionally you may want to dip the camera slightly left or right so the video image appears to tilt. A tilting video image has a strong disorienting effect on the viewer.
Now that you have footage to work with, you can perform the real magic in Premiere Elements. One effect that can provide a feeling of illness or disorientation is Fast Blur (found in the Blur & Sharpen category). Use keyframes to adjust camera blur throughout a clip, as if the subject's vision were moving in and out of focus. Another good one is Ghosting (also in the Blur & Sharpen category). Ghosting produces ghost images of moving objects. Similar to Ghosting is the Echo effect, found in the Time category, which is used in Figure 12-5. Echo gives you a bit more control over the number and timing of echoed images.

Do you ever wish you could produce a mirror image of a video clip, or maybe rotate and change its orientation on the screen? Such modifications are easy with Premiere Elements. Effects that you can use to flip video can be found in the Transform category of video effects. These effects include two classics:
Horizontal Flip: This effect flips the video left to right, as shown in Figure 12-6.
Vertical Flip: This effect flips the video top to bottom.

Your TV might have a picture-in-picture (PiP) feature that allows you to watch your favorite show in a small window while your significant other watches another show on the main screen. (See Figure 12-7.) Picture-in-picture effects can also be handy in your movies. For example, if you're interviewing a star soccer player, you may want to show the interviewee in a small window while the action of a soccer game appears in the main screen. Premiere Elements has presets that make picture-in-picture effects easy to accomplish.

Before you can create a picture-in-picture effect, you must set up the video clips properly in your Timeline. Place the main background image in the Video 1 track. Then place another clip in Video 2 or a higher video track, as shown in Figure 12-7 (remember, tracks Video 2 and higher are also called superimpose tracks). After you have placed the picture-in-picture clip in a superimpose track, follow these steps:
Open the Effects list in the Task pane by choosing Window
Choose Presets in the menu in the upper-left corner of the Effects list, and then scroll down to the PiP categories.
Scroll to a 25% or 40% PiP category, as appropriate.
The 25% PiP presets create picture-in-picture clips that are 25% of their original height and width, and the 40% PiP presets create images that are 40% of their original height and width.
Presets are also divided into LL (lower-left), LR (lower-right), Motion (these move from one orientation to another), UL (upper-left), and UR (upper-right) categories.
Find the preset that best matches the effect you want to create, and click-and-drag it to the clip in the superimpose track.
In Figure 12-8, I am using the preset PiP 25% LR Scale Out. The image's height and width will be reduced to 25%, and the image will be positioned in the lower-right corner of the screen. At the end of the clip it will scale down to a point and disappear.
Note
Picture-in-picture effects are cool, but always consider how your audience will view the movie. Will most of your audience view it on YouTube or an iPod? If so, the smaller viewing screen may turn picture-in-picture windows into tiny little postage stamps, especially 25% PiPs. Picture-in-picture works best when the audience will view the final movie on a large TV.
