
4
THE AUDIO ENGINE AND SPATIAL AUDIO
1. Listeners, Audio Clips and Audio Sources
While a number technologies are available to implement audio in game engines, most have settled on a basic layout, with various degrees of feature implementation. This model revolves around three basic audio objects. Although the terminology used in this chapter focuses on Unity’s implementation, other game engines tend to build upon a similar architecture. The three objects at the core of the audio engine are listeners, audio clips and audio sources. Let’s take a close look at them.
1. The Audio Listener
The audio listener allows us to hear the audio in the game and represents the auditory perspective rendered in the game when playing back spatial audio. Although there can be situations where multiple listeners are required, usually in multiplayer games, in single player situations there should only be one listener per level. Without an audio listener, no audio will be heard. Audio listeners are added to a game object, often the camera, as a component.
Audio Clips
Audio clips hold the actual audio data used in the game. In order to play back an audio clip, it must be added to an audio source (discussed next). Unity supports the following audio formats:
- aif files.
- wav files.
- mp3 files.
- ogg vorbis files.
Mono, stereo and multichannel audio (up to eight channels) are supported by Unity. First order ambisonic files are also supported. When an audio file is imported in Unity, a copy of the audio is created locally and a metadata file is generated with the same name as the audio file and a .meta extension. The meta file holds information about the file such as format, quality (if applicable), whether the file is meant to be streamed, its spatial setting (2D vs. 3D) and its loop properties.
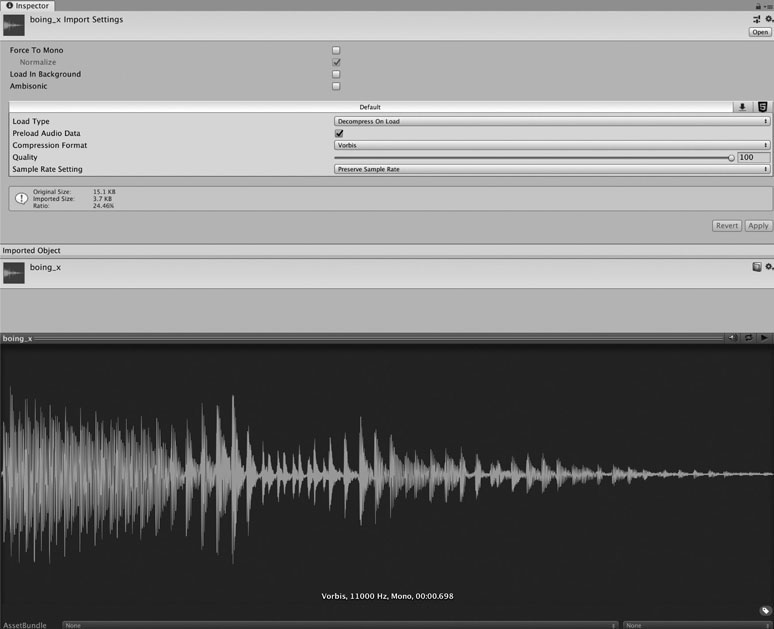
Figure 4.1
Audio Sources
Audio sources are the virtual speakers through which audio clips are played back from within the game. Audio sources play the audio data contained in audio clips and give the sound designer additional control over the sound, acting as an additional layer. This is where we specify if we want the audio file to loop, to be directional or 2D (whether the sound pans as we move around it or plays from a single perspective) and many more settings, each described in more detail later.
Note: audio sources can be added as a component to an existing object, but for the sake of organization I would recommend adding them to an object dedicated to hosting the audio source as a component. With a careful naming convention, this will allow the designer to quickly identify and locate the audio sources in a given level by looking through the hierarchy window in Unity. Ultimately, though, every designer’s workflow is different, and this is merely a suggestion.
Audio sources are rather complex objects and it is worth spending some time familiarizing yourself with the various parameters they give the game audio designer control over.
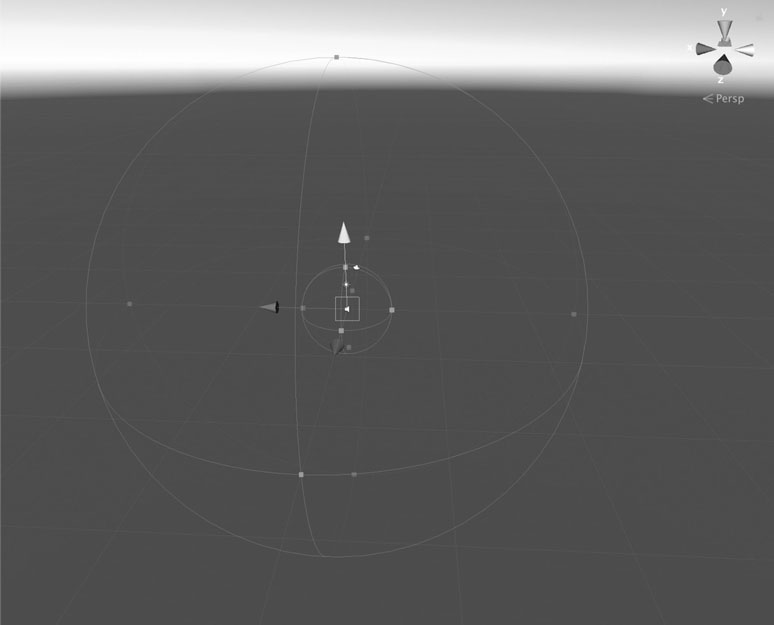
Figure 4.2
2. Audio Source Parameters
- Audio clip: use this field to select the audio clip to be played by that audio source. You must import the audio assets first for them to show up as an option in this field.
- Output: use this field to select a mixer’s group input – or submix – to route the audio source to. If none is selected the audio output will default to the master fader.
- Mute: when checked will mute the output of the audio source.
- Bypass effects: when checked, the audio output of that audio source will not be routed through any effects that were applied. This is a quick way to listen to the sound completely unprocessed.
- Bypass listener effects: when checked, global effects applied to the listener will not be applied to this audio source. (irrelevant if the audio source is routed through a mixer group).
- Bypass reverb zone: when checked, audio from that audio source will not be routed to any reverb zone applied.
- PlayOnAwake: when checked, the audio source will start playing as soon as the level starts running.
- Loop: when checked, the audio will keep on looping.
- Volume: amplitude of the audio source on a linear scale from 0, no audio, to 1, full audio, at a distance of one unit.
- Pitch: pitch of the audio source, from –3 to 3. 1 represents actual pitch, 0.5 an octave down and 2 an octave up from the original pitch. Negative values will play the sound backwards.
- Stereo pan: allows the panning of files in the stereo field. –1 = left, 0 = center and 1 = right. Disabled if the spatial blend is set to 3D.
- Spatial blend: determines if the audio source will be spatialized in 2D, 3D or a combination of both. With a setting of zero, the sound will not be spatialized in 3 dimensions or appear to come from a specific place in the level. The sound will not decay with distance but can still be panned left-right using the stereo pan slider. Furthermore, the sound will not pan relative to the position of the listener and will appear to be static. This setting is usually appropriate for voiceover, music and UI sounds.
- By setting this parameter to 1 the audio will playback in full 3D and will be localized using the 3D engine. The position of the sound will appear to change relative to the position of the listener and will not be heard when the player is outside the audio source’s maximum range. Use this setting when you want your audio sources to have a clear sense of location in your level.
- Priority: used to determine the importance of each audio source relative to each other. This setting comes in handy if Unity runs out of available audio voices and is therefore forced to mute some. A setting of 0 gives the audio source the highest priority and 256 the least. The Unity manual suggests 0 for music so that music tracks do not get interrupted, while sounds that may not be crucial to the gameplay or the level should be assigned a lower setting.
- Reverb zone mix: this parameter determines how much of the audio source’s signal will be routed through a reverb zone, if one is present. This acts as the dry/wet control found in traditional reverb unit, allowing you to adjust how much reverb to apply to each audio source.
- Doppler level: controls the amount of perceived change in pitch when an audio source is in motion. Use this parameter to scale how much pitch shift will be applied to the audio source when in motion by the engine.
- Spread: controls the perceived width in degrees of a sound source in the audio field. Generally speaking, as the distance between a sound and the listener decreases, the perceived width of a sound increases. This parameter can be changed relative to distance to increase realism using a curve in the 3D sound settings portion of an audio source.
- Volume roll off: This setting controls how a 3D sound source will decay with distance. Three volume roll off modes are available, logarithmic, linear and custom. Logarithmic tends to sound the most natural and is the most intuitive as it mimics how sound decays with distance in the real world. Linear tends to sound a little less natural, and the sound levels may appear to change drastically with little relation to the actual change in distance between the listener and source. Custom will allow the game designer to control the change in amplitude over distance using a curve for more precise control.
- Note: always make sure the bottom right portion of the curve reaches zero, otherwise even a 3D sound will be heard throughout an entire level regardless of distance.
- Minimum distance: the distance from the sound at which the sound will play at full volume.
- Maximum distance: the distance from the sound at which the sound will start to be heard. Beyond that distance no sound will be heard.
3. Attenuation Shapes and Distance
When working with 3D levels, the way sounds are represented in the world, how far they can be heard, how they sound up close or from a distance and whether they pan as the listener moves about or not, are crucial aspects of building something believable. It is worth spending a little more time specifically discussing the different ways that audio sources can be set up – in Unity and beyond – and how to adjust a given source to obtain the best results.
Note: the following applies to 3D audio sources. 2D audio sources will be played back as mono or stereo files, at the same volume regardless of the position of the listener.
a. Spherical Spreading
Spherical spreading over distance is probably the most common attenuation shape in games. In this configuration, the audio source will spread outwards as a sphere, and be heard from all directions, based on a minimum and maximum distance parameter.
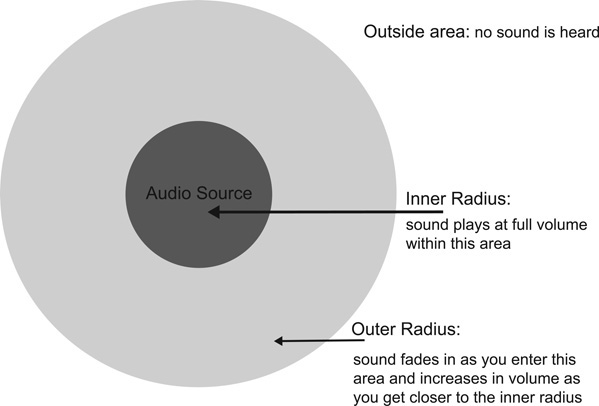
Figure 4.3
The maximum distance, expressed in game units, specifies how far from the source or the object it is attached to the audio will be heard. At any point beyond the maximum distance the audio will not be heard and will start fading in once the listener enters the maximum distance or radius. As you get closer to the audio source, the sound will get louder until you reach the minimum distance, at which point the audio will play at full volume. Between the two distances, how the volume fades out, or in, is specified by the fall-off curve, which can be either linear, logarithmic or custom:
- For more natural-sounding results, it is recommended to start with a logarithmic fall-off curve and adjust as needed.
- Linear is not recommended when looking for realistic, smooth sounding results but can be useful when a non-realistic behavior is desired.
- Custom is very useful when a specific behavior is required. This allows the game designer to draw a curve that represents the behavior of sound over distance and does not have to be rooted in real-world behavior. A sound could get louder as you get further away from it for instance.
While some game engines allow for a more flexible implementation, unfortunately, at the time of this writing Unity only implements audio sources as spheres. This can create issues when trying to cover all of a room, which doesn’t happen to be circular in shape, which of course is most rooms. This leaves us with two options, leaving the corners of the room uncovered or increasing the radius of the shape to the so that it encompasses the entire space, but the sound will also spill over into the next room or outside area.

Figure 4.4
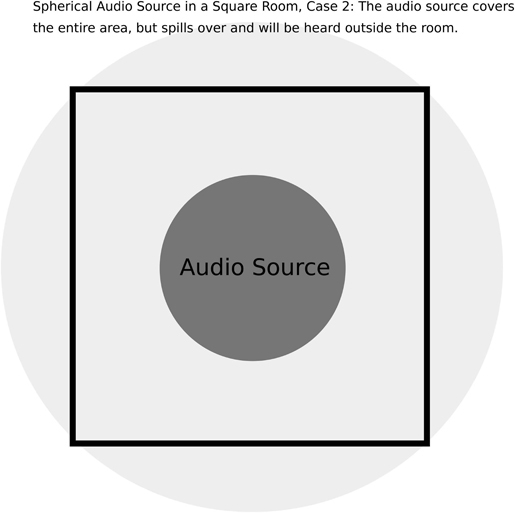
Figure 4.5
Although Unity does not allow one to natively alter the shape by which the audio spreads out into the level, other game engines and audio middleware allow the designer to alter the shape of the audio source. Other game engines and audio middleware, however, do, and other shapes are available.
b. Sound Cones – Directional Audio Sources
Sound cones allow the game designer to specify an angle at which the sound will be heard at full volume, a wider angle where the sound level will begin to drop and an outside angle where sound might drop off completely or be severely attenuated. This allows us to create directional audio sources and can help solve some of the issues associated with covering a square or rectangular area with spherical audio sources.
Sounds cones are particularly useful when we are trying to draw the player to a certain area, making it clearer to the player as to the actual location of the audio source.
Sound cones are very useful and can be recreated using a little scripting knowledge by calculating the angle between the listener and the sound source and scaling the volume accordingly.
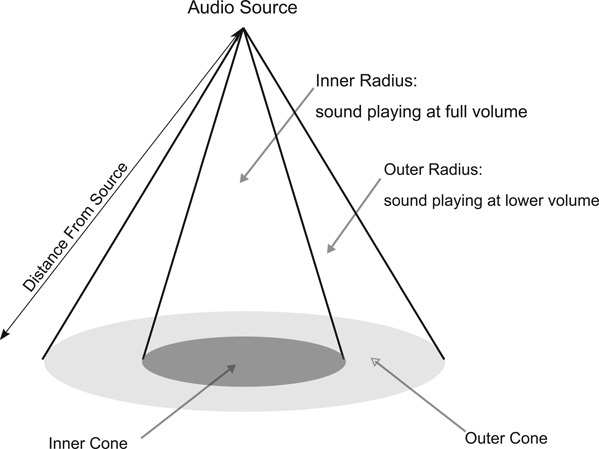
Figure 4.6
c. Square/Cube
As the name implies, this type of audio source will radiate within a square or cube shape, making it easier to cover indoor levels. There again we find a minimum and maximum distance.

Figure 4.7
d. Volumetric Sound Sources
Volumetric is a somewhat generic term for audio sources that evenly cover a surface area – or volume – instead of emanating from a single point source. Some game engines allow the game designer to create very complex shapes for volumetric audio sources, while some stay within the primitive geometric shapes discussed earlier. Either way these shapes are useful for any situation where the audio needs to blanket a whole area, rather than coming from a single point in space, such as a large body of water or a massive engine block.
Volumetric sound sources can be difficult to model using Unity’s built in tools, but a combination of a large value for the spread parameter with the right value for the spatial blend may help.
e. 2D, 3D or 2.5D Audio?
Most sound designers when they start working in the gaming industry understand the need to have both non-localized 2D sounds, such as in-game announcements, that will be heard evenly across the level no matter where the players are, as well as the need to have 3D localized audio files, such as a sound informing us as to the location of a pickup for instance, only audible when close to these objects and having a clear source of origin. Why, however, Unity gives the designer the option to smoothly go from 2D to 3D may not be obvious.
The answer lies in a multitude of possible scenarios, but one of the most common ones is the distance crossfade. Distance crossfades are useful when the spatial behavior of a sound changes relative to distance. Some sounds that can be heard from great distances will switch from behaving as 3D sound sources, clearly localizable audio events, to 2D audio sources when heard up close. A good example would be driving or flying toward a thunderstorm. From miles away, it will appear to come from a particular direction, but when in the storm, sound is now coming from every direction and is no longer localizable. In many cases, however, it is worth noting that different samples will need to be used for the far away sound and the close-up sound for added realism. In our case, a distant thunderstorm will sound very different from the sound of the same storm when ‘in’ it.
Another situation where you might want to have a sound neither fully 2D nor 3D is you want a particular audio source to be audible from anywhere in a large map but only become localizable as you get closer to it. In such a case, you might want to set the audio source to a spatial blend value of 0.8. The sound will be mostly 3D, but since it isn’t set to a full value of 1, it will still be heard across the entire level.
4. Features of Unity’s Audio Engine
Unity’s audio engine also provides us with additional features for audio processing, audio filters, and audio effects and the ability to create multiple audio mixers for flexible routing. A lot of these features will be explained in more detail in further chapters, such as the adaptive mixing chapter.
a. Audio Filters
Audio filters may be applied to an audio source or listener as components, and one should be mindful of the order in which they are added as the signal will be processed in that order. It is always possible to re-arrange components, however, by clicking on the component’s gear icon at the top right of the component and selecting either the move up or move down option.
An audio filter applied to the listener will be heard on every audio source in the level.
Unity provides the following effects as audio filters:
- Audio Low Pass Filter.
- Audio High Pass Filter.
- Audio Echo.
- Audio Distortion Filter.
- Audio Reverb Filter.
- Audio Chorus Filter.
b. Audio Effects
Audio effects are applied to the output of an audio mixer group as individual components, and, as was the case for audio filters, the order of the components is important, and the signal will be processed in the order through which the components are ordered.
Audio effects are discussed in more detail in the adaptive mixing chapter, but their list includes:
- Audio Low Pass Effect.
- Audio High Pass Effect.
- Audio Echo Effect.
- Audio Flange Effect.
- Audio Distortion Effect.
- Audio Normalize Effect.
- Audio Parametric Equalizer Effect
- Audio Pitch Shifter Effect.
- Audio Chorus Effect.
- Audio Compressor Effect.
- Audio SFX Reverb Effect.
- Audio Low Pass Simple Effect.
- Audio High Pass Simple Effect.
c. Audio Mixers
Unity also features the ability to instantiate audio mixers, which allows us to create complex audio routing paths and processing techniques and add effects to our audio for mixing and mastering purposes.
When you create an audio source, you have the option to route its audio through a mixer by selecting an available group using the output slot (more on that in the adaptive mixing chapter).
Groups can be added to the mixer to provide additional mixer inputs. Groups can be routed to any other audio mixer present in the scene, allowing you to create very intricate mixing structures.
Please refer to the adaptive mixing chapter for an in-depth discussion of audio mixers in Unity.
2. Audio Localization and Distance Cues
In order for us to understand the game engine’s implementation of 3D audio it is useful to first understand the way human beings relate to distance and direction. How do we estimate distance and tell the origin of a sound in a complex 360-degree real-world environment? A thorough study of distance and localization cues is well beyond the scope and ambitions of this book, however, it is extremely helpful to understand the fundamental concepts involved with the perception of both in order to take advantage of the current and future spatial audio technologies, especially as these technologies have implications for both game and sound design.
When discussing 360 audio, it is common to express the position of sound sources in terms of Azimuth, the angle between the sound source and the listener on the median plane; elevation, the angle between the listener and the audio source on the horizontal plane and of course distance, which we will begin our examination with.
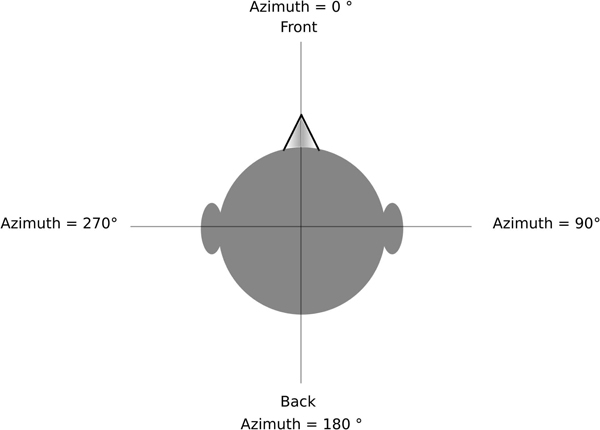
Figure 4.8
1. Distance Cues
In order to evaluate the distance from an object in the real world, humans rely on several cues. These cues, in turn, when recreated or approximated virtually, will give the listener the same sense of distance we would experience in our everyday life, allowing us as sound designers to create the desired effect. The main distance cues are:
- Loudness or perceived amplitude.
- Dry to reflected sound ratio.
- Timbre.
- Width (the perceived size of a sound in the audio field).
Although loudness may seem like the most obvious cue as to the distance of a sound, it does not on its own tell the whole story. In fact, simply turning down the volume of an audio source and nothing else will not necessarily make it seem further away; in most cases it will only make it softer. The ability of human beings to perceive distance is fundamentally and heavily dependent on environmental cues and, to a lesser degree, some familiarity with the sound itself. Familiarity with the sound will help our brain identify the cues for distance as such rather than mistaking them as being part of the sound. Physics students learning to understand sound are often pointed to the inverse square law as to understand how sound pressure levels change with distance. The inverse square law, however, is based on the assumption that waves spread outwards in all directions and ignores any significant environmental factors. In such conditions an omnidirectional sound source will decay by 6dB for every doubling of distance. This is not a very realistic scenario, however, as most sounds occur within a real-world setting, within a given environment where reflections are inevitable. Furthermore, the pattern in which the sound spreads is also a significant factor in how sound decays with distance. Most audio sources are not truly omnidirectional and will exhibit some directionality, which may vary with frequency. If the audio source is directional instead of omnidirectional, that drop changes from 6dB per doubling of distance to about 3dB (Roginska, 2017). Loudness is only a part of the equation that enables humans to appreciate distance. Loudness alone is most effective when the listener is very close to the sound source and environmental factors such as reflections are negligible. Research also suggests that when loudness is the main factor under consideration, human perception does not necessarily agree with the inverse square law, as for most people a doubling of distance is associated with a doubling of amplitude, which is closer to 10dB (Stevens & Guirao, 1962; Begault, 1991). Another key factor in the perception of distance under non-anechoic conditions, that is to say in any reflective environment or real-world conditions, is the ratio of direct sound to reflected sound. The ratio is a function of the distance between the audio source and the listener and provides us with important cues when it comes to distance. The ratio of reverberated to direct signal or R/D ratio is often used as a way of creating distance within mixes using reverberation, and most game engines will implement some technology to emulate this phenomenon. The exact science behind how to calculate the ratio of reflected to direct sound is quite complex, but it is not necessary to be scientifically accurate when doing sound design, with the exception, perhaps, of doing sound design for simulations. As we get further away from the sound the ratio of reflected sound present should increase and decrease as we get closer to it. It is also worth mentioning that once we go past a given distance, the sound will attain an event horizon point where it simply doesn’t get much softer in spite of an increase in distance between the sound and the listener. This point, sometimes referred to as critical distance or reverberation radius, happens when the sound heard is mostly made up of reflections and the dry signal’s contributions to the sound become insignificant in comparison. In the real world, high frequencies get attenuated with distance due to air absorption and atmospheric conditions. The amount of filtering over distance will vary with atmospheric conditions, and a loss of high frequency might also be due to the shorter wavelength of these frequencies and their inherent directionality. There, also, our purpose is not the scientific simulation of such a phenomenon but rather to take advantage of this phenomenon to better simulate distance in our games. Environmental factors, especially reflections, may also account for other less obvious phenomena that are somewhat subtle but when combined with other factors will create a convincing overall effect. One such factor is the perceived width of a sound over distance. Generally speaking, as we get closer to a sound, the dry signal will occupy more space in the sound field of the listener and become smaller as we get farther away. This effect might be mitigated when the wet signal is mixed in with the dry signal, however. This is relatively easy to implement in most game engines, certainly in Unity as we are able to change the spread property of a sound source, as well as its 2D vs.3D properties. Such details can indeed add a great level of realism to the gameplay. In spite of the mitigating effect of the wet signal, generally speaking, the overall width of a sound will increase as we get closer to it. Most game engines, Unity included, will default to a very narrow width or spread factor for 3D sound sources. This setting sounds artificial for most audio sources and makes for a very drastic pan effect as the listener changes its position in relation to the sound. Experimenting with the spread property of a sound will generally yield very positive results. Another such factor has to deal with the blurring of amplitude modulation of sounds as they get further away. This can be explained by the increased contribution of the reverberant signal with distance. Reflections and reverberation in particular naturally have a ‘smoothing’ effect on the sound they are applied to, something familiar to most audio engineers. A similar effect happens in the real world.a. Loudness
b. Dry to Reflected Sound Ratio
c. Low Pass Filtering With Distance
d. Spatial Width
2. Localization Cues
In order to localize sounds in a full 360 degrees, humans rely on a different set of cues than we do for distance. The process is a bit more complex, as we rely on different cues for localization on the horizontal plane than we do on the vertical plane, and although spatial audio technology is not entirely new – ambisonic recordings were first developed in 1971 for instance – only recently has the technology both matured and demanded wider and better implementation.
Additionally, the localization process is a learned one. The way humans localize sounds is entirely personal and unique to each individual, based on their unique dimension and morphology, which does make finding a universally satisfying solution difficult.
a. Localization on the Horizontal Plane
When considering spatial audio on the horizontal plane, the main cues tend to fall into two categories: interaural time difference – the time difference it takes for the sound to reach both ears – and interaural intensity difference, also sometimes referred to as interaural level difference, which represents the difference in intensity between the left and right ear based on the location of the audio source around us. Broadly speaking, it is accepted that the interaural intensity difference is relied upon for the localization of high frequency content, roughly above 2Khz, while the interaural time difference is more useful when trying to localize low frequencies. At high frequencies a phenomenon known as head shadowing occurs, where the size of an average human head will act as an obstacle to sounds with short wavelengths, blocking high frequencies. As a result, the difference in the sound at both ears isn’t just a matter of amplitude, but the frequency content between each ear will also be different. At low frequencies that phenomenon is mitigated by the longer wavelengths of the sounds, allowing them to refract around the listener’s head. For low frequencies the time difference of arrival at both ears is a more important factor. There are limitations to relying solely on IIDs and ITDs, however. In certain situations, some confusion may remain without reliance on additional factors. For instance, a sound placed directly in front of or in back of the listener at the same distance will yield similar results for both interaural time difference and interaural intensity differences and will be hard to differentiate. In the real world, these ambiguities are resolved by relying on other cues, environmental, such as reflections, filtering due to the outer ear and even visual cues.
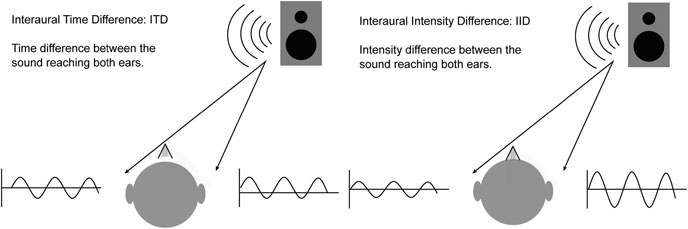
Figure 4.9

Figure 4.10
b. Localization on the Vertical Plane
Neither IID and/or ITD are very effective cues for localizations on the vertical plane, as a sound located directly above or below the listener may yield the same data for both. Research suggests that the pinna – or outer ear – provides the most important cues for the localization of sounds on the vertical plane. This highlights the importance of the filtering that the outer ear and upper body structure perform in the localization process, although here again environmental factors, especially reflection and refraction, are useful to help with disambiguation.
3. Implementing 3D Audio
3D audio technologies tend to fall in two main categories, object-based and channel-based. Object-based audio is usually mono audio, rendered in real time via a decoder, and it relies on metadata for the positioning of each object in a 3D field. Object-based technology is often scalable, that is, the system will attempt to place a sound in 3D space regardless of whether the user is playing the game on headphones or on a full-featured 7.1 home stereo system, although the level of realism may change with hardware.
Channel-based audio, however, tends to be a bit more rigid, with a fixed audio channel count mapped to a specific speaker configuration. Unlike object-based audio, channel-based systems, such as 5.1 audio formats for broadcasting, tend to not do very well when translated to other configurations, such as going from 5.1 to stereo.
In the past few years, we have seen a number of promising object-based-audio technologies making their way into home theaters such as Dolby Atmos and DTS:X. When it comes to gaming, however, most engines implement 3D localization via head related transfer functions or HRTFs for short. When it comes to channel-based technology, ambisonics have become a popular way of working with channel-based 3D audio in games and 360 video.
a. Object-based Audio and Binaural Renderings
The most common way to render 3D audio in real time in game engines relies on HRTFs and binaural renderings. A binaural recording or rendering attempts to emulate the way we perceive sounds as human beings by recording IID and ITD cues. This is done by recording audio with microphones usually placed inside a dummy human head, allowing the engineer to record the natural filtering that occurs when listening to sound in the real world by capturing both interaural time differences and interaural intensity differences. Some dummy heads can also be fitted with silicone pinnae, which further records the filtering of the outer ear, which, as we now know, is very important for localization on the vertical plane, as well as disambiguation in certain special cases, such as front and back ambiguity.
Head related transfer function technology attempts to recreate the ITD and IID when the sound is played back by ‘injecting’ these cues into the signal, via a process usually involving convolution, for binaural rendering. In order to do so, the cues for localization are first recorded in an anechoic chamber in order to minimize environmental factors, by using a pair of microphones placed inside a dummy’s head. The dummy’s head is sometimes mounted on top of a human torso to further increase realism. A full bandwidth audio source such as noise is then played at various positions around the listener. The dummy, with microphones located in its ears, is rotated from 0 to 360 degrees in small increments in order to record the IID and ITD cues around the listener. Other methods and material may be used to accurately collect this data. This recording allows for the capture of IID and ITD at full 360 degrees and if implemented can provide cues for elevation as well.
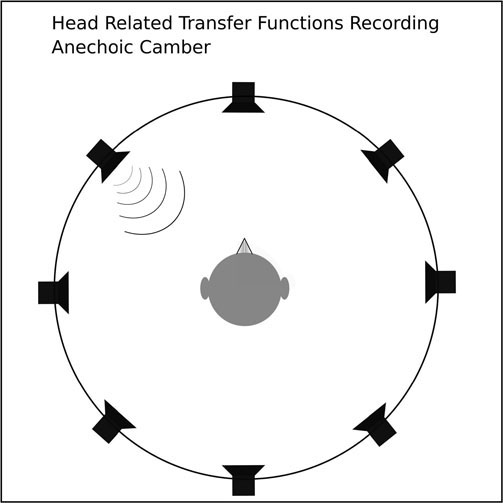
Figure 4.11
Once they have been recorded, the cues are turned into impulse responses that can then be applied to a mono source that needs to be localized in 3D via convolution.

Figure 4.12
HRTFs remain the most effective method to recreate 3D audio on headphones, but they do have some limitations. The main issue with HRTFs is that, localization being a learned process, it is unique to each individual. The one size fits all approach of using an idealized dummy’s head to capture IIDs and ITDs simply doesn’t work well for everyone. Interaural differences are indeed different for everyone, and the cues recorded with one dummy may or may not approach yours. If they do, then the desired effect of being able to localize sound in 3D over headphones works quite well. If they do not, however, the audio source may appear to come from a different place than intended, or, worse, a phenomenon known as ‘inside the head locatedness’ may occur, in which the listener, unable to properly resolve the cues presented to them, will have the sensation that the sound is coming from inside their own head. It is interesting to note that research has shown that after prolonged exposure to any given set of HRTFs, even if the set initially did not match the listener’s morphology, localization accuracy will improve over time. Additionally, HRTF technology does suffer from a few additional challenges. Mono sources are best when working with HRTFs, and while some audio engines such as Unity do allow the spatialization of stereo sources, some will only process mono audio sources. While this limitation may be disappointing to sound designers initially, stereo sources, in order to be processed through HRTFs, would have to be split into two mono channels, each then rendered on both the left and the right headphone with the appropriate interaural differences, then summed together. The results are usually disappointing due to phasing issues. Another issue when it comes to HRTFs is the artifacts of the convolution process itself, which may somewhat degrade the quality of the sound. This loss of fidelity and potential artifacts might be most audible when dealing with moving audio sources. This may be most noticeable for moving audio sources, which may in some cases add a slightly unpleasant zipping sound to the audio.
Lastly, HRTFs work best on headphones, and, when translated to stereo speakers, the effect is usually far less convincing, due in no small part to the cross talk between the left and right speaker, which is of course not present on headphones. Crosstalk greatly diminishes the efficacy of HRTFs, although some technologies have attempted to improve the quality and impact of HRTFs and binaural rendering on speakers.
In recent years we have seen a burst in research associated with optimizing HRTF technology. The ideal solution would be to record individualized HRTFs, which remains quite impractical for the average consumer. The process is quite time consuming and expensive and requires access to an anechoic chamber. It is also quite uncomfortable as the subject needs to remain absolutely immobile for the entire duration of the process. Although fully individualized HTRFs remain impractical for the time being, developers continue to find ways to improve the consumer’s experience. This could mean offering more than one set of HRTF measurements to choose from, creating a test level to calibrate the HRTFs to the individual and calculating an offset or a combination of the previous elements.
In spite of these disadvantages, HRTFs remains one of the most practical solutions for delivering 3D audio on headphones, and provides the most flexibility in implementation, as most game engines natively support it, and there are a number of third-party plugins available, often for free.
Binaural rendering has also been shown to improve the intelligibility of speech for video conferencing applications by taking advantage of the effect of spatial unmasking. By placing sounds in their own individual location, all sounds, not just speech, become easier to hear and understand, improving the clarity of any mix.
b. Working With HRTFs
Whether a sound should be playing as 3D or 2D ideally should be known by the design stage, prior to implementation in the game. This will allow the sound designer to make the best decisions to optimize each sound. For any sound that requires 3D localization, HRTFs remain one of the best options.
However, not all audio files will react well to HRTF processing, and in some cases the effect might be underwhelming or simply ineffective. In order to get the best results, we should keep the following in mind:
- HRTFs work best on mono signals. When doing sound design for 3D sounds, work in mono early in the process. This will prevent any disappointing results down the line. Most DAWs include a utility plug in that will fold sounds to mono. It might be a good idea to put one on your master bus.
- HRTFs are most effective when applied to audio content with a broad frequency spectrum. High frequencies are important for proper spatialization. Even with custom HRTFs, sounds with no high frequency content will not localize well.
- When it comes to localization, transients do matter. Sounds lacking transients will not be as easy to localize as sounds with a certain amount of snappiness. For sounds that provide important locational information to the player, do keep that in mind. If the sound doesn’t have much in the way of transients, consider layering it with a sound source that will provide some.
c. Multichannel Audio and Ambisonics
a. Stereo
Although video games are highly interactive environments and object-based audio is a great tool to address these dynamic needs, channel-based audio, while not as flexible in some regards as object-based, still has a place in game audio and is very well suited to gaming in several regards.
Multichannel audio is more computationally efficient than object-based audio, and not every sound in a game needs to be 3D. Some of these 2D sounds lend themselves well to stereo audio. Examples of 2D sound candidates in 3D environments include wind and some ambiences, announcers, user interface sounds and music, amongst others. A lot of these might even sound awkward if 3D localized. Wind, for instance, in real life, does not appear to emanate from a single direction in space, nor does it pan around as the listener moves about in a level. For 2D sounds, such as wind or in-game announcement, stereo files are usually well-suited and can still be adjusted at run time in the stereo field from within Unity using the stereo pan slider on the audio source the file is associated with.
b. Surround Channel-Based Formats: 5.1
The 5.1 standard comes to us from the world of movies and broadcast where it was adopted as a standard configuration for surround sound. The technology calls for five full spectrum speakers located around the listener and a subwoofer. The ‘5’ stands for the full speakers and the ‘.1’ for the sub. This type of notation is common, and you will find stereo configurations described as 2.0.
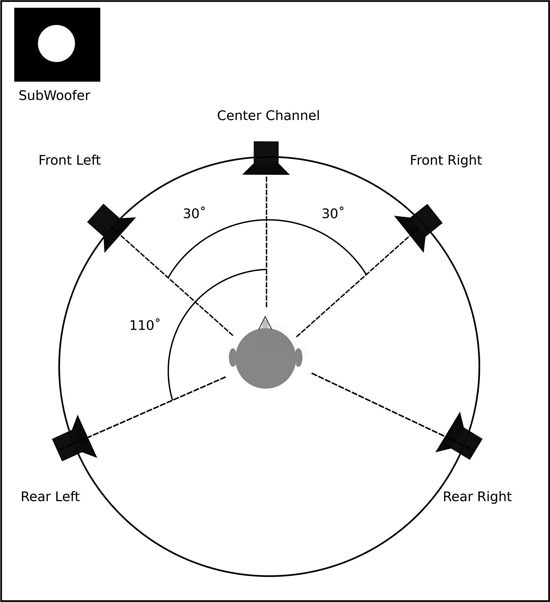
Figure 4.13
The main applications for 5.1 systems in games are monitoring the audio output of a video game and the scoring of cinematic scenes in surround. Most gamers, however, tend to rely on headphones rather than speakers for monitoring, but 5.1 can still be a great way for the sound designer to retain more control over the mix while working with linear cutscenes as well as making them sound much more cinematic. Video games mix their audio outputs in real time and do so in a way that is driven by the gameplay. Events in the game are panned around the listener based on their location in the game, which can sometimes be a bit disconcerting or dizzying if a lot of events are triggered at once all around the listener. Working with 5.1 audio for cutscenes puts the sound designer or mix engineer back in control, allowing them to place sounds exactly where they want them to appear, rather than leaving that decision to the game engine.
The viewer’s expectations change quite drastically when switching from gameplay to non-interactive (linear) cutscenes. This is a particularly useful thing to be aware of as a game designer, and it gives us the opportunity, when working with 5.1 surround sound, to make our games more cinematic sounding by using some of the same conventions in our mix than movie mixers may use. These conventions in movies were born out of concerns for story-telling, intelligibility and the best way to use additional speakers when compared to a traditional stereo configuration.
In broadcast and film, sounds are mixed around the listener in surround systems based on a somewhat rigid convention depending on the category they fall into, such as music, dialog and sound effects. An in-depth study of surround sound mixing is far beyond the scope of this book, but we can list a few guidelines for starting points, which may help clarify what sounds go where, generally speaking. Do keep in mind that the following are just guidelines, meant to be followed but also broken based on the context and narrative needs.
FRONT LEFT AND RIGHT SPEAKERS
The front left and right speakers are reserved for the music and most of the sound effects. Some sound effects may be panned behind the listener, in the rear left-right speakers, but too much going on behind them will become distracting over time, as the focus remains the screen in front of the player. Dialog is rarely sent to these speakers, which makes this stereo axis a lot less crowded than classic stereo mixes.
CENTER SPEAKER
The center speaker is usually reserved for the dialog and little else. By having dialog on a separate speaker, we improve intelligibility and delivery, as well as free up a lot of space on the left and right front speakers for music and sound effects. By keeping the dialog mostly in the center, it makes it easier to hear regardless of the viewer’s position in the listening space.
REAR LEFT AND RIGHT SPEAKERS
These are usually the least busy; that is where the least signal or information is sent to, save the subwoofer. They are a great way to create immersion, however, and ambiences, room tones and reverbs are often found in these speakers. If the perspective warrants it, other sounds will make their way there as well, such as bullets ricochets, impacts etc.
SUBWOOFER
Also referred to as LFE, for low frequency effects, the subwoofer is a channel dedicated to low frequencies. Low frequencies give us a sense of weight, and sending a sound to the LFE is a great way to add impact to it. It should be noted that you should not send sounds only to the subwoofer but rather use it to augment the impact of certain sounds. Subwoofers, being optimized for low frequencies, are usually able to recreate frequencies much lower than the traditional bookshelf type speakers, but their frequency response is in turn much more limited, rarely going above 150Hz. Additionally, the subwoofer channel often gets cut out altogether when a surround mix is played through a different speaker configuration, so any information sent only to the LFE will be lost.
Some mix engines or third-party audio middleware software will give the sound designer the ability to force certain sounds from the game engine to specific channels in a 5.1 configuration. It is recommended to keep the center channel for dialog and avoid routing music and SFX to the center speaker. The reason is that, having an additional speaker in the center, in front of the listener, may create a heavier-than-usual center image, since in stereo we are used to relying on the left and right speakers to create a center image. Relying on both the left and right speakers and the center speaker will make for a very strong center image. This may make the mix feel somewhat heavy in the front and overall unbalanced. Additionally, it will make the dialog easier to mix and hear if no other sounds or few sounds are sent to the center speaker.
Although more costly for the consumer due to the additional required hardware (speakers, multichannel capable sound card and amplifier), 5.1 audio does present some real benefits over stereo or quad type configurations and provides the game designer an alternative to headphones, especially when it comes to immersive audio.
Ambisonics
Although it was a technology studied primarily in academic circles for the longest time, support for ambisonics has become standard in game engines and audio middleware since the advent of virtual reality and 360 video. This technology offers an interesting alternative to stereo audio or HRTF/object-based audio. Ambisonic technology is the brain child of British engineer Michael Gerzon who developed a method to record and play back audio in full 360-degree surround. The technology is also speaker-independent and can easily be scaled to various configurations. Ambisonic recordings can be played on headphones via binaural rendering and on any multi-speaker configuration such as quad, 5.1 or 7.1. Ambisonic recordings can also be played on stereo speakers, but their impact greatly suffers as stereo speakers are not a favored way of delivering binaural renderings due to issues with crosstalk.
Note: when playing back ambisonic recording on headphones, you may expect the same side effects as you would with HRTFs, such as mixed results in accuracy.
Ambisonics is often described as a full sphere, surround format. Full sphere meaning the technology records signals in surround both on the horizontal plane, around the listener but also vertically above and below the listener. This happens by recording multiple channels simultaneously, usually with a dedicated ambisonic microphone whose capsules are arranged in a tetrahedral formation. The accuracy of the recording and of the positioning of the elements in the 360-degree sphere around the microphone depends on the order of the recording. First-order ambisonic recordings rely on four channels to capture a full 360-degree sonic image. Second-order ambisonics use nine channels, and third-order ambisonic recordings rely on 16 channels, all the way to sixth-order, which uses 49 channels. The increase of complexity from first- to second-order does yield additional spatial accuracy; however, recording, processing and implementation becomes complex due to the increased number of channels, and first-order ambisonics are the preferred format for games, Virtual Reality and 360 video.

Figure 4.14
Because of their ability to rapidly capture audio in full 360 degrees, ambisonics are a good option when it comes to efficiently recording complex ambiences and audio environments. By using a first order ambisonic microphone and a multitrack recorder, one can record a detailed picture of an audio environment in 360, with minimal hardware and software requirements. Ambisonics may also be synthesized in a DAW by using mono sources localized in 3D around a central perspective and rendered or encoded into an ambisonics file. Ambisonics recordings do not fall under the object-based category, nor are they entirely similar to some of the traditional, channel-based audio delivery system such as 5.1 Dolby Digital. As mentioned previously, ambisonics recordings do not require a specific speaker configuration, unlike 5.1 Dolby Digital or 7.1 surround systems, which rely on a rigid speaker structure. The ability of first-order ambisonic recordings to capture a full 360-degree environment with only four audio channels and the ability to project that recording on a multitude of speaker configurations is indeed one of the main appeals of the technology.
In fact, for certain applications ambisonics present some definite advantages over object-based audio. Recording or synthesizing complex ambiences that can then be rendered to one multichannel audio file is more computationally efficient than requiring the use of multiple audio sources, each localized in 360, rendered at run time. In most cases it is also faster to drop an ambisonics file in your game engine of choice than it would be to create and implement multiple audio sources to create a 360 ambience. Decoding an ambisonics recording is a fairly efficient computational operation, and the load on the audio engine can be decreased by using an ambisonics recording over the use of several audio sources, each requiring to be localized in real time using HRTFs, for instance.
The most common format for ambisonics is known as the B format. It is comprised of four channels, labelled W, X, Y and Z. The W channel is a omni directional recording, the X represents the front-back axis, Y represents the left-right asset and Z the up and down axis. A raw recording done via an ambisonic microphone is often referred to as A format. A format files need to be decoded, usually in a B format. There are two B formats types, AmbiX and Fuma, which are similar but not interchangeable. An A format file can be turned into a B format file using a software decoder, not unlike a Mid/Side recording. Once it has been turned into the appropriate B format file (check with the documentation of the software you are using to find out which B format to use), the file is ready for use.
In Unity, ambisonics recordings must be played through a third-party plug in, such as Facebook’s oculus tools, which also includes additional tools as well such as a powerful spatializer.
Ambisonics are very efficient and offer the ability to capture a 360-degree audio sphere around a single, static point. That sphere can then be manipulated, usually via rotation, to match the viewer’s perspective and current point of view, dynamically adjusting to changes in the game or video. The computational savings of using ambisonics can be significant over dedicated mono sources that each would require to be spatialized in 3D and is a very good alternative when dealing with complex ambiences that would otherwise require many audio sources, each localized in 3D individually. There are limitations to what this technology offers, and these should also be noted in order to make the best possible choice for a given project.
Ambisonics recordings or files have limited interactivity. They do allow the user to rotate the recording to match the viewer’s perspective, but once recorded or encoded the spatial relationship between the events is set and cannot be changed.
Although this is somewhat subjective, it is also generally agreed that object-based audio is usually more precise than first-order ambisonics, and when more accurate positioning is required, object-based solutions might be better.
The audio in ambisonics recording is forever at ‘arm’s length’; no matter how far the listener walks toward the direction of an audio source in the 3D world, they will never reach the actual position of that audio source. That makes ambisonics inappropriate for foreground elements that the player may be able walk up to, for which object-based audio is still the best solution.
In spite of these limitations, as pointed out earlier in the chapter, ambisonics remain a good option for working with complex, surround sound ambiences, with elevation information, while remaining a relatively inexpensive solution computationally.
4. Optimizing Sound Design for Spatialization
a. Putting It all Together
A hierarchy seems to naturally emerge when it comes to using and combining the technologies we just looked at in order to create an immersive environment.
- Ambisonics provide us with a very efficient way of capturing or rendering a full sphere environment, well suited for backgrounds, ambiences and other non-primary audio sources.
- Stereo files are well suited for 2D, non-directional audio, from environmental sounds to in-game announcements, music and dialog.
- Object-based audio, using HRTFs, is usually best for foreground 3D sounds and audio emitters.
By combining these technologies we can create a fully immersive audio environment, which will complement and possibly augment and elevate the visuals.
b. Working With 2D and Multichannel Audio
Stereo audio is a good option for a number of situations, in 2D or 3D environments. In a 3D world coordinate, stereo files are useful for:
- Ambiences, such as wind, rain, outdoors and city sounds.
- Music.
- UI (User Interface) sounds.
- In-game announcements, critical dialog, narration.
- Player’s own sounds, such as footsteps, Foley, breathing etc.
c. Working With Ambisonics
Ambisonics can fit within a hierarchy of sounds within a 3D environment as they are a very efficient way to encode complex 3D data at minimal computational costs. By encoding non critical sounds in 360 degrees on four channels we can save the number of 3D audio sources. Ambisonic files are useful for:
- Surround ambiences.
- Complex room tones.
- Synthesizing complex environments and rendering them to a single file.
d. Working With Object-Based Audio
Object-based audio, sounds that need to be localized in 2 or 3D by the player, is well suited for:
- Any sound that may give crucial information to the player.
- 3D emitters, such as birds in an outdoors environment, water dripping in a cave.
- Enemy weapon sounds, vehicles, AI characters, other players.
When combining these formats for our purposes, a hierarchy naturally emerges:
Figure 4.15
Conclusion
The audio engine is particularly complex sub system of the game engine, and regardless of the engine you are working with, as a sound designer and game audio designer it is important that you learn the features of the game engine you are working with in order to get the most out of it. Most audio engines rely on a listener – source – audio clip model, similar to Unity’s. From this point on, every engine will tend to differ and offer its own set of features. Understanding spatial audio technology is also important to every sound designer, and spending time experimenting with this technology is highly recommended.