
11
ADAPTIVE MIXING
1. What’s in a Mix? Inform and Entertain (Again)
As we did with sound design, before looking at the techniques available to us for mixing, we should stop and ask ourselves what makes a good mix in a game. Indeed, if we are unable to identify the objectives we are trying to achieve, we will never reach them. The question is not a simple one; there are a lot of factors to consider, and as always with interactive media, the relative unpredictability of gameplay complicates the matter somewhat. So, what are the goals one should strive for in considering mixing for game audio?
The mix is how we present information to the player. A good mix will make our experience all the more immersive and cinematic and make our sound design shine by highlighting the most important sounds and presenting them clearly to the player.
The following is a non-exhaustive list but will act as a good starting point for our conversation.
1. Mix Considerations
- Clarity: as with any mix, linear or not, real time or not, achieving clarity is an essential aspect of our work. Many sounds sharing similar characteristics and spectral information will likely play on top of each other; our job is to make sure that all sounds are heard clearly and that, no matter what, the critical sounds for the gameplay are heard clearly above all else.
- Dynamic range: a good mix should have a decent dynamic range, giving the player’s ears time to rest during low intensity moments and highlighting and enhancing the gameplay during action-packed sequences. A good dynamic range management will make it easier to hear the details of a well-crafted soundtrack, immersing the player further.
- Prioritization: at any given moment, especially during the more intense portions of the game, the engine might attempt to trigger a large number of audio sources. The question for us is which of these sounds are the most relevant to the player and can provide them with information to play the game better, giving them a better gaming experience. For instance, a bit of critical dialog may be triggered at the same time as an explosion. While both need to be heard, the dialog, although much softer than the explosion, still needs to be heard clearly, and it is the responsibility of the developer to see to it.
- Consistency: a good mix should be consistent across the entire game. The expectations developed during the earlier portions of the game in terms of quality and levels should be met throughout. Audio levels between scenes should be consistent and of course so should sounds by categories such as dialog, footsteps, guns etc.
- Narrative function: the mix needs to support and enhance the story-line and gameplay. It needs to be both flexible and dynamic, reflecting both the environment and plot developments. This can mean something as obvious as the reverb changing when switching to a different environment, but it is often much more subtle. Simple moves like making the beginning of a sound slightly louder when it is introduced for the first time can tell the player to pay attention to something on the screen or the environment without being too obvious about it.
- Aesthetics: this is harder to quantify, but there are certain things to look out for when thinking about the overall aesthetics of the mix. Does it sound harsh when played at high levels; is the choice of effects such as reverbs, delays and other processes optimized to serve the soundtrack as well as possible? Is it pleasant to listen to over long periods and at all levels, or is the bottom end clear and powerful yet not overpowering? These and many more questions are the ones that relate specifically to the aesthetics of a mix.
- Spatial imaging: 3D and virtual/mixed reality environments require special attention to the spatial placement of sounds. Our mix needs to accurately represent the location of sounds in 3D space using the technologies at our disposal to the best of our abilities.
- Inform: How do we create a mix that informs the player, providing them with important cues and establishing a dialog between the user and game itself? If all the points mentioned so far have been carefully weighted into your mix, very likely you’ve already succeeded in doing so.
- Are the important sounds prioritized in the mix?
- Does the mix reflect the environment accurately or appropriately? In this way the player is able to gain information on the space the scene takes place in.
- In a 360-degree environment, sounds can be used to focus the attention of the player. Do make sure that sounds used in such a way are clearly heard, designed to be able to be easily localized; remember the chime vs. buzzer principle. Sounds with brighter spectrums and a sharp attack are easier to localize than low-frequency hums.
With so many variables involved, it isn’t very surprising that mixing is a skill that is acquired over time, likely by working on both linear and non-linear material. It is important to understand that a good mix is a dynamic one and that we should always be in control of it. Let’s begin by breaking down the mix into three main categories – music, dialog and sound effects – and understand each’s function in the context of a mix.
2. Music, Dialogue and Sound Effects
The soundtrack of games and movies can be broken down in terms of its three most important structural components: music, dialog and sound effects. Each serves a different purpose, and the mix is – or should – ultimately be dominated by one of these three elements at any given point based on the desired perspective and emotional impact.
Music serves to underscore or manipulate the emotional perspective of the game. It tells us how to feel and is usually the most emotionally impactful aspect of the soundtrack. The music throughout the development of a game or movie is often quite dynamic, from very soft to very loud, and we might need to make sure that, while preserving the original intentions of the composer and the needs of the scene, we keep the music within a comfortable range, only breaking out of it when there is a need to make a certain point.
The dialog is the main narrative element of the soundtrack, and as such it is usually treated as the most important aspect of the soundtrack when present. Nothing should get in the way of dialog unless intentional, taking precedence over music and sound effects. In games, dialog falls into two broad categories, critical, which contains the important narrative elements – in other words it moves the plot forward – and non-critical, which does not contain important information and can therefore be treated as chatter.
The sound effects serve a number of purposes. They greatly contribute to the feeling of overall immersion by giving us a detailed and rich aural picture of our environment; they take the place of sense that we cannot experience over a screen and speakers, and, crucial to gaming, provide us with information on the objects and the environment that we evolve in, such as location, texture, movement etc. Sound effects can also become part of the emotional or narrative aspect of a game or a scene. Indeed, none of these categories are absolute. A good sound designer will sometimes blur the lines between the music and sound effects by using sounds that blend with and perhaps even augment the musical score.
Note: when present, narration can sometimes be considered a fourth component of the soundtrack, to be treated independently of the dialog.
At any given moment, the mix should be driven or dominated by one of these categories – and usually only one. The same principle applies to movies. If there is dialog, the music and the sound effects should not get in its way, and we should consider taking them down in the mix. The choice of which category should dominate and when usually depends on the gameplay itself.
In video games you will hear the terms states or game states used quite often. Game states can be used to mean any number of things, as they are a technique for implementing artificial intelligence in games, sometimes described as finite state machine. Game states, as they relate to mixing, are usually derived from the significant changes in the gameplay such as switching from an exploration mode to battle mode. These changes in game states can be useful references for our mix to follow and adapt, and they ideally organically stem from the game itself.
3. Planning and Pre-Production
Planning is an essential part of the mixing process.
A mix can be approached like a complex problem that we need to solve, the problem being: how do we get a large number of audio files playing all at once, in an impossible-to-predict sequence, to sound like an ordered, easy to understand and pleasant mix, rather than a cacophony of overlapping noises?
a. SubMixing
A classic and effective approach to tackling a complex problem is to break down complexity into smaller, manageable bits, which when put together create the desired result or mix. Breaking down complexity means, for instance, that rather than thinking of a mix as a large number of audio files playing all at once, we start by considering how we can group multiple tracks into a small number of groups by routing audio sources into a few carefully chosen subpaths – or in Unity’s case, in groups. The process starts by grouping sounds that belong together into subcategories such as music, dialog and sound effects, then by dividing audio sources still further such that sound effects might be made up of several subgroups such as ambiences, explosions, Foley etc. This means that rather than trying to mix 40 sounds or more at once, we start by focusing on each of these submixes and therefore only a few sounds at a time. After we are satisfied with the submix, such as ambience, Foley etc., we can consider how the overall ambience sits in the mix and make adjustments in the overall context of the mix.
This is a recursive process, one that requires making constant adjustments as more elements are brought in.
b. Routing
Careful routing is essential in order to get the most flexible mix. Establishing a good routing structure is critical. It usually starts from the basic categories that constitute a traditional soundtrack, music, dialog and sound effects and gets further subdivided based on the sounds present in the soundtrack. At this stage you can effectively architect the mix and plan the various places where you will place dynamic compressors and set up side chain inputs. Every mix, every game is slightly different, but the following diagram should make for a good starting point from which to work.
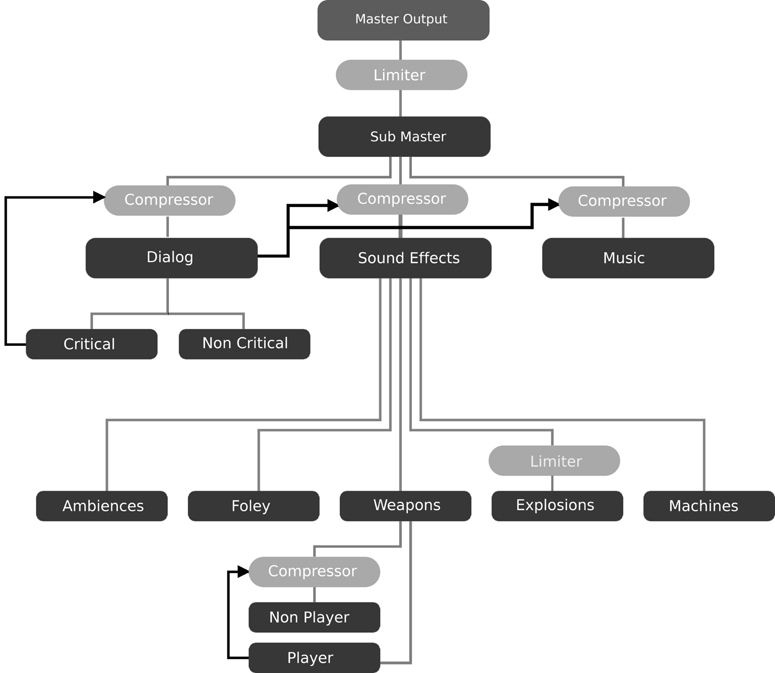
Figure 11.1
As you can see, music, dialog and sound effects get their own subgroup, all routed to the main output, at the top of which sits a limiter, to prevent any signal to exceed 0dBFS and cause distortion. The limiter should probably have its output ceiling or maximum level output set slightly below 0dBFS – such as −0.3dBFS – and a quick attack time to catch fast transients and prevent them from getting past the limiter.
c. Dynamic Range
It is impossible to study mixing without at some point discussing the concept of dynamic range. The term can be confusing because dynamic range can be employed in either one of two contexts:
- The difference between the loudest and softest points of a recording, expressed in dB.
- The ratio between the softest and loudest signal intensity a particular piece of equipment may accurately capture or playback.
Concept 1 is relevant to us because a good mix should have a decent dynamic range, in order to create contrast, surprise and give the player a pleasant experience by giving their ears a break once appropriate. Without adequate dynamic range the mix becomes tough to listen to very quickly for a number of reasons. Without giving the player ear’s the opportunity to rest, it will inevitably become tiring, leading them to possibly turn off the soundtrack altogether. A mix without dynamic range or an insufficient one will also tend to deteriorate the transients of the sounds it plays back, shaving them off. This will blur the attack portion of percussive sounds and make it harder for our ears and brain to process. Over-compression and poor gain staging leading to levels on individual groups and/or the master level clipping are amongst the main culprits.
If the dynamic range is too large, however, and the difference between the softest sounds and loudest sounds is too great, likely the player will adjust their monitoring levels based on the loudest sounds played and will simply not hear the softest sounds in the mix, usually ambiences but possibly more, including dialog.
A good balance between the two is therefore required and needs to be achieved in order to create the best possible experience.
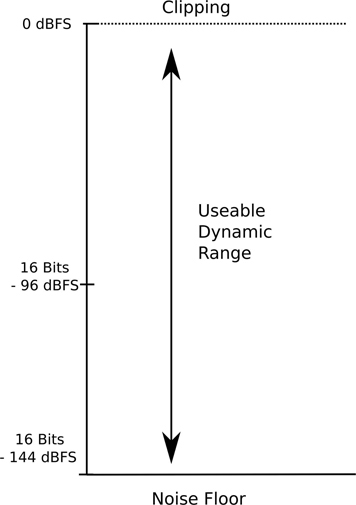
Measuring Dynamic Range in the Digital Audio Domain:
Figure 11.2
A compressor typically sits on the output of each of the three main subgroups as well. These tend to serve either one of two purposes: they can be used as a regular bus compressor, taking care of lowering loudness peaks in the signal routed through them, as well as blending all the sounds together via mild compression. They can also work as side chain compressors or ‘ducking’ compressors, usually taking their key input from the dialog and applying compression on the music and sound effects busses when dialog is present. For that reason and other potential ones, the dialog bus is usually split in two submixes: critical and non-critical dialog. Only the critical dialog would trigger the sidechain inputs on the compressors located on the music and sound effects busses. Typically, the compressor on the dialog will not have a key input and will work as a regular bus compressor.
The music bus will usually be a simpler setup, as while music soundtrack can get quite complex in terms of branching and adaptivity, the music or stems that comprise the soundtrack are usually already mixed. In some instances, if one is available a multiband compressor will sometimes help mix complex stems together. Since dialog may be triggered on top of the music, a compressor with a side chain input listening to the dialog will usually sit atop the music bus.
The sound effect bus is usually the busiest and most complex due to the number and variety of sound effects that make up a soundtrack. Just like the music bus, the sound effect bus will usually have a compressor keyed to the dialog group, sitting atop the bus, but the subgroup structure is usually much more complex. It is impossible to come up with a one-fits-all template, and each game has to be considered individually, but if we were to set up a mix for a first-person shooter, we might consider the following subgroups:
- Ambiences: room tones, outdoors sounds, city sounds.
- Player sounds: footsteps, player Foley, player vocalizations.
- Vehicles.
- Weapons: usually further divided into two main subgroups: friendly and enemies. Hearing your enemies’ positions, activity and fire is arguably more important than being able to hear the weapons from your own team, but further subgroups are possible.
- Explosions: explosions are dangerous, to our mixes anyhow. They tend to be the loudest elements of a game, and great care must be applied to avoid overwhelming the sound effect bus and possibly even the master bus. In order to do so, a limiter usually sits on top of the explosion bus.
- Enemies: footstep sounds, Foley, vocalizations.
Routing in mixing is usually done via busses, which are circuits or pathways that allow the mix engineer to route several audio tracks to a single destination. Unity uses a system of groups, which acts as a destination for multiple audio sources and send and receive modules to send signals from one group to another.
d. Passive vs. Active Mix Events
You will sometimes find mix events divided into subcategories, active and passive. The difference between the two highlights some of the inner mechanisms behind game audio mixing and perhaps game audio in general. Audio in games, generally speaking, is usually event-driven. That is to say that audio events, whether it’s playing an audio file or modifying a mix parameter, responds to something happening in the game, an event. In essence, most audio is triggered in response to an event in the game: shooting, walking into a trigger etc. An active mix event is one that is in direct response to something happening in the game, such as an enemy character spawning or a player walking into a trigger.
Passive mix events happen when the mix changes in response not from an event in the game but as a result of the mix structure itself, such as dialog ducking down the music by triggering a compressor on the music. The game engine has no awareness that the compressor on the music is being triggered.
This highlights another difficulty of mixing for games and interactive audio systems: self-awareness – or the lack thereof. Most games engines do not monitor their own audio outputs, either in terms of amplitude or spectral data. Since the game is mixing the audio for the soundtrack, it is akin to trying to teach someone how to mix by giving them basic instructions and then turning off the speakers. This is indeed challenging, especially with the introduction of concepts such as audio-driven events. These are events in the game triggered by a change in the audio, such as leaves being swept up as the volume of the wind increases over a certain threshold. While audio-driven events remain relatively rare in games, we can look forward to a greater synergy between the game and soundtrack over the next few years in the industry.
2. The Unity Audio Mixer
Unity does provide us with the ability to add mixers to our projects. Multiple mixers per project, in fact, as unlike traditional linear production where we tend to work around a single mixer, game developers for non-linear media often rely on multiple mixers for larger projects. The decision to use one or multiple mixers should be considered in relation to the complexity of the game and mix, flexibility, gains vs. CPU overhead and much more.
To create a new mixer, navigate to the project folder window in Unity and right click in the assets window. Select Create->Audio Mixer from the contextual menu. An audio mixer window tab should appear under the project window; if it doesn’t, you can bring up the mixer window from the Window menu: Window->Audio->Audio Mixer.
When a mixer is created Unity will provide a master group, where all audio for this mixer will be routed, and it lets you add groups on an as-needed basis. Groups allow us to run multiple audio sources into a single destination and are in essence submixes.
Additional mixers may be created by clicking the + button to the right of the mixers icon on the left side panel.

Figure 11.3
1. Adding Groups to the Unity Mixer
Groups can be added by clicking on the + button to the right of the groups label on the left panel. All subsequent subgroups will eventually run into the master group, but it is also possible to route the output of a group into other, cascading multiple subgroups. The Unity mixer defines two types of groups: child groups – which are routed into another – and sibling groups, that run in parallel to an existing group. You can change the routing hierarchy by dragging a group in the groups panel of the mixer window on top of the desired destination group or, when creating a new group, right clicking on an existing group and selecting either add child group or add sibling group. You can use the same contextual menu to rename, duplicate as well as delete groups.
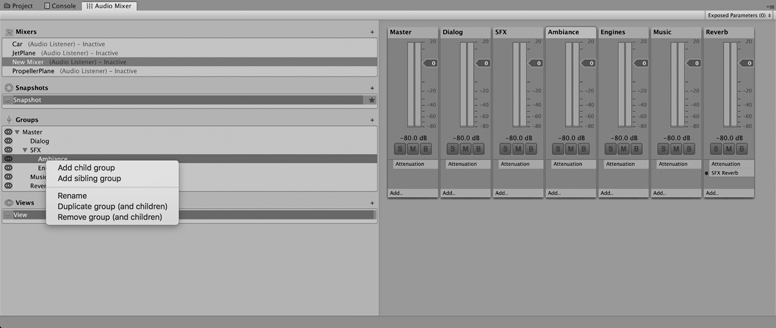
Figure 11.4
The letters at the bottom of each group allow the developer to mute the group by clicking the M button, solo the group with the S button and bypass effects using the B button.

Figure 11.5
In the earlier snapshot, the ambiences group is a child of the SFX group. The audio output of the ambiences group will be routed to the SFX group, itself routed to the master group.
2. The Audio Group Inspector
When a group is selected in the hierarchy or directly by clicking on it in the mixer, the audio group inspector for that group will become active in the inspector window. Here you will find the different components that make up a mixer group. Whenever a group is created the following units are added automatically:
- Inspector Header: here you will find the name of the group. By right-clicking anywhere in this window a contextual menu will appear with two options.
- Copy all effects settings to all snapshots: this will copy all of the group’s settings on this group top all other snapshots in the mixer, allowing you to pass on to the group’s settings to all other snapshots.
- Toggle CPU usage display: will turn on CPU performance metering for all effects present in the group.
- Pitch Slider: this slider controls the pitch of all the audio routed through this group.
- Attenuation Unit: every group can only have one attenuation unit, which acts as a gain stage control, ranging from −80dB, which is silence, to +20dB. Each attenuation unit has a VU meter, which displays both the RMS value of the signal as well as its peak hold value. The RMS value is displayed by the colored bar itself while the peak value is displayed by a gray line at the top of the range.
3. Working With Views and Colors in the Unity Mixer
Managing large mixing sessions is always a bit of a challenge once your session has reached a certain size and you are dealing with a large number of groups. Visually, Unity provides us with two tools that can help us manage how we view and organize the information from the mixer window.
The first is the ability to color code our groups, which we can access by right clicking on the top of any group and selecting one of the available colors at our disposal.
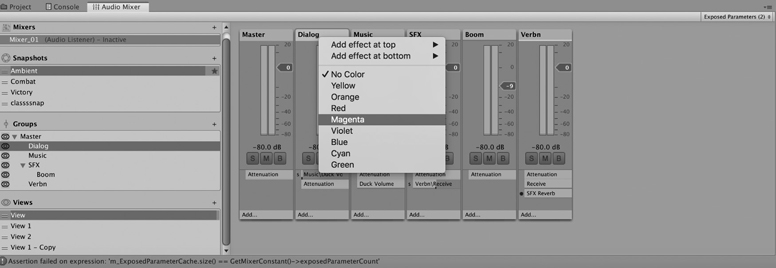
Figure 11.6
This will add a colored strip at the top of each group right below the name and help visually break the monotony of the mixer window.
The other visual tool that Unity puts at our disposal is the ability to display only the relevant groups at any given time in our mix, hiding the ones we are not focused on, in order to minimize visual clutter. This is done with the views feature, located in the bottom left panel of the mixer window.
Creating Views in Unity
- You can create a new view simply by clicking on the + button to the right of the word Views.
- Right-clicking on the newly created view will allow you to rename, duplicate or delete a new group.
- With a view selected, click on the eye icon to the left of each group name in the groups window. That group should now disappear.
4. Adding Effects to Groups in Unity
Working with effects in the mixer opens a world of possibilities. With effects we can better control our mix and use in real time some of the same types of plugins that we are used to working with in DAWs. Keep in mind that any effects added to the mixer will increase the load on the CPU and need to be monitored and carefully thought through. Any effect that could be rendered as an audio file prior to being imported in Unity should be. That being said, real time effects are a very powerful way to make our mix more dynamic, engaging and fun.
You may add effects to each group by clicking at the bottom of the group itself on the Add … button. The available effects are: (Note: some of these effects were described in more general terms in the sound design chapter)
- Duck volume: this really is a compressor optimized for side chain input; in order to control the audio levels of the group it is added to using the level of another one, such as a compressor on the sound effect group, listening to input from the dialog group for instance.
- Low pass: a low-pass filter with resonance control.
- High pass: a high-pass filter with resonance control.
- Echo: a simple delay line.
- Flange: time-based modulation effect.
- Distortion: a simple distortion effect.
- Normalize: normalization is a process that adds gain to a signal in order to raise its peak amplitude. Unity developers intended for the normalize effect to preprocess a signal prior to sending it to a compressor.
- ParamEQ: an equalizer with independent frequency and bandwidth control and a visual representation of the curve applied to the sound.
- Pitch shifter: Unlike changing the pitch value of an audio source, which changes the pitch and the duration of the audio accordingly, the pitch shifter plugin provides independent time and pitch control. For instance, raising the pitch by an octave will not make the sound twice as short as it otherwise would be. This will prevent the ‘chipmunk’ effect but also does require more processing power than a simple pitch shift. Use sparingly.
- Chorus: another time-based modulation effect, often used for thickening sounds.
- Compressor: a full-featured dynamic range processor.
- SFX reverb: a full-featured procedural reverb, which we will look at in more detail shortly.
- Low pass simple: a low-pass filter without resonance, cheaper computationally than the low pass.
- High pass simple: a high-pass filter without resonance, cheaper computationally than the high pass.
5. Inserts vs. Effect Loops
Under the same menu you will also find send and receive, although these are not effects per se but rather a way to send a signal to another group. Signals tend to travel from top to bottom in a mixer, going through the various components of the group it is routed to. There will be times, however, where you will wish to send the signal to another place in the mixer or maybe send a copy of the signal to another group. In traditional mixing, this is done using sends and busses. A send is a circuit that lets the signal flow out of the current group it is routed to, and it uses busses to travel to various destinations in the mixer. Unity does not rely on the same terminology, shying away from using the word bus. Rather, Unity uses send and receive.
Most audio effects in a mixer can be added in one of two ways, as an insert or as an effect loop. While there are instances where either solution could be appropriate, there usually are good reasons to go with one or another method.
Adding an effect as an insert simply means inserting the effect on the group that the audio is routed to by simply pressing the Add … button at the bottom of the mixer and selecting an effect. The effect is now inserted into the signal path. This method is appropriate for effects we only wish to apply to one particular group. This is usually the case for equalization and compression, although there are instances where you might wish to use the effect loop method for compression, something known as parallel compression or ‘New York’ compression. Working with inserts is fine for these types of situations but starts to become more difficult to manage when the same effect needs to be applied to more than one group, such as reverberation. If we wish to apply reverberation to multiple groups, then we need to insert multiple copies of the plugin on each group, which is costly computationally and inefficient in terms of workflow. Inefficient computationally because inserting multiple versions of the same plugin, especially reverberation, is going to increase the computational load on the CPU but also inefficient in terms of workflow because any change made to one reverb will also need to be applied to all other instances if we wish for the effect to be consistent across all channels. When working with a complex mix, a simple task may turn into a much more difficult and therefore time-consuming one. A much better solution in this case is to set up a separate group just for reverberation, insert one instance of a reverb plugin on it, then route all the audio requiring reverberation to be applied to be routed directly to that group, creating an effect loop.
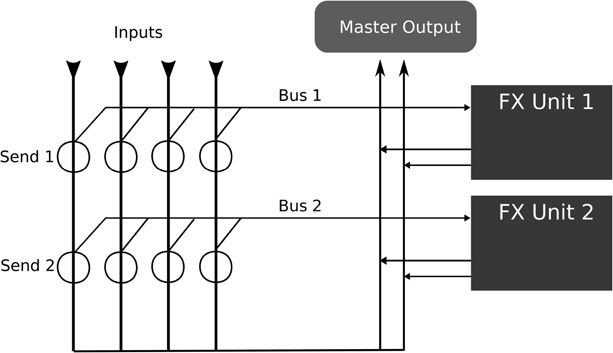
Figure 11.7
6. Setting Up an Effect Loop for Reverberation in Unity Using Send and Receive
Follow these simple steps to set up an effect loop you can use to route any group to a reverb plugin:
- Create a new, dedicated group for reverberation and name it appropriately.
- By clicking on Add … at the bottom of your new group, select Receive.
- By clicking on Add … at the bottom of your new group, select SFX Reverb. Note: the signal in a group flows from top to bottom; it is important that the receive be added prior to the SFX Reverb plug in or if added after the fact, be moved up before it.
- Select another group on the mixer that you wish to add reverb to, and using the Add … button select Send. In the inspector for that group you should now see the send component. Click the popup menu next to the word Receive and select the group you added the reverb to. The send level slider allows you to adjust how much signal you are sending to the group, therefore how much reverb you will hear on the sounds from that group. Feel free to experiment!
Some effects, such as reverberation, will allow the user to have independent control over the dry, unprocessed signal and wet signals. This raises the CPU usage a bit but does allow us to have much more control over our mix. To turn on that feature right-click on the SFX Reverb label in the reverb’s unit in the inspector and select Allow Wet Mixing.

Figure 11.8
Note: you may not use the Send/Receive technique on a group that is a child of another one, as that may result in a feedback loop. In other words, the output the of group on which reverb was applied cannot be routed to the group you are sending from. The receive group needs to be routed to the master group or another group that runs in parallel to the group we are sending from.
This technique is highly recommended for reverberation, echoes/delays and any processor that you wish to apply in the same way to multiple groups. Remember, by creating a send, you are sending a copy of the channel to another group; the original signal still flows through its original group. This gives the developer individual control over the dry signal (the original signal) and the wet signal (the copy going to the group reverb).
Note on Adjusting Levels During Gameplay

Figure 11.9
When Unity is in play mode, any change made to the game or any of its components will be lost as soon as you hit stop, and, as was pointed out earlier, you will need to make a note, mental or otherwise, if you wish to implement these changes after the fact. The Unity mixer is the exception. When in play mode, if you bring the mixer window in focus you will notice a button appearing labeled Edit in Play Mode. When pressed, changes you make to the mixer while playing will be remembered, allowing you to make adjustments to the mix as you play the game in real time.
7. Ducking in Unity
Ducking is especially useful when it comes to automating certain aspects of the mix. Ducking occurs when a compressor placed on a group, say group A, listens for a signal from another group, group B. When group B is active, the compressor will duck a volume on group A, making the signal from group A easier to hear. A common example of this is in radio, where the DJ’s voice will turn the music down when it comes on. The most common application of ducking in games is for dialog, which will often duck the volume on the music and sound effect groups. The control signal in the case of the DJ’s voice, also known as the key. Setting up a ducking compressor is very much like setting up an effect loop.
Usually this effect is achieved with a compressor equipped with a key signal input; Unity provides us with a dedicated tool for this, the duck volume plugin, which is in fact a regular compressor with a key input built in.
Setting Up a Ducking Compressor in Unity
- On the group that you wish to duck the volume of, place a duck volume plugin by clicking on Add … at the bottom of the group and selecting Duck Volume.
- On the group you wish to use as your key, click Add … and select Send.
- In the inspector for the group you just added the send plug in to, locate the send component, and click the popup menu next to the receive option and select the group you added the duck plug in to in step 1.
- Adjust the send level by raising the slider closer to 0dB.
- While the key signal is playing, adjust the duck volume plug in in order to obtain the desired results by adjusting the threshold and ratio.
You will likely need to adjust both the send coming out of the dialog group as well as the settings on the duck volume processor a few times before settling on the proper settings; use your ears, as always, and try your mix at a few places throughout the game.
3. Snapshots, Automation and Game States
Once you have planned and implemented the routing of your mix, the next thing to consider is to make it adapt to the various situations that will arise and require changes or adjustments as the game develops. There comes the idea of game states. Game states is a term borrowed from AI, where finite state machines systems are used to implement AI logic in non-player characters.
In video games, game states have come to be used to describe a relatively large change in the game. An example in a FPS might be:
- Ambient.
- Exploratory mode.
- Battle mode 1.
- Battle mode 2.
- Boss battle.
- Death.
Some game engines or third-party audio middleware will explicitly implement game states, while others, such as Unity, depend on whether the programmer implemented an explicit game mechanic. Either way, game states are very useful for mixing as they can give us a sense of the various situations we are likely to encounter and can prepare for. Battle mode might require the music to come up and ambiences to come down in volume for instance, and the opposite might be true for exploration states, where the ambience is more important and the music less intense anyway. In order to implement these changes, we can rely on snapshots.
1. Working With Snapshots
Snapshots is a term borrowed from music production, where snapshot automation was developed in order to automate the changes needed during a mix on large format mixing consoles, which became too complex to work in real time. A snapshot of the mixer and all of its setting could be stored at various points in the song and recalled in real time during mixdown. This technique, borrowed from a very linear world (most music was still recorded to tape when this technology came of age), is turning out to be quite useful in video games. By using snapshots, we can adjust our mix to match the developments of the game.
Working with snapshots in Unity is a simple process. To create a snapshot, follow these steps:
- Adjust the mixer to the desired setting.
- Once dialed in, in the left panel of the mixer window, press the + sign to the right of the word Snapshots.
- Name the snapshot, then press enter; you’re done!
Recalling a snapshot can be achieved either by clicking on the snapshot’s name in the mixer window – which is really only a valid method when mixing – or via script, as we shall see shortly.
2. Recalling Snapshots via Scripting
Snapshots can be easily recalled with scripting, using the TransitionTo() method, which will interpolate a transition to the new snapshot over the time specified by the user. The following example will demonstrate. This simple script will interpolate a transition between three snapshots labelled ambient, combat and victory in response to the user pressing the keys 1, 2 and 3 respectively.
First, create a new mixer or use an existing one, and create three snapshots, one for each of the three we outlined earlier: ambient, combat and victory.
You’ll notice right away that we added a new namespace using UnityEngine. Audio; which we need in order to use AudioMixerSnapshot. Next, after the class declaration we declare three new variables of type AudioMixerSnapshot, and by making them public they will show up in the inspector in the slot for the script. Prior to running this script, we need to assign an actual audio snapshot to each of the variables we just declared by clicking on the slot next to them in the inspector and selecting one of the three snapshots we created earlier in this example as demonstrated in the following illustration.
The transition time has been set to one second by default but may be changed by the user, in this case, simply by changing the value in the slot labelled transTime.
To see the example at work, make sure the mixer is showing upon entering play mode, and press the 1, 2 and 3 keys; you should see the sliders for the three subgroups move over the course of a second. Of course, in most cases the changes in the mix would not come from keystrokes by the user (although they might in some cases) but rather would be pushed by the game engine. It would be very easy to change this script to respond to another input, such as entering a trigger, an object or player getting spawned etc.
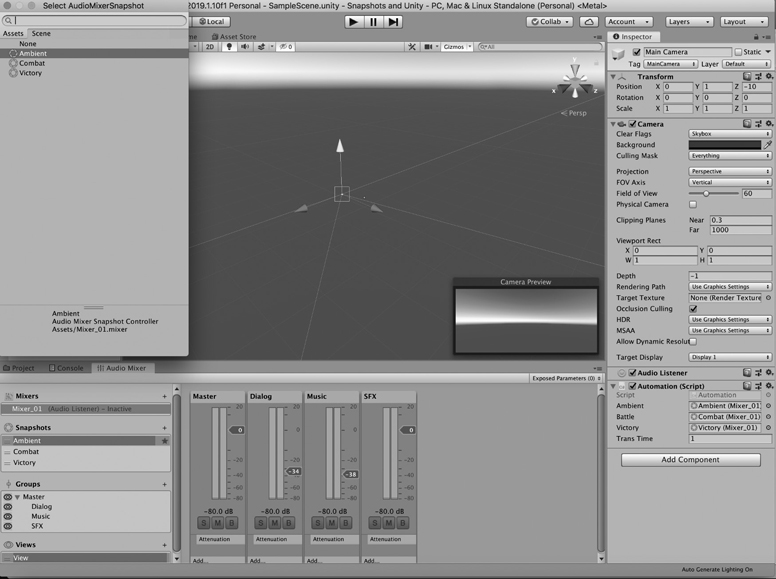
Figure 11.10
Note: transitions between snapshots are done using linear transitions by default. That can be changed by right clicking on any unit in the audio group inspector and selecting one of the other options.
Note on Edit in Playmode: this option will only appear while the editor is in play mode. When the game is running, the mixer is not editable and is controlled by the current snapshot or default one if none have been created. By enabling Edit in Playmode, the current snapshot is overridden and the game developer can now make changes and adjustments to the current snapshot.

Figure 11.11
3. Editing Mixer and Plugin Parameters via Scripting
Snapshots are a great way to manage a mix, but there might be time when you will need to control a single parameter and adjust it individually. In this case snapshots may not be a very good option. Rather, Unity allows you to control a single parameter from the mixer via the SetFloat() method, which takes only two arguments: a string, the name of the parameter to change and a float, which is the value for the parameter. However, before using SetFloat(), the parameter you wish to control individually has to be exposed. An exposed parameter will respond to values passed onto it by SetFloat() but will be removed from the snapshot, although as we shall see shortly, it can be returned to the snapshot if needed.
4. Exposing a Parameter: Controlling a Volume Slider
- In order to expose a parameter, open the mixer you wish to expose a parameter of.
- Select the group you wish to control the volume slider of.
- In the inspector, locate the attenuation component and right click on the word Volume.
- Select Expose ‘Volume of (name of group)’ to script. You will get confirmation that the parameter is now exposed by the arrow pointing right that will appear next to the name of the exposed parameter.
- At the top right of the mixer window, you will notice a textbox that should now say Exposed Parameters (1). Clicking once on it will reveal the newly exposed parameter. Double click on the parameter to rename it.
Once the parameter has been exposed, we can now control it with a script, using SetFloat(). This simple script will change the value of a slider when the user presses the 8 or 9 keys on the keyboard.
A very simple script indeed. Note that the mixer, which contains the exposed parameter you wish to change has to be explicitly named, which is why we are including a reference to it at the top of the script by creating a public AudioMixer variable. Since it is public, this variable will show up as a slot in the script in the inspector and has to be assigned by the developer by either dragging the proper mixer onto the slot itself, or by clicking the little disc next to the words Main Mixer in the inspector.
4. Good Practices
One of the most common questions that comes up, especially with beginners, is how to figure out what output levels should we shoot for in our mix. How loud should the dialog be? How much dynamic range is too much and will make the user reach for the volume slider in order to compensate, or how much is not enough and will make the mix fatiguing to listen to over time?
Often, however, the person asking the question is somewhat disappointed by the answer. We do have some guidelines, of course, and most of these actually come from broadcast, which has been much more concerned than gaming when it comes to standardizing mixes, however even the best and most accurate guidelines are just that, guidelines. Most matters in a mix are context dependent and need to be adjusted in reaction to other elements.
The first issue has to do with loudness. Loudness is actually a rather difficult thing to quantify, as it is a subjective measurement, having to deal with the way humans perceive and relate to sound at various intensities. Our perception of loudness varies across different frequency ranges, with humans being most sensitive to frequencies toward the center of our hearing range and dropping off toward the edges. This was first and best outlined by the equal loudness contour graph, also sometimes known as the Fletcher-Munson curves.

Figure 11.12
An in-depth study of the equal-loudness contour is beyond the scope of this book, but in addition to showing us that our perception of loudness falls off with the edges of the frequency range (very low and high frequencies are harder to hear than mid frequencies), it also tells us that that perception is also, in itself, dependent on the amplitude of the signal and that as a signal gets louder, it becomes easier to perceive the edges of our frequency ranges, low and high frequencies, in relation to the mid frequencies.
A lot of mixers are equipped with peak meters, which measure the instantaneous output value of each sample going through that particular group or channel strip. While peak meters are useful when it comes to making sure we are not clipping our output, they do not relate to loudness very well and are not an accurate measurement of it. A better solution is to use the relatively new standard LUFS unit, loudness unit full scale, which aims at measuring actual loudness in the digital audio domain by breaking down the frequency ranges in which energy is found in a sound and weighting them against the Fletcher-Munson curves. Another commonly found unit is LKFS, loudness K-weighted full scale, a term that you will find in the ITU BS.1770 specifications and the ATSC A/85 standards. Both LUFS and LKFS measure loudness and are often used interchangeably as units. The European Broadcast Union (EBU) tends to favor LUFS over LKFS, but they are otherwise very similar. Both of these units are absolute and, depending on the format for which you mix, a target level of −23LUFS or −24LKFS is often the target level for broadcast.
These standards were designed for broadcasts, not gaming, but they are proving useful to us. Doing a bit of research in this area will at the very least get you to a good starting place – a place that you may decide to stick to or not in your mix, depending on the game, mix, situation.
Note: while there are plugins out there that will allow you to monitor levels in Unity in LUFS, they need to downloaded separately. The reader is encouraged to.
Mix Levels
So how do we tackle the issues of levels and dynamic range? As you may have guessed, by planning.
-
A good mix starts with a plan. A plan means routing and also preparing assets and target levels. Of course, don’t forget the basics:
- Make sure that all the sounds that belong to same categories or that are to be triggered interchangeably are exported at the same level. This will prevent you from having to make small adjustments to compensate for level discrepancies that will eat up your time and resources.
- Set up starting levels for various scenes in your mix. You may start by using broadcasting standards as a guide if you are unsure of where to begin. Most broadcasters in the US will look for an average level at −24dB LKFS with a tolerance of + or – 2dB. If you do not have a LUFS or LKFS meter, try placing your dialog at −23 or −24dB RMS for starter and make sure that your levels stay consistent across. If there is dialog, it can be a great way to anchor your mix around and as a reference for other sounds.
- Don’t forget that the levels you set for your premix are just that, a premix. Everything in a mix is dependent on context and will need to be adjusted based on the events in the game.
-
Rest your ears.
Over time and as fatigue sets in, your ears are going to be less and less accurate. Take frequent breaks; this will not only make sure your ears stay fresh but also prevent mistakes that may occur from mixing with tired ears, such as pushing levels too hot or making the mix a bit harsh overall.
-
Mix at average loudness levels, but check the extremes.
While mixing, monitor the mix at average medium levels, but do occasionally check it at soft and louder levels. When doing so, you will listen for different things, based on the Fletcher-Munson curves of loudness. When listening to your mix at low volume, you should notice that relative to the rest of the mix, high and low frequencies should appear softer than they were at average listening levels, but can you still hear them? Are all the important components of your mix still audible, or do you need to adjust them further?
When listening to your mix loud, the opposite effect will occur. Relative to the rest of the mix the lows and high frequencies should now appear louder. What we must watch out for in this case is if the bottom end becomes overpowering, or does the increased perception in high frequencies make the mix harsh to listen to over time?
-
Headphones are a great way to check stereo and 3D spatial imaging.
While mixing on headphones is usually not recommended, they are a very useful tool when it comes to checking for stereo placement and 3D audio source location. Are sounds panned, in 2D or 3D where you mean for them to? Speakers, even in very well-treated rooms, are sometimes a little harder to read in that regard than headphones.
More specific to gaming is the fact that a lot of your audience will play the game on headphones, possibly even earbuds, so do also check for the overall cohesion of your mix when checking the spatial imaging of your mix on headphones.
-
Check your mix on multiple systems.
Even if you’ve checked your mix on headphones, and assuming that you know your speakers very well, you should check your mix on several other playback systems. Of course, the mix should sound good on your studio monitors, but remember than most people will experience your mix on much less celebrated sound systems. Check your mix on built in computer speakers or TV speakers, try if you can a second pair of speakers. Of course, your mix will sound quite different on different systems, but your primary concern should not be the differences across speakers but whether or not the mix still holds up on other systems.
Conclusion
Mixing is as much art as it is science. Learning all the tricks available in Unity or any other package for that matter is important – but is only useful if one is able to apply them in context, to serve the story and the game. Try, as much as possible, to listen to other games, picking apart their mixes, noting elements you like about them and those you like less. As you mix, always try to listen to your work on different systems, speakers, on headphones and make adjustments as you go along.
Mixing is skill learned over time through experience, but keeping in mind some of the guidelines outlined in this chapter should give you some good places to start. And as always and as with any other aspect of the game audio, the mix should both inform and entertain.