
8
IMPLEMENTING AUDIO
1. Before You Start: Preparing Your Assets
We introduced the topic of asset preparation in the chapter on sound design, but as we now tackle the topic of implementation, it is worth revisiting. In order to properly prepare your assets, you should be aware of how these assets are going to be implemented in the game and what their intended purpose is. A spreadsheet with a list of all the sounds in the level is an invaluable ally. This will tell the sound designer which sounds are loops and should be seamless, which sounds are 3D and should most likely be mono etc. Making sure the assets are ready does involve a checklist:
- Naming convention.
- File format, sampling rate, bit depth, number of channels.
- Number of variations, if any.
- Loop or one shot.
- Consistency quality control: are the levels of the sound consistent with other similar sounds?
- Trim/fades: is the sound properly trimmed and, if appropriate, faded in/out?
A batch processor is highly recommended. It will save you a lot of time both in terms of mouse clicks and in terms of potential human errors when dealing with dozens if not hundreds of audio files. A good batch processor will help you address all the issues cited earlier, from naming conventions to the inclusion of micro fades.
Once you are sure of your assets, you are ready to import them into the game engine and begin the process of implementing them and testing them in the context of the game. You will sometimes find that in-game some sounds might not work how you had expected them to initially and possibly require you to re-think them. The creative process is often iterative, and keeping your work organized is a must.
In the following chapter we will try to tackle some common scenarios you are likely to encounter when dealing with audio implementation, such as:
- Creating and working with loops for ambience and backgrounds.
- Using triggers for loop for 2D and 3D ambiences.
- Working with random emitters to create a richer soundscape.
- Collisions.
- Surface and velocity-dependent collisions.
- Distance crossfades.
- Sound concatenation.
- Raycasting for occlusion simulation.
- Adding sound to animation clips.
- Working with prefabs.
2. Ambiences and Loops
Ambiences and environmental sounds in the real world are quite a bit more complex than they might appear to the casual listener. Ambiences are usually comprised of several layers or sounds, some constant, such as a fan or an AC unit, others intermittent, such as birds or the honking of cars in a city. In order to create an immersive experience, we must create a multilayered landscape that provides the user with a rich, dynamic soundscape that will combine multiple implementation techniques. The foundational layer for ambience sounds often relies on one or multiple audio loops playing concurrently, possibly at several individual locations in the same space. Creating loops for ambiences isn’t very difficult technically, but the aesthetic challenge of creating something that can be both interesting and at the same time un-obtrusive is a difficult one.
1. Creating Ambiences and Loops
Loops are a staple for creating ambiences in games. At its simplest, a loop is just a short audio file, six to 12 seconds, created to add the sound of a hum or a room tone to a space. Loops can, however, be combined in order to create more sophisticated ambiences. Before looking at possible combinations, let’s take a moment to consider what makes a good loop and how to easily create seamless loops.
a. Seamless Loops
There are a few things to keep in mind when creating or selecting material for seamless loops:
- Length: how long should your loops be? The answer here is only as long as you need them to be. This, of course, will depend on how the loop will be used in the game. For simple ambiences, shorter loops such as eight to 12 seconds might be a good place to start. Remember we are always trying to keep the RAM footprint of our sounds to a minimum and trying to get the most out of the least.
- Mono vs. stereo: as always, when confronted with this choice, consider whether you need the loop to be localized in 3D or not. In other words, sounds that ought to emanate from a place within the level should be mono. Sounds for which 3D localization is not desirable can be rendered as stereo. Wind and rain are good examples of ambient loops that would sound unnatural if they appeared to come from a single direction. These are usually best left 2D and rendered in stereo. You can always force a stereo sound to play back in mono from the Unity editor if unsure or both versions are somehow needed.
- Sample choice: how does one choose appropriate audio files for looping? Look for a sample that is relatively even over the life of the loop. Avoid including any portion that includes sound that could stand out upon playback and draw attention to itself and remind the user that they are listening to a loop. The sound of someone sharply and loudly laughing among a crowd ambience or a particularly loud bird call, for instance, are good examples of elements to avoid.
- Layering: your loops do not need to be bland or boring, and you can achieve interesting results by layering multiple audio files, so long as it does not conflict with the previous rule. Create loops of slightly different lengths. Asynchronous loops create a more dynamic ambience by looping at different times and avoid repetition fatigue.
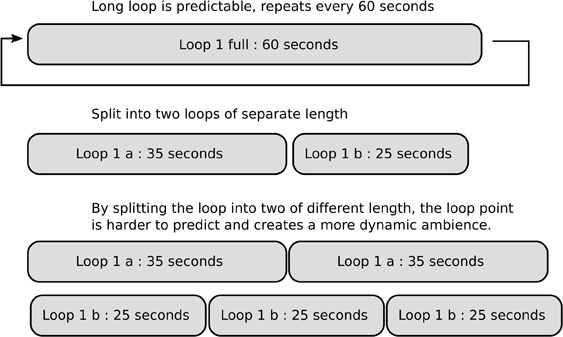
Figure 8.1
- The big picture: ambient loops often act as the foundational layer of your sound design, upon which all other sounds will exist. While it is difficult to predict which sounds are going to be triggered in a game at any given time, you can help maintain consistency in your mix by keeping your loops within a similar ‘spectral niche’ by ensuring the frequency content is consistent across all loops. For instance, avoid creating loops with a lot of low end, as they might clash with the music or other sounds that are more important to the player and could be partially masked by it. A high pass filter in the 100–200Hz range can be very effective in that regard.
b. Creating a Simple Loop – Looping Techniques
As long as you are working with a sample that is relatively consistent and that abides by the first rule outlined earlier, you can turn most sounds into a seamless loop with little effort:
- Import your audio file into your DAW of choice. Make sure to work with a sample that is at least a few seconds longer than you need the length of the loop to be.

Figure 8.2
- Somewhere near the middle of the loop, split the audio region in two. Do not add fades or micro fades to either one. This would break the waveform continuity required for a seamless loop to work.

Figure 8.3
- Reverse the order of the regions by dragging the first region so it starts after the second one, giving yourself a few seconds overlap or ‘handles’ between the two, which you will use for a crossfade.

Figure 8.4
- At the place where both regions overlap, use your best judgement to find a good spot to crossfade between the two regions. Make sure to use an equal power fade, rather than an equal gain fade. Equal power fades maintain the energy level constant across the fades; equal gain fades do not and may result in a perceived drop of amplitude in the middle of the fade. This step requires the most experimentation and is worth spending some time on. Some material is easier than others to work with.

Figure 8.5
- Once you are satisfied with the crossfade, select both regions exactly, down to the sample, and set your DAW to loop playback mode to listen to the results. The transition between your exit and entry points should be seamless, as the wave form should be continuous. You are done and ready to export your loop as an audio file. Always make sure to mind your audio levels, though.
c. Creating Variations
Creating variations of sounds is a challenge especially common to game developers, which we must confront in many areas, ambiences being one of them. Most sounds we create are layered – or probably should be – in order to be interesting. Once you’ve created an interesting ambience by layering a few audio layers, you are at a good place to start thinking about generating variations.
First establish the sound, through experimentation and by using any of the techniques outlined in the sound design chapter or of your own making.
Once you have obtained satisfactory results, work on variations by using some of these techniques:
- Pitch shift one or more of the layers. The range you choose for pitch shifting depends on many factors, but what you are trying to achieve is variations without the pitch shift becoming distracting or musical when the samples are played in a row.
- Swap one or more of the layers with a similar but different sample. It may be a new file altogether or a different portion of the same file/region.
- Add subtle effects to one of the layers, for one or more variations, such as mild distortion, modulation effects etc.
- Alter the mix slightly for each layer from one variation to the next. Again, be careful not to change the overall mix and the focus of the sound.
- Combine all the previous techniques and more of your making to create as many variations as possible.
This list is by no means exhaustive, and over time you will likely come up with more techniques, but when in doubt, you can always refer back to this list.
2. Implementing Our Loops in a Unity Level
Once the loops have been created, the next question is, of course, how do we best implement them in the game?
a. Challenges
Let’s start with 2D sounds. The geographical placement of these in the level matters little, as they will be heard evenly throughout the scene, only able to be panned in the stereo field if the designer desires it. They can be attached to an empty game object and moved anywhere out of the way where it’s convenient. 3D sounds can require a bit more attention. Let’s start with a simple example: two rooms, a 2D ambience playing across both, the sound of outside rain and a single audio source set to 3D spatial blend in the center of each room.

Figure 8.6
Here we come face to face with one of limitations of the Unity audio engine. Audio sources are defined as spheres within the level, which, of course, doesn’t bode well with the geometry of most rooms, which tend to be rectangular. Remember that audio sources are not stopped by objects that may be located in front of them, and sound travels through walls unaffected. Later, we will look at ways to compensate for this, but for now, when using a single audio source to cover an entire room we are left with a few options:
- In order to avoid blind spots, we extend the radius of the sphere, which means that it will also be heard if a player is standing close to a wall in the next room. This may be acceptable in some cases, but it is usually not okay.
- We restrict the radius of the sphere so that it only covers the room it is located in, but we are left with audio blind spots in the corners. Again, this may be an acceptable option sometimes, but it is not generally okay.
- We add smaller audio sources in the corners to cover the audio blind spots. However, if we simply duplicate the audio source in the center of the room and shrink its radius to fit the corners, we are inevitably left with areas where the sources will overlap, creating audio phasing, similar to comb filtering, which is definitely not okay.
As you can see, none of these solutions is entirely, if at all, satisfactory.
One solution is to extend the radius of each audio source so that it covers the entire room and therefore spills over in the next room, but we will use triggers to turn the sound on/off between two rooms and control the bleeding of sounds into the other room. We will set up the sound of the rain to be heard evenly throughout the level, and it will remain a 2D stereo ambience. Inside each room we will set up a simple ambience that will play in 3D located in the center of each room.
This solution works relatively well when it comes to controlling the bleeding of audio sources from one room to another, but it is not a very exciting ambience as the sound remains somewhat monolithic throughout the room. This may be okay for a top-down 2D type game or a casual game, but it will definitely seem a little weak in the context of a more developed first-person game and even more so in VR.
b. Spatial Distribution
An alternative approach is spatial distribution. Spatial distribution of ambient loops is the idea that a single ambient loop in a room will not always suffice to provide a satisfactory solution to our problem and that we can create better, more immersive ambiences by distributing several loops across the space. By distributing ambiences around the room we create a much more interesting soundscape, one that evolves with the space and over time, especially if these ambiences are of slightly different length.
When it comes to implementation of ambiences in Unity, it is possible to attach an audio source to an already existing object, but for the sake of organization I recommend creating empty game objects and adding an audio source and script to these. With a good naming convention, it will make it much easier to find your audio sources in the hierarchy, and you can easily turn those into prefabs, which makes them very easy to re-use.
The spatial arrangement or configuration of spatially distributed ambient audio sources is endless, but a common configuration is similar to a quad set up, putting one audio source toward each corner of a room with overlap so that there are no audio blind spots.
For this technique to work and avoid phasing issues, it is important that the audio sources that overlap each play a different sound clip and that they each be set to 3D spatial blend. The parameter adjustments of each audio source will depend on many factors, such as room size, type of sound etc. The thing to keep in mind is that you are usually looking for a smooth, gradual transition in the room tone as you walk around and that no audio source should stand out as the player moves from one position to another. The main factors to keep in mind are of course going to be the adjustment of the minimum and maximum radius of each audio source, their individual volume and the shape of the fall-off curve. Adjust each one until the results are smooth and satisfactory. If needed you can also adjust the placement of each audio source in the space.

Figure 8.7 Quad configuration
c. Working With the Time Property to Avoid Phasing Issues
There may be times where you will find it difficult to prevent two or more audio files playing in overlapping areas at the same time, which will usually result in phasing issues. Phasing will make the sound appear hollow and unnatural. One way to prevent or mitigate the phasing is to randomize the start time of the playback of the audio clip in at least one audio source. This can be done with the time property, which can be used to change or report the start time of the playback position of an audio clip, although the time property is applied to an audio source.
This example code uses the length property of an audio clip, which will return its duration and is used as the upper range for randomizing the start time of the playback.
3. Random Emitters
Ambient loops are a great way to lay down the sonic foundation of our level, but in order to create a rich, dynamic environment we need more than just loops. Another very helpful tool is random emitters. The term emitter is used somewhat loosely in the interactive audio industry, but in this case, we will use it to describes sound objects which are usually 3D, which can play one or often multiple sound clips in succession, picked at random, and played at random intervals. They are often meant to play somewhat sparingly, although that is in no way a rule. For instance, in an outdoors level we might use random emitters for the occasional bird calls rather than relying on an ambient loop. Random emitters represent a number of benefits over loops. It would take a rather long piece of audio in order for our bird calls not to sounds like a, well, loop, when played over and over. Probably several minutes, perhaps more if the player spends a lot of time in the environment. That of course means a large memory footprint for a sound that, while it may be useful to contribute to immersion, does not play a significant part in the game itself. If the bird calls are spaced well apart, most of that audio may end up being silence. Another issue is that a long ambient loop is static; it cannot change much to reflect the action in the game at that moment. By using a random emitter, we control the amount of time between calls and therefore the density of the birds in the level, and it can be adjusted it in real time easily via script. Furthermore, each bird call can be randomized in terms of pitch and amplitude or even distance from the listener, and by placing a few random emitters around the level, we can also create a rich, 360-degree environment. Combined with ambient loops, random emitters will start to give us a realistic and immersive soundtrack.
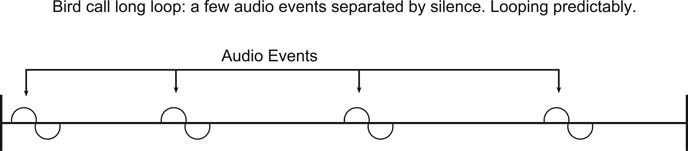
Figure 8.8
a. A Simple Random Emitter Algorithm
Let’s break down what we want our intermittent emitter to do:
- Wait for a random amount of time, specified within a minimum and maximum range in seconds. (It would be awkward if instead of starting with the silence portion we started by playing a sample. If multiple versions of the script were added to the level, it would mean that our level would start with multiple sounds all playing at once.)
- Pick a sample at random from an array. Optional: avoid repeating the last sample played by placing it at the start of the array – entry 0- and only picking samples from index 1 and up.
- Randomize pitch and amplitude, possibly distance from the listener.
- Play the audio clip.
- Do it again.
Because we are likely to be using random emitters in more than one place, as always, we want our code to be as easy to re-use as possible. To that extent we will add a few additional features in our script. For one, we will check to see if an audio source component already exists, and if none is found, our script will automatically attach one to the same object as our script. We will make sure all the most important or relevant settings of the audio source, whether one is already present or not, can be set from the script and then passed to the audio source. We will give the user control over:
- The number of sounds the user can load in the script.
- Whether it’s a 2D or 3D source.
- The minimum and maximum amount of time between sounds.
- The source volume and randomization range.
- Additionally, we will also randomize the maximum distance range of the audio source, which will further add a sense of realism by appearing to modulate the distance from the listener at each iteration.
We will create a function that will perform these tasks and use a coroutine to keep track of how much time to wait between samples by adding the random offset the computer picked to the length of the sample selected.
b. Coroutines
The lifespan of a function is usually just one frame. It gets called, runs, then returns, all in a single frame. This makes it difficult to use functions to work with actions that require the game engine to keep track of something over multiple frames. For this purpose, we can use coroutines.
A coroutine is akin to a regular function, but its lifespan can encompass multiple frames, and the coroutine keeps track of where it last left off and picks up from that same spot at the next frame cycle.
Coroutines always have a return type of IEnumerator and include a yield return statement. Coroutines are called using the StartCoroutine(‘NameOfCoroutine’) statement. In this example, we will use the yield return new WaitForSeconds() statement to introduce a random pause in the execution of our code.
At the top of the script we begin by creating a number of variables and link them to sliders the user can adjust to determine their value. These variables represent the various parameters we wish to set our audio source to: minimum and maximum distance, pitch, pitch randomization, as well as minimum and maximum time between sounds. By taking these values out of the code and making them available to the user, it is much easier to make our code reuseable. We will then create a function whose purpose is to apply these settings to our audio source.
After the variable declaration we use the awake function to check to see if an audio source is already present. This script will work if an audio source is already present but will also add one if none is found:
After making sure an audio source is present or adding one if none is found, we use the Start() function to initialize some basic properties of our audio source, such as turning off PlayOnAwake and looping.
For the purposes of this example, we can use the 1 key on the keyboard to turn on the emitter or 2 to turn it off. Pressing the 1 or 2 keys on the keyboard sets a Boolean variable to true or false, controlling when the script should be running. The code checking for key input was put in the update loop, as it is usually the best place to check for user input. The reader is encouraged to customize this script to fit their needs of course. By pressing 1 on the keyboard we also start a coroutine called WaitForIt. The point of the coroutine is to let the class wait for an amount of time chosen at random from the minimum and maximum values set by the user, then trigger a sample.
The SetSourceProperties() function is how we are able to set the parameters of our audio source to the values of each variable declared at the top of the class. Having a dedicated function whose purpose to set the audio source’s parameters is key to making our code modular. This allows us to avoid hard coding the value of the source’s parameters and instead use the editor to set them.
Next comes the PlaySound() function. PlaySound() calls SetSourceproperties() to set the parameters of our audio source to the settings selected by the user, triggers the audio source and then calls the coroutine WaitForIt() in order to start the process again and wait for a certain amount of time before resetting the process.
If PlaySound() calls SetSourceProperties() and plays our audio source, where does PlaySound() get called from? The answer is from the WaitForIt() coroutine. Several things happen in the coroutine.
- The coroutine sets a specific amount of time to wait between the minimum and maximum range set by the user:
- The coroutine checks to see if a sound has been assigned to the audio source. Essentially this line of code is to check whether we are running this script for the first time, in which case there would be no audio clip associated with the audio source.
- The second time around and afterwards, a clip should have been assigned to the audio source and the coroutine will wait for the duration of the clip + the amount of time selected at random before calling another sound.
- The coroutine checks to see that our Boolean variable enablePlayMode it set to true, and if it is, calls the PlaySound() function.
This script can be dropped on any game object and will create an array of audio clips that can be filled by the sound designer by dragging and dropping a collection of audio files on the array or by individually filling each sound clip slot after defining a length for the it. The sliders can be used to adjust pitch, pitch minimum and maximum random offset, volume, as well as volume randomization minimum and maximum offset, 2D vs. 3D, as well as maximum distance and distance randomization.
4. Ambiences, Putting It All Together
We can supplement loops and random emitters with intermittent triggers in order to create more immersive and dynamic environments. An intermittent trigger is one that will not always result in an action when the trigger is entered. A good example would be a trigger in an outdoors level that would once in a while play the sound of a twig cracking under the player’s footsteps in a certain area. We can make a trigger intermittent by generating a random number every time the player enters the trigger but only follow through with any action if the number is over or below a certain threshold. In this example a sound will only be played if a random number generated upon entering the trigger is less-than or equal to one. We can change the odds of the sound playing by changing the range in the inspector. If the range is set to 2, the odds of the sound playing are about 50%; changing that number to 10 will only make the sound play about 10% of the time.
We have now looked at a number of ways to work with sounds in Unity; by combining these techniques together we can start to put together convincing and immersive environments, using different tools for different purposes.
- 2D Loops: useful for sounds that do not require spatial treatment, such as wind, rain or some room tones.
- 3D Loops: useful for loops requiring spatial treatment.
- Intermittent Emitters: for one-shot sporadic sounds such as birds, insects, water drops etc.
- Triggers, to play sounds upon entering a room, a space or to turn on and off ambiences and/or other sounds.
- Intermittent triggers.
5. Sample Concatenation
Concatenation of sample is a very useful technique in game audio. We concatenate dialog, gun sounds, ambiences, footsteps etc. Concatenation refers to the process of playing two samples in succession, usually without interruption. In that regard the Intermittent Emitter script does sample concatenation, but we can write a script dedicated to sample concatenation that can be used in a number of scenarios. Let’s take a look at a few examples that can easily be applied to game audio.
a. Creating Variations With Footsteps Samples
Footsteps are notorious for being some of the most repetitive sounds in games, sometimes downright annoying. There are a number of reasons why that may be the case, from poor sound design to mix issues. One common complaint about footsteps sounds is that they tend to be repetitive. Most games do recycle a limited number of samples when it comes to footsteps, often on randomizing a limited number of parameters for each instance of one in the game, such as amplitude and pitch. Another way to combat repetition without the additional overhead of more audio files is to break each footstep sample in two: the heel portion and the toe portion of the sample. If we store four samples for each surface we would go from:
- Gravel_fs_01.wav
- Gravel_fs_02.wav
- Gravel_fs_03.wav
- Gravel_fs_04.wav
to:
- Gravel_fs_heel_01.wav
- Gravel_fs_heel_02.wav
- Gravel_fs_heel_03.wav
- Gravel_fs_heel_04.wav
and:
- Gravel_fs_toe_01.wav
- Gravel_fs_toe_02.wav
- Gravel_fs_toe_03.wav
- Gravel_fs_toe_04.wav
This allows us to at each instance randomize both the heel and toe sample, each individually randomized in pitch and amplitude, thus creating more variations.
- Instance 1: Gravel_fs_heel_02.wav + Gravel_fs_toe_03.wav
- Instance 2: Gravel_fs_heel_04.wav + Gravel_fs_toe_01.wav
A similar application would be for explosions and impacts. We can similarly think of an explosion as being a detonation, followed by debris and environmental effects, such as reflections and reverberation.
b. Case 1: Swapping Audio Clips
We can concatenate samples in one of two ways, by scheduling the second sample at exactly the end of the first sample or by checking to see if the audio source is still busy playing the first sample and as soon as it no longer is, swapping the audio clip with the second one and starting playback again.
To check if an audio source is busy currently playing a sound, we can simply check its isPlaying property. It will return true only when the audio source is playing. In this first example we’ll use this method for an explosion example. Let’s break this one down in terms of an algorithm:
- Load sample A in the audio source.
- Set the audio source to play.
- Set a flag (Boolean) to let the program know A has already been played.
- Once A is done playing, the audio source is free again; load sample B.
- Set the audio source to play.
We’ll break the logic into two functions:
- PlayFirst() will load audio file number one into the audio source, set it to play and set our Boolean variable to true to let the software know we’ve played audio file one already.
- PlaySecond() will load audio file and reset our flag to false.
This method works but does have a few drawbacks; most notably, there is a short interruption at the moment the audio source loads another clip. This may be okay for a lot of situations, but for more time-critical needs and a smooth transition, it makes sense to use two audio sources and to delay the second by the amount of time it takes to play the first sound. We could modify this script rather easily to make it work with two audio sources rather than one, but let’s consider another approach, sound concatenation using the Play-Scheduled() function, which gives us much more accurate timing and should be used for application where timing is crucial, such as music and music loops.
Also, you can see how easy it would be to modify this script to make it play samples at random and be used in the footstep example mentioned earlier.
c. Case 2: Using PlayScheduled()
It is possible to schedule events very accurately in Unity using the PlayScheduled() method. PlayScheduled() takes a single parameter, a double (more precise than floats) that represents the time at which to schedule the event. In this example we will work with multiple audio sources and use PlayScheduled() to make sure they are triggered at the right time.
In order to achieve this seamlessly, we have to know the exact length of the audio clip we are starting with. The length of an audio clip in terms of playback may vary, however, based on pitch modulation or randomization. The best way to accurately calculate the duration of a single clip is to divide its length in seconds by the playback pitch. We could do this in a number of ways:
The previous line will return the length in seconds of the audio clip. When it comes to sound and music, however, that might not be enough resolution to keep the playback smooth and music loops in time. For that reason, you might want to increase the level of precision by using a double, rather than a float:
A couple of things are worth noting here. For one, we actually look for the length of the audio clip in samples, rather than in seconds, which makes our measurement more accurate. You will also notice that we inserted the keyword (double) in front of the expression audioSource.clip.samples. This is known as casting, which is a way to turn the audioSource.clip.samples into a double, rather than a float.
By turning the length into a double, we also make sure the data is ready to be used by the PlayScheduled() function.
Now we can schedule our events accurately, ensuring one will play right after the other:
In this example the transition between clips ought to be a lot smoother than in the previous example, partly because we are using two audio files rather than one but also because of the more accurate timing allowed by PlayScheduled() over other alternatives. You will notice that the clip length is divided by 44,100, which is assumed to be the sampling rate of the project. This will convert the length of the audio clip from samples to seconds. When working with other sample rates, be sure to adjust that number to reflect the current rate.
6. Collisions
Without collision detection, making even the simplest games, such as Pong, would be impossible. Unity’s physics engine will call a specific function when a collision is detected, which we can access through scripting and use to trigger or modify sounds or music.
a. Detecting Collision
In order for Unity to detect a collision between two objects, a collider component is required on the game objects. Colliders are invisible and tend to be of a simpler shape than the object they are attached to, often geometric primitives such as cubes, spheres or a 2D equivalent. Keeping the collider simple in shape is much more computationally efficient and in most cases works just as well.
The green outline shows the colliders used for the body of the car. Primitive geometric shapes are used for greater efficiency.

Figure 8.9
In the cases where an approximation of the shape of the object by a primitive shape is not satisfactory, it is possible to use mesh colliders to match the shape of the object in 3D or polygon collider 2D for 2D objects. These colliders considerably increase the computational load on the game engine and should be used sparingly and only when necessary.
Unity makes a few distinctions between colliders. Static colliders are colliders that will not move, such as the geometry of a level, walls, floor etc. RigidBody colliders, which require a RigidBody component, will react to forces applied to them and the material they collide with and may bounce, glide, drop etc.
Kinematic RigidBody colliders are meant for geometry, which is intended to be mostly static but may move under certain conditions, such as a door or gate for instance.
Collisions can be a complex topic, so please refer to the Unity documentation for more information.
In this next example we will trigger a collision between a game object, a cube and the floor by walking through a trigger. The floor will consist of a static collider, while the cube is a kinematic RigidBody collider. Upon entering the trigger, the cube’s ‘isKinematic’ property will be set to off, which will allow it to drop. We will use tags to make sure that the player is the object walking through the trigger and that the cube does indeed collide with the floor.
We will access the OnCollisionEnter function – which gets called by the physics engine upon collision – and use it to trigger a sound at the moment of impact.
You will notice that the order in which the functions are declared has little impact. In this case, CollisionEnter() is defined prior to onTriggerEnter() although the trigger has to be called first in order to switch isKinematic to false, which drops the cube and lets it fall to the ground.
Furthermore, we can get additional information about the collision, such as velocity, which can be extremely useful when dealing with game objects with Rigidbodies or physics properties whose behavior mimics a real-world condition such as gravity. Here we encounter another limitation of the current audio technology in game engines. An object with physics properties will theoretically be able to create a massive amount of different sounds. A trash can may bounce, roll or drag, all at various velocities and on various surfaces, with a close to infinite potential for variations in sounds. Obviously, we cannot store such a massive amount of sounds, and much less justify the time and effort to create so many possible variations. Still, if we obtain enough information on an event, we can let the engine choose between various samples for low, medium and high velocity collisions and if needs be with different sounds for different surfaces. With pitch and amplitude randomization, this may prove to be just enough to make the process convincing.
b. Velocity-based Sample Selection
Objects with physics properties will often behave in unpredictable ways, which makes the job of triggering the right sample for the event difficult. One way we can address the issue when it comes to collisions, is to select an audio sample based on the velocity of the impact. A simple way to obtain this information in Unity is by calling relativeVelocity when an impact is detected. relativeVelocity will return the velocity of a collision relative to the speed of both objects, which is very useful when dealing with two moving objects, such as a projectile colliding with a moving vehicle for instance.
The following bits of code perform two actions. The first script, projectile.cs, will instantiate a RigidBody object, in this case, a sphere, (but it could be any object in a level), and it will propel it forward at a random speed within a given range when the user presses the fire button (by default left click):
This script is attached to an invisible game object, which also acts as an invisible game object and spawn point in this example, and every time the user presses fire, an object, which can be any RigidBody selected by the user, is instantiated from the spawn point and propelled straight ahead.
This next script, attached to the wall located in front of the spawn point, detects any collision and finds out the velocity of the collision. Based on that velocity, it will choose one of three samples from an array, one for low velocity impacts, another under ten another for medium velocity impacts, one for magnitudes within ten to 30 and another for high velocity impacts for anything above 30.
This script is attached to the wall, and once the RigidBody collides with it will be destroyed right away.
7. Raycasting and Smart Audio Sources
a. Implementing Occlusion With Raycasting
Let’s try a new challenge and try building an audio source that could detect whether there is a wall or significant obstacle between it and the listener that could apply a low pass filter and volume cut if one is detected. This would be a great first step toward achieving a further level of realism in our projects via the recreation of occlusion, the drop of amplitude and frequency response in a sound that occurs naturally as it is separated from the listener by a partial or fully enclosing obstacle. It might also be helpful if our audio source automatically turned itself off when the listener is beyond its maximum range since it cannot be heard beyond that range. We’ll call this a smart audio source, one that is capable of raycasting to the listener, of simulating occlusion, detecting the distance to the player and turning itself off if it is beyond the range of the listener.
Let’s start with finding out the distance between the listener and the audio source:
First, we will need to identify and locate the object the listener is attached to. There is more than one way to do this, but in the Start() function we will use the GameObject.Find() function to locate the object called ‘Player’, since in this case we are going to use a first-person controller and the listener will be on the player’s camera. The object to which the listener is attached must be named or changed to ‘Player’ in the inspector located above the transform component of the game object, or Unity will not be able to find it, and the script will not work. The word ‘Player’ was chosen arbitrarily. In this example, we also assign the object named ‘Player’ to the game object created earlier in the same line:
Then, at every frame we will keep track of the distance between the audio source and the listener object. Since we need to check on that distance on a per frame basis, the code will go in the update() function. Instead of doing the math in the update function itself, we’ll call a function that will return the distance as a float. We will call the function CheckDistance():
The function takes in two arguments: a game object – a reference to the object that carries the listener – and a float, which represents the maximum distance of the audio source’s range and returns a float, representing the distance between the source and player. Note: in this case, the maximum value passed to CheckForDistance() is not directly obtained from the audio source parameter and is passed as a value by the user. When the distance between the source and the player exceeds the range of the distance passed to the function as the second argument, we tell the audio source to stop. The code that turns the audio source back on is located in the Update() function.
In order to create basic occlusion and have the audio low pass filtered when the listener and the audio source are separated by a wall, we will need to introduce a new technique: raycasting. Raycasting is a very powerful tool. It allows is us to create a line in any given direction, starting from a desired set of coordinates a desired length, that will detect any intersection with colliders in the scene. In the script SmartAudioSource.cs we will raycast from the location of the smart audio source to the listener – only when the listener is within the maximum distance of our audio source so as to conserve resources – and look for any collider in our path.
Raycasting requires a few steps:
- Determine a point of origin. If you are attaching the ray to an object, you can use transform.position to establish that object as a point of origin.
- A direction, as a set of 3D or 2D coordinates, depending.
- A desired length.
Raycasting can be used for a number of purposes. For instance, rather than raycasting from the audio source to the listener, by raycasting outwards from the listener in every direction we can obtain information on the distance between the player and the walls and adjust reverberation information accordingly for additional realism.
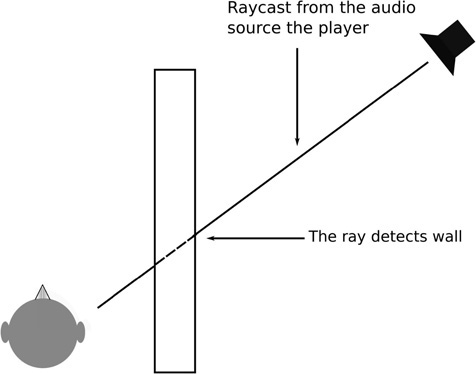
Figure 8.10
b. Avoiding the Pebble Effect
If we are not careful, any object with a collider attached to itself, such as another player or even a projectile, could be detected by the raycasting process and trigger the occlusion process. This is sometimes known as the Pebble Effect, and it can be quite distracting. In order to make sure that we are in fact dealing with a wall and not a passing game object, such as a projectile, we will rely on the object tagging system and check its tag. If the object is tagged ‘geometry’ (chosen arbitrarily) the script will update the frequency of the low pass filter component attached and bring it down to 1000Hz, at the same time lowering the amplitude of the audio source by 0.3 units.
The raycasting occurs in the GetOcclusionFreq() function, which takes two arguments, a game object – which is a reference to the object with the listener attached – and a float, which is the length of our raycast.
First, we must find the coordinates of the listener so that we know where to raycast to:
The next statement does several things at once, nested within the if statement, we instantiate the ray:
We do so by calling Physics.Raycast, which requires the following arguments:
- The initial coordinate from which to cast the ray, in this case, by using transform.position we are using the current coordinates of the object this script is attached to.
- The coordinates from which we are raycasting to, our destination.
- A RayCastHit, which will provide us with information back on the raycast.
- A distance, the max distance for our ray to be cast.
Additionally, it is also possible to use a layer mask as an optional argument to filter out results in more complex environments. Raycasts will return true if the ray intersects with a collider, so we can nest our raycast in an if statement, which will return true if a collider intersects with a collider:
As you can see, the code also checks to see; once a collider has been detected by the ray, we check to see if that object is tagged ‘Geometry’. This is to avoid the pebble effect and ensure that the audio source does not get low pass filter if another player or a projectile intersects with the ray.
The Update() function is where we put it all together:
The first if statement checks to see if our audio source is playing and, if so, constantly updates the value of the low pass filter by calling GetOcclusion-Freq(). The second if statement, however, checks to see if the audio source should be playing at all, based on whether the listener is within earshot of the audio source. For that, we call CheckForDistance(). CheckForDistance() will return the distance between the listener and the audio source, and if we are too far to hear it, the function will turn off the audio source. Here, we check to see if we are back within the range of our audio source and, if so, turn it back on.
Lastly, we call CheckForDistance() before leaving the update function. This will turn off the audio source if we are too far away to hear it.
There is a lot to this script, and it is worth spending some time with it and really understand what is going on. You will likely find ways to modify it and make it more efficient for the situations you need to address.
8. Animation Events
When working with animations, specifically animations clips, the best way to sync up sounds to a specific frame in the timeline is through the use of animation events. Animation events allow us to play one or multiple sounds in sync with a specific frame in the animation timeline by calling a function in the script attached to the object. As an option, animation events can also take a parameter in the form of a float, int, string or object.
In this example we’ll add a footstep sound to the third-person character controller from the Unity standard assets. We’ll focus on the running animation, since it is one of the most commonly used. First, we need to write a simple script that will play the actual sound whenever the character’s feet make contact with the ground in the animation.
Adding a footstep sound to a walking animation for a third-person controller:
(The same can be applied to most animations.)
- Locate the appropriate animation. For our example we will look for the running loop, from the standard asset package we imported earlier. The animations are going to be located in: Standard Assets/Characters/ThirdPersonCharacter/Animations. The running loop is called HumanoidRun.
- In the inspector, make sure to select the Animation tab.
- Scroll down to the Events tab, and open it up.
- Using the area next to the play button at the top of the animation window, scroll to the frame in the animation you would like to add a sound to.
- Back in the events tab, in the inspector, click on the Add Events button, located to the left of the timeline of the events section.
- Under the Function tab, write the name of the function you created in the script earlier, attached to the third-person controller.
- Make sure to add the script and an audio source to the character controller.
Figure 8.11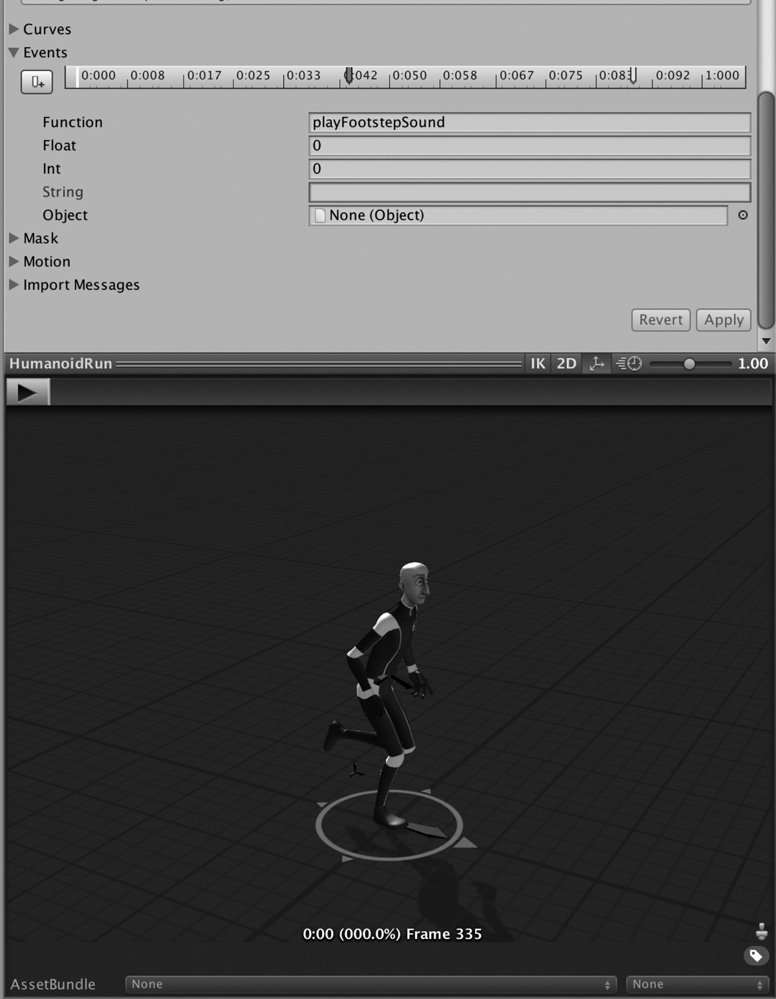
Press play!
9. Audio Fades
Fades are gradual changes in volume over time that tend to have two main parameters: target volume and duration. Fades are useful for elegantly transitioning from one music track to another, but a short fade can also help smooth out the sound of sample as it plays, especially if the audio sample is meant to be a seamless loop and therefore will not contain a micro fade to prevent pops and clicks, and may sound a tad jarring when first triggered.
We do fades by gradually increasing or decreasing the volume value of an audio source over time. However, we must be careful to not rely on the frame rate as a timing reference, since the frame rate may vary with performance and is therefore not an absolute timing refence. Instead, it is better to rely on Time.deltaTime. Time.deltaTime gives us timing independent from frame rate. It will return the time since the last frame, and when doing animations, or in this case fades, multiplying our fade increment by Time.deltaTime will ensure that the fade’s timing is accurate in spite of any potential frame rate variations by compensating for them.
Since many files would likely benefit from fades, it makes sense to write the code so that it will be easily available to all audio sources. Rather than writing a block of code for fades in every script that plays an audio file, we shall write a separate class and make the code available to all objects in the scene by making the functions both public and static.
Since fades occur over the course of multiple frames, it makes sense to use a coroutine, and since we wish to make that coroutine available to all audio sources, at any time, we will place our coroutine in a public class and make the coroutine itself both public and static. Making it static means that we do not need to instantiate the class it belongs to in order to call the function. It also ensures that the implementation will be identical, or consistent across all class methods. Static classes do have some drawbacks, they cannot be inherited or instantiated, but in this case this implementation should serve us well.
We’ll create a new class Fades.cs, which will contain three functions for fades: a fade-in, fade-out and transitioning to a target volume function. We’ll start by creating the fade-out function:
The function, being static and public, is easy to access from other classes. In order to fade out the volume of our audio source we will gradually decrease the volume over time. As mentioned previously, however, rather than simply relying on the frame rate of the computer, which can be erratic and is based on performance, we want to make sure our fades are controlled by Time. deltaTime, which returns the time elapsed since the last frame and therefore allows us to compensate for any frame rate discrepancies:
If we assume a frame rate of 60 frames per second, the time for each frame is 1/60 = 0.0167 seconds. Assuming a start from a volume of 1 and looking for a fade to occur over two seconds, each increment would be:
To check our math, a fade from 0 to 1, over two seconds or 120 frames, incrementing the volume by 0.0085:
Note: the decimal portion, .02, is due to rounding errors.
The fade in function works similarly.
The function for transitioning to a new value is slightly more complex but based on the same idea:
10. Distance Crossfades
Often, when sounds are heard from a large distance, such as a thunderstorm, it is difficult to accurately recreate the sound of the event heard from afar and from close up with a single sample. Rather, we employ two sounds for afar and close-up and crossfade between them as we move toward or away from the sound source. This is known as a distance crossfade.

Figure 8.12
In order for us to implement a distance crossfade we need a few elements.
- Two audio sources, one for the sound from afar, and another for the sound up close.
- Keep track of the distance between the listener and the origin of the audio source.
- Map the distance to a normalized range between 0 and 1, which can be used to control the volume of each audio source.
We will start by writing a new class, DistanceXFade:
We begin by declaring two audio sources, soundAfar and soundClose and two audio clips closeUpSound and farAwaySound for each one. We also declare a few floats, minDistance and maxDistance, which are going to represent the minimum and maximum range of the audio source. The float dist will be used to keep track of the distance between the listener and the audio source, while the GameObject listener will hold a reference to the player, which assumes the listener will be assigned to it.
Next, in Awake() we proceed to initialize our audio sources and find the player. We are using GameObject.Find() to look for a game object by name, which means that the object on which the listener is attached must be named ‘Player’, or, if using a different name, that field needs to be changed to match the name you gave it. Next we assign the appropriate clips to our audio sources and assign the max distance specified by the user to our audio source. Allowing the user to specify the max distance for each source makes the code easy to re-use across different contexts.
We start both audio sources in the Start() function, though that could easily be changed to a trigger or to respond to a game event.
Next, during Update(), therefore once per frame, we call CheckForDistance(). This function, which we will look at next, will determine the distance between the audio source and the player. The if statement that follows checks to see if the audio sources are currently playing and whether the player is within maximum range of the audio source. If the audio source isn’t playing (it can be turned off when we are outside range) and we are within range, the audio source will be turned back on.
CheckForDistance() is next, and the first line of code assigns the distance between the player and the sound source to the variable dist. CheckForDistance takes two arguments; the first is a reference to the player and the second is the maximum distance for the audio sources. If the player is farther than the maximum range and therefore unable to hear them, CheckForDistance turns both audio sources off. The next two lines are used to draw a raycast between the audio sources and the listener, which is only for debugging purposes and can be turned off when running the scene.
Once we’ve established the distance between the listener and the source, we call MapToRange(), which will then map the distance between the listener and the source to a range between 0 and 1, which can be used to control the volume of each audio source.
In order to map the distance to a range between 0 and 1 we do a little math. If the player is within the range of the audio source, we map the distance to a percentage using this simple formula:
This will return a value between 0 and 1 depending on the distance – 0 when on top of the audio source and 1 being at the limit of the range. We can now map this value to control the volume parameter of each audio source using the next function, UpdateVolume().
Since we want the value of the close-up source to be at one when we are on top of it and at the same time the far away source to have a value of zero, we will assign the value returned by MapToRange() to the far away audio source, and the close-up will assign the volume of the close-up audio source, to (1-range).
You will also notice that we actually use the square root of the percentage value, rather than the value itself. That’s optional, but it is to compensate for a drop of overall perceived amplitude while we stand at the halfway point between the two sources. Our perception of amplitude is not linear, and mapping volume curves to linear functions may result in sometimes awkward results. Most common when using a linear fade is a drop of the overall perceived amplitude at the halfway point, by about 3dB, rather than a constant amplitude across the fade. This technique of using the square root value rather than the raw data can be applied to panning and other fades as well.
Note: when working with a distance crossfade in Unity or any similar game engine, do keep in mind that the process will only be successful if the right candidates are selected for each perspective. Finding or creating two sounds that are meant to represent the same object but from a different perspective can be a little tricky, especially if they have to blend seamlessly from one to another without the player being aware of the process. Other factors are to be considered as well, the main one being that you may wish for the sounds to have different spatial signatures. In the case of a thunderstorm, the faraway sound would likely be 3D or partially 3D so that the player can easily identify where the storm is coming from, but up close and ‘in’ the storm the sound is often 2D, with rain and wind happening all around you. You may also wish to adjust the spread parameter differently for each. The spread parameter controls the perceived width of the sound. Sound heard from a distance tends to have narrower spatial signatures than the same sound up close. These changes may affect the perceived amplitude of each sound in the game – the 3D one with a narrower spread may appear softer than it was previously, especially when compared to the close-up sound. You may need to add a volume multiplier to each audio file so that you may control the levels better.
11. Working With Prefabs
Working with scripts, audio sources and other components that must be added to multiple objects, the process of populating a level can quickly become time-consuming and prone to errors. Unity offers an asset type known as a prefab, which works as a template. A prefab allows the user to combine an object made of multiple assets – or components – into a template that’s easy to instantiate multiple times.
Creating a prefab is simply a matter of creating an object from the hierarchy back into the asset folder. When wishing to re-use the prefab, one can simply drag the newly created asset back into a scene. The object will be displayed in blue, indicating it is a prefab. Prefabs can also be instantiated from script, making it easy to quickly create complex objects from a few lines of code at runtime.
With prefabs, we can create a complex audio object, containing scripts, an audio source and additional processing such as a low pass filters and store it as a prefab, easy to instantiate multiple times and across scenes.
a. Creating a Smart Intermittent Emitter Prefab With Occlusion
- Create a new empty GameObject by right clicking on the hierarchy and selecting Create Empty, or by selecting the GameObject menu and selecting Create Empty.
- If you haven’t done so yet, import the IntermittentSourceOcclusion. cs script Assets/Import New Assets and add the script to the newly created game object as a component.
- After making any adjustments to the parameters of either components you wish to save across multiple instances, simply click the empty object you created in step one and drag it into the asset folder.
b. Instantiating a Prefab From Scripting
Instantiating prefabs from scripting is done using the Instantiate() method, which is overloaded and can take different arguments based on the situation. It is often useful to instantiate an object at a specific location in the 2D or 3D world, and this can be easily done with the instantiate method.
The Instantiate() method always requires a reference to the prefab that is to be instantiated. In the following example we’ll instantiate a prefab at a specific location in a 3D level:
c. Destroying an Object Instantiated From a Prefab
When a prefab is instantiated, it becomes just another game object. Unless action is taken to remove it from the scene when no longer needed, it will linger on and use up resources for no reason This could potentially seriously damage the performance of your game and drastically slow down the frame rate if we are not careful with our code and do not keep track of instantiated prefabs. Whenever instantiating an object, you should also have a strategy in mind to remove it or destroy it when no longer needed.
The following code instantiates a prefab and waits three seconds before destroying it, using the Destroy() method:
We are using the Time.time to determine the amount of time that has gone since the game started. Time.time only gets defined once all Awake() functions have run.
It would be easy to customize the code to instantiate objects around the listener and dynamically create audio sources from any location in the scene.
d. Instantiating Audio Emitters at Random Locations in 3D
With prefabs we can easily write a script that will instantiate an audio source at random coordinates around the listener at random intervals whose range is to be determined. This next script will instantiate a new prefab, with an audio source attached to it, that will stay active for three seconds, then be destroyed. The script will wait until the previous object is destroyed and until we are out of the coroutine before instantiating a new object, ensuring we are only ever creating one prefab at a time.
This script could easily be modified in a number of ways. The audio sources could be generated randomly around the listener’s location, for instance, and the script could be started by a trigger, for instance. Further improvements could include the ability to play a sound at random from a list, and we could pass the clips to the prefab from the interface by dragging them onto the script directly. As always, the possibilities are endless.
Conclusion
Scripting can be a difficult skill to master, or it may appear that way at first, but with practice and perseverance, anyone can master the skills outlined earlier. Remember to go slow, build complexity slowly, one element at a time, and always try to have a map of exactly what it is you are trying to accomplish and the necessary steps to get there. Languages and systems change all the time. Today you might be working in C# in Unity, but there’s no telling what your next project will be. Being aware of audio-specific issues when it comes to implementation and the ability to break down a complex task into a series of smaller manageable steps is a skill you will be able to translate to any situation and game engine. So, where to go from here? If audio implementation is a topic of interest to you, delve deeper into C# and possibly learn C++, a skill that employers always seem to be looking for. Learn to work with other game engines and middleware. Learn about manager classes, classes written specifically to handle one aspect of the game mechanics, such as audio, which will allow you to create larger structures and more organized code. Look for additional material on the companion website, and have fun!