
5
SOUND DESIGN – THE ART OF EFFECTIVELY COMMUNICATING WITH SOUND
1. The Art of Sound Design
1. A Brief History of Sound Design
As we saw in Chapter one, video games are a relatively new medium, but sound design isn’t. It takes its roots in theatre and was used to augment the impact of dramatic scenes and help create immersion, before that term was even articulated. Early sound designers had to be crafty and create unique contraptions to create all types of needed sounds. Some devices became popular and even standardized, such as the aeoliphone or wind machine. The aeoli-phone consisted of a rotary device, a wooden cylinder outfitted with wooden slats that the operator would use by using a crank to spin the slats against a rough canvas. The aeoliphone was used in both orchestral and theatrical settings, and by varying the speed at which the operator would crank the device, various wind types and intensities were possible.
This type of ‘contraption-based sound design’ was in use until and through most of the 20th century, certainly through the golden age of radio and early cartoons and movies. For a very long time indeed, this was the only way to create sounds from a stage or recording studio. (Keep in mind that it wasn’t until the 1960s and 1970s that recording equipment became portable, cheap enough and reliable enough to allow audio engineers to record sound on location.)
One of the pioneers and master of these techniques applied to visual media was Jimmy MacDonald, the original head of the Disney sound effect department. MacDonald was also a voice actor, most notably the voice of Mickey Mouse. Since recording equipment was expensive, very bulky and therefore could not be moved out of the studio to record a sound, Mac Donald and his colleagues invented a multitude of devices and contraptions to create his sound world. These contraptions were then performed to picture in real time by the sound artist, which required both practice and expertise.
Disney’s approach was contrasted by the Warner Brothers team on their “Looney Tunes” and “Merry Melodies” cartoons, as early as 1936. Sound designer Tregoweth Brown and composer Carl Stalling worked together to create a unique sound world that blended musical cues to highlight the action on the screen, such as timpani hits for collisions or pizzicato strings for tip toeing, together with recorded sounds extracted from the growing Warner Brother audio library. In that regard, Brown’s work isn’t dissimilar the work of music concrete pioneers such as Pierre Schaeffer in Paris, who was using pre-recorded sounds to create soundscapes, and Brown was truly a pioneer of sound design. Brown’s genius was to re-contextualize sounds, such as the sound of a car’s tire skidding played against a character making an abrupt stop. His work opened the door to luminaries such as Ben Burtt, the man behind the sound universe of Star Wars.
Ben Burtt’s work is perhaps the most influential of any sound designer to date. While the vast majority of his work was done for movies, most notably for the Star Wars film franchise, a lot of his sounds are also found in video games and have influenced almost every sound designer since. Burtt’s genius comes from his ability to blend sounds together, often from relatively common sources, in such a way that when played together to the visual they form a new quantity that somehow seamlessly appears to complement and enhance the visuals. Whether it is the sound of a light saber or a Tie fighter, Burtt’s work has become part of our culture at large and far transcends sound design
A discussion of sound design pioneers would be incomplete without mentioning Doug Grindstaff, whose work on the original TV show Star Trek between 1966 and 1969 has also become iconic but perhaps slightly overlooked. Grindstaff’s work defined our expectations of what sliding doors, teleportation devices, phasors and many other futuristic objects ought to sound like. Grindstaff was also a master of re-purposing sounds. The ship’s engine sound was created with an air conditioner, and he made sure that each place in the ship had its own sound. The engineering section had a different tonality than the flight deck, which was something relatively new at the time. It allowed the viewer to associate a particular place with a tone, and an avid viewer of the show could tell where the action was taking place without needing to look at the picture. In that regard, Grindstaff’s work was visionary and helped further expectations on the role of sound design in visual media.
2. Sound Design – Basic Considerations
In his essay Dense Clarity – Clear Density, sound designer and film editor Walter Murch pointed out that, over time, the soundtracks of movies have continued to increase in complexity and sophistication, from early movies requiring under 20 sounds for the entire soundtrack, to modern movies now requiring many thousands.
One of the most common mistakes sound designers tend to make when they start out is to attempt to make things sound a little too realistic and, ultimately, not quite interesting enough. The pursuit of realism, albeit a worthy one, is ultimately optional and sometimes futile, as ultimately underwhelming in most situations. This is true of both film, games and VR experiences. We might of course want the user experience to ‘feel’ real, but in order to achieve that we may have to take liberties with the real world. We are story tellers; serving the story, not reality, ought to be our primary concern. While this chapter focuses on gaming, most of the concepts here can also be applied to other visual media.
a. Effective Sound Design
Perhaps a good place to start a practical discussion of sound design is to attempt to answer the question: what is effective sound design? As the title of this chapter states, sound design is about effective communication through sound, for a given medium. Every medium and genre tends to have its own conventions, but there are a lot of commonalities across all.
Sound is a highly difficult thing to describe. It cannot be seen, easily measured or quantified. But certain adjectives or words resonate. Interesting sound design should have depth and texture. Even a seemingly simple sound may have several layers upon closer inspection and can sonically be detailed, creating a rich spectrum even if meant to be subtle. This approach to sound design is an ‘active’ one, where the sound designer seeks not only to match the visuals but enhance them, becoming a contributor to the overall narrative.
I often like to contrast the full and always exciting and dazzling sound world of Star Wars to the brilliant, wonderfully understated sound world of the movie No Country for Old Men by the Coen brothers. While Star Wars and the stunning world created by sound designer Ben Burtt is simply breathtaking, the universe of No Country for Old Men is sparse yet extremely detailed and deliberate and certainly has a lot of texture. It creates tension by letting the listener focus on the sound of a candy wrapper slowly expand after it is discarded and immerses us in its world by subtle mix moves that seamlessly take us in and out of objective and subjective space.
These two very different approaches to sound design perhaps explain why it is so difficult to teach sound design in a systematic manner, since context and intention are so important to our craft. There are, however, certain concepts and techniques we can rely on when dealing with common sound design problems. Please note that the following is intended as a guideline, and that, each situation being different, we must ultimately rely on the conventions of the genre, our ears and taste.
When considering what makes effective and interesting sound design, here are a few points to consider:
- Effective sound design is exciting, often bigger than life.
- Effective sound design is congruent with the visuals. A great sound is useless if when put to visuals it doesn’t complement them well. Some sounds on the other hand will only come to life when played against the right visuals.
- Effective sound design is always clearly legible, that is, its purpose or meaning in the game, scene or overall context should be clearly understood and unambiguous. Ambiguity arises when a sound could be attributed to more than one object in the scene or when the gamer or viewer is confused as to why the sound was played at all.
- Effective sound design is stylistically appropriate. While a given sound may be extremely effective in the context of a medieval game, it may not work at all in the context of a science fiction piece. Another way to look at this is that a sound that may be extremely effective in the context of a retro 8bit game, would probably appear completely wrong, possibly comical, in a modern first-person shooter game. We must adhere to the conventions of the medium and genre, unless there’s a very good reason to break these.
- Effective sound design provides information to the user. This can mean information about the object itself, such as its weight and texture, as well as the purpose of the object in the context of the game. Is it a positive development? Does this object or character constitute a threat to me?
- Complete silence should be avoided. Inexperienced sound designers may sometimes try to use silence as a dramatic device by turning off all sound effects and music in a scene. However, by inserting silence into a scene, the attention of the viewer/player will be diverted to the sounds in their immediate environment, turning their attention away from the game, and the desired impact is not achieved. From the sound of an air conditioner unit in the background to a car passing by, their attention might start to turn to their surroundings, effectively breaking immersion.
- Always break complex sounds up into separate layers, each layer serving its own purpose. A gun for instance may be broken down into a very sharp snappy transient, a detonation sound and a sub layer, altogether creating a rich full spectrum and impactful sound. Breaking sounds into layers is especially useful in game audio where variations of the same sounds are often required to break up monotony. This allows the sound designer to create multiple variations by swapping one or two layers at a time, therefore creating endless variations without sacrificing continuity and consistency.
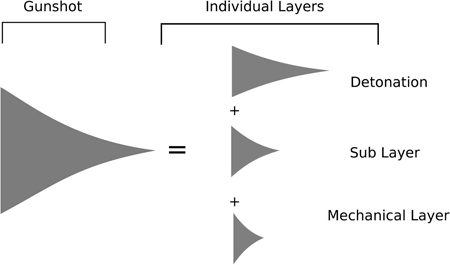
Figure 5.1 Gunshot separated into three layers here
- Avoid repeating samples. Certainly not back to back. Do not select or allow the game engine to select the exact same sound twice in a row or more. Hearing the same footstep sample four times in a row will sound artificial and synthetic. Your ear is quite sensitive to this sort of duplication and it immediately sounds artificial and breaks immersion.
b. Sound Design Guidelines
In addition to these guidelines, several general principles can be outlined that may help budding sound designers
The Size of an Object Can Often Be Related to the Pitch of the Sound
The same sample played at different pitches will imply different sizes for the object that creates the sound. The high-pitched version of the sound will imply a smaller size, while lower-pitched versions, a larger size.
A car engine loop, if pitch shifted an octave, will tend to imply a much smaller object, such as a toy or RC model. Likewise, if pitch shifted down, it will imply a truck or boat.
The Mass or Weight of a Sound Is Often a Product of How Much Bottom End Is Present in the Sound
By adding bottom end, either via an equalizer or using a sub harmonic synthesizer, we can make objects feel heavier, increasing their perceived mass. Likewise, cutting the bottom end of a sound makes it feel lighter. This is often used in footsteps, for instance, where a smaller character’s footsteps may be high pass filtered in order to better match the size/weight of the character on the screen and make them appear lighter. Remember, however, that in order for an equalizer to be effective, there already has to be some energy in the frequency band you are trying to boost or cut. If there is no information there and you are trying to add weight to a sound, then rather than using an equalizer, use a subharmonic synthesizer plugin.
Transients Are Crucial to Sharp Detonation, Impacts and Percussive Sounds
Transients, sharp spikes in amplitude usually associated with the onset of percussive sounds, are what give these sounds their snappy and sudden quality. Preserve them. Be careful not to over-compress for instance. By limiting the dynamic range of a sound it is easy to lower the amplitude spikes of the transients relative to the rest of the sound. Transients ultimately require dynamic range. For a snappy and impactful gun, make sure that the attack portion of the sound isn’t reduced to the point where you no longer can tell where the transient ends and where the rest of the waveform begin.
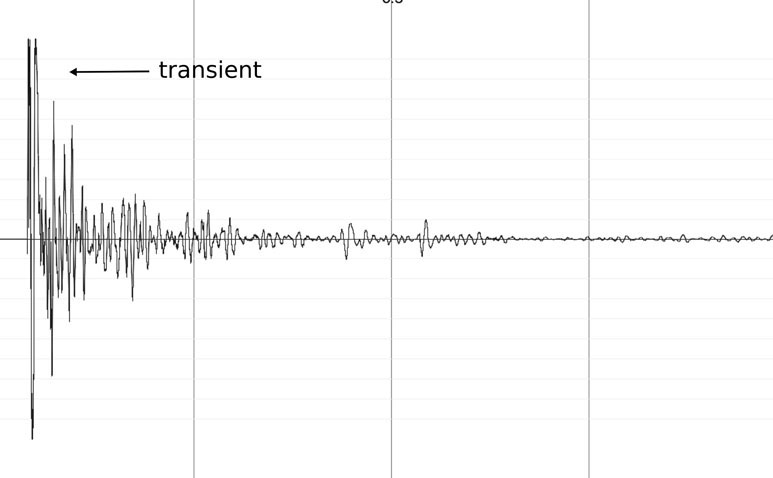
Figure 5.2
Softer Does Not Mean Further Away
Distance will be discussed further in the environment modeling section, but remember that distance is a product of several factors: Amplitude, certainly but also: wet to reverberant signal ratio, pre-delay time in the reverb, high pass and low pass filtering and even the blurring of amplitude modulation. Without these other cues, lowering the amplitude of a sound will not make the sound appear farther away, only softer.
The Law of Two and a Half
Articulated by legendary sound designer and film editor Walter Murch when dealing with footstep sounds for his work on the film THX1138, this law can be applied to other contexts as well. The Law of Two and a Half states that our brain can keep track of up to two people’s footsteps at once, but once a third person’s footsteps are added to the mix, the footsteps are no longer evaluated individually but rather as a group of footsteps, a single event, at which point sync matters a lot less, or any sync point is as good as any. Walter Murch goes beyond footsteps, and he extrapolated his concept to other sounds. When the mind is presented with three or more similar events happening at once, it stops treating them as simultaneous individual events and rather treats them as a group. In fact, when we attempt to sync up frame by frame three or more character’s footsteps in a scene, the effect achieved will just be confusing and clutter the mix and ironically feel less realistic.
The Audio-visual Contract
There is a magic to seeing and hearing sound syncing up together on a screen. The effect is different from either of these senses being stimulated independently. Michel Chion argued that when images and sounds are played in sync, the viewer’s experience transcends both sound and picture to create a new, trans-sensory experience. This phenomenon, known as multi-modal integration, allows us great latitude as sound designers and is a staple of the sound design experience. In a way, our brain, ears and eyes want to agree, and your senses fuse into a new one, where we as sound designers can insert our creative vision and sounds. There are limits to the power of this contract between senses, however. Synchronization between the audio and visual appears critical, as well as a basic level of congruency between the visuals and sound. Do keep this in mind when doing sound design. You brain wants to believe. Breaking those rules, however, will break the illusion, and your brain simply will discard the audio in favor of the visuals.
3. Getting the Right Tools
It is easy to get distracted by the overabundance of plugins available on the market and get overwhelmed by the sheer volume of it all. Getting the right tools is central to being successful as a sound designer. Rather than gathering as many processors as possible and never fully learning any of them, I recommend the opposite approach: learn a few key plugins and processors very well; get to know them in depth. These are the plugins I would recommend getting the most intimate with.
a. Equalization
A clean, full featured transparent and ‘surgical’ equalizer, capable of precise, narrow, deep boosts and cuts. This will be very helpful when trying to clean up a sound by targeting individual frequencies or perform massive boosts and cuts in order to shape the sound into its final iteration. Advances in technology have made it possible to create equalizers, which can truly be used as sound shapers. Get one.
Conversely, get an equalizer that might not have the same capabilities as your surgical equalizer but that will add a little gloss or personality to your sound, such as a replica of any classic hardware Neve or Pultec models. You will use these for very different reasons such as for ‘broader strokes’, when a sound might need a little help standing out in a mix for instance or simply to be made a little more interesting.
b. Dynamic Range
A very precise and somewhat transparent compressor. Compression, past a point anyhow, is never really transparent, but you will want something that allows you to control the dynamic range of a sound without imparting too much of its own sound on it. Look for a compressor with independent attack and release time, knee and ratio controls. Control over attack and release time will help you manage transients and shape the overall dynamic range of a sound with greater accuracy.
As with the equalizer, do also get a more classic sounding compressor that might not have all the controls and flexibility of the one mentioned earlier but that will also impart to your sound a little more personality. There are many classic compressor software emulations available to the sound designer today. Some of the most commonly used ones include the UREI 1176 limiting amplifier or the mythical Universal Audio LA-2A leveling amplifier. These tend to sound quite musical and can be used to impart to the sounds a bit more personality, making them more interesting to listen to.
At times, especially with gunshots and explosions, you will want to make a sample as loud as possible. In such cases, a loudness maximizer will be extremely helpful. Loudness maximizers are also often used in music mastering. In music as in sound design, they allow us to increase the perceived loudness of a sound by raising the audio levels of the softer portions of a sound relative to its peaks. Loudness maximizers also allow us to make sure that no audio signals get past a certain level, which is in itself a very useful tool when trying to prevent signals from clipping or to remain within certain guidelines for broadcasting standards. Do be mindful of transients, as loudness maximizers tend to be rough on them and destroy them.
c. Reverberation
A good, realistic sounding convolution reverb to simulate real-world spaces. A lot of DAWs these days come with good reverb units. Convolution-based reverb plugins are usually the best at emulating real spaces. That is because convolution reverbs use actual recordings of indoor and outdoor spaces, which based on the quality of the recording and of the plugin can sound quite spectacular when applied in a mix. Convolution reverb plugins can be used for much more than the simulation of real-world environments and can be great for modeling classic reverbs, such as plates, spring reverbs or other classic gear but will probably be your go-to to add a convincing ambiences and spaces to your sounds.
You will also need a good procedural, ‘creative’ reverb plugin that can be used for realistic applications and also non-realistic effects, such as infinite reverb times, freezing effects, or adding a little shine to a sound. Some reverb processors will also allow you to pitch shift the reverb itself independently of the dry signal for added sparkle to your sounds, an effect you can always recreate by pitch shifting the reverb at a later stage with a separate pitch shifter. A procedural reverb is one where the reverberation is computed using algorithms that create the reflections from scratch, and they tend to give the sound designer more control than some convolution-based plugins. While non-convolution-based reverbs can be used to simulate real spaces as well, they are great as part of your sound design toolkit and are sound design tools in their own rights.
Reverb can be further processed to give us more exciting sounding results – something that is often overlooked. Following a reverb plugin with chorus will often make the reverb wider; adding a flanger after a reverb plugin will make a somewhat dull and boring reverb more interesting to the ear by giving it movement and making it more dynamic. Reverb can also be ‘printed’ separately, that is rendered to an audio file and processed further (reversed, granularized etc.). The possibilities are endless and exciting.
d. Harmonic Processors
Harmonic processors are a generic term for distortion/saturation plugins. Distortion is an extremely helpful tool for any sound designer. Ideally you are looking for a plugin or plugins that can go from mild saturation to extreme distortion and are flexible enough to fit a wide range of situations. There are many different flavors of distortion available to the sound designer, most very useful, from saturators to bit crushers, so you will likely end up relying on a few plugins for distortion, but, as always, focus on a few choice plugins and learn them well.
e. Metering Tools
A LUFS-based loudness meter. LUFS meters have become the standard way of measuring loudness, and with good reason. They are much more accurate than previous RMS or VU meters and allow you to track the evolution of loudness of a sound or a mix over time with great accuracy. At some point after a few hours of work, your ears will become less accurate and you might have a harder time keeping track of the perceived loudness of your audio assets. This can be a critical issue, especially in gaming where multiple variations of a sound are often expected to be delivered. If a bit of stitched dialog sounds louder than the rest of the files it is meant to be triggered with, you will end up having to fix it at a later time, where it might not be as convenient to do so.
Although video games yet have to be as strictly standardized as broadcast in terms of expected loudness (broadcasting standards such as ITU-R BT1770 are more stringent), a good LUFS meter will also help you monitor the consistency of your mix, which does make it rather indispensable.
A good spectrum analyzer software. Rather than display the amplitude of the signal over time, which all DAWs and audio editors do by default, spectrum analyzers display the energy present in the spectrum over the full frequency range of the sample. In other words, they display the frequency content and change over time of a sound. This is an exceedingly helpful tool when trying to analyze or understand how a sound works. Some will allow you to only audition a portion of the spectrum, very helpful if you are trying to focus on one aspect of the sound and want to isolate it from the rest of the audio. A good spectrum analyzer will make it easy to see with precision the frequency starting and ending point of filter sweeps; the behavior, intensity and trajectory of individual partials, and some will even allow you to modify, for instance, transpose selected partials while leaving the rest of the sound untouched. Whenever you wish to find out more about a sound, inspect its spectrum.
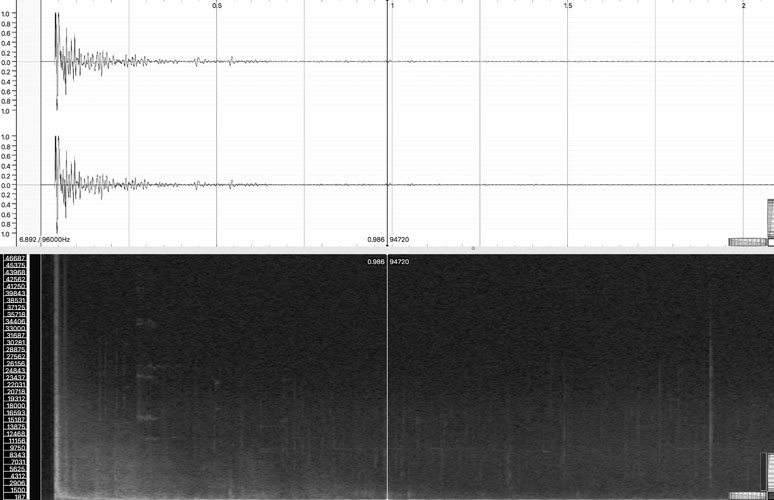
Figure 5.3
f. Utilities
A good batch processor. When working on games, you will inevitably end up working on large batches of sounds that need to be processed similarly. A good batch processor will be a massive time saver and ultimately help you make the most out of your time. Batch processors can perform functions such as conversion to a different format; applying a plug in, such as a high pass filter to clean up a number of audio files at once etc. Batch processing is also a useful tool when working on matching loudness levels across multiple audio files by applying a loudness normalization process. Batch processing can also be used to ensure clean assets are delivered by getting rid of silence on either end of the audio file or by applying micro fades at the beginning and end of the file to get rid of any pops and clicks.
The plugins listed earlier are certainly not the only ones you will need and add to your workflow. A multiband compressor, noise remover, delays and others will find their way into your list.
4. Microphones
There is no better way to create original content than by starting with recording your own sounds for use in your projects. Every sound designer should include in their setup a quick way to record audio easily in the studio, by having a microphone always setup to record. Equally important is being able to record sound on location, outside the studio. In both cases, the recording itself should be thought of as part of the creative process, and the decisions you are making at that stage, whether consciously or not, will impact the final result and how you may be able to use the sound. The following is not intended as an in-depth look at microphones and microphone techniques but rather to point out a few key aspects of any recording, especially in the context of sound effects recordings. The student is highly encouraged to study some basic microphone techniques and classic microphones.
a. Microphone Choice: Dynamic vs. Condensers
When in the studio, you are hopefully dealing with a quiet environment that will allow you a lot of freedom on how to approach the recording. Regardless of where the recording takes place, always consider the space you are recording in when choosing a microphone. In a noisy environment you may want to default to a good dynamic microphone. Dynamic microphones tend to pick up fewer details and less high-end than condenser microphones, which means that in a noisy environment, where street sounds might sneak in for instance, they might not pick up the sounds of the outside nearly as much as a condenser microphone would. Of course, they will also not give you as detailed a recording as a condenser, and for that reason condenser microphones are usually favored.
On location sound professionals often use ‘shotgun’ microphones, which are condensers, usually long and thin, with a very narrow pick up pattern, known as a hypercardioid polar pattern. They are very selective and are good for recording sounds coming directly from the direction they are pointed to and ignoring all other sounds. They can also be useful in the studio for simple sound effect recordings, but then other types of condensers are usually favored, such as large diaphragm condensers.

Figure 5.4
Large diaphragm condenser microphones are a good go-to for sound effect and voice over recording. They are usually detailed and accurate and are well suited to a wide range of situations.
If you are in a quiet enough environment and are trying to get as much detail as possible on the sound you are trying to record, you may want to experiment with a small diaphragm condenser microphone, which tends to have better transient responses than larger diaphragm microphones and therefore tend to capture more detail.
Lavalier microphones, the small microphones placed on lapels and jackets in order to mic guests on TV talk shows and for public speaking, are usually reserved for live, broadcast speech applications. They can be a great asset to the sound designer, however, because of their small size, which allows them to be placed in difficult or impossible to reach places with a regular microphone and therefore capture sounds from unusual perspectives.
Perhaps most importantly, especially as you are starting out and may not have access to a large selection of microphones, is to just record. Do not let lack of high-end equipment get in the way of your work, and use whatever you have at your disposal. Modern recording equipment, even some consumer devices, often provide recordings of good enough quality to work with, even if they may need to be processed a little more than sounds recorded under ideal situations on high-end equipment. So, record, record, record.
b. Mic Placement
Microphone placement is a crucial aspect of the recording, but there, also, do not overthink the technical side, and always focus on the creative aspect. Ask yourself: how do you wish to use and therefore record the sound you are recording? If you are trying to record a sound up-close, try placing the mic about a foot away and experiment by moving the microphone around the sound source until you get the best results in your headphones.
Perhaps it would help to think of a microphone as a camera. When close up to a subject, you tend to get a lot of detail on that subject but on a relatively small area only. Pulling the camera out will reveal more about the environment around the subject and give us more context but at the expense of the previous level of detail. A microphone works in a similar way. By pulling the microphone away from the source, you will start to hear more of the environment, which may or may not be a good thing. Recording footsteps in a reverberant hallway might make for a great recording but capture too much reverberated sound for the recording to be useful in other situations.
You can also use a microphone to magnify sounds by placing it extremely close to the sound and bring out elements of it rarely heard in it. In some cases, this will also make the sound source appear significantly larger than it is and can be a great way to record unusual sounds. Lavalier microphones, with their small size, are especially useful in creative recordings.
These remarks and suggestions are to be taken as general guidelines, and every situation needs to be assessed individually. Do not place a condenser microphone very close to a very loud audio source hoping to capture more details; the air pressure of loud sounds can be very harmful to the microphone, and always keep safety in mind when recording, especially on location. It is easy to get lost in our sound worlds and forget about the world around us.
5. Sound Design – Before You Start
Working with the right assets is key when sound designing. That means finding the proper raw material and making sure it is suited for our purposes. Audio assets that are noisy or flawed can be difficult to work with and degrade the overall quality and impact of your work. The following are a few guidelines to keep in mind while gathering and preparing your raw assets.
a. Always Use High Quality Material
Always use high quality material in the first place. A mediocre sounding audio file will usually result in mediocre outcome, even after processing. While processing an audio file might improve its quality and render it useable, you will end up spending a lot more time to obtain the desired results than if you had started with a clean file in the first place. Here are a few things to look for:
- Avoid heavily compressed audio file formats such as MP3, which may be acquired from online streaming services, even if it is otherwise the perfect sample. Even when buried in a mix, compressed sounds will stand out and weaken the overall result.
- Work with full bandwidth recordings. Are high frequencies crisp? Is the bottom end clean? Some sound effect libraries include recordings made in the 1960s and even earlier. These will inevitably sound dated and are characterized by a limited frequency response and a lack of crispness. If a frequency band is not present in a recording, an equalizer will not be able to bring it back, and boosting that frequency will only result in nothing at best or the introduction of noise at worst.
- For percussive sounds, make sure transients have been preserved/well recorded. Listen to the recording. Are the transients sharp or snappy? Have they suffered from previous treatment, such as compression? When in doubt, import the file in your preferred DAW and inspect the file visually. A healthy transient should look like a clean spike in amplitude, easily picked apart from the rest of the sound.

Figure 5.5
- Does the sound have baked in reverberation or other effects or recorded ambience that could prevent it from blending well within your mix? Some recordings are made in environments that can be heard as roomy. While there are de-reverberation plugins available, they are rarely entirely transparent and will sometimes impact the sound negatively in other ways.
- Is the recording noisy? If some noise is present but initially seems acceptable, that may no longer be true once dynamic range compression is applied, which will tend to bring up the softest parts of a sound and make the noise appear louder relative to the recording post compression. A de-noising stage might help.
b. Don’t Get Too Attached
Don’t get too attached to your material. Sometimes you just have to try another audio file, synth patch or approach altogether to solve a problem. Every sound designer at some point or another struggles with a particular sound that remains stubbornly elusive. When struggling with a sound, take a step back and try something drastically different, or move on to something else altogether and come back to it later.
c. Build and Learn
You’re going to have to build a consequent sound effect library, usually consisting of purchased or downloaded assets (from online libraries, Foley artists) and your own recordings. Having hundreds of terabytes worth of sounds is absolutely useless if you cannot easily access or locate the sound you need. There are tasks worth spending time during the sound design process; fumbling through an unorganized sound library is not one of them. You may want to invest in a sound FX librarian software, which usually allows the user to search by tags and other metadata or simply organize it yourself on a large (and backed up) hard drive or cloud. The best way to learn a sound effect library is to use it, search through it, make notes of what interesting sounds are located where etc. In addition to learning and organizing your library, keep growing it. The best way to do it is to record or process your own sounds. Too much reliance on commercial libraries only tends to make your work rather generic and lacking in personality. Watch tutorials – especially Foley tutorials – and always be on the lookout for interesting sounds.
d. Listen for the Expected and the Unexpected
Every processor, be it a compressor, equalizer or delay, will tend to affect a sound in more or less subtle and unexpected ways. For instance, a compressor will have a tendency to bring up the softer portions of a recording, which could, if some noise was present but very soft, make the noise a little more obvious. Some plug ins will sometimes have a negative side effect on the stereo width of a sound without intending to affect it. Always compare your before and after sound by matching the output levels so that the processed sound isn’t louder or softer than the unprocessed. The loudest one will always tend to sound more appealing at first, which can be very misleading. Then try listening for different things at each comparison pass, by actively tuning your ears and attention.
e. Layers
Don’t try to find a single sample to fit a complex task, such as the roars and grunts of a large creature for instance. Instead try to figure out what are the different layers that could/would make up its sounds. For instance, if it is scaly, a creature might have a reptilian component, such as a hiss or a rattle; it if has a large feline-like build, it could also growl etc. A dragon might have all the earlier characteristics along with a gas-like or fire sound. It is very unlikely that a single source or layer would be enough to cover all these elements. Even if it did, it wouldn’t allow you the flexibility to change the mix between these layers to illustrate the various moods or states of our monster, such as resting, attacking, being wounded etc.
f. Be Organized
Asset management and version tracking are especially important to game audio, where dealing with multiple revisions is common place, and the sound designer is often dealing with hundreds, if not thousands of assets. Being organized means:
- Coming up with a sensible naming convention and sticking to it. Try to find something easy to understand and easy to adhere to. For instance, your ambiences may start with the letters AMB; gun sounds might start with the letter GUN etc. Additional information might be added to the name based on the context.
- Create a spreadsheet containing a list of all the sounds that need to be created, the name of the output file, the status of the progress on the sound, the number of variations needed if any as well as date of the last revision. An example of a spreadsheet used for this purpose can be found on the website for this book.
- Work with a version tracking software. There are a number of solutions out there, and the choice might not be up to you. A good version tracking system will make sure that all members of the teams are working with the latest version of the software and that no duplication will occur.
- Create a detailed design document. An example of a design document can be found on the companion website for this book. Its purpose is to ensure that there is a clear artistic direction for the sound design and scope of the project and that the basic implementation and limitations of the audio engine are clearly outlined.
g. Communicate
With other members of your team and the client. Communication with your client is especially crucial during the pre-production process and continuously throughout production. Most people that aren’t sound designers have a difficult time articulating what they are looking for in terms of sound design or what they are hearing in their head. It is your responsibility as a sound designer to help them express and articulate their needs. Perhaps the client doesn’t know exactly what they are looking for, and your creative input and vision is why you are part of the team. When talking about sound, use adjectives, a lot of them. Is the sound design to be realistic, cartoonish, exaggerated, slick, understated?
h. Experiment, Experiment, Experiment
Keep trying out new processes, watching tutorials of other sound designers and, of course, keep your ears and eyes open. Ideally, get a small, high quality portable recorder and carry it with you at all times or often; you never know when something interesting will come up.
2. Basic Techniques
Explaining the inner working of the processes and effects mentioned in this chapter would fall far beyond the scope of this book, instead, we shall focus on the potential and applications for sound design, from a user, or sound designer’s perspective.
1. Layering/Mixing
Layering or mixing is one of the staples of sound design. The process of layering allows us to break down a sound into individual parts, which can be processed independently and customized to best fit the visuals. Most sounds tend to be much more complex than they initially appear to the casual listener, and, although we perceive them as a single event, they are often the combination of several events. The sound of a car driving by is often the combination of the sound of its tires on the road, especially on some material such as gravel; then there’s the sound of the engine, which is itself a rather complex quantity; additional sounds such as the body of the car or the shock absorbers, breaks squealing and more can also easily become part of the equation. The relationship between these sounds isn’t a static one either, meaning that the intensity of the sound of the tires on the road depends on the speed of the vehicle, for instance, and we all know an internal combustion engine’s sounds can be very different based on at which gear and rpm the vehicle is going.
A gunshot sound is often broken down into three or more layers, such as the initial transient, which gives the gun its ‘snap’; the sound of an actual detonation, as the round is being pushed through the barrel and, often, a low end layer or sub, which gives the sound weight and power.
By breaking a sound down into individual layers at the design process, it is also much easier to create variations, something often required in video games. If a sound is comprised of three layers, for instance, we can obtain multiple permutations by applying mild pitch shifting to one or more layer for each permutation, replacing one of the samples in a layer with a different but similar sounding one and much more.
2. Pitch Shifting
Pitch shifting is one of the most commonly used techniques employed by sound designers and one of the most useful ones too. As previously outlined, pitch is often related to the size of an object. This is especially useful in games where we might be able to use a sample in various contexts to score similar objects but of different sizes. It can also be used to great effect in creature sound design, where the growl of a cat, when pitch shifted down, will imply a much larger creature and might not, when put to visual, remind the player of a cat at all but of a giant creature.
There are several considerations to keep in mind of when working with pitch shifting as a technique. The first being that higher sampling rates, 88.2Khz and above, are usually desirable when dealing with pitch shifting, especially down pitching. The reason is simple. If you pitch shift a recording made at 44.1Khz an octave down, you essentially low pass filter your frequency content in addition to lowering its pitch. Any information that was recorded at 22Khz, when pitched down an octave is now at 11Khz, which will have a similar effect to removing all frequencies above 11Khz with a low pass filter. The resulting file might end up sounding a little dull and lose a bit of its original appeal. Doing the same thing with a file recorded at 88.2Khz means that your Nyqusit frequency, which was at 44.1Khz, is now at 22.050Khz, which still gives us a full bandwidth file and will not suffer from the perceived lack of high frequencies you would encounter with a standard resolution sample rate of 44.1 or 48Khz. Always record files you plan on pitch shifting at high sampling rates if possible.
Not all pitch shifters work in similar ways, and their output can sound quite different as a result. Choosing the right type of pitch shifting algorithm can make the difference between success and failure. Some algorithms can change the pitch without affecting the overall duration, some will preserve formants, others will alter the harmonic content and can act as distortion processes, some are better with transients and are best suited for percussive material.
Most pitch shifters fall into these few categories:
a. Playback Speed Modulation
These work by changing the playback speed of the file, in the same way older reel to reel tape players could alter the pitch of the material by slowing down or speeding up the playback speed. Playing a tape at half speed would make the audio twice as long and drop the pitch by about an octave, and, conversely, playing a tape at twice the speed would make the audio half the length and raise the pitch by an octave. This is clearly not a transparent process, and outside of very mild changes the artifact of the pitch shifting process will be heard. This is a very commonly available algorithm, and usually the default pitch shifting method in game engines such as Unreal, or Unity. The algorithm is cheap computationally, and when within mild ranges it is an effective way to introduce mild variations in a sound.
b. Granular Synthesis
Granular synthesis is a technique first articulated by physicist Denis Gabor, then developed by pioneers such as Iannis Xenakis and Curtis Roads to name a few. Granular synthesis is a technique in which a sound is broken down into very small chunks, known as grains, typically ranging from 20 to 60ms and then manipulated at this granular level. Pitch Synchronous Overlap and Add, PSOLA, is the most commonly used technique for pitch shifting using granular synthesis. By transposing individual grains rather than the entire sound file, as with the technique discussed previously, we can change the pitch independently from duration. This technique for sound design is especially useful for sustained, harmonically rich material. It can be applied to transient rich audio; however, transient deterioration and smearing might occur. This is due to the fact that in order to keep the resulting audio sounding smooth, it has to be duplicated and overlapped.
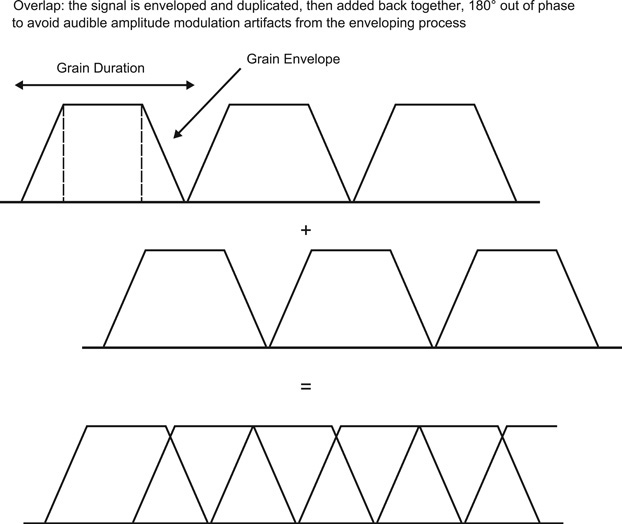
Figure 5.6
Each grain has to be enveloped in order to prevent pops and clicks. If no overlap is present the enveloping will eventually be heard as amplitude modulation, and the audio will appear to have a tremolo effect applied to it due to the grain envelopes. Duplicating the signal out of phase and adding both together will mitigate, if not eliminate, the amplitude modulation effect.
The ideal number of overlaps is ultimately dependent on the desired transformation. Because overlapping means playing two or more copies of the signal against itself, a comb filtering effect can sometimes be heard. The grain duration will also affect the end result. Longer grains, 50ms and above, will tend to sound smoother but will negatively affect transients more so than shorter grain sizes. Conversely, shorter grain sizes tend to be better at preserving transient information but do not sound as smooth, and, in some cases, sidebands may be introduced as a byproduct of the grain enveloping process.
c. Fast Fourier Transform-Based Algorithms
There are a number of pitch shifting based algorithms available via Fourier-based transforms, the earliest one being the phase vocoder introduced in 1966 by Flanagan, one of the first algorithms to allow for independent control over time and pitch. Fourier-based algorithms share some similarities with granular-based algorithms due to the segmentation process (breaking down sounds into small windows of time) enveloping and overlapping. Fourier-based algorithms are fundamentally different from granular-based ones, however. Fourier-based transforms occur in the frequency domain, where each frame of audio and its spectrum are analyzed and manipulated in the frequency domain. Granular synthesis in opposition processes signal in the time domain.
3. Distortion
Distortion is another extremely powerful process for sound design. To clarify, we are talking about harmonic distortion, which is a process where overtones are added to the original signal by one of several methods. In purely engineering terms, however, distortion occurs when any unwanted changes are introduced in a signal as it travels from point A to point B. The latter is of no interest to us in this chapter.
a. Saturation
Saturation plug ins generally attempt to emulate the behavior of a signal pushed harder than the nominal operational level into tape or tube circuitry. The process is gradual and generally appealing to our ears, often described as warm. Saturation also sometimes involves a compression stage, often referred to as tape compression, which comes from the signal reaching the top of the dynamic range of the device through which it is passed. This type of distortion is usually associated with a process known as soft clipping, which describes what happens to an audio signal when overdriven through tape or a tube amplifier, as illustrated in the following illustration. It can be contrasted to hard clipping, which has a much harsher sound and can be better suited for use as a distortion pedal for guitar.

Figure 5.7
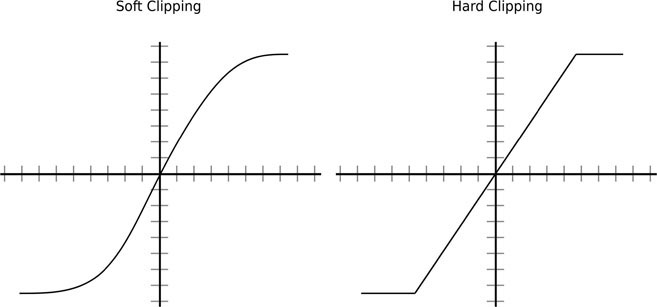
Figure 5.8
Every saturation plug in tends to have a personality of its own, but saturation tends to be used in one of several ways:
- Mild saturation: mild saturation can be used to add warmth to otherwise rather bland or somewhat clinical sounds that tend to be the trademark of some of the cheaper software synthesizers out there. It is a good compromise between severely altering the original sound – something you might not always desire – but still injecting some excitement to it. It can also be used as part of a signal chain and combined with other distortion plugins sequentially to achieve a more severe overall distortion, which is often better achieved in stages rather than with one plug in driven hard.
- Heavy saturation: by applying more saturation or driving the signal harder into the plug in, a more obvious color can be imparted, which can be used to emulate the sound of older recordings or gear or the sound of a signal going through a device, such as a boombox. Any sound will also start to appear more aggressive.
Saturation is a gradual process as noted earlier, that is, a signal with a decent dynamic range will therefore sound slightly different at softer levels, where it will appear cleaner, than at higher levels, where it will sound warmer and more colored.
b. Overdrive
Sonically, overdrive falls between saturation and full-on distortion. It does come from driving a signal into an analog circuit hotter than the designers intended, which can be done with an analog preamplifier, for instance, and it is often used by guitar players to generate a clipped signal when entering the next stage of the signal stage.
Overdrive, sonically, tends to be a more extreme process than saturation.
c. Distortion
Distortion is indeed a type of distortion. Unlike saturation, it isn’t a gradual process, and the sonic transformations are more drastic-sounding than saturation or overdrive. It is often associated with a process known as hard clipping and is the type of process often used by guitar players to achieve the aggressive tones associated with heavy metal styles.

Figure 5.9
Distortion will severely change the harmonic content of a sound and will make any sound appear much more aggressive and increase in intensity dramatically. In terms of sound design its applications as a process are numerous.
Distortion can be used to make any audio source more edgy and terrifying sounding. That can be very effective for creature sounds, where the voice, snarls or growls of a monster can be made more malevolent and angrier by being distorted. It can be used as part of a transformation process as well, where it is used to transform the sound of an existing recording, such as a cat meowing and turn it into a much more intimidating creature, especially if layered with one or two other samples as to not make the initial recording readily identifiable.
d. Bit Crushing
Bit crushing is a native digital signal processing technique. Digital audio signals are expressed in terms of sampling rate – the numbers of samples per seconds at the recording or playback stage – and the bit depth, which is the number of bits used to express the numerical value of each sample. As the number of bits increases so does the range of potential values, increasing the resolution and accuracy of the signal. The sampling rate relates to the frequency range of the audio signal, which is the sampling rate divided by two, while the bit depth relates to the dynamic range. Bit crushing plugins in fact often combine two separate processes, bit depth reduction and sample rate reduction or more. Bit crushers work by artificially reducing the number of possible values with which to express the amplitude of each sample, with the consequence of increasing quantization errors and reducing the fidelity of the signal. As the bit depth or resolution is decreased from the standard 24 bits to lower rates, such as 12, eight or lower, noise is introduced in the signal, as well as a decidedly digital, very harsh, distorted quality. It is interesting to note that, especially at low bit depths, such as ten and under, the signal becomes noisiest as it is at its softest, while the louder portions of the signal will remain (relatively) noise free. It is especially noticeable and interesting from a sound design perspective on slow decaying sounds, such as the sound of a decaying bell for instance, where the artifacts created by the bit depth reduction become more and more obvious as the signal decays.
Bit crushing, because of its very digital and harsh-sounding quality, is very well suited for sound design application dealing with robotics, non-organic or partially organic characters.
4. Compression
Compression is not always thought of as a creative tool in sound design but rather a utilitarian process, often misunderstood and somewhat overlooked by beginners. Compression is harder to hear than a lot of other processes, such as a sharp equalizer boost or cut, and as a result it is often misused. At its core compression is a simple concept, yet its implications are profound and not always intuitive. Dynamic range compression is used to ensure that audio signals exceeding a certain level, usually determined by the threshold, are brought down by a certain amount, mostly determined by the ratio setting. In practice, however, compression tends to actually bring up the softer portions of a sound, especially if the compression stage is followed by a gain stage. This can make the sound feel louder or generally thicker and more interesting. Be careful, however, not to overdo it.

Figure 5.10
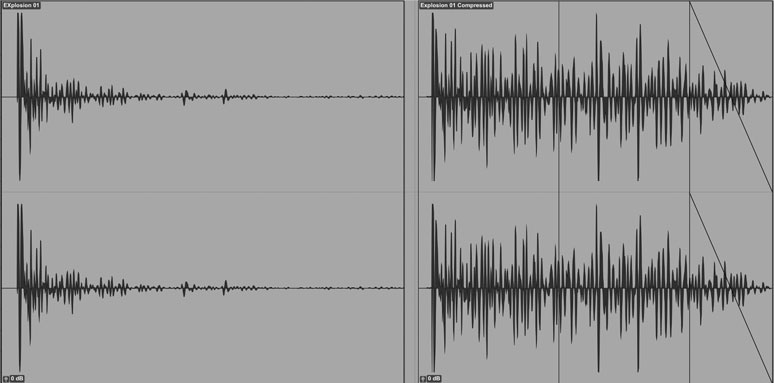
Figure 5.11
Compression can be used in creative ways beyond just making sure that signals do not exceed a certain level, such as:
a. Blending Through Bus Compression
When layering multiple sounds or samples together, it is sometimes difficult to achieve a sense of cohesion, especially if the sounds are coming from completely different sources. The result may sometimes sound like several sounds on top of each other rather than a unified sound. In such cases compression can help. By bussing all the audio tracks together (see your DAW’s user guide for assistance) and applying compression to the entire bus, therefore all the sounds together, we can achieve a better sense of cohesion. In such a scenario, it usually is best to apply mild rather than heavy compression. It is usually enough to achieve the desired results without altering the overall sound too much. Try a mild compression ratio: 2:1 to 4:1, a rather high threshold, which would need to be adjusted on a case per case basis and medium to slow attack time (50ms and above) are good places to start. The release time can be adjusted to taste. A short release time will tend to make the audio feel a bit more natural sounding by releasing the compressor sooner and letting the signal return to its natural state quickly, while a longer release time will keep the compressor in longer and impart a bit more color. Additionally, if your compressor has a knee control, which controls how abruptly the compressor kicks in, a medium setting, implying a more gradual transition from compressed to uncompressed audio, is also desirable. Every situation is different, however you can look for about 3dB of gain reduction on the compressor meter, and you can follow it up by about as much gain. The result, if successfully applied, will bring up the soft portions of the sound by the amount of gain reduction dialed in, which will help the sound feel more cohesive. As always, when A/B’ing before and after, make sure the overall loudness for both settings, compressed and bypassed, are similar. A lot of compressors have an auto gain setting, where the compressor will automatically apply as gain to match the gain reduction achieved. While these settings can be useful when learning to work with compression initially, I would recommend applying gain post compression manually, which gives the sound designer more control over the process. The amount of gain reduction obtained through compression is not dependent on one setting alone. Although the ratio is one of most important factors in the process, it is a combination of all the previously mentioned factors. Lowering the threshold will increase the amount of gain reduction obtained, as will reducing the attack time.
b. Transient Control
While there are dedicated transient shapers plugins available to the sound designer today, compression is a great way to manage transients. Especially useful with gunshots and percussive sounds, a slow attack time, over 50ms, will let the initial transients pass through untouched but then compress the rest of the audio signal. This will increase the dynamic range between the transients and the rest of the sound. The result will be a snappier sounding, percussive sound. If, on the other hand, transients are a bit too harsh and they need to be tamed, a short attack time, followed by gain reduction, will tend to smooth them out. Experiment with the release time to get the desired result.
c. Inflation
Drastic compression/limiting can be used to inflate the perceived amplitude a signal. In the same way that mild compression can be used to slightly bring up the softer portion of a signal relative to its peak, likewise, drastic compression or limiting can be used to inflate these same portions and drastically change the overall quality of a sound. This can be a particularly useful technique for explosions and impacts. This usually means lowering the threshold to a place where most of the signal is affected, and higher compression ratios are followed by a fair amount of gain. This will significantly inflate the perceived loudness of a sound.
5. Equalization/Filtering
Equalization is not always thought of as a creative tool, and it is often used in sound design and music rather as a corrective tool. That is, it is often used to fix an issue with a sound, either with the sound itself – which might appear muddy or too dull for instance – or with the sound in the context of the mix, where some frequency range might need to be tamed in order not to clash with other elements in the mix. However, especially with digital equalization algorithms becoming increasingly more transparent and allowing for more drastic transformations before audible artifacts start to appear, equalization has indeed become a full-fledged creative tool.
a. Equalization for Sound Design
One aspect of understanding how to use equalization is to understand the various qualities associated with each frequency band. These ranges are meant as guidelines.
Note: even the most sophisticated EQ cannot boost – or cut for that matter – what isn’t already there. If you wish to add bottom end to a sound that has none, a massive boost anywhere below 200Hz will only bring up the noise floor and therefore degrade the signal. In such cases a subharmonic generator plug in might be better suited to synthesize these frequencies.

Figure 5.12
The previous chart is intended as a reference or starting point only, and the borders between terms are intentionally left somewhat vague, as the terms themselves are subjective. As always, with any aspect of audio engineering, please use your ears, and keep in mind that every situation and every individual sound must be assessed on an individual basis.
Weight: EQ can be used to modulate the weight of a sound. A very common occurrence is on footsteps samples. A high pass filter between 160–250Hz can be used to make the sound of heavy footsteps more congruent with the visual of a smaller person, such as a child for instance. Likewise, adding bottom end will have the effect of adding weight.
b. Resonance Simulation
A very often-quoted rule of working with EQ is to boost broad and cut narrow. In this case, this is a rule we are going to break. When trying to emulate the sound of an object inside a box or tube, applying a short reverberation plugin will help but often will not fully convince. That is because 2D and 3D resonant bodies tend to exhibit narrow spikes in certain frequencies known as modes. The amplitude and frequency of these modes depends on many factors, such as the dimension of the resonant body, its material, shapes and the energy of the signal traveling through it. A very good way of recreating these modes is by applying very narrow boosts; usually two or three are enough to create the necessary effect. As to where these frequencies should be, the best way is to figure it out empirically by using a spectrum analyzer on a similar sound and looking for where the modes are located. For best results, the frequencies ought to be heard individually and not overlap each other, so make sure to use a very narrow boost for each boost. You may apply as much gain as 15dB per boost, so turn the audio output of the track down ahead of time.
6. Harmonic Generators/Aural Exciters
Related to equalization but not quite equalizers are a family of processes and plug ins that will synthesize harmonics where none or few are present. They differ from equalization insofar that they indeed are capable of adding information where none is present. The main common use for exciters is to generate high frequencies such as the now famous Aphex Aural Exciter or for subharmonic generators, to generate additional bottom end, such Wave’s MaxxBass plug in.
The main applications in sound design for aural exciters are found in the enhancement of otherwise dull recordings, mixes and potentially for audio restoration. However, the generation of artificial bottom end can be very useful to sound designers. The main point here, of course, being to add weight or impact through additional bottom end. Adding a subharmonic generator in a mix can be done in one of two ways:
- Directly as an insert on a track where the sound file is. This will of course add weight and impact, but the drawback is that very low frequencies can be sometimes difficult to manage and tame in a mix and may demand to be processed separately.
- As a parallel process, using an aux/send configuration where a portion of the signal is sent to the plugin via a mixer’s send. The benefit of this configuration is that the wet signal can be processed independently of the original audio by following the plugin by a dynamic processor, such as a compressor, which may be helpful in keeping your bottom end from getting overwhelming. Additionally to compression, a steep high pass filter set to a very low frequency, such as 30 to 45Hz, might prevent extremely low frequencies from making their way into your mix and eating up dynamic range without actually contributing to the mix, as most speakers, even full range ones, will not be able to reproduce such low frequencies.
On the other hand, these types of processors can also be very useful when trying to bring back to life an audio file that has suffered from high frequency loss either through processing or recording. Where an equalizer might only bring up noise, an aural exciter can often manage to at least partially bring back lost frequency content and give the sound a bit more crispness.
7. Granular Synthesis and Granulation of Sampled Sounds
Granular synthesis as a process for sound synthesis and modification was first articulated by Nobel prize recipient, Hungarian born physicist Dennis Gabor, in his 1946 paper “The Theory of Communication”, which was followed with “Acoustical Quanta and the Theory of Hearing”. Gabor theorized that a granular representation of sound on the micro-scale was apt to describe any sound in a novel way, by looking at it and manipulating it on a micro time scale of short 10ms to long 100ms windows of time (the length may vary). He suspected that, at that scale, sonic manipulations that were otherwise difficult or impossible would become available. It took several decades, however, for the technology and science to catch up with Gabor’s vision and for the tools to become widely available to sound designers. Granular synthesis is a vast topic, and anyone curious to find out more about it is encouraged to study on further.
Even at the time of this writing, granular synthesis remains a relatively underused technique by sound designers, though it does offer some very powerful and wide-ranging applications and is already implemented in a number of major tools and DAWs. While usually considered a rather exciting technique, it often remains poorly understood overall. Granular synthesis can be a little confusing. It has its own terminology, with terms like clouds, evaporation or coalescence, and some of its theory remains somewhat counter-intuitive when put to practice.
The basic premise of granular synthesis is deceptively simple. Operating on the micro time scale, that is, a time scale shorter than individual musical notes, granular synthesis breaks down sound into very short individual micro chunks, roughly 10ms to 100ms in length, known as grains. Each grain has its own envelope to avoid pops and clicks, and a number of grains are fired at a rate called density, either synchronously or asynchronously. While envelopes do prevent unwanted clicks, they can also be used in creative ways.

Figure 5.13
a. Granular Synthesis Terminology
The content of each grain can vary greatly, and while we will focus on the granularization of sampled sounds in this chapter, grains can also be made up basic waveforms, such as sine or triangular waves. The most common synthesis parameters and terms employed in granular synthesis are:
- Density: this is the number of grains per second. Generally speaking, a higher density will create a thicker sounding output. Increasing the density, however, often comes at the expense of the computational cost.
- Grain duration: this is the individual length of individual grains. The useful range is usually between 10ms, although at this duration grains might sound like clicks, up to 200ms, which is a relatively long duration for a grain. It is difficult for humans to perceive pitch below 50ms. (Roads’96)
- Clouds: composer, researcher and mathematician Iannis Xenakis described clouds in relation to granular synthesis as a collection of particles part of a similar musical structures. Clouds, opposed to streams, are generally somewhat diffuse in their pitch boundaries, and since granular synthesis parameters are often randomized, clouds are more apt a description.
- Streams: while sound clouds are in nature nebulous and their boundaries often hard to distinguish and ever changing, streams in comparison are very focused, narrow sonic patterns.
- Opacity: generally associated with clouds, opacity refers to the ability of a cloud to mask other sounds.
- Evaporation: by gradually reducing the density of an audio stream down to nothing, it is possible to create the illusion of the sound disappearing, in a very different way than a simple fade out. Evaporation, as opposed to a fade out, is not about a gradual drop in amplitude of the audio file but rather a quick and somewhat randomized deconstruction (depending on the synthesis parameters) of the overall audio files.
- Coalescence: coalescence is the opposite of evaporation. By gradually increasing the density from nothing, it is possible to create the effect of a sound appearing out of thin air. Both evaporation and coalescence are very useful tools for magic spells and other unusual animations.
Here are a few basic principles that should help guide you in your explorations:
- The higher the number of grains per seconds, the thicker the overall sound.
- Adding randomization to the pitch and amplitude of each grain creates a more diffuse sound, often referred to as clouds, while no randomization at all will create very focused sounds, sometimes referred to as streams; this is especially true if the content of the grain is a basic waveform.
- When applied to sampled sounds, a medium grain density, played at the same rate as the original audio file with medium grain size and no randomization, will approximate the original recording.
b. Sound Design Applications of Granular Synthesis
Time Stretching – Pitch Shifting
As outlined earlier in this chapter, granular synthesis can be used for pitch shifting and time stretching applications through a technique known as Pitch Synchronous Overlap and Add or PSOLA.
This technique is particularly well-suited to sustaining, non-percussive sounds but can also be adapted to transient rich material. A number of time-stretching algorithms available in DAWs and plugins will often offer a granular option if they implement pitch shifting and time stretching.
Sample Manipulation/Animation
Granular synthesis is often used musically to synthesize endlessly evolving sound-scapes or to add movement to a pad or texture. Likewise, we can use granular synthesis to breathe additional life into otherwise stale recordings or simply to modify an existing sound file in order to make it fit a change in the context of the game or scene. With this technique it is possible to take a recording of a small water stream and transform it into roaring rapids and everything in between. We can therefore thicken or thin out a recording according to the following parameters.
To thicken a sound, you will want to increase the density of the grains, adjust the grain size to a relatively long duration and add a random offset to both pitch and amplitude. As always, in order to keep the results from sounding too artificial, it is best to work with a relatively smooth amplitude envelope for each grain, such as a gaussian shape. If you start to notice a hollow ring, characteristic of comb filtering, try reducing the density, and if your software allows it, try randomizing the length of each grain slightly.
To thin a sound, you’ll want to decrease the density of the grains, as well as shorten the duration of each one and decrease the random factor of each grain’s pitch and amplitude. By reducing the density and shortening the grains slightly, you can take the intensity level below its original levels.
This technique of sample animation works particularly well on sounds that tend to be granular per nature, such as the sound of gravel or coins, but it works well on a lot of sources, such as water, wind or fire.
8. DSP Classics
a. Ring Modulation/Amplitude Modulation
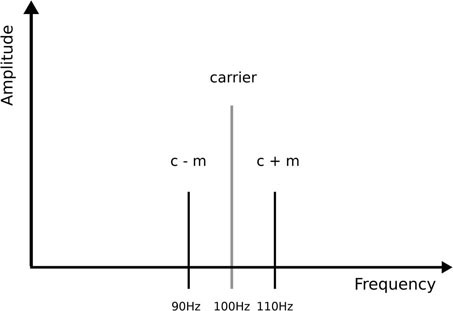
Ring modulation is a process involving multiplying two audio signals together, one of them typically a sine wave, but it can be anything, and the other is the signal to be modulated, in order to create a hybrid signal. Ring modulation could be considered a form of distortion, but unlike the distortion processes described earlier, ring modulation will destroy the harmonic relationship of the original sound. More specifically, ring modulation will remove the fundamental frequency/frequencies of the original signal and add sidebands, a pair of new frequency components where the fundamental previously was. It’s easiest to predict the resulting spectrum if both signals are sinewaves. With a carrier at 100Hz and a modulator at 10Hz the resulting spectrum will be an output at:
Figure 5.14
Because ring modulation will remove the signal’s original fundamental and effectively destroy the harmonic relationship of the original signal, it is often used, still today, as an effective way to mask someone’s voice while retaining enough intelligibility for speech to be understood. Perhaps one of the most famous example of sound design using ring modulation is the original Doctor Who’s robotic villains, the Daleks.
Ring modulation is a subset of amplitude modulation, which has a similar outcome with the difference that the original’s signal fundamental frequency will be preserved.
b. Comb Filtering/Resonators
Comb filters take their names from the visualization of their output and the sharp, narrow resonance that characterizes them. These are obtained by adding to the signal a delayed version of itself, resulting in both creative and destructive interferences.

Figure 5.15
The simplest way to implement comb filtering is by duplicating a signal and applying a short delay to it in the DAW of your choice. Resonances will appear at a delay time of 0.1ms or more (“Clear resonances around 10Khz will start to appear at a delay time of 0.1ms up to about 50Hz for delay times of 20ms” (Roads ’96)). A more classic and full featured implementation, allowing for more control, is through a delay line with feedback, as in the following:
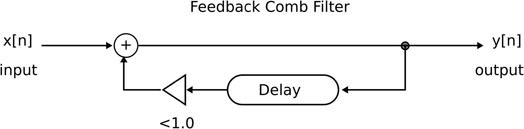
Figure 5.16
Comb filters are the building blocks of resonators. They are useful in many other applications, most notably reverberation. It is possible to control the resulting output resonance by adjusting the delay time and the amplitude of the resonances by adjusting the amount of feedback. Resonant frequencies are created at 1/delay time in milliseconds, and the higher the feedback, the more obvious the effect. As always with algorithms involving feedback, do exercise caution and lower your monitoring level.
The sound design applications of comb filters and resonators are plenty. They are quite good at recreating synthetic or robotic resonances. When the resonant resulting frequencies have a low fundamental, they create deep metallic, somewhat ominous sounds. As the frequency of the resonances increases, they can be a pleasant yet still synthetic addition to a voice.
9. Reverberation
a. Indoors vs. Open Air
Reverberation is one of the most crucial aspects of sound design or music production and is often overlooked, or a very utilitarian approach is taken. That is, a reverb is added to a scene without much consideration for whether it is the best possible choice for that scene or whether the settings that come with the preset are the best ones for our purposes. Another common mistake of sound designers starting out is often to forgo reverb completely when it isn’t an obvious type of reverberation implied on screen. An obvious reverb would be what we would expect to hear within a large stone cathedral, where sounds will sustain for several seconds after they were initially heard. A much less but just as crucial type of reverb is the one that would come with a small living room for instance, where the sound would not be expected to sustain for several seconds, and reverb, although present, is far more subtle. Yet, when no reverb is applied, the listener’s brain may have a hard time accepting that the sounds being heard at that moment all belong together and are coming from the same space. Another situation where reverb is often ignored is outdoor scenes, as some sound designers only think of reverb as an indoors phenomenon. It certainly tends to be a more obvious phenomenon indoors, but reverb is a product of thousands or more individual reflections, and most, if not all outdoors settings will offer reflective surfaces. In other words, unless you are dealing with a scene happening inside an anechoic chamber, some kind of reverb needs to be added to your scene.
Although reverberation may appear to the listener as a single, unified phenomenon, it can be broken up into two parts, the early reflections, which represent the onset of the reverb and the late reflections, which are the main body of the reverb. Most plugins will allow the sound designer some control over each one individually, especially in the context of virtual reality, where that kind of control can be crucial in recreating a believable, dynamic space.
Historically, reverb was created using an actual space’s reverberant qualities, also known as a chamber. Sound was routed through a speaker in the space and was picked up by a microphone located strategically in another corner or at a distance from the speaker. Throughout the 20th century, other means of creating reverberation were developed, such as with the use of springs, still popular to this day with many guitar players and often included in guitar amplifiers; metal plates and then eventually through electronic means. To this day, a lot of plugins attempt to recreate one of these methods, as they all tend to have their own distinct sound. In terms of recreating an actual space, which is often the case when dealing with picture, animation and games, reverbs that emulate actual spaces are usually the best choice. However, even these can be created in multiple ways. Some reverberation plugins use a technique known as convolution. The main idea behind convolution reverb is that an actual space sonic characteristics are recorded by setting up one or often more microphones strategically around the space and recording a burst of noise or a signal sweeping through every frequency up to the desired sample rate. This is known as the impulse response, which is a bit like the space’s DNA or fingerprint. To apply the impulse response to the desired sound, the process known as convolution is applied. The benefits of this technique are many. This allows sound designers to have access to spaces otherwise unattainable, such as world famous opera houses or recording studios. Additionally, this technique tends to sound very realistic and therefore convincing. By recording simultaneous impulse responses from different locations in the original space we can also give the sound designer access to multiple auditory perspectives and crossfade between them to best match a perspective change in a scene.

Figure 5.17
The drawback of this technique, if any, is that we have limited control over the reverb itself once it has been recorded. Most convolution reverb plugins will have a more limited set of parameters than some of their algorithmic counterparts. Algorithmic reverberation plugins are usually created using a combination of delay lines, comb and allpass filters. These algorithmic reverbs can be just as effective as their convolution counterparts, with the added benefit of giving the sound designer access to more parameters and therefore more control. Neither of these two categories is inherently better than the other, however, each has an edge when it comes to certain aspects. A convolution reverb might give you access to the Sydney Opera House’s auditorium, as well as a vintage spring reverb from a mythical guitar amplifier. A good convolution reverb can sometimes get you the sound you are after more realistically than an algorithmic one. Algorithmic reverbs may not be as easily and readily able to recreate a famous or less famous space, for that matter, but they might be just as effective in some regards and allow the sound designer to have more control and fine tuning over the sound. In that regard, they can be used for sound design purposes in more creative and not necessarily realistic sounding ones.
Generally, when dealing with indoors reverb, the most important matters to consider are room size and materials. Some materials reflect sound more than others, typically harder materials, such as stone or marble, absorb very little sound and therefore reflect most of it, while softer materials, such as heavy curtains or carpeting, will absorb more sound and make for tighter-sounding environments. Another common misconception is that materials absorb or reflect sound evenly across all frequencies. Generally speaking, although there are exceptions, higher frequencies will have a shorter decay time than medium or low frequencies.
There are many types of reverberation units out there, and although more are software these days, they all tend to recreate a specific reverb type. The following is a discussion of parameters found in most reverb plugins, but note that your particular plugin may not implement all of the following, or some parameters may have slightly different names.
b. Reverb Parameters
- Reverb time/decay time: this is the most obvious and perhaps important setting, though by no means the only parameter in getting just the right sound. It defines how long the sound will persist in the environment once it has occurred. It is defined, scientifically, by the RT60 measurement. That is the time it takes for sound pressure levels to decay by 60dB once the source has been turned off or has stopped. It is usually measured using noise, abruptly turned off. Noise is useful because it allows for the presence and therefore measurement of all frequencies at once. Longer reverberation times will sound pleasant for music but can get in the way of intelligibility of speech. Keep in mind that unless you are working on an actual simulation, the best reverb for the job many not exactly be that of the space depicted in the scene.
- Size: if present, this parameter will affect the dimension of the space you are trying to emulate. A larger space will put more time between individual reflections and might make the reverb feel slightly sparser and wider in terms of its spatial presence.
- Predelay: measured in milliseconds, this parameter controls the amount of time between the original signal and the arrival of early reflections. This setting is often set to 0 by default in a lot reverbs, and although it can be a subtle parameter to hear, leaving a reverb on with a predelay of 0 means that the original signal (dry) and the reverberant signal (wet) essentially are happening at the same time, at least as far as early reflections are concerned. This is not only a physical impossibility but also will have the tendency to make mixes a bit muddy, as the listener’s ear is given no time to hear the dry signal first on its own, followed closely by the early reflections. While this might seem like nitpicking, it is a much more important setting than it may appear. A shorter pre-delay time will be associated with smaller rooms or the listener being closer to a wall.
- Density: controls the number of individual reflections, often for both the early and late reflection stage at once, which tends to make the reverb thicker-sounding, when up or thinner, when down. Some older plugins tend to sound simply better with the density knob all the way up, as the individual reflections can sound a bit lo-fi when heard individually.
- Width: this controls the spread of the reverb in the stereo field. Generally speaking, a 0% setting will create a monaural effect, while a setting over 100% will artificially increase the width.
- High cut: this setting usually controls the frequency at which the high frequencies will start decaying faster than the rest of the signal. This parameter sometimes includes additional controls, which can be used to give the sound designer more control, such as how quickly the high frequencies will start to decay compared to the rest of the reverberant signal. This is especially useful to make the sound smoother and more pleasant, as too much high frequency content tends to make the signal sound harsh, a sound often compared to frying bacon.
- Low cut: similar to the high cut setting, this controls the frequency at which low frequencies will start decaying faster than the main body of the reverb. This is very useful to add or regain clarity to your signal as, especially with longer decay times, too much reverb in the lower octaves of the spectrum will muddy up a mix and diminish the clarity of the overall signal. Going overboard with that setting can, however, make the reverb a bit thin sounding. As always, use your ears.
c. Reverberation for Environmental Modeling
The most obvious application of reverberation is as part of environmental modeling. Environmental modeling is not limited to reverberation, but reverberation is certainly one of its most crucial aspects. Being able to give a viewer or player the sense that all the sounds heard are happening in the proper acoustical space is key to immersion. Keep in mind, however, that the best reverb for a given situation isn’t necessarily the one that would actually recreate the depicted acoustical space exactly. There are several reasons for this, but usually it has to do with the mix, often for speech intelligibility. The space the scene takes place in might have a very long decay time and very dense reflections, which could get in the way of the intelligibility of speech or simply make the mix a bit muddy. The choice of a reverb for a given scene is therefore also an artistic decision, for the sake of the mix or dramatic impact.
Reverb as a Tool for Blending
In some cases, reverberation can be applied gently to a group of sounds in order to blend them together better. This can be particularly useful when using the layering techniques outlined in Chapter five and trying to blend multiple samples together into a single sound. By applying the same reverb to several sounds happening at once we can trick the ear into believing that these sounds belong together since they will now have similar reflections applied. In such a case we are not looking to use reverberation as a way to recreate an actual acoustical space, and therefore we are looking for a somewhat subtle effect. As such, you should try short to very short reverb times; start at around 0.8 seconds and adjust as needed. If the reverb is to be applied directly to a submix as an insert, then start with a 10% wet to 90% dry ratio and adjust as needed. If you are using an aux/send pair, send very little to the bus going to the reverb and raise the send level until the desired effect is achieved, usually right before the reverb starts to draw attention to itself and is heard clearly. The effect should be subtle, and reverb might be only one of the tools you are using to achieve the desired results (another common tool in this scenario is compression). In fact, the effect should be transparent to a casual listener or anyone not familiar with the session or sound and should really only be noticed when taken off.
d. Reverberation as a Dramatic Tool
While reverb is a crucial tool to recreate a sense of space and realism, it can also be used to great effect as a way to create drama and punctuation by drenching a sound, usually percussive one, in a very long reverb. Most reverb plugins and manufacturers make realistic reverb algorithms, but some focus on non-realistic reverb types, such as extremely long reverb times; some reverb units offer infinite decay times, others allow the users to freeze any portion of the decay and some still focus on creating spaces that simply could not exist in the physical world. Do feel free to blend reverb, layering a realistic impulse response in a convolution unit with a more exotic reverb such as a pitch shifted signal or a frozen or infinite reverb.
Reverberation is also a crucial, although not always obvious, aspect of the way we perceive certain sounds, the most obvious perhaps being gunshots. While there are many factors that can affect a gunshot, such length of the barrel and caliber of the round fired, gunshots sound very different and sound significantly softer when you take away environmental reflections.
10. Convolution
Convolution is by now well-known for its role in reverberation, and it is one of the most studied Digital Signal Processing techniques in the engineering world. Reverberation, however, is a small subset of what convolution can achieve. Here also, an in-depth study of convolution goes far beyond the scope of this book, but there are a few points we can make about this technique that will help anyone unfamiliar with the process and eager to find more.
Convolution is a technique where a hybrid sound is created from two input audio files. Usually one of them is designated as the impulse response – or IR – and the other the input signal. Although convolution is often mathematically expressed in other ways (see brute force convolution), it is usually implemented as the multiplication of the spectra of both files used in the process. Convolution therefore requires a Fast Fourier Transform to take place first; to obtain the spectral content of both sound files, their spectra are multiplied together, then an inverse FFT has to occur before we can use the resulting hybrid output. The artifacts resulting from any FFT process (transient smearing, echo, high frequency loss etc.), therefore apply to convolution as well.

Figure 5.18
So, what does convolution sound like? Well, it primarily depends on the files used in the process, of course, as well as the settings used in the process for the available parameters, but, generally speaking, the qualities of one sound will be applied to another, especially in areas where the spectrums overlap. The sound of a human voice convolved with a snare drum hit will sound like the sound a human voice through a snare drum. Another very common example is the sound of someone singing convolved with the sound of a rapid noise burst left to decay in a cathedral, which will sound like that person singing in that cathedral. This is why convolution is such a great way to create reverberation, usually meant to emulate real spaces. And still another common application of convolution relevant to game audio is for the spatialization of monaural sources, via Head Related Transfer Functions.
A lot of plugins dedicated to reverberation actually allow you to use your own impulse responses as long as they are properly formatted. This essentially turns your reverberation plugin into a general-purpose convolution engine, which you can use for any of the purposes outlined previously. Additionally, fluency with a computer music language such as MAXMSP, Csound or Chuck will give you access to very flexible ways of working with convolution, among other things, and while these tools might seem off-putting to some, mastering one such tool is highly recommended to the adventurous sound designer.
a. Optimization
There are a few universal principles about working with convolution that are very useful to understand in order to get the best results:
- Convolution is the spectral intersection of two audio files; the most interesting results will occur when both the IR and the input file share a lot of common spectral data. In other words, convolution sounds most interesting when both files share similar frequency information. If not, such as in the instance where one might convolve a kick drum with the IR of a triangle, since there is very little overlap in the frequency content of both signals, the output will simply sound like both sounds mixed together.
- A loss of high frequency information is a rather common side effect of convolution, and you might need to compensate for that phenomenon. The reason is simple; multiplication of two spectrums means that frequencies strongly present in both signals will come out strongly in the output, and frequencies that aren’t will end up being less present in the output. Most sounds do not tend to have a lot of information in the last octave of human hearing – or not as much as other frequency bands, anyway. As a result, it is common for the output to be duller than either file used.
- As with all FFT based processes, there is a tradeoff between time and frequency resolution (see the FFT explanation earlier); when dealing with a transient rich sound, if you have access to such parameters, it is best to use a shorter window. Otherwise, longer windows, 1,024 samples and over, will be better suited for frequency-rich sounds.
So, what are the applications of sound design beyond reverberation? There again there are many potential options, but here are a few applications where convolution might especially come in handy and where other traditional techniques might fall short.
b. Speaker and Electronic Circuit Emulation
This is a very common scenario for any sound designer: recreating the sound of a small speaker, portable radio, PA system etc. The traditional method involves band-limiting the output using an equalizer, adding some type of distortion and perhaps compression to the signal. While this might create okay, perhaps even good results at times, this technique often seems to fall a bit short. That’s partly due to the fact that while EQ and distortion will get us part of the way there, they usually are approximations of the sound. A better approach is simply to convolve the audio that we need to treat with the IR of a small speaker such as the one we are trying to emulate. Of course, this does require the proper IR, and while I would recommend indeed to become familiar with the process of recording simple impulse responses to use for convolution, some manufacturers actually specialize in convolution-based tools whose purpose is to emulate electronic circuits and speakers, but a lot of convolution-based reverb plugins will offer some less traditional IRs, such as those of small speakers, common electronic circuitry and other non-traditional impulse responses. These are usually great starting points and often do not require much additional processing to obtain a realistic sound.
c. Filtering/Very Small Space Emulation
Another common situation where convolution will come in very handy is in the emulation of very, very small spaces, such as a full body space suit for instance, where the subject’s voice should reflect the very small space their helmet represents. There again, a traditional approach was to use filtering or equalization in order to simulate this sound. However, a fully enclosed helmet can be thought of as a very tiny room. One option to simulate this sound is to scale down or shorten an available impulse response to an extremely short reverb time, perhaps 0.2 or 0.1 seconds and apply an extremely short predelay time, in the order of 1–2ms. Another option is to record the impulse response of such a helmet or similar object and convolve it with the sound to be treated. Something as trivial as a bucket might be extremely helpful in this situation.
d. Hybrid Tones
One of the most exciting applications of convolution from the standpoint of sound design is the creation of hybrid tones. In this case, the only limit is the sound designer’s imagination. Convolving the sound of speech with a wind gust will give speech an other-worldly, ghost-like quality. Convolving the sound of two animal calls will create a sound sharing the quality of both, possibly sounding like neither. The key here is to experiment and carefully choose the files you are going to process.
11. Time-Based Modulation FX
Time based modulation effects are a wonderful way to add movement to your sound and make a static recording feel a lot more compelling. There are a number of time-based effects that are classics by now and ought to be in every sound designer’s inventory.
a. Chorus
A chorus is one or multiple delay lines whose length is modulated, usually by a low frequency oscillator, which causes pitch fluctuations. The intention is to add slightly delayed duplicated copies of the signal at slightly different pitches. Chorus is used to help thicken and often widen a sound. It is a good way to widen mono sounds especially or to take an otherwise mono source and make it a stereo sound. It was and still is widely used as a way to make mono synth bass sounds much more interesting, and some early commercial synthesizers, such as the original Juno series by Roland, derived a lot of their magic from their built-in chorusing units. Chorus can be applied to any sound source you wish to impart any of these qualities to and can also give the sounds it is applied to a dreamlike, psychedelic quality.

Figure 5.19
b. Flanger
Flangers are similar to chorus, they are a variable delay line, constantly modulated, usually within a 1–10ms range. At these times, the perceived effect is not that of a delay but rather a filtering instead of individual repetitions. Unlike in a chorusing unit, flangers include a feedback path, mixing the delayed signal or signals with the original one, creating resonances similar to that of a comb filter. The filtering of the sound will depend upon the delay times and is due to constructive and destructive interference when the waves are added together. The small delay time means the duplicated signal’s phase will be different from the original. When the two are layered, destructive interference will create notches, a frequency where the signal is attenuated significantly. Because the delay time is modulated, usually by an LFO, the notches are constantly changing in frequency, which creates a dynamic signal and is a good way to add movement to a sound.
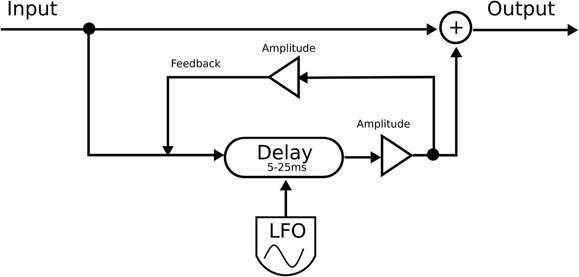
Figure 5.20
c. Phasers
Phasers work by duplicating the signal and changing the phase of the duplicates. Like flangers and choruses, they alter the sound through patterns of cancellation and reinforcement, but phasers rely on allpass filters instead of delay lines, which gives the sound designer a bit more control. Phasers are a staple of robotic sound design and are often added as part of a signal chain to make human voices robotic by adding a soft resonance in the high frequencies. There is definitely an association with futuristic and sci-fi sounds, which can be both a little commonplace and delightful.
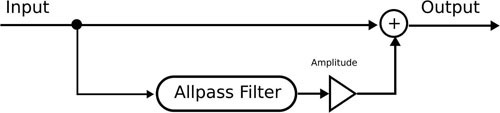
Figure 5.21
d. Tremolo
Tremolo is a relatively simple effect, which has been widely used by musicians for quite some time to add movement to their sound. It is a classic with guitar players and electric piano players. It usually consists of a low frequency oscillator that modulates the amplitude of a signal, giving the user control over depth of modulation, rate of modulation and sometimes the shape of the waveform used by the LFO.
While it is obviously a form of amplitude modulation, because it happens at sub audio rates, tremolo does not create sidebands as we saw earlier with ring modulation.
In sound design, its applications can be both subtle – as a way to add some movement to a sound – and more drastic in order to create dramatic effects.
When working with tremolo in a subtle way, to simply add some movement to a sound, we tend to work with slow rates under 1Hz and set the depth to a rather small value using a smooth shape for the LFO, such as a sine. Some tremolo plugins allow you to set the phase between the left and right channel independently, which can be helpful when working with stereo sounds or trying to widen a mono sound in stereo.
Tremolo can also be a far more dramatic effect, used to recreate or emulate drastic forms of modulations found in real-world sounds or to create new ones. A rapid form of amplitude modulation can be used to recreate the sound of a rattlesnake for instance, especially if the rate and depth can be automated over time. If the plugin used allows for extremely fast rates, tremolo can be used to emulate the sound of insect wings flapping. Tremolo can be used very effectively with non-organic sounds too, such as hovering or flying vehicles where adding a fast tremolo to the sound of an engine or fly by can increase the perceived sensation of movement and speed, especially if the rate of the tremolo follows the speed of the vehicle or rpm. Additionally, if the tremolo sounds irregular or unsteady, it will give the impression the vehicle is struggling.
12. Foley Recording
No discussion on sound design can be complete without a mention of Foley. Named after Jack Foley, another pioneer of sound design, Foley is the process of recording sounds using real-world objects to create part of the soundtrack of a film or game. Foley can sometimes be literal – by literally recording the sound of an object depicted in a game by recording that same object in the studio – or by using a completely different object altogether to create the desired effect. Foley is very much in the vein of the ‘contraption based’ sound design mentioned at the top of this chapter and can be both rewarding and a quick way to get the sound you are looking for, if you know how to get it, of course. Foley is a skill in itself in the world of sound design, one that is developed over time, but anyone with a little imagination can take advantage of these techniques and reap some benefits rather quickly.
Let’s not forget that bringing in objects in the studio and sometimes building them was the only alternative for sound design until recording technology became truly portable. Of course, today this is not much of a concern, but the reason Foley is still relevant tends to fall into two main categories:
If you have a basic recording setup, which can be as simple as a portable handheld recorder and as complex as a full recording studio, recording certain sounds tends to be as fast, if not faster, than looking for them in a sound effect library and has the undisputed benefit of making your sound design unique. A sound pulled from a sound effect library may have been heard before in other shows and games, while your recordings are always unique, giving your sound design its own identity and personal touch. If it seems like pointing a microphone at a source to record that sound will be faster than looking it up in a library, editing it and conforming it, it probably is. Ultimately, the more of your own recordings you can rely on, the more unique your sound worlds will be.
The other category of sounds that Foley is useful for are sounds that are not literal but can be recreated convincingly using certain objects and can be customized to a particular situation. There are so many candidates, tricks and techniques that a whole book dedicated to the art of Foley would just scratch the surface, but let’s take a look at a few examples that may spark your imagination and compel you to research this topic.
- The sound of a grapefruit being manually squeezed, at various speeds and pressure will make for very realistic gore sounds especially close mic’ed, while the sound of dry celery being broken will sound like bones getting crunched or broken.
- Similarly, the sound of overcooked elbow pasta being mixed together will sound quite gory.
- Bird wings sounds can be achieved by flapping together a pair of plastic gloves such as dish washing gloves or some leather gloves.
- A smaller, creaky door, such as a cabinet door, will sound like the wail of a mammal if moved at the right speed. (You can also add water to the hinges to make it a bit creakier.)
- Hitting one end of a slinky with a microphone making contact at the other will sound like a laser blaster.
The list is endless as you can see, and as you watch more tutorials and read up on the topic you will grow your library of tricks and unique sounds.
Conclusion
Sound design is a vast topic and requires technical knowledge, mastery and artistic sensibility. Over the course of this chapter you have been introduced to some of the basic tools of the trade, as well as some suggestions for their uses. These suggestions are merely intended to be starting points for exploration and experimentation. You should dedicate time to learning more about the tools and techniques introduced here, as well as experiment as much as possible. Over time you will develop a catalog of techniques and aesthetics that will make your sound design unique.