
6
PRACTICAL SOUND DESIGN
1. Setting Up a Sound Design Session and Signal Flow
Sound design is both a creative and technical endeavor. There is a ‘what’ element and a ‘how’ element. The ‘what’ is the result we intend to create, and the ‘how’, of course, the method we use to get there. This is a common struggle to most artists and one that the great painter Wassily Kandinsky had identified and articulated in his writings, a testimony to the universality of this struggle to all artists. A solid understanding of the signal flow in DAWs and gain staging overall is critical to obtaining good results. Students often end up struggling with the technology itself, as much as the sound design portion, complicating their tasks a great deal. Often, however, the technical matters can be overcome with a better understanding of the technical side, leaving the student to focus on the matter at hand, the creative.
1. Signal Flow
The term signal flow refers to the order through which the audio signal encounters or flows through the various elements in a mixer or via external processors, from the input – which is usually the hard drive – or a mic input to the digital audio converters (DACs) and out to the speakers.
In this chapter we will use Avid’s Pro Tools as our DAW. The concepts discussed here, however, will easily apply to another software, especially as most DAW mixers tend to mimic the behavior and setup of classic analog mixers.
Let’s take a look at how the signal flows, from input to output, in a traditional DAW and how understanding this process will make us better audio engineers and therefore sound designers.
The following chart will help us understand this process in more detail:
a. Input
In most mixers the very first stage is the input. The input varies whether we are in recording mode, in which case the input will usually be a microphone or line input or whether we are in playback mode, in which case the input will be the audio clip or clips in the currently active playlist.
b. Inserts
The next stage your signal is going to run into are the inserts or insert section. This is where you can add effects to your audio, such as equalization, compression and whatever else may be available. Inserts are often referred to as an access point, allowing you to add one or multiple processors in your signal path. In most DAWs, the signal goes from the first insert to the last from top to bottom.
c. Pre-Fader Send
After the inserts, a pre-fader send is the next option for your signal. This is where you will send a copy of your audio to another section of your mixer, using a bus. A bus is a path that allows you to move one or multiple signals to a single destination on another section of the mixer. Sending out a signal at this point of the channel strip means the amount sent will be irrespective of the main fader, therefore changes in volume across the track set by the main fader will not affect the amount of audio going out on the pre-fader send. The amount of signal sent is only dependent on the level of the send and, of course, the level of the signal after the insert section.
If you were to send vocals to a reverb processor at this stage, fading out the vocals would not affect the level of the reverb, and you would eventually end up with reverberation only after fading out the vocals.
d. Volume Fader
The next stage is the volume fader, which controls the overall level of the channel strip or audio track. When the volume fader is set to a value of 0dB, known as unity, no gain is applied to the overall track, and all the audio is playing at the post insert audio level. Raising or lowering the fader by any amount will change the current gain value by as much.
Often it is here that you will find panning, to place the audio output in stereo or surround space, depending on the format you are working with.
e. Metering: Pre-Fader vs. Post Fader
Next to the volume fader, you will usually find a level meter. Please check with your DAW’s manual to find out exactly how the meter is measuring the level (Peak, RMS, LUFS etc.). Some DAWS will allow you to change the method for metering. Irrelevant of the method employed, you have the option to monitor signals pre-fader or post-fader. By default, most mixers will have their meters set to post fader mode, which means the fader will display the level after the volume fader and will therefore be affected by it. When monitoring pre-fader, the meter will display the level of the signal right after the last insert, giving you an accurate sense of the level at this stage. It’s probably a good idea to at least occasionally monitor your signals pre-fader, so you can be sure your signal is clean coming out of the insert section.
Please refer to your DAW’s documentation to find out how to monitor pre or post-fader.
f. Post-Fader Send
Next we find the post-fader send. The level sent to the bus will be impacted by any changes in the level of the volume fader. This is the most commonly used type of send. In this case, if you are sending vocals to a reverb processor, fading out the vocals will also fade out the level of the reverb.
g. Output
Last, we find the output, which determines where the signal is routed to next, by default usually the master bus, where all the audio is summed. Often the output of an audio track should be routed to a submix, where multiple audio tracks that can or should be processed in the same way are mixed together, such as all the ambience tracks in a session or the dialog, music etc.
It’s probably a good rule of thumb to make sure that no track be routed directly to the master fader but rather to a subgroup or submix. Routing individual tracks directly to the master will make your mix messy and difficult to manage.
You may have already noticed that DAWs often do not display the information on a channel strip in their mixer in the order through which the signal flows from top to bottom. If unaware of this, it is easy to make mistakes that get in the way of the task at hand.
2. Working With Video
Sound designers are often asked to work to linear video clips when working in games. Models, such as AI characters, can be exported to video before they are implemented in the game engine, and the animations are often given to the sound designers as linear loops prior to their implementation in the game. Working to video is also a great way to experiment freely in the DAW of your choice, prior to exporting the sounds you created as assets to be imported in the game.
In other cases, you will be given a video clip of a cut scene, a cinematic sequence often used to move the plot forward between levels.
Either way, it is important to be aware of a few key issues when working to picture. Every DAW has slightly different way of importing video, so if you are unsure, please refer to the user manual; the points made here, however, will apply regardless of the DAW you are working in. As in the rest of this chapter, Avid’s Pro Tools will be used to illustrate these concepts.
a. Know Your Frame Rate
Frame rates for video are usually lower than the ones we work with in gaming. Frame rates ranking from 24 to 30 frames per second are common in video, film and broadcast. Find out what the frame rate is of the video you are working with, and make sure to set your DAW’s timeline to be displayed in Timecode format, rather than bars and beats.

Figure 6.2
Timecode is a way to make sure that each and every frame in a piece of video will have a single address that can be easily recalled and is expressed in the following format:
It is important to understand that, although expressed in seconds and frames, time code is a positional reference, an address for each frame in the video file.
Do make sure your DAW’s session is running at the same frame rate as the picture. Setting up our timeline to time code format allows us to move through our session in a frame by frame way, using the nudge feature. Nudging allows you to scrub forward and backwards through the video and allows you to find out exactly and easily where the sync points for each event are in the picture, down to frame accuracy. In some cases, you might need to use a nudge value to half frame for events where synchronization is critical.
The first frame of the clip should be lined up with the address: 01:00:00:00 in the timeline; any material such as slates that provide information about the video clip or countdowns will therefore start prior to the hour mark. Lining up the first frame of video with the address 01:00:00:00 is not a requirement but rather a convention and will make it easier to keep track of time.
Once you have imported the video, set up your DAW to the proper time timecode format and lined up your movie, you’re almost ready to sound design. The next step is to set up the routing and gain staging of the session.
3. Clipping Is Easy – Mind the Signal Path
As you can see from Figure 6.1, the inserts are located pre-fader. A common mistake is to assume that if an audio track is clipping and the meter is in the red, that the problem can be solved by reducing the level with the main fader. This will indeed turn the audio level down, and the meter may no longer be in the red, if they are monitoring the level post fader, which is often the default. Doing this, however, only makes the signal quieter, and the clipping is still present, polluting your signal.
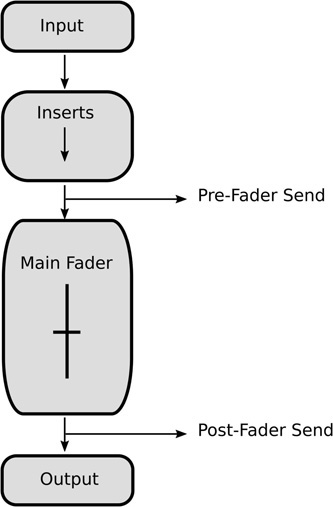
Figure 6.1
Main elements of a mixer channel strip
Figure 6.3

The clipping may not be obvious, especially to tired ears and mixed in with other audio signals, but this can lead to harsh sounding mixes and make your task much more difficult.
A better solution would be to turn the gain down at the level of the first insert by inserting a trim plugin and turning the level down before it hits the first plugin and preventing any clipping to occur in the first place.
Use the Dynamic Range
The term dynamic range in the context of a mixing session or a piece of equipment refers to the difference– or ratio – between the loudest and the softest sound or signal that can be accurately processed by the system. In digital audio, the loud portion of the range refers to the point past which clipping occurs, introducing distortion by shaving off the top of the signal. The top of the dynamic range in the digital audio domain is set to 0dBFS, where FS stands for full scale.
Figure 6.4 shows the same audio file, but the right one shows the characteristic flat top of a clipped audio file, and the fidelity of the audio file will be severely affected.
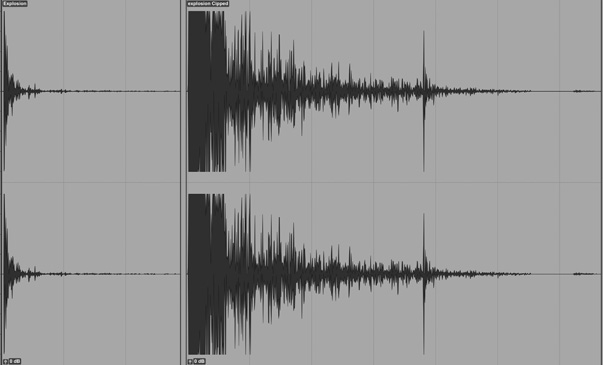
In the digital audio world, the bottom of the dynamic range depends on the number of bits the session or processor is running at. A rule of thumb is that 1 bit = 6dB of dynamic range. Keep in mind this is an approximation, but it is a workable one. A session at 24 bits will therefore offer a dynamic range of 144dB, from 0 to −144dBFS. This, theoretically, represents a considerable improvement over previous high-end large format analog mixing consoles. Any signal below that level will simply blend into the background noise and probably will sound quite noisy as it approaches that level.
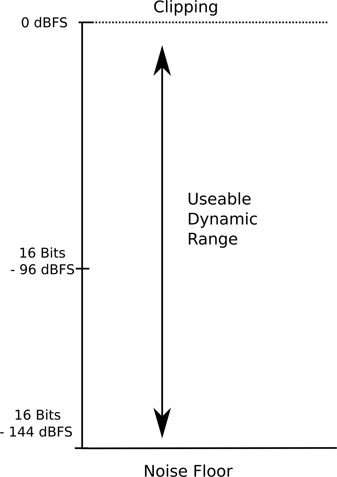
Figure 6.5
Clipping therefore ought not to be an issue. Yet is often is. A well-mastered modern music pop track, when imported into a session, will already bring your master fader dangerously close to the 0dB mark. While it might be tempting to lower the master fader at this stage, refrain from doing so. Always address gain staging issues as early as possible. Lowering the master fader may lower the level on the master bus meter, but in reality, it lends itself to a session where you are constantly fighting for headroom.
There again, a better solution is to lower the level of the music track, ideally at the first insert, and push its levels down by 10 to 15dB, with the volume fader for both the music track and the master fader still at unity. This will give you a lot more headroom to work with while leaving the volume fader at unity.
If the music track now peaks at −15dB, it is still 133dB above the bottom of your dynamic range, which, if working with a clean signal where no noise is already present, gives you more than enough dynamic range to work with.
As good practice, I recommend always keeping the mixer’s master fader at unity.
4. Setting Up a Basic Session for Linear Mixes and Cut Scenes
Next we will organize the mix around the major components of our soundtrack, usually music, dialog and sound effects.
a. Music, Dialog and Sound Effects
Delivery of stems is quite common and often expected when working with linear media. Stems are submixes of the audio by category such as music, dialog and sound effects. Stems make it convenient to make changes to the mix, such as replacing the dialog, without needing to revisit the entire mix. Having a separate music bounce also allows for more flexible and creative editing while working on the whole mix to picture.
It also makes sense to structure our overall mix in terms of music, effects and dialog busses for ease of overall mixing. Rather than trying to mix all tracks at once, the mix ultimately comes down to a balance between the three submixes, allowing us to quickly change the relative balance between the major components of the mix.
b. Inserts vs. Effects Loops for Reverberation
Effect loops are set up by using a pre or post-fader send to send a portion of the signal to a processor, such as reverb, in order to obtain both a dry and wet version of our signals in the mixer, allowing for maximum flexibility. The effect we are routing the signal to usually sits on an auxiliary input track.
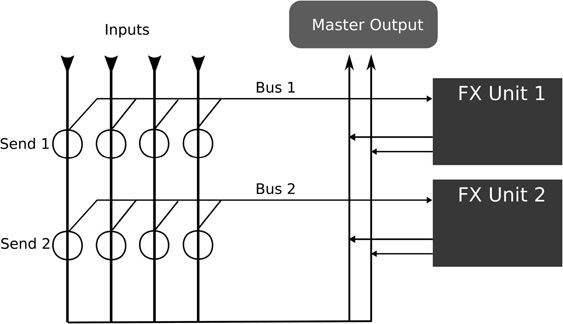
Figure 6.6
Additionally, when it comes to sound effects such as reverb and delays, which are meant to be applied to multiple tracks, it usually makes more sense to use effects loops and sends rather than inserting a new reverb plugin directly on every track that requires one. The point of reverberation when working with sound replacement is often to give us a sense for the space the scene takes place in, which means than most sound effects and dialog tracks will require some reverberation at some point. All our sounds, often coming from completely different contexts, will also sound more cohesive and convincing when going through the same reverb or reverbs. Furthermore, applying individual plugins to each track requiring reverb is wasteful in terms of CPU resources and makes it very difficult to make changes, such as a change of space from indoors to outdoors, as they must be replicated over multiple instances of the plugins. This process is also time consuming and difficult to manage as your mix grows in complexity.
As a rule, always set up separate aux send effect loops for reverberation processors and delays used for modeling the environment. In addition to the benefits mentioned earlier, this will also allow you to process the effects independently from the original dry signal. The use of equalization or effects such as chorus can be quite effective in enhancing the sound of a given reverb. As all rules, though, it can be broken but only if there is a reason for it.
c. Setting Up the Mix Session
The structure suggested here is intended as a starting point, and ultimately every audio engineer settles on a format that fits their workflow and the needs of the project the best. Different formats for delivery may have different needs in terms of routing and processing, but we can start to include all the elements outlined so far into a cohesive mix layout.
Figure 6.7 represents the suggested starting point for your mix. From top to bottom:
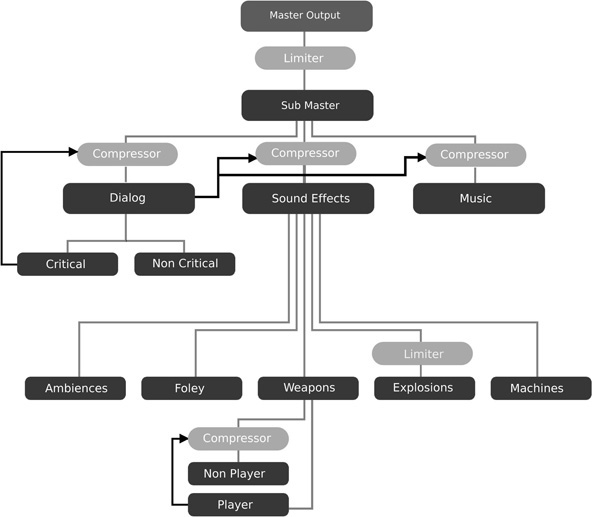
d. Master Output and Sub Master
In this configuration, no audio from the mix is routed directly to the master fader. Rather there is an additional mixing stage, a master sub mix where all the audio from our mix is routed. The sub master is then sent to the master output sub master -> master output. This gives us an additional mix stage, the sub master, where all premastering and/or mastering processing can be applied, while the master output of the mix is used as a monitoring stage only, such as audio levels, spatial image and spectral balance.
Since all premastering or mastering is done at the master sub mix, our master outputs will be ‘clean’. Should we wish to use a reference track, this configuration means that we can route our reference track directly to the master out and compare it to the mix without running the reference through any of the mastering plugins as well as easily adjust the levels between our mix and the reference.
e. Submixes and Effects Loops
The next stage from the top is where we find the submixes by categories or groups for music, dialog and sound effect, as well as the effect loops for reverb and other global effects. All the audio or MIDI tracks in the session are summed to one of these, no tracks going out directly to the master or sub master output. Each of the group will likely in turn contain a few submixes depending on the needs and complexity of the mix. Sound effects are often the most complex of the groups and often contain several submixes as illustrated in the diagram.
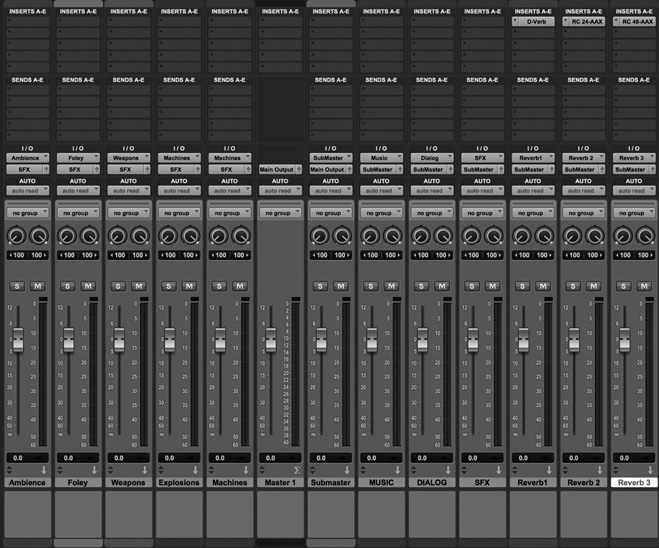
Figure 6.8
The screenshot shows an example of a similar mix structure for stereo output realized in Avid’s Pro Tools, although this configuration is useful regardless of the DAW you are working with. The submixes are located on the left side of the screen, to the left of the master fader, and the main groups for music, dialog and sound effects are located on the right side.
- On each of the audio tracks routed to the groups a trim plugin would be added at the first insert, in order to provide the sound designer with an initial gain stage and prevent clipping.
- Each audio track is ultimately routed to a music, dialog or sound effect submix, but some, especially sound effects, are routed to subgroups, such as ambience, gunshots and vehicles that then get routed to the sound effect submix.
- Three effect loops were added for various reverberation plugins or effects.
f. Further Enhancements
We can further enhance our mix by adding additional features and effects to our mix to give us yet more control and features.
Dedicated Software LFE Submix
Adding weight to certain sounds, such as impacts and explosions, can be achieved using a subharmonic generator plugin that will generate low frequency components to any sound that runs through it. These plugins can be difficult to manage as they introduce powerful low-end frequencies that can in turn make the mix challenging to manage. Rather than applying these plugins as inserts on one or multiple tracks, use an effect loop instead, setting it up in the same way you would a reverb, and send any audio file you desire to add weight to it.
Using a dedicated submix for the plugin means that we can process the low frequencies introduced in our mix by the plugin independently from the dry signal, making it easy to compress them or even high pass filter the very lower frequency components out.
Group Sidechaining
Sidechaining is a commonly used technique in mixing where a compressor sits on track A but is listening (aka ‘is keyed’) to track B, compressing A only when the level of B crosses the threshold.
We can also use our subgroup structure to apply sidechain compression on an entire submix at once. A common example of group sidechaining involves the sound effects being sidechained to the dialog so that the mix naturally ducks the effects when dialog occurs. Another option would be to sidechain the music to the sound effect, if we want our sequence to be driven mostly by sounds effects where there is no dialog present. This type of group sidechaining is most common in game engines but is also used in linear mixing.
Monitoring
While the meters in the mixer section of your DAW give you some sense of the levels of your track, it is helpful to set up additional monitoring for frequency content of the mix, stereo image (if applicable) and a good LUFS meter to have an accurate sense of the actual loudness of your mix.
At this point, we are ready to mix. Additional steps may be required, based on the session and delivery requirements, of course.
2. Practical Sound Design and Prototyping
When dealing with interactive objects that the player can pilot or operate, our task becomes a little bit more difficult, as we now need to create sound objects that can respond in real time and in a believable fashion to the actions of the player. Often this might involve manipulating sounds in real time, pitching shifting, layering and crossfading between sounds. More complex manipulations are also possible; granular synthesis as noted in the previous chapter is a great way to manipulate audio. Of course, the power of granular synthesis comes at a computational cost that may disqualify it in certain situations.
1. Guns
Guns are a staple of sound design in entertainment, and in order to stay interesting from game to game they demand constant innovation in terms of sound design. In fact, the perceived impact and power of a weapon very much depends on the sound associated with it. The following is meant as an introduction to the topic of gun sound design, as well as an insight as to how they are implemented in games. There are lots of great resources out there on the topic, should the reader decide to investigate the topic further, and is encouraged to do so.
a. One Shot vs. Loops
There are many types of guns used in games, but one of the main differences is whether the weapon is a single shot or an automatic weapon.
Most handguns are single shot or one shot, meaning that for every shot fired the used needs to push the trigger. Holding down the trigger will not fire additional rounds.
Assault rifles and other compact and sub compact weapons are sometimes automatic, meaning the weapon will continue to fire as long as the player is pushing the trigger or until the weapon runs out of ammunition.
The difference between one shot and automatic weapons affects the way we design sounds and implement the weapon in the game. With a one-shot weapon it is possible to design each sound as a single audio asset including both the initial impulse, the detonation when the user presses the trigger, as well as the tail of the sound, the long decaying portion of the sound.
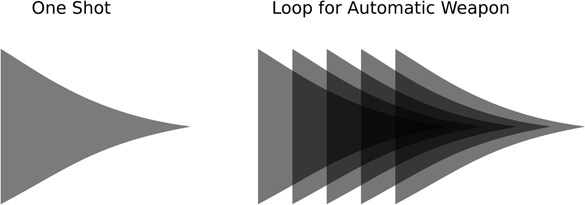
Figure 6.9
In the case of an automatic weapon, the sound designer may design the weapon in two parts: a looping sound to be played as long as the player is holding onto the trigger and a separate tail sound to be played as soon as the player lets go of the trigger, to model the sound of the weapon decaying as the player stops firing. This will sound more realistic and less abrupt. Additional sounds may be designed and triggered on top of the loop, such as the sound of the shell casings being ejected from the rifle.
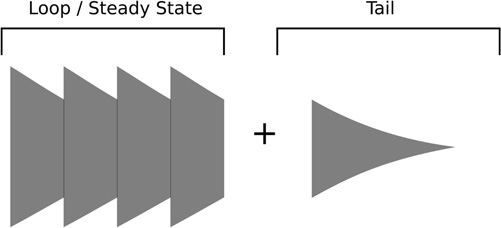
Figure 6.10
b. General Considerations
Overall, regardless of the type of weapon you are sound designing and implementing, when designing gun sounds, keep these few aspects in mind:
- Sound is really the best way to give the player a sense of the power and capabilities of the weapon they’re firing. It should make the player feel the power behind their weapon and short of haptic feedback, sound remains the best way to convey the impact and energy of the weapon to the player. Sound therefore plays an especially critical role when it comes to weapons.
- Guns are meant to be scary and need to be loud. Very loud. Perhaps louder than you’ve been comfortable designing sounds so far if this a new area for you. A good loudness maximizer/mastering limiter is a must, as is a transient shaper plugin, in order to make the weapon both loud and impactful.
- Guns have mechanical components; from the sound of the gun being handled to the sound of the firing pin striking the round in the chamber to that of the bullet casings being ejected after each shot (if appropriate), these elements will make the weapon sound more compelling and give you as a sound designer the opportunity to make each gun slightly different.
- As always, do not get hung up on making gun sounds realistic, even if you are sound designing for a real-life weapon. A lot of sound designers won’t even use actual recordings of hand guns or guns at all when working sound designing for one.
- The sound of a gun is highly dependent on its environment, especially the tail end of it. If a weapon is to be fired in multiple environments, you might want to design the initial firing sound and a separate environmental layer separately, so you can swap the appropriate sound for a given environment. Some sound designers will take this two-step approach even for linear applications. That environmental layer may be played on top of the gun shot itself or baked in with the tail portion of the sound.
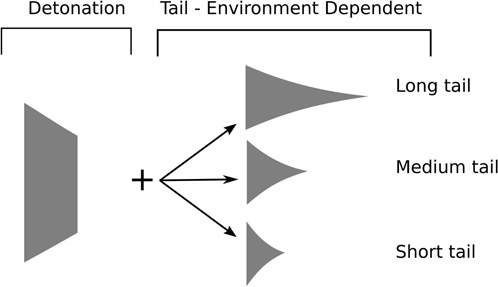
Figure 6.11
- A simple rule of thumb for determining the overall loudness of gun is the ratio of the length of the barrel to the caliber of the bullet. The shorter the barrel and the bigger the caliber, the louder the gun.
- Most bullets travel faster than the speed of sound and therefore will create a supersonic crack. Some bullets are subsonic, designed specifically to avoid creating excessive noise.
c. Designing a Gunshot
One approach when sound designing a gun is to break down the sound into several layers. A layered approach makes it easy to experiment with various samples for each of the three sounds, and individually process the different aspects of the sound for best results.
Three separate layers are a good place to start:
- Layer 1: the detonation, or the main layer. In order to give your guns maximum impact, you will want to make sure this sample has a nice transient component to it. This is the main layer of the sound, which we are going to augment with the other two.
- Layer 2: a top end, metallic/mechanical layer. This layer will increase realism and add to the overall appeal of the weapon. You can use this layer to give your guns more personality.
- Layer 3: a sub layer, to add bottom end and make the sound more impactful. A subharmonic generator plugin might be helpful. This layer will give your sound weight.
When selecting samples for each layer, prior to processing, do not limit yourself to the sounds that are based in reality. For instance, when looking for a sound for the detonation or the main layer, go bigger. For a handgun, try a larger rifle or shotgun recording; they often sound more exciting than handguns. Actual explosions, perhaps smaller ones for handguns, may be appropriate too.

Figure 6.12
The Detonation/Main Body Layer
As always, pick your samples wisely. A lot of sound effects libraries out there are filled with gun sounds that are not always of the best quality, may not be the right perspective (recorded from a distance) or already have a lot reverberation baked in. You’ll usually be looking for a dry sample, as much as possible anyway, something that ideally already sounds impressive and scary. Look for something with a healthy transient. You might want to use a transient shaping plugin or possibly a compressor with a slow attack time as described in the previous chapter in order to emphasize the transients further. An equalization scoop around 300–400Hz might actually be a good way to make a bit more room for the low and mid frequencies to cut through.
The Top End/Mechanical Layer
When a shot is fired through a gun, some of the energy is transferred into the body of the gun and in essence turns the gun itself into a resonator. This is partially responsible for the perceived mechanical or metallic aspect of the sound. In addition, some guns will eject the casing of the bullet after every shot. The sound of the case being ejected and hitting the floor obviously makes a sound too. The mechanical layer gives you a lot of opportunity for customization. When sound designing a lot of guns for a game, inevitably they will tend to sound somewhat similar. This layer is a good place to try to add some personality to each gun. Generally speaking, you will be looking for a bright sound layer that will cut through the detonation and the bottom end layers. It should help give your gun a fuller sound by filling up the higher frequencies that the detonation and the sub may not reach. It also adds a transient to your gun sound, which will make it sound all the more realistic and impactful.
The Sub Layer
The purpose of the sub layer is to give our sounds more weight and impact and give the player a sense of power, difficult to achieve otherwise, except perhaps via haptic feedback systems. Even then, sound remains a crucial aspect of making the player ‘feel’ like their weapon is as powerful as the graphics imply.
A sub layer can be created in any number of ways, all worth experimenting with.
It can be created using a synthesizer by modifying or creating an existing bass preset and applying a subharmonic generator to it to give it yet more depth and weight. Another option is to start from an actual recording, perhaps an explosion or detonation, low pass filtering it and processing it with a sub-harmonic generator to give it more weight still. A third option would be to use a ready-made sub layer, readily found in lots of commercial sound libraries. Avoid using a simple sine wave for this layer. It may achieve the desired effect on nice studio monitors but might get completely lost on smaller speakers, while a more complex waveform, closer to a triangle wave, will translate much better, even on smaller speakers.
Modeling the Environment
Guns and explosions are impossible to abstract from the environment they occur in. Indeed, the same weapon will sound quite different indoors and outdoors, and since in games it is often possible to fire the same gun in several environments, game sound designers sometimes resort to designing the tail end of the gun separately so that the game engine may concatenate them together based on the environment they are played into. In some cases, sound designers will also add an environment layer to the gun sounds simply because the reverb available in the game may not be quite sophisticated enough to recreate the depth of the sound a detonation will create when interacting with the environment. This environment layer is usually created by running the sound of the gun through a high-end reverberation plugin.
The environment layer may be baked into the sound of the gun – that is, bounced as a single file out of the DAW you are working with – or triggered separately by the game engine, on top of the gun sound. This latter approach allows for a more flexible weapon sound, one that can adapt to various environments.
Putting It all Together
Once you have selected the sounds for each layer, you are close to being done, but there still remain a few points to take into consideration.
Start by adjusting the relative mix of each layer to get the desired effect. If you are unsure how to proceed, start by listening to some of your favorite guns and weapons sounds from games and movies. Consider importing one or more in the session you are currently working on as a reference. (Note: make sure you are not routing your reference sound to any channels that you may have added processors to.) Listen, make adjustments and check against your reference. Repeat as needed.
Since guns are extremely loud, don’t be shy, and use loudness maximizers and possibly even gain to clip the waveform or a layer in it. The real danger here is to destroy transients in your sound, which may ultimately play against you. There is no rule here, but use your ears to strike a compromise that is satisfactory. This is where a reference sound is useful, as it can be tricky to strike the proper balance.
In order to blend the layers together, some additional processing may be a good idea. Compression, limiting, equalization and reverberation should be considered in order to get your gun sound to be cohesive and impactful.
Player Feedback
It is possible to provide the player with subtle hints to let them know how much ammunition they have left via sound cues rather than by having to look at the screen to find out. This is usually done by increasing the volume of the mechanical layer slightly as the ammunition is running out. The idea is to make the gun sound slightly hollower as the player empties the magazine. This approach does mean that you will need to render the mechanical layer separately from the other two and control its volume via script. While this requires a bit more work, it can increase the sense of immersion and realism as well as establish a deeper connection between the player and their weapon.
2. Prototyping Vehicles
When approaching the sound design for a vehicle or interactive element, it is first important to understand the range of actions and potential requirements for sounds as well as limitations prior to starting the process.
The implementation may not be up to you, so you will need to know and perhaps suggest what features are available to you. You will likely need the ability to pitch shift up and down various engine loops and crossfade between different loops for each rpm. Consider the following as well: will the model support tire sounds? Are the tire sounds surface dependent? Will you need to provide skidding samples? What type of collision sounds do you need to provide? The answers to these questions and more lie in the complexity of the model you are dealing with.
a. Specifications
A common starting point for cars is to assume a two gear vehicle, low and high gear. For each gear we will create an acceleration and deceleration loop, which the engine will crossfade between based on the user action.
| • Eng_loop_low_acc.wav | Low RPM engine loop for acceleration. |
| • Eng_loop_low_de.wav | Low RPM engine loop for deceleration. |
| • Eng_loop_high_acc.wa | High RPM engine loop for acceleration. |
| • Eng_loop_high_de.wav | High RPM engine loop for deceleration. |
This is a basic configuration that can easily be expanded upon by adding more RPM samples and therefore a more complex gear mechanism.
The loops we create should be seamless, therefore steady in pitch and without any modulation applied. We will use input from the game engine to animate them, to create a sense of increased intensity as we speed up by pitching the sound up or decreased intensity as we slow down by pitching the sound down. As the user starts the car and accelerates, we will raise the pitch and volume of our engine sample for low RPM and eventually crossfade into the high RPM engine loop, which will also increase in pitch and volume until we reach the maximum speed. When the user slows down, we will switch to the deceleration samples.
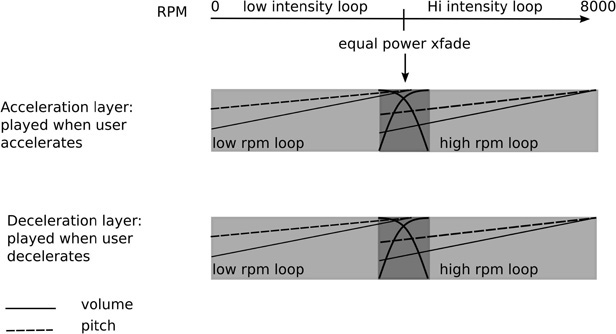
Figure 6.13
Let’s start by creating the audio loops, which we can test using the basic car model provided in the Unity Standard’s asset package, also provided in the Unity level accompanying this chapter.
b. Selecting Your Material
When working on a vehicle it is tempting to start from the sound of a similar looking or functioning real-world vehicle and try to recreate it in the game. Sample libraries are full of car and truck samples that can be used for this purpose, or, if you are feeling adventurous, you can probably record a car yourself. A little online research can give you tips about what to look out for when recording vehicles. This can be a very effective approach but can be somewhat underwhelming ultimately without further processing. Remember that reality, ultimately, can be a little boring.
Another approach still is to look at other types of vehicles, such as propeller airplanes, boats and other vehicles and layer them together to create a new engine sound altogether.
Finally, the third option is to use sounds that have nothing to do with a car engine – gathered via recordings – or synthesize and create the loops required from this material.
Always try to gather and import in your sound design session more than you think you will need. This will allow you to be flexible and give you more options to experiment with.
c. Processing and Preparing Your Material
Once you have gathered enough sounds to work with it’s time to import them and process them in order to create the four loops we need to create.
There are no rules here, but there are definitely a few things to watch out for:
- The sample needs to loop seamlessly, so make sure that there are no obvious variations in pitch and amplitude that could make it sound like a loop.
- Do not export your sounds with micro fades.
Use all the techniques at your disposal to create the best possible sound, but, of course, make sure that whatever you create is in line with both the aesthetics of the vehicle and the game in general.
Here are a few suggestions for processing:
- Layer and mix: do not be afraid to layer sounds in order to create the right loop.
- Distortion (experiment with various types of distortion) can be applied to increase the perceived intensity of the loop. Distortion can be applied or ‘printed’ as a process in the session, or it can be applied in real time in the game engine and controlled by a game parameter, such as RPM or user input.
- Pitch shifting is often a good way to turn something small into something big and vice versa or into something entirely different.
- Comb filtering is a process that often naturally occurs in a combustion engine; a comb filter tuned to the right frequency might make your sound more natural and interesting sounding.
Once you have created the assets and checked that length is correct, that they loop without issue and that they sound interesting, it’s time for the next step, hearing them in context, something that you can only truly do as you are prototyping.
d. Building a Prototype
No matter how good your DAW is, it probably won’t be able to help you with the next step, making sure that, in the context of the game, as the user speeds up and slows down, your sounds truly come to life and enhance the experience significantly.
The next step is to load the samples in your prototype. The tools you use for prototyping may vary, from a MaxMSP patch to a fully functioning object in the game engine. The important thing here is not only to find out if the sounds you created in the previous step work well when ‘put to picture’, it’s also to find out what are the best ranges for the parameters the game engine will control. In the case of the car, the main parameters to adjust are pitch shift, volume and crossfades between samples. In other words, tuning your model. If the pitch shift applied to the loops is too great, it may make the sound feel too synthetic, perhaps even comical. If the range is too small, the model might not be as compelling as it otherwise could be and lose a lot of its impact.
We will rely on the car model that comes in with the Unity Standard Assets package, downloadable from the asset store. It is also included in the Unity level for this chapter. Open the Unity project PGASD_CH06 and open the scene labelled ‘vehicle’. Once the scene is open, in the hierarchy, locate and click on the Car prefab. At the bottom of the inspector for the car you will find the Car Audio script.

Figure 6.14
The script reveals four slots for audio clips, as well as some adjustable parameters, mostly dealing with pitch control. The script will also allow us to work with a single clip for all the engine sounds or with four audio clips, which is the method we will use. You can switch between both methods by clicking on the Engine Sound Style tab. You will also find the script that controls the audio for the model, and although you are encouraged to look through it, it may make more sense to revisit the script after going through Chapters seven and eight if you haven’t worked with scripting and C# in Unity. This script will crossfade between a low and high intensity loop for acceleration and deceleration and perform pitch shifting and volume adjustments in response to the user input. For the purposes of this exercise, it is not necessary to understand how the script functions as long as four appropriate audio loops have been created. Each loop audio clip, four in total, is then assigned to a separate audio source. It would not be possible for Unity to swap samples as needed using a single audio source and maintain seamless playback. A short interruption would be heard as the clips get swapped.
Next, import your sounds in the Unity project for each engine loop, load them in the appropriate slot in the car audio script and start the scene. You should be able to control the movement of the car using the WASD keys.
Listen to the way your sounds sound and play off each other. After driving the vehicle for some time and getting a feel for it, ask yourself a few basic questions:
- Does my sound design work for this? Is it believable and does it make the vehicle more exciting to drive?
- Do the loops work well together? Are the individual loops seamless? Do the transitions from one sample to another work well and convey the proper level of intensity? Try to make sure you can identify when and how the samples transition from one another when the car is driving.
- Are any adjustments needed? Are the loops working well as they are, or could you improve them by going back to your DAW and exporting new versions? Are the parameter settings for pitch or any other available ones at their optimum? The job of a game audio designer includes understanding how each object we are designing sound for behaves, and adjusting available parameters properly can make or break our model.
In all likelihood, you will need to experiment in order to get to the best results. Even if your loops sound good at first, try to experiment with the various different settings available to you. Try using different loops, from realistic, based on existing sounding vehicles, to completely made up, using other vehicle sounds and any other interesting sounds at your disposal. You will be surprised at how different a car can feel when different sounds are used for its engine.
Other sounds may be required in order to make this a fully interactive and believable vehicle. Such a list may include:
- Collision sounds, ideally different sounds for different impact velocity.
- Tire sounds, ideally surface-dependent.
- Skidding sounds.
- Shock absorbers sounds.
There is obviously a lot more to explore here and to experiment with. This car model does not include options to implement a lot of the sounds mentioned earlier, but that could be easily changed with a little scripting knowledge. Even so, adding features may not be an option based on other factors such as RAM, performance, budget or deadlines. Our job is, as much as possible, to do our best with what we are handed, and sometimes plead for a feature we see as important to making the model come to life. If you know how to prototype regardless of the environment, your case for implementing new features will be stronger if you already have a working model to demonstrate your work and plead your case more convincingly to the programming team or the producer.
3. Creature Sounds
Creatures in games are often AI characters that can sometimes exhibit a wide range of emotions, which sound plays a central role in effectively communicating. As always, prior to beginning the sound design process, try to understand the character or creature you are working on. Start with the basics: is it endearing, cute, neutral, good, scary etc.? Then consider what its emotional span is. Some creatures can be more complex than others, but all will usually have a few basic emotions and built in behaviors, from simply roaming around to attacking, getting hurt or dying. Getting a sense for the creature should be the first thing on your list.
a. Primary vs. Secondary Sounds
Once you have established the basic role of the creature in the narrative, consider its physical characteristics: is it big, small, reptilian, feline? The appearance and its ‘lineage’ are great places to start in terms of the sonic characteristics you will want to bring out. Based on its appearance, you can determine if it should roar, hiss, bark, vocalize, a combination of these or more. From these characteristics, you can get a sense for the creature’s main voice or primary sounds, the sounds that will clearly focus the player’s attention and become the trademark of this character. If the creature is a zombie, the primary sounds will likely be moans or vocalizations.
Realism and believability come from attention to detail; while the main voice of the creature is important, so are all the peripheral sounds that will help make the creature truly come to life. These are the secondary sounds: breaths, movement sounds coming from a creature with a thick leathery skin, gulps, moans and more will help the user gain a lot better idea of the type of creature they are dealing with, not to mention that this added information will also help consolidate the feeling of immersion felt by the player. In the case of a zombie, secondary sounds would be breaths, lips smacks, bones cracking or breaking etc. It is, however, extremely important that these peripheral or secondary sounds be clearly understood as such and do not get in the way of the primary sounds, such as vocalizations or roars for instance. This could confuse the gamer and could make the creature and its intentions hard to decipher. Make sure that they are mixed in at lower volume than the primary sounds.
Remember that all sound design should be clearly understood or legible. If it is felt that a secondary sound conflicts with one of the primary sound effects, you should consider adjusting the mix further or removing it altogether.
b. Emotional Span
Often, game characters, AI or not, will go through a range of emotions in the game’s lifespan. These are often, for AI at least, dictated by the game state and will change based on the gameplay. A sentinel character can be relaxed, alert, fighting, inflict or take damage and possibly kill or die. These actions or states should be reflected sonically of course, by making sure our sound design for each state is clear and convincing. It may be overkill to establish a mood map (but if it helps you, by all means do), yet it is important to make sure that the sounds you create all translate these emotions clearly and give us a wide range of sonic transformations while at the same time clearly appearing to be emanating from the same creature.
The study or observation of how animals express their emotions in the real world is also quite useful. Cats and dogs can be quite expressive, making it clear when they are happy by purring or when they are angry by hissing and growling in a low register, possibly barking etc. Look beyond domestic animals and always try to learn more.
Creatures sound design tends to be approached in one of several ways: by processing and layering human voice recordings, by using animal sounds, by working from entirely removed but sonically interesting material or any combination of these.
c. Working With Vocal Recordings
A common approach to designing creature sounds is to begin with a human voice and emote based on the character in a recording studio. These sounds are usually meant to be further processed, but it is important to record a lot of good quality material at this stage. Do not worry too much about synchronization at this point; this is what editing is for. Try loosely matching animations, that is if any were provided, and record a wide variety of sounds. Your voice or that of the talent may not match the expected range of the character, perhaps lacking depth or having too much of it, but the raw sounds and emotions are more important at this point. Emotion is harder to add to a sound after the fact, and while it can be done, usually by drawing pitch envelopes and layering different sounds together, it is faster to work with a file that already contains the proper emotional message and process it to match the character on screen.
As always, record more material than you think you’re going to need. This will give you more to work with and choose from, always recording multiple takes of each line or sound.
Also make sure your signal path is clean, giving you a good signal to work with in the first place. This means watching out for noise, unwanted room ambiences, room tones etc.
Traditionally, large diaphragm condenser microphones are used for voice recording, but in noisy environments you may obtain cleaner results with a good dynamic microphone, though you might need to add some high-end back into the signal during the design and mix process.
Pitch Shifting in the Context of Creature Design
Your voice talent may sound fabulous and deliver excellent raw material, but it is unlikely that they will be able to sound like a 50 meters tall creature or a ten centimeters fairy. This is where pitch shifting can be extremely helpful. Pitch shifting was detailed in the previous chapters, but there are a few features that are going to be especially helpful in the context of creature sound design.
Since pitch is a good way to gauge the size of a character, it goes without say that raising the pitch will make the creature feel smaller, while lowering it will inevitably increase its perceived size.
The amount of pitch shift to be applied is usually specified in cents and semitones.
Note: there are 12 semitones in an octave and 100 cents in a semitone.
The amount by which to transpose the vocal recording is going to be a product of size and experimentation, yet an often-overlooked feature is the formant shift parameter. Not all pitch shifting plugins have one, but it is recommended to invest in a plugin that does.
Formants are peaks of spectral energy that result from resonances usually created by the physical object that created the sound in the first place. More specifically, when it comes to speech, they are a product of the vocal tract and other physical characteristics of the performer. The frequency of these formants therefore does not change very much, even across the range of a singer, although they are not entirely static in the human voice.
| Formant Frequencies in Hz | E | A | 0h | 0oh` | |
|---|---|---|---|---|---|
|
|
|||||
| Men | Formant 1 | 270 | 660 | 730 | 300 |
| Formant 2 | 2290 | 1720 | 1090 | 870 | |
| Formant 3 | 3010 | 2410 | 2440 | 2240 | |
| Women | Formant 1 | 310 | 860 | 850 | 370 |
| Formant 2 | 2790 | 2050 | 1220 | 950 | |
| Formant 3 | 3310 | 2850 | 2810 | 2670 | |
When applying pitch shifting techniques that transpose the signal and ignore formants, these resonant frequencies also get shifted, implying a smaller and smaller creature as they get shifted upwards. This is the classic ‘chipmunk’ effect. Having individual control over the formants and the amount of the pitch shift can be extremely useful. Lowering the formants without changing the pitch can make a sound appear to be coming from a larger source or creature and inversely. Having independent control of the pitch and formant gives us the ability to create interesting and unusual hybrid sounds.
A lot of pitch correction algorithms provide this functionality as well and are wonderful tools for sound design. Since pitch correction algorithms often include a way to draw pitch, they can also be used to alter the perceived emotion of a recording. By drawing an upward pitch gesture at the end of a sound, it will tend to sound inquisitive, for instance.
Distortion in the Context of Creature Design
Distortion is a great way to add intensity to a sound. The amount and type of distortion should be decided based on experience and experimentation, but when it comes to creature design, distortion can translate into ferocity. Distortion can either be applied to an individual layer of the overall sound or to a submix of sounds to help blend or fuse the sounds into one while making the overall mix slightly more aggressive. Of course, if the desired result is to use distortion to help fuse sounds together and add mild harmonics to our sound, a small amount of distortion should be applied.
Watch out for the overall spectral balance upon applying distortion, as some algorithms tend to take away high frequencies and as a result the overall effect can sound a bit lo-fi. If so, try to adjust the high frequency content by boosting high frequencies using an equalizer or aural exciter.
Note: as with many processes, you might get more natural-sounding results by applying distortion in stages rather than all at once. For large amounts, try splitting the process in two separate plugins, in series each carrying half of the load.
Equalization in the Context of Creature Design
As with any application, a good equalizer will provide you with the ability to fix any tonal issues with the sound or sounds you are working with. Adding bottom end to a growl to make it feel heavier and bigger or simply bringing up the high frequency content after a distortion stage, for instance.
Another less obvious application of equalization is the ability to add formants into a signal that may not contain any or add more formants to a signal that already does. By adding formants found in a human voice to a non-human creature and sounds, we can achieve interesting hybrid resulting sounds.
Since a formant is a buildup of acoustical energy at a specific frequency, it is possible to add formants to a sound by creating very narrow and powerful boosts at the right frequency. This technique was mentioned in Chapter five as a way to add resonances to a sound and therefore make it appear like it takes place in a closed environment.
In order to create convincing formant, drastic equalization curves are required. Some equalizer plugins will include various formants as parts of their presets.
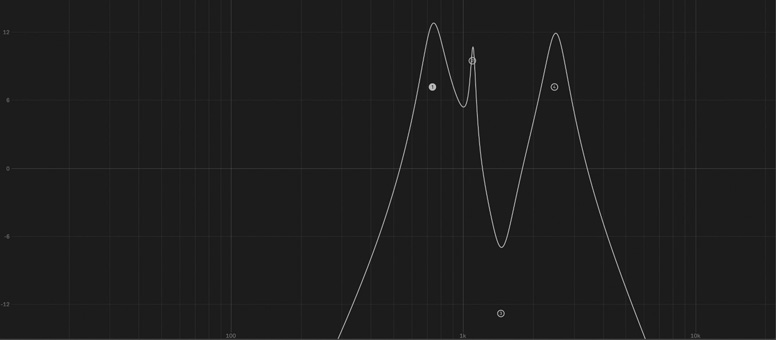
Figure 6.15
d. Working With Animal Samples
Animal samples can provide us with great starting points for our creature sound design. Tigers, lions and bears are indeed a fantastic source of ferocious and terrifying sounds, but at the same time they offer a huge range of emotions: purring, huffing, breathing, whining. The animal kingdom is a very rich one, and do not limit your searches to these obvious candidates. Look far and wide, research other sound designer’s works on films and games and experiment.
The main potential pitfall when working with animal samples is to create something that actually sounds like an animal, in other words too easily recognizable as a lion or large feline for instance. This is usually because the samples used could be processed further in order to make them sound less easily identifiable. Another trick to help disguise sounds further is to chop off the beginning of the sample you are using. By removing the onset portion of a sample you make it harder to identify. Taking this technique further you can also swap the start of a sample with another one, creating a hybrid sound that after further processing will be difficult to identify.
Amplitude Modulation in the Context of Creature Design
Amplitude modulation can be used in two major ways: to create a tremolo effect or to add sidebands to an existing sound. A rapid tremolo effect is a good way to bring up insect-like quality in creatures, such as the rapid wing flap of a fly. It can also be applied to other aspects of a sound and impart to other sounds a similar quality.
When applied as ring modulation, the process will drastically change the current harmonic relationship of the sound by adding sidebands to every frequency component of the original sound while at the same time removing these original components. In other words, ring modulation removes the original partials in the sound file and replaces them with sidebands. While the process can sound a little electronic, it is a great way to drastically change a sound while retaining some of its original properties.
Convolution in the Context of Creature Design
- Convolution can be a potentially very powerful tool for creature sound design. Although most frequently used for reverberation, convolution can be very effective at creating hybrid sounds by taking characteristics of two different sounds and creating a new, hybrid audio file as a result. The outcome will tend to be interesting, perhaps even surprising, as long as both files share a common spectrum. In other words, for convolution to yield its most interesting results, it is best if the files’ frequency content overlaps. You will also find that often, unless the algorithm used compensates for it, the resulting file of a convolution can come out lacking in high frequencies. This is because convolution tends to yield more energy in the areas in both files which share the most, while its output will minimize the frequency content where the energy in either or both files is less strong. High frequencies are often not as powerful in most sounds as other frequency ranges, such as midrange frequencies.
When trying to create hybrid sounds using convolution, first make sure the files you are working with are optimal and share at least some frequency content. You may also find that you get slightly more natural results if you apply an equalizer to emphasize high frequencies in either input file, rather than compensating after the process.
Some convolution plugins will give you control over the window length or size. Although this term, window size, may be labelled slightly differently in different implementations, it is usually expressed as a power of two, such as 256 or 512 samples. This is because most convolution algorithms are implemented in the frequency domain, often via a Fourier algorithm, such as the fast Fourier transform.
In this implementation, both audio signals are broken down into small windows whose length is a power of two, and a frequency analysis is run on each window or frame. The convolution algorithm then performs a spectral multiplication of each frame and outputs a hybrid. The resulting output is then returned to the time domain by performing an inverse Fourier transform.
The process of splitting the audio in windows of a fixed length is not entirely transparent, however. There is a tradeoff at the heart of this process that is common to a lot of FFT-based algorithms: a short window size, such as 256 and under, will tend to result in better time resolution but poorer frequency resolution. Inversely, a larger window size will yield better frequency resolution and a poorer time resolution. In some cases, with larger window sizes, some transients may end up lumped together, disappearing or getting smeared. Take your best guess to choose the best window size based on your material, and adjust from there.
Experimentation and documenting your results are keys to success.
e. Working With Non-Human or Animal Samples
Perhaps not as obvious when gathering material for sound design for creatures and monsters is to use material that comes from entirely different sources than human or animal sources. Remember that we can find interesting sounds all around us, and non-organic elements can be great sources of raw material. Certain types of sounds might be more obvious candidates than others. The sound of a flame thrower can be a great addition to a dragon-like creature, and the sound of scraping concrete blocks or stone can be a great way to add texture to an ancient molten lava monster, but we can also use non-human or animal material for primary sounds such as vocalizations or voices.
Certain sounds naturally exhibit qualities that make them sound organic. The right sound of a bad hinge on a cabinet door, for instance, can sound oddly similar to a moan or creature voice when the door is slowly opening. The sound of a plastic straw pulled out of a fast food cup can also, especially when pitch shifted down, have similar characteristics. The sound of a bike tire pump can sound like air coming out of a large creature’s nostrils and so on. It’s also quite possible to add formants to most sounds using a flexible equalizer as was described in the previous section.
Every situation is different of course, and every creature is too. Keep experimenting with new techniques and materials and trying new sounds and new techniques. Combining material, human, animal and non-organic, can create some of the most interesting and unpredictable results.
4. An Adaptive Crowd Engine Prototype in MaxMSP
Our next example is a simple adaptive crowd engine, built this time in Max-MSP. MaxMSP is a graphical programming environment for audio and visual media. This example is meant to recreate the crowd engines you can find in classic large arena sports games and demonstrate the basic mechanics of how the crowd sounds react to the action.1
In order to create an evolving and dynamic ambience, we will rely on four basic loops, one for each state the crowd can be in: quiet, medium intensity, high intensity, and finally upset or booing.
Rather than doing simple crossfades between two samples, we will rely on an XY pad instead, with each corner linked to an audio file. An XY pad gives us more options and a much more flexible approach than a simple crossfade. By moving the cursor to one of the corners, we can play only one file at a time. By sliding it toward another edge, we can mix between two files at a time, and by placing the cursor in the center of the screen, we can play all four at once. This means that we could, for instance, recreate the excitement of fans as their teams is about to score, while at the same time playing a little of the boos from the opposite teams as they express their discontent. As you can see, XY pads are a great way to create interactive audio objects, certainly not limited to a crowd engine.

Figure 6.16
We will rely on four basic crowd loops for the main sound of the crowd:
- Crowd_Lo_01.wav: A low intensity crowd sample: the crowd is quiet and waiting for something to happen.
- Crowd_Mid_01.wav: A medium intensity crowd sample: the crowd is getting excited while watching a play.
- Crowd_Hi_01.wav: A high intensity crowd sample: the crowd is celebrating a score or play.
- Crowd_Boo_01.wav: the crowd is unhappy and booing the action.
Each one of these samples should loop seamlessly, and we will work with loops about 30 seconds to a minute in length, although that figure can be adjusted to match memory requirement vs. desired complexity and degree of realism of the prototype. As always when choosing loops, make sure that the looping point is seamless but also that the recording doesn’t contain an easily remembered sound, such as an awkward and loud high pitch burst of laughter by someone close to the microphone, which would eventually be remembered by the player and suddenly feel a lot less realistic and would eventually get annoying. In order to load the files into the crowd engine just drag the desired file to the area on each corner labelled drop file.
As previously stated, we will crossfade between these sounds by moving the cursor in the XY pad area. When the cursor is all the way in one corner, only the sound file associated with that corner should play; when the cursor is in the middle, all four sound files should play. Furthermore, for added flexibility, each sound file should also have its own individual sets of controls for pitch, playback speed and volume. We can use the pitch shift as way to increase intensity, by bringing the pitch up slightly when needed or by lowering its pitch slightly to lower the intensity of the sound in a subtle but efficient manner. This is not unlike how we approached the car engine, except that we will use much smaller ranges in this case.
In order to make our crowd engine more realistic we will also add a sweeteners folder. Sweeteners are usually one-shot sounds triggered by the engine to make the sonic environment more dynamic. In the case of a crowd engine these could be additional yells by fans, announcements on the PA, an organ riff at a baseball game etc. We will load samples from a folder and set a random timer for the amount of time between sweeteners. Audio files can be loaded in the engine by dragging and dropping them in each corner of the engine, and sweeteners can be loaded by dropping a folder containing .wav or .aif files into the sweetener area.
Once all the files have been loaded, press the space bar to start the playback. By slowly moving and dragging around the cursor in the XY pad while the audio files are playing, we are able to recreate various moods from the crowd by starting at a corner and moving toward another. The XY pad is convenient because it allows us to mix more than one audio file at once; the center position would play all four, while a corner will only play one.
Recreating the XY pad in Unity would not be very difficult; all it would require are five audio sources, (one for each corner plus one for the sweeteners) and a 2D controller moving on a 2D plane.
The architecture of this XY pad is very open and can be applied to many other situations with few modifications. Further improvements may include the addition of a granular synthesis or other processing stage, which could be used to further animate the audio generated by our engine and obtain a significantly wider range of variations and intensities, albeit at some computational cost. Perhaps a more obvious improvement would be to work with multiple loops for the crowd states, which would also give us more potential for variations. This architecture also does not have to be used for a crowd engine; it could easily be applied to ambiences, machines, vehicles and lots more situations.
Conclusion
Sound design, either linear or interactive, is a skill learned through experimentation and creativity, but that also requires the designer to be organized and aware of the pitfalls ahead of them. When it comes to linear sound design, organizing the session for maximum flexibility while managing dynamic range are going to be some of the most important aspects to watch out for on the technical side of things. When it comes to interactive sound design, being able to build or use prototypes that effectively demonstrate the behavior of the object in the game by simulating the main parameters is also very important. This will allow you to address any potential faults with the mechanics or sound design prior to implementation in the game and communicate more effectively with your programming team.