
One of the most common office functions is sharing/printing documents and files. In this chapter, we will show you how this can be done using Linux. Linux provides many ways to share information. It can share information with Microsoft Windows clients or macOS using an integration tool called Samba. It can also share documents between Linux (and other Unix) hosts using a tool called Network File System (NFS).
In heterogeneous environments, it has become increasingly common to move document management and storage into cloud-based providers. These services are widespread and have several key advantages over traditional file sharing such as version control, multiple device support, collaboration features, and some support workflows. Businesses now expect this ease of access to documents, and neither Samba nor NFS is particularly suited for this work.
To go beyond basic file sharing, though, we are going to introduce you to different platforms that can be cheap and effective for document management. We will give a list of possible alternatives for this.
Lastly, we’ll show you how to configure printing and print services on your Linux host. We’ll demonstrate both how to print from your host and how to make your host act as a print server. Printing on Linux is easy to implement, and both CentOS and Ubuntu share a common toolset that makes it easy to implement and manage.
File Sharing with Samba and NFS
File sharing is the ability to share documents between your users. Rather than everyone keeping company documents on their individual desktop computers and passing them via means such as e-mail, we centralize the documents in one place and allow our staff to access them in a controlled and secure way. The benefits of this are enormous, as it cuts down on the proliferation of multiple copies of one document on everyone’s desktops and makes restricting access and backing up documents much easier. Certain applications require a file share before they can be accessed by desktop clients, and file sharing can be used for this.
On your desktops, you can mount a network drive. A file share can be assigned when you log in to your host either via a domain controller that runs login scripts or manually when you require one. You can also mount file shares on your Linux desktop. Linux desktops can easily mount a Samba or NFS share; however, they can’t run Windows executable files without some modification.
Note
You may get some success running some Windows applications using software developed by Wine ( www.winehq.org ). This open source community works on integrating a selected group of Windows applications to run on Linux operating systems (or macOS). There is also a supported version offered by sister organization CodeWeavers ( www.codeweavers.com ).
File sharing can be achieved in many ways using Linux, depending on your needs for access, security, and the clients you have to support. Linux can provide a good platform for traditional file sharing, as it gives you the ability to mount a network drive on your client host. This allows for access to common data shared by a centralized file server host. The two main tools for achieving this are Samba for Microsoft Windows desktops and NFS for Linux or Unix hosts (macOS can use either).
Samba can provide user authentication for file shares and printer services. NFS on its own does not provide any user authentication, but it can be integrated into a Kerberos domain for authentication. This is complicated to set up, and we will not attempt to cover it in this book.
Next, we give you an up-close look at Samba.
Samba
Samba is a file-sharing and printing service for Linux. It operates in the standard client-server model with a daemon accepting requests from network clients. It is based on the Common Internet Filesystem (CIFS) and Server Message Block (SMB) protocols, the protocols that handle interhost communications of the filesystem on Microsoft products, making Samba compatible with Microsoft Windows desktop clients and Microsoft Windows domain services.
There are currently two supported versions of Samba, version 3.x and version 4.x. What you are trying to achieve will form your view as to which is best for you. Version 4.x is emulating Active Directory (AD), while version 3.x is more like NT 4. Version 3.x supports Lightweight Directory Access Protocol (LDAP) integration, while LDAP integration in version 4.x is still experimental. Also, Samba 4 currently supports up to Windows Server 2012 R2, but 2012 servers will require a Windows 2008 server to join the Samba AD first. Windows Server 2012 or 2012 R2 directory schemas are currently experimental. Please see https://wiki.samba.org/index.php/Joining_a_Windows_Client_or_Server_to_a_Domain to find out what clients are supported and how to join a domain for Windows clients and servers (2008 and 2012).
In this example, we are going to show you how to implement version 4.x of Samba and mount a drive on our macOS host. We show you how to set up a simple file using Samba that will allow you to share documents with your co-workers. You will also learn how to set up a Samba AD domain server so your users can authenticate, as well as how to set up a departmental share that you can also mount to your desktop.
Also, in this example, it is important to note that we are going to create a samba.example.com Domain Name System (DNS) subdomain. This is because Samba is going to manage this subdomain, which would conflict with our example.com domain. We are also setting up only one domain controller and having that act as our file server. The Samba documentation recommends that this setup is not suitable for production use, but instead we should have one or two Samba AD and a couple of file servers that hang off the ADs. Having more than one AD allows for ease of maintenance (you can perform maintenance on one while still serving with the other), reliability, and availability.
First you need to install the software. Both CentOS and Ubuntu require the same packages to get Samba up and running.
On CentOS, you issue the following:
$ sudo yum install samba-client samba-common samba winbindHowever, CentOS 7 does not provide the samba-tool binary that we require to configure Samba AD. You can configure Samba as a classic NT4 server or you can buy a Samba software subscription from https://www.sernet.de/en/samba/samba/ for CentOS. We suggest that you just use Samba with Ubuntu instead.
On Ubuntu, you issue the following:
$ sudo aptitude install samba-client samba-common samba winbindConfiguring Samba AD
We are going to install Samba on our Ubuntu server. To do that, we need to do several things.
Set the hostname
Update Apparmor
Update DNS
Once these tasks are done, we can configure Samba.
First we need to make sure that our hostname is set correctly. We are going to use the hostname dc1.samba.example.com, which is unique in our domain. For a complete understanding of Samba naming recommendations, please read https://wiki.samba.org/index.php/Active_Directory_Naming_FAQ . Our host needs to match the following configuration:
$ hostname –sdc1$ hostname –dsamba.example.com
It is a good idea to add dc1.samba.example.com to your /etc/hosts file too.
127.0.0.1 localhost dc1 dc1.samba.example.comAlso, because we are going to let Samba manage its own DNS subdomain, we need to allow it access to bind configuration. The bind9 server must be on the same server as the Samba AD server as it requires access to certain directories. Because we are using an Ubuntu server, we need to make some changes to Apparmor that will allow the bind9 service to access Samba directories. Remember, we spoke about Apparmor in Chapter 12; it is a security module that describes security access for system resources (such as ports and files).
We will add the following to our /etc/apparmor.d/local/usr.sbin.named file, remembering that we add localhost changes into the /etc/apparmor.d/local directory:
# Samba4 DLZ and Active Directory Zones/var/lib/samba/lib/** rm,/var/lib/samba/private/dns.keytab r,/var/lib/samba/private/named.conf r,/var/lib/samba/private/dns/** rwk,
After saving this file, we then need to load this into Apparmor with the following:
$ sudo apparmor_parser -r /etc/apparmor.d/usr.sbin.namedTo configure our bind9 service in preparation for our Samba configuration, we are going to add the following to the bottom of our /etc/bind/named.conf.options file:
include "/var/lib/samba/private/named.conf";We will need to reload our bind9 configuration with the following:
$ sudo rndc reloadNow it’s time to configure Samba. Samba provides a tool, called samba-tool, to help configure the Samba server. You may need to remove or copy off any existing /etc/samba/smb.conf file that is present on your system as the following command will create a new file for you.
In Listing 13-1, we have used samba-tool in interactive mode (--interactive). For a full list of options that you can provide on the command line, see samba-tool provision --help. We have provided the --use-rfc2307 option, which tells Samba to store user and group information in the internal LDAP directory. This is useful for maintaining consistent user IDs/group IDs (UIDs/GIDs) across domain members and has some associated benefits; see https://wiki.samba.org/index.php/Setting_up_RFC2307_in_AD . We have also provided our preferred hostname (--host-name), dc1.
Listing 13-1. Configuring Samba with samba-tool
$ sudo samba-tool domain provision --use-rfc2307 --host-name=dc1 --interactiveRealm [SAMBA.EXAMPLE.COM]:Domain [SAMBA]:Server Role (dc, member, standalone) [dc]:DNS backend (SAMBA_INTERNAL, BIND9_FLATFILE, BIND9_DLZ, NONE) [SAMBA_INTERNAL]: BIND9_DLZAdministrator password:Retype password:Looking up IPv4 addressesMore than one IPv4 address found. Using 192.168.0.10Looking up IPv6 addressesNo IPv6 address will be assignedSetting up secrets.ldbSetting up the registrySetting up the privileges databaseSetting up idmap dbSetting up SAM dbSetting up sam.ldb partitions and settingsSetting up sam.ldb rootDSEPre-loading the Samba 4 and AD schemaAdding DomainDN: DC=samba,DC=example,DC=comAdding configuration containerSetting up sam.ldb schemaSetting up sam.ldb configuration dataSetting up display specifiersModifying display specifiersAdding users containerModifying users containerAdding computers containerModifying computers containerSetting up sam.ldb dataSetting up well known security principalsSetting up sam.ldb users and groupsSetting up self joinAdding DNS accountsCreating CN=MicrosoftDNS,CN=System,DC=samba,DC=example,DC=comCreating DomainDnsZones and ForestDnsZones partitionsPopulating DomainDnsZones and ForestDnsZones partitionsSee /var/lib/samba/private/named.conf for an example configuration include file for BINDand /var/lib/samba/private/named.txt for further documentation required for secure DNS updatesSetting up sam.ldb rootDSE marking as synchronizedFixing provision GUIDsA Kerberos configuration suitable for Samba 4 has been generated at /var/lib/samba/private/krb5.confSetting up fake yp server settingsOnce the above files are installed, your Samba4 server will be ready to useServer Role: active directory domain controllerHostname: dc1NetBIOS Domain: SAMBADNS Domain: samba.example.comDOMAIN SID: S-1-5-21-295742502-4045385941-247307200
In interactive mode we are given the defaults in the [] brackets, and we have chosen the defaults for Realm, Domain, and Server Role. The Server Role setting is dc, which stands for domain controller , meaning we are the authority for the Samba Windows domain, SAMBA.
For DNS , we have the options SAMBA_INTERNAL, BIND9_FLATFILE, BIND9_DLZ, and NONE. We have chosen BIND9_DLZ, which will tells Samba to manage our DNS subdomain dynamically through the special Samba module we included in our named.conf.options file previously. Samba will create all the necessary DNS records required during the setup process. SAMBA_INTERNAL is also suitable if you want to let Samba own and manage your DNS setup. BIND9_FLATFILE is not a recommended option, and you should choose NONE if you want to completely manage your own DNS.
You will be asked to provide the administrator password. The password needs to be eight or more characters and complex, requiring symbols, letters, and numbers. Once that has been entered, the setup of Samba completes quickly. Once it is complete, we can start our service.
$ sudo systemctl start samba-ad-dcThis starts the Samba service, and you can use the systemctl status samba-ad-dc command to check it has started alright. Also, remember to enable it on boot with systemctl enable samba-ad-dc.
Testing Samba
Now we can test that we can authenticate against the service. To do that, we use the smbclient command, which is the tool used to interact with the Samba service.
$ smbclient –L dc1 -U AdministratorEnter Administrator's password:Domain=[EXAMPLE] OS=[Windows 6.1] Server=[Samba 4.3.9-Ubuntu]Sharename Type Comment--------- ---- -------netlogon Disksysvol DiskIPC$ IPC IPC Service (Samba 4.3.9-Ubuntu)Domain=[EXAMPLE] OS=[Windows 6.1] Server=[Samba 4.3.9-Ubuntu]Server Comment--------- -------Workgroup Master--------- -------WORKGROUP DC1
Here we have gotten a listing (-L) from our dc1 Samba service using the Administrator user (-U) to authenticate. If you get errors here, then you have made an error in your setup. There is a troubleshooting page that might help you here: https://wiki.samba.org/index.php/Samba_AD_DC_Troubleshooting .
You can see from the test that we have two disk shares (netlogon and sysvol) and one IPC$ (interprocess connection for communicating with Samba). We can run the ls command (-c) to get a listing of the netlogon share, again testing that we can list the netlogon share.
$ smbclient //localhost/netlogon -UAdministrator -c 'ls'Enter Administrator's password:Domain=[EXAMPLE] OS=[Windows 6.1] Server=[Samba 4.3.9-Ubuntu]. D 0 Sat Sep 24 14:02:06 2016.. D 0 Sat Sep 24 14:02:15 201610098468 blocks of size 1024. 7667640 blocks available
Testing DNS
We can test our DNS responses now too. For Samba to act as a domain controller, it must respond to the following text record requests:
$ host -t SRV _ldap._tcp.samba.example.com._ldap._tcp.samba.example.com has SRV record 0 100 389 dc1.samba.example.com.$ host -t SRV _kerberos._udp.samba.example.com._kerberos._udp.samba.example.com has SRV record 0 100 88 dc1.samba.example.com.$ host -t A dc1.samba.example.com.dc1.samba.example.com has address 192.168.0.10
Here we have tested that we can resolve the LDAP service record, the Kerberos service record, and the A record for dc1.samba.example.com. If this resolves correctly, then Samba can use our bind9 DNS service correctly.
If this does not work, check the bind service for any errors, starting with /var/log/syslog.
Testing Kerberos
Kerberos is a network authentication protocol that can be used to join Active Directory services together and authenticate users and machines. Kerberos is installed as part of the automatic installation of Samba. Since we have only one Samba server, it is not really required unless we are joining another Active Directory domain controller or we want to authenticate our Linux user accounts via the Samba service as a single sign-on authority.
Before we can test our Kerberos configuration, we first need to create a symlink. The output in Listing 13-1 tells us that the Kerberos configuration file has been generated and placed in /var/lib/samba/private/krb5.conf. We are going to symlink that to /etc/krb5.conf.
$ sudo ln –sf /var/lib/samba/private/krb5.conf /etc/krb5.confTaking a look at that file, we can see that it looks like this:
[libdefaults]default_realm = SAMBA.EXAMPLE.COMdns_lookup_realm = falsedns_lookup_kdc = true
The dns_lookup_ option determines whether we use DNS lookups for SRV records. We have already tested the SRV record (host -t SRV _kerberos._udp.samba.example.com.) in our DNS tests previously and have confirmed that it is working for our KDC (Kerberos Domain Controller).
Let’s now test the implementation to make sure it is working correctly. We are going to obtain a Kerberos ticket and then verify it.
$ kinit [email protected]Password for [email protected]:Warning: Your password will expire in 41 days on Mon 07 Nov 2016 11:04:17 PM UTC
You do need to specify capital letters for the domain. Now let’s look at our ticket:
$ klistTicket cache: FILE:/tmp/krb5cc_1000Default principal: [email protected]Valid starting Expires Service principal09/26/2016 23:34:37 09/27/2016 09:34:37 krbtgt/[email protected]renew until 09/27/2016 23:34:30
That proves Kerberos is working correctly. We are all set to create a share now.
Note
Kerberos can be a pretty complex and daunting topic. You may like to read the following for a gentle introduction: www.roguelynn.com/words/explain-like-im-5-kerberos/ .
Configuring Samba Shares
To access Samba shares, there will be several things we will need to do:
Add the share to smb.conf
Create the directory and add permissions
Create any system users that are necessary
Add Samba users to Samba
Let’s start by looking at the Samba configuration file we are going to use. This is what is created by the provision process.
The configuration file can be broken up into two sections, the [global] configuration options and then the specific configuration options, such as [netlogon], [sysvol], and so forth (see Listing 13-2). The [global] section, as the name implies, defines the configuration options that affect the whole server, and the specific configurations in [netlogon] and [sysvol] affect only those services they are trying to define.
Listing 13-2. Samba /etc/samba/smb.conf File
# Global parameters[global]workgroup = SAMBArealm = SAMBA.EXAMPLE.COMnetbios name = DC1server role = active directory domain controllerserver services = s3fs, rpc, nbt, wrepl, ldap, cldap, kdc, drepl, winbindd, ntp_signd, kcc, dnsupdateidmap_ldb:use rfc2307 = yes[netlogon]path = /var/lib/samba/sysvol/samba.example.com/scriptsread only = No[sysvol]path = /var/lib/samba/sysvolread only = No
Let’s go through the [Global] section. First you see the option workgroup. This option should be familiar to you if you are a Windows user. It is the workgroup name that will appear in your network neighborhood. A workgroupis a collection of computers sharing information. Usually, in a workgroup, the computers do not have central authentication, and each host in the workgroup takes care of its own authentication. In other words, you maintain a list of users with access to each host on each host.
Central authentication is achieved when one of the hosts in the workgroup becomes a primary domain controller (PDC) . Hosts join the domain and then use the PDC to authenticate user access to their resources. If the host is not part of a domain, it can still share resources, but it will have to maintain its own authentication and access lists.
Setting the workgroup here does not make our host a PDC, just part of a workgroup. We have set this to our domain name, EXAMPLE.
workgroup = SAMBANext you need to configure NetBIOS . NetBIOS is a local broadcast protocol that is used to handle connection information between hosts. NetBIOS information is used to match names to Internet Protocol (IP) addresses in WINS servers, kind of like DNS. The NetBIOS protocol itself is used for a name service, session service, and datagram server. As you can see in Listing 13-2, we are setting the netbios name option to dc1, and we will be able to use this NetBIOS name to refer to our host.
Note
If you are interested in a further explanation of NetBIOS, please read http://en.wikipedia.org/wiki/NetBIOS .
The server role directive is set to active directory domain controller. This obviously means that we are operating an AD DC. If you were to use the classic domain controller, you would set it here (NT4). The server services directive defines the services that this server supports. You can add or remove services here with a + or -, like -kdc.
You can further control access to your Samba service by specifying what hosts can access your service by using the hosts allow option. In our configuration, we specify the loopback network and the 192.168.0. network. The notations 127. and 192.168.0. are equivalent to specifying the network masks 127.0.0.0/8 and 192.168.0.0/24, respectively. Here you can also specify individual hosts by using their full IP address and exclude certain hosts by using the EXCEPT clause. For example, if we want to allow access to all hosts on our 192.168.0. network except a naughty host with the address 192.168.0.15, we would use the following in hosts allow:
hosts allow = 127. 192.168.0. EXCEPT 192.168.0.15You can also use fully qualified domain names (FQDNs) like headoffice.example.com or gateway.example.com to specify individual hosts. We don’t show it here, but hosts deny allows you to list the hosts and networks you do not want to access this service.
We are going to have the networks 192.168.0.0 to 192.168.30.0 access this Samba service, so we will specify the following, which will allow any address in the 192.168.0.0/16 range to connect:
hosts allow = 127. 192.168.Samba considers some of the services, demarcated in sections beginning with the [] brackets, to be “special.” Specifically, [global], [printers], and [homes] describe special services. Samba treats these services differently from, say, a [sales] or [tmp] share.
For example, as you would expect, when Samba receives a file via the [printer] service, it deals with it differently from a file received via a user-defined [tmp] service. Samba has functions that are associated with definitions only in these “special” services. In this example, a path definition in [printer] defines a spooling directory. When your printer spools your printout to this path via the [printer] service, Samba automatically passes it on to CUPS for printing. Setting the value for path in another service will not trigger this behavior. This special behavior also applies to [homes], where Samba will create home directories dynamically if required. You can read more under the “Special Sections” section in the smb.conf man page.
When you define your own services, you use a set of directives that are common to special services and user-defined services. In Table 13-1, we have listed the directives that we will use in our example. You would use these directives to alter or create your own services.
Table 13-1. Samba Service Directives
Directive | Description |
|---|---|
path | Defines the path of the share you are describing (e.g., /tmp). |
browseable | Describes whether the share is visible in the browser list of shares. |
comment | Gives a description of the share. |
writable | Indicates the share can be written to, as opposed to being read-only. |
readonly | Signifies the share is read-only. |
printable | Allows spool files to be created and submitted to the share. Applies to printing only. |
guest ok | Indicates no password is required for the share. Default is no. Also called public. |
valid users | Specifies a list of users allowed to use this service. |
write list | Specifies a list of users/groups that can read/write to a share regardless of the readonly setting. |
force user | Assigns a default user to all connections to this share. |
force group | Assigns a default group to all connections to this host. |
force create mode | Forces Unix permissions on files that are created. |
force directory mode | Forces Unix permissions on directories that are created. |
create mask | Sets Unix permissions on files that are created. |
directory mask | Sets Unix permissions on directories that are created. |
You can use these service directives to define the path and access rights to your shares. There are many more directives available, and you can find a comprehensive explanation of them in the man smb.conf page.
The [netlogon] share is not classified as a special service in Samba, but it is a standard service in many default smb.conf files and is included by default in the Ubuntu and CentOS Samba packages. That and [sysvol] have been created as part of the default configuration process. The [netlogon] service is used to authenticate Windows clients and can contain things such as login scripts and other information. The [sysvol] service is required by each domain controller and is a folder that is replicated on other domain controllers.
We are going to add the following to the section at the end of the file to set up a sales share that members of the sales group can share:
[sales]comment = shared sales directorypath = /data/staff/salesreadonly = yespublic = nobrowseable = yesvalid users = +SAMBAsaleswrite list = jsmith, bsinghforce create mode = 0770force directory mode = 2770create mask = 0770directory mask = 2770force group = salesforce user = exbackup
We have added a share called [sales]. This share is to be made available to our sales staff only. We have decided to put our staff-shared documents into the /data/staff directory, and the sales directory will be under that. We have specified that it should be read-only by default (readonly = yes). This stops unintended users from writing to this directory. We have also denied public or guest users (public = no). It is browsable (browserable = yes), so it will appear in share browser lists for this Samba server. We have also specified here a valid users list, which is set to the sales group (valid users = +SAMBAsales). The + indicates to Samba to look through the local Unix user/group lists. The people in the sales group will have read-only access to the [sales] share. We then specify exactly who we want to have read/write access, jsmith and bsingh. We could use group lists here as well. If we had a group called sales_admins, we could add write list = @sales_admins.
The last section ensures that files and directories are created with the correct ownership, group, and permissions. We don’t want users owning their own documents throughout the directory tree and then having to get someone to change the permissions or ownership for them later when they want to share those documents with others. We want the owner to always be exbackupso that we will always be able to access the shares with our backup scripts, and we want the shares to have group ownership according to their departmental group. We want files to be readable and writable, and for directories we should give full access to the specified users and groups but no access for the general public.
force create mode = 0770force directory mode = 2770create mask = 0770directory mask = 2770force group = salesforce user = exbackup
As you saw in Chapter 4, the permissions here are read, write, and execute/access on all files and directories. This might be too liberal for your requirements, but it gives you an idea how to use the permissions. You might want to create files with only 0660 permissions, which is entirely reasonable but might entail some administration overhead.
Samba should automatically load your new configuration without a need to restart the service; however, if you do not see your configuration, you can restart the service with the following:
$ sudo systemctl restart samba-ad-dcAdding Users to Samba
We now have a basic Samba configuration. You can add your own shares to this configuration as you see fit. There are several things we need to do now to the host to get it ready for users. We are shortly going to create our Samba users and groups via the samba-tool command, and once that is done, we will create our directories and assign permissions.
We have set up Samba in such a way that requires user accounts to be administered on the Samba host. Samba provides a subcommand to samba-tool to administer user accounts on your Samba host. The tool samba-tooluses the following syntax:
$ sudo samba-tool user --helpUsage: samba-tool user <subcommand>User management.Options:-h, --help show this help message and exitAvailable subcommands:add - Create a new user.create - Create a new user.delete - Delete a user.disable - Disable an user.enable - Enable an user.list - List all users.password - Change password for a user account (the one provided in authentication).setexpiry - Set the expiration of a user account.setpassword - Set or reset the password of a user account.For more help on a specific subcommand, please type: samba-tool user <subcommand> (-h|--help)
Let’s list the current users we have.
$ sudo samba-tool user listAdministratordns-dc1krbtgtGuest
You can see that we have four current users that have been created by the Samba provisioning. We are going to add two more users, jsmith and bsingh, who are part of the sales team.
$ sudo samba-tool user create jsmithNew Password:Retype Password:User 'jsmith' created successfully
We have added a new user called jsmith. We will do the same for bsingh. The password should be at least 8 characters and complex.
Unfortunately, tbear has just left the firm, and his Samba account needs to be disabled. To do that, we disable tbear’s details like so:
$ sudo samba-tool user disable tbearDisabled user tbear
If we wanted to remove him completely, we would use samba-tool user delete.
Next we are going to create our sales group, and then we will add jsmith and bsingh to it. We use samba-tool again via the group subcommand. Issuing help shows our options.
$ sudo samba-tool groupUsage: samba-tool group <subcommand>Group management.Options:-h, --help show this help message and exitAvailable subcommands:add - Creates a new AD group.addmembers - Add members to an AD group.delete - Deletes an AD group.list - List all groups.listmembers - List all members of an AD group.removemembers - Remove members from an AD group.For more help on a specific subcommand, please type: samba-tool group <subcommand> (-h|--help)
As you can see, it is similar to the user subcommand. First let’s add the sales group.
$ sudo samba-tool group add salesAdded group sales
That is simple, and you should add the group staff too. We can now add our users to the sales group.
$ sudo samba-tool group addmembers sales jsmith,bsinghAdded members to group sales
We can list the members of the sales group now.
$ sudo samba-tool group listmembers salesjsmithbsingh
We can delete groups and remove members of groups with the following:
$ sudo samba-tool group removemembers sales tbearRemoved members from group sales
We have removed the user tbear from the sales group; we can also delete the fails group with the following:
$ sudo samba-tool group delete failsDeleted group fails
Samba will authenticate our users and provide them with access to any shares they have access to. Samba will use Winbind to authenticate and map users and groups for us. We still need to create one Linux system user, though. This user will own the files and therefore needs to exist on each Samba server. This user will be our backup user. We will show you more on how we will use this user in our backup strategies in Chapter 14.
$ sudo useradd –u 903 exbackupNext, we need to create the directory /data/staff/sales. We will make exbackup the owner of the files and directories in /data/staff. We need to make sure that the appropriate groups can access the shares we have defined, and we will do that shortly.
$ sudo mkdir –p /data/staff/sales$ sudo chown exbackup –R /data/staff
Note
Any of these user and group IDs are arbitrary, and they may already be used on your host. You may want to choose a different range for your network. Remember, ID values less than 1000 are reserved for system accounts.
We have set up the sales group in Samba. We need to query Winbind now to get the GID that has been assigned to the sales group, and then we will change the group ownership on our directories. These users and group don’t exist in the normal Linux /etc/passwd or /etc/group file, so we need to use the GID that Samba will use when accessing files and directories.
$ wbinfo --group-info salesSAMBAsales:x:3000010:
We can see that wbinfo has queried the group information for the sales group and the GID 3000010 has been assigned to it. We will use this GID to change the group ownership.
$ sudo chgrp 3000010 /data/staff/salesWe also found that the staff GID was 3000012, and we will use that here:
$ sudo chgrp 3000012 /data/staffNow we have set permissions on those directories. We want to prevent general access to the directories and allow only defined users and groups.
$ sudo chmod 0750 /data && sudo chmod 2750 /data/staff&& sudo chmod 2770 –R /data/staff/sales
We are now ready to use our Samba service .
Required iptables Rules for Samba
Samba 4 requires the following ports to be open in your firewall:
UDP protocol on ports 137 and 138 for NetBIOS name services
TCP protocol on port 139 for NetBIOS sessions
The Microsoft-dn TCP port 445 for the Samba server
For Ubuntu we just need to add the following commands:
$ sudo ufw allow samba$ sudo ufw allow bind9
There are many ports that are listening with Samba. It is a good idea to change your ufw default policy to deny to deny access to ports unless explicitly allowed.
$ sudo ufw default denyThis should be done with some caution as it can block other legitimate processes listening on the host.
Note
We discussed iptables in Chapter 7.
Mounting Samba Shares on Linux
Linux hosts can also mount Windows shares using the mount command and the cifs type. You will need to install the cifs-utils package. However, some Linux distributions do not include the ability to read and write to NTFS shares, as Microsoft considers it a breach of its patent to do so. Both distributions allow the ability to mount NTFS and FAT filesystems, and you can find it in the cifs-utils package.
You will need to create the /data/sales directory. To mount the Samba share on a Linux host, you would do something similar to the following:
$ sudo mount -t cifs //dc1.samba.example.com/sales /data/sales -o username=jsmithPassword for [email protected]: *****************
This will mount the remote Samba share /data/staff/sales under the /data/sales directory. You pass the remote host and your username. You will be asked to provide a password, and then the share should be mounted under the /data directory. For more information on mounting Samba shares, read the man mount.cifs page.
We can see the mounted share with our mount command.
$ sudo mount\dc1.samba.example.comsales on /data/sales type cifs (rw,relatime,vers=1.0,cache=strict,username=jsmith,domain=SAMBA,uid=0,noforceuid,gid=0,noforcegid,addr=192.168.0.1,unix,posixpaths,serverino,acl,rsize=61440,wsize=65536,actimeo=1)
The default options for cifs mount can be found in the previous example, the full details of which can be found in the man mount.cifs page. You can see the username we attach as; the domain is SAMBA. You can see rsize and wsize, which are the maximum byte size of data that can be sent between the host and the Samba server, and this is configurable if need be. cache=strict sets the caching strategy to support and follows the CIF/SMB2 protocol; other options are none and loosely.
If we want to automount this via fstab, we will need to provide credentials at boot time. These credentials need to be provided in plain text in a file on the filesystem, preferably the user’s home directory. This, of course, is a security concern as storing plain-text credentials on filesystems can be snooped on compromised systems and be used to gain access to other systems. However, if you choose this path, you might like to have separate credentials for Samba from other systems (which adds to the administration burden).
So, you will first need to create the .smb_credentials file in the home directory. It should contain the following:
username=bsinghpassword=C0mpl#xp$sSw0rd
You should secure it with the following:
$ chmod 0600 .smb_credentialsYou will need to edit your /etc/fstab file and add the following for automounting:
//dc1.samba.example.com/sales /data/sales cifs _netdev,credentials=/home/bsingh/.smb_credentialsThis is useful for single desktop access but becomes more complicated if you have people sharing development servers.
Where you have many people sharing one server, you can share access to shared directories using the multiuser mount option. The users gain access to these shares via a local user and a shared mount connection. For example, users jsmith and bsingh can share one common mount, via a common local user.
In this example, the group sales does not need to exist on the local Linux server we are mounting the share on, but the user exbackup also needs to exist. There are local user accounts on the Linux server for jsmith and bsingh too.
On the Samba server, we will create a user that we will use as a set of shared credentials for mounting. Remember to give this user a unique complex password.
$ sudo samba-tool user add sharedcredsWe will add them to sales group.
$ sudo samba-tool group addmembers sales sharedcredsWhen we normally mount the share, we provide a username and password, and we use that to manage our mount. This allows for only one mount of /data/sales and only one set of user credentials being able to access it. In the shared multiuser environment, we can mount the share with one common user. From our user session on the local Linux server , we can then provide our credentials to the kernel, and it will allow us to access the share with those credentials.
On the local Linux server we are going to mount /data/sales as the sharedcreds user (a user that does not exist on the local Linux server). We do this via the cifscreds command like so:
$ sudo cifscreds add -u sharedcreds dc1.samba.example.comWe can use any user that has sudo access to do this. We provide the add argument, the user, and the hosts that we want to provide access to. To remove these credentials, we can issue the following:
$ sudo cifscreds clear –u sharedcredsTake a look at the man page for cifscreds for other options. We can now mount the share on the local server with the following command:
$ sudo mount -tcifs //dc1.samba.example.com/sales /data/sales/ -o multiuser,username=sharedcreds,uid=exbackup,gid=3000017
This mounts the /data/sales share using the sharedcreds user. But because there is no local sharedcreds user, we don’t have access to write into /data/sales. If we see the perspective from jsmith, we can see that it too does not have access.
[jsmith@backup]$ cp text.file /data/sales/cp: cannot create regular file '/data/sales/text.file': Permission denied[jsmith@backup ∼]$ ll /data/ls: cannot access /data/sales: Permission deniedtotal 20d?????????? ? ? ? ? ? sales
The user jsmith cannot even see the permissions on the /data/sales directory, which is the reason for ????. We need to provide our credentials to the kernel for jsmith too so that it can manage our session to that mount.
$ sudo cifscreds add –u jsmith dc1.samba.example.comThe jsmith user will need sudo access to cifscreds; otherwise, it will not be able to execute that command. Now that we have added our credentials to the kernel, we can list the sales directory and read and write from and to it using the exbackup and sales group permissions.
[jsmith@backup ∼]$ ll /data/sales/total 1405408-rwxrwx---+ 1 exbackup 3000017 66376 Nov 26 17:14 logo.png-rwxrwx---+ 1 exbackup 3000017 479678976 Nov 27 13:21 forecast-2016.xls-rwxrwx---+ 1 exbackup 3000017 479678976 Nov 27 14:04 media.docx
Now, bsingh also needs to access to the sales directory. We need to add the user to the Samba sales group and then set their Samba credential in their user session on the local Linux server. So, on the Samba server, we issue the following:
$ sudo samba-tools group addmembers sales bsinghNow in bsingh’s local Linux server sign-in, we issue the following:
$ sudo cifscreds add -u bsingh dc1.samba.example.comNow bsingh too can access the Samba share mounted on /data/sales.
Mounting Shares on macOS
We are going to show you how to mount your Linux Samba shares on macOS using the graphical interface. This is an easy procedure on macOS or Windows desktops and follows the same pattern.
We will need to be able to resolve the hostname of the Samba server. If you can’t resolve the dc1.samba.exmaple.com hostname, check your /etc/resolv.conf or, if you are using Windows, your network settings.
First we use Finder to mount our Samba share. Once the application is started, select Go ➤ Connect to Server, or you can press ⌘ K and get to the same screen.
In Figure 13-1 we just add our server address and click Connect.
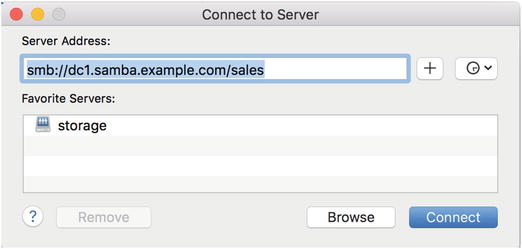
Figure 13-1. Adding server address
The next step is to add credentials, as shown in Figure 13-2.
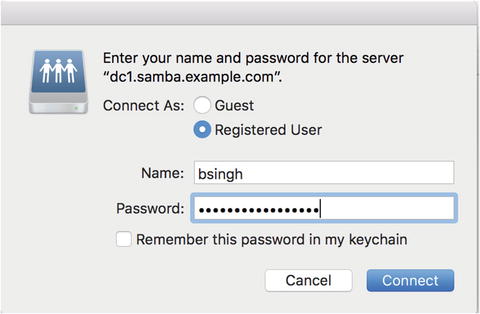
Figure 13-2. Adding Samba credentials
If we want to keep these credentials securely, we can add them to our keychain , which is an encrypted safe for credentials (Figure 13-3).
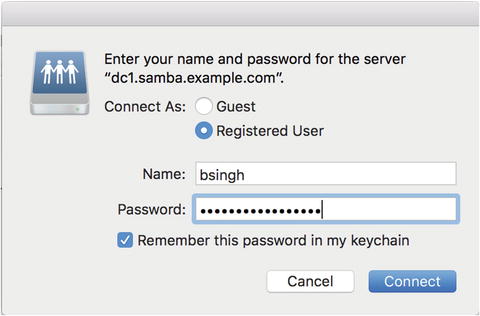
Figure 13-3. Adding credentials to the keychain
Now all we need to do is click Connect (Figure 13-4 ).

Figure 13-4. Successfully mounted
As shown in Figure 13-4 we have a successfully mounted sales directory. There are plenty of instructional pages on the Internet that can help you with your particular version of software or help you with different errors that may pop for both Windows and macOS .
There are already several resources about mounting drives for Windows hosts available online, like this one: www.laptopmag.com/articles/map-network-drive-windows-10 . We will leave that as an exercise for you. The process is similar to how we mounted the drive for our Mac and is similar to mounting other Windows network drives.
Resources
For more information on setting up Samba, please see the following resources:
NFS Shares: Linux to Linux
Linux hosts can also mount shares from each other much in the same way that Samba does. Traditionally, this is achieved on Linux and Unix hosts via Network File System (NFS). The latest version, NFS 4, has many advantages over previous NFS versions. Namely, now it requires only one port, where before it required several, and prior to that you couldn’t tell what ports it was going to use! This made it impossible to use firewalls, which of course made many security administrators immensely happy to deny its existence on their networks. It has learned from this and today is a respectable network citizen.
We will quickly show you how to share a filesystem , commonly called a network mount, between hosts. On Ubuntu hosts, you will need to install the nfs-server package. On CentOS hosts, you will need to install nfs-utils.
NFS requires port TCP 2049 to be opened on your firewall. You would add it like so for CentOS:
$ sudo firewall-cmd --permanent --zone public --add-service nfs$ sudo firewall-cmd --reload
On Ubuntu you would add the following:
$ sudo ufw allow 2049/tcpLet’s now make sure that the NFS server is running on our host. If it is not running, you can start it by issuing the following (swapping nfs for nfs-server on Ubuntu):
$ sudo systemctl restart nfs$ sudo systemctl enable nfs
Once done, you need to edit the /etc/exports file.
NFS reads its share instruction from the /etc/exports file. Here you add the directories you want to share along with some options as to how you want them shared. You need to use the following syntax:
directory network(nfs_options),network(nfs_options)You select the directory you want to share, the network to which you want it shared, and then several NFS options. Take a look at the one we are going to use:
/data/staff 192.168.0.2/255.255.255.255(rw,root_squash,fsid=0)Here we are going to share the /data/staff directory to the host at 192.168.0.2/32. This IP address can also be an FQDN, like fileserver2.example.com, or a whole domain, like *.example.com, like this:
/data/staff 192.168.0(rw,root_squash,fsid=0) *.example.com(rw,root_squash,fsid=0)Next, we set the following options: rw,root_squash,fsid=0. The first option (rw) allows the share to be readable and writable. The option root_squash means that the root user on the remote host has the UID/GID set to the anonymous UID/GID—which means this user’s root powers are valid on this share. This is to protect the network mount from being compromised by the remote root user.
The fsid option identifies the filesystem that NFS is exporting. This (fsid=0) is telling NFS that /data/staff is the root of all the exported filesystems and not /data. This means that when we issue the following mount command:
$ sudo mount nfs1:/ /path/to/mountpointonly /data/staff, and everything under it, will be mountable from nfs1:/. This also means that you don’t have to specify nfs1:/data/staff with your mount command. You will also not be able to see any other directory in the /data directory when you mount nfs1:/.
There are many other options that can be specified, and we suggest you read the man page for exports to get further details. To make these settings active, you need to run the following command:
$ sudo exportfs –aThe previous command will export or unexport all listed directories in /etc/exports. You can also use exportfs –rv, which will also update exported directories and remove unexported directories. These options synchronize the exports with /var/lib/nfs/etab and the Linux kernel.
Now that the new network mounts have been defined, we will try to mount our share on our remote host. Let’s see whether our NFS mount is being served. You can use the showmount command to check your NFS shares by issuing the following:
$ sudo showmount -e localhostExport list for localhost:/data/staff 192.168.0
You can see that the output shows our NFS mount and the host IP address that can connect to it.
On the remote host, 192.168.0.2, we need to issue the following command to mount the share /data/staff to /data/remote (/data/remote needs to exist prior to running this command):
$ sudo mount -t nfs4 -o rw,intr,hard 192.168.0.1:/data/staff /data/remoteThis will mount the /data/staff directory to the /data/remote directory on the remote host. You will notice that we have specified the share name, /data/staff, followed by the host to mount from, as indicated by the setting 192.168.0.1:/data/staff. This is because we are specifically requesting the directory that we have access to on that remote host; however, we could specify / if we wanted, and we would mount all shares that we have access to.
We use the mount command to mount a filesystem of type nfs4. We have set the following options on that mount: read/write, interruptible (as specified by intr), and hard. The first is self-explanatory; the last two are not. NFS traditionally had the quirk that if the host sharing the filesystem had a hiccup, it would cause all hosts joined to it to be severely affected until that service was restored or the hosts rebooted. The intr, or interrupt, allows for NFS 4 operations to be interrupted while waiting for a response from the server. The hard option means that the filesystem will be treated like a local mounted filesystem. If it is set to soft, the alternative to hard, the filesystem would automatically be unmounted if it is idle for a period of time. For more information on mount options, please see the man page for mount.
To set this to automatically mount when our host is rebooted, we would add this to the /etc/fstab file:
192.168.0.1:/ /data/remote nfs4 rw,hard,intr,_netdev 0 0Here we are accessing the NFS filesystem from host 192.168.0.1 and mounting the remote shares under the /data/remote directory. We are specifying the same options we did previously and adding one more. The _netdev option tells our host not to try to mount our filesystem until after our network devices are up. If this is not set, the host will fail to mount the filesystem and wait for ages until it fails and the attempt times out.
Troubleshooting NFS
NFS is notoriously hard to troubleshoot as it provides limited logging and obscure error messaging. It is getting better, and you can try some basic troubleshooting by adding –v to the mount command, which should give you more information.
$ sudo mount -v -tnfs4 192.168.0.30:/data/cows /data/remotes/cows -oromount.nfs4: timeout set for Fri Sep 30 03:29:32 2016mount.nfs4: trying text-based options 'addr=192.168.0.30,clientaddr=192.168.0.1'mount.nfs4: mount(2): No such file or directorymount.nfs4: mounting 192.168.0.30:/data/cows failed, reason given by server: No such file or directory
There is a “user space” or FUSE-based alternative to the kernel NFS server that is part of the mainline Linux operating system. It is called NFS-Ganesha and can be found here:
FUSE is short for Filesystem in UserSpacE , which means that the NFS server doesn’t execute in the kernel but uses kernel modules to access necessary resources and executes in user space (see https://en.wikipedia.org/wiki/Filesystem_in_Userspace ).
NFS servers are not designed to be highly available without substantial modification. There is no native concept of clustering, and they need block-level device replication or clustered filesystems, floating IP addressing, and more to make them scale. It’s time now for us to show you an alternative: distributed network filesystems.
Resources
You can find more information about NFS here:
Distributed Network Filesystems
A distributed network filesystem (DNFS) is a large, distributed and scalable filesystem using commodity hardware. Distributed network filesystems are useful for handling disk image files, media files, and scalable data for analysis processing. The benefits of DNFS over the simple NFS are several:
Distributed (the loss of one server does not affect the service)
Scalable up to several petabytes
Geodistributed, with ability to be available across data centers
There are several different solutions to choose from. We are going to show you how to set up GlusterFS, but you could also choose from several alternatives depending on your workload or preference.
CephFS: http://ceph.com/
BeeGFS (formerly FhGFS): www.beegfs.com/content/
Hadoop (HDFS): http://hadoop.apache.org/
For a straight filesystem to share files across many servers, you probably wouldn’t want Hadoop HDFS as it is more suited to the Hadoop map-reduce workloads and requires you to use the Hadoop API for filesystem access. The others all provide POSIX-compliant filesystems that you can mount and access the files and directories natively on your servers.
CephFS and GlusterFS are most similar in architecture in that they both don’t require a metadata server, where the architecture of BeeGFS and HDFS are similar in that they do. Ceph itself is object block storage and a reliable autonomous distributed object store (RADOS) that can support huge amounts of data. All can be supported by commercial support licenses or the relevant communities that create them.
GlusterFS
GlusterFS is a network filesystem, and the company that initiated its development (Gluster Inc.) was acquired by Red Hat. Red Hat offers a support model of the software, and if you have complex requirements, then you should consider purchasing that. You can run the open source version that can be found at the web site ( https://www.gluster.org/ ).
Since we are installing a distributed service, we will require at least three hosts. As with all distributed services, having an odd number of hosts is usually preferred as it helps to avoid “split brain.” There are other things you can think about too when designing your cluster, such as housing the physical servers in different racks or different data centers to help with your data resiliency.
Note
Split brain is where at least two servers serving the same application in a cluster can no longer see each other and yet they still respond to clients. In this situation, data integrity and consistency start to drift apart as both servers continue to serve and store data but can no longer sync any data between each other.
GlusterFS Key Concepts
There are several key concepts when thinking of GlusterFS.
The GlusterFS network filesystem is a “no metadata” distributed filesystem, which means that it does not have a dedicated metadata server that is used to handle file location data. Instead, it uses a deterministic hashing technique to discover the file location (see DHT; http://gluster.readthedocs.io/en/latest/Quick-Start-Guide/Architecture/ ).
GlusterFS exports a fully POSIX-compliant filesystem, which basically means you can mount, read, and write to GlusterFS from Unix and Unix-like operating systems (such as Linux).
GlusterFS is a user space filesystem , meaning it doesn’t run in the Linux kernel but makes use of the FUSE module.
A trusted poolis a network of servers operating in the GlusterFS cluster. Each server is called a peer.
A brickis a basic unit of storage for the GlusterFS. It is exported a server in the trusted pool.
A volume is a logical collection of bricks.
There are several ways that data can be stored inside GlusterFS. These concepts are similar to those found in RAID. Files can be stored in Gluster volumes either with or without levels of redundancy depending on your configuration options.
Distributed volume: By default, if no distribution type is specified, GlusterFS creates a distributed volume . In this setup, a file can be stored on any brick in the volume with no redundancy.
Replicated volume: In a replicated volume setup, your files are replicated across all bricks in the volume . This requires a minimum of two bricks and provides a level of redundancy.
Distributed replicated volume: Files in this configuration are stored across replicated sets of bricks. Here the number of bricks must be a multiple of the replica count. This is a configuration for highly available file storage.
Striped volume: For large files frequently accessed by many clients, this configuration will store the large file in chunks (the same number of chunks as there are bricks). This configuration provides zero redundancy.
Distributed striped volume: Here we stripe (chunk) the data across a number of bricks . The number of bricks must be a multiple of the number of stripes. This can provide greater speed but still doesn’t provide redundancy.
Installing GlusterFS
Luckily GlusterFS is easy to install. Both Ubuntu and CentOS have native packages available to them. But to install the latest GlusterFS on CentOS, we are going to install packages provided by the CentOS Special Interest Group (SIG; see https://wiki.centos.org/SpecialInterestGroup ). To do that, we are going install its YUM repository for GlusterFS version 3.7.x like so:
$ sudo yum install centos-release-gluster37$ sudo yum install –y glusterfs-server
For Ubuntu, we are going to add the Gluster team PPA (this PPA, or Personal Package Archive, is not directly associated with Gluster but a group of Ubuntu maintainers). This will provide us with the latest 3.7.x version of Gluster too.
$ sudo add-apt-repository ppa:gluster/glusterfs-3.7 && sudo aptitude update$ sudo aptitude install –y glusterfs-server
Now for both Ubuntu and CentOS let’s make sure that the service starts on boot. Do this on Ubuntu:
$ sudo systemctl enable glusterfs-serverDo this for CentOS:
$ sudo systemctl enable glusterd glusterfsdNow that they are installed, we can configure GlusterFS.
Configuring GlusterFS
Let’s look at how we are setting up our servers. We have three servers each with a 50GB drive attached for data. We will have one Ubuntu and two CentOS servers. The Ubuntu server has attached the 50GB disk to /dev/sdc, and on CentOS it’s attached to /dev/sdb.
We are going to format those drives with the XFS filesystem as it is the recommended filesystem. With that in mind, you could format with ext4, if you wanted. We do that with the following:
$ sudo mkfs.xfs –L brick1_r1 /dev/sdb$ sudo mkdir –p /data/brick1_r1 && sudo bash –c 'echo LABEL=brick1_r1 /data/brick1_r1 xfs defaults 1 2 >> /etc/fstab'$ sudo mount –a
We have chosen to create our device labels and bricks with the brickN_rN suffix, with brickN being an incrementing number and _rN being the replication set they belong to. This allows us to add and replace bricks into replication sets. Naming things is hard, and there is no reason to follow this if you have a better naming scheme. Let’s start Gluster on our Ubuntu server; to do that, we execute the following:
$ sudo systemctl start glusterfs-serverIf we had chosen our CentOS server, we would issue the following:
$ sudo systemctl start glusterd && sudo systemctl start glusterfsdOf course, we can check that the services started properly by issuing sudo systemctl status <service.name>, but we are going to run one of the gluster commands . If everything is right, we should not receive an error.
$ sudo gluster peer statusNumber of Peers: 0
This is great. We have used the gluster command to query the Gluster cluster and check the status of our peers. We have not added any peers, so we expect this to be 0 at this stage.
You access and configure the GlusterFS service via the gluster command utility. The syntax looks like this:
$ sudo gluster <subcommand> <options> <args...>The gluster help option is useful in describing the subcommands, options, and arguments to each instruction. Table 13-2 lists some of the common subcommands you will use.
Table 13-2. Gluster CLI Commands
volume info | Shows information on any volumes configured |
volume list | Lists the current volumes |
volume create | Creates volumes |
volume delete | Deletes volumes |
volume start/stop | Starts or stops volumes |
volume add-brick | Adds a brick to a volume |
volume replace-brick | Replaces bricks |
volume top | Gives Gluster volume metrics |
volume set | Turns on or sets options on volume <key> <value> |
peer status | Gives status of the peers in the cluster |
peer probe | Probes and adds other peers |
pool list | Lists all nodes in the trusted storage pool |
GlusterFS: Adding Peers and Creating Volumes
Let’s select one host (it doesn’t matter which one); we are going to start our cluster. We are going to choose our Ubuntu server, but any would do. We are going to do the following from this one server:
Add peers to our cluster
Create a volume directory on our brick
Create a volume
We have named our hosts au-mel-dfs-1 to au-mel-dfs-3 and have added them to our DNS zone. The Ubuntu host has been assigned au-mel-dfs-3. To add our peers to the cluster, we issue the following:
$ sudo gluster peer probe au-mel-dfs-1peer probe: success.
We do the same for au-mel-dfs-2. Now we can show the status of our peers again.
$ sudo gluster peer statusNumber of Peers: 2Hostname: au-mel-dfs-1Uuid: a605a82d-fa77-48dd-8183-95a960547b1fState: Peer in Cluster (Connected)Hostname: au-mel-dfs-2Uuid: 5ceee284-616b-4c2d-87d7-1c44f4cbdca0State: Peer in Cluster (Connected)
We can now see these hosts in the gluster trusted storage pool too.
sudo gluster pool listUUID Hostname Statea605a82d-fa77-48dd-8183-95a960547b1f au-mel-dfs-1 Connected5ceee284-616b-4c2d-87d7-1c44f4cbdca0 au-mel-dfs-2 Connected30cf104f-00b2-4371-8935-d91719a2e17b localhost Connected
Each peer has been given a UUID, and you can see the hostname and current state. Only peers in this list can probe new peers. Now we will create our volume directory on all our peers. This can be any name, but we are calling ours vol1.
$ sudo mkdir /data/brick1_r1/vol1We shall now create our Gluster volume. We do that with the following command:
$ sudo gluster volume create vol1 replica 3au-mel-dfs-1:/data/brick1_r1/vol1au-mel-dfs-2:/data/brick1_r1/vol1au-mel-dfs-3:/data/brick1_r1/vol1volume create: vol1: success: please start the volume to access data
We have created a new Gluster volume called vol1. It is going to replicate each file over the three bricks. Those bricks we are adding are on our three peers, and we have listed the peers previously.
Note
It is worth noting here that having three replicas of each file increases your storage requirements by at least three.
We can see the information associated with this volume now; let’s run the following command:
$ sudo gluster volume infoVolume Name: vol1Type: ReplicateVolume ID: e9964568-feef-4f2f-a61d-14ba643b76e5Status: CreatedNumber of Bricks: 1 x 3 = 3Transport-type: tcpBricks:Brick1: au-mel-dfs-1:/data/brick1_r1/vol1Brick2: au-mel-dfs-2:/data/brick1_r1/vol1Brick3: au-mel-dfs-3:/data/brick1_r1/vol1Options Reconfigured:performance.readdir-ahead: on
Our Gluster volume has been created, and we can see the details in the previous lines. We can see the type (Replicate) and the number of bricks (1 × 3 = 3). This tells us that each file is going to be stored on each brick, and we have one set of three bricks for a total of three bricks.
We can check the status of our volume. We can do that with the following:
$ sudo gluster volume statusVolume vol1 is not started
So, like the message from when we created our volume, it is not started, and we will have to start it. Let’s do that now with the following command:
$ sudo gluster volume start vol1volume start: vol1: success
With that we have created and started our Gluster volume, and we are now ready to test that we can mount and write to it.
Testing GlusterFS
In this testing scenario, we are going to mount our Gluster volume onto another server. We are going to perform some write tests. Then we are going perform those same write tests and shut down the server we mounted Gluster from.
The first thing we will do is install the Gluster client. Now, you don’t have to do this if you intend to use Gluster with NFS or SMB (Samba). The Gluster client does provide one great feature that we will demonstrate.
You need to install the glusterfs-fuse package for CentOS or glusterfs-client for Ubuntu.
Now we will mount our Gluster volume. To do that, we issue the following:
$ mount –t glusterfs au-mel-dfs-1:/vol1 /mntWe have mounted our GlusterFS volume to our /mnt directory. Taking a look at df shows the following:
$ df -h /mntFilesystem Size Used Avail Use% Mounted onau-mel-dfs-1:/vol1 50G 33M 50G 1% /mnt
As shown, we have our 50GB volume mounted successfully. We can do a write test to see whether we can write data to it. For this we are going to use a for loop bash one-liner. It is going to write zeros in 100 files in the mount directory of incrementing sizes.
$ for a in {1..100} ; do sudo dd if=/dev/zero of=/mnt/datafile${a} bs=4096 count=$a ;done....100+0 records in100+0 records out409600 bytes (410 kB, 400 KiB) copied, 0.0287382 s, 14.3 MB/s
We can see that the test data files have been created, and when take a look at df, we will see that all hosts are reporting the same disk usage for their bricks.
$ df -h /data/brick1_r1/Filesystem Size Used Avail Use% Mounted on/dev/sdc 50G 62M 50G 1% /data/brick1_r1
Let’s do another exercise. When you mount your GlusterFS volume, the Gluster FUSE client will receive a volfile from one of the peers. It will then mount the volume from any one of the peers listed, not necessarily the one we first contacted. This time we are going to drop the host we had in our mount command, au-mel-dfs-1, and we will see what happens when we are in the middle of copying a file.
$ while true ; do sudo cp /var/log/syslog /mnt/ ; date ; done....Sat Sep 17 15:09:05 UTC 2016Sat Sep 17 15:09:05 UTC 2016Sat Sep 17 15:09:05 UTC 2016....
The previous command says, let’s copy the syslog file to /mnt indefinitely and, in between copies, print the current date. You will see the date firing rapidly on your screen after each copy. While it is doing that, on au-mel-dfs-1 enter the reboot command.
$ sudo rebootThe host will immediately reboot. While this is happening, two things can happen.
If our host had mounted the volume from au-mel-dfs-1, you would see a pause in the copying. You can tell that we are paused because the date output will stop incrementing. We need to wait for the Gluster network ping to time out or the host to be restarted and the service to come back up. If the host does not come up and the network ping times out, the Gluster client will request access to one of the other peers in the volfile and try to require the resources it needs (file locks and so on; this can take up to a minute). The network timeout is configurable, and we will show you how to change that shortly. Once it does, we will resume the copy.
If our host mounted the volume from one of the other peers , nothing exciting will happen, and the copy will continue. If this is the case, reboot one of the other peers when au-mel-dfs-1 comes up and see what happens.
Managing GlusterFS
In this section, we are going to show you how to manage your GlusterFS server. We would like to show you the following:
Set a volume option
Expand our storage
Replace a brick
Setting Configuration Options
We can change the option settings per volume. Starting with changing the cluster volume configuration for vol1, we are going to set our network ping timeout from the default 42 seconds to 15 seconds. This setting tells the GlusterFS client that it should wait 15 seconds before giving up and reacquiring all the resources from another Gluster peer. This an expensive operation, and really we should delay this action for as long as possible. Here, as a demonstration only, we are going to show you how to change it.
We use the gluster volume subcommand to change options on the volume. The syntax is the following:
$ sudo gluster volume set <volume name> <option> <value>So in our case, we would issue the following to change the network.ping-timeout setting:
$ sudo gluster volume set vol1 network.ping-timeout 15If we look at the volume information, we will now see our change in the Options Reconfigured section.
$ sudo gluster volume infoVolume Name: vol1Type: ReplicateVolume ID: e9964568-feef-4f2f-a61d-14ba643b76e5Status: StartedNumber of Bricks: 1 x 3 = 3Transport-type: tcpBricks:Brick1: au-mel-dfs-1:/data/brick1_r1/vol1Brick2: au-mel-dfs-2:/data/brick1_r1/vol1Brick3: au-mel-dfs-3:/data/brick1_r1/vol1Options Reconfigured:network.ping-timeout: 15performance.readdir-ahead: on
There are a large number of configuration options that can be changed using the volume set subcommand; you can see them here:
Expanding GlusterFS Volume Storage
Of course, there will be time you need to expand the size of your storage, and that is where Gluster is a great performer, compared to alternatives like plain old NFS. The options to expand come down to adding new bricks to existing peers or adding new peers and bricks into the volume. We have added a new 50GB hard drive to our existing peers, and we are going to add them to the vol1 volume.
We are going to create another three 50GB drives and add them into the volume as another set. This will give us a total of 100GB of usable storage with a redundancy factor of 3. We are going to follow the same instructions for our first brick.
$ sudo mkfs.xfs -L brick1_r2 /dev/sdc && sudo mkdir -p /data/brick1_r2 &&sudo bash -c 'echo LABEL=brick1_r2 /data/brick1_r2 xfs defaults 1 2 >> /etc/fstab' && sudo mount –a$ sudo mkdir /data/brick1_r2/vol1
Here we have created and mounted our new device (/dev/sdc on our CentOS hosts) and created a vol1 directory on the new device. This is just like we did earlier, but we’ve condensed our commands into two lines. Now we create our new replica set and add it to the vol1 volume.
$ sudo gluster volume add-brick vol1 replica 3au-mel-dfs-1:/data/brick1_r2/vol1au-mel-dfs-2:/data/brick1_r2/vol1au-mel-dfs-3:/data/brick1_r2/vol1volume add-brick: success
We have now added these new bricks to the vol1 volume. If we run the volume info subcommand, we will see we have a new replica set.
$ sudo gluster volume infoVolume Name: vol1Type: Distributed-ReplicateVolume ID: e9964568-feef-4f2f-a61d-14ba643b76e5Status: StartedNumber of Bricks: 2 x 3 = 6Transport-type: tcpBricks:Brick1: au-mel-dfs-1:/data/brick1_r1/vol1Brick2: au-mel-dfs-2:/data/brick1_r1/vol1Brick3: au-mel-dfs-3:/data/brick1_r1/vol1Brick4: au-mel-dfs-1:/data/brick1_r2/vol1Brick5: au-mel-dfs-2:/data/brick1_r2/vol1Brick6: au-mel-dfs-3:/data/brick1_r2/vol1Options Reconfigured:network.ping-timeout: 15performance.readdir-ahead: on
As you can see, we have added three new bricks to our volume , bricks 4–6. You can also see that we now have two sets of three disks for a total of 6 (2 × 3 = 6). Looking at our mounted volume on our test server, we can see that the volume has increased to 100GB.
$ df -h /mntFilesystem Size Used Avail Use% Mounted onau-mel-dfs-1:/vol1 100G 85M 100G 1% /mnt
Replacing a Brick
We are stupid. We have just wiped out the /data/brick1_r2/vol1 directory on au-mel-dfs-1. This now puts that brick into a failed state. We can view that from our system log and from the volume status subcommand.
$ sudo gluster volume statusStatus of volume: vol1Gluster process TCP Port RDMA Port Online Pid--------------------------------------------------------------------------------Brick au-mel-dfs-1:/data/brick1_r1/vol1 49152 0 Y 1292Brick au-mel-dfs-2:/data/brick1_r1/vol1 49152 0 Y 3198Brick au-mel-dfs-3:/data/brick1_r1/vol1 49152 0 Y 1978Brick au-mel-dfs-1:/data/brick1_r2/vol1 N/A N/A N N/ABrick au-mel-dfs-2:/data/brick1_r2/vol1 49153 0 Y 11652Brick au-mel-dfs-3:/data/brick1_r2/vol1 49153 0 Y 2133
As you can see, the current status shows that service for au-mel-dfs-1:/data/brick1_r2/vol1 is not listening on a port and does not have a PID. We are going to replace it. We have added another device to our peer of 50GB and have formatted and mounted it similarly as we did when we expanded the volume.
$ sudo mkfs.xfs -L brick2_r2 /dev/sdd && sudo mkdir -p /data/brick2_r2 &&sudo bash -c 'echo LABEL=brick2_r2 /data/brick2_r2 xfs defaults 1 2 >> /etc/fstab' &&sudo mount –a$ sudo mkdir /data/brick2_r2/vol1
Now to replace the damaged brick, we use the following command:
$ sudo gluster volume replace-brick vol1 au-mel-dfs-1:/data/brick1_r2/vol1 au-mel-dfs-1:/data/brick2_r2/vol1 commit forcevolume replace-brick: success: replace-brick commit force operation successful
Now we can see the health with the volume status.
$ sudo gluster volume statusStatus of volume: vol1Gluster process TCP Port RDMA Port Online Pid---------------------------------------------------------------------------------Brick au-mel-dfs-1:/data/brick1_r1/vol1 49152 0 Y 12252...Brick au-mel-dfs-3:/data/brick2_r2/vol1 49154 0 Y 2280
The brick has been replaced, and we can see from the df command that data has been synced to it.
$ df -h /data/brick2_r2Filesystem Size Used Avail Use% Mounted on/dev/sde 50G 42M 50G 1% /data/brick2_r2
Managing Documents
File sharing is an important part of distributing documents in your company. However, it does have certain limitations when it comes to tracking and versioning documents. Without excessive overhead in writing and checking permissions, you can’t get great fine-grained control of who is accessing your documents. Also, you can’t lock the file being edited, so two people can access the same file, make separate changes, and, when one user saves it back to the file share, destroy the other’s work. There is still clearly a need for file sharing, but a better way to manage the documents in your business exists.
A good document management system (DMS) will ideally achieve these five things for you:
Securely share your documents with other staff members
Provide version control for documents so that previous edits are not lost
Require documents to be checked out so that two people can’t edit the same document at the same time
Style the DMS to match your company’s workflow for creating, reviewing, and publishing documents
Have a single entry point for all your document sharing without having to manage several file servers and their file shares
With a good document management system, you typically have a web portal that becomes the central point for all access to your documents. This can be part of a secured intranet with remote offices accessing it via your virtual private network (VPN) links into your main office.
Using Document Management Systems
Your company doesn’t need to be a large firm to have a good document management system. A little thought put into designing a DMS early on in your business will save you a lot of problems later as your business grows and your need to control documents becomes more evident. A good DMS helps not only with workflow but also with securing your documents. Add to this version control of your documents, and you have greater security of the data you are sharing with your colleagues.
Of course, we have online document management like Google Docs, Quip, and Microsoft360, and these may be just fine for your needs. In many cases, using these solutions are great for small businesses that don’t have the infrastructure and are relatively low cost. Of course, documents are online (or partly online) and so can be subject to network problems, but in general they are very secure, highly available, and low cost.
There are several open source, or partly open source alternatives, that you might like to try.
Alfresco: Community edition LGPLv3 license, limited features compared to commercial editions
LogicalDoc: Community edition LGPLv2 license, limited features compared to commercial editions
OpenKM: Community edition GPLv2, limited features compared to commercial editions
Each of these solutions has online documentation and the ability for you to purchase support if needed. We provide this because it is most likely a better choice for document management compared to either Samba or NFS.
Print Servers
Setting up printer servers on CentOS and Ubuntu is easy. Both distributions use the same print server software to manage print services. We will show you how to set up the CUPS printer server, which is the standard for Linux distributions and which also has a consistent web interface available across both CentOS and Ubuntu.
In many circumstances, setting up CUPS servers for printing has become redundant as many modern printers now have their own print servers and are available on the network, Wi-Fi, or even Bluetooth. Also, we really hope fewer people require printing as there are many alternative ways to transport and read documents in this day and age.
If you still need to set up a printer on your network (for example, you have a USB printer and you want to share that among the hosts on your network), you can attach it to a Linux server or even attach it to a small Raspberry Pi and use the CUPS print server.
Note
There are many uses for a Raspberry Pi ; one of them is being a print server. A Raspberry Pi is a microcomputer that can be attached to a printer via USB and can act as a print server. It normally comes with the Raspberian operating system, which is a Debian-based distribution of Linux. A Raspberry Pi is even better used for learning! See https://www.raspberrypi.org/ .
CUPS
We will begin by showing you how to configure a new printer that is attached via USB to your host. You can then share that with other hosts in your network. To demonstrate this, we will then attach our printer to a client.
Installing and Configuring CUPS
You can configure your printers from the command line and by hand-editing your CUPS configuration files (though it’s not recommended). CUPS also comes with a web UI that we will use to add and share our printer.
When you plug in your printer, the kernel will send an event notice to both Udev and the Hardware Abstraction Level (HAL) manager. Udev is a user-space device management application, and HAL provides a consistent interface for the desktop programs. This means that applications such as word processors can consistently know how to use a printer device, and a calendar can talk to a smart device using a consistent and defined set of rules.
Let’s look at what happens when we plug in an Epson USB printer on our Ubuntu host. To make sure everything is working properly, first we issue the tail command on the log to make sure our device has been picked up by the kernel.
$ sudo dmesg[13433828.652994] usb 2-1: new high-speed USB device number 4 using ehci-pci[13433828.786834] usb 2-1: New USB device found, idVendor=04b8, idProduct=0811[13433828.786847] usb 2-1: New USB device strings: Mfr=1, Product=2, SerialNumber=3[13433828.786855] usb 2-1: Product: USB2.0 MFP(Hi-Speed)[13433828.786860] usb 2-1: Manufacturer: EPSON[13433828.786865] usb 2-1: SerialNumber: L76010502151505100[13433828.789721] usblp 2-1:1.1: usblp0: USB Bidirectional printer dev 4 if 1 alt 0 proto 2 vid 0x04B8 pid 0x0811[13433828.790798] usb-storage 2-1:1.2: USB Mass Storage device detected[13433828.791051] scsi9 : usb-storage 2-1:1.2[13433829.790811] scsi 9:0:0:0: Direct-Access EPSON Stylus Storage 1.00 PQ: 0 ANSI: 2[13433829.791627] sd 9:0:0:0: Attached scsi generic sg5 type 0[13433829.795826] sd 9:0:0:0: [sdf] Attached SCSI removable disk
Here you can see that our host has recognized that we have attached a USB printer and has registered the device as usblp. We can check that the device exists by issuing ls /dev/usblp. Now we can be content that our device has been recognized and is ready to be added under the control of the CUPS printing service.
We first need to set up some things on our print server. We will need to add an administration user to administer the setup of our print devices. This can be any user, and we will make bsingh our printer administrator by adding them to the lpadmin group.
$ usermod –aG lpadmin bsinghNext, unless this CUPS server is running locally, we are going to allow it to be administratively accessible remotely.
$ sudo cupsctl --remote-adminNow we are going make sure it can reached by our print server hostname. We will edit the /etc/cups/cupsd.conf file and add the following:
LogLevel warnPageLogFormatMaxLogSize 0Port 631Listen print-srv.example.comServerAlias *
Here we have added the Listen directive to allow it to listen on our printer server interface and have added a ServerAlias * so that we can use the print-srv.example.com hostname to connect to the administration web page.
We should also add the hostname print-srv.example.com and map that to 192.168.0.1 in our DNS server.
$ sudo nsupdate –k /etc/bind/dynamic-update-key> server ns1.example.com> update add print-srv.example.com 86400 A 192.168.0.1> send<ctrl d>
Here we have used the nsupdate command to add our print-srv.example.com record. We should now restart our cups service and make sure it is available on boot.
$ sudo systemctl enable cups$ sudo systemctl start cups
Now we can go to the web administration page and add our printer. Open a web page and go to the URL https://print-srv.example.com:631 . Since we don’t have a valid Secure Sockets Layer (SSL) certificate installed, we will get a warning that this site is untrusted. We will accept that risk, which brings us to the following page, as shown in Figure 13-5.
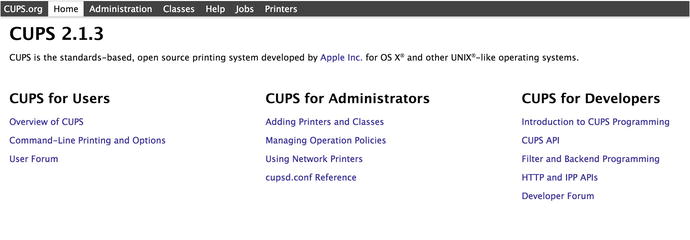
Figure 13-5. The CUPS home page
From this page we are going to click Adding Printers and Classes under the CUPS for the Administrators column. We will be prompted for a username and password; we will use bsingh’s credentials (Figure 13-6).

Figure 13-6. Using the administrator’s credentials
From here we will add a printer using the Add Printer button (Figure 13-7).
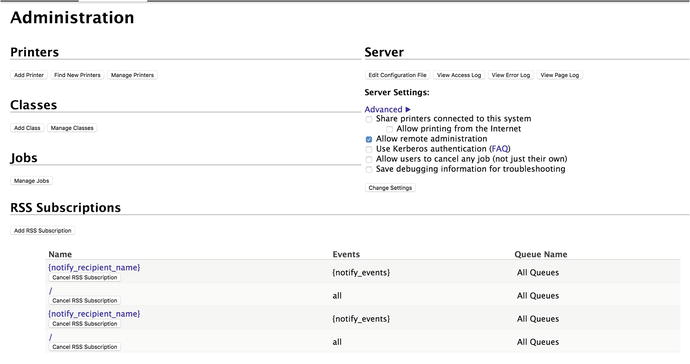
Figure 13-7. Administration page for CUPS
Clicking the Add Printer button brings up the first of our printer dialogs. We have a local Epson Stylus printer attached to our host via USB, as shown in Figure 13-8.

Figure 13-8. Selecting the USB printer
You will also notice that we can add other types of network printers, including printing via our Samba server. You can see how to set up Samba printer shares here:
We are now asked a series of questions about the printer. We are asked to give the printer a name, description, and location. These can be whatever makes sense to you. We are going to enable sharing of this printer and allow color management, as shown in Figure 13-9.
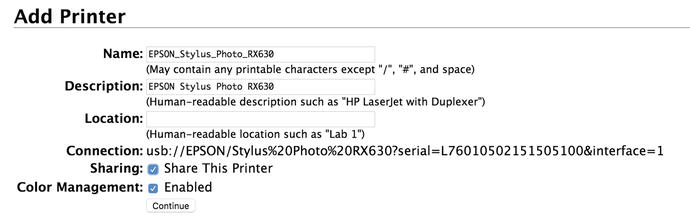
Figure 13-9. Printer information
We are then asked more information, this time about the model of the printer. We will choose from the drop-down list (Figure 13-10).

Figure 13-10. Selecting the printer model
If we don’t find the printer model, we can add a PPD file. Next comes the printer defaults (Figure 13-11).

Figure 13-11. Editing or selecting defaults
You can edit or select defaults for your printer. We will just keep the defaults (Figure 13-12).

Figure 13-12. Ready and waiting for jobs
Our printer is now ready for jobs. We will now attach that to a client. On our macOS client we can again select our printer and add it (Figures 13-13 and 13-14).
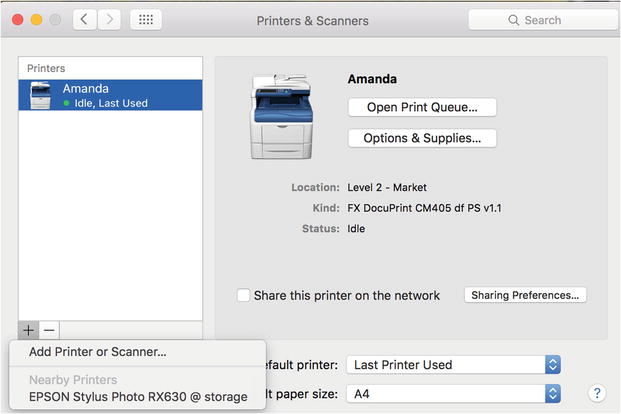
Figure 13-13. Bonjour finds our print server
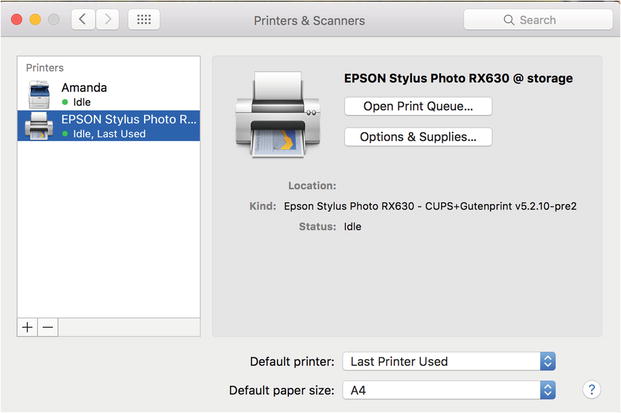
Figure 13-14. The printer is installed and ready
Now our printer is installed and ready for printing .
Summary
In this chapter, we explored file- and print-sharing offerings from Linux. We showed that the traditional methods of file sharing are via the Samba server and via the NFS server, depending on the clients you want to serve. We showed you how to set up data storage that can scale to petabyte size with GlusterFS. We talked about alternative solutions to traditional file sharing, such as document management services (DMS). They have many advantages over file sharing, since they offer finer-grained access control and versioning of documents and they allow you to implement company workflows. Finally, you learned how to set up the CUPS printing service.
In this chapter, you learned how to do the following:
Configure a Samba server to be an AD domain controller
Configure an NFS server to mount filesystems between Linux hosts
Install and configure the GlusterFS
Talked about DMSs
Configure CUPS printer servers and attach them to a host
In the next chapter, we will look at backup and recovery for your office.