
In Chapter 1, we talked a little about what Linux is and where it came from, and in Chapter 2 we installed our first Linux host. In this chapter, we’re going to introduce you to some basic Linux concepts and skills. Some people find Linux intimidating because of what looks like arcane commands with strange switches and mysterious options. We’ll decode some of the arcane commands you’ll need to know and demonstrate these commands and their functions.
This chapter focuses on getting started, logging in, logging in locally and remotely, and working with and navigating the command line and the filesystem. We’re also going to introduce some basic Linux concepts: users, groups, packages, services. We then will delve deeper into the filesystem and how to work with files and directories, including file types, how to set permissions, and then reading, editing, and managing them. In the chapters that follow, we’ll expand on these concepts and introduce you to the key activities you’ll need to know in order to operate and administer your Linux hosts.
In this chapter, we’ll mostly talk about commands running on the command line. This gives you an introduction to using the command line and will help get you comfortable with operating on it. This is not to say that there isn’t a broad array of graphical administration tools available for Linux. If you’re more comfortable in a graphical, Windows-like environment, you can still easily and effectively find mechanisms to administer your Linux hosts. For most command-line tools we’re going to show you, there is a graphical equivalent. However, you should find the Linux shell easier and faster to operate on one or several Linux systems at once.
Note
This chapter is a broad introduction to Linux. It won’t make you an expert. Rather, it’ll prepare you to take the first steps to deploy your Linux infrastructure.
Getting Started
If you haven’t already installed a Linux host, the easiest way to try out Linux commands prior to tackling a Linux install is to try a LiveCD. LiveCDs are Linux distributions on a CD, DVD, or USB. To use a LiveCD, you need to download an image, in the form of an ISO file. You can choose any LiveCD and burn that image to a CD, DVD, or USB. Following are some URLs that describe how to burn ISO files onto CDs, DVDs, or USBs:
http://pcsupport.about.com/od/toolsofthetrade/ht/burnisofile.htm
www.ubuntu.com/download/desktop/create-a-usb-stick-on-windows
Once you have burned your LiveCD, you can then insert the disc or USB into your computer and reboot. Most computers will automatically detect the LiveCD and offer you the option of booting from it.
Note
If your host doesn’t offer you the option to boot from CD/DVD, you may need to adjust your BIOS (Basic Input/Output System) settings to change your boot order so the CD, DVD, or USB is booted before your hard drive.
The LiveCD will load and present you with a working Linux distribution that you can experiment with. By default, this does not install anything to your host, and your original desktop configuration will be available when you remove the CD/DVD and reboot your computer.
LiveCDs are available for a variety of distributions. Some good distributions to try using their LiveCDs include the following:
Ubuntu: You can find LiveCDs, called Desktop CDs, for Ubuntu at www.ubuntu.com/download/desktop .
Fedora: You can find a LiveCD for Fedora (called Fedora Desktop Live Media) at https://getfedora.org/ .
CentOS: Available for the latest CentOS 7 release is a LiveCD from one of the mirror sites listed at https://wiki.centos.org/Download .
Tip
There is a comparison list of some of the available Linux LiveCDs available at http://en.wikipedia.org/wiki/Comparison_of_Linux_LiveDistros .
You can also consider using Vagrant, as we showed you in Chapter 3. Using Vagrant is a great way to explore and learn Linux without the need to install a physical server, and it runs inside the VirtualBox virtualization environment.
Logging In
After your Linux host or LiveCD boots, you will be presented with a login prompt: either a command-line or GUI (graphical user interface) login prompt.
In Figure 4-1, you can see a typical command-line login prompt for an Ubuntu Linux host, and in Figure 4-2, you can see the graphical login for a CentOS host.

Figure 4-1. Command-line login prompt
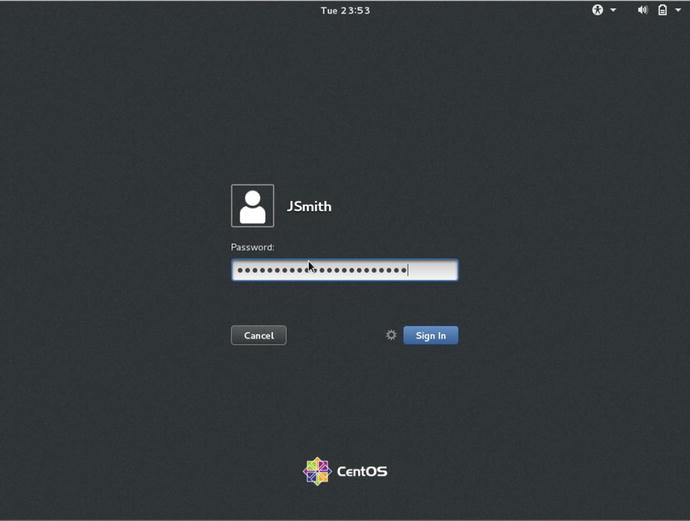
Figure 4-2. Graphical login prompt
Note
Don’t panic if your initial screens differ slightly from these, as some minor changes do appear between versions.
At either login prompt you need to supply your username and a password or similar form of authentication. (Like Windows, Linux can also use smartcards or tokens or other mechanisms to authenticate users.)
If you just installed a Linux host, you’ll have been prompted to create a user, and you can make use of that user to log in now. If you’re testing Linux with a LiveCD, you may see a default username and password that you will be prompted to log in with, or you may even be automatically logged in. For example, the Ubuntu LiveCD has a default username of ubuntu with a password of ubuntu, and it usually automatically logs you in. If you don’t see a default username and password, you may need to check the LiveCD’s online documentation, or you may be prompted to create a username and a password.
Once your host has verified your access, then you’ll be logged in and, depending on your configuration, your host will either display a command-line or a GUI desktop environment.
Linux vs. Microsoft Windows
The title of this section might sound a bit like we’re about to present a pro wrestling match. However, it’s more about the similarities between Linux and Microsoft Windows (hereafter just Windows) than their differences. Windows and Linux are both operating systems, and while different in many technical aspects, they share a lot of the same concepts. As a result, we’re going to examine these similarities to help you leverage some of your existing knowledge about Windows as a means of understanding related concepts in Linux.
In this book, we’re going to look at how to interface with your Linux host. There are two principal interfaces: the GUI desktop and the command line. We’ll explore both of these interfaces in this book.
The GUI Desktop
Both Linux and Windows can have GUIs. Unlike recent Windows releases, Linux has always been able boot to either a GUI or the command line. Once you’re booted up, you can also switch between these two modes, and we’ll discuss how to do that in the section “Shells” later in this chapter and in some more detail in Chapter 5.
On Linux the GUI is a combination of several applications. The basic application is called the X Window System (you’ll also see it called X11 or simply X). The X application provides an underlying “windowing” environment.
Note
You won’t need to worry about installing or managing X. Your distribution will generally install this for you if you install a GUI desktop. If you don’t install a GUI desktop, for example, if you are installing a server, X will not be installed, and you’ll generally interact with Linux through the command-line interface. An example of a distribution that doesn’t load a GUI by default is the Ubuntu Server distribution we installed in Chapter 2.
On top of X you then add a desktop environment to provide the “look and feel” and desktop functionality such as toolbars, icons, buttons, and the like. There are two major desktop environments popular on Linux: Gnome and KDE. Most distributions have one of these desktop environments as their default; for example, Gnome is the default desktop environment on the Debian, CentOS, Red Hat, and Fedora distributions, and KDE is the default on Ubuntu derivative Kubuntu and on SUSE, while Ubuntu uses Unity, which is a Gnome shell (based on Gnome).
Tip
In keeping with the flexibility of Linux, you can change the default desktop environment on all of these distributions. Unity, Gnome, and KDE are not the only desktops to choose either. For a discussion on the current desktops available check www.techradar.com/au/news/software/operating-systems/best-linux-desktop-which-is-ideal-for-you--1194516 .
In Figure 4-3, you can see the default Gnome desktop on an Ubuntu distribution.
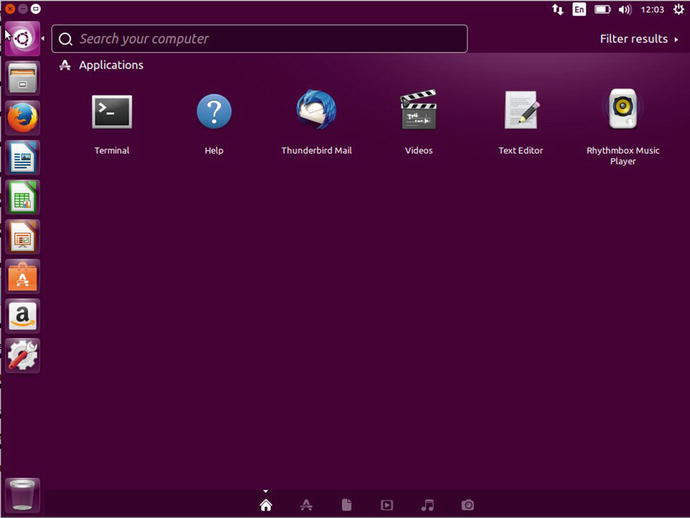
Figure 4-3. Ubuntu Unity desktop on the Xenial Xerus release
The Unity desktop has many of the underlying Gnome tools available to it. In this book we will talk primarily about the Gnome desktop in our examples and these examples will also apply to the Unity desktop .
The Command Line
In the Linux world, the command line is one of the most powerful tools available to you. The command line can be referred to as the “console,” “terminal,” or “shell”; each has a slightly different context, but in the end it is the place where you type Linux commands in. In this book, a lot of focus is going to be on the command line. This is where at least some of your administration tasks are going to occur, and it’s important to be able to understand and make use of the command line. Indeed, in some cases you will not have a GUI environment available. If your GUI environment is not functional, you will need to be able to administer your hosts using the command line. The command line also offers some powerful tools that can make your administration tasks faster and more effective.
Note
This is not to say we’re going to ignore the GUI. We’ll also show you how to administer your Linux host using GUI tools.
Let’s take a look at the Linux command line. You can access the command line in one of several ways. If your host has booted to a command-line prompt, as you can see in Figure 4-1, you can simply log in and use the prompt.
From inside the Gnome or KDE GUI, you have two options. The first is to use a virtual console—a kind of Linux management console that runs by default on most Linux distributions. Or you can launch a terminal emulator application like the Gnome Terminal or Konsole. In Figure 4-3 you can see how we would access the Terminal emulator in the Unity desktop.
Note
A terminal emulatoris a tool that emulates a text terminal inside another application. For example, when you start a command prompt, or command-line shell, in Windows, you’ve started a Windows terminal emulator.
To launch a virtual console from inside a Gnome or KDE GUI, use the key combination Ctrl+Alt and one of the F1 through F7 keys. Each of the windows that can be opened is a new virtual console. Six virtual consoles are available. You can cycle through consoles using the Crtl+Alt+F1 to F7 keys. Each terminal is independent and separate. Ubuntu and CentOS have the GUI on different consoles. You use Ctrl+Alt+F7 to access the Ubuntu GUI and Ctrl+Alt+F1 for CentOS.
Tip
If you are not running a GUI interface, the virtual consoles are still available to you, and you can use the Alt+F1 to F6 keys and the Alt+left arrow and Alt+right arrow keys to navigate them.
You can also launch a terminal emulator . In Gnome, for example, you click the Applications menu , open the Accessories tab, and select the Terminal application. This will launch the Gnome Terminal application, as you can see in Figure 4-4.
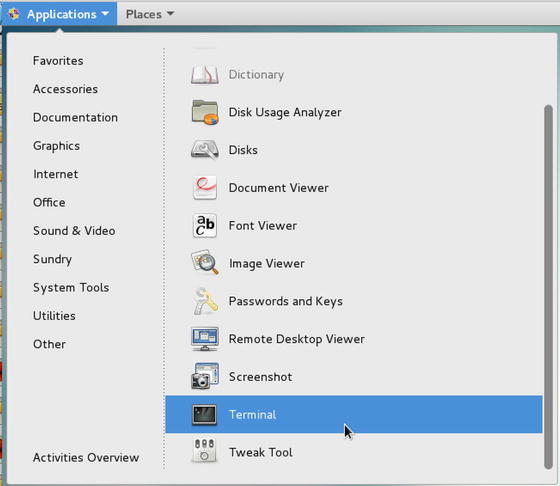
Figure 4-4. Launching the Gnome Terminal application
On KDE, things are slightly different. On earlier versions of KDE, you could launch the Konsole application by clicking Applications, opening System Tools, and selecting the Konsole application. On KDE version 4 and later, you launch Konsole by clicking Applications and then System, and selecting the Konsole application. And in Figure 4-3 we were able to see that we needed to bring up the search in Unity by selecting the Ubuntu symbol and typing Terminal. In Figure 4-3 we can see that it has already appeared without our searching for Terminal because it is a recently used application.
Shells
What command line is presented to you depends on what shell is running for your user. Shells are interfaces to the operating system and kernel of your host. For example, the command line on a Windows host is also a shell. Each shell contains a collection of built-in commands that allow you to interact with your host (these are supplemented by additional tools installed by your distribution).
A variety of shells are available, with the most common being the Bash (or Bourne-again) shell that is used by default on many distributions, including the popular Red Hat, Ubuntu, and Debian distributions.
We’re going to use the Bash shell for all of our examples in this chapter, because it is most likely the shell you’ll find by default.
Command-Line Prompt
After you have logged in to your Linux host, you should see a prompt that looks something like the following:
jsmith@au-mel-centos-1 ∼$So what does this mean? Well let’s break it down.
user@host directory$On most Linux distributions, the basic prompt is constructed from the username you’re logged in as, the name of the host, the current directory, and the $ symbol, which indicates what sort of user you are logged in as.
Tip
You can customize your prompt to include additional information, add or change colors, or implement a variety of other options. Find more information at http://tldp.org/HOWTO/Bash-Prompt-HOWTO/ .
In our case, jsmith is the name of the user we are logged in as; the @ symbol comes next and is followed by the name of the host we are logged into, i.e., jsmith at au-mel-centos-1.
Note
This part of the prompt looks like an e-mail address, for a good reason. This is how e-mail began—people with login accounts on connected Unix machines sending each other messages. The @ symbol was first used for this purpose in 1971! You can read about it at http://openmap.bbn.com/~tomlinso/ray/ firstemailframe.html .
Next you see a ∼ symbol, which is an abbreviated method of referring to your home directory. On a Linux host, most users have a special directory, called a home directory, which is created when the user is created. Like a Microsoft Window’s user profile , the user’s preferences and configuration files and data are stored in this directory. Any time you see the ∼ symbol used, it indicates a shortcut that means home directory. We talked about home directories earlier, and they roughly equate to a combination of the Windows concept of the Documents and Settings profile and the My Documents folder. You would usually find home directories under a directory called /home.
Note
Linux is a multiuser operating system where multiple users can log on multiple times and work simultaneously. Like Windows, users can have their own environment, storage, access controls, and permissions.
Finally, you see the $ symbol. This symbol tells you what type of user you are; by default all normal users on the host will have $ as their prompt. There is a special user, called root, whose prompt uses the # symbol:
root@au-mel-centos-1 ∼#The root user is the superuser. On Windows, we’d call this user the Administrator. Like the Administrator user on Windows, the root user can control and configure everything. So if you see the # symbol, you know you are logged in as the root user.
In some distributions, you can log in as the root user, and you’ll usually be prompted to specify a password for the root user during installation. Other distributions, most notably the Ubuntu distribution, disable the root user’s password. On Ubuntu, you are assumed to never use the root user, but rather a special command called sudo. The sudo command allows you to run commands with the privileges of the root user without logging in as that user. We’ll talk about the sudo command in Chapter 5. To use the sudo command, you simply type sudo and the command you wish to run. You will usually be prompted for your password, and if you enter the correct password, the command will be executed.
$ sudo passwd rootThis command would change the password of the root user, which is one method of enabling the root user on Ubuntu.
The root user is all-powerful and can do anything on your host. As a result, it can be easy to accidentally make a mistake that could delete data or disrupt your applications and services when logged in as the root user. Thus, for security and safety reasons, you should never log in as the root user. We’ll discuss other ways to administer your host without using the rootuser later in Chapter 5.
Note
In recent years, other security controls have been introduced that help reduce the reliance on the root user and provide more granular security controls. These controls include tools like SELinux and AppArmor, which we briefly discussed in Chapter 2.
Typing Your First Command
Now it’s time to try entering a command. A command could be a binary executable (like a Windows executable or EXE file), or the command might be provided as part of the shell. Let’s type a command called whoami and execute it by pressing the Enter key:
$ whoamijsmith
The whoami command returns the name of the user you are logged in as. You can see our host has returned jsmith. This tells us we’re logged in to our host as the user jsmith.
Each shell contains a series of built-in commands and functions to help you make use of the command line. Let’s try one of these now. We start by running the whoami command again. This time, though, we make a spelling error and type the wrong command name:
$ whoamiiNote
Throughout this book, we’re going to abbreviate the shell prompt to just the final prompt character, either $ or #.
We then press the Enter key to run the command and find that Bash has returned the following response:
-bash: whoamii: command not foundSo what happened? Well, Bash is telling us that no command called whoami exists on the host. We can fix that. Let’s start by correcting the command. We can bring back a previously typed command by using the up arrow key. Do that now, and you can see that the previous command has returned to the command line:
$ whoamiiBash usefully has what is called command history, which keeps track of a number of the previous commands typed. Bash allows you to navigate through these commands by using the up and down arrow keys.
Tip
The amount of history kept is user-configurable and can be manipulated using the history command. Enter the command history now to see your command history. If you’ve just signed on, you might find this history empty. In that case, use a few commands and try again. You will see a list of numbered lines showing previous commands you’ve typed. You can retrieve any of these commands by entering the number next to the command, prefixed by the ! symbol. For example, !12 would retrieve and execute command number 12 in your history. If you type !! you re-run the last command you entered.
You can also move the cursor along the command line to edit commands using the left and right arrow keys. Move to the end of the command using the arrow keys and delete the extra i, leaving you with
$ whoamiNow press the Enter key, and you will see the result on the command line:
jsmithThis time the corrected command, whoami, has again returned the name of the user who is logged in.
Tip
Another useful Bash feature is autocompletion. Start typing a command and then press the Tab key, and Bash will search your path to try to find the command you’re trying to issue. Type more characters, and the Tab key will further narrow the search.
Remote Access
In the last two sections, we’ve talked about the GUI desktop and the command line. In both cases, we’ve assumed that you are logged on to your host locally (i.e., sitting in front of a screen and keyboard typing commands directly into the host). But in a lot of cases, people access Linux hosts remotely. This is particularly true for Linux hosts running as servers that might be hosted in a data center or in another geographical location, or stored in a rack or cabinet. In many cases, these hosts don’t even have screens or keyboards attached and are only accessible via a network.
With Linux, it is very easy to remotely connect to these hosts so you can administer and manage them. You can use a number of different methods to do this remote connection. These include a desktop sharing protocol like Virtual Network Computing (commonly called VNC), Remote Desktop Protocol (RDP), which is often used to provide remote access to Windows hosts, and the extensively used Secure Shell (SSH).
Using SSH
We’re quickly going to look at using SSH to provide remote command-line access to a Linux host. You can also access your GUI desktops with SSH, but we’ll talk about that in Chapter 10.
SSH is both an application and a secure protocol used for a number of purposes but primarily for remote administration of hosts. On Linux hosts, SSH is provided by an open source version of the application called OpenSSH (see www.openssh.com/ ).
SSH connects over TCP/IP (Transmittion Control Protocol/Internet Protocol ) networks in a client-server model. Your connecting host is the client. For example, if you are connecting to a remote host from your laptop, your laptop is the client. The host you are connecting to is called the server and receives and manages your connection.
Remote connections using SSH are encrypted and require authentication, either a password or public key cryptography. To make an SSH connection, you need to know the IP address or hostname of the remote host. A connection is then initiated on the client and connects to the server via TCP on port 22 (you can change this port, and we’ll talk about how to do that in Chapter 10).
Note
You have probably encountered IP addresses and hostnames before, but you might not have come across ports. Ports are communications end points used by services like SSH. Port numbers range from 0 to 65535 with some commonly known ports being 80 for HTTP, 25 for SMTP, and 21 for FTP. Ports between 1 and 1023 are generally reserved for system services, while ports 1024 and higher (also called ephemeral ports) are more arbitrarily assigned. We’ll go into more detail on this in Chapter 7.
After the initial connection, the client is then prompted by the server for a username and authentication credentials like a password. If the user exists on the server and the correct credentials are provided, the client is allowed to connect to the server.
On most distributions, SSH is installed as one of the default applications, and a server is started by default. This SSH server or SSH daemon (servers are also called daemons in the Linux world) allows remote connections to be made to the command line or GUI of your host.
You can use SSH via the command line or from one of a number of clients. Via the command line, client connections are made using a command called ssh. Most Linux and Unix-like operating systems (Mac OS X, for example) have SSH installed and have the ssh command available. To use the ssh command, you specify your username and the host you’d like to connect to separated with the @ symbol, as you can see in Listing 4-1.
Listing 4-1. SSH Connections
$ ssh [email protected]Password:
In Listing 4-1, we’ve connected to a host called us-ny-server-1.example.com as the user jsmith. We’ve then been prompted to input our password. If we have entered the correct password, we will be logged in to the command line of the remote host.
Caution
In reality, if you run this exact command, it won’t work, as the host us-ny-server-1.example.com doesn’t exist. If you want to test this, you’ll need to specify an actual live host.
There are also a variety of SSH clients or terminal emulators available, for example, the popular and free PuTTY client (available from www.chiark.greenend.org.uk/~sgtatham/putty/ ), which runs on Windows (and also on Linux). You can also use the one that comes with Git Bash, which we installed in Chapter 3, which of course, runs on Windows.
SSH clients allow you to run text terminals to the command lines of your Unix or Linux hosts from your GUI. You can see the PuTTY client’s configuration screen in Figure 4-5.
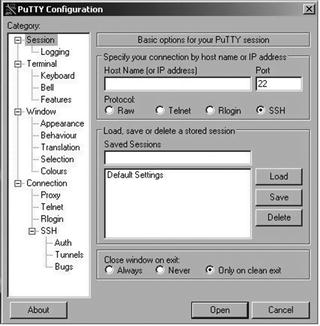
Figure 4-5. The PuTTY client
Using a GUI client like PuTTY is very simple. As with the command line, you need to specify the hostname (or IP address) and port of the host to which you wish to connect. With a client like PuTTY, you can also do useful things like save connections so you don’t need to input your hostname again.
With Git Bash we can access ssh from the Bash terminal. We showed you how to install Git Bash in Chapter 3. Take a look at Figure 4-6, where we are making a connection to us-ny-server-1.example.com.

Figure 4-6. Using Git Bash to make an ssh connection
AS in Listing 4-1 we are making a connection to the US server. Here you will note that when we first connect to a host we have never connected to before, we are asked to accept the RSA key fingerprint. This is from the SSH server you are connecting to. After you accept this key, it is stored against the server name in a file called known_hosts. Every subsequent SSH connection to this host will check the fingerprint to see if it is changed. If it has you will be asked to clean the key before reconnecting. This gives you the opportunity to verify if the host or your communication has been tampered with. Again, we will talk more about this in Chapter 10.
In Figure 4-6 we accept the fingerprint after ideally first checking that we are connecting to the host we think we are connecting to (this is harder to do in an online world where you might connect to hosts outside your domains). Once this is done, we store the fingerprint and are then prompted for our password.
If you intend to manage Linux servers from Windows, we recommend you download a client like PuTTY if you prefer a GUI; otherwise you can install and use the Git Bash terminal, like we showed you in Chapter 3. Either will effectively allow you to remotely connect to and administer your Linux hosts from an environment that you’re comfortable in. Mac OS, being Unix based, comes with an SSH client built in.
Tip
SSH clients also exist for operating systems like Windows Mobile, Android, Symbian, and the Apple iPhone, allowing road warriors to connect to their Linux hosts while on the go!
Getting Help
So how do you get help on your Linux host? You’re probably thinking, “I can’t use the F1 key, right?” Well, actually you can. In both Gnome’s and KDE’s GUI, the F1 key will bring up help text for that interface. But on the command line, there are also a wide variety of tools designed to tell you how things work, help you find the command you want, and then explain the options available for that command.
The easiest way is to check the command or application’s man page (short for manual page). A man page tells you what the command can do, what options are available, and a variety of other information about it. You can access the man page by typing man and the name of the command whose man page you wish to view, as you can see in Listing 4-2.
Listing 4-2. The man Command
$ man lsThe man command will return a document that describes the ls (or list) command and its various options.
Note
The ls or list command lists the files and directories on your host. We’re going to show you quite a bit more about files with the ls command later in this chapter, so stay tuned.
If you are struggling with a command, its man page is the first place you should look for help. Not all commands have man pages, and you’ll get an error message if the man page of a particular command does not exist. In this case, it is often useful to try adding the --help switch to a command, as you can see in Listing 4-3.
Note
Switches are command-line options you can add to particular commands. They are specified using a dash (-) or two dashes (--) and the single-letter abbreviation or name of the switch, for example, -l or --name. You can use either the abbreviated or longer version. The longer version is sometime more helpful when writing scripts and can be less ambiguous. Like making sure people know that you mean --version when using –v, and not --verbose.
Listing 4-3. The --help Switch
$ ls --helpTip
Also available via the man command is a good introduction to Linux in general. To view this introduction, use the command man intro.
You can search for relevant man pages that match words in their short description.
$ man –k useradduser (8) - create a new user or update default new user informationapplygnupgdefaults (8) - Run gpgconf - apply-defaults for all users.arpd (8) - userspace arp daemon.
Or you can also search all of the man pages on a host for a keyword using the -K option.
$ man -K userThis would search all man pages for the keyword user and return a list of all man pages containing the term. You will then be prompted to view each page that is returned, skip a page and go to the next page, or quit the search.
This search can be a little slow because your host usually has a lot of man pages, so there are two simpler search commands available that may offer a shortcut to what you are looking for: whatis and apropos. The whatis command searches a summary database of commands that is available on most Linux distributions for a complete word match as follows:
$ whatis useradduseradd(8) – create a new user or update default new user information
The whatis search has returned the useradd command and included a brief description of what the command does.
The apropos command also searches the whatis database but searches for strings rather than complete words.
$ apropos whoamldapwhoami(1) – LDAP who am i? toolwhoami(1) – print effective userid
The apropos search has searched the whatis database for all references to the string whoami and returned a number of commands and functions that contain this string.
There are also some additional useful commands that can tell you about commands on your host. The info command, for example, sometimes provides a more verbose explanation of a command’s function and options; try info ls to read about the ls command in more detail.
Note
The info interface is not very intuitive. It, and man pages, came about before the Internet (or good UX design) was everywhere. They are designed to have as much information as possible on the local system, in case you can’t connected to Internet, but it is not meant to be pretty.
Users and Groups
Linux is multiuser operating system . This means it allows multiple users to connect simultaneously via multiple command-line or GUI sessions. Linux controls access to the host and its resources via user and group accounts. Users are also created for particular systems components and used to run services; for example, if you install a mail server, a user called mail might also be created that is used with this service, or a user called lp (for line printer) may exist to control printer resources.
Linux also relies on groups, which are collections of like users. Users can be members of one or more groups and are usually placed in a group so they can access some kind of resource. For example, all the users who need to access the Accounts Payable system might be added to a group called accounts.
Tip
Your user and group information is primarily contained in two files: /etc/passwd holds your user information, and /etc/group holds your group information. We’ll talk more about these files in Chapter 6.
Users and groups are important, and we’re going to explain how they work and how to create them in Chapter 6. Conceptually, users and groups operate in much the same way as they do on a Windows host. Each user has an account that is usually secured with a password. When most general users are created, a home directory analogous to a Windows profile is also created. This home directory provides users with a place to store their data and is also the default location for many applications to store their user-specific configuration. Users also belong to groups, as they do on Windows, which provide them with access to additional resources or services.
Services and Processes
On a Windows host, a lot of background activities and server applications run as services. Services can be started and stopped and often have to be restarted when an application is reconfigured. These services are usually controlled via the Services manager available in the Control Panel. On Linux hosts, the concept of services also exists. Services, also called daemons, run many of the key functions on your host.
Note
The term “Daemon” is the Greek spelling of demon and based on the imaginary being that sorted molecules in Maxwell’s Demon thought experiment on the second law of thermodynamics. For more information, see https://en.wikipedia.org/wiki/Daemon_(computing )
Like on a Windows host, each service or daemon is one or more processes running on your host. These processes have names; for example, the Secure Shell daemon we discussed earlier usually runs as a process called sshd. Other common daemons include master (the Postfix mail server), httpd (the Apache web server), and mysqld (the MySQL database server). Some of these processes may be running by default on your host together with a number of other processes that perform a variety of system and application functions. Most daemon processes usually have a name ending in “d” for daemon.
In Listing 4-4, we’ve used the ps command with the -A flag (for all) to list all the processes currently running on our host.
Listing 4‑4. The ps Command
$ ps -APID TTY TIME CMD1 ? 00:00:00 systemd2 ? 00:00:00 kthreadd3 ? 00:00:00 ksoftirqd/04 ? 00:00:00 kworker/0:05 ? 00:00:00 kworker/0:0H6 ? 00:00:00 kworker/u4:0...<snip>...445 ? 00:00:00 crond1571 ? 00:00:00 sshd
In Listing 4-4, you can see a truncated list of the processes running on our host. This list was generated using the ps command with the -A (or list all processes) option. Each process running on the host is listed in order of its Process ID (PID) , represented in Listing 4-4 by the left-hand column. PIDs are used to control processes, and we’ll use them when we look at starting and stopping processes in Chapter 6. The most important process on your host is called systemd. The systemd process is the base process on Linux hosts that spawns all other processes on a host. This master process always uses PID 1 and must be running for your host to be functional.
Note
Depending on the operating system you have chosen you might notice that you don’t have a systemd process but an init process instead at PID 1. Systemd is a recent addition to mainstream Linux OS’s, having been accepted in OSs like Fedora and Debian Unstable for some time. On systems that are older you will see init. We help explain the difference between the two in Chapter 6.
Many of the processes whose name starts with “k” are not real processes, but kernel threads. These threads are a special kind of service that performs management tasks in the core of the operating system, the kernel. These “light weight processes” allow the kernel process to different tasks in the background, like handle what happens when someone plugs in a USB drive. The listing <thread>/0 indicates the name of the thread and the /0 is the processor it is running on.
Processes 445 and 1571 in Listing 4-4 are examples of daemon processes running on your system. We see the crond and sshd daemons, crond being a job scheduling service and sshd being the OpenSSH daemon for handling connections from ssh clients.
There is another useful command that can tell you which processes are running on your host and which are consuming the most CPU and memory. This command is called top, and we run it in Listing 4-5.
Listing 4-5. The top Command
$ topThe top command starts an interactive monitoring tool that updates every few seconds with the top running processes on your host. You can see a snapshot of the top command’s output in Figure 4-7.
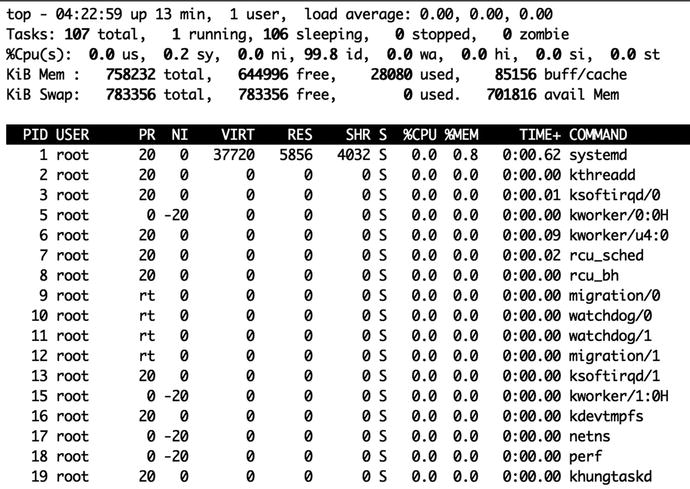
Figure 4-7. The top process-monitoring command
This is the output of a very quiet system. Top shows a lot of detail including system uptime, system load averages, CPU usage and memory utilization. Top refreshes every three minutes by default and processes will drift in and out of the listing as they consume resources. Processes that are heavy consumers of resources, like CPU, will always be listed at the top of the list, but you can also list by other resources like memory usage.
Packages
Applications in the Microsoft Windows world are usually installed by running a binary application and following an installation process. Some applications also come with uninstallers that remove them if you no longer require them. In some cases, you may instead use the Add or Remove Programs tool in the Control Panel to add or remove applications.
In the Linux world, package managers are the equivalent of the Add or Remove Programs tool. A package manager contains a collection of pre-packaged applications, for example, the Apache web server or the LibreOffice suite. These pre-packaged applications are, not surprisingly, called packages. Applications bundled as packages contain the required binaries, supporting files, and often configuration files as well, and they are ready to be run straight after being installed.
In Chapter 8, we’re going to extensively cover two of the commonly used package management systems: RPM and Deb. These are used by distributions based on the Red Hat and Debian distributions, respectively. So Red Hat Enterprise Linux, CentOS, the Fedora Project, and even SUSE (a non-Red Hat based distribution) are distributions that all use RPM. Distributions that use Deb include Ubuntu, Debian, and a number of others.
Files and Filesystems
In Unix, there is a phrase that says, “Everything in UNIX is either a file or a process.” Linux also adheres to this statement. There are several types of files, but we are going to start with files and directories. In Linux directories are just files containing the names of other files. Let’s take a closer look at Linux files and the filesystem.
We’re going to start by using a command called pwd, or print working directory.
$ pwd/home/jsmith
The pwd command allows you to orient yourself in the filesystem by identifying our working or current directory. From here you can navigate the filesystem; start by changing the directory to the root directory using the cd, or change directory, command, as you can see in Listing 4-6.
Listing 4-6. Changing Directories
user@host:∼$ cd /user@host:/$
If you can ignore the user@host for a moment in Listing 4-6, you can see we’ve moved from our current directory to /, which is called the root directory. You can tell that by ∼$ changing to ‘/$. The root directoryis the base of the directory tree. The Linux filesystem is a single directory. This means that, unlike Windows, Linux has a single hierarchal directory structure. Instead of multiple drives, for example, C: and D:, with separate directory trees beneath them, all drives, partitions, and storage are located off the root, or /, directory.
How does this work? Linux drives and devices are mounted (this can occur automatically when you boot, or you can do it manually). These mounted drives and devices appear in the filesystem as subdirectories under the ‘/’ root directory. We explain how the ‘/’ directory is initially mounted in Chapter 6.
Note
We’ll also discuss more about storage and mounting devices in Chapter 9.
With the cd command , you can traverse to other directories and subdirectories. Linux calls the steps you take to traverse the filesystem a path. There are two types of paths—absolute and relative. The absolute path always starts with a slash symbol (/) representing the root directory and specifies the definitive location of the place you are describing; for example, /home/jsmith/ is an absolute path.
Relative paths allow you to specify a location relative to your current location or starting point. For example, the command
$ cd foobarattempts to change from the current directory to a directory called foobar. If no such directory is present, the cd command fails.
There are also a couple of symbols that are often used with relative paths:
$ cd ..The .. indicates that we wish to traverse up one level on the directory tree (if we’re already at the top, we won’t go anywhere at all).
We can also traverse in other ways through the directory tree using this mechanism, as you can see on the following line:
$ cd ../foo/barIn this instance we have
Traversed up one directory level as indicated by the .. notation
Changed into a directory called foo in the next level up
Then changed into a directory called bar under the foo directory
Let’s illustrate this in Figure 4-8.

Figure 4-8. Directory traversal to ../foo/bar
Note
If you’re used to the Microsoft Windows command line, you may notice that the slash separating directories is a forward slash, or /, rather than a backslash, or . This does take a little getting used to, but you’ll soon be acclimatized!
We can also refer to relative objects in a directory using the following construct:
$ ./makeThe addition of the ./ in front of the command executes the make command in our current directory.
Which directories you can traverse to depends on their permissions. Many directories only allow access to specific users and groups (the root user can go anywhere). If you try to change to a directory to which you don’t have suitable permissions, you will get an error message:
$ cd /root-bash: cd: /root: Permission denied
Note
We will talk about permissions in the section “Permissions,” later in this chapter.
So now you know how to move around in your directory tree. But where is everything located on your host? Most Linux distributions adhere to a very similar directory structure. This is not to say all distributions are identical, but generally speaking, files and directories are located in a logical and consistent model. You can see the typical directory structure under the root directory in Table 4-1. Each entry has a brief description of each directory.
Table 4-1. Linux Directory Structure
Directory | Description |
|---|---|
/bin/ | User commands and binaries. |
/boot/ | Files used by the boot loader. (We talk about boot loaders in Chapter 6.) |
/dev/ | Device files. |
/etc/ | System configuration files. |
/home/ | User’s home directories. |
/lib/ | Shared libraries and kernel modules. |
/media/ | Removable media is usually mounted here (see Chapter 8). |
/mnt/ | Temporary mounted filesystems are usually mounted here (see Chapter 8). |
/opt/ | Add-on application software packages. |
/proc/ | Kernel and process status data is stored in here in text-file format. |
/root/ | The root user’s home directory. |
/run/ | A directory where applications can store data they require to operate. |
/sbin/ | System binaries. |
/srv/ | Data for services provided by this host. |
/sys | Virtual filesystem that contains information and access to the Linux kernel subsystems. |
/tmp/ | Directory for temporary files. |
/usr/ | User utilities, libraries, and applications. |
/var/ | Variable or transient files and data, for example, logs, mail queues, and print jobs. |
Note
Not every distribution will have every one of these directories (and others might have additional directories), but generally this list is accurate.
Let’s look at some of the key directories under the root (/) directory that are listed in Table 4-1. The first, and one of the most important, is /etc/. The /etc/ directory, named for etcetera, is where most of the important configuration files on your host are located. You’ll be frequently working with files located in this directory as you add applications and services to your hosts.
Next, the /home/ directory contains all of the home directories for users (except the root user—whose home directory is usually /root/). The /tmp directory is where you’ll commonly find temporary files. In a similar vein is the /var directory, in which transitory data such as logs are stored. You’ll often look at log files contained in the /var/log/ directory that have been created by applications or via the host’s syslog (or system logger) daemon. These log files contain a wide variety of information about the status of your applications, daemons, and services.
Let’s take a closer look at files and directories and how to work with them. Start by changing to the root, or /, directory:
$ cd /Now you’re at the root directory , and you want to see what is contained in that directory. To do this, you use the ls, or list directory, command, as you can see in Listing 4-7.
Listing 4-7. Listing the Contents of a Directory
$ lsbin dev etc lib lost+found mnt proc root sys usrboot home lib64 media opt sbin srv tmp var
In Listing 4-7, you can see the ls command has returned a list of files and directories that are in the root directory. You’ll see it looks pretty close to the list in Table 4-1.
By default, ls lists all files in a directory, but you can limit it to displaying a single file name or several file names by listing that file on the command line as follows:
$ ls foobarThis command would display any file or directory called foobar. We could also use the wildcard or asterisk symbol to select files.
$ ls foo*This would return any file called foo plus any files that started with foo, such as foobar, as well as the contents of any directories whose name starts with foo. Specifying the asterisk symbol alone lists all files and all directories and their contents.
Tip
You’ll see a lot more of the * symbol, as it is used on Linux much as it is on Windows. It indicates a wildcard that is used to substitute for one or more characters; for example, you’ve just seen foo*, which means anything starting with foo. A single character is matched using the ? symbol; for example, specifying ?at would match cat, mat, bat, etc. Collectively, this activity is called globbing, and you can read about its use in Linux shells at www.faqs.org/docs/abs/HTML/globbingref.html .
You can also list files in other directories by specifying the directory name:
$ ls /usr/local/binThis would list all the files in the /usr/local/bin directory.
You don’t see a lot of details about these files and directories in Listing 4-7, though. It only shows a list of names. To find out some more information about this list, you can add switches to the ls command, as you can see in Listing 4-8, to reveal more information.
Listing 4-8. Getting More Information from ls
$ ls -latotal 192drwxr-xr-x 25 root root 4096 2016-07-22 12:47 .drwxr-xr x 25 root root 4096 2016-07-22 12:47 ..-rw-r--r-- 1 root root 0 2016-07-15 20:47 .autofsckdrwxr-xr-x 2 root root 4096 2016-05-18 04:11 bindrwxr-xr-x 6 root root 3072 2016-05-25 21:57 bootdrwxr-xr-x 14 root root 4100 2016-07-19 12:26 devdrwxr-xr-x 116 root root 12288 2016-07-22 12:47 etcdrwxr-xr-x 7 smtpd smtpd 4096 2016-05-02 12:00 homedrwxr-xr-x 12 root root 4096 2016-05-17 18:14 libdrwxr-xr-x 8 root root 4096 2016-06-06 10:19 lib64drwx------ 2 root root 16384 2016-06-11 16:01 lost+founddrwxr-xr-x 2 root root 4096 2016-06-11 16:14 mediadrwxr-xr-x 4 root root 4096 2016-06-12 11:28 mnt...
In Listing 4-8, the l and a switches have been added to the ls command. The l switch, which is an abbreviation of long, uses a long listing format, which as you can see shows a lot more information. The a switch tells ls to list all files and directories, even “hidden” ones, otherwise known as “dot” files.
Tip
In Linux (and Unix) “hidden” or “dot” files are prefixed with a full stop or period (e.g., the .autofsck file in Listing 4-8) and are often used to hold configuration and history information or as temporary files. They are normal files but some utilities, like ls, do not show them by default. They can also surprise you when you are looking for files in the directory that are using a lot of space. A ls -lh will show you the normal files in human-readable sizes (-h), were a ls -lah will show file sizes including the dot files. We talk more about this a little later.
You can see a full list of the available switches for the ls command by reading the command’s man page—just enter man ls.
So what does the long listing format tell you about your files and directories? In Listing 4-8, each item has a small collection of information returned about it. In Listing 4-9, you can see a subset of that listing showing one file and one directory, which we’re going to examine in more detail.
Listing 4-9. File Listing Subset
-rw-r--r-- 1 root root 0 2016-07-15 20:47 .autofsckdrwxr-xr-x 2 root root 4096 2016-05-18 04:11 bin
Each line of the listing contains seven pieces of information about each object:
Unix file type
Permissions
Number of hard links
User and group ownership
Size
Date and time
Name
Some of the information contained in the listing also introduces some key Linux concepts, such as permissions and users, groups, and ownership. We’re going to take advantage of this introduction to not only explain each item but also explore some of the broader concepts they represent.
File Types and Permissions
The file type and permissions are contained in the first ten characters, the section resembling -rw-r--r--. This potentially intimidating collection of characters is actually quite simple to decipher: the first character describes the type of file, and the next nine characters describe the permissions of the file.
File Types
Almost everything on the Linux file system can be generally described as a file. The first character of the listing tells us exactly what sort of file. A dash (-) here indicates a regular file that might contain data or text, or be a binary executable. A d indicates a directory, which is essentially a file that lists other files. An l indicates a symbolic link. Symbolic links allow you to make files and directories visible in multiple locations in the filesystem. They are much like the shortcuts used in Microsoft Windows.
Table 4-2 lists the file types available.
Table 4-2. File Types
Type | Description |
|---|---|
- | File |
d | Directory |
l | Link |
c | Character devices |
b | Block devices |
s | Socket |
p | Named pipe |
We’ll cover the other types here briefly. You won’t regularly need most of the types, but they will appear occasionally in later chapters. The b and c file types are used for different types of input and output devices (if you look in the /dev directory, you will see examples of these device files). Devices allow the operating system to interact with particular hardware devices; for example, many distributions will have a device called /dev/usb that represents a USB drive attached to the host.
Tip
You’ll learn more about devices in Chapter 9 when we show you how to load a USB on your host.
Finally, sockets and named pipes are files that allow interprocess communications of varying types. They allow processes to communicate with each other. You’ll see some sockets and named pipes later in the book.
Permissions
The next nine characters detail the access permissions assigned to the file or directory. On Linux, permissions are used to determine what access users and groups have to a file. Controlling your permissions and access to files and applications is critical for security on your Linux host, and frequently in this book we’ll use permissions to provide the appropriate access to files. Thus it is important that you understand how permissions work and how to change them.
There are three commonly assigned types of permissions for files:
Read, indicated by the letter r
Write, indicated by the letter w
Execute, indicated by the letter x
Note
There are two other types of permissions, sticky and setuid/setgid permissions, represented by t or s characters, respectively. We discuss these in the sidebar “Setuid, Setgid, and Sticky Permissions” later in this chapter.
Read permissions allow a file to be read or viewed but not edited. If it is set on a directory, the names of the files in the directory can be read, but other details, like their permissions and size, are not visible. Write permissions allow you to make changes or write to a file. If the write permission is set on a directory, you are able to create, delete, and rename files in that directory. Execute permissions allow you to run a file; for example, all binary files and commands (binary files are similar to Windows executables) must be marked executable to allow you to run them. If this permission is set on a directory, you are able to traverse the directory, for example, by using the cd command to access a subdirectory. The combination of the read and execute permissions set on a directory thus allows you to both traverse the directory and view the details of its contents.
Each file on your host has three classes of permissions:
User
Group
Other (everyone else)
Each class represents a different category of access to the file. The User class describes the permissions of the user who owns the file. These are the first three characters in our listing. The Group class describes the permissions of the group that owns the file. These are the second set of three characters in our listing.
Note
Groups in Linux are collections of users. Groups allow like users to be collected together for the purpose of allowing access to applications and services; for example, all the users in the Accounting department can belong to the same group to allow them access to your Accounts Payable application. We’ll talk about groups in Chapter 6.
Finally, the Other class describes the permissions that all others have to the file. These are the final set of three characters in the listing.
Figure 4-9 describes these classes and their positions.
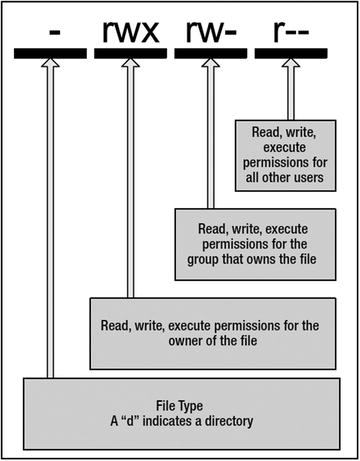
Figure 4-9. File permission breakdown
Note
A dash in any position means that particular permission is not set at all.
You can see a single file in Listing 4-10 whose permissions we’re going to examine in more detail, and then you’ll learn how to make some changes to those permissions.
Listing 4-10. Permissions
-rw-r--r-- 1 root root 0 2016-07-15 20:47 myfileIn Listing 4-10, we have a file, as indicated by the dash (-) at the beginning of the listing. The file is owned by the root user and root group. The first three permissions are rw-, which indicates the root user can read and write the file, but the dash means execute permissions are not set, and the file can’t be executed by the user. The next three permissions, r--, indicate that anyone who belongs to the root group can read the file but can do nothing else to it. Finally, we have r-- for the last three permissions, which tell us what permissions the Other class has. In this case, others can read the file but cannot write to it or execute it.
Now you’ve seen what permissions look like, but how do you go about changing them? Permissions are changed using the chmod (change file mode bits) command. The key to changing permissions is that only the user who owns the file or the root user can change a file’s permissions. So, in Listing 4-10, only the root user could change the permissions of the myfile file.
The chmod command has a simple syntax. In Listing 4-11, you can see some permissions being changed.
Listing 4-11. Changing Permissions
# chmod u+x myfile# chmod u-x,og+w myfile# chmod 654 myfile
In Listing 4-11, we’ve changed the myfile file’s permissions three times. Permission changes are performed by specifying the class, the action you want to perform, the permission itself, and then the file you want to change. In our first example, you can see u+x. This translates to adding the execute permission to the User class.
Note
The execute permission is usually set only on files that are executable in nature such as scripts and binaries (a.k.a. applications or programs) and on directories. On directories x means traverse, meaning that you can list directories in the parent directory but you can’t go any further.
After our update, the permissions on our file would now look as follows:
-rwxr--r-- 1 root root 0 2016-07-15 20:47 myfileYou can see the addition of the x to the User class . So how did chmod know to do that? Well, the u in our change represents the User class. With chmod, each class is abbreviated to a single letter:
u: User
g: Group
o: Other or everyone
a: All
After the class, you specify the action you’d like to take on the class. In the first line in Listing 4-11, the + sign represents adding a permission. You can specify the - sign to remove permissions from a class or the = sign to set absolute permissions on the class. Finally, you specify the permission to the action, in this case x.
You can also specify multiple permission changes in a single command, as you can see in the second line of Listing 4-11. In this second line, we have the change u-x,go+w. This would remove the x, or execute, permission from the User class and add the w, or write, permission to both the Group and Other classes. You can see we’ve separated each permission change with a comma and that we can list multiple classes to act upon. (You can also list multiple permissions; for example, u+rw would add the read and write permissions to the User class.)
Thus the second line in Listing 4-11 would leave our file permissions as
-rw-rw-rw- 1 root root 0 2016-07-15 20:47 myfileWith chmod, you can also use the a class abbreviation, which indicates an action should be applied to all classes; for example, a+r would add read permissions to all classes: User, Group, and Other.
We can also apply the permissions of one class to another class by using the = symbol.
# chmod u=g myfileOn the previous line, we’ve set the User class permissions to be the same as the Group class permissions.
You can also set permissions for multiple files by listing each file separated by space as follows:
# chmod u+r file1 file2 file3As with the ls command, you can also reference files in other locations as follows:
# chmod u+x /usr/local/bin/foobarThe previous line adds the execute permission to the User class for the foobar file located in the /usr/local/bin directory.
You can also use the asterisk symbol to specify all files and add the -R switch to recurse into lower directories as follows:
# chmod -R u+x /usr/local/bin/*The chmod command on the previous line would add the execute permission to the User class to every file in the /usr/local/bin directory.
The last line in Listing 4-11 is a little different. Instead of classes and permissions, we’ve specified a number, 654. This number is called octal notation. Each digit represents one of the three classes: User, Group, and Other. Additionally, each digit is the sum of the permissions assigned to that class. In Table 4-3, you can see the values assigned to each permission type.
Table 4-3. Octal Permission Values
Permission | Value | Description |
|---|---|---|
r | 4 | Read |
W | 2 | Write |
x | 1 | Execute |
Each permission value is added together, resulting in a number ranging from 1 and 7 for each class. So the value of 654 in Listing 4-11 would represent the following permissions:
-rw-r-xr-- 1 root root 0 2016-08- 14 22:37 myfileThe first value, 6, equates to assigning the User class the read permission with a value of 4 plus the write permission with a value of 2. The second value, 5, assigns the Group class the read permission with a value of 4 and the execute permission with a value of 1. The last value, 4, assigns only the read permission to the Other class. To make this clearer, you can see a list of the possible values from 0 to 7 in Table 4-4.
Table 4-4. The Octal Values
Octal | permissions | Description |
|---|---|---|
0 | --- | None |
1 | --x | Execute |
2 | -w- | Write |
3 | -wx | Write and execute |
4 | r-- | Read |
5 | r-x | Read and execute |
6 | rw- | Read and write |
7 | rwx | Read, write, and execute |
In Table 4-5, you can see some commonly used octal numbers and the corresponding permissions they represent.
Table 4-5. Octal Permissions
Octal Numbers | permissions |
|---|---|
600 | rw-r--r-- |
644 | rw-r--r-- |
664 | rw-rw-r-- |
666 | rw-rw-rw- |
755 | rwxr-xr-x |
777 | rwxrwxrwx |
Tip
The chmod command has some additional syntax for changing permissions, and you can read about them in the command’s man page.
Finally, there is an important concept called umaskthat you need to also understand to fully comprehend how permissions work. The umask dictates the default set of permissions assigned to a file when it is created. By default, without a umask set, files are created with permissions of 0666 (or read and write permissions for the owner, group, and others are all set), and directories are created with permissions of 0777 (or read, write, and execute for the owner, group, and others). You can use the umask command to modify these default permissions. Let’s look at an example.
# umask 0022Here we’ve specified a umask of 0022. This looks familiar, doesn’t it? Yes, it’s a type of octal notation; in this case, it indicates what’s not being granted. So here we would take the default permissions for a file, 0666, and subtract the 0022 value, leaving us with permissions of 0644. With a umask of 0022, a new file would be created with read and write permissions for the owner of the file and read permissions for the group and others. Newly created directories (default permissions of 0777) would now have permissions of 0755 with a umask of 0022. Another commonly used umask is 0002, which results in default permissions of 0664 for files and 0775 for directories. This allows write access for the group also, and this umask is often used for files located in shared directories or file shares.
On most hosts, your umask is set automatically by a setting in your shell. For Bash shells, you can usually find the global umask in the /etc/bashrc file, but you can also override it on a per-user basis using the umask command or using the pam_umask module (we will give you more information about what PAM is in Chapter 5).
Tip
The umask command can also set umasks using alternative syntax. We’ve just described the simplest and easiest. You can find more details in the umask man page.
Links
Let’s take another look at the example from Listing 4-9:
-rw-r--r-- 1 root root 0 2016-07-15 20:47 .autofsckdrwxr-xr-x 2 root root 4096 2016-05-18 04:11 bin
In our listing, after our file type and permissions is the number of hard links to the file. Hard links are references that connect your file to the physical data on a storage volume. There can be multiple links to a particular piece of data. However, hard links are different from the symbolic links we introduced earlier (indicated by a file type of l), although both linkages are created with the same command, ln. We’ll talk about the ln command later in this chapter in the section “Linking Files.”
Users, Groups, and Ownership
Next in our listing is the ownership of the file. Each object is owned by a user and a group; in Listing 4-9, the root user and root group own the objects. We briefly discussed user and group ownership when we looked at permissions. We explained that only the user who owns a file could change its permissions, and that groups were collections of users. Groups are generally used to allow access to resources; for example, all users who need to access a printer or a file share might belong to groups that provide access to these resources. As we discussed earlier in this chapter, on Linux hosts a user must belong to at least one group, known as the primary group, but can also belong to one or more additional groups, called supplementary groups.
You can change the user and group ownership of a file using the chown command. Only the root user has authority to change the user ownership of a file (although you can assume this authority using the sudo command we discussed earlier in the chapter and will cover in more detail in Chapter 6).
In Listing 4-12 we show some examples of how to use the chown command to change user and group ownership.
Listing 4-12. Changing Ownership
# chown jsmith myfile# chown jsmith:admin myfile# chown -R jsmith:admin /home/jsmith/*
In Listing 4-12, we’ve got three chown commands. The first command changes the user who owns the myfile file to jsmith. The second command changes the ownership of the file’s user and group, the user to jsmith and the group to admin, the owner and group being separated by a colon, :. The third and last command uses the -R switch to enable recursion. The command would change the owner of every file and directory in the /home/jsmith directory to jsmith and the group to admin.
Note
Also available is the chgrp command. It allows users to change the group of a file they own. The user can only change the group ownership to a group of which that user is a member. You use it like chgrp groupname file.
Size and Space
Next in our listing you see the size of the object on the disk. The size of the file is listed in bytes (a thousand and twenty four bytes is a Kibibytes, or K). We can also display sizes in a more human-readable format by adding the -h switch as follows:
$ ls -lh-rw-rw-r-- 1 jsmith jsmith 51K 2016-08- 17 23:47 myfile
On the previous line, you can see that the myfile file is 51 kibibytes in size.
In a listing, the size next to the directory is not its total size but rather the size of the directory’s metadata. To get the total size of all files in a directory, you can use the du, or disk usage, command. Specify (or change to) the directory you want to find the total size of and run the command with the -s and -h switches. The -s switch summarizes the total, and the -h switch displays the size in a human-readable form.
$ du -sh /usr/local/bin4.7M /usr/local/bin
The du tool has a number of additional switches and options that you can see by reviewing its man page.
In addition to the size of files and directories, you can also see the total disk space used and free on your host using another command, df. This command displays all of your disks and storage devices and the free space present on them. You can see the df command in Listing 4-13.
Listing 4-13. Displaying Disk Space
$ df -hFilesystem Size Used Avail Use% Mounted on/dev/mapper/VolGroup00-LogVol01 178G 11G 159G 6% //dev/sda1 99M 37M 58M 39% /boottmpfs 910M 0 910M 0% /dev/shm
We’ve executed the command and added the -h switch, which returns human-readable sizes. It shows our current filesystems and their used and free space, as well as percentage used. There are additional options you can use with the df command, and you can review these in the command’s man page. We’ll revisit the df and du commands in Chapter 9.
Date and Time
The penultimate and ultimate items in our listing are the date and time the file was last modified (known as mtime) and the name of the file or directory. Linux also tracks the last time a file was accessed (called atime) and when it was created (called ctime). You can display the last accessed time for a file by listing it with the -u switch as follows:
$ ls -luYou can list creation dates by using the -c switch:
$ ls -lcNote
We will revisit atime in Chapter 17.
If you want to know the actual time and date on the current host, you can use the useful and powerful date command. Using date on the command line without any options will return the current time and date as follows:
$ dateTue Aug 19 13:01:20 EST 2016
You can also add switches to the date command to format the output into different date or time format; for example, to display Unix epoch time (the number of seconds since January 1, 1970), you would execute the date command as follows:
$ date +%s1219116319
Here we’ve used the + symbol to add a format and then specified the format, in this case %s, to display epoch time. Epoch time can be useful when calculating time differences or for adding as a suffix to a file for uniqueness. You can see additional formats in the date command’s man page. You can also use the date command to set the time. Type date and then specify the required date and time in the format MMDDhhmm[[CC]YY]. You can find out more about Unix epoch time at http://en.wikipedia.org/wiki/Unix_time .
Note
This is just one way to set the time, and we’ll discuss other more effective methods such as Network Time Protocol in Chapter 10.
Working with Files
So, in the course of exploring our simple file listing, we’ve covered a lot of concepts, introduced you to some Linux commands, and taught you how to perform a few key administrative tasks. Leading on from these tasks, we’re going to finish this chapter by covering how to view, edit, search, copy, move, and delete files. You’ll need to know how to handle all these tasks in order to administer your Linux host.
Reading Files
The first thing you’re going to learn is how to read files. Many files on Linux hosts, especially configuration files, are text-based and can be read using some simple command-line tools.
Note
Always remember that in order to read a file, you must have read permissions to that file. This means you need to own it or belong to a group that has read permissions to the file, or the file has read permission set for the Other class.
The first of these tools is cat. The cat command is so named because it “concatenates and prints files.” In Listing 4-14, you can see the use of the cat command on a text file.
Listing 4-14. Using the cat Command
$ cat /etc/hosts# Do not remove the following line, or various programs# that require network functionality will fail.127.0.0.1 localhost.localdomain localhost localhost::1 localhost6.localdomain6 localhost6
In Listing 4-14, we’ve outputted the /etc/hosts file to the screen. The /etc/hosts file contains the host entries for our Linux host (like the WINDOWSSystem32servicesetchosts file under Windows) that match hostnames to IP addresses. But the cat command is a pretty simple tool and just outputs the text directly. If the file is very large, the text will keep outputting and scrolling down the screen, meaning if you wanted to see something at the start of the file, you’d need to scroll back.
Tip
You can scroll a virtual console up and down via the Shift+Page Up and Shift+Page Down key combinations.
To overcome this issue, we’re going to look at another command called less.
Note
You can try the cat command on the /etc/passwd and /etc/group files to see a full list of the users and groups on your host.
The less command allows you to scroll through files, both backward and forward, a screen at a time. Each time a page is displayed, you will be prompted as to how you’d like to proceed. We run less by specifying the name of the file as follows:
$ less /etc/servicesFrom inside the less interface, you can scroll through the file. To go to the next page, you use the spacebar, and to advance one line at a time, you use the Enter key. To scroll backward, you can use the B key. You can also scroll using the arrow keys, and to quit the less command, you use the Q key.
Note
There are additional ways to navigate files using less that you can see by reviewing the command’s man page.
In addition to navigating through files, it is also possible to search a file or files for specific information. To do this, we can make use of the very powerful grep command . The grep command allows you to search through a file or files for a string or pattern (using regular expressions) and return the results of that search.
Note
The word “grep” has become a commonly used term in IT for searching, much like the term “google” has for using an online search engine. In 2003, the Oxford English Dictionary added the word “grep” as both a noun and a verb (e.g., “John grep’ed his mailbox to find the e-mail”).
In Listing 4-15, you can see a very simple grep search for the string localhost in the file /etc/hosts.
Listing 4-15. Introducing grep
$ grep localhost /etc/hosts127.0.0.1 localhost.localdomain localhost localhost::1 localhost6.localdomain6 localhost6
To use grep, you specify the string you’re searching for, in this case localhost (grep is case sensitive, so it will only find this lowercase string), and then the name of the file you’re searching in.
Note
You can make grep case insensitive by adding the -i switch to the command.
By default, grep returns those lines in the file that contain the string we’re searching for. You can also search for more than one file by using the asterisk symbol, as we have demonstrated for other commands earlier in this chapter, for example:
$ grep localhost /etc/host*$ grep localhost /etc/*
The first command would search all files starting with host* in the /etc/ directory, and the second would search all files in the /etc/ directory. Both searches are for the string localhost.
You can also recursively search down into lower directories by adding the -r switch as follows:
$ grep -r localhost /etcTip
On Ubuntu and Debian hosts, the rgrep command automatically recurses into directories.
You can also specify more complicated search terms, for example, multiple words, as follows:
$ grep "local host" /etc/hostsYou can see we’ve specified the words “local” and “host” with a space between them. In order to tell grep these words are grouped together and have them parsed correctly, we need to enclose them in quotation marks. The quotation marks are used often on the command for a number of commands to protect input from being inappropriately parsed. In this case, we’re searching for the exact string "local host", and grep has returned no results because the string is not present in the /etc/hosts file.
The grep command is capable of much more than these simple examples. You can use grep to do complex regular expression searches in files, for example:
$ grep 'J[oO][bB]' *This would find the strings JOB, Job, JOb, or JoB in all files in the current directory (remember, grep is case sensitive by default, so our regular expression has explicitly specified upper- and lowercase variations). Regular expressions allow you to do some very powerful searching across your host.
Let’s look at some other useful regular expression searches using grep.
$ grep 'job$' *In the previous line, we’ve searched all files in the current directory for strings ending in job. The $ symbol tells grep to search for the text at the end of strings.
You can use the ^ symbol to in turn search for strings starting with a particular string like so:
$ grep '^job' *This would return any string starting with job. There are myriad other regular expressions that you’ll find useful for employing frequently.
Searching for Files
We’ve shown you how you can read a file, but what if you need to find the location of a file? A number of commands and tools on a Linux host allow you to find files in much the same way as the Windows Search function works. In Figure 4-10, you can see the Gnome search function.

Figure 4-10. Gnome search function
On the command line , you can also search for files using the find command. Let’s use the find command to search for a file called myfile in the /home directory:
$ find /home/ -type f -iname myfile*The find command is very simple to use. First you specify where you are searching, in this case in the /home/ directory. You can also specify / for the root (and thus search the whole directory tree), or any other location that you can access.
Note
If you don’t have permission to search a particular directory, you’ll get an error message indicating that your search has been denied.
Next, we’ve specified two options, -type and -iname. The first option, -type, specifies the type of file we are searching for; in this case, a normal file is represented by f. You can also specify d for directories or s for sockets (special files for interprocess communications), for example (see the man page for all the possible types you can search for). The -iname option searches for a case-insensitive pattern, in this case, all files starting with myfile. These options are just a very small selection of the possible search options; you can also search by owner, group, permissions, date and time of creation or modification, and size, among others. The find command will then search the specified location and return a list of files that match the search criteria.
You could also use the find command to locate files and directories that aren’t owned by any user or group. These often exist if a user or group has been deleted and the associated files not reassigned or removed with that user or group. We’ll talk more about this in Chapter 6. Using the following find command, you can list all files in this state:
# find / -nouser -o -nogroupThis command, run as root, will search the whole directory tree for any files that don’t belong to a valid user or group.
Tip
There are some other search-related commands you might want to look at, including locate, whereis, and which. You should read their man pages for more information.
Copying Files
In addition to viewing files, one of the most common actions you’ll need to take while administering your host is to copy a file. The first thing to understand about copying files is that, like reading files, you need to have appropriate permissions in order to copy. To copy a file, you will need two permissions: read permissions on the file you are copying and write permissions in the destination you are copying to.
To copy a file, use the cp command (short for copy). In Listing 4-16, you can see a simple cp command.
Listing 4-16. Copying Files
$ cp /home/jsmith/myfile /home/jsmith/yourfileIn Listing 4-16, we’ve copied the file /home/jsmith/myfile to /home/jsmith/yourfile. You need to be a little bit careful with the cp command. By default, the cp command will copy over existing files without prompting you. This can be bad if you already have a file with the same name as the one you are copying to. You can change this behavior by adding the -i switch. The -i switch enables interactive mode, where you are prompted with a yes or no question if the file you are copying to already exists. You answer y to overwrite or n to abort the copy.
Note
On some older Red Hat, Fedora, and CentOS distributions, the -i switch for the cp, mv, and rm commands is automatically set on by aliasing each command; for example, cp -i is aliased to cp. You can do this on other distributions using the alias command; see www.ss64.com/bash/alias.html for more details.
If we didn’t have permission to read the file, we’d get an error like the following:
cp: cannot open `/home/jsmith/myfile' for reading: Permission deniedWe’d get a similar error if we could not write to the target destination.
cp: cannot stat `/home/jsmith/yourfile': Permission deniedYou can also do a few more things with cp. You can copy multiple files, using the asterisk symbol as follows:
$ cp /home/jsmith/* /home/jsmith/backup/The target on the previous line, /home/jsmith/backup/, has to be a directory, and we’re copying all files in the /home/jsmith directory to this directory.
You can also select a subset of files.
$ cp -i /home/jsmith/*.c ./On the previous line, we’ve copied all the files with a suffix of .c to the current directory (using the ./ shortcut). We’ve also added the -i switch to make sure we’re prompted if a file already exists.
You can also copy directories and their contents using cp by adding the –r switch.
$ cp -r /home/jsmith /backupThe previous line copies the /home/jsmith directory and all files and directories beneath it to the /backup directory.
Caution
When using the -r switch, be careful to not use the *.* wildcard like you might on Windows. When used on Linux, the .. directory will also be copied recursively, which probably is not your intent!
Finally, when copying files using the cp command, some items about the file, such as dates, times, and permissions, can be changed or updated. If you want to preserve the original values on the copy, you can use the -p switch.
$ cp -p /home/jsmith/myfile /home/jsmith/yourfileThe cat command we examined earlier can also be used to copy files using a command-line function called redirection.
$ cat /home/jsmith/myfile > /home/jsmith/yourfileThe use of the > symbol sends the output from one command to the command or action on the other side of the > symbol. In this case, the output of the cat command is redirected into a file called yourfile. If this file doesn’t exist, it will be created. If it does exist, its content will be overwritten.
Caution
Be careful when using redirection, as your target file will be overwritten without warning.
You can also append to files using the same mechanism.
$ cat /home/jsmith/myfile >> /home/jsmith/yourfileUsing the >> syntax will append the output from the cat of myfile to the end of yourfile. If yourfile does not exist, it will be created.
Tip
Redirection can be used by many other commands as well to direct output from one command to another. It is also closely linked to another Bash capability called piping(see the sidebar “Piping and Other Bash Tips”).
Moving and Renaming Files
Moving files around in Linux is pretty straightforward. Using the mv command, you can move a file or directory from one location to another. In order to move a file, you must have write permissions to the file and write permissions to the location you want to move it to.
Listing 4-17 demonstrates how to move a file.
Listing 4-17. Moving Files
$ mv -i ∼/myfile /home/bjones/yourfileThe command in Listing 4-17 moves a file called myfile from the home directory to /home/bjones and renames it to yourfile. The -i option again ensures we get prompted if the target file already exists. You can also rename files in place with the mv command.
$ mv -i ∼/myfile ∼/mynewfileYou can do the same for directories.
Deleting Files
Use the rm (remove) command to delete files. As with any host, deleting files should be done carefully and with thought. On Linux, however, unlike Windows, there isn’t a quick and easy way to undelete files, so you need to be careful and take some precautions before you delete files. The first precaution is the use of the -i switch with the rm command. The -i switch enables interactive mode, which prompts you each time a file is deleted. You have to respond with a y or Y to delete the file or anything else to abort, as you can see in Listing 4-18.
Listing 4-18. The rm -i Switch
$ rm -i /home/jsmith/myfilerm: remove regular file `/home/jsmith/myfile'? n
Tip
Many distributions used to alias the rm command to rm -i to force deletion checking. You can enter the command alias to see a list of all the current aliases on your host. You can create your own aliases too. For instructions, check the alias command’s man page.
You can also delete directories and their contents recursively with the -r switch as follows:
$ rm -r /home/jsmith/backupThis would delete the /home/jsmith/backup directory and all its contents.
You can also override the -i switch using the -f, or force, switch like so:
$ rm -fr /home/jsmith/backupThis will also delete the backup directory and all its contents, but you will not be prompted to confirm the deletions. Be careful of using this switch and always be cognizant of where you are in the directory tree when you execute the command—the results of an inappropriate use of this command could be devastating!
Caution
Unlike Windows with its Recycle Bin, deleting files on Linux tends to be fairly permanent unless you have backups. Some methods are available to recover files, like the following: http://unix.stackexchange.com/questions/80270/unix-linux-undelete-recover-deleted-files . Your success with these methods will vary greatly. You should always delete files with extreme care, and you should make sure you have an appropriate backup. This is particularly important when editing configuration files. Always back up files before you edit, move, or delete them. Sometimes it is better to move the file or directory, wait for a period, then delete when you are sure you don’t need it.
Linking Files
On Linux hosts, you can also create links to files. Links can be used like Windows shortcuts but come in two forms—hard links and soft, or symbolic, links. Hard links are not like Windows shortcuts. They are actual references to the physical file. If you delete all hard links to a file, the file they reference is also deleted.
Note
Hard links can hence only be created on the physical partition or hard drive; you can’t link to a file located on another drive or partition.
Soft, or symbolic, links are more like Windows shortcuts: if they are deleted, the original file remains and only the link is removed.
You create links with the ln command. Hard links are created by default, and soft links are created by adding the -s switch. There are a few ways the ln command can be used, but the simplest is to create a link to a target file as follows:
$ ln -s /home/jsmith/myfileThe previous line would create a symbolic link called myfile to the /home/jsmith/myfile file. You can see other options you can use with the ln command by reviewing its man page.
Editing Files
Linux provides a wide variety of editing tools for files, including both GUI and command-line tools. In the GUI , you can find editors like kate or the simpler gedit. These are straightforward editors, but they are not word processors—much like Windows Notepad. Also, there are tools that allow you to edit files from the command line, like the popular vim, nano, joe, or bizarrely popular emacs.
We’re going to start by taking a quick look at vim, which is a text editor that is an enhancement of an older Unix editor called vi. To edit a file, you run the vim command and specify the name of the file to edit.
$ vim ∼/newfileTip
Some distributions also alias the vim command to vi to make it easier for people who are used to the older name.
This opens a file called newfile in your home directory. To insert some text into the file, type i, which is short for insert. You will see the word -- INSERT -- appear at the bottom of the screen. This means you’re in insert mode, which allows you to add to the file. You can now type in the file. Let’s type in hello jsmith. You can also use the arrow keys to move around on the line and through the file. The Enter key can be used to add lines to the file.
Tip
You can use the touch command to create empty files. Simply enter touch and the file name you want to create to create an empty file, for example, touch /home/jsmith/newfile.
When you’ve done that, press the Esc key. The Esc key takes you out of insert mode (you will see the text -- INSERT -- disappear from the bottom of the screen). You can now save what you’ve added to the file by entering the colon character (:) and the letters wq for a combination of :wq. This means write and quit. You could also just specify w, which would write but not quit. If you quit back to the command line , you can now view your file and see your typed text:
$ cat newfilehello jsmith
Tip
You can find an introduction to vim at www.openvim.com/ , or you might be able to run vimtutor on the command line to start a vim tutorial (depending on whether you have installed the vim-enhanced package).
A variety of GUI editors are also available. Some are simple in a similar style to the Microsoft Window’s Notepad or WordPad applications, and others are fully fledged word processors and text editors.
An example of these is the Gnome default text editor, gedit. You can launch gedit in Gnome by clicking the Applications menu, opening the Accessories tab, and selecting the Text Editor application. This will launch the gedit editor, as you can see in Figure 4-11.
Figure 4-11. The gedit editor
Another example of these editors is kate ( http://kateeditor.org/ ), which comes with the KDE GUI. In Figure 4-12, you can see a KDE desktop with kate open.

Figure 4-12. The kate editor
Summary
Well, what have you learned? First of all, Linux isn’t that hard to understand and the command line is a very powerful tool. Compared to Window or Macs it encompasses a lot of similar concepts and principles, and this will help you get started with Linux. Some of the key things you should take away from this chapter are the following:
You can test out lots of things using LiveCDs without any risk to your existing hosts and data, or use a virtual machine.
Learn to use the command line—it’s useful and powerful (and sometimes you won’t have a choice!). The Bash shell is especially powerful, and you’ll find yourself wondering how you ever got by without a command shell.
Learn a bit more about globbing and regular expressions—you’ll find both useful and powerful tools in your arsenal when administering your hosts.
Don’t use the root user to administer your host. Instead, make use of the sudo command. More on the sudo command in the next chapter.
Use the Linux man pages to find out more about each command. These are useful resources packed with information.
Learn to use the vim editor (or another editor of your choice) to help you work with configuration files on the command line.
Don’t forget online resources or the Linux community if you need help. Lots of people use Linux, and someone may have found a solution to a problem you’re having. Use Google or your favorite search engine to find these solutions.
In the next chapter, we’ll cover more on users and groups and how to manage them on your hosts.