
In previous chapters, we talked about a lot of the services your organization might implement (e.g., e-mail and web services). We showed you a variety of ways to deliver those services to your users and customers, including over the Internet, and to mobile users and users located at other sites. Some services, however, are simply easier and safer to deliver locally (e.g., file and print services). If your users are not located locally, then you need some way of connecting them as if they were local. Enter the virtual private network (VPN).
A VPN is, in essence, a private network that runs over a public, or hostile, network. VPNs are often called tunnels, and they are used to secure and protect traffic you’d like to keep private over an otherwise public network like the Internet. VPNs can be initiated to and from network devices or to and from hosts. They can be made between two offices, for example, or from a client such as a desktop or laptop to an office. The traffic running over a VPN is usually encrypted and authenticated via a mechanism such as an TLS/SSL certificate, a password, or a two-factor authentication mechanism such as a token or smartcard.
VPNs are commonplace and home and business-grade firewalls will usually have support for them.
In this chapter, we’re going to show you how to install the required software (in our case, an open source VPN tool called OpenVPN) to create a VPN and how to configure and generate VPN tunnels.
Our Example Network
We’re going to demonstrate a variety of VPN connections in this chapter, and we’ll use the example network we created in Chapter 7 for our sample environment and network to configure. Figure 15-1 shows that network again.
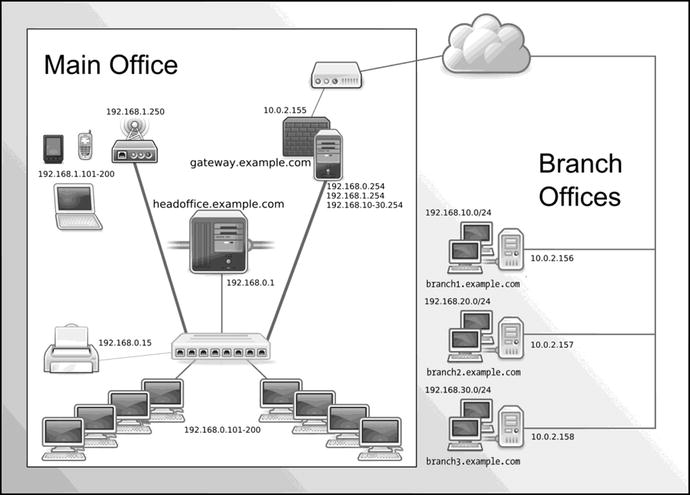
Figure 15-1. Our example network
Currently in our example network we have a head office with two main hosts:
gateway.example.com: Our bastion host. It has an external IP address of 10.0.2.155 and an internal IP address of 192.168.0.254.
headoffice.example.com: Our main head office server host. It has an internal IP address of 192.168.0.1, and external connections go out through the gateway host.
Note
We show how you can create these DNS CNAMEs (e.g., gateway and headoffice) in Chapter 10.
We also have three branch offices, each with its own internal and external IP address ranges.
branch1.example.com: A branch office host with an external IP address of 10.0.2.156. The branch has an internal IP address range of 192.168.10.0/24.
branch2.example.com: A branch office host with an external IP address of 10.0.2.157. The branch has an internal IP address range of 192.168.20.0/24.
branch3.example.com: A branch office host with an external IP address of 10.0.2.158. The branch has an internal IP address range of 192.168.30.0/24.
Introducing OpenVPN
OpenVPN ( http://openvpn.net/ ) is an open source SSL VPN application written by James Yonan that is available under the GNU GPLv2 license (OpenVPN v2) and AGPL (OpenVPN v3). There is also a commercial version under a separate EULA. You can also choose to use an AWS Marketplace–bundled EC2 instance that allows you to pay an hourly price and removes some of the administrative burden to set it up.
It works in a client/server model, with a server running on your host and clients connecting to the server and creating VPN tunnels.
Note
Other Linux-based VPN solutions are available, including IPsec implementations such as Openswan.
OpenVPN runs on a variety of platforms including Linux, Solaris, macOS, and Microsoft Windows. This allows you to connect a variety of clients to your Linux host; for example, you can connect a VPN tunnel from a desktop or laptop running Microsoft Windows. OpenVPN will even run on mobile devices running Android, Apple’s iPhone, or Windows Mobile. You can use it to create VPN tunnels from these sorts of devices to allow you to securely access resources in your internal networks.
OpenVPN can also be configured to use several different authentication services. We will show you how to authenticate using normal Linux PAM modules but you can use PAM to authenticate against services like LDAP and RADIUS.
In the sections that follow, we will demonstrate how to install and set up OpenVPN in a variety of configurations.
Installing OpenVPN
You will need to install OpenVPN on both ends of your connection. For hosts, this means installing the OpenVPN server on both ends. If one end of your connection is a network device that supports connecting to OpenVPN, then you’ll need to install the server only on the host that you will be using as the tunnel endpoint.
We’re going to start by installing the server on our bastion host, gateway.example.com, which has the internal IP address of 192.168.0.254 and external IP address of 192.0.2.155, in the head office branch of our example network.
OpenVPN works on both CentOS and Ubuntu, and it can be installed via normal package management methods. On CentOS, you will get the most recent OpenVPN package from the EPEL repository. Ubuntu is currently a few minor releases behind.
To view what version is currently available on your operating system, issue either of the following:
$ sudo aptitdue show openvpn (Ubuntu)$ sudo yum info openvpn (CentOS)
On CentOS we first issue the installation of the EPEL repository, if it is not already installed, and then install the package.
$ sudo yum install epel-release$ sudo yum install openvpn
On Ubuntu, you install the openvpn package, and some additional prerequisites will generally also be installed.
$ sudo aptitude install openvpnLet’s look at stopping and starting the service now.
Starting and Stopping OpenVPN
OpenVPN runs as a service on your hosts. The openvpn package on both Ubuntu and CentOS will install appropriate Systemd service scripts.
However, with OpenVPN, the way we start and stop the services is slightly different. Taking a look at CentOS, for example, we need to pass the name of the OpenVPN configuration we want to start. The systemctl command can take arguments. Looking at the Systemd service file for OpenVPN, you will see the following:
ExecStart=/usr/sbin/openvpn --daemon --writepid /var/run/openvpn/%i.pid --cd /etc/openvpn/ --config %i.confDo you notice the %i? We need to specify the configuration file (--config %i.conf) when we start the openvpn service. We use the systemctl command with the @ symbol to do this.
$ sudo systemctl start service@configurationThe systemctl command will extrapolate %i.conf to the configuration name we passed in after the openvpn@. In the following command, we will start configuration defined in /etc/openvpn/gateway.conf:
$ sudo systemctl start openvpn@gatewayYou use the Systemd enable command to ensure it starts at bootup.
$ sudo systemctl enable openvpn@gatewayOn Ubuntu, we just run the following:
$ sudo systemctl start openvpnWhen we start OpenVPN, these configuration service files will be automatically loaded, and the server will attempt to start the specified VPNs.
Configuring OpenVPN
As we mentioned earlier, we need to configure OpenVPN on both ends of any connection. We’re going to start our configuration by setting up the OpenVPN server on our bastion host in our head office, and then we’ll configure connections to our branch offices. A connection between two offices like this is called a static or point-to-point VPN. Finally, we’ll show you how to configure a client, such as a laptop or desktop, for a mobile user.
Our Proposed VPN Configuration
Let’s quickly look at a network diagram of our proposed VPN tunnel configuration (see Figure 15-2). We’re going to create tunnels between our head office branch and each of our branch offices.

Figure 15-2. Point-to-point VPN configuration between the head office and branches
Configuring OpenVPN on Our Gateway Server
We’ve installed OpenVPN on our head office’s bastion server, gateway.example.com, and now we’re going to start configuring it. We start by telling OpenVPN a few basics about our configuration. We’re going to create a file called gateway.conf in the /etc/openvpn directory, as shown in Listing 15-1.
Listing 15-1. The gateway.conf Configuration File
# Network configurationdev tunport 1194proto udpserver 10.8.0.0 255.255.255.0keepalive 10 120# Logging configurationlog-append /var/log/openvpn.logstatus /var/log/openvpn-status.logverb 4mute 20# Security configurationuser nobodygroup nobodypersist-keypersist-tun# Compressioncomp-lzo
Note
We’ll expand on the gateway.conf file with additional options as we go along.
In Listing 15-1 we’ve specified a number of options. The first of these options is dev tun, or tunnel device. A tun device is a special software network interface in the kernel that user space programs can use. A tun device will receive raw IP packets, and its sister, tap, expects Ethernet frames.
We’re going to configure a tun to run our VPN over, and we will create a virtual device, tun0, which will be used for the VPN connection. By specifying dev tun, we’re also creating a routed VPN. OpenVPN can create two types of VPNs: bridged and routed. In simple terms, a bridged VPN joins your networks together at the Ethernet level, while a routed VPN relies on TCP/IP networking to join your networks together. We’re going to implement a routed VPN (which is the reason for the tun device) because these types use the IP protocol, which is much more scalable and better suited to our network requirements.
Note
If you are interested in reading more about the differences between routed and bridged VPNs, you can find further information at http://openvpn.net/index.php/documentation/howto.html#vpntype . For more information on taps or tuns, visit https://www.kernel.org/doc/Documentation/networking/tuntap.txt .
Next, we’ve specified two options, port 1194 and proto udp. These tell OpenVPN to listen for UDP traffic on port 1194 when making VPN connections. The firewall needs to be configured to allow traffic on this port to accept incoming connections.
Tip
If required, you can change the port and use TCP instead by changing these options to the required port and protocol.
Using the Netfilter firewall and the iptables command , you can ensure traffic passes through the appropriate port on your host, as you can see in Listing 15-2.
Listing 15-2. OpenVPN Firewall Rules CentOS
$ sudo firewall-cmd --zone public --permanent --add-port=1194/udp && sudo firewall-cmd --reloadHere we’ve added a rule allowing incoming UDP traffic to the tun0 interface on port 1194.
Or, if you are using TCP instead, you use a rule like the following:
$ sudo firewall-cmd --zone public --permanent --add-port=1194/tcp && sudo firewall-cmd –reloadAnd of course for Ubuntu that would be as follows:
$ sudo ufw allow 1194/udpTip
The most common reason for a failed VPN configuration is a firewall issue. You should always check that your firewall rules allow access to this port by using the tcpdump or nmap command. We discuss firewall setup, rules, and troubleshooting in Chapter 7.
Next in Listing 15-1, the server option tells OpenVPN the IP address of the server and the pool of IP addresses available to our VPN clients. We’ve specified the default network, 10.8.0.0/24. By default, our OpenVPN server will take the address 10.8.0.1 and assign the remaining addresses to incoming VPN connections.
We’ve specified an option called keepalive that is used to keep our connection open. We specify the keepalive option and two values, 10 and 120. The value 10 indicates that OpenVPN will ping the connection every 10 seconds to check it is active. The value 120 indicates the time in seconds that OpenVPN will wait for a response. If no response is received within 120 seconds, then OpenVPN will assume the connection is down and notify us.
Then we’ve added some logging functions. The first is log-append, which tells OpenVPN to log to the /var/log/openvpn.log file. The second option, status, outputs a status file that shows current connections to a log file, in our case /var/log/openvpn-status.log. The third option, verb, tells OpenVPN how much logging to do. It ranges from 0 to 15, where 0 is no logging and 15 is maximum logging. A value of 4 generates sufficient logging to suit most purposes. Finally, mute reduces consecutive messages from the same category.
The next block of configuration options provides some additional security for our OpenVPN server. The first two options, user and group, allow us to specify a user and group for OpenVPN to run as. This drops any privileges (e.g., from the root user) the process has and ensures that if someone were to compromise the process, he would have limited privileges to exploit that compromise on your host. On CentOS, you use the nobody user and the nobody group. On Ubuntu, we recommend you use the user nobody and the group nogroup.
user nobodygroup nogroup
The next two options, persist-tun and persist-key, are related to this dropping of privileges. They allow OpenVPN to retain sufficient privileges to work with network interfaces and SSL certificates.
The last option in the file , comp-lzo, tells OpenVPN to use compression for VPN tunnels. This improves performance across the tunnel.
So, we’ve configured the basics of our VPN, but is it now ready? Not quite yet—we have one more step: authentication.
Configuring OpenVPN Authentication
Authentication ensures that only authorized hosts can initiate VPNs and connect. OpenVPN allows a wide variety of authentication mechanisms including preshared keys, two-factor authentication such as tokens, and TLS/SSL certificates.
The most basic authentication is preshared keys, which are static keys generated on your host and then distributed to the host you want to connect to. You can generate a static key with the --genkey option of the openvpn command like so:
$ sudo openvpn --genkey --secret /etc/openvpn/secret.keyThis will create a file containing a key in a file called secret.key in the directory /etc/openvpn, the file name and directory being specified with the --secret option. You specify the location of this file in your OpenVPN configuration using the secret option.
secret /etc/openvpn/secret.keyYou would then copy this file, preferably in a secure way such as via scp or GPG-encrypted file sharing (like that offered by https://keybase.io ) or by encrypting and using a configuration management system and applying it to the other host’s OpenVPN configuration.
We’re not going to use preshared keys, though, because they have some limitations. Their biggest limitation is that you can have only one server and client connection (i.e., you can connect only one host to each VPN tunnel). This isn’t an ideal model if you have more than one host or office you want to connect. For example, it won’t be effective to allow multiple mobile users to connect to your head office.
Instead, we’re going to use certificates to secure the VPNs between our head office and branch offices. To use certificates, we need to create and sign them with a certificate authority (CA). The alternative to this is to use Let’s Encrypt or commercial certificates. Commercial certificates can get expensive, and Let’s Encrypt certificates require frequent renewing. We will use our own CA because it will be cheaper and we can manage the renewal cycle.
Note
We discuss the CA process extensively in Chapter 11 (refer there now if you like).
We’re going to show you how to create and sign your own using the CA we created in Chapter 11.
We first need to create a server certificate for the VPN server. You will remember the first step in the process of creating a new certificate is to create a certificate signing request (CSR) and a secret key. Let’s do that now by first changing into the /etc/pki/tls directory and executing the following:
$ openssl req -new -newkey rsa:4096 -nodes -keyout private/gateway.example.com.key-out gateway.example.com.req
We’ve generated a 4,096-bit RSA key in the /etc/pki/tls/private directory and created a CSR. You will be prompted to populate the required fields (State, City, etc.). You need to use the same values as your certificate authority. For the Common Name field, you should specify the fully qualified domain name of your server, in our case gateway.example.com.
We need to sign on to our host that manages our CA to sign our CSR request and generate our public certificate. We need to copy the CSR to the CA host and then run the command shown in Listing 15-3.
Listing 15-3. Signing Our Server Certificate
$ cd /etc/pki/CA$ sudo openssl ca -out gateway.example.com.cert -cert certs/cacert.pem -infiles gateway.example.com.reqUsing configuration from /etc/pki/tls/openssl.cnfEnter pass phrase for /etc/pki/CA/private/cakey.pem:Check that the request matches the signatureSignature okCertificate Details:Serial Number: 1 (0x1)ValidityNot Before: Oct 22 11:47:26 2016 GMTNot After : Oct 22 11:47:26 2017 GMTSubject:countryName = AUstateOrProvinceName = VictoriaorganizationName = Example IncorganizationalUnitName = ITcommonName = gateway.example.comemailAddress = [email protected]X509v3 extensions:X509v3 Basic Constraints:CA:FALSENetscape Comment:OpenSSL Generated CertificateX509v3 Subject Key Identifier:A6:A4:16:17:32:D2:7B:03:D2:5C:5A:DE:85:29:51:BE:E4:73:EA:20X509v3 Authority Key Identifier:keyid:98:3E:03:EB:FF:8A:FF:E8:1A:BC:56:04:CA:BE:BC:DB:D2:FA:68:12Certificate is to be certified until Oct 22 11:47:26 2017 GMT (365 days)Sign the certificate? [y/n]:y1 out of 1 certificate requests certified, commit? [y/n]yWrite out database with 1 new entriesData Base Updated
First, on our CentOS CA server , we change into our /etc/pki/CA directory and then run the openssl ca command to sign our CSR. This outputs a certificate signed by our CA. We now have our public certificate file, gateway.example.com.cert. We need to copy this file to the /etc/pki/tls/certs directory on our gateway host. We will also need to copy the CA root certificate.
To do this, we have an OpenSSH shell open on both the CA server and the gateway server. Then we use the cat program to print the public and cacert certificates to the screen. For each file we copy and paste them into the gateway.example.com.cert and cacert.pem files to the following directories:
[ca.example.come] $ sudo cat gateway.example.com.cert[gateway.example.com] $ sudo vi /etc/pki/tls/certs/gateway.example.com.cert[ca.example.come] $ sudo cat certs/cacert.pem[gateway.example.com] $ vi /etc/pki/tls/certs/cacerts.pem
Then on the gateway host we make sure we move the private key to the proper directory.
[gateway.example.com] $ sudo mv gateway.example.com.key /etc/pki/tls/private/gateway.example.com.keyIn the previous lines, we have copied our TLS certificates to their proper locations on our gateway host, including the CA’s root certificate, cacert.pem. In addition, the gateway.example.com.key should be on our gateway.example.com host and moved into the proper location.
Note
In addition to the private key and certificate files, you have a CSR request file. It’s worth hanging on to this for when your certificate expires. You can use this request again to create a new certificate, as we mentioned in Chapter 11.
We want to protect our certificate and key with the right ownership and some restricted permissions for our key.
$ sudo chown root:root /etc/pki/tls/{private,certs}/gateway.example.com.*$ sudo chmod 0400 /etc//pki/tls/private/gateway.example.com.key
We also need to create some Diffie-Hellman parameters, cryptographic parameters that enhance the security of our VPN session. This is on the server only. This key is used to generate a public key that communicating parties use to generate a shared secret that both parties will use to communicate. (You can read about Diffie-Hellman in more detail at https://wiki.openssl.org/index.php/Diffie_Hellman ). We can use the openssl command to create these.
$ sudo openssl dhparam -out /etc/openvpn/dh2048.pem 2048Generating DH parameters, 2048 bit long safe prime, generator 2This is going to take a long time.........................................+..........................................
Here we’ve created a file called dh2048.pem in the /etc/openvpn directory. It’s a 2,048-bit DH parameter file, and we’ve specified the size using the 2048 option. This will be a sufficiently safe key size for several years, but you can increase this to 4,096 if you want longer protection from future cracking.
One more thing we will quickly do is create a tls-auth key. This is also used to provide greater security to the TLS channel by using a pre-shared key. This PSK should be deployed to all servers and clients.
openvpn --genkey --secret /etc/openvpn/ta.keyNow we tell OpenVPN about our new certificates and the location of our CA certificate and our DH parameter file (see Listing 15-4).
Listing 15-4. The gateway.conf Configuration File
# Network configurationdev tunport 1194proto udpserver 10.8.0.0 255.255.255.0keepalive 10 120# Certificate configurationca /etc/pki/tls/certs/cacert.pemdh /etc/openvpn/dh2048.pemcert /etc/pki/tls/certs/gateway.example.com.certkey /etc/pki/tls/private/gateway.example.com.keytls-auth ta.key 0# Logging configurationlog-append /var/log/openvpn.logstatus /var/log/openvpn-status.logverb 4mute 20# Security configurationuser nobodygroup nobodypersist-keypersist-tun# Compressioncomp-lzo
You can see we’ve added four options. The first is the ca option to specify the location of the CA certificate, in our case /etc/pki/tls/certs/cacert.pem. The next, dh, specifies the location of the Diffie-Hellman parameter file we created, in our case /etc/openvpn/dh2048.pem. Lastly, we’ve used the cert and key options to specify the location of our certificate and key files, respectively, in our case /etc/pki/tls/certs/gateway.example.com.cert and /etc/pki/tls/private/gateway.example.com.key.
The tls-auth key needs to be specified as tls-auth <key> 0 on the server and tls-auth <key> 1 on the clients. We will need to copy the tls-auth key to all the clients.
We can start our OpenVPN server as follows :
$ sudo systemctl start openvpn@gateway$ sudo systemctl status [email protected]● [email protected] - OpenVPN Robust And Highly Flexible Tunneling Application On gatewayLoaded: loaded (/usr/lib/systemd/system/[email protected]; enabled; vendor preset: disabled)Active: active (running) since Sat 2016-10-22 22:37:09 UTC; 1h 39min agoProcess: 7779 ExecStart=/usr/sbin/openvpn --daemon --writepid /var/run/openvpn/%i.pid --cd /etc/openvpn/ --config %i.conf (code=exited, status=0/SUCCESS)Main PID: 7780 (openvpn)...
You can see that we’ve started the OpenVPN server, and you can see when it started the VPN called gateway.service. The VPN is named for the gateway.conf configuration file.
We are also able to see some log entries in the /var/log/openvpn.log file, as shown in Listing 15-5.
Listing 15-5. The /var/log/openvpn.log Log File
Sat Oct 22 22:37:09 2016 us=712503 OpenVPN 2.3.12 x86_64-redhat-linux-gnu [SSL (OpenSSL)] [LZO] [EPOLL] [PKCS11] [MH] [IPv6] built on Aug 23 2016Sat Oct 22 22:37:09 2016 us=712511 library versions: OpenSSL 1.0.1e-fips 11 Feb 2013, LZO 2.06Sat Oct 22 22:37:09 2016 us=724495 Diffie-Hellman initialized with 2048 bit keySat Oct 22 22:37:09 2016 us=724919 TLS-Auth MTU parms [ L:1542 D:1212 EF:38 EB:0 ET:0 EL:3 ]Sat Oct 22 22:37:09 2016 us=724982 Socket Buffers: R=[212992->212992] S=[212992->212992]Sat Oct 22 22:37:09 2016 us=725172 ROUTE_GATEWAY 10.0.2.2/255.255.255.0 IFACE=eth0 HWADDR=52:54:00:c5:83:adSat Oct 22 22:37:09 2016 us=733863 TUN/TAP device tun0 openedSat Oct 22 22:37:09 2016 us=733929 TUN/TAP TX queue length set to 100Sat Oct 22 22:37:09 2016 us=733946 do_ifconfig, tt->ipv6=0, tt->did_ifconfig_ipv6_setup=0Sat Oct 22 22:37:09 2016 us=733963 /usr/sbin/ip link set dev tun0 up mtu 1500Sat Oct 22 22:37:09 2016 us=740224 /usr/sbin/ip addr add dev tun0 local 10.8.0.1 peer 10.8.0.2Sat Oct 22 22:37:09 2016 us=745857 /usr/sbin/ip route add 10.8.0.0/24 via 10.8.0.2Sat Oct 22 22:37:09 2016 us=755742 Data Channel MTU parms [ L:1542 D:1450 EF:42 EB:143 ET:0 EL:3 AF:3/1 ]Sat Oct 22 22:37:09 2016 us=756240 GID set to nobodySat Oct 22 22:37:09 2016 us=756256 UID set to nobodySat Oct 22 22:37:09 2016 us=756265 UDPv4 link local (bound): [undef]Sat Oct 22 22:37:09 2016 us=756270 UDPv4 link remote: [undef]Sat Oct 22 22:37:09 2016 us=756279 MULTI: multi_init called, r=256 v=256Sat Oct 22 22:37:09 2016 us=756297 IFCONFIG POOL: base=10.8.0.4 size=62, ipv6=0Sat Oct 22 22:37:09 2016 us=756313 Initialization Sequence Completed
Listing 15-5 shows that the OpenVPN server has started, our interface tun0 was created, and our IP address of 10.8.0.1 was added and bound to the UDP port of 1194 .
Note
Ensure you have the right firewall rules in place to allow VPN connections to your host—in this case, incoming connections on UDP port 1194 need to be accepted.
Our server is running, but we’re still not quite done. We need to configure our clients, install the OpenVPN software, and create certificates for our clients to use to connect.
Note
Going forward in this chapter, we’ll refer to two hosts. When a command needs to be run on a particular host, we’re going to prefix it with the same of that host: [ca]$, [gateway]$, or [branch1]$.
Configuring OpenVPN on Our Branch Office Servers
First, we need to install the OpenVPN packages on our branch server , branch1.example.com. Follow the appropriate instructions for your distribution and set OpenVPN to start when your host boots, for example:
[branch1]$ sudo systemctl enable openvpn@branch1Note
You can tell we’re running the preceding command on the branch1.example.com host by the command prefix, [branch1]$.
The next step is to create a certificate and key for each of our branch offices. We’re going to create our certificate and key on the ca.example.com host and sign it using the CA on that host. We’ll start with one branch office, branch1.example.com.
[ca]$ openssl req -new -newkey rsa:4096 -nodes -keyout branch1.example.com.key-out branch1.example.com.req
We’ve generated a 4,096-bit RSA key and created a CSR. You will be prompted to populate the required fields: State, City, and so forth. You need to use the same values as your certificate authority. For the Common Name field, you should specify the fully qualified domain name of your server, in our case branch1.example.com.
Then we use our CA to sign our certificate as we did earlier.
[ca]$ cd /etc/pki/CA[ca]$ sudo openssl ca -out branch1.example.com.cert -cert certs/cacert.pem-infiles branch1.example.com.req
Now we need to send our certificate and key as well as the CA certificate to the branch server. There are a number of ways you can do this, but you must do it securely—don’t e-mail them, for example, as they can be readily intercepted. Take them on a USB key, add them to your configuration management system (encrypted), and install them locally on the target server/client. Or if you are able to directly connect to the host, use the scp (secure copy) or sftp (secure FTP) command to send the files. These commands use an SSH connection to securely connect to another host and transfer files.
In this example, we’re going to use the sftp command to connect to our branch office server and transfer the required files.
[ca]$ sftp [email protected]Connecting to branch1.example.com...[email protected]'s password:sftp> put branch1.example.com.certUploading /home/jsmith/branch1.example.com.cert to/home/jsmith/branch1.example.com.cert/home/jsmith/branch1.example.com.cert 100% 5881 12.0KB/s 00:03
We have connected to the branch1.example.com host and, using the put command, transferred the branch1.example.com.cert certificate file from its location, here the /home/jsmith directory, to the equivalent directory /home/jsmith on the branch1 host. You can use the cd command to change to an appropriate directory on the remote host where you want to write your files.
sftp> cd /tmpYou’ll need permission to write to that location. You can use the cd command to change the directory on the local gateway.example.com host if your files are located elsewhere.
We use the put command to also put the branch1.example.com.key and the cacert.pem CA certificate file onto the branch1 host. Since this is an Ubuntu server, we’re now going to move our files to the /etc/ssl directory and secure their ownership and permissions. On CentOS we would be using the /etc/pki/tls directory again.
[branch1]$ sudo mv branch1.example.com.cert /etc/ssl/certs/[branch1]$ sudo mv branch1.example.com.key /etc/ssl/private/[branch1]$ sudo mv cacert.pem /etc/ssl/certs/
We want to protect our certificate and key with the right ownership and some restricted permissions for our key.
branch1$ sudo chown root:root /etc/ssl{certs,private}/branch1.example.com.*branch1$ sudo chown root:root /etc/ssl/certs/cacert.pembranch1$ sudo chmod 0400 /etc/ssl/private/gateway.example.com.key
Next, we need to create a configuration file for our client. We’re going to create a file called branch1.conf in our /etc/openvpn directory, as you can see in Listing 15-6.
Listing 15-6. The branch1.conf Configuration File
# Network configurationdev tunclientremote gateway.example.com 1194keepalive 10 120# Certificate configurationca /etc/ssl/certs/cacert.pemcert /etc/ssl/certs/branch1.example.com.certkey /etc/ssl/private/branch1.example.com.keytls-auth ta.key 1# Logging configurationlog-append /var/log/openvpn.logstatus /var/log/openvpn-status.logverb 4mute 20# Security configurationuser nobodygroup nogrouppersist-keypersist-tun# Compressioncomp-lzo
Note
If you’re using CentOS, your group setting should be set to nobody rather than nogroup.
The file in Listing 15-6 is similar to the gateway.conf configuration file, but we’ve specified some different options because of the host’s role as a client. Again, we’ve specified dev tun for a routed VPN. We’ve also specified the client option, which indicates that this is a client, and the remote option, which tells OpenVPN where to connect our VPN tunnel. We’ve specified gateway.example.com and port 1194.
Note
OpenVPN must be able to resolve this host (i.e., it must be able to find an IP address for this host). If you don’t have a DNS (you should), then you can specify an IP address directly in this option.
We’ve also specified the location of our CA certificate with the ca option and the location of our client’s certificate and key using the cert and key options, respectively.
Starting OpenVPN on Our Branch Office Server
With the VPN configured on our server, we can now start OpenVPN on our client. For example, we use the following command on CentOS:
[branch1]$ sudo systemctl start openvpn@branch1Testing Our OpenVPN Tunnel
You can determine whether your connection has worked in a number of ways, and we’ll take you through them all. First, you should see some entries in the /var/log/openvpn.log file on the branch1 host. You should see similar entries to those in Listing 15-5, but you’ll also see the negotiation process as our client connects to the server.
Sun Oct 23 06:24:58 2016 us=729639 [gateway.example.com] Peer Connection Initiatedwith [AF_INET]10.0.2.155:1194
Note
You will see factious public IPv4 addresses here (10.0.2.155 and 10.0.2.156) in these examples that match the diagram in Figure 15-2.
You should also see some entries on the gateway host in the /var/log/openvpn.log file showing the connection.
gateway$ less /var/log/openvpn.logSun Oct 23 06:25:06 2016 us=416152 branch1.example.com/10.0.2.156:1194 SENT CONTROL [branch1.example.com]: 'PUSH_REPLY,route 10.8.0.1,topology net30,ping 10,ping-restart 120,ifconfig 10.8.0.6 10.8.0.5' (status=1)
In addition, you can see a new interface created on both the gateway and branch1 hosts, starting with tun. On the gateway host you can see a new interface called tun0 with an IP address of 10.8.0.1 (as mentioned earlier).
[gateway]$ ip addr show tun05: tun0: <POINTOPOINT,MULTICAST,NOARP,UP,LOWER_UP> mtu 1500 qdisc pfifo_fast state UNKNOWN qlen 100link/noneinet 10.8.0.1 peer 10.8.0.2/32 scope global tun0valid_lft forever preferred_lft forever
On the branch1 host an interface, also called tun0, has been created with an IP address of 10.8.0.6 from the pool of addresses our server is offering.
[branch1]$ ip addr show tun05: tun0: <POINTOPOINT,MULTICAST,NOARP,UP,LOWER_UP> mtu 1500 qdisc pfifo_fast state UNKNOWN group default qlen 100link/noneinet 10.8.0.6 peer 10.8.0.5/32 scope global tun0valid_lft forever preferred_lft forever
You can also see the route table on the branch1 host (using the ip command introduced in Chapter 7) has a route for our 10.8.0.0/24 network.
branch1$ ip route showsudo ip route showdefault via 10.0.2.2 dev enp0s310.0.2.0/24 dev enp0s3 proto kernel scope link src 10.0.2.1510.8.0.1 via 10.8.0.5 dev tun010.8.0.5 dev tun0 proto kernel scope link src 10.8.0.6192.168.0.0/24 dev enp0s8 proto kernel scope link src 10.0.2.156
There is a route to the 10.8.0.1 host via the tun0 interface.
You’ll notice that on both hosts a file called /var/log/openvpn-status.log has been created. This file contains a list of the current connections and is refreshed every 60 seconds. Let’s look at this file on the gateway host.
gateway$ less /var/log/openvpn-status.logOpenVPN CLIENT LISTUpdated,Sun Oct 23 06:44:43 2016Common Name,Real Address,Bytes Received,Bytes Sent,Connected Sincebranch1.example.com,10.0.2.156:1194,16384,16774,Sun Oct 23 06:24:30 2016ROUTING TABLEVirtual Address,Common Name,Real Address,Last Ref10.8.0.6,branch1.example.com,10.0.2.156:1194,Sun Oct 23 06:33:01 2016GLOBAL STATSMax bcast/mcast queue length,0END
You can see a connection listed from the branch1 host with an IP address of 10.0.2.156.
Lastly, you can use network tools to test your actual connection. Let’s start by using the ping command on our gateway host to ping our branch1 host. We’re going to ping the address used as the end of our VPN tunnel on the branch1 host, which we discovered earlier is 10.8.0.6.
[gateway]$ ping 10.8.0.6 -c 3PING 10.8.0.6 (10.8.0.6) 56(84) bytes of data.64 bytes from 10.8.0.6: icmp_seq=1 ttl=64 time=0.593 ms64 bytes from 10.8.0.6: icmp_seq=2 ttl=64 time=0.588 ms64 bytes from 10.8.0.6: icmp_seq=3 ttl=64 time=0.807 ms
The preceding code shows us that the gateway host can see the branch1 host using ICMP and the 10.8.0.6 IP address on that branch1 host responds to ICMP traffic.
We can do the same thing from the branch1 host by trying to ping IP address 10.8.0.1 on the gateway host end.
branch1$ping 10.8.0.1 -c 3PING 10.8.0.1 (10.8.0.1) 56(84) bytes of data.64 bytes from 10.8.0.1: icmp_seq=1 ttl=64 time=0.682 ms64 bytes from 10.8.0.1: icmp_seq=2 ttl=64 time=0.672 ms64 bytes from 10.8.0.1: icmp_seq=3 ttl=64 time=0.751 ms
If both ends respond, then your VPN is up, and you can use it to route traffic to and from your branch office to your head office.
If you now want, you can repeat this configuration for any additional branch offices. For example, in our case we could add tunnels from the branch2.example.com and branch3.example.com offices.
Exposing Head Office Resources with OpenVPN
With our configuration so far, we can route traffic between our branch offices and our head office over our VPN tunnel. Let’s take a look at how our head office and our branch offices now interact.
Take another look at Figure 15-2. Currently, we have two paths from our branch offices to our head office. The first is across the 10.0.2.0/24 network you saw in Chapter 7. This is our DSL or ASDL (or similar type) Internet connection between our offices and the Internet. Each individual office will generally have an individual Internet connection. We’ve used the 10.0.2.0/24 network as their IP address, but it’s more likely that each office has an individual address acquired from the ISP.
This network is not secure, as it runs over the Internet. Unless we secure a particular application or protocol (e.g., in the way we used SSL/TLS in Chapter 12 to protect our SMTP and IMAP services), then an attacker could read our data from that network. Because of this potential security issue, across this connection we’ve instantiated our second path between these hosts, the 10.8.0.0/24 network that we are using for our VPN tunnels. Our head office is the OpenVPN server with an IP address of 10.8.0.1. Each branch office has an IP address from that range—for example, you’ve seen the 10.8.0.6 IP address assigned to the branch1.example.com office.
Currently through our VPN tunnel, however, we can reach only the IP address 10.8.0.1. This isn’t much use to us because we can’t access any of the resources available on the internal network (e.g., a file share on the headoffice.example.com host). We can test this from our branch office host by trying to ping the headoffice host:
branch1$ ping 192.168.0.1We’ll get no reply from these pings because there is no route to this network. To access these resources, we need to ensure two elements are in order: routing and firewall rules. We’ll discuss these in the sections that follow.
Routing
We first need to configure our branch offices to route to the internal network of our head office. To do this, we tell our branch office that when it wants to route to the 192.168.0.0/24 network, it needs to go through the VPN tunnel to the gateway host. We do this as shown in Listing 15-7 by adding a line to the gateway.conf configuration file on the gateway host to push a route to our branch hosts.
Listing 15-7. Push Route Added to gateway.conf
push "route 192.168.0.0 255.255.255.0"This line adds a route to all clients that connect to the OpenVPN server. For the new route to be pushed, we need to restart the openvpn service on both the gateway host and the branch office hosts.
If we look at the route table on our branch1 host, we can see a new route to the 192.168.0.0/24 network in our routes (in bold).
[branch1]$ ip routedefault via 10.0.2.2 dev eth0 proto static metric 10010.0.2.0/24 dev eth0 proto kernel scope link src 10.0.2.15 metric 10010.8.0.1 via 10.8.0.5 dev tun010.8.0.5 dev tun0 proto kernel scope link src 10.8.0.6169.254.0.0/16 dev eth1 scope link metric 100310.0.2.0/24 dev eth1 proto kernel scope link src 10.0.2.156192.168.0.0/24 via 10.8.0.5 dev tun0192.168.10.0/24 dev eth1 proto kernel scope link src 192.168.10.254
We can now ping this network from the branch1 host.
branch1$ ping 192.168.0.1PING 192.168.0.1 (192.168.0.1) 56(84) bytes of data.64 bytes from 192.168.0.1: icmp_seq=1 ttl=64 time=1.18 ms64 bytes from 192.168.0.1: icmp_seq=2 ttl=64 time=1.31 ms64 bytes from 192.168.0.1: icmp_seq=3 ttl=64 time=2.33 ms64 bytes from 192.168.0.1: icmp_seq=4 ttl=64 time=1.25 ms64 bytes from 192.168.0.1: icmp_seq=5 ttl=64 time=0.923 ms
You can see we’re getting a response from the host 192.168.0.1 on our branch1 host. We are able to access anything that the firewall on the gateway host allows us to on the 192.168.0.0/24 network.
If the branch1 host is the default route for 192.168.10.0/24 (the local network at the branch1 site), then all our users in the 192.162.10.0/24 network will be able to access resources in the 192.168.0.0/24 network at our head office.
Note
We’re not going to tell our head office how to route to the internal networks of our branch offices, but this is also possible.
Firewall
We also need to ensure the firewall rules on our gateway and branch hosts allow traffic to and from the relevant networks. On our gateway host, this involves forwarding IP traffic from our gateway host into the internal network and back, much like the configuration we created in Chapter 7 for forwarding our services from our bastion host, gateway.example.com.
First, we direct traffic that we want to forward through our gateway host from the VPN tunnel interface tun0 using the public zone. We will add the tun0 interface to the public zone.
[gateway]$ sudo firewall-cmd --zone public --permanent --add-interface tun0We then need to create a rule set for this zone to allow our gateway host to forward particular traffic through the host, as shown in Listing 15-8.
Listing 15-8. Some Sample firewalld Rules for OpenVPN Routing
[gateway]$ sudo firewall-cmd --zone public --permanent --add-service=httpsuccess[gateway]$ sudo firewall-cmd --zone public --permanent --add-service=httpssuccess[gateway]$ sudo firewall-cmd --zone public --permanent --add-service=smtpsuccess[gateway]$ sudo firewall-cmd --zone public --permanent --add-service=dnssuccess[gateway]$ sudo firewall-cmd --zone public --permanent --add-service=ntpsuccess[gateway]$ sudo firewall-cmd --zone public --permanent --add-service=imapssuccess
Now we have to reload the firewall configuration.
[gateway]$ sudo firewall-cmd --reloadWe’ve created a variety of simple rules to allow traffic through the VPN tunnel and forward it into our internal network. We’ve forwarded SMTP, HTTP/HTTPS, and IMAP, among other protocols.
Note
You can use the instructions provided in Chapter 7 to add these rules to your gateway host.
VPN Connections for Mobile Users
OpenVPN is capable of more than just allowing point-to-point connections from your branch offices to your head office. You can also use it to allow mobile users to connect to your head office and access resources such as file shares, printers, and applications. To do this, we need to set up another VPN tunnel on our gateway host and install OpenVPN on our clients. As we mentioned earlier in this chapter, OpenVPN can run on platforms including Linux, Microsoft Windows, macOS, and others.
We’re going to do a few things differently with our mobile users. We’re not going to use certificates (although we could use them) to authenticate our client because the overhead of potentially generating a lot of certificates can be quite high.
Note
A tool that makes certificate management easier with OpenVPN is easy-rsa. The documentation is available here: https://openvpn.net/index.php/open-source/documentation/miscellaneous/77-rsa-key-management.html .
Instead, we’re going to show you how to use PAM (which we introduced you to in Chapter 5) to authenticate your users. As a result of PAM’s ability to plug in a variety of authentication mechanisms, we can use it to include authentication mechanisms such as the following:
Local Linux users
Two-factor authentication such as RSA tokens or smartcards
Kerberos
RADIUS
IMAP (against an IMAP server)
LDAP
We’re going to show you how to configure basic local-user authentication—that is, your users will have a Linux user on the gateway host, and they will be authenticated as if they were logging on to that host using the console or via SSH. Using PAM, you can easily extend this to other forms of authentication.
Configuring Our Mobile VPN
To start our configuration, we need a new .conf file. We’re going to create one called mobile.conf in /etc/openvpn, as you can see in Listing 15-9.
Listing 15-9. Mobile User’s mobile.conf Configuration File
# Network configurationdev tunport 1195proto udpserver 10.9.0.0 255.255.255.0keepalive 10 120# Certificate configurationdh /etc/openvpn/dh2048.pemca /etc/pki/tls/certs/cacert.pemcert /etc/pki/tls/certs/gateway.example.com.certkey /etc/pki/tls/private/gateway.example.com.keytls-auth ta.key 0plugin /usr/lib64/openvpn/plugins/openvpn-plugin-auth-pam.so login# Logging configurationlog-append /var/log/openvpn-mobile.logstatus /var/log/openvpn-status-mobile.logverb 4mute 20# Security configurationuser nobodygroup nobodypersist-keypersist-tun# Compressioncomp-lzo
Note
We’ll expand on this configuration later in this section when we look at configuring routing and related functionality on our client.
You can see that our mobile.conf configuration is similar to our gateway.conf VPN tunnel. We are separating the two so that machines use the server on 1194 and roaming users use 1195, which will be further secured by their username and password.
Let’s focus on the differences. We’ve changed some networking configuration: we’ve used a different port, 1195, because our other VPN tunnel is bound to the 1194 port. It can be common for administrators to use the TCP protocol and port 443 for mobile users; this is because ports like 1195 or 1194 can be blocked at places like airports. We’ve also specified an additional IP subnet for our mobile users, 10.9.0.0/24.
We need to ensure we have suitable firewall rules in place for this subnet. First, we open the 1195 port for our tunnel on the tun1 interface (the interface number has incremented for our new tunnel).
[gateway]$ sudo firewall-cmd --zone public --permanent --add-port=1195/udpNote
Our new interface will be tun1 because we already have a tun0 interface. If you don’t have another VPN tunnel, then your interface may be tun0.
We’ve specified the same certificate, key, tls-auth, and DH parameters, but we’ve added a new option called plugin. The plugin configuration option allows us to specify external plug-ins, in our case a PAM plug-in called openvpn-pluging-auth-pam.so that ships with the OpenVPN package.
On Ubuntu, the plug-in is located at /usr/lib/openvpn/openvpn-plugin-auth-pam.so.
We also need to specify the name of a PAM authentication file that OpenVPN will use to authenticate the VPN tunnel. On Ubuntu, we’ve specified the standard shadow password PAM authentication file, passwd, as the authentication mechanism to use. On CentOS, we could specify the system-auth default PAM authentication file.
For other forms of authentication , you specify here an appropriate PAM authentication file for that mechanism. For example, to enable two-factor authentication, you might specify a file that uses the Google Authenticator PAM module, pam_google_authenticator.so (see https://www.linux.com/learn/how-set-2-factor-authentication-login-and-sudo for an example of how to implement it). This module allows you to integrate your Google Authenticator with PAM to allow you to provide a token to authenticate users.
We’ve updated the logging files to create new files for our mobile connection. We’ve also specified the user and group options (in this case, we’ve used the nobody group on CentOS).
Next, we need to restart our OpenVPN service to start our mobile VPN tunnel.
Configuring Mobile VPN Clients
You need to configure your clients to connect to the gateway, which you can do in a variety of ways depending on the client. A number of clients are available, ranging from the normal OpenVPN binary right through to sophisticated GUI clients. We’ll provide a list of some of the available clients in this section, and we’ll show you how to connect via OpenVPN.
The simplest client is the OpenVPN binary. We will create and sign a key and certificate for mobile1.example.com like we have for our other TLS certificates. We will put them in similar place as before, either in the /etc/pki/tls directories or in the /etc/ssl directories depending on our host.
If you’re using the OpenVPN binary, you’re also going to need to create a client configuration file. We’ll call ours mobileclient.conf and store it in the /etc/openvpn directory on our client, as shown in Listing 15-10.
Listing 15-10. The mobileclient.conf Configuration File
# Network configurationdev tunclientremote gateway.example.com 1195keepalive 10 120# Certificate configurationca /etc/ssl/certs/cacert.pemcert /etc/ssl/certs/mobile1.example.com.certkey /etc/ssl/private/mobile1.example.com.keytls-auth ta.key 1auth-user-pass# Logging configurationlog-append /var/log/openvpn.logstatus /var/log/openvpn-status.logverb 4mute 20# Security configurationuser nobodygroup nobodypersist-keypersist-tun# Compressioncomp-lzo
You can see the options we’ve used previously with one addition and some minor changes. We’ve changed the remote port we’re connecting on to 1195. We’ve also added the auth-user-pass option, which tells the client that we’re going to use usernames and passwords rather than just certificate authentication.
Now, if we start OpenVPN on our client, it will connect to the gateway, prompting the user to enter appropriate credentials.
$ sudo /etc/init.d/openvpn restartShutting down openvpn [ OK ]Starting openvpn:Enter Auth Username:jsmithEnter Auth Password:********
Notice the auth username and password prompts. We’ve entered the username of a user on the gateway host, jsmith, and his password.
The client will then connect, and you should be able to see a new interface (tun1, in our case).
$ ip addr show tun010: tun0: <POINTOPOINT,MULTICAST,NOARP,UP,LOWER_UP> mtu 1500 qdisc pfifo_fast state UNKNOWN qlen 100link/noneinet 10.8.0.6 peer 10.8.0.5/32 scope global tun0valid_lft forever preferred_lft forever
The interface has the IP address of 10.9.0.6 issued by the gateway host (remember, we set our mobile client VPN network as 10.9.0.0/24). You can then ping this IP address of the gateway host (in our case, 10.9.0.1) and vice versa back to 10.9.0.6.
$ ping 10.9.0.1PING 10.9.0.1 (10.9.0.1) 56(84) bytes of data.64 bytes from 10.9.0.1: icmp_seq=1 ttl=64 time=10.3 ms64 bytes from 10.9.0.1: icmp_seq=2 ttl=64 time=10.64 ms64 bytes from 10.9.0.1: icmp_seq=3 ttl=64 time=10.59 ms64 bytes from 10.9.0.1: icmp_seq=4 ttl=64 time=10.73 ms64 bytes from 10.9.0.1: icmp_seq=5 ttl=64 time=10.59 ms
OpenVPN Client Profile
The other way we can distribute the OpenVPN client configuration is to create an OpenVPN profile file. These can be distributed via the OpenVPN Access Server or by other means. In this example, we will create an .ovpn profile file for our mobile client, upload that to our OpenVPN app in iTunes, and connect to our OpenVPN server.
A profile is basically the same as a normal OpenVPN configuration file. The difference is we include the TLS certificates, including the private key. The following is the mobile1.ovpn file we have created for our profile:
clientproto udpremote gateway.example.comport 1195dev tunnobindauth-user-passkey-direction 1<ca>-----BEGIN CERTIFICATE-----# TLS root ca-----END CERTIFICATE-----</ca><cert>-----BEGIN CERTIFICATE-----# TLS public certificate-----END CERTIFICATE-----</cert><key>-----BEGIN PRIVATE KEY-----# TLS private key-----END PRIVATE KEY-----</key><tls-auth>-----BEGIN OpenVPN Static key V1-----# tls-auth key-----END OpenVPN Static key V1-----</tls-auth>
Now we need to install the app from the App Store on the iPhone (Figure 15-3).

Figure 15-3. Installing the app
Now we need to add the mobile1.ovpn file to the app via iTunes (Figure 15-4).
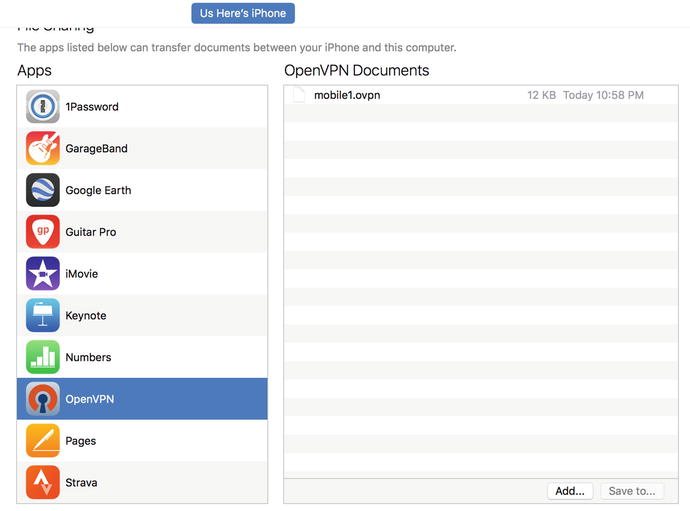
Figure 15-4. Adding mobile1.ovpn to the OpenVPN client
Once this is done, we are ready to make our connection to the OpenVPN server. From the app we add the profile using the green plus button. Then we are ready sign in. In Figure 15-5 we enter the username and password for jsmith and then toggle the connection button.
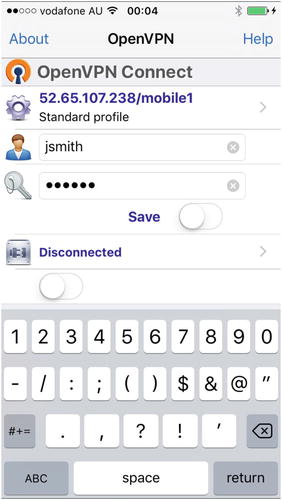
Figure 15-5. Entering the username and password
Figure 15-6 shows we are connected via the iPhone app.
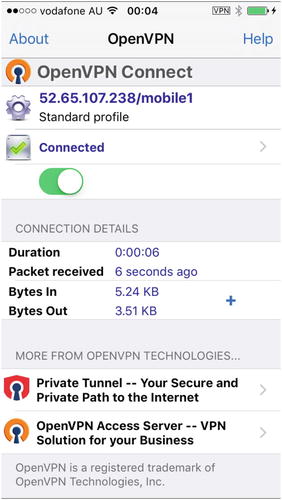
Figure 15-6. Connected via the iPhone app
We can confirm this in our server logs on the gateway machine.
AUTH-PAM: BACKGROUND: received command code: 0AUTH-PAM: BACKGROUND: USER: jsmithAUTH-PAM: BACKGROUND: my_conv[0] query='Password: ' style=1Mon Oct 24 09:50:48 2016 us=779104 118.209.127.108:55174 PLUGIN_CALL: POST /usr/lib64/openvpn/plugins/openvpn-plugin-auth-pam.so/PLUGIN_AUTH_USER_PASS_VERIFY status=0Mon Oct 24 09:50:48 2016 us=779146 118.209.127.108:55174 TLS: Username/Password authentication succeeded for username 'jsmith' [CN SET]...<snip>...Mon Oct 24 09:50:48 2016 us=801096 118.209.127.108:55174 [jsmith] Peer Connection Initiated with [AF_INET]118.209.127.108:55174
We have completed the authentication, and now our iPhone is connected via our OpenVPN server to the local network.
There are a variety of other clients for various platforms available as many networking tools will support OpenVPN. You can also download the client for most systems here:
Mobile VPN Routing
Just as you can create a point-to-point head office to branch office VPN tunnel, you can also perform a variety of routing configurations between your client host and the gateway. In this case, you’re going to not just help the client see hosts behind the gateway host but also tell the client how to configure itself, especially its DHCP settings.
You’ll also see how to force all traffic up through the VPN. This is a method commonly used to ensure a user’s traffic goes only to your organization. For example, it is often used to ensure all user web traffic passes through your organization’s proxy, thus ensuring it complies with your organization’s acceptable use policy or similar standards.
First, let’s allow our mobile user to see the 192.168.0.0/24 internal network at our head office. We do this by adding the push option to our mobile.conf configuration on the gateway host and use it to push a route.
push "route 192.168.0.0 255.255.255.0"We also need to update the firewall rules on our gateway host, in much the same way as we added rules for the branch to head office tunnel. We add another chain for our mobile VPN tunnel.
[gateway]$ sudo firewall-cmd --zone public --permanent --add-interface tun1Now we have reload the firewall configuration.
[gateway]$ sudo firewall-cmd --reloadWe’ve created a variety of simple rules to allow traffic through the VPN tunnel and forward it into our internal network. We’ve forwarded SMTP, HTTP/HTTPS, and IMAP, among other protocols.
Note
You can use the instructions provided in Chapter 7 to add these rules to your gateway host.
We can also pass a variety of options to our client, for example, to help set DHCP options like DNS and WINS servers.
Note
We set up DHCP in Chapter 10.
Different types of clients (e.g., Linux and Microsoft Windows clients) require different methods to push down the required options. When passing options to a Microsoft Windows client, we can simply pass the required options along using the push option. For example, to push a DNS server IP address to the client, we do the following:
push "dhcp-option DNS 10.0.2.155"Here we’re telling OpenVPN to tell a Microsoft Windows client to push the DNS server 10.0.2.155 to its DHCP option.
In a Microsoft Windows environment, we can also push down a variety of other options, as shown in Table 15-1.
Table 15-1. DHCP Options
Option | Description |
|---|---|
DOMAIN name | Sets the client’s DNS suffix. |
DNS address | Sets the DNS server address. Repeat to set secondary DNS servers. |
WINS address | Sets the WINS server address. Repeat to set secondary WINS servers. |
NBDD address | Sets the NBDD server address. Repeat to set secondary NBDD servers. |
NTP address | Sets the NTP server address. Repeat to set secondary NTP servers. |
DISABLE-NBT | Disables NetBIOS over TCP/IP. |
On Linux and other hosts, you can’t directly set these sorts of options using the push option. Instead, you need to tell OpenVPN to run scripts when the tunnel goes up and down. To do this, you use the appropriately named up and down options. We can add the following options to the mobileclient.conf on our VPN client:
up /etc/openvpn/tunnelup.shdown /etc/openvpn/tunneldown.sh
Each option specifies scripts or commands that will be run when the VPN tunnel goes up and down. If we wanted to set the DNS configuration of our client, we might use an up script, tunnelup.sh, like this:
#!/bin/shmv /etc/resolv.conf /etc/resolv.conf.bakecho "search example.org" > /etc/resolv.confecho "nameserver 10.0.2.155" >> /etc/resolv.conf exit 0
We could then use a down script, tunneldown.sh, to revert our configuration options, like so:
#!/bin/shmv /etc/resolv.conf.bak /etc/resolv.conf
Note
You need to transfer these scripts to the client yourself or use a configuration management tool, as we’ll show you in Chapter 19.
Lastly, we can force all traffic from the client to the VPN. This is often used to force users to comply with some policy or standard or to ensure all traffic is scanned for viruses and malware through a proxy or virus scanner.
There are some issues with pushing all traffic through your tunnel, though. Most notably, performance can be impacted by pushing traffic through the tunnel to your office and then onto the Internet. You will also need a proxy or NAT redirection for all the traffic generated by the client, as every protocol—not just web traffic—will need a means to connect.
To force all traffic up the VPN tunnel from the client, we add the following directive to the mobile.conf configuration file on our gateway host:
push "redirect-gateway def1"If your VPN setup is over a wireless network and all clients and the server are on the same wireless network, you need to add to this directive.
push "redirect-gateway local def1"You can see we’ve added the local option to the directive.
Troubleshooting OpenVPN
Troubleshooting OpenVPN requires you to take into consideration all elements of a connection: networks, firewalls, and OpenVPN itself. OpenVPN’s extensive logging (you saw the log-append, status, and verb options earlier in the chapter) allows you to quickly see errors. Additionally, OpenVPN’s error messages usually provide a clear and accurate indication of the actual problem.
But you also need to ensure you check that you have network connectivity and appropriate firewall rules, both iptables rules on your host(s) and potentially rules on any intervening network devices, to allow connections. You need to check that the connection is up, that firewall rules allow the VPN tunnel to connect, and finally that rules and routing exist that allow your traffic to flow across the VPN and to the intended destination.
Tip
Chapter 6 covers network and firewall troubleshooting.
The best place to start to look for troubleshooting help is the OpenVPN web site ( http://openvpn.net/ ). There you can find documentation, including a comprehensive HOWTO page:
http://openvpn.net/index.php/documentation/howto.html
and a FAQ page:
http://openvpn.net/index.php/documentation/faq.html
You can find OpenVPN’s man page here:
https://openvpn.net/index.php/open-source/documentation/manuals.html
Also available is a mailing list you can join here:
http://openvpn.net/index.php/documentation/miscellaneous/mailing-lists.html .
For more complex implementations, the OpenVPN developers provide commercial support, or you can turn to the book OpenVPN: Building and Integrating Virtual Private Networks by Markus Feilner (Packt Publishing, 2006) for help.
Summary
In this chapter, we took you through the process of configuring and managing VPN tunnels. We introduced point-to-point tunnels, such as between a head office and remote branches. We also explained how you can use VPN tunnels to allow your mobile users to securely and safely connect to resources at your head office or other locations. You’ve learned how to do the following:
Configure VPN tunnels
Create and configure certificates for authentication
Make use of PAM to allow alternative forms of authentication
Configure your iptables firewall to allow VPN tunnels
Configure your networks and routing to allow users to traverse VPN tunnels and access resources
Configure networking options on your clients using OpenVPN
In the next chapter, we’ll discuss LDAP services.