
Chapter 4 introduced Linux basics and the concepts of users and collections of users called groups. We explained how users and groups own files and objects. We also demonstrated how that ownership, in combination with permissions, controls access to those files and objects. Users and groups are also used to initiate and run processes.
In this chapter, we’ll go into detail about how users and groups work, starting with what happens when you log in, and how to control some of that process. We’ll demonstrate how to create users and groups, give you some more information about passwords, and explain the process by which Linux controls access to your host.
Among the topics we’re going to talk about are the su and sudo commands. These commands let you run commands as other users, specifically the root user. Thus, these commands allow you to avoid logging in as the root user to perform administrative tasks. The su and sudo commands are critical to securely administering your hosts.
What Happens When You Log In?
In Chapter 4, we talked about logging a user into a Linux host, and you saw some sample screens showing how you might enter your username and password. In this chapter, we’re going to explain a bit more about what happens when you log in, and we’ll begin to explore some of the options and security controls that you can manage as part of this process.
So what actually happens after you enter your username and password and before you are delivered to your command-line prompt or graphical user interface (GUI) screen? Well, this process varies slightly from distribution to distribution, but generally an application called loginis executed and performs the following actions:
Checks that the user and group exist and the user is allowed to log in
Checks that the user is allowed to log in from a particular location (e.g., only some users can log in to the console, or the screen attached to a Linux host)
Checks that the password is correct, and, if the password is incorrect, allows a specified number (usually three) of retries
Checks that the password is valid and prompts the user for a new password if it has expired
Sets environment variables like the user’s home directory and path
Starts the shell process
Presents the user with a command-line prompt or GUI screen
In the sections that follow, we’ll take you through these processes and explain how you can configure and change some of these steps to suit your environment. You’ll start by learning how to create, delete, and manage users and groups.
Note
In this chapter, we demonstrate command-line user administration, but most things we show you is also available from a GUI tool if you prefer to administer your users and groups that way. In the application search bar, type in “users” and you’ll find the Users application (CentOS) or User Accounts (Ubuntu)—or open the Settings or System Settings menu and you’ll find them there.
Working with Users and Groups
At the heart of managing access to your Linux hosts is the concept of users and groups. We introduced users and the collections of users called groups in Chapter 4, and you discovered they are much like the users and groups that exist on the Microsoft Windows platform.
You can organize users and groups on your host in two ways. One way is to add users and groups to each host in your domain; the other is to centralize your user administration on one or two authentication servers. In this chapter, we will explain the former, and in Chapter 16 we will explain the latter.
As on Microsoft Windows hosts, everyone who needs to log in to your host will need a user created. Many applications, such as web and mail servers, will also require a user to be created. When they are started, these applications will then make use of that user’s rights and privileges to access system resources like files, your network, or other aspects of your host.
Every user on your Linux host also needs to belong to at least one group but can belong to any number of additional groups as well. Groups are collections of users, gathered together because they are alike or require access to a particular resource. For example, all the users in your organization’s sales department may belong to a group called sales. You might configure your host to ensure that only the users in the sales group have access to the sales department’s applications and files.
Note
When applications are installed, they often install additional users and groups required to run those applications.
Users and groups are easy to create using two commands: useradd (to create users) and groupadd (to create groups). Additionally, two commands we can use to modify existing users and groups are usermod and groupmod. Finally, to complete the life cycle, users and groups can be deleted with the userdel and groupdel commands.
Tip
Working with users and groups on CentOS and Ubuntu is a very similar process that uses many of the same commands and options. We’ll tell you about any minor variations between distributions.
Introducing sudo
Before we jump into explaining how to create users and groups, we want to discuss the sudo command, which we talked about a little in Chapter 4. The sudo command allows a user to run commands as if that person were signed in as the root user, Linux’s equivalent of the Windows Administrator account. This ability is useful for three reasons:
It increases security.
It allows greater control of privileged commands.
It provides you with a better audit trail to understand who did what on your host.
Note
Another good reason to use sudo rather than the root user on Ubuntu is that Ubuntu doesn’t enable the root user by default. You cannot sign on as the root user at all.
We’re going to need sudo in this chapter because almost all of the commands used to manage users and groups require the privileges of the root user to run. For example, only the root user can create another user.
When you run the sudo command , it will prompt you to enter your password (to confirm you are actually who you say you are), and then you are allowed to make use of the sudo command for a period of 5 minutes on CentOS and 15 minutes on Ubuntu. When this period expires, you will be prompted to enter your password again.
Tip
The first time you run the sudo command, it may also show you a warning to be careful with the power of the sudo command.
On Ubuntu , the sudo command is available and configured for the user you created when you installed Ubuntu. If you’re logged in as that user, you can use the sudo command already. You can also enable sudo access for other users by adding them to the admin group. You can use the usermod command (which you’ll see more of later in this chapter) to add a user to the group.
$ sudo usermod -G admin ataylorHere we’ve used sudo and the usermod command to modify a user called ataylor. We’ve added the user to the admin group by specifying the -G option and the name of the group to add the user to. (Note that we’ve used the sudo command to do the user modification. The only user allowed to do this is the user you created when you installed the host; hence you must be logged in as that user to make this change.)
On CentOS , if you did not create the user (jsmith) as an administrator, the sudo command is not enabled by default, and you’ll need to enable it. To do this, you need to use a command called visudo to edit the sudo command’s configuration file, /etc/sudoers. To do this, you need to log on as the root user and run the visudo command.
# visudoAs you can see from the # command prompt, you’re logging in as the root user and you’re executing the visudo command. This opens an editing application that looks much like the vi or vim editor. Inside this file is the following line:
# %wheel ALL=(ALL) ALLShown above, in this line the # indicates the line you are working on is a comment. You need to uncomment the line. To do this put your cursor near on the # and press the x key twice. That will delete the hash (or pound sign, #) and one space character in the line. Once done, write and quit the file using the same commands you would with vim by typing the colon character, :, and w and q followed by Enter, or :wq. This enables any member of a group called wheel to use the sudo command. You can then add a user to the wheel group, as follows:
# usermod –a wheel ataylorAgain, you specify the group, wheel, with the -a option and the name of the user you want to add to the group last. Now the ataylor user can make use of the sudo command. You can also set the groups for a user using –G <group1>,<group2> and this will replace any existing groups assigned to the user.
Creating Users
Now that you know how to enable and use the sudo command, we can start looking at users and groups. Let’s begin by creating a new user using the useradd command, as shown in Listing 5-1.
Listing 5-1. Creating a New User
$ sudo useradd –m –c 'John Smith' jsmithNote
In Listing 5-1, you can see we’ve prefixed the useradd command with the sudo command to avoid having to log on as the root user.
The useradd command has a number of options, and we’re using just a couple in Listing 5-1. The first argument, -m, tells the host to create a home directory for the user. The format of the name and location of the home directory would usually resemble /home/ username.
Tip
You can prepopulate the new home directory with, for example, generic configuration files. To do this, add files to the /etc/skel (short for skeleton) directory. When a new home directory is created (using the –m option), then all the files contained in this directory are copied to the user’s new home directory.
The –c option adds a description of our new user. This description is stored in the /etc/passwd file. All users have an entry in this file, and we’ll examine this file and the /etc/group file that is used to store group data later in this chapter. Finally, we’ve specified the name of our new user, jsmith.
By default, the new user will be created disabled and with no password set. You will need to change the user’s password using the passwd command (which we’ll cover in more detail later in this chapter).
Table 5-1 lists some other useful useradd command-line options.
Table 5-1. Some useradd Command-Line Options
Option | Description |
|---|---|
-c | Add a description of the user |
-d homedir | The user’s home directory |
-m | Create the user’s home directory |
-M | Do not create the user’s home directory (CentOS only) |
-s shell | Specify the shell the user will use |
The –d option allows you to specify the user’s home directory. A home directory is the directory a user is placed in after they login. This is a private directory owned by the user for the user’s files, this applies to a system user (like a user that runs a database) or a regular human user. The –M option tells Red Hat–derived distributions not to create a home directory. This option highlights the major difference between creating users on CentOS and Ubuntu distributions. On Red Hat–derived distributions, home directories are created automatically.
Ubuntu requires that the useradd command is executed with the –m option; otherwise no home directory is created.
Note
See the sidebar “Adduser: An Alternative on Ubuntu” for an alternative method to create users on Ubuntu.
Finally, the –s option allows you to specify a different shell from the default for the user.
Tip
We recommend you read the useradd command’s man page for more detailed information on this command.
User Default Settings
Your new user will also be created with a variety of defaults (e.g., the setting for the user’s shell). So where does the useradd command get these defaults from? On both CentOS and Ubuntu distributions, the defaults are contained in the /etc/default/useradd file, and you can display the current defaults using the following command:
$ sudo /usr/sbin/useradd -DListing 5-2 shows a sample of this file.
Listing 5-2. The /etc/default/useradd File
$ sudo cat /etc/default/useradd# useradd defaults fileGROUP=100HOME=/homeINACTIVE=-1EXPIRE=SHELL=/bin/bashSKEL=/etc/skel
This file is usually populated by default when your host is installed, but you can modify it to suit your environment .
Note
There are system-wide defaults that are set for the system when a user logs in. Those are found in the /etc/login.defs file. It contains things like the uid and gid ranges to use when creating users.
Table 5-2 shows the possible options you can include in the useradd file.
Table 5-2. The /etc/default/useradd File
Option | Description |
|---|---|
SHELL | The path to the default shell |
HOME | The path to the user’s home directory |
SKEL | The directory to use to provide the default contents of a user’s new home directory |
GROUP | The default group ID |
INACTIVE | The maximum number of days after password expiration that a password can be changed |
EXPIRE | The default expiration date of user accounts |
Each option in the file controls a specify default; for example, the SHELL option specifies the default shell for the user. The HOME option specifies the directory in which all new home directories should be created. The SKEL option specifies which directory to use to populate the user’s home directory, and as we discussed earlier, this defaults to /etc/skel. The GROUP option specifies the default group ID (GID) to use. It is set to group 100, or the “users” group, and you generally won’t ever need to change this. We’ll talk a bit more about groups, membership, and GIDs in the sections that follow.
Finally, two other options, INACTIVE and EXPIRE, control two different types of user account expiration. The INACTIVE value controls how long in days after a user’s password expires that the user can reset his password. This allows you to specify that if a user’s password expires, the user has a finite time to reset that password before he is marked inactive. The user would then require some interaction to re-enable it for access. A setting of -1 disables this setting, and a setting of 0 disables the account as soon as the password expires.
Note
We’ll talk more about password expiration later in this chapter.
The EXPIRE option is useful for creating temporary accounts, as it specifies a date in the format YYYY-MM-DD on which the account will be expired and disabled. The EXPIRE default allows you to specify such a date for all accounts. You can also create an individual account on the command line using the following command:
$ sudo useradd –e 2016-09-15 temp_accountThis command creates an account called temp_account that would be disabled on 09-15-2016.
You can change many of the default settings in this file by executing the useradd command with the -D option. Listing 5-3 shows you how to change the default shell for your new users, and Table 5-3 shows the additional options available for use with the -D option.
Table 5-3. The useradd -D Defaults
Option | Description |
|---|---|
-b path/to/default/home | Specifies the path prefix of a new user’s home directory |
-e date | Specifies the default expiration date |
-f days | Specifies the number of days after a password has expired before the account will be disabled |
-g group | Specifies the default group |
-s shell | Specifies the default shell |
Listing 5-3. Changing useradd Defaults with the -D Option
$ sudo useradd -D -s /bin/bashTip
You can also change your default shell with the chsh command. Use chsh -l on CentOS to see a list of all the available shells. On Ubuntu, you can see the list in the /etc/shells file.
Creating Groups
We mentioned earlier that every user must belong to at least one group. By default on most Linux distributions, including CentOS and Ubuntu, when you create a new user, a new group with the same name as the user is also created. The new user is always the only member of this group.
But earlier we said that the default group for useradd was 100? Why isn’t that used? If you use the –N (no-user-group) option to useradd or if the setting USERGROUPS_ENAB in the login.defs file is ‘no’ then the default group of 100 (users) will be assigned. By default the useradd command will create a group with the same name as the user.
Note
The creation of a unique group for each user is called a user private group (UPG) scheme. It is a flexible model for managing group permissions. You can read some details of UPG at https://wiki.debian.org/UserPrivateGroups
In our case, our first user, jsmith, would automatically belong to a group called jsmith. This group is called the primary group . Our user can also belong to other groups, and these additional groups are called supplementary groups .
So how do we tell what groups our new user belongs to? To check the details of a particular user, we can use the id command as shown in Listing 5-4.
Listing 5-4. The id Command
$ id jsmithuid=1001(jsmith) gid=1001(jsmith) groups=1001(jsmith)
In Listing 5-4, we query our new user, jsmith, using the id command. But the command has returned some fairly cryptic information about uid and gid, the name of our user, and some numbers. So what exactly are these?
Each user and group is assigned a unique user ID (UID) and a GID when created. UIDs range from 0 to 65535, with the root user always having a UID of 0. GIDs also range from 0 to 65535, with the root user also always having a GID of 0.
If you run the id command for the root user, you can see the results on the following line:
$ id rootuid=0(root) gid=0(root) groups=0(root)
This shows the root user having a UID of 0 and a GID of 0.
Note
Each user and group on a host must have a unique UID and GID. A user or group cannot be created on your host with the same UID or GID as an existing user or group. Your operating system will automatically assign the numbers and prevent any conflicts.
Most distributions reserve ranges of numbers for particular types of users and groups. There are really two kinds of users on your system. One kind is a system user such as users and groups that run services—for example, a user running a database or web server. So system users like “apache” and “www-data” have set and known UID. The other kinds of users are “people,” (e.g., you and I) who need to log into the system.
A CentOS distribution reserves the UID and GID ranges of 1 to 200 for assigned system UIDs (like apache). They do this by specifying the UID when the user is created. UIDs from 201 to 999 are for dynamically assigned system UIDs—these are daemons that have not defined UID and will pick a UID at installation. This is done by specifying the --system option when creating the user. Normal users are created with UIDs of 1000 and above.
Ubuntu reserves the UID and GID ranges of 1 to 99 for assigned system users. 100 to 999 for dynamically assigned system users (again by passing the --system option). On Ubuntu, the first new user would have a UID and GID of 1000 as well.
Tip
You can control the range of the UIDs and GIDs that are provided to users in the /etc/login.defs file. Edit the UID_MIN and UID_MAX range for UIDs and the GID_MIN and GID_MAX range for GIDs. It’s unlikely you’ll ever want to do this, but the option is there. You can also set the SYS_UID_MIN and SYS_UID_MAX as well as the group there too.
So in Listing 5-4 we’ve executed the id command for the jsmith user and displayed the user’s UID of 1001 and GID of 1001 (with the name of the user and group in brackets after the UID and GID). The last field, groups, is where the primary and any supplementary groups are displayed.
You have two methods for adding your user to a group or groups. First, you can add the user to a group or groups upon creation with the useradd command . Second, you can modify an existing user and add groups using the usermod command.
On the following line, we’re going to create a second user called ataylorand add her to some groups when we create her.
$ sudo useradd –m –c 'Anne Taylor' –G printing,finance ataylorWe have specified the –G option, which allows us to provide a comma-separated list of groups that we’d like our new user ataylor to join. The -G option allows our user to join additional groups other than her primary group, which is a unique group created when the user is created and shares her username. Here the user ataylor is a member of a unique UPG scheme primary group called ataylor, and we’re trying to add her to the additional supplemental groups printing and finance.
If we execute that command now, however, it will fail because each of these groups needs to exist before we can add a user to them, otherwise we’ll get an error message and the user will fail to be created. This is the error message that would be generated in such a scenario on Ubuntu:
useradd: unknown group printinguseradd: unknown group finance
So in this case, we need to create our groups first, and we can do that with the groupadd command, as you can see in Listing 5-5.
Listing 5-5. Creating New Groups
$ sudo groupadd printing$ sudo groupadd finance
Table 5-4 shows some command-line options available with the groupadd command.
Table 5-4. The groupadd Command-Line Options
Option | Description |
|---|---|
-g GID | Sets the GID for the group. This must be a unique number. |
-r | Creates a system group (with a GID inside the system GID range). |
Use the -g option if you wish to override the autogenerated GID with a specific number. Available only on CentOS, the –r option lets you create a system group and will ensure the group is assigned a GID within the range for system groups.
When we try to create the ataylor user, we succeed because the prerequisite groups now exist.
$ sudo useradd -m -c 'Anne Taylor' -G printing,finance ataylorWe can also add existing users to groups using the usermod command.
$ sudo usermod -a -G accounts ataylorThe usermod command is used to modify existing users. By specifying the –a (for append) option, the -G option, and the name of the new group to join (the group must already exist), we add the ataylor user to the accounts group.
Tip
You can change many of the aspects of a user with the usermod command, and we recommend reading its man page for further information. Changes won’t take effect until the user logs out and back in again if the user is currently logged in.
Also available to manage groups is the gpasswd command, which allows you to delegate responsibility for managing groups and their memberships. You can assign a particular user rights to add or remove users to a particular group. For example, you could have someone on the sales team manage the membership of the sales group . You can read about gpasswd in more detail on its man page.
Deleting Users and Groups
In addition to creating and modifying users and groups, you will also want to be able to delete them. You can use the following two commands to do this: userdel and groupdel. The userdel command deletes users, and the groupdel command removes groups. Let’s now delete the ataylor user we created earlier using the userdel command, as shown in Listing 5-6.
Listing 5-6. Deleting a User
$ sudo userdel ataylorThe userdel command deletes the user, but by default it doesn’t delete the user’s home directory. You can force Linux to delete the user’s home directory using the –r option of the userdel command. This will delete the /home/ username directory and all files in it, but it won’t delete any files outside this directory that might also belong to the user. The userdel command will also not delete a user who is currently logged in to the host.
Removing a user who owns files can be problematic. If you delete a user, then all the user’s objects will no longer be owned by the user. You can identify these objects because the username will be replaced in the file listing with the former UID (the same applies for any deleted groups). As a result, if you create another user that uses the same UID or GID, that user will now own the deleted user’s files. It’s a very good idea to confirm the files and directories a user owns and work out what you are going to do with them prior to deleting the user. We’ll show you how to assign ownership of files and directories later in this chapter. In light of this issue, it is sometimes better to disable a user rather than delete the user. But if you do decide to delete a user , you can run the command find / -user UID –o –group GID to find all the files associated with the user you have just deleted.
To delete a group, use the groupdel command and specify the name of the group to be deleted.
$ sudo groupdel financeThis command will remove the group from the host. It is important to note that the groupdel command won’t delete the primary group of any user—for example, you couldn’t delete the ataylor group before you deleted the ataylor user. If you want to delete a user’s primary group, you must delete the user first. Like with users, deleting groups can leave files owned by those groups orphaned.
Managing Users and Groups via the GUI
Both CentOS and Ubuntu have GUIs for managing users. On CentOS and Ubuntu , the GUI tool to manage user accounts is accessed in the Settings panel launched by selecting Applications ➤ System Tools ➤ Settings (see Figure 5-1).
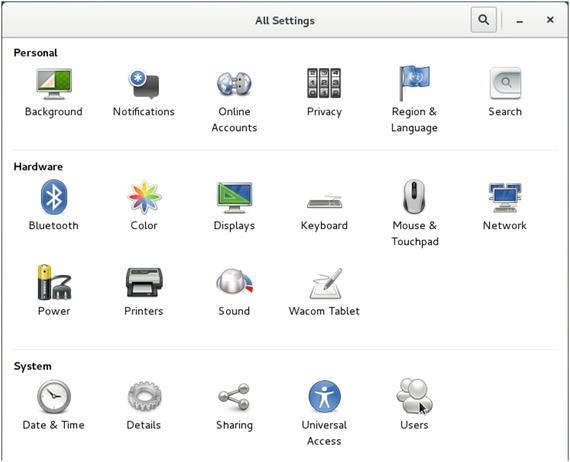
Figure 5-1. Accessing users from the system settings
You can change users in using this settings panel . But first you need to gain root privileges (or also referred to as administrator privileges in the GUI) to be able to change settings here. Figure 5-2 shows you that you need to click the unlock button and will then be prompted to enter your password.

Figure 5-2. Unlocking the Users settings interface
In Figure 5-2 the list of the current users is in the left panel. To add a user click the + button at the bottom of that list. You can delete users by clicking the – button. In Figure 5-3 we add a new user called ataylor.
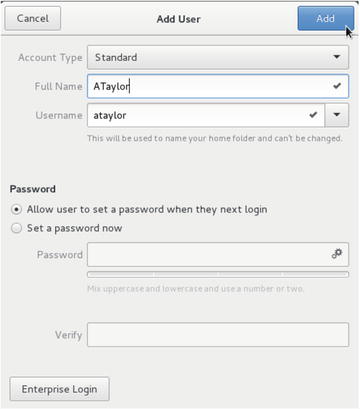
Figure 5-3. Adding user ATaylor
In Figure 5-3 we are adding the user ataylor . By selecting Allow user to set a password when they next login, ATaylor will be allowed to create their own password when they next log in. There are two types of users we can add, a Standard user or an Administrator . You can also choose to add an Enterprise Login to your users to an Active Directory domain or an IPA (Identity Policy Audit) domain. In Chapter 16 we will go further into this. By clicking the Add button we will add the user ataylor after we authenticate again with the system.
Caution
Allowing users to create their own passwords when they next log in does expose a security risk. Anybody signing in as ataylor will be prompted to set a new password and, by doing so, will have access to all that ataylor does. In this situation it is a good idea to make sure that you get ataylor to log in as soon as is immediately possible and confirm access.
Finally, in Figure 5-4 we show how you can view the login history of the user JSmith.

Figure 5-4. Login history for JSmith
In Figure 5-4 we can see that JSmith logged out at 21:17 and logged in again 21:18. Using the arrows in the title bar scroll through the history to view further back in time.
While you can add and delete users through this application you cannot administer group settings . To do this you must use the command line.
Note
Remember, the Ubuntu Server version does not come with a GUI by default, and you should make use of the command-line tools provided. The Ubuntu Desktop release does come with the appropriate GUI tools, as it installs a GUI by default.
Passwords
When you create accounts via the command line, no password is set for the account. You may now want to set or at some time change the user’s password. To do this, you use the passwd command. The passwd command works one of two ways depending on who runs the command. If a normal user, like ataylor, has a password already set and runs the command, then she will be prompted to change her own password. You can see the passwd command in action in Listing 5-7.
Listing 5-7. Changing Your Password
$ passwdChanging password for ataylor.(current) UNIX password:Enter new UNIX password:Retype new UNIX password:
You type in your current password and then your new password. You’ll be prompted to type the new password in twice to ensure it’s correct. You’ll also have to provide a suitable password. By default on most distributions, some basic password checking is performed to try to prevent you from providing a weak or easy-to-guess password. On most distributions these checks are generally as follows:
Minimum password length of four characters
Not a palindrome (i.e., the reverse of the last password)
Not the same as the previous password with a case change (i.e., password to PASSWORD)
Some basic similarity checking
Some simplicity tests based on the length of the password and the combination of characters (all alpha, all numeric, etc.)
Simple rotation checks (i.e., rotating letters in a password, such as ginger being changed to ingerg)
If you provide a password that isn’t sufficiently complex, you’ll be given an error message indicating what is wrong with your password. You will then be prompted to provide a more acceptable password.
Alternatively, if you are running the passwd command as the root user, you can change the passwords of other users as you can see in Listing 5-8.
Listing 5-8. Changing Someone Else’s Password
$ sudo passwd jsmithIn Listing 5-8, the passwd command prompts you to provide a new password for the user jsmith.
Tip
It is important to note that as the root user you can override any warnings about bad passwords and change the user’s password to a weak or easily guessable password.
Password Aging
Password aging allows you to specify a time period during which a password is valid. After the time period has expired, the user will be forced to choose a new password. This has the benefit of ensuring passwords are changed regularly and that a password that is stolen, cracked, or known by a former employee will have a time-limited value. Unfortunately for many users, the need to regularly change their passwords increases their desire to write down the passwords. We recommend you use a password age between 30 and 60 days for most passwords, depending on the nature of the host and encouraging password managers. More important, hosts should have shorter password expiration periods (e.g., 30 days), while less critical hosts could have longer periods. Some organizations choose a single expiration period so the period is consistent for all users on all hosts.
Two ways exist to handle password aging. The first uses the command-line tool called chage to set or change the password expiration of a user account individually. Listing 5-9 shows this command.
Listing 5-9. The chage Command
$ sudo chage -M 30 ataylorListing 5-9 uses the -M option to set the password expiration period for the user ataylor to 30 days. After 30 days the user’s password will be expired and the user will be prompted to enter a new password. Table 5-5 shows several of the other variables you can set.
Table 5-5. The chage Command Flags
Option | Description |
|---|---|
-m days | Sets the minimum number of days between password changes. Zero allows the user to change the password at any time. |
-M days | Sets the maximum number of days for which a password stays valid. |
-E date | Sets a date on which the user account will expire and automatically be deactivated. |
-W days | Sets the number of days before the password expires that the user will be warned to change it. |
-d days | Sets the number of days since January 1, 1970, that the password was last changed. |
-Idays | Sets the number of days after password expiration that the account is locked. |
Tip
You’ll come across the date January 1, 1970, quite a few times in the Unix/Linux world. This date is also known as Unix epoch or Unix time. It is used to describe points in time and is measured in seconds since January 1, 1970 (e.g., 1229519557). You can find the Unix time on your host by using the command date +%s.
The first option, -m, allows you to specify the minimum amount of time between password changes. A setting of 0 allows the user to change the password at any time. The option -W specifies the number of days before a user’s password expires that he will get a warning that the password is about to expire. The -d option is principally useful to immediately expire a password. By setting the -d option to 0, the user’s last password change date becomes January 1, 1970, and if the –M option is greater than 0, then the user must change his password at the next login. The last option, -I, provides a time frame in days after which user accounts with expired and unchanged passwords are locked and thus unable to be used to log in.
If you run chage without any options and specify only the user, it will launch an interactive series of prompts to set the required values, as shown in Listing 5-10. The values between the brackets[ ] indicate the current values to which this user’s password aging is set.
Listing 5-10. Running chage Without Options
$ sudo chage ataylorChanging the aging information for ataylorEnter the new value, or press return for the defaultMinimum Password Age [0]:Maximum Password Age [30]:Last Password Change (YYYY-MM-DD) [2016-06-27]:Password Expiration Warning [7]:Password Inactive [-1]:Account Expiration Date (YYYY-MM-DD) [2016-07-28]:
Users can also utilize the chage command with the -l option to show when a password is due to expire.
$ chage -l ataylorThe other method to handle password aging is to set defaults for all users in the /etc/login.defs file.
Listing 5-11 shows the controls available for password aging in /etc/login.defs.
Listing 5-11. The login.defs Password-Aging Controls
PASS_MAX_DAYS 60PASS_MIN_DAYS 0PASS_WARN_AGE 7
In Listing 5-11, we have set the maximum password age to 60 days using the PASS_MAX_DAYS option, allowing users to change their passwords at any time by setting the PASS_MIN_DAYS option to 0 and providing a warning to users that their passwords will expire seven days before the password expiration date using the PASS_WARN_AGE option.
Disabling Users
As the root user, you can also use the passwd command to disable and enable user accounts using the –l, or lock, option. For example, consider the following:
$ sudo passwd –l ataylorThe previous command would lock the ataylor user and prevent ataylor from logging into the host using her password. You can then unlock the user using the –u, or unlock, option.
$ sudo passwd –u ataylorHowever, this command doesn’t fully disable access to the host. Users could access the host through other authentication mechanisms such as public keys for remote access using SSH (Secure Shell).
There is another way to totally disable access to the user that uses the usermod command with the --expiredate option:
$ sudo usermod --expiredate 1 ataylorThis sets the account expiration date to January 1, 1970, and disables the account immediately. The user can now do nothing on the host.
Finally, you can set the login shell to /bin/false or /usr/sbin/nologin. This doesn’t lock a user out but disables the user’s getting shell access.
$ sudo usermod –s /bin/false ataylorNote
You can also set the user’s shell to a command. For example, you could set the user’s shell to the /bin/mail command, which is a small command-line mail reader. When the user then logs on, she can access only that command.
Storing User Data
First, your host checks that your user exists and is allowed to log in. Linux distributions store details of users, groups, and other information in three files on your host: /etc/passwd, /etc/shadow, and /etc/group. You generally won’t ever need to edit these files, as there are commands and tools that allow you to add, remove, and manage users and groups. It is useful, however, to know what information they contain.
Tip
If you use other forms of authentication such as NIS (Network Information Service), LDAP (Lightweight Directory Access Protocol), or Active Directory, which we’ll look at in Chapter 16, then your host will usually query one of these authentication stores to confirm your user exists and is allowed to log in.
The first file, /etc/passwd, contains a list of all users and their details. Listing 5-12 shows examples of some passwd entries.
Listing 5-12. /etc/passwd Entries
root:x:0:0:root:/root:/bin/bashdaemon:x:2:2:daemon:/sbin:/sbin/nologin
Each entry can be broken into its component pieces, separated by a colon.
username:password:UID:GID:GECOS:Home Directory:ShellThe username can be up to 32 characters and is case sensitive (though it’s usually all in lowercase). The x in the next field is a marker for the password. The actual password is stored in the /etc/shadow file, which we will discuss in the sidebar “Shadow Passwords.”
Next is the UID and GID . As noted earlier, on a Linux host, each user account and group is assigned a numeric ID; users are assigned a UID and groups are assigned a GID. Depending on the distribution, lower-numbered UIDs and GIDs indicate system accounts and groups such as root or daemon. On CentOS and Ubuntu you will usually see system account UIDs and GIDs lower than 1000.
Note
As mentioned earlier, the root user has a UID and GID of 0. This should be the only user on the host with a UID and GID of 0.
The next item is the GECOS or comment field. This field usually contains data such as the name of the user, office locations, and phone numbers. If you have more than one item of data in the GECOS field, then a comma separates each data item.
The user’s home directory comes next. As we described in Chapter 4, this is usually located in the /home directory (e.g., /home/jsmith).
The last item is the user’s default shell. The shell, as we discussed in Chapter 4, is a command-line environment through which the user interacts with the host. Each shell is initiated by running a binary. For example, to start the Bash shell, the /bin/bash binary would be executed. This binary is specified in the /etc/passwd file. If the default shell points to a nonexistent file, then the user will be unable to log in.
The second line in Listing 5-12 uses the shell /sbin/nologin, which is a dummy shell that not only stops the user from logging it, but also logs the login attempt to the syslog daemon.
Note
The syslog daemon is the Linux logging server. It receives log entries from the operating system and applications and writes them to files, generally in the /var/log directory. We’ll talk more about logging in Chapter 18.
Unless the user is set to not log in, most users will have a shell entry that references the binary that launches their shell, for example, /bin/bash.
Storing Group Data
On Linux hosts, information about groups is stored in the /etc/groups file. Listing 5-13 shows a sample from this file.
Listing 5-13. Sample of the /etc/groups File
root:x:0:rootataylor:x:501:finance,printing
The /etc/group file is structured much like the /etc/passwd file, with the data separated by a colon. The file is broken into a group name, a password, the GID, and a comma-separated list of the members of that group.
groupname:password:GID:member,memberThe password in the group file allows a user to log in to that group using the newgrp command. If shadow passwords are enabled, then like the passwd file, the passwords in the group file are replaced with an x and the real passwords are stored in the /etc/gshadow file.
Configuring Your Shell and Environment
After users have been authenticated and authorized, their shell is started. Most shells are highly customizable, and many users eventually tweak every aspect of their shell environment to help them work faster and more efficiently.
The Bash shell reads its initial configuration from the /etc/profile file. This file usually contains references to other global configuration files and is used to configure Bash for all users on the host except the root user. Finally, any configuration files in the user’s home directory are processed. The .bash_profile and .profile files are most commonly used, and each user will have these in his or her home directory.
Note
You can check the INVOCATION section of bash man page for a full listing of other configuration files.
Environment Variables
One of the main reasons for customizing your shell is to set environment variables. These variables act as default options that are used by many applications. They can define characteristics like your preferred text editor, your preferred language, and the colors used when listing files and directories with ls. You can also define your own variables for use with your own scripts.
To get a full listing of all environment variables, use the env command. Table 5-6 lists the most commonly customized variables.
Table 5-6. Environment Variables
Name | Used For |
|---|---|
HOME | The user’s home directory |
LANG | Defines which language files applications should use |
LS_COLORS | Defines colors used by the ls command |
The location of the user’s mailbox | |
PATH | A colon-separated list of directories where shells look for executable files |
PS1 | Defines the normal prompt |
SHELL | The current shell |
_ | Contains the last command executed in this session |
You can display the contents of an environment variable via the echo command. Prefix the name of the variable you want to display with $.
$ echo $PS1u@h:w$
The preceding is a string of special escape codes that display the username u, hostname h , current working directory w, and the final character $ in the prompt. $ displays a pound (#) symbol if the prompt is displayed as the root user and a dollar sign ($) otherwise. For a full listing of available escape codes, see the PROMPTING section of the bash man page.
You can change environment variables either by defining them in any of the Bash configuration files or by setting them from the command line. If we wanted to change our prompt to include a timestamp and have it break to give us more space to type commands, we could add the T and codes:
$ PS1="[T] u@h:w $ "[12:50:59] jsmith@au-mel-ubuntu-1:∼$
Tip
You may have noticed that we sometimes use $ and sometimes not. The simple rule here is that if we are referring to the variable and prefixing it with $, then we’re interested in the value of the variable (i.e., the contents of the variable). Without $, we’re talking about the variable itself.
Another useful example is adding directories to your path. You can quickly prefix or suffix directories to your path. You can add a single directory to the start of the path as follows:
$ PATH=/home/ataylor/scripts:$PATHHere we’ve added the directory /home/ataylor/scripts to the front of the path and then included the existing path by separating it with a colon and specifying the $PATH value . This allows you to put binaries, scripts, or other applications in the path, which is searched every time you run a command or an application. In this case, when executing commands, Linux will look for the command first in the /home/ataylor/scripts directory before anywhere else on the host.
You can add a directory to the end of the path using the same basic construct:
$ PATH=$PATH:/home/ataylor/scriptsThen when you run a command, Linux will search all the directories in your path, and if a matching command or application isn’t found, it will search your suffixed directory.
Any string of the type KEY=value is assumed to be an environment variable assignment by Bash. Making the variables uppercase is a matter of convention.
Of course, setting environment variables on the command line changes them only for the duration of your session. If you log off, they will revert back to the previous configuration. To make changes like this permanent, place them in the .bash_profile file located in your home directory, for example,
PATH=$PATH:/home/ataylor/scriptsexport PATH
Here we’ve specified our new path and then used a special command, export, to propagate the change. Normally, changes to environment variables change only the current session or script in which they are being made. In order to use them in other sessions or scripts, you need to export them. To make a path or other environmental change for all users, add the changes to the /etc/profile file or generally you would add those to a file in the /etc/profile.d/ directory. This file is used by all users (except the root user; use the .bash_profile file in the /root directory to modify the root user’s variables) to set values.
Tip
You can find more information on configuring your Bash prompt at http://tldp.org/HOWTO/ Bash-Prompt-HOWTO/.
Command Aliases
The second reason for configuring your shell is to create command aliases. Aliases allow you to create shortcuts or set default options for often-used commands. A prime example is an alias for the ls command we looked at in Chapter 4.
When listing files with ls, we saw in Chapter 4 that we get a simple listing of our files in a directory. By using an alias, you can have the shell execute ls -lah each time you type ll, so that you always have a full long human reading listing of your directory. You create an alias via the alias command.
$ alias ll='ls -lah'$ lltotal 40Kdrwx------. 4 vagrant vagrant 4.0K Mar 9 06:07 .drwxr-xr-x. 4 root root 4.0K Mar 3 05:37 ..-rw-------. 1 vagrant vagrant 2.2K Mar 9 06:08 .bash_history-rw-r--r--. 1 vagrant vagrant 18 Nov 20 00:02 .bash_logout-rw-r--r--. 1 vagrant vagrant 225 Mar 9 06:04 .bash_profile
You can make an alias permanent by adding it to the .bash_profile configuration file in your home directory.
To get a listing of all aliases defined in your shell, run the alias command without any parameters.
$ aliasalias egrep='egrep --color=auto'alias fgrep='fgrep --color=auto'alias grep='grep --color=auto'alias l.='ls -d .* --color=auto'alias ll='ls -lah'alias ls='ls --color=auto'
Here you can see our defined listing alias, other listing aliases, and several aliases that we have available to us from the /etc/profile.d/colorgrep.csh file.
You should not define an alias with the same name as an existing command, unless you’re setting default options. You will still be able to run the original command by specifying the full path to the executable, but it might create nasty surprises when you don’t expect them (e.g., in automated scripts).
To delete an alias , use the unalias command. To remove our interactive delete we would use this:
$ unalias llTo read more about aliases, see the ALIASES section of the bash man page.
The Bash shell is extremely powerful and flexible, and it can make everyday administration tasks very easy. If you want to know more about Bash and what you can use it for, see www.tldp.org/LDP/Bash-Beginners-Guide/html/ and http://tldp.org/HOWTO/Bash-Prog-Intro-HOWTO.html .
Controlling Access to Your Host
You can control quite a lot of user characteristics, including when and how users can log in, what their passwords look like, and how often they have to change and reset their passwords. These controls are all checked when users log in to the host and are generally managed by a series of modules. These modules are collectively known as Pluggable Authentication Modules (PAM) . Almost all Linux distributions, including CentOS and Ubuntu, rely on PAM to control how and when users can interact with hosts.
In this section, we’ll introduce you to PAM and how it works. You won’t generally have to change much PAM configuration, but it is important to understand how it works.
Note
We’ll talk a bit more about how PAM is used with other authentication mechanisms (e.g., integration with Active Directory and LDAP) in Chapter 16.
PAM was originally designed by Sun Microsystems to provide a plug-in authentication framework. It has been heavily used and developed in the Linux world, and a large number of PAM modules exist to perform a variety of functions ranging from checking passwords to creating home directories. PAM modules were originally used to provide authentication and other services to applications that lacked authentication or a particular authentication capability. Later, as more sophisticated types of authentication became available, such as smart cards and one-time passwords (or tokens), PAM became a way to integrate and extend authentication mechanisms. Rather than having to rewrite each application for new authentication methods, all that is required is to add PAM support. PAM then takes care of the hard work of authenticating through a standard API.
Configuring PAM
Essentially PAM is a hierarchy of authentication and authorization checks that are performed when an application wants to perform some action. These checks are stacked together; for example, when logging in we check the user exists, then check that the user’s password is valid, and then that the password hasn’t expired. This stack is usually made up of multiple PAM modules, each of which performs some check function. Additionally, some checks must pass (e.g., your user must exist), and other checks may be optional. The best way to understand PAM is to examine some PAM configuration files.
On most Linux distributions, you have two possible locations to look for PAM configuration information. The legacy file /etc/pam.conf is used to hold PAM configuration information on Linux distributions, but now it is generally deprecated and has been replaced by the /etc/pam.d directory. Most modern versions of CentOS and Ubuntu use this directory to hold a collection of configuration files for PAM-aware services. The service shares the same name as the application it is designed to authenticate; for example, the PAM configuration for the passwd command is contained in a file called /etc/pam.d/passwd. These files are called service configuration files.
There are a variety of service configuration files—for example, when users log in to a host, we use an application called, appropriately, login. The login application is triggered when a user logs in, and inside the pam.d directory you’ll find a file named login that contains the authentication configuration for the application. Similarly, you’ll find a file called sshd that performs similar work for users who log in via an SSH connection.
Other common services that come with default PAM configurations and that you’ll find in the /etc/pam.d directory are the passwd command and the cron scheduling daemon. Inside each of these files, you’ll find the authentication configuration that these applications use.
Note
We’ll discuss crontab and how to schedule jobs and actions in Chapter 6.
We’re not going to look at each specific file, though, because most of these services rely on some common configuration for authentication. CentOS and Ubuntu both have separate files that define the common authentication configuration. Many of the service files reference and include this common configuration. On CentOS , this file is /etc/pam.d/system-auth, which is automatically generated when you install your host and is updated with a special command called authconfig. On Ubuntu, the same role is performed by four separate files: common-auth, common-password, common-session, and common-account. Let’s look at the contents of the CentOS system-auth file in Listing 5-14.
Listing 5-14. The login PAM File
#%PAM-1.0# This file is auto-generated.# User changes will be destroyed the next time authconfig is run.auth required pam_env.soauth sufficient pam_unix.so nullok try_first_passauth requisite pam_succeed_if.so uid >= 1000 quiet_successauth required pam_deny.soaccount required pam_unix.soaccount sufficient pam_localuser.soaccount sufficient pam_succeed_if.so uid < 1000 quietaccount required pam_permit.sopassword requisite pam_pwquality.so try_first_passlocal_users_only retry=3 authtok_type=password sufficient pam_unix.so md5 shadow nulloktry_first_pass use_authtokpassword required pam_deny.sosession optional pam_keyinit.so revokesession required pam_limits.so-session optional pam_systemd.sosession [success=1 default=ignore] pam_succeed_if.so servicein crond quiet use_uidsession required pam_unix.so
The system-authand the other service configuration files have four possible directives . Let’s use a single line from Listing 5-14 to examine them in more detail.
auth sufficient pam_unix.so nullok try_first_passThe first directive in our line is auth, which is the management group we’re configuring. Four major management groups are available in PAM, and they represent the different portions of the authentication and authorization process that can be configured:
auth: These modules perform user authentication, for example, checking a password.
account: This management group handles account verification tasks, for example, confirming that the user account is unlocked or if only the root user can perform an action.
password: These modules set passwords, for example, checking to ensure your password is sufficiently strong.
session: These modules check, manage, and configure user sessions.
Note
Remember we talked about setting strong complex passwords; the password management group is one of the places you can set password rules on complexity.
Usually one or more modules are assigned to each management group, and these modules are usually checked in the order they are specified, and each module will return either a success or failure result. A particular module might also be specified more than once in a PAM configuration. For example, in Listing 5-14 you can see that all four management groups specify the pam_unix.so module.
auth sufficient pam_unix.so nullok try_first_passaccount required pam_unix.sopassword sufficient pam_unix.so m5 shadow nullok try_first_pass use_authtoksession required pam_unix.so
This indicates that the pam_unix.so module, which is the module that takes care of most standard Unix authentication functions such as entering a traditional password, can perform checks and functions for each management group. For example, it can confirm that the user’s password is correct in the auth group and also confirm the user exists for the account group.
The next directive, sufficient, is called a control flag, and it tells PAM how to treat the result of the module. As mentioned earlier, some checks are more important than others. Control flags tell PAM what to do with the success or failure result and how that result impacts the overall authentication process. Table 5-7 lists the four PAM control flags.
Table 5-7. PAM Control Flags
Flag | Description |
|---|---|
required | A required module must succeed for authentication to succeed. |
requisite | If a requisite module fails, then authentication will immediately fail. |
sufficient | Authentication immediately succeeds if the module is successful. |
optional | The success or failure of the module doesn’t impact authentication. |
The required flag means the module result must be a success in order for the authentication process to succeed. If the result of this module is a failure, then the overall authentication is also a failure. If more than one module is stacked together, the other modules in the stack will also be processed, but the overall authentication will still fail.
The requisite flag also indicates that the module result must be successful for authentication to be successful. Additionally, unlike the required flag, the success or failure of this module will be immediately notified to the service requesting authentication, and the authentication process will complete. This means that if any modules are stacked together and a module with a requisite control flag fails, then the modules remaining to be processed will not be executed. In comparison, with the required control flag, the remaining modules in the stack continue to be processed.
The next control flag is sufficient. The sufficient flag means that the success of this module is sufficient for the authentication process to be successful or, if modules are stacked, for the stack to succeed. This is dependent on no other required modules processed prior to this module failing. If a sufficient module fails, however, then the overall stack does not fail.
The last control flag is optional. An optionalmodule is not critical to the overall success or failure of the authentication process or the module stack. Its success or failure will not determine the success or failure of the overall authentication process.
The next directive, pam_unix.so, indicates what PAM module will be used and its location. If you specify a PAM module without a path, then the module is assumed to be located in the /lib/security directory. You can also specify a module from another location here by providing the path to it, as you can see in the following line:
auth required /usr/local/pamlib/pam_local.so id=-1 root=1The last directives are arguments to be passed to the PAM module—in this case, we are passing the arguments try_first_pass and nullok to the pam_unix.so module. The try_first_pass argument tells the module to see if a password has already been received by the module, and if so, to use that password to authenticate. The nullok argument tells the module that it is OK to have a blank password. Most modules will ignore invalid or incorrect arguments passed to them, and the module will continue to be processed, though some modules do generate an error message or fail.
Tip
You can find man pages for most PAM modules (e.g., man pam_unix will return the pam_unix man page). You can also find documentation at www.linux-pam.org/Linux-PAM-html/Linux-PAM_SAG.html/ .
There is a last PAM function we need to mention: include. The include function allows you to include one PAM file in another. This is how our common configuration is included in specific service configuration files. To see this function, let’s look at a snippet from the Ubuntu login PAM service configuration file in Listing 5-15.
Listing 5-15. The Ubuntu login PAM Service Configuration File
@include common-auth@include common-account@include common-session@include common-password
There is a lot more configuration in that file, but we can see that using the format @include, you can include other files in a PAM service configuration file. So @include common-account will include the content of the file common-account in the login file. Each module specified in that file will now be processed when the login file is used. The file is pulled in and parsed at the point at which it is included, and any modules in that included file are executed in order.
You can also use the include option as a control flag as follows:
auth include system-authThis will include all auth type lines from the file system-auth.
More about sudo
As discussed earlier in this chapter, the sudo command allows you to run some commands yourself with the privilege of another user, in most cases the root user. The command works much like the RunAs command in Microsoft Windows that allows a user to run a command as another user.
Note
Another command called su, also known as substitute user or switch user, allows you to open a subshell as a specific user. It is commonly used to change to the root user to perform some action. You can read about it through its man page. Note that su will not work if the root account is locked, as it is on Ubuntu. You can unlock the account by setting a password for the root user, but usually you will just use sudo su to temporarily open the root subshell. With sudo su <user> you don’t need to know the password of the user you are trying to access as you are using privileges via sudo.
To use this command, you type sudo and then the command you want to execute. If you’re allowed to run sudo on that command, you’ll be prompted to input a password, usually your own user password. Then the specified command will be executed as the root user, unless you specify a different user with the –u <username> option to sudo.. This allows you to perform the actions the root user can, like creating users, without actually having to sign in as the root user. You can see sudo at work in Listing 5-16.
Listing 5-16. Using sudo
$ sudo userdel ataylorWe trust you have received the usual lecture from the local System Administrator.It usually boils down to these three things:#1) Respect the privacy of others.#2) Think before you type.#3) With great power comes great responsibility.Password:
This rather intimidating message generally appears the first time you use the sudo command; afterward, you’ll get the password prompt only.
Once you have entered the password correctly, the sudo command does not prompt you for a password each time it is used. After you enter your password, the sudo command gives you a grace period during which you are not prompted for your password. This period is 5 minutes on CentOS and 15 minutes on Ubuntu. After this period, you will again be prompted for your password when you next run the sudo command.
On Ubuntu and CentOS , the sudo command is installed by default. Ubuntu, in fact, doesn’t even set a password for the root user; rather, you are encouraged to always use sudo to run privileged commands. Any member of the admin group on Ubuntu has access to run the sudo command. On CentOS, we earlier configured it so that if you are a member of the wheel group and then you can run commands using the sudo command.
The sudo command is also highly configurable. You can specify exactly what commands, including grouping commands together as categories of commands, can be executed using the sudo command. You can configure the sudo command to allow users to execute all commands, some commands, or even to execute commands without prompting for their password (though this isn’t recommended).
Tip
As you learned at the start of the chapter, you configure exactly what sudo can do by editing a file called /etc/sudoers using a special command called visudo. We strongly recommend that you only use visudo to edit this file, as bad configuration will make all sudo commands fail. We’ll talk more about this in the section “Configuring sudo.”
So, what happens if you’re not allowed to execute the sudo command? In Listing 5-17 we try to use the sudo command as the user ataylor, who doesn’t have the correct authority to use the sudo command.
Listing 5-17. Unauthorized sudo
$ sudo useradd –m –c 'Illegal User' iuserataylor is not in the sudoers file. This incident will be reported.
A failed attempt to use the sudo command will be logged by your host’s syslog (or system logger) service, and then the message is sent to a file in the /var/log/ directory. On CentOS, you can see sudo command failures in the /var/log/secure file, and on Ubuntu they appear in the /var/log/auth.log file. A log message like this will be generated showing the date, time, user who tried to execute the sudo command, and unauthorized command the user tried to execute.
Sep 1 20:27:43 au-mel-centos-1 sudo: ataylor : user NOT in sudoers ; TTY=pts/1 ;PWD=/home ; USER=root ; COMMAND=/usr/sbin/useradd –m –c 'Illegal User' iuser
These messages allow you to monitor for people attempting to perform inappropriate actions on your hosts, and they can be used to detect attempted security breaches.
Note
In Chapter 18, we’ll talk more about logging and how you can monitor for messages like the ones detailed in this section and send alerts or take some kind of action.
Configuring sudo
The sudo command checks the /etc/sudoers file for authorization to run commands. Using visudo, you can configure the sudoers file to restrict access to particular users, to certain commands, and on particular hosts.
Let’s look at the /etc/sudoers file. First, you will need to use the command visudo to edit the /etc/sudoers file. The visudo command is a special editor designed to be used with the sudo command, and it is the safest way to edit the sudoers file. The command locks the file against multiple simultaneous edits, provides basic sanity checks, and checks for any parse errors. If the /etc/sudoers file is currently being edited, you will receive a message to try again later.
We’ll start by looking at how we might allow our user ataylor to run the userdel command. We have added the content of Listing 5-18 to the sudoers file.
Listing 5-18. Sample sudoers
ataylor ALL=/bin/userdelWe can break down this line into its component parts.
username host = commandListing 5-18 shows the user ataylor is allowed, on all hosts (using the variable ALL), to use the command /bin/userdel as if she were the root user. Any command you specify in the command option must be defined with its full path. You can also specify more than one command, each separated by commas, to be authorized for use, as you can see on the following line:
ataylor ALL=/bin/userdel,/bin/useraddIn the previous line, atayloris now authorized to use the userdel and useradd commands as if she were the root user. All configuration lines in the sudoers file must be on one line only, and you can use to indicate the configuration continues on the next line.
A single sudoers file is designed to configure multiple hosts. Thus, it allows host-specific access controls. You would maintain your sudoers file on a central host and distribute the updated file to all your hosts.
Note
In Chapter 19 we talk about configuration management and how you could distribute this file to multiple hosts.
With host access controls, you can define different authorizations for different hosts, as shown in Listing 5-19.
Listing 5-19. Using sudo Authorization on Multiple Hosts
ataylor au-mel-centos-1=/bin/userdel,/bin/useraddataylor au-syd-ubuntu-1=ALL
In Listing 5-19, the user ataylor is allowed to use only the userdel and useradd commands on the host au-mel-centos-1, but on the host au-syd-ubuntu-1, she is allowed to use all commands as represented by the ALL option.
Caution
You should be careful when using the ALL variable to define access to all commands on a host. The ALL variable allows no granularity of authorization configuration.
You can be somewhat more selective with your authorization by granting access to the commands in a particular directory:
ataylor au-mel-centos-1=/bin/*This applies only to the directory defined and not to any of its subdirectories. For example, if you authorize access to the /bin/* directory, then you will not be able to run any commands in the /bin/extra/ directory unless you explicitly define access to that directory, like the configuration on the next line:
ataylor au-mel-centos-1=/bin/*,/bin/extra/*Sometimes you want to grant access to a particular command to a user, but you want that command to be run as another user. For example, say you need to start and stop some daemons as specific users, such as the MySQL or named daemon. You can specify the user you want the command to be started as by placing the username in parentheses in front of the command, as follows:
ataylor au-mel-centos-1=(mysql) /usr/bin/mysqld,(named) /usr/sbin/namedAs you can imagine, lists of authorized commands, users, and hosts can become quite long. The sudo command also comes with the option of defining aliases. Aliases are collections of like users, commands, and hosts. Generally you define aliases at the start of the sudoers file. Let’s look at some aliases. The first type of alias is User_Alias, which groups like users.
User_Alias ADMIN = ataylor,jsmithYou start an alias with the name of the alias type you are using, in this case User_Alias, followed by the name of the particular alias you are defining, here ADMIN. Next you specify a list of the users who belong to this alias. You can then refer to this alias in a configuration line.
ADMIN=/bin/userdel,/bin/useradd,(named) /usr/sbin/named
In the previous line we have specified that the users in the alias ADMIN are able to use the commands userdel, useradd, and named.
The next type of alias you can define is a command alias, Cmnd_Alias, which groups collections of commands.
Cmnd_Alias USER_COMMANDS = /bin/userdel,/bin/useraddYou can use this alias in conjunction with the user alias just created.
ADMIN ALL=/bin/groupadd,USER_COMMANDSNow all users defined in the alias ADMIN can use the command /bin/groupadd and all those commands defined in the command alias USER_COMMANDS on ALL hosts.
You can also specify an alias that groups a collection of hosts. The Host_Alias alias can specify lists of hostnames, IP addresses, and networks.
Host_Alias SERVERS = au-mel-centos-1, au-mel-centos-2, au-syd-centos-1You can combine this alias with the preceding ones you defined.
ADMIN SERVERS=USER_COMMANDSNow all users specified in the ADMIN alias can run the commands specified in USER_COMMANDS on the hosts defined in the SERVERS alias group.
You can also negate aliases by placing an exclamation point (!) in front of them. Let’s look at an example of this. First, you define a command alias with some commands you do not want users to use, and then you can use that alias in conjunction with a sudo configuration line.
Cmnd_Alias DENIED_COMMANDS = /bin/su,/bin/mount,/bin/umountataylor au-mel-centos-1=/bin/*,!DENIED_COMMANDS
Here the user ataylorcan use all the commands in the /bin directory on the au-mel-centos-1 host except those defined in the DENIED_COMMANDS command alias.
Let’s look at one of the other ways you can authorize users to use sudo. Inside the sudoers file, you can define another type of alias based on the group information in your host by prefixing the group name with %.
%groupname ALL=(ALL) ALLYou would then replace groupname with the name of a group defined on your host. This means all members of the defined group are able to execute whatever commands you authorize for them, in this case ALL commands on ALL hosts.
On CentOS hosts, a group called wheel already exists for this purpose, and if you uncomment the following line in the /etc/sudoers file on your CentOS host, then any users added to the wheel group will be able to use the sudo command to gain root privileges on your host. On Ubuntu this group is called admin rather than wheel.
%wheel ALL=(ALL) ALLAdditionally, the sudoers file itself has a number of options and defaults you can define to change the behavior of the sudo command. For example, you can configure sudo to send e-mail when the sudo command is used. To define who to send that e-mail to, you can use the option on the following line:
mailto "[email protected]"You can then modify when sudo sends that e-mail using further options.
mail_always onTo give you an idea of the sorts of defaults and options available to you, Table 5-8 defines a list of the e-mail–related options.
Table 5-8. Sending E-mail When sudo Runs
Option | Description |
|---|---|
mail_always | Sends e-mail every time a user runs sudo. This flag is set to off by default. |
mail_badpass | Sends e-mail if the user running sudo does not enter the correct password. This flag is set to off by default. |
mail_no_user | Sends e-mail if the user running sudo does not exist in the sudoers file. This flag is set to on by default. |
mail_no_host | Sends e-mail if the user running sudo exists in the sudoers file but is not authorized to run commands on this host. This flag is set to off by default. |
mail_no_perms | Sends e-mail if the user running sudo exists in the sudoers file but does not have authority to the command he tried to run . This flag is set to off by default. |
The sudoers man page details a number of other options and defaults.
The sudo command itself also has some command-line options you can issue with it. Table 5-9 shows some of the most useful options.
Table 5-9. sudo Command-Line Options
Option | Description |
|---|---|
-l | Prints a list of the allowed (and forbidden) commands for the current user on the current host |
-L | Lists any default options set in the sudoers file |
-b | Runs the given command in the background |
-u user | Runs the specified command as a user other than root |
The -l option is particularly useful to allow you to determine what commands the current user on the current host is authorized and forbidden to run.
$ sudo -lPassword:User ataylor may run the following commands on this host:(root) ALL
For readability, it is also a good idea to break up your rules into logically grouped files and place them in the /etc/sudoers.d directory. You would issue the following:
$ sudo visudo –f /etc/sudoers.d/01_operatorsIn the above file we would place things that are particular to the operators group. Sudo will look through the /etc/sudoers.d/ directory and load any files it finds, in order, if present, as above.
The sudo command is complicated and, if improperly implemented, can open your host to security breaches. We recommend you carefully test any sudo configuration before you implement it and thoroughly explore the contents of the sudo and sudoers man pages.
Summary
In this chapter, you learned how to create users and groups from the command line or via the GUI interface. You also learned what happens when you sign on to your host, as well as about PAM and how to control access to your host.
This chapter also detailed the sudo command and how to use it to avoid the use of the root user to administrate your host. Additionally, we examined how to configure sudo to control who can access particular commands and how to report on sudo use. Finally, we covered a bit about how to monitor your users’ logins.
In the next chapter, we’ll look at what happens when your host boots up and how to start, stop, and manage services.