
The ability to back up and restore data is critical in any organization. You need high-quality backups not only to restore deleted or overwritten data but also in many cases for legal requirements you might have in your country (e.g., related to keeping tax or customer records).
We will begin this chapter by discussing disaster recovery planning (DRP) and business continuity management (BCM), giving you a grounding in these concepts. We will show you how to securely copy data from a remote host, whether it is on your network or on the other side of the world. We will then introduce you to the backup server Bareos and show you how to use it to save and restore your files. Also using Bareos, we will demonstrate how to back up and restore a database. Finally, we will discuss the Web-UI console, which is a web-based UI for Bareos.
By the end of this chapter, you should be able to do the following:
Be aware of the requirements needed for DRP and BCM
Use the rsync command to securely copy data from one host to another and use a script to automate that process
Install and configure Duply to back up to Amazon S3
Install and configure a backup server called Bareos
Manage your backups and create jobs within Bareos
Restore files to your host using Bareos
Install and configure the Web-UI management console
We’ll start off with a general discussion on DRP.
Disaster Recover Planning
Of course, we all hope that nothing disastrous happens to our business, but it’s important to prepare for any number of scenarios, just in case. There are two main categories of disaster: man-made disasters and natural disasters. An e-mail server going down for a day, causing vital, time-sensitive business matters to be missed, is a man-made disaster related to human error or mechanical malfunction that can have a process of recovery associated with it. On the other hand, an earthquake that destroys your office is a natural disaster that would require a completely different recovery response. Both scenarios can be planned for, depending on the likelihood of them occurring.
Disaster recovery planning is all about recognizing, managing, and mitigating risk. It is part of an overarching process called business continuity management, or making sure a business can continue in the face of unknown adversity to at least a predetermined minimum level. BCM covers various aspects of your organization and should detail timelines that your business agrees upon for the restoration of particular services.
The following are questions to consider when formulating your organization’s BCM and DRP strategy:
Can we predict the most likely disruptions our business could face? What are the steps required to recover from them? What are timelines for expected recovery?
What are the costs associated with mitigating the risks for and recovering from each potential event?
Do we need a co-location where we can move our business?
Do we need to rent extra equipment, such as power generators, in any potential crisis scenario?
Who are the people and organizations that need to reached/communicated with in the event of disruption to the business? How should the disruption be communicated to the public?
In the case of a large-scale catastrophic event, what are the points that determine whether continuation of the business can be achieved? Losses can quickly accumulate if key infrastructure or business assets are disrupted.
Developing BCM and DRP plans can be a complex process. Within your organization, you should have a BCM plan that contains the findings of risk analysis, business impact analysis, and crisis management investigations that can be signed off on by the major business units. Even small businesses can benefit from a semiformal arrangement, though the resources to develop a full BCM may not be required. For further information on BCM and DRP, we recommend the following resources:
Ready Business (U.S. Homeland Security): www.ready.gov/business/index.html
Australian National Security, Business Continuity Planning: www.ag.gov.au/agd/www/nationalsecurity.nsf/Page/Information_For_BusinessBusiness_Continuity
Wikipedia, Business Continuity Planning: http://en.wikipedia.org/wiki/Business_continuity_planning
Wikipedia, Disaster Recovery: http://en.wikipedia.org/wiki/Disaster_recovery
Business Continuity and Disaster Recovery Checklist for Small Business Owners: http://www.continuitycentral.com/feature0501.htm
Disaster Recovery Using Bareos: https://www.bareos.org/en/HOWTO/articles/relax-and-recover-with-bareos.html
In this chapter, we’re going to focus on the process of backing up and restoring your data, which should be part of your organization’s BCM and DRP plans. The next section covers backup strategies.
Backup Process
You have many different questions to think about when choosing a backup regimen. Answering these questions will give your company its backup strategy.
What is it we are trying to back up?
How often do we need to back up the data?
How long do we want to keep the data backed up?
Where should we store our backups and on what media?
The important thing here is to know your data. You need to know how often it changes and in what volume. You also need to know your storage media and how much data it can store, and for how long. Data volumes can be tricky things—without planning, you could have too much data to back up or not enough time to back up your data. In these situations, you may find yourself backing up data you don’t need, or you may need to get different storage appliances for faster performance or larger backup volumes.
Data retention periods, called the data life cycle, are also important to consider. You may need to keep your data for legal or tax purposes for specific periods of time, usually a few years. You may want to keep client data for several years, and you may want to keep other types of data for shorter periods of time. Depending on what you are backing up, there may be absolutely no point in keeping data on media with the aim to restore data that is months old; in such cases, you could look at shortening your backup cycles to free up that media.
Another thing to think about is scheduling. What time window do you have available to schedule backups in? You may be running 24/7 shops that leave little time for offline backup regimens. You may have to perform hot backups(i.e., backups of live hosts at a moment in time), and you may not have much time to do this in. For scheduling, you may need to think in terms of daily, weekly, or monthly backup regimens.
Finally, you’ll need to determine the type of backup you’ll perform. In most backup regimens, you can break backups into three types: full, incremental, and differential. Full backups are definitive backups of data, and they will be the largest and longest backups performed. Incremental backups are backups of files and directories that have changed since the last backup (be it full, differential, or incremental). Incremental backups are smaller than full and differential backups, and they are normally much quicker to perform. Differential backups are backups of all changed files since the last full backup. These can be larger than incremental backups but are useful when doing restores, as you need only the full backup and the latest differential (if you are not running incremental backups at all). In scheduled backups, you may take one full backup every week with nightly incremental or differential backups.
With full, incremental, and differential backups, your restore operations are done in the following order: the last full backup is restored first, followed by the most recent differential backup, and then any subsequent incremental backups. If you are not using differential backups, then it is the last full backup followed by each subsequent incremental, from the oldest to the most recent.
Caution
In backup operations, you may restore unwanted, deleted files and directories along with good data. You should take care to examine what has been restored before proceeding.
Your network will have its own special backup requirements, and a plethora of hardware appliances and even online storage options are available for you to choose from. Hardware appliances can come bundled with different vendor software, or you can buy your hardware and run open source software to run your backups. The following are some hardware storage options:
Magnetic tapes: Different types depending on the volume of your backups
Hard disks: Different speed and volume options
Optical: DVD/CD-ROM low-volume data backups
Online storage options can also be used for large volumes of data, as long as you have a fast, reliable Internet connection and low data-charge rates. Storing data in AWS S3 (life-cycling your data through S3 storage classes and then moving off to Glacier storage after a period) can be economical for large data sets. Google Cloud Storage also has competitive data storage services but without the super-cheap long-term storage of Glacier.
Here are some AWS storage offerings:
S3 Standard: Fastest object store
S3 Standard-IA: Intermediate, infrequent access
Glacier: Long-term, infrequent access
Here are some Google storage offerings:
Standard: Fastest object store
DRA: Intermediate, infrequent access
Nearline: Long-term, infrequent access
Both AWS , with an option, and Google, by default, provide Server Side Encryption (SSE) of your data at rest, but you can also use your own encryption key to secure your data. Both comply with PCI DSS (3.x) and the various ISO standards on securing hardware and servers, storing data, and securing data centers. Combining this security with running highly reliable and durable services makes AWS or Google a good choice for intermediate and long-term storage.
AWS also offers an AWS Storage Gateway, which is a virtual appliance (a virtual machine) that you install inside your data center and use as a gateway to S3 and Glacier. It also has the capability to act as a virtual tape library (VTL), which software like Bareos can use to back up to. The AWS Storage Gateway will then sync the data to AWS storage while maintaining a local cache. It has a significant price associated with it, but that could be offset by the costs of tape drives and storage tapes.
Things to Think About
We have talked about disaster recovery and business continuity and the importance of securing your data, but there is one other thing we want to talk about. What we really need to think about is how quickly we can recover from a data loss or hardware failure. You have hosts, and you have data. In the event of hardware loss, can you recover your hosts and data quickly?
If you have a database, your database will probably be the single most important data and server you will have. A database server is usually built lovingly, with disk arrays created and the operating system installed and tuned. In this scenario, provided you have recent data, rebuilding this host can take a long time.
Of course, there are a couple of ways around this time recovery time.
The best is having primary/secondary databases. Your secondary database can be promoted to primary, providing time for you to rebuild your host.
You can make use of virtualization technology. Your host can be rebuilt quickly from a template or image, or it can be moved off failing hardware without interruption. Combined with configuration management, like Puppet or Ansible, you will be able to recover your systems quickly.
If you have bare-metal hosts, then you need to back up the disk architecture as well as the operating system and the data. Something like Relax-and-Recover might be a good idea, or something like Mass or Cobbler would help rebuild your servers quickly from a known build.
The worst situation we can have is relying on a running list of how we might have built the host 6 months ago while never having tried to build a host like it since. Actually, there probably is one worse situation: not having the running list.
For other types of hosts, like web servers, you might not need to back them up. You should take careful consideration of things like logs, but if you can rebuild your hosts quicker than restoring them, that would be your best option. If the rebuilding process is automated via configuration management, then you are in a great position as an administrator. This is the notion of treating servers as cattle and not pets and leaves your backup regimes much simpler.
Network Backups
Our network is simple: we have one main host, headoffice.example.com, and hosts in remote branch offices that may have data we need to back up.
Figure 14-1 shows our network. (This is a variation on the diagram from Chapter 7.)
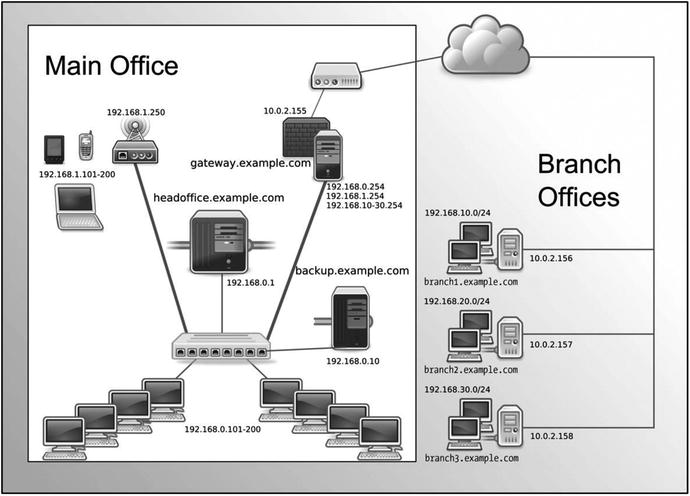
Figure 14-1. Our network
We are going to show you two methods of how we can back up our network. We will copy the data from the remote hosts to the headoffice.example.com central server. After copying these remote files, we can then back them up using a full-featured backup application that will reside on backup.example.com.
We have chosen to use a separate host to house our backup server. Ideally, you do not want your main server to also be your backup host because if you lose your main server, you also lose the ability to restore your backups. However, if you can’t afford to buy an extra host, any backups are better than no backups, and you should then back up to external media such as DVDs or data tapes.
Note
Traditionally, Linux backups have been a combination of tar, gzip, rsync, dd, cpio, dump, restore, and mt commands in hand-rolled scripts. This approach may be worthwhile for one or two hosts, but it can become unwieldy with a few cross-platform hosts.
Using rsync
We’ll begin by showing you how to copy data from remote hosts securely and efficiently using a tool called rsync. This solution is designed for less complicated networks that don’t require a full-blown backup plan. To do this, we’re going to use rsync to securely copy data from host to host.
Note
The rsync tool is part of the Samba product suite (directly related to the Samba server project we covered in Chapter 13). The Samba community has taken rsync under their wing, though, and it is housed here: http://rsync.samba.org/ .
The rsync tool can be used in a client/server configuration or a remote shell. When we talk about a “remote shell,” we mean we can rsync between hosts over another transport mechanism like ssh, which will provide the rsync program with a remote shell (or command line) on the target host. It is because of this use of ssh that we can provide secure, efficient copying of data from hosts in hostile environments such as the Internet.
The rsync program is a fast and efficient way of copying data because it copies only data that has changed from the initial copy. After the initial rsync copy of the remote data to our host, any subsequent copy will be compared against what we already have. rsync does this by sending a file list of the data it wants to copy to the receiving host. The file list includes the pathnames of the data we want to back up and also the permissions, ownership, size, modtimes, and, if specified, checksums of the files. This allows rsync to make a comparison of the files being copied and then copy only those that are different, making rsync very efficient when it sends data between hosts. It will also check the files being copied and copy only the portion of the data that is different in the file. For example, if a 1MB text file contains 990KB of the same data, rsync will copy only the 10KB that is different. Unfortunately, this can’t be done with binary files (like JPEGs), because with binary files, it is harder to differentiate any changes to the file.
As mentioned earlier, we can use rsync in a client/server model, where we run an rsync daemon on the target host that waits for rsync connections. These connections do not run over an encrypted session and therefore can be a security issue, so we are not going to discuss this method of using rsync further. In this chapter, we are going to describe using rsync with Secure Shell (SSH) to provide secure transport. This also means that we require only TCP port 22 to be enabled on our firewall rather than TCP port 873, which is required by the rsync daemon. You can read more about setting up the rsync daemon in the following tutorials:
Using rsync over SSH
It is not uncommon to have a requirement to back up remote hosts outside your immediate network, across hostile environments like the Internet. In these situations, you can use rsync to remotely access those hosts via SSH and pull data off them or make a backup. With the implementation of a simple Bash script , you can automate your backups by connecting to the remote host and copying the files back to your backup host.
In this section, we are going to do the following:
Create a user to manage our backups
Create our passphrase-less SSH keys
Copy our keys to our remote hosts
Create a script that allows only certain commands via SSH
Create a script that uses rsync to sync files from remote hosts
Add that script to cron
We introduced you to SSH communications in Chapters 4 and 10. Normally, you would create your SSH keys with a suitable passphrase, which you would use to authenticate your session when you signed on to a remote host. The reason we need an SSH key without a passphrase to make our connection is that we are going to run this script via crontab, which we introduced in Chapter 6, so we can regularly do the backup of our remote host without any user interaction. Not having a passphrase on our keys is a security concern, so we will take steps to mitigate any chance of them being abused a little later.
First, we are going to create a new user, exbackup, to control these backups, if you haven’t created them already. Then we will generate our SSH keys.
$ sudo /usr/sbin/useradd -m -d /data/backups -u 903 -g adm exbackupHere we have created a user called exbackup with a UID of 903 and default group of adm. We have chosen a UID for this user that is lower than 1000, as we are creating a service user (any user UID less than 1000 is fine) and we prefer to have service users between 900 and 999. We have added this user to the adm, or administrator, group because this group traditionally has access to read log files. The exbackup home directory is /data/backups, and that is where we will store all our backups. Next, we will sudo into the user’s account and create our SSH keys.
$ sudo su – exbackup$ mkdir .ssh && chmod 0700 –R .ssh && cd .ssh$ ssh-keygen -b 4096 -t rsa -f exbackupGenerating public/private rsa key pair.Enter passphrase (empty for no passphrase):Enter same passphrase again:Your identification has been saved in exbackup.Your public key has been saved in exbackup.pub.The key fingerprint is:c1:0c:1f:a5:e4:cf:b9:a5:30:c3:4b:45:23:4f:c9:96 exbackup@backup$ ls –l total 16-rw-------. 1 exbackup adm 3243 Oct 12 23:10 exbackup-rw-r--r--. 1 exbackup adm 741 Oct 12 23:10 exbackup.pub
First, we issue sudo su – exbackup to change to the shell of exbackup. Then we create the .ssh directory to store our keys in, and if that was successful (as signified by &&), we change the permissions on the directory and change into that directory. We then use the ssh-keygen command to create our keys. We chose to make the key length 4,096 bytes, -b 4096, and of type rsa, and we called the key exbackup so that we recognize it easier. As the key was being generated, we were asked for the passphrase, and we just pressed Enter twice. You can see that we have listed the contents of our .ssh directory, and we have the two keys, one private and one public, as indicated by the .pub suffix. We keep the private one (exbackup) secured on this host, and we copy the contents of the public key (exbackup.pub) to the authorized_keys file for the user on our remote host.
We need to now talk a little about security. Having passphrase-less keys whizzing across the Internet to your remote hosts is a potential security risk. The data will be encrypted to prevent casual snooping, but a committed attacker could potentially use the keys as an access point to attack your hosts. We could also create a security mechanism called a chroot jailon our remote hosts, but this will limit our ability to access the rest of the host’s file systems.
Tip
For information on how to set up chroot jails, visit https://www.debian.org/doc/manuals/securing-debian-howto/ap-chroot-ssh-env.en.html .
We could use passphrases with our keys and use a tool called key-chain to cache our passphrase for our connection, but we would have to enter the passphrase each time we rebooted the host, which is not ideal. What we will do to make it slightly harder for an attacker is limit the commands our SSH keys can be used for. On our remote hosts, we will create an executable file called ssh_limiter.sh. When we log on to our remote host with our SSH key, this script will be called, which allows only one command to be executed by anyone with this key.
You can limit what SSH can do by adding some options to the authorized_keys file. authorized_keys is a file in the .ssh directory of the user on the remote host that holds copies of the public keys authorized to make connections to our host. We create them in the home directory of our user on our remote host. We can use these options to limit what our keys can do, as shown in Table 14-1.
Table 14-1. authorized_keys Options
Option | Description |
|---|---|
From="hostname.example.com" | Limits where connections can come from. Takes domain, FQDN, and IP addresses. |
Command="/command/to/execute" | Specifies the command to be executed whenever this key is used for authentication. |
Environment | Sets user environment if it is allowed by sshd. |
no-agent-forwarding | Prevents SSH authentication agent forwarding, meaning we cannot use these keys to make connections to other hosts using the ssh agent. |
no-port-forwarding | Prevents SSH port forwarding, meaning we cannot use ssh port forwarding to open connections to other hosts. |
no-X11-forwarding | Prevents X11 forwarding. This means we cannot use the X protocol; therefore, we cannot open new X windows or terminals. |
no-pty | Prevents interactive shell. This means the user with this key can only run commands and not have an interactive shell. |
Table 14-1 is a subset of the complete options available. For more information, read the man page for sshd.
Let’s use this information to create an authorized_keys file that we will send to our remote host. First, we’ll copy the existing exbackup.pub key to a file called remote_authorized_keys. This creates a file containing the public key for the exbackup user. We are shortly going to edit this file copy, add some restrictions to it, and send it to the authorized_keys file on remote hosts.
$ cp exbackup.pub remote_authorized_keysIf we want to simply copy our public keys to any remote host, we can use ssh-copy-id, which will create the authorized_keys file on the remote server for the user, like so:
$ ssh-copy-id -i .ssh/exbackup [email protected]/usr/bin/ssh-copy-id: INFO: Source of key(s) to be installed: ".ssh/exbackup.pub"/usr/bin/ssh-copy-id: INFO: attempting to log in with the new key(s), to filter out any that are already installed/usr/bin/ssh-copy-id: INFO: 1 key(s) remain to be installed -- if you are prompted now it is to install the new keys[email protected]'s password:Number of key(s) added: 1Now try logging into the machine, with: "ssh '[email protected]'"and check to make sure that only the key(s) you wanted were added.
But we are going to do a few more tasks than simply copying the authorized_keys file. In fact, we are going to do these extra things:
Create a wrapper script to deny unauthorized commands
On the remote host, create a user and home directory containing .ssh and bin directories
Move the SSH wrapper script with authorized commands to the bin directory
Move the authorized_keys to the .ssh directory
Make sure the permissions are correct for each file and directory
Creating the Wrapper Script
First up, we are going to create a file called ssh_limiter.sh, and that will be the script we’ll force our connection to run when we connect with the exbackup SSH key. This script will live on our remote hosts. This provides some security to the range of commands anybody with this SSH key can execute.
When we make an SSH connection to a host, the variable $SSH_ORIGINAL_COMMAND holds the command we want to execute on our remote host. So if we make the following SSH connection:
$ ssh [email protected] ls –l /tmpthe variable $SSH_ORIGINAL_COMMAND will hold the value ls –l /tmp. When presented with an SSH key, we can now test that variable and decide whether it’s the kind of command we will accept this key to use. When we perform an rsync on our remote host, the variable will contain rsync --server <some other arguments for rsync>. We want to allow this and exclude anything else.
We do this with a wrapper script , as shown in Listing 14-1.
Listing 14-1. Limiting the Commands ssh Can Do Using Keys
$ vi ssh_limiter.sh#!/bin/bash# Command to be used by exbackup at example.com to limit what exbackup can# do on a remote host.# SSH2 stores the original command sent by the remote host in a variable# $SSH_ORIGINAL_COMMAND. We will use case to test and limit the commands# we are running.case "$SSH_ORIGINAL_COMMAND" in*&*)echo "UNAUTHORIZED COMMAND";;*;*)echo "UNAUTHORIZED COMMAND";;*|*)echo "UNAUTHORIZED COMMAND";;rsync --server*)$SSH_ORIGINAL_COMMAND;;*)echo "UNAUTHORIZED COMMAND";;esac
In Listing 14-1, we are using the Bash scripting language to test the commands that are being presented by the ssh user.
The case statement tests the variable $SSH_ORIGINAL_COMMAND to make sure it contains only the command rsync --server. First, we deny control commands &, ;, and |, which can be used to add other commands to the end of our intended command. If the command starts with rsync --server, then we accept it ( --server is making sure Bash escapes the <space>--). Anything else that may be passed as a command is denied by *.. The case statement is ended by the esac statement.
We now need to edit our remote_authorized_keys file to add options for our key.
$ vi remote_authorized_keyscommand="∼/bin/ssh_limiter.sh",from="*.example.com", no-port-forwarding,no-X11-forwarding,no-agent-forwarding,no-pty ssh-rsaAAAAB3NzaC1yc2EAAAABIwAAAgEAp7jGL2il3QKREVTpNWkdPqiEbG4rKdCLt/nx57PHkZvzSGI64Glscl0zIz92PBN/ZjNb4Z1ZaOGS7UYQOg4SHKXsw5/VHchIN1k3p9Vwm9rZUiDg3azKr9J+R+r9TDhwReyYt0QhR/j1aZf1gYS3+xRLs+bQb6UXVRrccygCFtxvrA2B5Kkgw2QJhctSlNRyi8XobUK7kOs2Bw4zIY8hEZMRBFEibqi/diXPngWsMeo2UQQGICo6yXmgUKqiuQq1azdDuTbEstLS97/LdTqWd9MNAsYk= [email protected]
Here we added the options to the remote_authorized_key file that will eventually be on our remote host. We specified the command to be run when we use the key and the hosts that can connect with it, and we limited the functions normally allowed with general users. Anyone connecting with this key will now be able to run only the ssh_limiter.sh script, which allows only the rsync command to be executed and only connections originating from the *.example.com domain. We could be stricter in the from= option if we wanted and put in the IP address of the host originating the connection.
We also specify that we cannot port forward to other hosts (no-port-forwarding), x11 terminals, or X Windows (no-X11-forwarding); we can’t use the ssh agent to forward our keys to other hosts (no-agent-forwarding); and we will also fail to get an interactive shell (no-pty).
Deploying to the Remote Host
We are going to set up our remote host with the username and directory, mirroring what we previously did for exbackup. We need to make sure that the exbackup home directory on the remote host has an .ssh directory and that it has the permissions of 0700 set on it. We will now copy the remote_authorized_keys file to our remote server using a normal user. First, we’ll copy the remote_authorized_keys file somewhere we can access by the user jsmith; /tmp should be OK. We’ll copy the ssh_limiter.sh file to /tmp, too.
Using jsmith, who has an account on the remote hosts with administrative sudo access, we do the following:
$ scp /tmp/remote_authorized_keys /tmp/ssh_limiter.sh[email protected]:∼/
This securely copies the remote_authorized_keys file to the home directory of jsmith on the remote host. Now we issue the following series of ssh commands:
$ ssh [email protected] 'sudo useradd –u 903 –g adm –m–d /data/backups exbackup && sudo –u exbackup mkdir –p /data/backups/.ssh &&sudo chmod 0700 /data/backups/.ssh'
This sets up our exbackup user on our remote host. It also creates a directory called .ssh in the home directory and sets the permission of 0700 on it, which is a requirement of SSH security. We would like to point out that we used sudo –u exbackup to make the directory so it has the correct ownership permissions. The double ampersand (&&) indicates that we want to execute the next set of commands if the first set was successful.
Caution
Adding any user to the adm group can give them elevated sudo privileges.
We have the wrapper script (ssh_limiter.sh) and the remote_authorized_keys file in the home directory of jsmith, and we have created the exbackup user. Next, we will copy the remote_authorized_keys file to its proper location on the remote host, renaming it on the way and setting the required permissions. We will also create the /data/backups/bin directory and move ssh_limiter.sh there.
$ ssh [email protected]'sudo mv remote_authorized_keys /data/backups/.ssh/authorized_keys&& sudo chown exbackup:adm /data/backups/.ssh/authorized_keys&& sudo chmod 0600 /data/backups/.ssh/authorized_keys&& sudo -u exbackup mkdir /data/backups/bin&& sudo mv ssh_limiter.sh /data/backups/bin&& sudo chown exbackup:adm /data/backups/bin/ssh_limiter.sh&& sudo chmod 0750 /data/backups/bin/ssh_limiter.sh'
In the preceding code, we used the backslash () to break up the lines; the backslash tells Bash that our command continues on the next line rather than to execute the line of code when we press the Enter key. As far as Bash is concerned, it could be all one line, but this makes this somewhat easier to see what is happening.
The sudo command , unless used in conjunction with the –u <username> option, will create all the new files and directories with root being the owner. Therefore, we need to change the permissions and ownership of the directories and files we are creating. We also created a bin directory in the /data/backups directory, which is the home directory of exbackup. In the authorized_key file, we specified command=∼/bin/ssh_limiter.sh, so our ssh_limiter.sh script needs to be copied to the bin directory with the appropriate permissions as well.
Tip
This rather convoluted setup process can be made infinitely easier with configuration management tools, like those explained in Chapter 19.
Testing rsync
We are going to create a file on our remote host to test the rsync script we are about to show you. On our remote host, we will create a text file in the /tmp directory called /tmp/test_sync.txt and fill it with garbage text.
$ vi /tmp/test_sync.txtfldjfsllfdsjfslafsdjfslfjsdlfsjfsfslfsa23433
Here we created a file on remotehost.example.com and added random text to a file called /tmp/test_sync.txt. If you use the cat command on the file (cat /tmp/test_sync.txt), you will see that it contains all that random text.
We are now going to test our backup of this file on the remote host using rsync and our SSH keys.
$ sudo su - exbackup[sudo] password for jsmith:$ rsync -av -e 'ssh -i .ssh/exbackup' remotehost.example.com:/tmp/test_sync.txt /tmpreceiving file list ... donetest_sync.txtsent 42 bytes received 194 bytes 472.00 bytes/sectotal size is 58 speedup is 0.25$ cat /tmp/test_sync.txtfldjfsllfdsjfslafsdjfslfjsdlfsjfsfslfsa23433LDJAS
We used the rsync command to perform a simple copy of the file test_sync.txt to our local /tmp directory. You can see that the file has been copied by using cat to display its contents. We will explain the details of the rsync command a little later.
Next, let’s add some more lines to the file and sync it again.
$ vi /tmp/test_sync.txtfldjfsl...<snip>...fsa23433ldjasdfaldasd12344556
We’ll then save the file and do the rsync again.
$ rsync -av -e 'ssh -i .ssh/exbackup' branch1.example.com:/tmp/test_sync.txt /tmpreceiving file list ... donetest_sync.txtsent 48 bytes received 213 bytes 174.00 bytes/sectotal size is 77 speedup is 0.30
When we use the cat command on the /tmp/test_sync.txt file, on our localhost you will notice that it contains the new changes to the file.
$ cat /tmp/test_sync.txtfldjfsl...<snip>...fsa23433ldjasdfaldasd12344556
So, we can securely sync a file from a remote host without needing to use a password. Let’s quickly test our ssh_limiter.sh script to check that it works as expected. Here we will test to see whether we can use our key to ssh across to the remote host and run the top command.
$ ssh -i .ssh/exbackup remotehost.example.com topUNAUTHORIZED COMMAND
Perfect—sending prohibited or unexpected commands elicits the UNAUTHORIZED COMMAND response.
Setting a rsync Script in crontab
Now we can set up crontab scripts to regularly sync our remote host files down to our backup directory.
Table 14-2 lists some of the options that can be used with rsync.
Table 14-2. rsync Options
Option | Description |
|---|---|
-a | Archive, general-purpose option that copies recursively with these options: -rlptgoD. |
-r | Recursively copy directories. |
-l | Copy symlinks as symlinks. |
-p | Copy permissions . |
-t | Copy timestamps. |
-g | Copy group permissions. |
-o | Copy ownership permissions. |
-D | Preserve device (character and block devices) and special files (fifo and named sockets). |
--exclude | Exclude directories or file; can be patterns. An example is .svn/ to exclude .svn directories. |
--include | Include directories or files; fine-tune the files you want to copy. Same syntax as --exclude. |
-n, --dry-run | Dry run. Show what would happen but do not actually perform sync. |
In general, you will primarily use the rsync command with the archive options set, which is –a. This is a bundled option that represents the following options: -rlptgoD. These options are –r, recursive; -l, copy symlinks as symlinks; -p, copy permissions; -t, copy file and directory modified times; -g, preserve groups; -o, preserve ownership; and -D, preserve devices and special files. These options are usually sufficient to archive your systems, but if you need to, you can add more options, which are explained in the rsync man page.
You will probably make use of the --exclude and --include options, which allow you to fine-tune the file or directory you want to sync. You can also use --exclude-from=<file> and --include-from=<file> to list multiple selections of files or directories you want to target.
The rsync Backup Script
Let’s take a look at a typical script we can use to sync our remote hosts to our local host. On our remote hosts, we will have a directory called /data/staff/sales that we want to sync down to our local host, and then we will back that up with our backup application. We will have two remote hosts, branch1.example.com and branch2.example.com, and we will use rsync to sync the contents of their /data/staff/sales directory, except the /data/staff/sales/temp directory, which we want to exclude. We also want this script to be run by the exbackup user using the passphrase-less key we have created.
First, let’s set up the .ssh/config file that will handle all the SSH configuration we need. In that file, we will add the hostname, the IP address or FQDN name, and the user to connect with. We will also define the SSH key we will use in our connection.
$ cat .ssh/configHost *.example.comUser exbackupIdentityfile ∼/.ssh/exbackup
The preceding code adds the username exbackup with the identity file in ∼/.ssh/exbackup to every ssh connection made to a host in the example.com domain space. It is the equivalent of specifying $ ssh –I ∼/.ssh/exbackup [email protected].
The script that we will use to run rsyncbetween our hosts looks like Listing 14-2.
Listing 14-2. The nightly_remote_sync.sh Script
1. #!/usr/bin/env bash2.3. # This uses rsync to sync down remote files to the /data/backups/<hostname>4. # directories.5. # The rsync command we will use.6. RSYNC='which rsync'7. RSYNC_OPTS="-av "8.9. # Host list - Bash array10. HOSTLIST='11. branch1.example.com12. branch2.example.com13. '14. # Back up directory on local host and source directory on remote host15. BACKUP_DIR='/data/backups/'16. SALES_DIR='/data/staff/sales'17.18. # excluded directory19. EXCLUDED="temp/"20.21. # error function22. error_check() {23. if [ $1 -eq 0 ] ; then24. echo "backup successful"25. else26. echo "backup failed: see error number: $1"27. fi28. }29.30. # The rsync functions31. get_sales() {32. ${RSYNC} ${RSYNC_OPTS} --exclude $EXCLUDED $HOST:$SALES_DIR $BACKUP_DIR/$HOST2>&1 > /dev/null33. }34.35. # Bash for loop to go through each host and rsync the data.36. for HOST in $HOSTLIST ; do37. get_sales38. error_check $?39. done40.41. exit 0
The purpose of the script in Listing 14-2 is to sync files from one or more remote hosts to the /data/backups directory of the host the script is running on. This can be the local network’s backup host, backup.example.com, where we will have installed proper backup software. This is just one approach among many to achieve this outcome.
Line 1 contains the call to set the environment as a Bash script . We could also use the traditional shebang (#!/bin/bash) to let Linux know we are running a Bash script.
Lines 2–5 are comments describing our script. Lines 6–7 set RSYNC variables, and lines 10–13 declare the list of hosts we want to sync from. Lines 15–19 are more variables. The backup directory we will be directing our backups to is BACKUP_DIR='/data/backups'. The sales directory, SALES_DIR='/data/staff/sales', is the target directory we are backing up. The temp/ directory is the one we want to exclude.
Note
The user exbackup must have read permissions on all the files and directories you want to back up and write permissions on the directories you are backing up to. You can look at using groups to achieve this.
Lines 22–28 are a Bash function that handles our error checking. If the script ends in anything other than a zero, then it fails; if it ends in zero, the script is successful. The error_check() subroutine or function takes the $? argument, the exit code from another function call, and tests it for a zero. We know that if everything goes well, rsync will exit with a zero; otherwise, it exits with another error code. We can use this error-check function to test for the success or failure of any other function that exits with a zero on success.
The get_sales function declared in lines 31–33 describes the rsync function that calls the rsync command and syncs the /data/staff/sales directory to the /data/backups/<hostname> directory. In line 32, 2>&1 >/dev/null directs the stdout and stderr (or standard out and standard error) to /dev/null. Note that /dev/null is a Linux black hole; if you send things to it, like stdout or stderr, they disappear into nothingness.
Note
When you run a program on Linux/Unix hosts, three standard special file descriptors are used: stdin (standard input), stdout (standard output), and stderr (standard error). When your program receives input, it can receive that input by attaching to the stdin file descriptor. Likewise, when it produces its output, it can write that to stdout. If there is an error in the program, it can write that to stderr. For more information on handling and redirecting stdin, stdout, and stderr, please visit www.tldp.org/LDP/abs/html/io-redirection.html .
Finally, lines 36–39 loop through each host in the host list with the for loop function and perform rsync on each host. Then the script checks the error code of each to see whether it is zero, and if so, it prints the success message.
Note
A good resource for learning more about Bash programming is located at www.tldp.org/LDP/abs/html/index.html . Another reference is the book Beginning the Linux Command Line by Sander Van Vugt (Apress, 2015).
When we run the script from the command line, we get the following result:
exbackup@au-mel-ubuntu-1:∼$ ./bin/nightly_remote_rsync.shbackup successfulbackup successful
Note
When you first run this script, you will be presented with SSH asking you to confirm the new key signature of the remote hosts. Type yes to confirm the signature and the script should proceed as normal from then on.
We will now put this script into a crontab file so we can run it on a regular basis. Recall that we discussed crontab files in Chapter 5. Let’s create the file /etc/cron.d/example_nightly_sync and add the following:
# run the nightly rsync script at 5 minutes past 12 every morning.[email protected]5 0 * * * exbackup/data/backups/bin/nightly_remote_rsync.sh
Here we are setting the script to run every night at five minutes past midnight as the user exbackup. If there is an error, an e-mail will be sent to [email protected]. This is a great way to sync up files from one host to another, but it is not really a great backup strategy. For instance, every night we sync over all the changed files, including mistakes. If they are not noticed early enough, then the mistakes are propagated to our backup host and we lose our good copy of data. When we use a proper backup strategy, the potential for losing our ability to restore good data is minimized.
Tip
When running commands from crontab, it is a really good idea to consider using flock. This uses file locking to prevent scheduled commands being executed while existing commands are already running. See man flock for more details.
A few backup tools have been developed around rsync.
BackupPC: http://backuppc.sourceforge.net/
RSnapshot: http://rsnapshot.org/
Duplicity: http://duplicity.nongnu.org/
Next, we’ll take a look at an open source backup server application called Bareos, which can back up Linux, Microsoft Windows , and macOS hosts.
Backing Up with Duply
Duply is a backup program that makes using the Duplicity program dead simple. Duplicity is a program that uses rsync, and rsync can sync large amounts of data. Around the world rsync has been used by many companies as their remote backup strategy successfully. rsync by itself is great at syncing, but it does not easily manage discrete backups. Duplicity manages discrete backups effectively, but it can have many options to choose from. Duply provides a simple way to configure Duplicity backups.
Duplicity can back up to various cloud storage providers. We are going to use AWS in this example, but you could just as easily use Dropbox, RackSpace Cloudfiles, Google Cloud Storage, or more, as listed in the Duplicity man page.
In this exercise, we are going to do the following things:
Create an S3 bucket with a retention policy
Create a policy that allows access to our bucket
Configure Duply
Test our backup
Set up a cron job to trigger the backup nightly
We will assume that you already have an AWS account and that you have created a user to access it. You will need the credentials, SECRET_ACCESS_KEY_ID and SECRET_ACCESS_KEY, for this user handy as we are going to need to add them to our configuration. If you need help creating an AWS user, you should start with this documentation:
To set up an account: https://aws.amazon.com/
To create users: https://aws.amazon.com/iam/getting-started/
Setting Up S3 Buckets
To back up our data, we are going to use Amazon’s S3 object store. For this we need to create an S3 bucket. An S3 bucket is used to store S3 objects . S3 objects are made up of a unique key, data, and metadata and are stored in a flat structure. While the keys can have prefixes (such as nightly/backupfile.zip, where nightly is the prefix and nightly/backupfile.zip is the key), they are not nested hierarchically but instead all live in the one bucket.
We are going to set up an S3 bucket.
We are to create a life-cycle version policy.
Set the access policy to allow our backup user to put files in S3, list them, and get them.
When you have logged into the AWS web console for your account, you will need to make your way to the S3 service tab like in Figure 14-2.
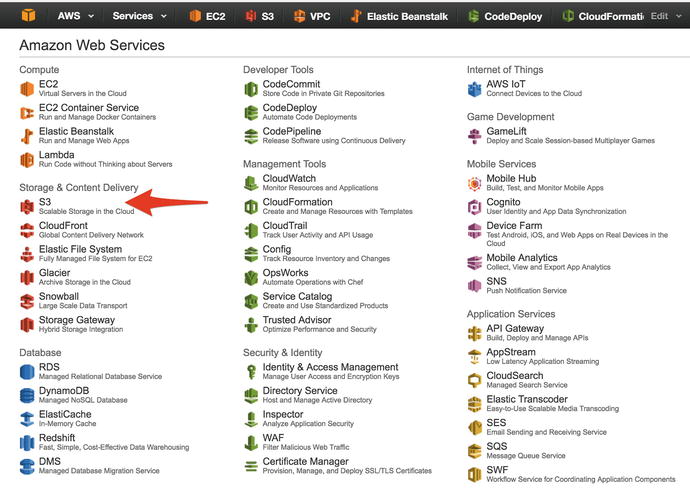
Figure 14-2. Going to S3
From there we are going to create a bucket called our-backups. You are free to choose an appropriate name. Click the Create Bucket button to proceed.
As shown in Figure 14-3, we have created an S3 bucket called our-backups. We are next going to make sure that we have a life-cycle versioning policy on this bucket so that we don’t have to pay too much for any old data. What this policy will do is to move to lower-cost storage after 35 days and delete any objects just older than one year. The reason is that if we haven’t used the data after a month, the likelihood we will need it beyond that is small and so we will move it to a lower-cost tier of storage. We allow 5 days (30+5) after the month for a little buffer like we do at the expiration of 1 year. This does mean that retrieval will be slower, but the chance of us actually needing it is much lower after only a few weeks. There may be times when this is not the case, and we should revise as we went along.
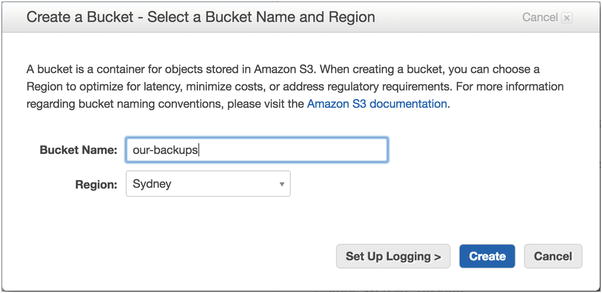
Figure 14-3. Creating an S3 bucket
We can apply these life-cycle policies to different paths in our bucket or to the whole bucket. We are going to apply these to a prefix nightly, as these are the nightly backups for our hosts . After you have created the bucket, on the right pane of the console you will see a Lifecycle option. Click it and you will see the screen shown in Figure 14-4.
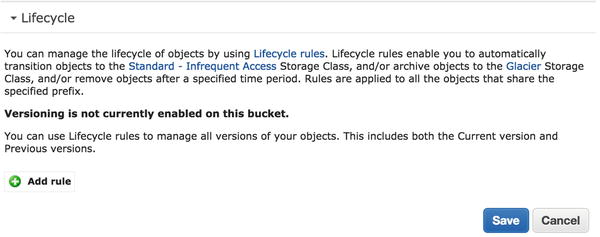
Figure 14-4. Adding a life-cycle rule
Click “Add rule” to start adding our rule.
In Figure 14-5 we are creating a life-cycle policy that is concerned only with objects that have the “nightly” prefix in their keys. Now we click Configure Rule.
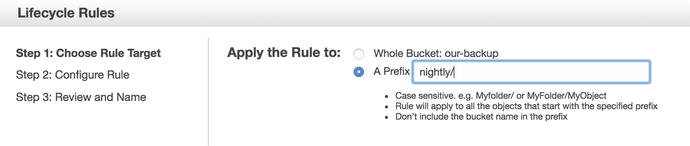
Figure 14-5. Setting life-cycle policy target
In Figure 14-6 you can see there are three nobs we can tweak. Remember we talked about the S3 tiers earlier? We back up originally to the Standard tier. The next below that is Standard Infrequently Accessed (Standard-IA) and then below that is the Glacier storage . The Standard tier costs the most, so we want to transition off that as soon as possible, and we have chosen 35 days. This gives us the standard month plus a couple of days for holidays or people being off work as a buffer. We will not bother moving to Glacier storage because if we need it, we will need it relatively quicker than Glacier will take retrieve. Standard-IA also has a minimum object size of 128Kb, which means objects smaller than that will not be transitioned and will be deleted after the year is up. Also, once we have transitioned the files into Standard-IA, they need to remain there for 30 days before we can transition them to another tier like Glacier.
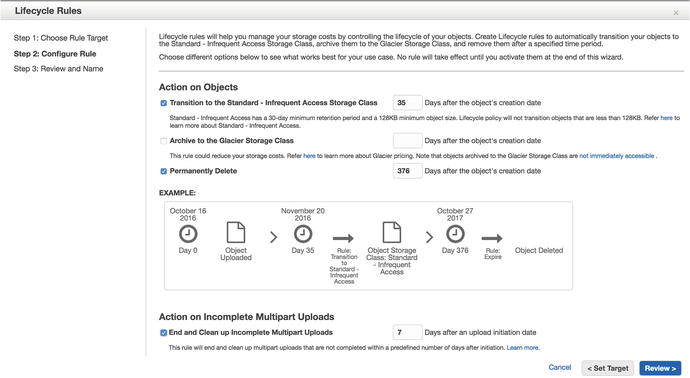
Figure 14-6. Configuring life-cycle rules
We permanently delete the files just after a year with again a buffer in case we discover we need to retrieve them just after a year is up. Any partly uploaded files will be cleaned up, and multipart uploads will end after 7 days. A multipart upload is when you upload files in smaller chunks. This will clean up and end any of those jobs. You can learn more about that process here:
We can click the Review button when we are done.
We have the opportunity in Figure 14-7 to give our policy a name, and we have called it nightly-lifecycle. You can have more than one policy on a bucket. You use this page to review the settings; we are just going to click the Create and Activate Rule button.

Figure 14-7. Reviewing the life cycle
AWS User Policies
We want to secure the S3 bucket we have created to allow only those AWS users with the right credentials to access and upload to it. We are going to add an inline policy to the AWS user we asked you to create earlier.
Now we can add the policy to allow the proper access to the S3 bucket from our AWS user. To do that, we need to use the IAM service in AWS.
Tip
In general, the preferred way to attach a policy to a user is to not use an inline policy like we will do here but to make a managed policy and attach that to the user or even a role. That way you can centralize your policies and share them more easily.
In Figure 14-8 we can see the policy we are going to attach to our AWS backup user. Lines 3–11 allow us to list all our S3 buckets. It is made up of three parts: the effect, the action, and resource. The effect can be Allow or Deny. The action is the API action being performed (in this case ListAllMyBuckets). The resource is the AWS resource (the Amazon resource name) you are applying this to; arn:aws:s3:::* is our S3.
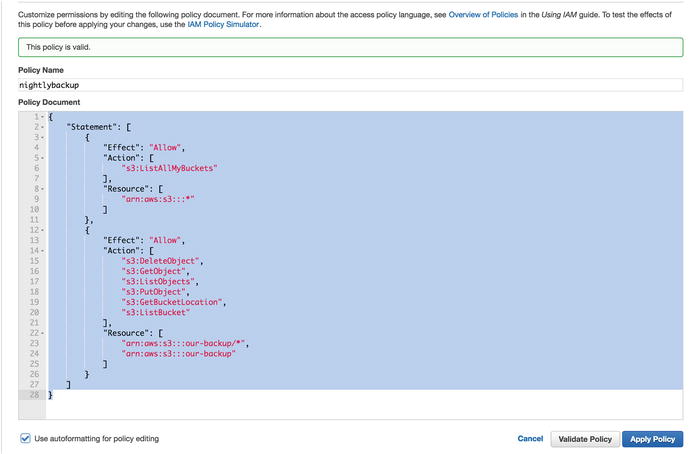
Figure 14-8. Attaching an inline policy to our user
The second part of the policy statement shows the other API actions we allow. They manage our objects and allow us to put (PutObject), get (GetObject), and list (ListObject). In lines 22–25 we see that we are limiting these actions to the backup bucket ARN, arn:aws:s3:::our-backup, only.
For further information on this, please read the following:
Testing S3 Bucket Access
We are going to test our access to our backup S3 bucket. To do that, we are going to download and configure the awscli program that allows us to interact with AWS resources from our command line.
The first thing we will do is download the awscli package. This can be done using your native package manager or by downloading via PIP, the Python package manager.
$ sudo aptitude install –y awscliIf you use PIP, try this:
$ sudo pip install awscliOnce that has been installed, we can begin to use the aws command to interact with AWS resources. As the local Linux user that will run our backups, we need to configure our AWS credentials to access the AWS resources. We need to run the following command:
$ aws configureAWS Access Key ID [None]: ALIAIJBASN4NOMJ4FLTRAWS Secret Access Key [None]: +GDHpm+FLPj311tu6YJ29c9luMlQTHwntgy7vgs2Default region name [None]: ap-southeast-2Default output format [None]: json
Here we have used the aws configure command to add our AWS access key ID and our access secret. We have also specified our default region, which is the one closest to us, and the output format of JSON; these can be overridden at any time and are not really important.
Note
The aws configure command creates a clear-text file of your AWS credentials. This can be a security risk, and you may like to use other encrypted methods to store these, such as aws-vault, credstash, and awscli-keyring among others.
The aws command takes several subcommands that deal with different resources. We are asking it to list an S3 resource. If we were to be working on EC2 resources, we would use aws ec2 <command>. You can get a list of AWS resources by issuing the following:
$ aws helpNow that we have our AWS credentials set up, we are going to test that we can list our S3 bucket.
$ aws s3 ls our-backup/If there are no errors, that shows we can list our S3 bucket. We can try to copy, or put, a local file up into our S3 bucket. To do that, we issue the following:
$ aws s3 cp afile s3://our-backup/upload: ./afile to s3://our-backup/afile$ aws s3 ls our-backup/2016-10-16 05:02:47 32768 afile
There you can see we have uploaded a small file to our S3 bucket. Let’s now see if we can copy the file back down to our host and then delete that file from S3.
$ aws s3 cp s3://our-backup/afile afile2download: s3://our-backup/afile to ./afile2$ aws s3 rm s3://our-backup/afiledelete: s3://our-backup/afile
These are all the actions that our backup program will perform, and we can see that our credentials allow us to perform these actions. Let’s now move on to creating our nightly backup with Duply.
Installing and Configuring Duply
Duply, as we have said, is the convenient way to manage our Duplicity backups. Duplicity can run multiple methods to securely back up files to remote systems . With AWS, it is going to copy our backup in file chunks of about 25Mb. It does this because it is easier to manage several small files than one rather large file.
There are two ways you can secure your data with Duplicity, one with GPG symmetric keys and the other using GPG asymmetric keys. We are going to use symmetric keys, but if you have GPG asymmetric keys available, please use those. We also store our data encrypted at rest with S3, and we could further encrypt our files using server-side encryption.
Installing Duply will install Duplicity as a requirement. It may not, however, install python-boto, and you may have to install this also. However, by installing awscli previously, we should have already installed python-boto.
$ sudo aptitude install –y duplyFor CentOS, you will need to use YUM, of course.
Now that Duply is installed, we can investigate how to use the command. Table 14-3 shows the command usage to get help information (--help or help do not work).
Table 14-3. $ duply usage
create | Creates a configuration profile. |
backup | Creates a backup (full if it doesn’t exist and incremental if it does) and executes pre- and post-scripts. |
pre/post | Executes '<profile>/pre', '<profile>/post' scripts. |
bkp | Backs up without executing pre- and post-scripts. |
full | Forces a full backup. |
incr | Forces an incremental backup. |
list [<age>] | Lists all files in the backup (as it was at <age>). The default is now. |
status | Prints backup sets and chains currently in repository. |
verify [<age>] [--compare-data] | Lists files changed since <age>, if given. |
verifyPath <rel_path_in_bkp> <local_path> [<age>] [--compare-data] | Lists changes of a file or folder path in backup compared to a local path since <age>, if given. |
restore <target_path> [<age>] | Restores the complete backup to <target_path> (as it was at <age>). |
fetch <src_path> <target_path> [<age>] | Fetches single file/folder from backup (as it was at <age>). |
purge [<max_age>] [--force] | Lists outdated backup files (older than $MAX_AGE). Use --force to actually delete these files. |
purgeFull [<max_full_backups>] [--force] | Lists number of full backups and associated incrementals to keep, counting in reverse chronological order. Use --force to actually delete these files. |
purgeIncr [<max_fulls_with_incrs>] [--force] | Lists outdated incremental backups ($MAX_FULLS_WITH_INCRS being the number of full backups that associated incrementals will be kept, counting in reverse chronological order). Use --force to actually delete these files. |
cleanup [--force] | Lists broken backup chain files archives (e.g., after unfinished run). Use --force to actually delete these files. |
version | Shows version information of Duply and needed programs. |
When we interact with our backups , we will need to use the duply command like so:
$ duply <profile> commandTo configure Duplicity via Duply, we need to create a backup profile. This is going to store our configuration details for Duplicity to use.
$ duply nightly create# although called exclude, this file is actually a globbing file listCongratulations. You just created the profile 'nightly'.The initial config file has been created as'/home/exbackup/.duply/nightly/conf'.You should now adjust this config file to your needs.IMPORTANT:Copy the _whole_ profile folder after the first backup to a safe place.It contains everything needed to restore your backups. You will needit if you have to restore the backup from another system (e.g. after asystem crash). Keep access to these files restricted as they contain_all_ informations (gpg data, ftp data) to access and modify your backups.Repeat this step after _all_ configuration changes. Some configurationoptions are crucial for restoration.
This command creates a directory (∼/.duply) in the home directory of the user issuing the command. In that directory, a profile (∼/.duply/nightly) directory is created, and in that directory, a ∼/.duply/nightly/conf file is created. Created is an excludes file (∼/.duply/nightly/exclude) that can contain the directories we want to include or exclude from our backup profile.
In this nightly profile directory we can also include pre- and post-scripts that can be run before or after our backups. These should be included in .duply/nightly/pre or .duply/nightly/post files.
Also, the output in the end of the create command tells us to make a safe copy of the whole profile directory after the first backup as we may need it when we restore our systems.
Configuring Duply Backups
As we said previously, the create command will create a conf file in the profile directory. We are going to edit that to manage our backups now.
Note
If you want to configure Duply for the root user, you can configure Duply in the /etc/duply directory.
There are many options available to us in the configuration file, but we need to set only a couple to create our backups. We will need to set the following:
GPG_PW='mygeniusbigbikeisnice'First we have provided the GPG_PW value. This is the password we will use to encrypt and decrypt our backups. You can use a more random password than this simple example. You should copy it to your password safe or manager for future reference. Alternatively, you can also use asymmetric encryption where we use private and public GPG keys to encrypt our data.
Next we can set our target and target credentials. The target can be any of the accepted Duplicity back-end types; see the man duplicity page for the list. In general, the type should conform to the following:
<scheme://><uid>:<password>@<other.host>/<some_dir>We are going to use the S3 scheme that does not require user and password information in the URL.
TARGET='s3://s3-ap-southeast-2.amazonaws.com/our-backup/nightly'This is similar to the URL we used to copy our test file via the aws cli command. Next we need to set our AWS access credentials.
TARGET_USER='ALIAIJBASN4NOMJ4FLTR'TARGET_PASS='+GDHpm+FLPj311tu6YJ29c9luMlQTHwntgy7vgs2'
We have set the AWS credentials here, but we may not like to do this as it means we are scattering our AWS credentials over many files in our home directory . Alternatively, we could do something like the following:
TARGET_USER=`awk '/aws_access_key_id/ {print $3}' ∼.aws/credentials`TARGET_PASS=`awk '/aws_secret_access_key/ {print $3}' ∼.aws/credentials`
Here we use the awk command to search the ∼/.aws/credentials file for the access and secret AWS keys, printing the third (print $3) column. Another alternative is to have something like this where we use environment variables that are populated from a secured keychain:
TARGET_USER=`echo $AWS_ACCESS_KEY_ID`TARGET_PASS=`echo $AWS_SECRET_ACCESS_KEY`
A list of alternatives to storing your secrets for AWS would look like this:
Next we list the base root, or source, of all our backups.
SOURCE='/'If you are doing home directories, you might like to use your home directory as the source.
SOURCE='/home/jsmith'Lastly, we are going to set MAX_AGE to 1 month. When we run a purge on our backup files, the actual files are not deleted until we run a --force option with our command. We can still keep our files in S3 for 12 months, but they will not be in the duply catalog. Having many months of backups can slow our duply commands down.
MAX_AGE=1MThat is all we need to configure for the conf file. Next we are going to edit the ∼/.duply/nightly/exclude file to not back up certain files. The exclude file takes the following syntax:
- /path/to/exclude+ /path/dir/of/directory/to/include+ /path/*/**.py
We can use various conditions to select the paths that we want to include (+) or exclude (-). The file list is included unless it is specifically excluded. Ordering is important as files included will take precedence over files excluded.
In our example, we are going to do a full system backup. The following are files we want to exclude:
- /data/- /dev/- /lost+found/- /media/- /mnt/- /proc/- /run/- /srv/- /sys/- /tmp/- /var/tmp
By default, all files are included under the / directory as determined by the SOURCE='/' configuration in our Duply conf file . This example shows we are going to exclude all the normal system directories, like /dev, /proc, and /sys. These are ephemeral and don’t need backing up. There are others that don’t need backing up, including /data, which will hold remote network filesystems, and the /run and /tmp directories, which are volatile.
You can learn more about how to include and exclude directories and files in the duplicity man page. We are ready to back up or system now.
Running a Duply Backup
Now it is time to back up our system. The first backups are always the longest, as are any full backups . However, to make sure that our exbackup user can access all the parts of the system when running duply, we must first make this change in our sudoers file.
$ sudo visudo# Cmnd alias specificationCmnd_Alias BACKUPS = /usr/bin/duply%backup ALL=(ALL) NOPASSWD: BACKUPS
We will then need to add exbackup to the backup group. On CentOS you may have to create the group prior to this step; on Ubuntu the backup group should exist already.
$ sudo usermod -aG backup exbackupTo make sure that we back up all our system files, we are going to use the sudo command to elevate our permission.
$ sudo duply nightly backupStart duply v1.11, time is 2016-10-15 23:57:21.Using profile '/home/exbackup/.duply/nightly'.Using installed duplicity version 0.7.06, python 2.7.12, gpg: unsafe (Home: ∼/.gnupg), awk 'GNU Awk 4.1.3, API: 1.1 (GNU MPFR 3.1.4, GNU MP 6.1.0)', grep 'grep (GNU grep) 2.25', bash '4.3.46(1)-release (x86_64-pc-linux-gnu)'.Signing disabled. Not GPG_KEY entries in config.Checking TEMP_DIR '/tmp' is a folder and writable (OK)Test - Encryption with passphrase (OK)Test - Decryption with passphrase (OK)Test - Compare (OK)Cleanup - Delete '/tmp/duply.12989.1476575841_*'(OK)--- Start running command PRE at 23:57:21.238 ---Skipping n/a script '/home/exbackup/.duply/nightly/pre'.--- Finished state OK at 23:57:21.252 - Runtime 00:00:00.013 ------ Start running command BKP at 23:57:21.262 ---Reading globbing filelist /home/exbackup/.duply/nightly/excludeLocal and Remote metadata are synchronized, no sync needed.Last full backup date: noneNo signatures found, switching to full backup.Error accessing possibly locked file /var/lib/lxcfs--------------[ Backup Statistics ]--------------StartTime 1476588974.26 (Sun Oct 16 03:36:14 2016)EndTime 1476591675.63 (Sun Oct 16 04:21:15 2016)ElapsedTime 2701.37 (45 minutes 1.37 seconds)SourceFiles 140466SourceFileSize 2375250457 (2.21 GB)NewFiles 140466NewFileSize 2375250457 (2.21 GB)DeletedFiles 0ChangedFiles 0ChangedFileSize 0 (0 bytes)ChangedDeltaSize 0 (0 bytes)DeltaEntries 140466RawDeltaSize 2281512996 (2.12 GB)TotalDestinationSizeChange 198548201 (189 MB)Errors 1---------------------------------------------------- Finished state OK at 04:39:42.342 - Runtime 01:03:29.436 ------ Start running command POST at 04:39:42.354 ---Skipping n/a script '/home/exbackup/.duply/nightly/post'.--- Finished state OK at 04:39:42.375 - Runtime 00:00:00.020 ---
With the backup finished, we can see that we have captured 2.21GB of data in our backup. The backup started with several checks, then we read the exclude file, and then we started the backup. There was one file that was not successfully backed up (/var/lib/lxcfs, which is a docker view of the /proc filesystem cgroups and can be excluded too). Despite this, we had a successful backup. Checking in with our S3 bucket, we can see that there are now several files related to our backup.
$ aws s3 ls our-backup/nightly/2016-10-16 03:35:34 02016-10-16 04:25:55 36877167 duplicity-full-signatures.20161015T235721Z.sigtar.gpg2016-10-16 04:39:28 634738 duplicity-full.20161015T235721Z.manifest.gpg2016-10-16 03:35:37 26244347 duplicity-full.20161015T235721Z.vol1.difftar.gpg2016-10-16 03:35:37 26194091 duplicity-full.20161015T235721Z.vol10.difftar.gpg2016-10-16 03:35:37 26196749 duplicity-full.20161015T235721Z.vol11.difftar.gpg2016-10-16 03:35:38 26227650 duplicity-full.20161015T235721Z.vol12.difftar.gpg...
In the S3 listing, we can see the files that make up our backup. The backups of the files themselves are in the *.difftar.gpg files. There are *.manifest.gpg and *.sigtar.gpg files too. The manifest file is the listing of files, and the sigtar is the signatures of the files to see if they change between backups.
We can now also run a list command to get a few of the files we have backed up.
$ sudo duply nightly listStart duply v1.11, time is 2016-10-16 10:41:48.Using profile '/home/exbackup/.duply/nightly'.Using installed duplicity version 0.7.06, python 2.7.12, gpg: unsafe (Home: ∼/.gnupg), awk 'GNU Awk 4.1.3, API: 1.1 (GNU MPFR 3.1.4, GNU MP 6.1.0)', grep 'grep (GNU grep) 2.25', bash '4.3.46(1)-release (x86_64-pc-linux-gnu)'.Signing disabled. Not GPG_KEY entries in config.Checking TEMP_DIR '/tmp' is a folder and writable (OK)Test - Encryption with passphrase (OK)Test - Decryption with passphrase (OK)Test - Compare (OK)Cleanup - Delete '/tmp/duply.18655.1476614508_*'(OK)--- Start running command LIST at 10:41:49.064 ---Local and Remote metadata are synchronized, no sync needed.Last full backup date: Sun Oct 16 10:01:58 2016Thu Oct 13 07:21:56 2016 .Thu Sep 29 23:57:15 2016 binFri Jun 24 15:44:14 2016 bin/bashTue Jan 19 23:11:42 2016 bin/btrfsTue Jan 19 23:11:41 2016 bin/btrfs-calc-size...<snip>...Thu May 26 23:31:30 2016 sbin/wipefsTue Feb 16 13:19:00 2016 sbin/xfs_repairFri Feb 19 15:21:11 2016 sbin/xtables-multiThu May 26 23:31:30 2016 sbin/zramctlThu Sep 1 17:37:32 2016 snapTue Oct 11 14:07:06 2016 vmlinuzThu Sep 29 12:36:50 2016 vmlinuz.old--- Finished state OK at 10:41:58.667 - Runtime 00:00:09.603 ---
This is a long list of all the files we have backed up. We can use a time argument to reduce the output and grep to further narrow what we are looking for (duply nightly list 2016-10-15 | grep /usr/sbin).
From the list we are going to now fetch one of the files (/bin/bash) from our backup and copy it to the local /tmp directory.
$ sudo duply nightly fetch bin/bash /tmp/restores/bashStart duply v1.11, time is 2016-10-16 11:41:15.Using profile '/home/exbackup/.duply/nightly'.Using installed duplicity version 0.7.06, python 2.7.12, gpg: unsafe (Home: ∼/.gnupg), awk 'GNU Awk 4.1.3, API: 1.1 (GNU MPFR 3.1.4, GNU MP 6.1.0)', grep 'grep (GNU grep) 2.25', bash '4.3.46(1)-release (x86_64-pc-linux-gnu)'.Signing disabled. Not GPG_KEY entries in config.Checking TEMP_DIR '/tmp' is a folder and writable (OK)Test - Encryption with passphrase (OK)Test - Decryption with passphrase (OK)Test - Compare (OK)Cleanup - Delete '/tmp/duply.20766.1476618075_*'(OK)--- Start running command FETCH at 11:41:15.242 ---Synchronizing remote metadata to local cache...Copying duplicity-full-signatures.20161015T235721Z.sigtar.gpg to local cache.Copying duplicity-full-signatures.20161016T100158Z.sigtar.gpg to local cache.Copying duplicity-full.20161015T235721Z.manifest.gpg to local cache.Copying duplicity-full.20161016T100158Z.manifest.gpg to local cache.Last full backup date: Sun Oct 16 10:01:58 2016--- Finished state OK at 12:04:32.407 - Runtime 00:23:17.164 ---
The duply fetch process will download the signature files and manifest files locally so they can be processed. This can take some time. Once done, Duply will restore the file. Here you can see that we have restored the bin/bash file successfully. To restore the whole backup, we use the duply restore <path_to_restore_to> command.
Now that we have successfully backed up and restored files on our host, we will add a cron job to do this for us on a nightly basis. We will add this to the exbackup crontab with the following command:
$ crontab –e0 2 * * * env HOME=/home/exbackup sudo duply nightly backup
We will run this Duply backup at 2 a.m. every morning and guarantee that the HOME environment variable is set correctly as many parts (gpg, duply) rely on the correct home directory.
Using Bareos
The cost of a commercial backup solution can be extremely high. Bareos provides a robust, reliable, customizable, and efficient open source backup service for Linux, Unix, and Windows desktops and servers. It works with most storage devices, DAT, LTO, and autoloaders, and it can also back up to disk, including GlusterFS. Bareos is easy to configure, secure, and upgrade, and it is a complete, free, and robust backup server.
Bareos is a fork of the popular Bacula backup server software. Bacula is still available in an open source community version, but it has dedicated development for the commercial version of its software. Bareos and Bacula have since diverged significantly in features but still remain similar in configuration and installation. In most instances, in this section you could swap Bareos for Bacula and you would be fine for configuring either.
Bareos works on the client/server model and requires a Bareos client installed on the target host to be backed up. The components of the Bareos are as follows:
A Director daemon
A Storage daemon
A File daemon
A catalog of what has been backed up to where
A console to manage Bareos
The Bareos backup server itself requires at least these two daemons to be running: the Director daemon and the Storage daemon.
The Director daemon controls what will be backed up, when it will be backed up, and the location to which it will be backed up. It also provides similar services for any restoration jobs that might need to take place. It has a configuration file that contains the details that control the running of the Director daemon itself, as well as the Storage daemon and the File daemon that run on the target host.
The Storage daemon communicates with the Director daemon and the File daemon running on the target host and controls the access to the devices where your data will be stored, either on disk or on tape. The Storage daemon controls access to the backup media, tape drives, and autoloaders. It can be configured to even write to GlusterFS, and we will demonstrate this shortly.
The File daemon sits on the target host waiting for connections from the Bareos Director daemon. When it receives the instructions to start a backup, the target host gets a list of the files it is to back up. It then makes a direct connection to the Storage daemon and sends the backup data to the Storage daemon to be written to the backup media. The File daemon communicates what files have been backed up to the Director daemon, and that information is written to the Bareos catalog.
The catalog records the files that have been backed up, the location from which they were backed up, when they were backed up, and onto what media (or volume) they were backed up. This catalog is kept in a SQL database for future reference. Once the backup is complete, the Bareos program can verify the backup was successful by comparing what was written to the catalog and what was written to the tape.
When a restore operation is requested, Bareos will read the contents of the catalog and request that the appropriate media be loaded. It will then contact the target client and the Storage daemon, and they will begin the restoration process.
The backup and restore operations are referred to as jobs in Bareos. You can schedule backup and restore jobs in the Bareos Director configuration file, /etc/bareos/bareos-dir.conf. Each job is made up of a series of definitions, and these definitions can inherit a set of common definitions that can make your configurations easier to manage. Each job acts on a client that is the target host. The jobs back up on or restore from a volume, which refers to the storage media you are using (e.g., tape, DVD, or disk). These volumes can be grouped into pools and given common definitions concerning retention periods, usage, and rotation. The scheduler can, of course, manage the coordination of the jobs, clients, volumes, and pools to run a one-off operation or repeated ones.
You control Bareos operations via the bconsole, a terminal console program that you can use to run jobs and view the status of the Director, Storage, or File daemons. You can also use it to manage volumes, pools, and restore operations. It is simple to set up, and you can place it anywhere on the network.
Note
We will look at setting up Bareos’s console in the “Introducing the Bareos Web-UI” section.
The Bareos server requires the following TCP ports open on your server:
The Bareos Director daemon requires port 9101 (on the Bareos server only).
The Bareos Storage daemon requires port 9102 (on the Bareos server only).
The Bareos File daemon requires port 9103 (on any target host or client).
You add them with the following command on the backup server:
$ sudo firewall-cmd --zone public --permanent --add-service bacula$ sudo firewall-cmd --reload
On the clients, you only need to open TCP port 9103, and on CentOS hosts you will find that there is a bacula-client service provided in firewalld.
$ sudo firewall-cmd --zone public --permanent --add-service bacula-client$ sudo firewall-cmd –reload
If you are running this on Ubuntu, you can use ufw to add the application file (/etc/ufw/applications.d/bareos) like so:
[Bareos]title=Bareos Backup Serverdescription=The Bareos Backup Server.ports=9101,9102,9103/tcp
And you do similar for the client by just allowing port 9103 access. We then would execute the following:
$ sudo ufw reload && sudo ufw allow bareosGetting the Software
The Bareos download page ( https://www.bareos.org/en/download.html ) provides links to RPM and DEB packages of the latest releases for you to download. Distributions can be several versions behind the latest release, and only Ubuntu is currently shipping with Bareos. CentOS still has Bacula available but not Bareos. You can get the packages and tarballs here: http://download.bareos.org/bareos/ .
For CentOS we will install the following YUM repo contents into the file /etc/yum.repos.d/bareos.repo, as shown here:
[bareos_bareos-15.2]name=Backup Archiving Recovery Open Sourced 15.2 (CentOS_7)type=rpm-mdbaseurl=http://download.bareos.org/bareos/release/15.2/CentOS_7/gpgcheck=1gpgkey=http://download.bareos.org/bareos/release/15.2/CentOS_7/repodata/repomd.xml.keyenabled=1
We are then able to install the following packages:
$ sudo yum install bareos-client bareos-director bareos-storage bareos-storage-glusterfs bareos-bconsoleOn Ubuntu, you have to use the following:
$ sudo aptitude install bareos-filedaemon bareos-bconsole bareos-director bareos-storageOn Ubuntu, you will be asked to give a username and password for your MariaDB service via the dbconfig-common helper. At this stage we are not ready to provide that information, so we are going to choose <No>. If you have your details or are setting this up on your localhost, you can select yes and go through the steps for setting up the database. We are going to go through the database configuration shortly.
The installation process installs all the required packages and any dependencies and creates the default configuration files in the configuration directory /etc/bareos. The bareos user is also created at this point. To get Bareos up and running, you will have to edit the following files in the configuration directory to access the Bareos management console: /etc/bareos/bareos-dir.conf, /etc/bareos/bareos-sd.conf, /etc/bareos/bareos-fd.conf, and /etc/bareos/bconsole.conf.
Configuring the Database
We talked about MariaDB servers in Chapter 11. We are now going to create a database on that host to house our catalog. Along the way, we’ll configure the MariaDB host to be backed up. First, we need to create the correct accounts and the database on our MariaDB host.
We will assume that the headoffice.example.com host has the MariaDB database server installed and that we are running our backups from backup.example.com. We can, of course, house this database on the one host, headoffice.example.com, if we didn’t have an extra host available to be the separate backup host. In that case, you should use localhost in the following examples where we have used backup.example.com. The other alternatives are to store a separate MariaDB database server (or PostgreSQL, if you want) on your backup host or to use a SQLite database on the backup host.
On the headoffice.example.com MariaDB host, we will create a new database for Bareos and grant access to the user bareos from our backup.example.com host. We will then make sure that our backup.example.com host can connect to port 3306 on headoffice.example.com by making a change to the firewall. While we do that, we will also make sure that our Bareos File daemon is installed on headoffice.example.com and that we have firewall access for TCP port 9103 on that host from backup.example.com.
We need to install the following packages on the host that will house the Bareos database; they contain the helper scripts that help manage the database:
$ sudo aptitude install –y bareo-database-common bareos-database-mysqlOf course, on CentOS, you would use the yum command.
On headoffice.example.com we will do the following:
$ sudo mysql –u root –pEnter Password:...mysql> CREATE DATABASE 'bareos';Query OK, 1 row affected (0.00 sec)mysql> GRANT ALL PRIVILEGES ON bareos.* to [email protected]IDENTIFIED BY 'somepassword';Query OK, 0 rows affected (0.00 sec)mysql> FLUSH PRIVILEGES;Query OK, 0 rows affected (0.00 sec)mysql> q;Bye
In the previous code, we have created a database called bareos. On that database, we have given the user bareos signing in from backup.example.com all privileges if they use the somepassword password. If you were setting this up for a localhost, you would change [email protected] to bareos@localhost. Finally, we use FLUSH PRIVILEGES, which reloads the grants table with all the recent changes.
On CentOS and Ubuntu hosts, there are scripts to create, drop, update, and back up your Bareos databases. You will find them in /usr/lib/bareos/scripts/.
To create the database tables for the Bareos database, we will run the following on the backup.example.com host:
$ sudo /usr/lib/bareos/scripts/create_bareos_databaseCreating mysql databaseCreating of bareos database succeeded.$ sudo /usr/lib/bareos/scripts/grant_bareos_privilegesGranting mysql tablesPrivileges for user bareos granted ON database bareos.
Running these scripts supplied by Bareos will create the necessary tables for our catalog and appropriate grants for the Bareos user.
We confirm that the database was created by running the following command from backup.example.com:
$ sudo –u bareos mysql –h headoffice.example.com –u bareos –p –D bareos–e 'show tables;'
This command connects to the MariaDB database running on the headoffice.example.com host using the Bareos username and password. -p prompts for a password, and -psomepassword is how you would submit the password on the command line (there is no space between –p and the password). Getting the output will do two things: confirm that our username and password are working correctly and that the scripts actually did create some tables.
Note
You can find additional information on using Bareos with MySQL and MariaDB at http://doc.bareos.org/master/html/bareos-manual-main-reference.html#x1-41100032.1.2 .
Other things to be aware of are that the /data/backups/bareos/FileStorage directory must exist, and it must also be writable by the Bareos user, as should the /var/log/bareos.log file.
Configuring Bareos
We’ll now examine the configuration files that need to be defined for your Bareos server. As mentioned earlier, there are three files for dealing with the Bareos server itself and one for the management console.
What we are going to do in these exercises is the following:
In the bareos-dir.conf file:
Configure the director with the correct name
Configure the default Linux backup job definition
Configure a backup job for the headoffice server
Configure the set of files to back up
Configure the schedule of the backup
Configure the client to back up
Add the Storage daemon configuration for the Director
Configure the pools
Configure the console
Configure the messages
In the bareos-sd.conf file:
Configure the storage daemon
In the bareos-fd.conf file:
Configure the client daemon
Before we configure anything in Bareos , we should explain the relationship these files have with each other. For the Bareos daemons to communicate with each other, they require the exchange of a set of passwords. Each Storage daemon (you can have more than one) and each File daemon (you will generally have more than one) must contain the name of the Bareos Director and the password it uses to verify itself. The password is set in two places for each daemon that wants to communicate with the Bareos Director.
Figure 14-9 shows the relationship between the configuration files and their common definitions.
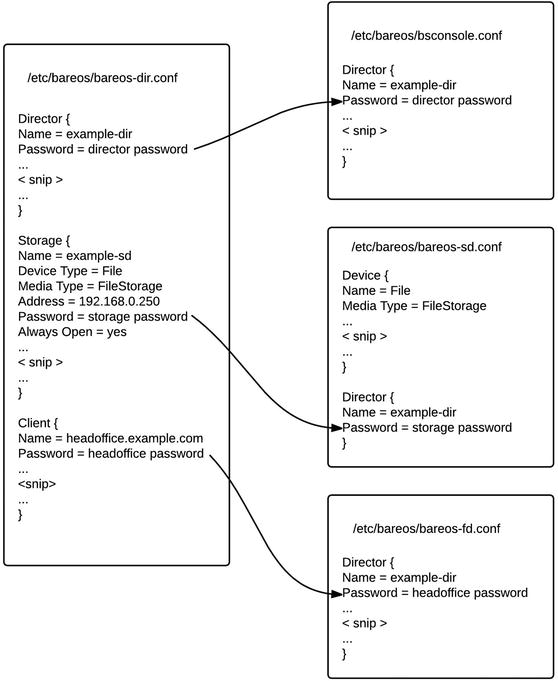
Figure 14-9. Bareos common configuration file definitions
As you can see in Figure 14-9, the Bareos /etc/bareos/bareos-dir.conf file for the Director will contain information for the Storage daemon, the Client daemon, and the bconsole program. You can also see that definitions of configuration objects, such as Storage, Pools, FileSets, and so forth, require the name of the object being configured and the definitions to be enclosed in curly brackets: {<definition = value>}. The definitions must be one per line.
You can also see in Figure 14-9 that in the Storage file, the Name and Media Type entries must match the Device Type and Media Type entries in the Device object definition in the Director file. The Director Name and Password in the Director object definition in the Storage file must match the storage password in the Storage section of the Director file.
When we define a client in our Director file , the password assigned to the client must be present in the File daemon configuration for that Director name. Also in Figure 13-2, you see that the bconsole program configuration file requires the name of the Director and the password for that Director before it will establish a connection.
Let’s start with the main file, the Director, at /etc/bareos/bareos-dir.conf.
bareos-dir.conf
The Director configuration file is the main file used by Bareos. In here, you define every aspect of the Bareos service: jobs, file sets, clients, schedules, pools, and so on. To paraphrase the Bareos documentation, the file set is what to back up, the client is who to back up, the schedule defines when, and the pool defines where (i.e., what volume). There are many parts to this configuration file, and it can be easy to get lost in how it relates to the other files, but we will try to guide you through it.
The Director {} section defines the directory itself.
Director { # define myselfName = backup-dirQueryFile = "/usr/lib/bareos/scripts/query.sql"Maximum Concurrent Jobs = 10Password = "uogx2tNL9dRUwGfNvY/b+uQrU8osZn+JOM7t8iIrpszN" # Console passwordMessages = DaemonAuditing = yes# Enable the Heartbeat if you experience connection losses# (eg. because of your router or firewall configuration).# Additionally the Heartbeat can be enabled in bareos-sd and bareos-fd.## Heartbeat Interval = 1m# remove comment in next line to load dynamic backends from specified directory# Backend Directory = /usr/lib64/bareos/backends# remove comment from "Plugin Directory" to load plugins from specified directory.# if "Plugin Names" is defined, only the specified plugins will be loaded,# otherwise all director plugins (*-dir.so) from the "Plugin Directory".## Plugin Directory = /usr/lib64/bareos/plugins# Plugin Names = ""}
When we install Bareos , a lot of our basic configuration is ready to go. The installation should configure the passwords automatically. Here we have changed the Name definition; the password was autogenerated. The rest of the entries are defaults and are fine. The Director port is sitting on 9101. The QueryFile directive points to /usr/lib/bareos/scripts/query.sql and is a SQL file that contains various “precanned” SQL statements that can be used to query the database from the console. You could add your own SQL queries to this script if you believe that Bareos console doesn’t have the information you are looking for.
JobDefs
A JobDefs section groups similar backup job requirements together. They are then referenced in one of the Job sections. For instance, to group the requirements for our web servers that define their FileSet, Schedule, and Storage media, we can create a JobDefs section for them, and mail servers can be defined in another. All the options that you use to define a Job can be put into the JobDefs section. The following creates a generic DefaultLinux job definition:
JobDefs {Name = "DefaultLinux"Type = BackupLevel = IncrementalClient = bareos-fdFileSet = "Linux”Schedule = "WeeklyCycle"Storage = FileMessages = StandardPool = IncrementalPriority = 10Write Bootstrap = "/var/lib/bareos/%c.bsr"Full Backup Pool = FullIncremental Backup Pool = Incremental}
The preceding code is taken from the provided /etc/bareos/bareos-dir.conf. All the definitions here can also be defined in the Job resource. First, we declare the JobDefs section between the curly brackets, {}. Next, we name the JobDefs as DefaultLinux.
The Type of job can be Backup, Restore, Verify, or Admin. The Backup job type performs a backup, the Restore type performs a restore, the Verify type compares the contents of the catalog to the file system you have just backed up, and the Admin type can be used to perform catalog maintenance, if required.
The Level of backup required is not really required, but it must be specified either here in the JobDefs or in the Schedule section. Any setting within the Schedule overrides the setting here.
The value for Level can be Full, Incremental, or Differential. The full backup takes a backup of all files in the specified FileSet regardless of their backup history. The incremental backup will back up files changed since the last full, differential, or incremental backup. The differential backup will do a very similar job as the incremental, but it will back up all files changed since the last full save. Let’s discuss that a little more.
Whenever a differential or incremental backup is performed, the Bareos File daemon clients will check the file list for modified file timestamps and changed file timestamps and compare them to the previous full backup . If the timestamps are different, then the files will be backed up by the incremental or differential backup process. However, what differentiates the differential from the incremental is that the differential backup merges all changed files into one backup since the last full backup. This means that although the backup may take up more space on your volumes (storage media), when you restore from the backups , you will need only the last full backup and the most recent differential backup. If you had been using incremental backups, you would need the last full backup plus each incremental since the last full backup. The other point we will make here is that if there is no full backup for this FileSet on this client for the retention time period, Bareos will upgrade your backup to a full backup automatically. We are going to leave Level = Incremental in this JobDefs.
The Client directive here is set to bareos-fd. This is overridden by the Client {} definition but is needed by the configuration file. The client bareos-fd resource has to exist in the configuration file; otherwise, an error will occur. We will leave this as is.
The FileSet = "Linux" directive defines the resource that describes the files we want to back up for our hosts. The FileSetwill be defined later in our Director configuration file. In the FileSet, you can include and exclude directories and file names or types. You can also define Linux, Microsoft Windows, or Mac files to be backed up or excluded. The default FileSet included here refers to a typical Linux file set, which will be seen shortly.
Next is the Schedule resource we are assigning to the JobDefs, which defines when we should run this type of job. The default definition for the WeeklyCycle included in Bareos is a simple monthly full backup with a differential once a week. It also runs a nightly incremental backup from Monday to Saturday. We will alter this so that it runs another full backup every third week; we will cover how to do this shortly.
In the default JobDefs, we can also see that the Storage resource has been defined as File. This points to the name of the storage device defined by Name = File. We just explained that this points to our Storage configuration file, and our backups will go to a portion of hard disk we have set aside for backups, /data/backups/FileStorage.
Messages = Standard refers to the Messages resource. Here, you can set the way your messages are handled. They can be either written to a log or sent to an e-mail address.
The Pool = Full definition points the job to a particular pool of volumes where they are backed up. As mentioned earlier, volumes are groups of storage media. You might have a group for your daily backups, a group for your weekly backups, and a group for your monthly backups. In this instance, we have defined a default group, Full, for our backups. We have, however, defined Full Backup Pool = Full and Incremental Backup Pool = Incremental to make sure that the full and incremental backups go to the right media.
Lastly in our JobDefs we have Priority = 10. This setting helps prioritize jobs; the lower the number, the higher the priority Bareos will give to the job. Some settings in the JobDefs can be overridden by definitions in other areas, like in the Job, Schedule, and Client definitions.
Jobs
Jobs define the actual backups that can occur. The most basic job must have a name, a client, a JobDefs name, and if it is enabled. If the job is enabled, it will be listed in the schedule.
Job {Name = "BackupCatalog"JobDefs = "DefaultJob"Level = FullFileSet="Catalog"Schedule = "WeeklyCycleAfterBackup"# This creates an ASCII copy of the catalog# Arguments to make_catalog_backup.pl are:# make_catalog_backup.pl <catalog-name>RunBeforeJob = "/usr/lib/bareos/scripts/make_catalog_backup.pl MyCatalog"# This deletes the copy of the catalogRunAfterJob = "/usr/lib/bareos/scripts/delete_catalog_backup"# This sends the bootstrap via mail for disaster recovery.# Should be sent to another system, please change recipient accordinglyWrite Bootstrap = "|/usr/bin/bsmtp -h localhost -f "(Bareos) " -s "Bootstrap for Job %j" root@localhost" # (#01)Priority = 11 # run after main backup}Job {Name = "RestoreFiles"Type = RestoreClient=au-mel-centos-1-fdFileSet = "Linux All"Storage = FilePool = IncrementalMessages = StandardWhere = /tmp/bareos-restores}Job {Name = headoffice.example.comClient = headoffice-fdEnabled = yesJobDefs = "DefaultLinux"}
The first two job definitions are standard in Bareos. We need the first job, named BackupCatalog, to back up our MariaDB database, which holds the catalog. The second job definition is used by restore jobs. These are both defaults in the current Bareos installation.
You can also see we have now described a new job. In the headoffice.example.com job, we have declared the Name and the Client (which we will define shortly), Enabled the job, and given it a JobDef. We have used JobDefs = "DefaultLinux" to define the other options we can use in our job.
The remaining items we need to address are FileSet, Pool, and Schedule, and we need to set a Client. Let’s look at the FileSet definition first.
FileSets
A FileSet describes what you want to back up on your hosts. You can declare as many as you like, and you can declare these file sets for Windows, Linux, and Mac hosts. We are going to create a new FileSet called Linux.
FileSet {Name = "Linux"Include {Options {Compression = GZIPSignature = SHA1}File = "/etc"File = "/var/lib" File = "/data" File = "/home"}Exclude {File = "/proc"File = "/sys"File = "/dev"File = “/run”File = “/tmp”File = "/data/backups/FileStorage"}}
In this FileSet we first define the Name. This can be used in the JobDefs or Job resource definition. As you can see, we can divide the FileSet into two parts: the Include section and the Exclude section. In the Include section, we have specified a couple of options: Compression and Signature. These settings allow our backup data to be compressed with the gzip program and define the signature of either SHA1 or MD5. If we were using a tape drive that did hardware compression on the data as it was written to tape, we would not use the software compression here. It also supports other compression formats like LZO, LZ4, and LZ4HC. The LZ formats tend to provide greater speed in compression/decompression but a smaller compression ratio. You can also choose your GZIP compression ratio with choosing between GZIP1 to GZIP9 (with GZIP9 being the best, and slowest, compression).
With the signature, you can use either SHA1 or MD5, but MD5 will add an extra overhead to each file saved in both data size and CPU time. The signature is stored in the catalog for use with verification of the file’s contents and if they have changed. SHA1 is recommended as it has less chance of collision and greater integrity than MD5.
Next we define the files we want to include in our backup. These are the /etc, /var/lib, /data, and /home directories. We chose /etc because it contains the main configuration files for our system, the /var/lib/ directory because some of our Samba and MariaDB data will be stored there, and the /data and /home directories because that is where our user data will be stored.
We are also excluding some directories (or at least making sure that they will not be backed up by mistake): /proc, /sys, /dev, and others. These directories are nonpermanent and change at every boot of the host, so there is no point in saving them. The /data/backups/FileStorage directory is being excluded because that is where we are backing up to. There is no point making backups of backups here—if we did, our backups would double in size with every backup.
It is also interesting to note that we are not backing up the whole system here; for example, we are not backing up /usr or /lib or /boot, which are important in full system restores. The reason behind this is that we are confident that we will be able to rebuild this host as fast or faster than we can restore it. This way we can reduce the size of our backups without increasing our risk of not being able to restore data if we need it. If you want to back up the whole Linux system, take a look at the Linux All file set instead.
Our file lists can also be kept in a separate file that we include into the FileSet with the @ symbol. For example, say we have a Windows list like the following that we have saved to a file called /etc/bareos/windows.list:
File = "C:/"File = "D:/"
In our FileSet we would include that file list like so:
FileSet {Name = "Windows All Drives"Enable VSS = yesInclude {Options {Signature = MD5Drive Type = fixedIgnoreCase = yesWildFile = "[A-Z]:/pagefile.sys"WildDir = "[A-Z]:/RECYCLER"WildDir = "[A-Z]:/$RECYCLE.BIN"WildDir = "[A-Z]:/System Volume Information"WildDir = "*/Cache/*"WildDir = "*/cache/*"Exclude = yes}@/etc/bareos/windows.list}}
Here we have included the C: and D: drives on our Windows host via the @/etc/bareos/windows.list file. We are using the SHA1 signature for our catalog. We are also excluding some unwanted directories using the [A-Z] regular expression to handle any drive letter between A and Z. We don’t want any temp or cache directories, as these tend to hold lots of data that doesn’t require backing up and can be quite large.
FileSet {Name = "Catalog"Include {Options {signature = MD5}File = "/var/lib/bareos/bareos.sql" # database dumpFile = "/etc/bareos" # configuration}}
This last FileSet has been defined in the BackupCatalog resource job.
Schedules
Next, we have the Schedule resources. A Schedule defines when a job should run. We can also describe the level of our backup (if it is declared in the schedule, it overrides the setting in the Job or JobDefs resource). For the WeeklyCycle we are using, we need to change it slightly from the default. We want to take a full backup of our data bimonthly, so we change the Schedule to look like this:
Schedule {Name = "WeeklyCycle"Run = Full 1st 3rd sun at 23:05Run = Differential 2nd 4th 5th sun at 23:05Run = Incremental mon-sat at 23:05}Schedule {Name = "WeeklyCycleAfterBackup"Run = Full sun-sat at 23:10}
As described in the Schedule named WeeklyCycle, we are running a full backup on the first and third Sundays of every month. We run a differential every second, fourth, and fifth Sunday, with an incremental nightly between Monday and Saturday. These date-time specifications are made up of several well-defined keywords, and it is easy to create complex schedules if you want.
Note
You can read more about the terms you can use in the Scheduleresource documentation at http://doc.bareos.org/master/html/bareos-manual-main-reference.html#x1-1300009.4 .
Clients
Before we can run any backups, we need to create the Client resource. We do that by providing an Address, a Name, and a Password. The Name in the Client definition will match the Client defined in the Job resource. The Password must match the password defined in the File daemon configuration file (bareos-fd.conf) Director resource. The Address can be the fully qualified domain name or the IP address. Our Client resource will look like the following:
Client {Name = headoffice-fdAddress = headoffice.example.comPassword = "6rZQQqVsOJeeTPefrG2AslT5ODxtPWO1hNsd7Re1u6J/"}
Storage
Let’s now configure the Storage definition. Again, this will be within the Storage {} section of the bareos-dir.conf file. We will use this information in the bareos-sd.conf file soon.
Storage {Name = File# Do not use "localhost" hereAddress = backup.example.comPassword = "4ncvx7V+Mw4NOMDMyuYjCHsNg1nKgcdh8nl0szWpi6t4"Device = FileStorageMedia Type = File}
This is the default configuration for the Storage section. We have changed only the Address details, the password being created during the installation process. In Figure 14-9, you saw that the Name, Password, Device, and Media Type details should also be in the /etc/bareos/bareos-sd.conf file.
Catalog
Next, we should add these details to the Bareos Director configuration file. The configuration for the catalog will begin with the Catalog definition.
Catalog {Name = MyCatalog# Uncomment the following lines if you want the dbi driver# dbdriver = "dbi:postgresql"; dbaddress = 127.0.0.1; dbport =#dbdriver = "postgresql"dbdriver = "mysql"dbname = "bareos"dbuser = "bareos"dbpassword = "somepassword"dbaddress = headoffice.example.com}
The Name can be anything, and we will stick with the default MyCatalog. By default Bareos will use the PostgreSQL driver and database. Here we are specifying the dbdriver mysql for the MariaDB database we are using. The dbname should be bareos, as should the user. The dbpassword is the password we created previously. The dbaddress should be the address of the host the Catalog is on.
Pools
Pools, as described earlier, are media volumes that are grouped together to reflect their purpose. You could have pools of media in groups like monthly, weekly, daily, or archive, or even by things like web servers, database servers, and so forth. In the Pool definition, you specify things like retention policies, labeling formatting, and so on. We are using our hard disk as our storage device, so we won’t have any physically different media to load in or rotate out like you do with tape media. Our main interest here will be retention or how long we hold the data for before we wipe it.
In our Pool definition we have made the following changes to the default:
Pool {Name = FullPool Type = BackupRecycle = yesRecycle Oldest Volume = YesAutoPrune = yesVolume Retention = 365 daysMaximum Volume Bytes = 50GMaximum Volumes = 100Label Format = "Full-${Year}-${Month:p/2/0/r}-${Day:p/2/0/r}"}Pool {Name = DifferentialPool Type = BackupRecycle = yesRecycle Oldest Volume = YesAutoPrune = yesVolume Retention = 90 daysMaximum Volume Bytes = 10GMaximum Volumes = 100Label Format = "Differential-${Year}-${Month:p/2/0/r}-${Day:p/2/0/r}"}Pool {Name = IncrementalPool Type = BackupRecycle = yesRecycle Oldest Volume = YesAutoPrune = yesVolume Retention = 30 daysMaximum Volume Bytes = 1GMaximum Volumes = 100Label Format = "Incremental-${Year}-${Month:p/2/0/r}-${Day:p/2/0/r}"}
The Name of the Poolwill be used to reference the Pool in other resource definitions. Each has the Pool Type of Backup, which is currently the only available type, according to the Bareos documentation. We have set two different Maximum Volume Bytes, one at 50GB, 10GB, and one at 1GB. This will roll over the volume to the next available volume (or Bareos will create a new volume for us) when the volumes reach those size limits. This means that we will have small files to deal with, rather than one huge file containing all our backup data.
Note
With tape media, you probably won’t set the Maximum Volume Bytes limit, as in general you will want the tape to hold as much as its capacity. If a volume is created with this limit, it will remain at that limit regardless of the setting in the Pool resource. You will have to update the volume itself to change this limit using the Bareos console.
In our Pool definition we have also set AutoPrune = Yes, which enables Bareos to delete backup details from the catalog once the Volume Retention period has expired. There are times when you would not want this to occur. For example, with archive backups—that is, when you want to keep your data for as long as possible—you will not want the records of those backups to be deleted from the catalog. In this case, you would set AutoPrune to No, just to be safe.
Caution
Even if you have set your Pool to AutoPrune = No and Volume Retention = 10 years, your backup data will last only as long as the data on the tape or the disks lasts. Overwriting the data or corruption of the data will make restoring the data impossible, regardless of what the Bareos catalog says.
Volume Retention tells Bareos how long it should consider the data on the volume as current. We have set our pools to different values: we want to keep the data in our full volumes for 12 months and 90 days for differentials and our incremental volumes for 30 days. You may want to consider longer retention periods. After this retention period has expired, Bareos considers the volume data to have expired and that data can be overwritten.
Setting Recycle = Yes in our Pool definition means that once the data on the volume is considered expired, that volume will become available again to the general pool, to be used for writing again. Setting Recycle Oldest Volume = Yes means the oldest volume will be used before any other volume when more than one volume is available. This has the obvious advantage of destroying any existing data on those volumes at the latest possible time, so you will still be able to restore from those volumes up until that time.
Last in our Pool resource is the Label definition. Bareos gives a name or label to volumes based on this format. Tapes from autoloaders with barcode labels are not automatically read into Bareos and need to be manually labeled when you add a new tape. In the case of tape media, a small section of data is written to the start of the tape, giving it the label name for that volume. Once a tape is labeled, Bareos will always know which tape is inserted into the tape unit. We are using "Full-" and "Incremental-" and adding the suffix "${Year}-${Month:p/2/0/ r}-${Day:p/2/0/r}" to produce a labeled volume like Full-2016-01-01. For full details on the variable expansions available with Bareos , please visit http://doc.bareos.org/master/html/bareos-manual-main-reference.html#x1-1190008.3.3 .
Note
For a discussion on backup strategies in relation to managing your tapes and rotations using Bareos , go to http://doc.bareos.org/master/html/bareos-manual-main-reference.html#x1-23200019 .
Console
The Console service gives the Director the ability to poll the File or Storage daemons and report on their status. This ability is verified by the password provided and requires the name of the Bareos service allowed to monitor it. In the Director configuration file, we have the following:
Console {Name = example-monPassword = "tcqT4bG9NLl11YoZ5GXFLrcb8o9mSuM2U4rxl7mgH8eD"CommandACL = status, .statusJobACL = *all*}
Messaging
The messaging service is defined in the Director configuration and is a way for all communications from Bareos to be sent via the Director and not from the individual clients. When an incident occurs or a job completes, the messages are sent to the standard messaging service configured in the Director. The resource named Standard is defined in the Messages section and looks like the following:
Messages {Name = Standardmailcommand = "/usr/bin/bsmtp -h localhost -f "(Bareos) <%r>" -s "Bareos: %t %e of %c %l" %r"operatorcommand = "/usr/bin/bsmtp -h localhost -f "(Bareos) <%r>" -s "Bareos: Intervention needed for %j" %r"mail = [email protected] = all, !skipped, !audit # (#02)operator = [email protected] = mount # (#03)console = all, !skipped, !saved, !auditappend = "/var/log/bareos/bareos.log" = all, !skipped, !auditcatalog = all, !audit}## Message delivery for daemon messages (no job).#Messages {Name = Daemonmailcommand = "/usr/bin/bsmtp -h localhost -f "(Bareos) <%r>" -s "Bareos daemon message" %r"mail = [email protected] = all, !skipped, !audit # (#02)console = all, !skipped, !saved, !auditappend = "/var/log/bareos/bareos.log" = all, !skipped, !auditappend = "/var/log/bareos/bareos-audit.log" = audit}
Bareos uses the mailcommand and operatorcommand commands to send e-mail messages indicating the status of Bareos, either alerts or completion messages. It uses its own mailer binary, bsmtp, to send messages to the appropriate addresses. –f sets the From header, and -s sets the Subject header of the e-mail. You need to change the mail and operator settings to suit your environment by setting the e-mail address to the person responsible for administering the Bareos server (in our case, [email protected]). You can set operator type messages, such as “Please mount tape,” to a different e-mail address compared to success/failure messages defined in the mail definition. We have also added the –h mail.example.com setting, which points to our mail server for the mailcommand and operatorcommand commands. For more information, see the following documentation: http://doc.bareos.org/master/html/bareos-manual-main-reference.html#x1-16500012 .
In the next section, we’ll look at the file we are going to configure to describe our Storage daemon.
bareos-sd.conf
Bareos stores the configuration details for the Storage daemon in the /etc/bareos/bareos-sd. conf file. The Storage configuration file that is supplied by Bareos has many examples of different ways to configure your devices. You should use the file as a guide to setting up different types of storage devices. In our Storage file we have the following:
Storage { # definition of myselfName = example-sdMaximum Concurrent Jobs = 20# remove comment from "Plugin Directory" to load plugins from specified directory.# if "Plugin Names" is defined, only the specified plugins will be loaded,# otherwise all storage plugins (*-sd.so) from the "Plugin Directory".## Plugin Directory = /usr/lib64/bareos/plugins# Plugin Names = ""}## List Directors who are permitted to contact Storage daemon#Director {Name = example-dirPassword = "4ncvx7V+Mw4NOMDMyuYjCHsNg1nKgcdh8nl0szWpi6t4"}
In the file /etc/bareos/bareos-sd.conf, we have defined the Name of our Storage daemon, example-sd. We could have other storage daemons on our network, so this name must be unique. The Director section defines the name of our Bareos Director and the storage password that was defined in /etc/bareos/bareos-dir.conf and was automatically also created here by the installation process.
Director {Name = example-monPassword = "/H9QQD9YJOcd9jTnX1w/aFMMghxFuHmPYuJv882Sk54F"Monitor = yes}Messages {Name = Standarddirector = example-dir = all}
The Monitor, or Console, section in bareos-dir.conf defines the resource Director { ... Name = example-mon ... }. This is used to monitor the resource and allows the Director to get the status of the Storage daemon. It requires that the password be declared in the Director configuration as well as here. Again, that password was generated during installation.
The messages resource allows the Storage daemon to send informational messages via the Bareos Director daemon.
In the Device section, the Name matches the Device in the Storage section of the Director configuration file. Media Type = FileStorage matches in both the Director and Storage configuration files.
Device {Name = FileStorageMedia Type = FileArchive Device = /data/backups/FileStorageLabelMedia = yes;Random Access = Yes;AutomaticMount = yes;RemovableMedia = no;AlwaysOpen = no;}
Here we have defined the device that our backups will be stored on. We don’t have any tape drives or autoloaders, so this will be a simple disk-based storage setup. We define where on our host the backup files will be stored. In this instance, we are going to store them in the /data/backups/FileStorage directory. Most of the other options are not really relevant when talking about backing up to the filesystem, and we’ve left the other options at their defaults.
Also, it is worth noting that the Plugin Names = "" directive is where you can load any particular plug-in that you might like to use. There are file daemon plug-ins and storage daemon plug-ins. File daemon plug-ins concern themselves mainly with how to back up things from, and storage deals with how to back up things to.
Note
You can read more on the configuration of the Storage daemon at http://doc.bareos.org/master/html/bareos-manual-main-reference.html#x1-15000010 .
bareos-fd.conf
The last thing we have to do before we can take a backup is to install the bareos-fd software on our headoffice.example.com host. CentOS and Ubuntu hosts require bareos-common and bareos-client, which will download any dependencies we may also need. Once these are installed, we will edit the /etc/bareos/bareos-fd.conf file and add the following information:
Director {FileDaemon { # definition of myselfName = headoffice-fdWorkingDirectory = /var/lib/bareosMaximum Concurrent Jobs = 20# remove comment from "Plugin Directory" to load plugins from specified directory.# if "Plugin Names" is defined, only the specified plugins will be loaded,# otherwise all storage plugins (*-fd.so) from the "Plugin Directory".## Plugin Directory = /usr/lib64/bareos/plugins# Plugin Names = ""# if compatible is set to yes, we are compatible with bacula# if set to no, new bareos features are enabled which is the default# compatible = yes}## List Directors who are permitted to contact this File daemon#Director {Name = example-dirPassword = "6rZQQqVsOJeeTPefrG2AslT5ODxtPWO1hNsd7Re1u6J/"}## Restricted Director, used by tray-monitor to get the# status of the file daemon#Director {Name = example-monPassword = "WOhEm9JC+uBvpNBJta1RuA7NJSmUgQrz3QPRgPYhRzyZ"Monitor = yes}# Send all messages except skipped files back to DirectorMessages {Name = Standarddirector = example-dir = all, !skipped, !restored}
In the File daemon configuration script, we declare the Director {} stanza for connecting to the Bareos Director daemon. That requires the Name of the Director we are connecting to and the Password we have defined in the Client resource for headoffice-fd. The FileDaemon defines primarily the Name and Maximum Concurrent Jobs settings. The Name setting must match the Name in the Client resource in the bareos-dir.conf file. Maximum Concurrent Jobs defines the number of jobs that can connect to this host at any one time.
The Director and Messages sections are the same as described in the Storage file. They are used to allow the Director to get the status of the File daemon and define where to send messages if there is an error.
Testing the Syntax
We can now test the syntax of our bareos-dir.conf configuration file by issuing the following command:
$ sudo /usr/sbin/bareos-dir -t -c /etc/bareos/bareos-dir.confFor the File and Storage daemons, we would issue this command:
$ sudo /usr/sbin/bareos-fd -t -c /etc/bareos/bareos-fd.confor this one:
$ sudo /usr/sbin/bareos-sd -t -c /etc/bareos/bareos-sd.confIf neither command returns an error, then each has a syntactically correct configuration, and we can enable and start our service using systemctl. Great! They’re running, aren’t they? You’re right—how can we tell? We can use the status argument to see whether they are running.
$ sudo systemctl enable bareos-dir bareos-sd bareos-fd$ sudo systemctl start bareos-dir bareos-sd bareos-fd$ sudo systemctl status bareos-dir bareos-sd bareos-fd
bconsole.conf
We now have to set up the console so we can administer and monitor the backup service. The file that holds the configuration for our bconsole is called /etc/bareos/bconsole.conf.
Several consoles are available, and depending on your own preferences, you can set up either a GUI or a screen-based console. We’ll first set up the screen-based console, and then we’ll set up the Web-UI console later in the chapter. In the /etc/bareos/bconsole.conf file, we define the following:
Director {Name = example-dirDIRport = 9101Address = backup.example.comPassword = "uogx2tNL9dRUwGfNvY/b+uQrU8osZn+JOM7t8iIrpszN"}
This has the same details (Name, port, Address, and Password) as the Directory resource in the bareos-dir.conf configuration file. Again, the password was created and installed during the installation process.
Managing Bareos with bconsole
After you configure Bareos, you can start the services by using the systemctl command, like we just did previously. We can now start the Bareos console program using the bconsole command like so:
$ sudo /usr/sbin/bconsoleFirst, we can list the current status of the Director by issuing the status all command. Issuing this command gives a detailed list of what is happening on the Bareos Director, including the attached Storage daemons and File daemons.
To find out what the Director itself is doing, we use the stat dir command. This command gives an overview of the pending jobs, the current running jobs, and the jobs that have been completed. We access the console by issuing the following command:
$ sudo /usr/sbin/bconsoleConnecting to Director backup.example.com:91011000 OK: example-dir Version: 15.2.2 (16 November 2015)Enter a period to cancel a command.* stat direxample-dir Version: 15.2.2 (16 November 2015) x86_64-redhat-linux-gnu redhat CentOS Linux release 7.0.1406 (Core)Daemon started 10-Oct-16 00:56. Jobs: run=0, running=0 mode=0 db=mysqlHeap: heap=274,432 smbytes=86,156 max_bytes=86,156 bufs=321 max_bufs=322Scheduled Jobs:Level Type Pri Scheduled Name Volume=================================================================================Incremental Backup 10 10-Oct-16 23:05 headoffice.example.com *unknown*Full Backup 11 10-Oct-16 23:10 BackupCatalog *unknown*Running Jobs:Console connected at 10-Oct-16 00:57No Jobs running.====No Terminated Jobs.====*
As you can see, we have no jobs completed and no jobs currently running. We have two jobs scheduled to run on October 11 at 23:05, one that backs up headoffice.example.com and one that backs up the catalog (BackupCatalog). Take some time to explore bconsolea little more. For example, type help and then press Enter to see a list of commands available to you on the command line. Table 14-4 lists the most useful commands.
Table 14-4. Useful Bareos bconsole Commands
Command | Description |
|---|---|
run | Starts a job (a backup) |
cancel | Cancels the current job |
mess | Shows any current messages |
restore | Manages restore jobs |
label | Labels a tape or media volume |
update volume | Allows you to update the properties of any particular volume |
stat dir | Gets the current status of the Director daemon |
stat client | Gets the current status of a File daemon |
stat storage | Gets the current status of the Storage daemon |
mount | Mounts a volume (e.g., loads a media volume into a tape drive) |
unmount | Unmounts a media volume (e.g., unloads the tape from a drive) |
Note
Another resource for useful commands is in the Bareos documentation at http://doc.bareos.org/master/html/bareos-manual-main-reference.html#x1-18400015 .
You can run a job or a backup in two ways. One is to use the run command and press Enter. You are then presented with an easy-to-understand menu-driven way to submit your backup. The other is to place the commands directly on the command line like this:
* run job=headoffice.example.com level=full priority=7 yesWhen we run the * stat dir command, we can see that our job is running.
Running Jobs:Console connected at 10-Oct-16 01:21JobId Level Name Status============================================================1 Full headoffice.example.com.2016-10-10_01.21.34_04 is running====
From that status you can see that we have a job ID of 1 and that we are running a full backup, since we do not have a full backup yet. Bareos will automatic start a full backup if it does not exist yet. A new volume has been created, and the backup is restoring to it. If you type mess at the command line, you will receive any messages that are available about your job.
Now if we wanted to stop this job, we would use the cancel command with JobId 1 as an argument. You can see in the previous Running Jobs output the JobId to use.
*cancel jobid=1The cancel command can be run without arguments and will automatically select the JobId for you (if only one job is running; otherwise, it presents a list to choose from). We have run the job again, this time without canceling it, and it has completed. When we do a stat dir in the Terminated Jobs section, we find the following:
Terminated Jobs:JobId Level Files Bytes Status Finished Name==================================================================2 Full 8,908 140.1 M OK 10-Oct-16 01:21 headoffice.example.com
The preceding output shows that we have a full save of the Linux FileSet for the host headoffice.example.com. You can see the number of files it holds and the data volume. Let’s try to restore the /etc/hosts file using the restore command.
* restoreTo select the JobIds, you have the following choices:1: List last 20 Jobs run2: List Jobs where a given File is saved3: Enter list of comma separated JobIds to select
The list of options to use here actually goes to 12, but we will use option 2 to find out the JobId (which we already know from the Terminated Jobs output to be 4).
Select item: (1-12): 2Automatically selected Client: headoffice-fdEnter Filename (no path):hosts+-------+------------+---------------------+---------+-----------+----------+-------------+| JobId | Name | StartTime | JobType | JobStatus | JobFiles | JobBytes |+-------+------------+---------------------+---------+-----------+----------+-------------+| 2 | /etc/hosts | 2016-10-10 01:21:36 | B | T | 8908 | 140144767 |+-------+------------+---------------------+---------+-----------+----------+-------------+
Now that we know our JobId, we would then use option 3 to restore our hosts file, as follows:
Select item: (1-12): 3Enter JobId(s), comma separated, to restore: 4You have selected the following JobId: 4Building directory tree for JobId 4 ... ++++++++++++++++++++++++++++++++++++1 Job, 1,174 files inserted into the tree. cwd is: /$ cd /etccwd is: /etc/$ mark hosts1 file marked.$ doneBootstrap records written to /var/lib/bareos/example-dir.restore.1.bsrThe job will require the followingVolume(s) Storage(s) SD Device(s)===========================================================================Full-0001 File FileStorageVolumes marked with "*" are online.1 file selected to be restored.Run Restore jobJobName: RestoreFilesBootstrap: /var/lib/bareos/example-dir.restore.1.bsrWhere: /tmp/bareos-restoresReplace: AlwaysFileSet: Linux AllBackup Client: headoffice-fdRestore Client: headoffice-fdFormat: NativeStorage: FileWhen: 2016-10-10 01:32:35Catalog: MyCatalogPriority: 10Plugin Options: *None*OK to run? (yes/mod/no): yesJob queued. JobId=4
When selecting the files you want to restore, you can use the ls and cd commands to list and change directories as you search for the files .
cwd is: /$ cd /etccwd is: /etc/$ mark hosts1 file marked.$ done
Here we have used the mark command to select the file we want to restore after using the cd command to navigate through the backed-up file system. To select everything recursively in a directory, you can use the mark * command. When you are finished selecting the files you want to restore, use the done command.
You are given a list of the media volumes required to perform this restore. You will have to load them if they are not already available to your backup host. Then you are given the rundown of the restore job you are going to run. Make a note of Where: /tmp/bareos-restores, as this is where your restored file will be found.
Looking at stat dir and the Terminated Jobs section, a complete restore will look like this:
JobId Level Files Bytes Status Finished Name==========================================================================4 1 403 OK 10-Oct-16 01:32 RestoreFiles
Now we can check that the file has been restored to the /tmp/bareos-restores directory.
$ $ sudo ls -l /tmp/bareos-restores/etc/total 4-rw-r--r--. 1 root root 403 Oct 10 00:53 hosts
We could always use the restore command to restore to a different host and a different destination by changing the Client and Where options before we confirm that we want to run the restore job.
Using GlusterFS for Backup Storage
We are going to quickly go through how to set up your Bareos server to use the GlusterFS storage as our backup device. As you can remember, GlusterFS provides us with reliable and expandable storage options on commodity hardware and can be a great option for safely keeping backups on disk. In this section, we are going to do the following:
Create a new backup volume in GlusterFS and update our GlusterFS configuration
Add a new record to our DNS server
Mount volume and setup directories
Configure Bareos storage
Bareos can talk directly to the Gluster daemon via the libgfapi provided by the bareos-storage-glusterfs package. This means we don’t FUSE mount the Gluster volume but allow Bareos direct access to the daemon.
Creating Backup Gluster Volume
Like in Chapter 13, to create a new volume on our GlusterFS cluster, we first need to add our new devices (disks) and format and mount them. Once we have done that, we then need to create the new volume with those new bricks.
We will assume that we have added our new disks to our Gluster servers. We can execute the following:
$ sudo mkfs.xfs -f -L brick3_r1 /dev/sdf &&sudo mkdir -p /data/brick3_r1 &&sudo bash -c 'echo LABEL=brick3_r1 /data/brick3_r1 xfs defaults 1 2 >> /etc/fstab' &&sudo mount –a &&sudo mkdir /data/brick3_r1/backups
We have seen this command previously, and we are formatting the disks, making the directories where we will mount the devices, adding the disks to automount in our fstab, mounting the device, and finally creating a backup directory on the mounted disk. We have done this on all our three servers, and now we are ready to create our GlusterFS volume.
$ sudo gluster volume create backups replica 3au-mel-dfs-1:/data/brick3_r1/backupsau-mel-dfs-2:/data/brick3_r1/backupsau-mel-dfs-3:/data/brick3_r1/backups
We now start the volume.
$ sudo gluster volume start backupsOur volume is now ready to be mounted, but first we need to make some changes to our Gluster configuration to allow the Bareos server to directly contact our glusterd daemons. To do that, we need to do the following.
First we need to edit the /etc/glusterfs/glusterd.vol file and add the following on each Gluster server:
volume managementtype mgmt/glusterdoption working-directory /var/lib/glusterd...<snip>...option rpc-auth-allow-insecure onend-volume
We will need to restart the glusterd service after making this change. This change allows unprivileged connections from our backup server. We are going to also make this change to the Gluster backup volume only.
$ gluster volume set backups server.allow-insecure onThis need to be executed on only one of the Gluster peers. We are now ready to move on to the next step.
Update DNS Records
We are going to use a single hostname to contact our GlusterFS service. We are going to call this storage.example.com, and we need to create a series of A records to respond.
We need to be on our DNS server, and we are going to issue the following:
$ sudo nsupdate -k /etc/bind/ddns_update.key> server localhost> update add storage.example.com 360 A 192.168.0.240> update add storage.example.com 360 A 192.168.0.241> update add storage.example.com 360 A 192.168.0.242> send> quit
Using dig, we can see that our DNS returns the correct records:
$ dig @localhost storage.example.com....;; ANSWER SECTION:storage.example.com. 360 IN A 192.168.0.242storage.example.com. 360 IN A 192.168.0.240storage.example.com. 360 IN A 192.168.0.241
Now when we query storage.example.com, we will receive one of these IP addresses in a round-robin fashion.
Preparing the Bareos Server
Now it is time to prepare the Bareos server. On backup.example.com we are going to mount the Gluster volume, create the storage directory, and set the ownership of that directory.
We will need to mount the Gluster volume via the FUSE package. We are going to make sure that the package glusterfs-fuse is installed on our CentOS backup server. Once it is, we are going to mount our volume.
$ sudo mount –t glusterfs storage.example.com:/backups /mntNow that we have mounted our Gluster volume, we are going to create a directory and change the ownership. We first get the UID and GID of our bareos user. We can do that by issuing the following:
$ id bareosuid=899(bareos) gid=986(bareos) groups=986(bareos),6(disk),30(tape)
Now we will create the directory and then change the ownership and mode of the directory.
$ sudo mkdir /mnt/FileStore &&sudo chown 899:986 /mnt/FileStore &&sudo chmod 2770 /mnt/FileStore
We can now unmount the directory.
$ sudo umount /mntNow we need to change the /etc/bareos/bareos-dir.conf and /etc/bareos/bareos-sd.d/device-gluster.conf files. Let’s begin with the latter.
/etc/bareos/bareos-sd.d/device-gluster.confDevice {Name = GlusterStorageArchive Device = "Gluster Device"Device Options = "uri=gluster://storage.example.com/backups/FileStore"Device Type = gfapiMedia Type = GlusterFileLabel Media = yesRandom Access = yesAutomatic Mount = yesRemovable Media = noAlways Open = no}
Once this is done, we can change bareos-dir.conf. Let’s do that now.
/etc/bareos/bareos-dir.confStorage {Name = GlusterAddress = backup.example.com # N.B. Use a fully qualified name herePassword = "4ncvx7V+Mw4NOMDMyuYjCHsNg1nKgcdh8nl0szWpi6t4"Device = GlusterStorageMedia Type = GlusterFileMaximum Concurrent Jobs = 10}
This maps the directory storage to the device storage file. We are now going to change the JobDefs named DefaultLinux for the Storage option.
JobDefs {Name = "DefaultLinux"Type = Backup...<snip> ...Storage = Gluster...<snip>...}
Lastly we need to tell the Storage daemon to load in our Gluster device. We need to remove the # from the following line:
/etc/bareos/bareos-sd.conf...<snip>...@/etc/bareos/bareos-sd.d/device-gluster.conf...<snip>...
We now need to reload our configuration so that the Bareos Storage daemon will add in the device-gluster.conf file. Using bconsole, we can issue the reload command, or we can restart using the normal systemctl commands. We are now ready to back up to our GlusterFS servers.
From bconsole we will issue the following command to see that we have everything ready for our backups to Gluster:
*status Storage=Gluster... <snip>...====Device status:Device "GlusterStorage" (Gluster Device) is not open.==...<snip>...
We are ready to do our backups now. Let’s test with our database backups in the next section.
Backing Up Databases with Bareos Plug-Ins
We now want to show you a more advanced scenario. We have a MariaDB database running on our headoffice.example.com host. Currently it holds our Bareos catalog database, but it could also contain the WordPress database that we created in Chapter 11 or any other databases we use.
As we have mentioned, you can install Bareos plug-ins on your Storage and File daemons to do special tasks. We are going to install a Python plug-in on the database server so the File daemon can back up the MariaDB database for us. This plug-in will make use of the mysqldump and mysql commands to make a database backup, consisting of a file for each database found.
The plug-in we are going to use can be found here:
We are going to install it in /usr/lib64/bareos/plugins and then make a configuration change to update our bareos-fd.conf file. To do that, we going to copy two files from the GitHub repository with the curl command.
# curl -s https://raw.githubusercontent.com/bareos/bareos-contrib/master/fd-plugins/mysql-python/BareosFdMySQLclass.py-o /usr/lib64/bareos/plugins/BareosFdMySQLclass.py# curl -s https://raw.githubusercontent.com/bareos/bareos-contrib/master/fd-plugins/mysql-python/bareos-fd-mysql.py-o /usr/lib64/bareos/plugins/bareos-fd-mysql.py
These two files have been copied via curl into the plugins directory as the root user. Now we have to configure the /etc/bareos/bareos-fd.conf file on the headoffice.example.com server where the database lives.
FileDaemon { # definition of myselfName = headoffice-fdMaximum Concurrent Jobs = 20# remove comment from "Plugin Directory" to load plugins from specified directory.# if "Plugin Names" is defined, only the specified plugins will be loaded,# otherwise all storage plugins (*-fd.so) from the "Plugin Directory".#Plugin Directory = /usr/lib64/bareos/pluginsPlugin Names = "bareos-fd-mysql.py"...}
You will need to restart the File daemon on the headoffice.example.com server. Now we are going to change the Director configuration and create a new FileSet for the database server.
FileSet {Name = "DBLinux"Include {Options {Compression = GZIPSignature = SHA1}File = "/etc"File = "/var/lib" File = "/data" File = "/home"Plugin = "python:module_path=/usr/lib64/bareos/plugins:module_name=bareos-fd-mysql"}Exclude {File = "/proc"File = "/sys"File = "/dev"File = "/run"File = "/tmp"File = "/data/backups"}}
We are going to create a new JobDefs for headoffice.example.com also.
JobDefs {Name = "DBLinux"Type = BackupLevel = IncrementalClient = headoffice-fdFileSet = "DBLinux"Schedule = "WeeklyCycle"Storage = GlusterMessages = StandardPool = IncrementalPriority = 10Write Bootstrap = "/var/lib/bareos/%c.bsr"Full Backup Pool = FullIncremental Backup Pool = Incremental}
We have created a new JobDefs and added the DBLinux FileSet for the database server. We can change other defaults for the job as we require, like schedules or storage. Lastly we need to change the job for the database server.
Job {Name = headoffice.example.comClient = headoffice-fdEnabled = yesJobDefs = "DBLinux"}
We need to reload or restart the Director service before this becomes active. Let’s try to run our backup for headoffice.example.com.
* run job=headoffice.example.com client=headoffice-fdAutomatically selected Catalog: MyCatalogUsing Catalog "MyCatalog"Run Backup jobJobName: headoffice.example.comLevel: IncrementalClient: headoffice-fdFormat: NativeFileSet: DBLinuxPool: Incremental (From Job IncPool override)Storage: Gluster (From Job resource)When: 2016-10-11 22:29:37Priority: 10OK to run? (yes/mod/no): yesJob queued. JobId=15
Here you can see our job being scheduled and run with the DBLinux FileSet. As this job runs, we can follow it in /var/log/bareos/bareos.log, and we can see the databases being backed up here:
11-Oct 22:29 example-sd JobId 15: Ready to append to end of Volume "Full-0004" size=14592691711-Oct 22:29 headoffice-fd JobId 15: /var/lib/nfs/rpc_pipefs is a different filesystem. Will not descend from /var/lib into it.11-Oct 22:29 headoffice-fd JobId 15: Starting backup of /_mysqlbackups_/test.sql11-Oct 22:29 headoffice-fd JobId 15: Starting backup of /_mysqlbackups_/mysql.sql11-Oct 22:29 headoffice-fd JobId 15: Starting backup of /_mysqlbackups_/bareos.sql11-Oct 22:29 example-sd JobId 15: Elapsed time=00:00:08, Transfer rate=18.22 M Bytes/second
When we issue the restore command in bconsole and select the jobid for the last restore, we can see the backups of our database files.
cwd is: /$ cd _mysqlbackups_/cwd is: /_mysqlbackups_/$ lsbareos.sqlmysql.sqltest.sql$ mark bareos.sql1 file marked.$ done
The contents of the bareos.sql file when restored contain the full backup of our bareos database.
Caution
Make sure you have enough space on your host to handle the size of your database dump—you could find yourself in trouble if you run out of room. It is a good idea to dump this file into a separate partition so that if you do run out of space, it does not impact other processes on your host.
Bareos also provides two instructions in the Jobresource that we can take advantage of when running complex jobs: Client Run Before Job and Client Run After Job. As their names imply, these instructions can be used to run scripts on the target host. Client Run Before Job will execute the command or script on the target host and require a successful completion before it continues. If it does not succeed, the job will terminate and produce an error message. Client Run After Job also requires a successful completion of the script or command on the target host; otherwise, it stops further processing for that job and submits an error message. If we did not want to use the Python plug-ins, we could write our own scripts. To use these, we could change the headoffice.example.com Job resource we defined earlier. We would change it as follows:
Job {Name = headoffice.example.comClient = headoffice-fdEnabled = yesJobDefs = "DefaultLinux"Client Run Before Job = "/usr/local/bin/mysql_backup start"Client Run After Job = "/usr/local/bin/mysql_backup stop"}
The script mysql_backup must exist on our target host in the /usr/local/bin directory.
You can now see how you can manage complex backups on the Bareos backup server. You can use Bareos to back up a complete file system, or you can target data directories only. If you are going to target data directories only, be sure to look at how you are going to rebuild your hosts in the event of a problem with the hosts.
Next, we’re going look at using the Web-UI console to manage our Bareos configurations.
Introducing the Bareos Web-UI
Using a text-based console is a quick and easy way to set up and manage your Bareos services. Some people prefer a GUI, however, so Bareos created a nice, clean web interface called Web-UI for managing the Bareos Director.
We set up a PHP web service in Chapter 11 and now would be a good time to review that if you have forgotten. The Web-UI can be installed on any web host; it does not require a Bareos Director to be installed. You install the Web-UI via the bareos-webui package, which is available from the online repository. It will install the required dependencies for you.
The bareos-webui package will install the web files into /usr/share/bareos-webui and install an Apache configuration file in /etc/httpd/conf.d/bareos-webui.conf.
We can restart the Apache service, and then we will create a user to access the web interface. We will create a file /etc/bareos/bareos-dir.d/admin.conf if it is not already created by your installation process.
Console {Name = "admin"Password = "secret"Profile = "webui"}
Next we will need to create the file /etc/bareos/bareos-dir.d/webui-consoles.conf and enter the following contents for the file:
Profile {Name = webuiCommandACL = status, messages, show, version, run, rerun, cancel, .api, .bvfs_*, list, llist, use, restore, .jobs, .filesets, .clientsJob ACL = *all*Schedule ACL = *all*Catalog ACL = *all*Pool ACL = *all*Storage ACL = *all*Client ACL = *all*FileSet ACL = *all*Where ACL = *all*}
This profile relates to the commands that the admin user can access using the webui profile. If you wanted to restrict access to certain profiles, you would edit this file by listing the resources the profile has access to (see http://doc.bareos.org/master/html/bareos-manual-main-reference.html#x1-1510009.12 for more details).
We now need the Bareos Director to read these files in when it starts. To do that, we need to add the following to the bottom of our bareos-dir.conf file:
@/etc/bareos/bareos-dir.d/webui-consoles.conf@/etc/bareos/bareos-dir.d/webui-profiles.conf
Again, we are using the @ symbol to tell the Bareos Director to read in these files. We now have to restart or reload the Director.
Once all this is done, we should be able to restart the Apache server and log in to the Bareos Web-UI. Let’s log in, as shown in Figure 14-10.

Figure 14-10. Log Web-UI page
We use the password secrets and the username admin, which we specified in webui-consoles.conf earlier. In Figure 14-11 we see the main dashboard.
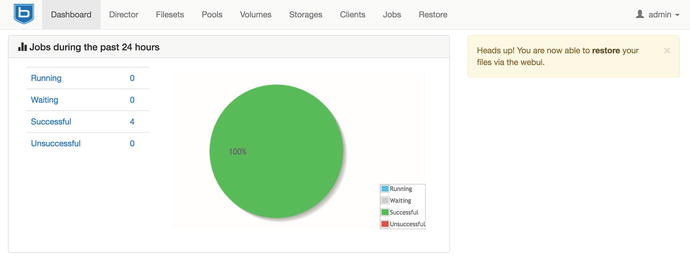
Figure 14-11. Dashboard page of Web-UI
We will not go through every page; as you can see, there are many parts to explore that maps to parts of the Bareos configuration. We do want to show you the Restore page, as you can use this to find and restore your backups like in Figure 14-12.
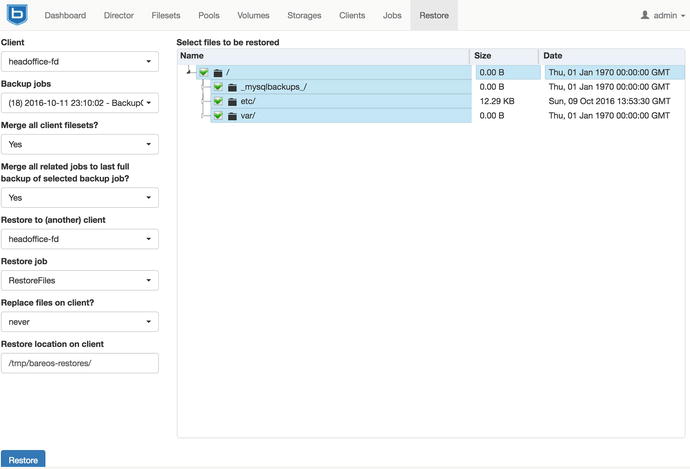
Figure 14-12. Restore page on Web-UI
Here you can see that you can explore and select your restore options via the Web-UI , and this will become useful for you if you need to restore any files.
Summary
In this chapter, we explored the backup options available to back up a single Linux host or hundreds of servers and workstations in a mixed environment. We introduced you to the software you can use to manage your backups, rsync and Bareos. You can combine them to securely back up remote hosts.
In Chapter 19, we’ll introduce automated provisioning systems that, combined with a backup regimen, allow you to quickly and efficiently recover your hosts.
In this chapter, we covered the following topics:
Issues to consider when formulating a disaster recovery planning and business continuity management strategy
How to back up remote hosts to a central host using rsync and SSH
How to write a simple Bash script that can rsync your remote hosts regularly
How to install and configure Duply and Duplicity
How to install and configure Bareos
How to run a backup job with Bareos
How to restore a file with Bareos
How to do an advanced backup with Bareos of a MariaDB database
The Bareos Web-UI console, an advanced web-based management GUI for Bareos
In the next chapter, we will show you how to manage your own VPN links and internetwork security.