
CHAPTER 2
![]()
Exploring the Alternatives
The world of integration has a storied history and can be overwhelming to the newcomer. There are at least half a dozen viable open source solutions, and at least a dozen (very) expensive, proprietary integration solutions. Although the open source solutions can meet most integration challenges, there are some technologies that don't lend themselves to the open source ecosystem because they are of a proprietary nature, or represent a relatively niche concern that the community hasn't suitably addressed. For this reason, and because open source options hold the largest mindshare today, no proprietary options will be discussed in this book. The reader is encouraged as always to investigate alternative solutions.
While there is good guidance on the core language and idioms common to the discipline of application integration—such as Enterprise Integration Patterns1, and The Enterprise Service Bus2 —the various technologies are wildly divergent in architecture and development approach. Before diving headfirst into Spring Integration, we'll explore several of the available and popular open source integration frameworks. The two most popular projects are Mule ESB (www.mulesoft.org) and Apache ServiceMix (http://servicemix.apache.org). Each of these projects takes a different approach. This chapter will cover four different integration approaches:
- Mule provides a lightweight container and leverages a simple XML configuration file and Plain Old Java Objects (POJOs).
- ServiceMix is based on the Java Business Integration (JBI) standard and now supports OSGI.
- OpenESB is (
http://open-esb.dev.java.net) the integration offering from Oracle based on the JBI and J2EE standards. OpenESB is designed to live in a J2EE application server like GlassFish. - And there is always the do-it-yourself (DIY) approach. J2EE does provide the necessary support to implement integration, including the J2EE Connector Architecture (JCA). JCA is the J2EE framework for creating resource adapters (RAs) for connecting with external applications and systems.
The Spring Framework is the most widely used enterprise Java technology in the market today, and represents a natural avenue for integration because it provides a component model built on loosely coupled, clean POJO-centric code. The Spring Framework ships with simplifying libraries on top of that component model that simplify many enterprise concerns such as transaction management, data store access, messaging, and RPC or web services. The Spring Framework has been around for the better part of the last decade, and is in use by countless governments and companies worldwide, including most of the Fortune 1000.
_______________________
1 Gregor Hohpe et. al.
2 David A. Chappell
Camel, Mule, and ServiceMix all support the Spring Framework as a component model, in a fashion, but oddly ignore the support for core technologies that already come with Spring. Those familiar with the Spring Framework will find little to relate to when using these solutions beyond the component model. It is necessary to relearn core concepts such as transaction management, data access, and messaging.
A Basic Example of Integration
In order to survey the different open source integration offerings and to ensure an apples-to-apples comparison, a simple integration example will be implemented by each framework. The most basic example is to create an endpoint that publishes a message to a JMS queue. Then another endpoint will be created to receive the JMS message from the queue. This is the most basic example, with the endpoints representing one system sending a message to another system. The message may represent moving data or initiating a process between the two systems.
For simplicity, the endpoint in the example will be some sort of HTTP service that will allow starting a process using either a simple HTML page or a testing tool. The receiving endpoint will simply log a message to indicate that the message has been transferred. This is an event-driven architecture in its most simplistic form. In a real integration implementation, the endpoint would probably be an adapter that allows interfacing to a particular service or application.
Mule ESB
Probably one of the first widely accepted open source integration frameworks, Mule ESB was the result of Ross Mason's system integration consulting work looking for a method to increase productivity and maintainability of custom integration engagements.
Philosophy and Approach
Mule's approach was to create a lightweight container that can run standalone, without requiring the support of a J2EE application server where the integration component can be deployed. Although Mule can also be deployed within an application server, the standalone mode is the recommended approach, eliminating the overhead of a heavyweight container.
The service components are POJOs configured though an XML file for deployment in Mule. These components do not require any Mule-specific interfaces to implement or classes to extend from. Mule comes with a number of out-of-the-box service components, including those for message routing and data transformation. The messages within Mule may be in many formats from SOAP to binary. Mule also includes a suite of adapters (or transports, as they're called in Mule), supporting everything from JDBC to SMPP. One caveat is that some of the transports' functionality is limited unless if you don't purchase the enterprise edition of Mule.
Implementing the Integration Example
Mule ESB may be downloaded from www.mulesoft.org. This example uses Mule Community Edition 3.0.0. The installation is a simple as decompressing the TAR or ZIP file. Mule also requires that Java SE version 1.5 or greater be installed (version 1.6 is recommended). Maven 2.2.1 will be used as the build tool; it can be downloaded at http://maven.apache.org. In addition, the example will require downloading ActiveMQ to get the client JAR files. Mule no longer supplies these JAR files with its distribution. ActiveMQ 5.4.1 may be downloaded at http://activemq.apache.org. Copy the files in Listing 2–1 from the ActiveMQ lib directory and the file activeio-core-3.1.2.jar from the liboptional directory to the Mule installation lib/user directory.
Listing 2–1. ActiveMQ JAR Files Needed by Mule
kahadb-5.4.1.jar

activemq-core-5.4.1.jar

activeio-core-3.1.2.jar

geronimo-j2ee-management_1.1_spec-1.0.1.jar
The basic project will be created using a Maven archetype provided by the Mule project. In order to use the archetype, the environmental properties MULE_HOME must be set to the Mule installation directory. In addition, the settings shown in Listing 2–2 must be added to the settings.xml file usually found in the Maven .m2 repository directory.
Listing 2–2. settings.xml File
<settings>

  <pluginGroups>

    <pluginGroup>org.mule.tools</pluginGroup>

  </pluginGroups>

  ...

</settings>
Run the maven command:
mvn mule-project-archetype:create -DartifactId=mule-example -DmuleVersion=3.0.0
Maven will prompt with a number of questions. Enter Mule Example for the project description, enter com/apress/prospringintegration/mule for the Java package path, enter http,jms,vm for the Mule transports, and accept the defaults for the rest of the questions. The archetype will create a basic Mule project with the structure shown in Listing 2–3.
Listing 2–3. mule-example Project Structure
mule-example

--assembly.xml

--pom.xml

--MULE-README.txt

--src/main

  --app/mule-config.xml

  --java/com/apress/prospringintegration/mule/muleexample

  --org/mule (empty directory that can be deleted)

--src/test

  --resources/muleexample-functional-test-config.xml

  --java/com/apress/prospringintegration/mule/muleexample/MuleexampleTestCase.java
The mule-config.xml file shown in Listing 2–4 contains a skeleton Mule configuration. Due to a bug in the archetype, the last / in the default namespace xmlns="http://www.mulesoft.org/schema/mule/core/" must be removed. Listing 2–4 has the correction.
<?xml version="1.0" encoding="UTF-8"?>

<mule xmlns="http://www.mulesoft.org/schema/mule/core"

      xmlns:xsi="http://www.w3.org/2001/XMLSchema-instance"

      xmlns:spring="http://www.springframework.org/schema/beans"

      xmlns:http="http://www.mulesoft.org/schema/mule/http"

      xmlns:jms="http://www.mulesoft.org/schema/mule/jms"

      xmlns:vm="http://www.mulesoft.org/schema/mule/vm"

      xmlns:client="http://www.mulesoft.org/schema/mule/client"

      xmlns:cxf="http://www.mulesoft.org/schema/mule/cxf"

      xmlns:management="http://www.mulesoft.org/schema/mule/management"

      xmlns:scripting="http://www.mulesoft.org/schema/mule/scripting"

      xmlns:sxc="http://www.mulesoft.org/schema/mule/sxc"

      xmlns:mule-xml="http://www.mulesoft.org/schema/mule/xml"

      xsi:schemaLocation="

        http://www.mulesoft.org/schema/mule/core

        http://www.mulesoft.org/schema/mule/core/3.0/mule.xsd

        http://www.mulesoft.org/schema/mule/http

        http://www.mulesoft.org/schema/mule/http/3.0/mule-http.xsd

        http://www.mulesoft.org/schema/mule/jms

        http://www.mulesoft.org/schema/mule/jms/3.0/mule-jms.xsd

        http://www.mulesoft.org/schema/mule/vm

        http://www.mulesoft.org/schema/mule/vm/3.0/mule-vm.xsd

        http://www.mulesoft.org/schema/mule/client

        http://www.mulesoft.org/schema/mule/client/3.0/mule-client.xsd

        http://www.mulesoft.org/schema/mule/cxf

        http://www.mulesoft.org/schema/mule/cxf/3.0/mule-cxf.xsd

        http://www.mulesoft.org/schema/mule/management

        http://www.mulesoft.org/schema/mule/management/3.0/mule-management.xsd

        http://www.mulesoft.org/schema/mule/scripting

        http://www.mulesoft.org/schema/mule/scripting/3.0/mule-scripting.xsd

        http://www.mulesoft.org/schema/mule/sxc

        http://www.mulesoft.org/schema/mule/sxc/3.0/mule-sxc.xsd

        http://www.mulesoft.org/schema/mule/xml

        http://www.mulesoft.org/schema/mule/xml/3.0/mule-xml.xsd

        http://www.springframework.org/schema/beans

        http://www.springframework.org/schema/beans/spring-beans-3.0.xsd">


  <description>

    Mule Example

  </description>


  <flow name="main">

    <vm:inbound-endpoint path="in" exchange-pattern="request-response"/>


    <!-- TODO add your service component here.

     This can also be a Spring bean using <spring-object bean="name"/>

   -->

    <echo-component/>


    <vm:outbound-endpoint path="out"/>

  </flow>

</mule>
The first step is to configure ActiveMQ as the embedded JMS broker in Mule. Typically, the message broker is started as a separate external process to the Mule container. In this case, ActiveMQ will be started in the same JVM as Mule. This simplifies the example and also adds a JMS broker support to Mule. Add the element <jms:activemq-connector name="jmsConnector" specification="1.1" brokerURL="vm://localhost" /> within the mule element to the mule-config.xml file.
The next step is to configure a flow that sends a message to the JMS broker. The archetype creates a simple flow named main as a starting point. To allow this process to be started using an HTTP GET or POST, an HTTP transport needs to be added to the beginning of the flow. Then you can start the process by simply hitting the HTTP endpoint. Replace the element <vm:inbound-endpoint path="in" exchange-pattern="request-response"/> with the following:
<http:inbound-endpoint host="localhost" port="8192" path="example" keep-alive="true"/>
Note that the attribute keep-alive is set to true. This attribute controls if the socket connection is kept alive. Then the process may be started by using a browser with the address http://localhost:8192/example.
Note that the next line in the main flow is <echo-component>. This is a standard component that comes with Mule; it logs the inbound message and forwards it to the outbound endpoint. No transformer has been defined, so the message will simply be passed as is. This component may be replaced with a Spring bean for custom processing on the message. The final step for the main flow is to publish the message to the JMS broker. This is done using the JMS transport by replacing the element <vm:outbound-endpoint path="out"/> with <jms:outbound-endpoint queue="my.destination"/>. This will publish the message to the queue named my.destination. The configuration file is shown in Listing 2–5 with ActiveMQ and the main flow configured.
Listing 2–5. mule-config.xml with ActiveMQ and Main Flow Configured
...

  <jms:activemq-connector name="jmsConnector"

                          specification="1.1" brokerURL="vm://localhost"/>


  <flow name="main">

  <http:inbound-endpoint host="localhost"

                         port="8192" path="example" keep-alive="true"/>


  <!-- TODO add your service component here.

      This can also be a Spring bean using <spring-object bean="name"/>

    -->

  <echo-component/>


  <jms:outbound-endpoint queue="my.destination"/>

  </flow>

...
The last part of this example is to add a listener to the JMS queue my.destination to receive and log the message. A new flow element is added within the ulme element to support this functionality. Again, the JMS transport component is used as the inbound endpoint, and the VM component is used as the outbound endpoint to simply log the message. The address attribute is set to stdio://OUT to log to the console, and the exchange-pattern attribute is set to one-way so that no response input is expected. The complete Mule configuration file is shown in Listing 2–6.
Listing 2–6. Complete mule-config.xml File
<?xml version="1.0" encoding="UTF-8"?>

<mule xmlns="http://www.mulesoft.org/schema/mule/core"

      xmlns:xsi="http://www.w3.org/2001/XMLSchema-instance"

      xmlns:spring="http://www.springframework.org/schema/beans"

      xmlns:http="http://www.mulesoft.org/schema/mule/http"

      xmlns:jms="http://www.mulesoft.org/schema/mule/jms"

      xmlns:vm="http://www.mulesoft.org/schema/mule/vm"

      xmlns:client="http://www.mulesoft.org/schema/mule/client"

      xmlns:cxf="http://www.mulesoft.org/schema/mule/cxf"

      xmlns:management="http://www.mulesoft.org/schema/mule/management"

      xmlns:scripting="http://www.mulesoft.org/schema/mule/scripting"

      xmlns:sxc="http://www.mulesoft.org/schema/mule/sxc"

      xmlns:mule-xml="http://www.mulesoft.org/schema/mule/xml"

      xsi:schemaLocation="

          http://www.mulesoft.org/schema/mule/core

          http://www.mulesoft.org/schema/mule/core/3.0/mule.xsd

          http://www.mulesoft.org/schema/mule/http

          http://www.mulesoft.org/schema/mule/http/3.0/mule-http.xsd

          http://www.mulesoft.org/schema/mule/jms

          http://www.mulesoft.org/schema/mule/jms/3.0/mule-jms.xsd

          http://www.mulesoft.org/schema/mule/vm

          http://www.mulesoft.org/schema/mule/vm/3.0/mule-vm.xsd

          http://www.mulesoft.org/schema/mule/client

          http://www.mulesoft.org/schema/mule/client/3.0/mule-client.xsd

          http://www.mulesoft.org/schema/mule/cxf

          http://www.mulesoft.org/schema/mule/cxf/3.0/mule-cxf.xsd

          http://www.mulesoft.org/schema/mule/management

          http://www.mulesoft.org/schema/mule/management/3.0/mule-management.xsd

          http://www.mulesoft.org/schema/mule/scripting

          http://www.mulesoft.org/schema/mule/scripting/3.0/mule-scripting.xsd

          http://www.mulesoft.org/schema/mule/sxc

          http://www.mulesoft.org/schema/mule/sxc/3.0/mule-sxc.xsd

          http://www.mulesoft.org/schema/mule/xml

          http://www.mulesoft.org/schema/mule/xml/3.0/mule-xml.xsd

          http://www.springframework.org/schema/beans

          http://www.springframework.org/schema/beans/spring-beans-3.0.xsd">


  <description>

    Mule Example

  </description>


  <jms:activemq-connector name="jmsConnector"

                          specification="1.1" brokerURL="vm://localhost"/>


  <flow name="main">

    <http:inbound-endpoint host="localhost"

                           port="8192" path="example" keep-alive="true"/>


    <!-- TODO add your service component here.

     This can also be a Spring bean using <spring-object bean="name"/>

   -->
<echo-component/>
<jms:outbound-endpoint queue="my.destination"/>
</flow>
<flow name="jms-receive">
<jms:inbound-endpoint queue="my.destination"/>
<echo-component/>
<outbound-endpoint address="stdio://OUT" exchange-pattern="one-way"/>
</flow>
</mule>
One side note is that the Mule archetype also includes a sample unit test class. This allows sending messages to any custom-developed service components. Since no custom components have been used in this example, this test framework is not used.
With the configuration complete, the project may be built and deployed into Mule. Within the mule-example project directory, run the Maven command mvn install. This will build, test, and create a mule project archive, muleexample-1.0-SNAPSHOT.zip. Copy this archive file to the apps directory in the Mule installation. Start Mule ESB by issuing the command bin/mule in the Mule home directory, and the project will be deployed and started. You should now be able to test the example project by hitting the HTTP endpoint either through a browser or using a tool such as the Firefox plug-in Poster. The log files should show the message being published to and then received from the JMS broker.
ServiceMix
ServiceMixwas one of the first and most popular integration frameworks to embrace the JBI standard. The ServiceMix 4 release adds OSGi support, allowing component deployment and life cycle management following the OSGi standard.
Philosophy and Approach
ServiceMixis a standalone JBI container. Although it can be deployed within an application server, it is optimized to run in standalone mode. ServiceMix comes with a wide range of adapters (or binding components, in JBI terms), from FTP to Extensible Messaging and Presense Protocol (XMPP). Internal logic within ServiceMix is contained in service engine components with support for scripting and Business Process Execution Language (BPEL).
One of the most interesting service engine components is for Camel support. Camel allows simple configuration of routing and mediation rules. All components deployed to ServiceMix must follow either the JBI or OSGi standard. In addition, the JBI standard requires that all messaging with ServiceMix be in XML format.
Implementing the Integration Example
ServiceMix may be downloaded at http://servicemix.apache.org. This example uses ServiceMix 4.2.0. All the components in this example will following the JBI standard, since the ServiceMix project has not ported all the binding components to OSGi at the time of writing this book. OSGi will, however, be leveraged to deploy the JBI components. ServiceMix has similar requirements for Java SE and Maven to Mule, as discussed previously. ActiveMQ is included with ServiceMix to support remoting, clustering, reliability, and distributed failover. ActiveMQ will also be used as the message broker for this example.
To create the integration example, four service units will be needed. A JBI service unit (SU) is a JBI component packaged up with the necessary configuration files and dependencies so it may be deployed in a JBI container.
- An SU using a
servicemix-httpcomponents will be used, allowing the process to be kicked off via an http endpoint. - Two SUs using the
servicemix-jmscomponents will be needed: one for publishing the message to and one for receiving the message from the JMS broker. - Finally a SU using the
servicemix-camelcomponent will be used to log the incoming JMS message.
In order to deploy the four SUs, you must wrap them up in a JBI Service Assembly (SA). A JBI SA is used to package up JBI SUs for deployment to a JBI compliant container. The concept is similar to a JEE EAR file.
First create the directory servicemix and change into that directory. Next create the SA and the four ServiceMix JBI SUs and the SA using the Maven archetypes by issuing the commands shown in Listing 2–7.
Listing 2–7. Maven Archetype Creation Commands
mvn archetype:create

  -DarchetypeGroupId=org.apache.servicemix.tooling

  -DarchetypeArtifactId=servicemix-jms-provider-service-unit

  -DarchetypeVersion=2010.02-SNAPSHOT

  -DremoteRepositories=https://repository.apache.org/content/groups/public

  -DgroupId=com.apress.prospringintegration.jms

  -DartifactId=jms-provider-su -Dversion=1.0-SNAPSHOT


mvn archetype:create

  -DarchetypeGroupId=org.apache.servicemix.tooling

  -DarchetypeArtifactId=servicemix-http-consumer-service-unit

  -DarchetypeVersion=2010.02-SNAPSHOT

  -DremoteRepositories=https://repository.apache.org/content/groups/public

  -DgroupId=com.apress.prospringintegration.jms

  -DartifactId=http-consumer-su

  -Dversion=1.0-SNAPSHOT


mvn archetype:create

  -DarchetypeGroupId=org.apache.servicemix.tooling

  -DarchetypeArtifactId=servicemix-service-assembly

  -DarchetypeVersion=2010.02-SNAPSHOT

  -DremoteRepositories=https://repository.apache.org/content/groups/public

  -DgroupId=com.apress.prospringintegration.jms

  -DartifactId=example-sa

  -Dversion=1.0-SNAPSHOT


mvn archetype:create

  -DarchetypeGroupId=org.apache.servicemix.tooling

  -DarchetypeArtifactId=servicemix-jms-consumer-service-unit

  -DarchetypeVersion=2010.02-SNAPSHOT

  -DremoteRepositories=https://repository.apache.org/content/groups/public

  -DgroupId=com.apress.prospringintegration.jms
-DartifactId=jms-consumer-su
-Dversion=1.0-SNAPSHOT
mvn archetype:create
-DarchetypeGroupId=org.apache.servicemix.tooling
-DarchetypeArtifactId=servicemix-camel-service-unit
-DarchetypeVersion=2010.02-SNAPSHOT
-DremoteRepositories=https://repository.apache.org/content/groups/public
-DgroupId=com.apress.prospringintegration.jms
-DartifactId=camel-su
-Dversion=1.0-SNAPSHOT
The archetype will create boilerplate Maven modules with the following names for the four SUs and the SA:
<a href="http-consumer-su">http-consumer-su</a>for the http endpointjms-provider-sufor JMS publishingjms-consumer-sufor JMS receivingcamel-suto log the JMS messageexample-safor the SA wrapper
In addition, a root Maven pom.xml file is needed. This will allow the entire project to be built with a single command. The root pom.xml to support this example is shown below in Listing 2–8.
Listing 2–8. Root pom.xml File
<?xml version="1.0" encoding="UTF-8"?>

<project xmlns="http://maven.apache.org/POM/4.0.0"

         xmlns:xsi="http://www.w3.org/2001/XMLSchema-instance"

         xsi:schemaLocation="http://maven.apache.org/POM/4.0.0

  http://maven.apache.org/maven-v4_0_0.xsd">


  <modelVersion>4.0.0</modelVersion>


  <groupId>com.apress.prospringintegration.servicemix</groupId>

  <artifactId>servicemix-example</artifactId>

  <packaging>pom</packaging>

  <version>1.0-SNAPSHOT</version>

  <name>ServiceMix Example</name>


  <modules>

    <module>http-consumer-su</module>

    <module>jms-provider-su</module>

    <module>jms-consumer-su</module>

    <module>camel-su</module>

    <module>example-sa</module>

  </modules>


</project>
Note that the SUs and SA are listed as Maven modules in the pom.xml file. The ServiceMix example project should now have the directory structure shown in Listing 2–9.
Listing 2–9. ServiceMix Example Project Directory Structure
servicemix

--pom.xml

--camel-su

  --...

--http-consumer-su

  --...

--jms-consumer-su

--...

--jms-provider-su

  --...

--example-sa

  --...
The example-sa SA must be configured to include the four SUs so that all the SU modules are compiled and packaged into a SA. This is done by adding each to the SUs as Maven dependencies to the example-sa pom.xml file. The additions to the pom.xml file are shown in Listing 2–10.
Listing 2–10. example-sa pom.xml Dependencies
<dependencies>

  <dependency>

    <groupId>com.apress.prospringintegration.jms</groupId>

    <artifactId>http-consumer-su</artifactId>

    <version>1.0-SNAPSHOT</version>

  </dependency>

  <dependency>

    <groupId>com.apress.prospringintegration.jms</groupId>

    <artifactId>jms-provider-su</artifactId>

    <version>1.0-SNAPSHOT</version>

  </dependency>

  <dependency>

    <groupId>com.apress.prospringintegration.jms</groupId>

    <artifactId>jms-consumer-su</artifactId>

    <version>1.0-SNAPSHOT</version>

  </dependency>

  <dependency>

    <groupId>com.apress.prospringintegration.jms</groupId>

    <artifactId>camel-su</artifactId>

    <version>1.0-SNAPSHOT</version>

  </dependency>

</dependencies>
Next, the http-consumer-su SU needs to be configured. The SUs are configured through the xbean.xml file in the directory src/main/resources. The http:consumer element attributes need to be modified as listed in Table 2–1 to expose the http endpoint http://localhost:8192/example/ and send the message to the endpoint jms-provider.
Table 2–1. http-consumer Attributes
| Attribute | Value |
targetService |
test:provider |
targetEndpoint |
jms-provider |
locationURI |
http://0.0.0.0:8192/example/ |
defaultMep |
http://www.w3.org/2004/08/wsdl/in-only |
At the writing of this book, the archetypes for ServiceMix 4.2.0 are still SNAPSHOT versions and require some modifications to work. Many of the namespaces are incorrect and some of the dependency versions have not been properly replaced. A working version of the xbean.xml file is shown in Listing 2–11.
Listing 2–11. http-consumer-su xbean.xml
<?xml version="1.0" encoding="UTF-8"?>

<beans xmlns:http="http://servicemix.apache.org/http/1.0"

       xmlns:test="http://servicemix.apache.org/test"

       xmlns="http://www.springframework.org/schema/beans"

       xmlns:xsi="http://www.w3.org/2001/XMLSchema-instance"

       xsi:schemaLocation="http://servicemix.apache.org/http/1.0

        http://servicemix.apache.org/schema/servicemix-http-2010.01.xsd

        http://www.springframework.org/schema/beans

        http://www.springframework.org/schema/beans/spring-beans-2.0.xsd">


  <http:consumer

      service="test:http"

      endpoint="http-endpoint"

      targetService="test:provider"

      targetEndpoint="jms-provider"

      locationURI="http://localhost:8192/example/"

      defaultMep="http://www.w3.org/2004/08/wsdl/in-only"/>


</beans>
Next, the jms-provider-su and jms-consumer-su SUs need to be configured. Again, the SUs are configured through the xbean.xml file in the src/main/resources directory of the SU project. The important attributes of the jms:provider element are shown in Table 2–2; they're configured to receive a message sent from the http-consumer-su component to the test:provider service. The jms-provider endpoint is configured to send a JMS message to the queue my.queue.
Table 2–2. jms-provider Attributes
| Attribute | Value |
service |
test:provider |
endpoint |
jms-provider |
destinationName |
my.queue |
The complete xbean.xml file for the jms-provider-su SU is shown in Listing 2–12. Note the amq:ConnectionFactory element that is configured to connect to the embedded ActiveMQ broker. Also note the use of the # symbol before the connectionFactory reference in the jms:provider element. This allows a reference to the ActiveMQ connection factory Spring bean.
Listing 2–12. jms-provider-su xbean.xml
<?xml version="1.0" encoding="UTF-8"?>

<beans xmlns:jms="http://servicemix.apache.org/jms/1.0"

       xmlns:test="http://servicemix.apache.org/test"

       xmlns:amq="http://activemq.apache.org/schema/core"

       xmlns="http://www.springframework.org/schema/beans"

       xmlns:xsi="http://www.w3.org/2001/XMLSchema-instance"

       xsi:schemaLocation="http://servicemix.apache.org/jms/1.0

        http://servicemix.apache.org/schema/servicemix-jms-2010.01.xsd

        http://activemq.apache.org/schema/core

        http://activemq.apache.org/schema/core/activemq-core-5.3.0.xsd

        http://www.springframework.org/schema/beans

        http://www.springframework.org/schema/beans/spring-beans-2.0.xsd">


  <jms:provider service="test:provider"

                endpoint="jms-provider"

                destinationName="my.queue"

                connectionFactory="#connectionFactory"/>


  <amq:connectionFactory id="connectionFactory" brokerURL="tcp://localhost:61616"/>


</beans>
The jms-provider-su and jms-consumer-su SUs have the additional requirement of adding the ActiveMQ dependencies to the pom.xml file. The additional dependencies are shown in Listing 2–13.
Listing 2–13. jms-provider-su and jms-consumer-su pom.xml Additional Dependencies
<dependency>

  <groupId>org.apache.activemq</groupId>

  <artifactId>activemq-core</artifactId>

  <version>5.3.0</version>

  <exclusions>

    <exclusion>

      <groupId>org.apache.activemq</groupId>

      <artifactId>activeio-core</artifactId>
</exclusion>
<exclusion>
<groupId>org.apache.camel</groupId>
<artifactId>camel-core</artifactId>
</exclusion>
<exclusion>
<groupId>commons-logging</groupId>
<artifactId>commons-logging</artifactId>
</exclusion>
<exclusion>
<groupId>commons-logging</groupId>
<artifactId>commons-logging-api</artifactId>
</exclusion>
</exclusions>
</dependency>
<!-- this is a dependency for ActiveMQ -->
<dependency>
<groupId>org.apache.geronimo.specs</groupId>
<artifactId>geronimo-j2ee-management_1.1_spec</artifactId>
<version>1.0.1</version>
</dependency>
Then the jms-consumer-su SU needs to be configured to receive the JMS message from the destination queue my.queue. As with the other SU, the xbean.xml file in the src/main/resources directory needs to be modified. The attributes of the jms:consumer element need to be modified, with the targetService set to test:consumer and the destinationName set to my.queue. The attributes and their values are given in Table 2–3.
Table 2–3. jms-consumer Attributes
| Attribute | Value |
service |
test:consumer |
endpoint |
jms-consumer |
targetService |
test:consumer |
destinationName |
my.queue |
The complete xbean.xml configuration file for the jms-consumer-su SU is given in Listing 2–14.
Listing 2–14. jms-consumer-su xbean.xml
<?xml version="1.0" encoding="UTF-8"?>

<beans xmlns:jms="http://servicemix.apache.org/jms/1.0"

       xmlns:test="http://servicemix.apache.org/test"

       xmlns:amq="http://activemq.apache.org/schema/core"

       xmlns="http://www.springframework.org/schema/beans"

       xmlns:xsi="http://www.w3.org/2001/XMLSchema-instance"

       xsi:schemaLocation="http://servicemix.apache.org/jms/1.0

       http://servicemix.apache.org/schema/servicemix-jms-2010.01.xsd
http://activemq.apache.org/schema/core
http://activemq.apache.org/schema/core/activemq-core-5.3.0.xsd
http://www.springframework.org/schema/beans
http://www.springframework.org/schema/beans/spring-beans-2.0.xsd">
<jms:consumer service="test:consumer"
targetService="test:consumer"
endpoint="jms-consumer"
destinationName="my.queue"
connectionFactory="#connectionFactory"
concurrentConsumers="8"/>
<amq:connectionFactory id="connectionFactory" brokerURL="tcp://localhost:61616"/>
</beans>
In addition, there is an issue with the pom.xml file generated by the servicemix-jms-consumer-service-unit artifact. The version element of one the plug-in dependencies is not correctly set. The pom.xml file with the correct version for the jbi-maven-plug-in element is shown in Listing 2–15.
Listing 2–15. Corrected pom.xml for jms-consumer
<?xml version="1.0" encoding="UTF-8"?>

<project xmlns="http://maven.apache.org/POM/4.0.0"

         xmlns:xsi="http://www.w3.org/2001/XMLSchema-instance"

         xsi:schemaLocation="http://maven.apache.org/POM/4.0.0

     http://maven.apache.org/xsd/maven-4.0.0.xsd">


  <modelVersion>4.0.0</modelVersion>


  <groupId>com.apress.prospringintegration.jms</groupId>

  <artifactId>jms-consumer-su</artifactId>

  <packaging>jbi-service-unit</packaging>

  <version>1.0-SNAPSHOT</version>

  <name>Apache ServiceMix :: JMS Consumer Service Unit</name>


  <dependencies>

    <dependency>

      <groupId>org.apache.servicemix</groupId>

      <artifactId>servicemix-jms</artifactId>

      <version>2010.01</version>

    </dependency>

  </dependencies>


  <build>

    <resources>

      <resource>

        <directory>src/main/resources</directory>

        <includes>

          <include>**/*</include>

        </includes>

      </resource>

    </resources>

    <plugins>
<plugin>
<groupId>org.apache.servicemix.tooling</groupId>
<artifactId>jbi-maven-plugin</artifactId>
<version>4.3</version>
<extensions>true</extensions>
</plugin>
</plugins>
</build>
</project>
The last SU to configure is camel-su. This SU is only used for logging the JMS message. But Camel has many more capabilities, including message routing and its own set of adapters. But this is beyond the scope of this book. Please refer to the Camel documentation for further information. In the case of Camel, the configurations are found in the file camel-context.xml in the src/main/resources directory. The configuration is straightforward, simply routing the JMS message from the jms-consumer endpoint to ServiceMix's built-in logging support. The camel-context.xml file is given in Listing 2–16.
Listing 2–16. camel-su camel-context.xml
<?xml version="1.0" encoding="UTF-8"?>

<beans xmlns="http://www.springframework.org/schema/beans"

       xmlns:xsi="http://www.w3.org/2001/XMLSchema-instance"

       xsi:schemaLocation="

       http://www.springframework.org/schema/beans

       http://www.springframework.org/schema/beans/spring-beans-2.0.xsd

       http://activemq.apache.org/camel/schema/spring

       http://activemq.apache.org/camel/schema/spring/camel-spring.xsd">


  <camelContext id="camel"

                xmlns="http://camel.apache.org/schema/spring">

    <route>

      <from uri="jbi:endpoint:http://servicemix.apache.org/test/consumer/jms-consumer" />

      <to uri="log:com.apress.prospringintegration.jms?level=INFO" />

    </route>

  </camelContext>


</beans>
This completes the configuration of the SU and SA for the integration example. The next step is to create the SA deployable by issuing the Maven command maven install. This will build all the SUs and SA, which will create the deployable ZIP file example-sa-1.0-SNAPSHOT.zip in the example-sa/target directory. This file may be deployed to ServiceMix using either Maven or the OSGiServiceMix console. First, start ServiceMix by running the command bin/servicemix in the ServiceMix installation directory. This will bring up a console. Type the following command:
osgi:install –s mvn:com.apress.prospringintegration.jms/example-sa/1.0-SNAPSHOT/zip
Then type in log:display to list the logging file. If everything has gone well, there should not be any exceptions.
In order the test the endpoint, an XML message must be posted to the endpoint http://localhost:8192/example. Since ServiceMix messaging is limited to XML format, a simple text value will not work. Either use the client.html file provided by the ServiceMix installation in the directory examples/bridge-camel, or use the Firefox Poster plug-in to post an XML message. After the XML message is sent to ServiceMix, it should be published to the JMS broker, and then received and logged by ServiceMix. Either check the service log file or type in the command log:display in the console to see the message. Typical output is shown in Listing 2–17.
Listing 2–17. Sample Output for the ServiceMix Example
21:19:35,233 | INFO  | x-camel-thread-3 | jms                              | rg.

apache.camel.processor.Logger   88 | Exchange[BodyType:org.apache.servicemix.soa

p.util.stax.StaxSource, Body:<test>This is a test</test>]
OpenESB (GlassFish)
OpenESBis the integration solution from Sun (now Oracle) based on the JBI and J2EE standards.
Philosophy and Approach
OpenESB is designed to run in an application server such as GlassFish. It does not have any Maven support out of the box, and instead is tightly coupled to NetBeans IDE. OpenESB offered an alternative to the existing Oracle integration solutions, which include the Oracle SOA suite and BEA Aqualogic. Oracle recently reduced the funding to the OpenESB project, and OpenESB's future will heavily depend on community support if it is to survive. OpenESB is best used with a WSDL first approach, leveraging the NetBeans IDE and deploying to GlassFish. This is the approach that will be taken for the integration example.
Implementing the Integration Example
A SOAP endpoint will be created to kick off a BPEL process sending a JMS message. Another BPEL process will receive the JMS message and log the results. SOAP and BPEL are used to integrate easily with the OpenESB framework. OpenESB 2.2 may be downloaded from https://open-esb.dev.java.net. The full install package is used for this example.
- Run the installation program to install NetBeans and GlassFish. (OpenESB requires Java SE 1.6.)
- Start NetBeans by double-clicking the icon on Windows, or by typing the command
bin/netbeansin the NetBeans installation home directory. - Once NetBeans has started, close the start page. Then you can start GlassFish from the IDE by going to the Services tab. Expand the Servers tab, right-click the GlassFish icon, and select Start from the menu. This will start the GlassFish application server, as shown in Figure 2–1.
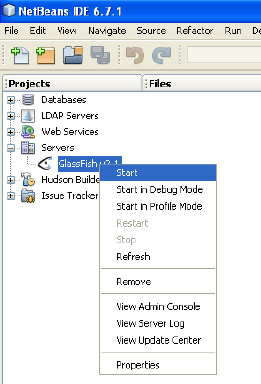
Figure 2–1. Starting the GlassFish application server
OpenESB is optimized to orchestrate the integration process using the BPEL process engine. The process engine will control the flow of the messages between the different components. The first step is to create the BPEL flow.
- Start by creating a BPEL module by selecting File
 New Project from the main menu, which will bring up the New Project wizard.
 - Select the SOA category and the BPEL Module project, as shown in Figure 2–2.

Figure 2–2. New Project wizard
- Click the Next button, name the project JmsExample, and click the Finish button. This will create a BPEL project called JmsExample.
The next step is to create a WSDL file to represent the BPEL process interface. This allows the BPEL flow to be kicked off by a web service call. A SOAP RPC Literal WSDL file will be created, since it is the easiest to integrate with the testing framework in NetBeans.
- Right-click the Process Files directory under the JmsExample BPEL module and select New WSDL Document. This should bring up the New WSDL Document wizard.
- Name the WSDL document jmsProvider, select Concrete WSDL Document for the WSDL type, and accept the defaults, SOAP and RPC Literal, in the drop-down boxes below, as shown in Figure 2–3. Click the Next button, accept the defaults on the next two screens, and click Finish to create the WSDL document.
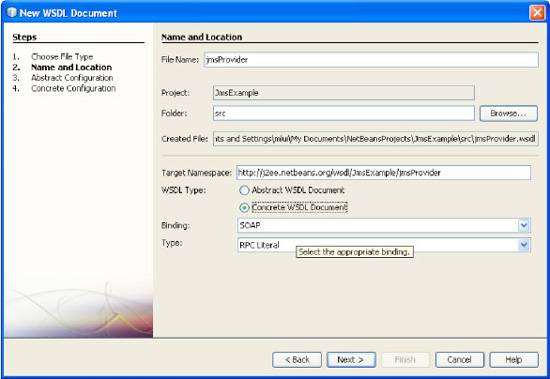
Figure 2–3. New WSDL Document wizard
- Double-click
jmsExample.bpelin project explorer on the left side of the IDE to bring up the BPEL design diagram. To add the WSDL document to the BPEL process, drag and drop thejmsProvider.wsdlfile on the left side of the BPEL diagram. An orange dot will light up when the file is properly placed. The resulting BPEL diagram is shown in Figure 2–4.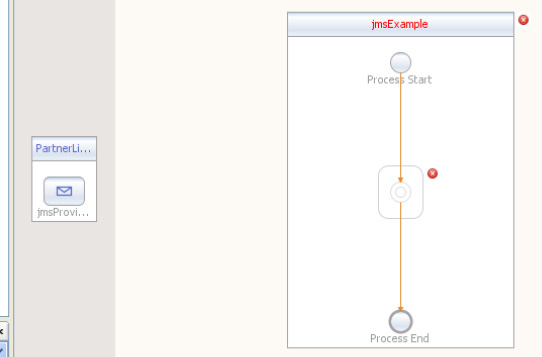
- The next step will be to connect the SOAP WSDL to the BPEL process. The WSDL represents the SOAP binding component, which will be configured as an endpoint to the BPEL service engine. A Receive and Reply activity will be added to the BPEL process, and configured to receive the SOAP request and reply with a SOAP response. An Assign activity will be placed between the Receive and Reply activity so that the SOAP request message will be directly mapped to the response. Later, the same message payload will be sent to the JMS broker.
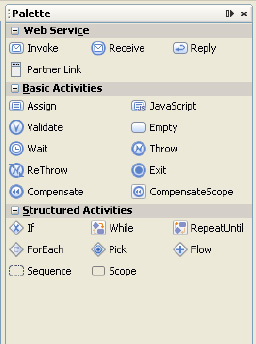
- Drag and drop a Receive activity from the BPEL component palette on the left, as shown in Figure 2–5, to the center of the BPEL diagram. Again, an orange dot will appear when the activity is correctly placed.
- Next, drag and drop the Assign activity right below the Receive activity. Similarly, drag and drop the Reply activity right below the Assign activity. The resultant BPEL diagram is shown in Figure 2–6.
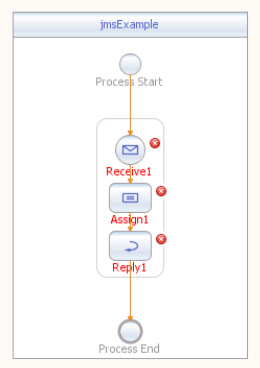
Figure 2–6. jmsExample BPEL diagram
- The BPEL activities are configured by double-clicking the icon in the jmsExample diagram, which will bring up the Property Editor.
- Select PartnerLink1 and jmsProviderOperation from the Partner Link and Operation drop-downs, respectively, as shown in Figure 2–7. Then click OK. The BPEL process is now configured to start after receiving the SOAP request.
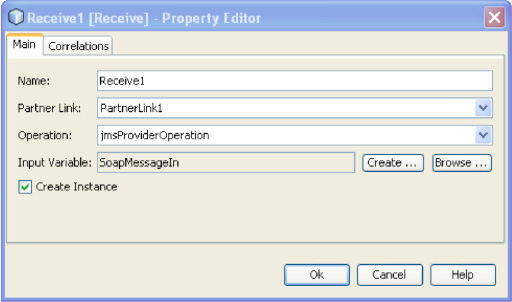
Figure 2–7. Configuring the Receive activity
- Click the Create button to bring up the New Input Variable wizard, shown in Figure 2–8. Enter the name SoapMessageIn and click OK.
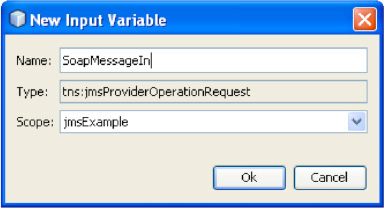
Figure 2–8. Configuring the Receive activity input variable
- Next in the BPEL process is configured to Reply with a SOAP response. Double-click the Reply activity icon in the BPEL diagram to bring up the Property Editor.
- Choose PartnerLink1 from the Partner Link drop-down and JmsProviderOperation from the Operation drop-down, as shown in Figure 2–9. The BPEL process with the configured SOAP endpoint is shown in Figure 2–10.

Figure 2–9. Configuring the Reply activity
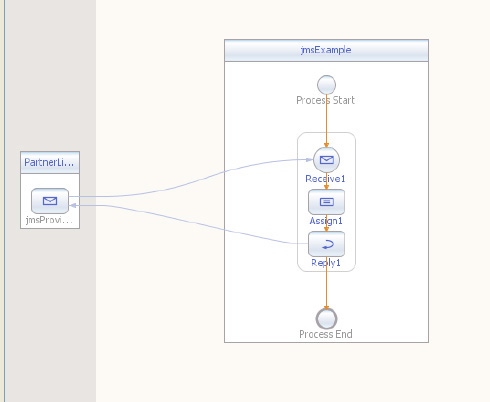
Figure 2–10. Complete jmsExample BPEL process
- Again, click the Create button and specify a normal response output variable name of SoapMessageOut, as shown in Figure 2–11. Click the Ok button to return to the Property Editor. (To simplify the example, the fault response is not being used.)

Figure 2–11. Configuring the Reply activity output variable
You configure the Assign activity by double-clicking its icon in the BPEL diagram, which brings up the data mapping tool. For simplicity, the input payload will be mapped to the output. The only purpose for exposing the BPEL process is to provide a hook to start it. The payload being passed is irrelevant to this example, and is directly mapped to ensure that the process is working. Drag the part1 variable under SoapMessageIn on the right to the part1 variable under SoapMessageOut, as shown in Figure 2–12.
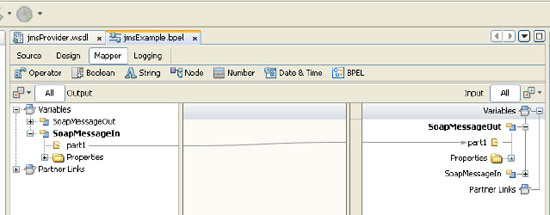
Figure 2–12. Configuring the Assign activity mapping
The JMS binding components now need to be configured for sending and receiving the JMS message. Again, the New WSDL Document wizard is used following the WSDL first approach used previously.
- Right-click the Process Files directory under the jmsExample BPEL module in the project explorer, and select New WSDL Document.
- Name the WSDL jmsPublish, select the Concrete WSDL Document radio button, and choose JMS from the Binding drop-down and Send from the Type drop-down, as shown in Figure 2–13. Click Next.
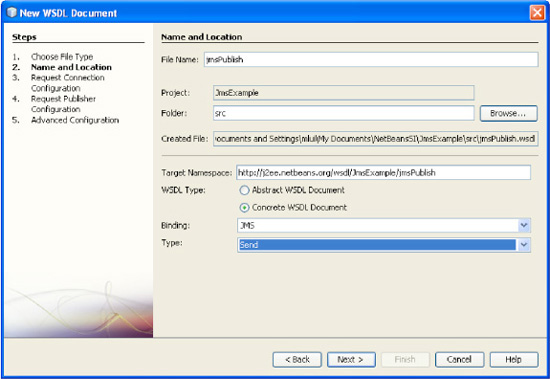
Figure 2–13. WSDL wizard for the Send JMS binding component
- On the next screen, set the connection URL to
mq://localhost:7676. This is the connection for the internal OpenESB JMS broker. Set the username and password to “guest,” select the defaults for the embedded JMS broker, and click Next, as shown in Figure 2–14.
- Click Finish to create the jmsPublish binding component. Repeat the same process to create the binding component to receive the JMS message.
- Repeat the preceding steps to create the JMS component to receive the JMS message. Name the WSDL jmsReceive, select Concrete WSDL Document, and choose JMS and Receive from the drop-downs, as shown in Figure 2–15. The JMS configurations will be the same as those for jmsPublish, as shown in Figure 2–14.
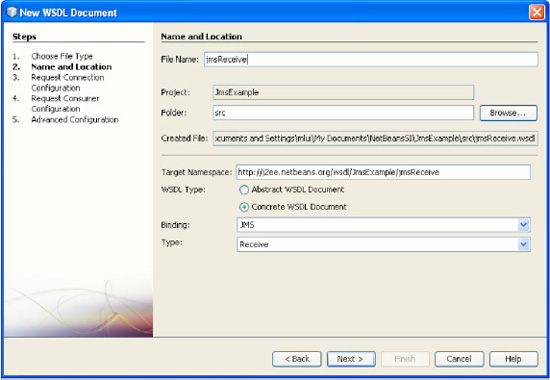
Figure 2–15. WSDL wizard for the Receive JMS binding component
- Add the Invoke activity to the jmsExample BPEL process by dragging and dropping the icon from the BPEL component palette to right under the Receive activity.
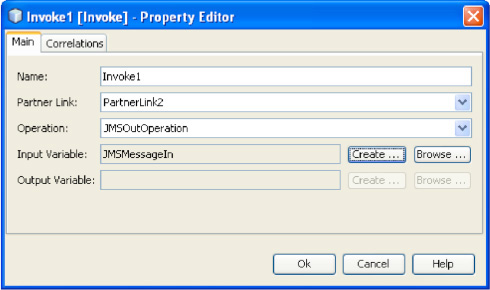
- Click the Ok button to return to the Property Editor. Choose PartnerLink2 from the Partner Link drop-down and JMSOutOperation from the Operation drop-down, as shown in Figure 2–16.
- Double-click the Invoke icon to bring up the Property Editor. Click the Create button specify an input variable name of JMSMessageIn. Click the Ok button to complete the configuration.
- Place an Assign activity between the Receive and Invoke activities by dragging and dropping the Assign activity from the BPEL activity palette. Double-click the Assign activity to bring up the mapping tool. Expand and drag the
part1variable underSoapMessageInon the left side to thepart1variable underJMSMessageInon the right side to configure the SOAP payload to be sent to the JMS message broker, as shown in Figure 2–17. The final BPEL process is shown in Figure 2–18.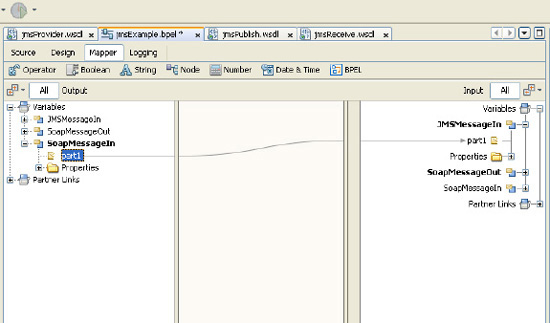
Figure 2–17. Configuring the Assign activity for JMS Send
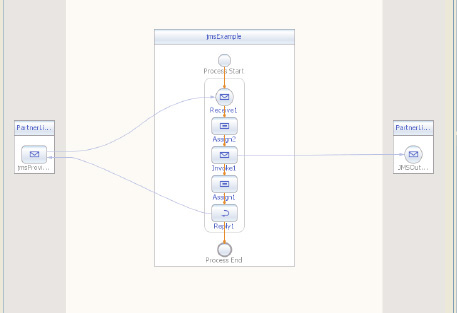
Figure 2–18. Complete jmsExample BPEL diagram which publishes a JMS message
- Another BPEL process must be created to receive the JMS message from the broker. As with the jmsExample BPEL process, right-click the Process Files directory under the JmsExample BPEL module in the left-hand project explorer and select New BPEL Process. This will bring up the New BPEL Process wizard, as shown in Figure 2–19.
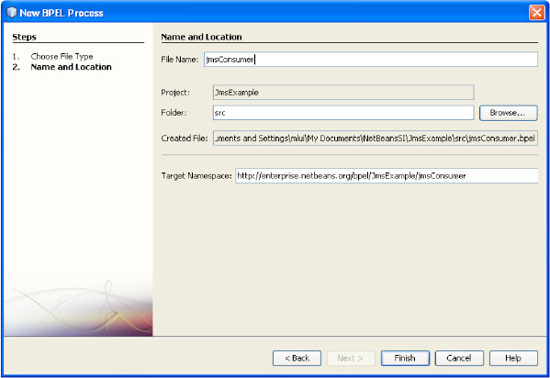
Figure 2–19. New BPEL Process wizard for the JMS Receive activity
- Name the process jmsConsumer and click the Finish button.
- Drag and drop the
jmsReceive.wsdlbinding component from the project explorer to the left side of the BPEL process diagram. As before, an orange dot will light up when the component is properly placed. Add a Receive activity from the component palette to the center of the BPEL design diagram. - Set Partner Link to PartnerLink1 and Operation to JMSInOperation, as shown in Figure 2–20.
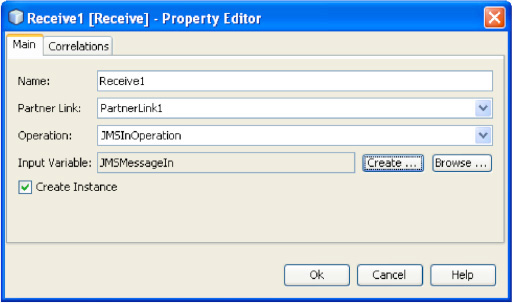
Figure 2–20. Property Editor for the JMS Receive activity
- Double-click the Receive activity to bring up the Property Editor. Click the Create button to specify an input variable name of JMSMessageIn. Click the Ok button to return to the Property Editor, and click Ok again to complete the configuration.
In order to show that the BPEL process does indeed receive the JMS message, logging will be added to the Receive activity.
- Select the Receive activity in the BPEL process diagram and click the Logging button in the top menu. This will bring up the log mapping tool, as shown in Figure 2–21.
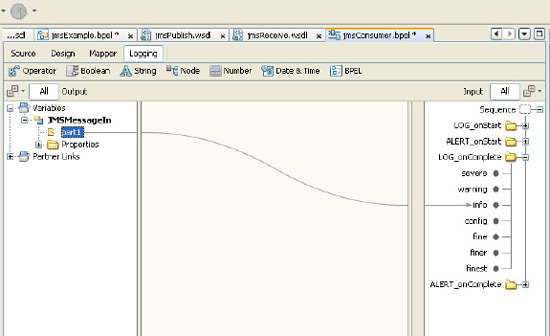
- Expand and drag the
part1variable underJMSMessageInto theinfologging variable under theLOG_onCompletedirectory. This will log the JMS message at the info level after the BPEL process receives the JMS message. The complete BPEL process is shown in Figure 2–22.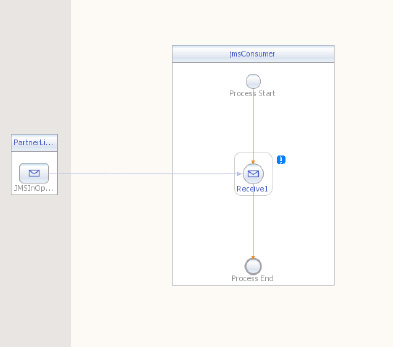
Figure 2–22. Complete jmsConsumer BPEL process
- Build the JmsExample BPEL module by right-clicking the JmsExample project in the left-hand project explorer and selecting Build. This will build the BPEL service unit.
In order to deploy the BPEL module service unit, you must wrap it in a composite application service assembly.
- Select from NetBean's main menu File New Project to bring up the project wizard shown in Figure 2–23.
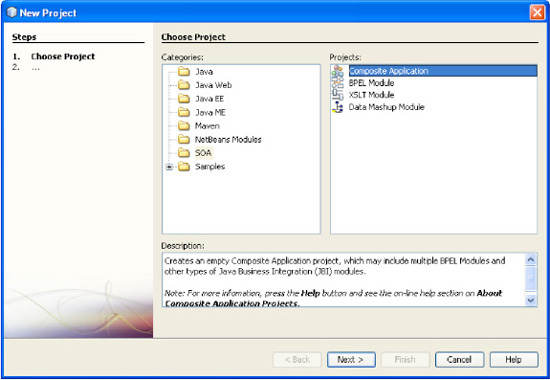
Figure 2–23. Creating the Composite Application project for the deployable service assembly
- Select the SOA category and the Composite Application project.
- Click the Next button and name the project JmsCAP (for JMS Composite Application project), and click the Finish button to create the project.
- Drag and drop the JmsExample project onto the center of the JmsCAP composite application design diagram. Then build the JmsCAP composite application by right-clicking the JmsCAP project in the left-hand project explorer and selecting Build. This will build the composite application service assembly; the design diagram should look like Figure 2–24.
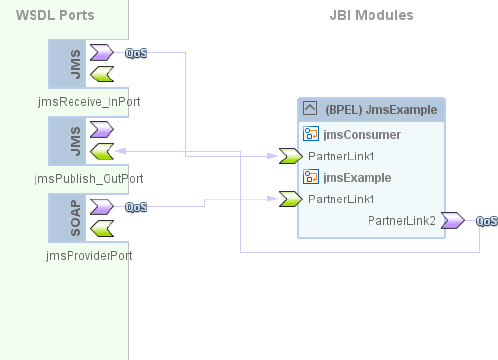
Figure 2–24. Complete composite application service assembly
- You can now deploy the complete project to GlassFish by right-clicking the JmsCAP project and selecting Deploy. This completes creating the integration example using OpenESB.
The project may now be tested using NetBeans's built-in testing facility. A unit test may be created based on the jmsProvider WSDL, which drives the main BPEL process that publishes a JMS message.
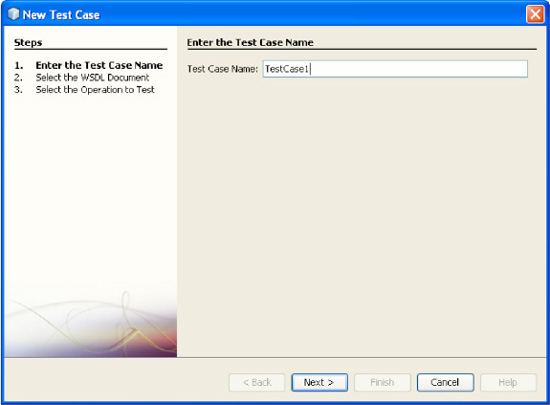
- Right-click the Test directory under the JmsCAP project and select New Test Case. This will bring up the Test Case wizard, as shown in Figure 2–25. Accept the defaults and click the Next button.
- Expand the JmsExample - Process File directory, select jmsProvider.wsdl, and click the Next button, as shown in Figure 2–26.

Figure 2–26. Specifying the SOAP WSDL in the New Test Case wizard
- Select jmsProviderOperation and click Finish as shown in Figure 2–27. This creates a unit test for the SOAP endpoint. After creating the test case, the XML SOAP request will be displayed in NetBeans, as shown in Listing 2–18.
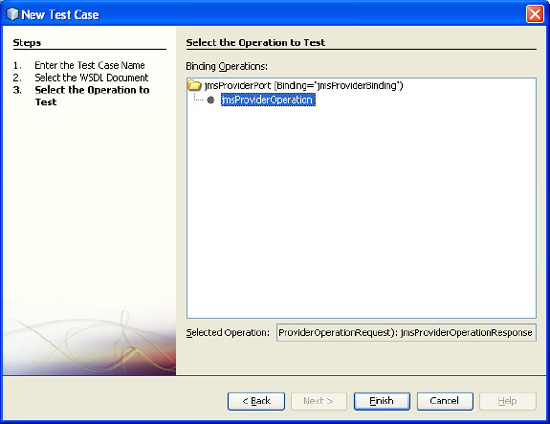
Figure 2–27. Specifying the WSDL operation in the Test Case wizard
Listing 2–18. Test Case SOAP XML Request Message
<soapenv:Envelope xsi:schemaLocation="http://schemas.xmlsoap.org/soap/envelope/
http://schemas.xmlsoap.org/soap/envelope/" xmlns:xsi="http://www.w3.org/2001/
XMLSchema-instance" xmlns:xsd="http://www.w3.org/2001/XMLSchema"
xmlns:soapenv="http://schemas.xmlsoap.org/soap/envelope/"
xmlns:jms="http://j2ee.netbeans.org/wsdl/JmsExample/jmsProvider">
<soapenv:Body>
<jms:jmsProviderOperation>
<part1>test</part1>
</jms:jmsProviderOperation>
</soapenv:Body>
</soapenv:Envelope> - Set the
part1element totest. You can start the unit test by right-clicking TestCase1 under the Test directory and selecting Run. The unit test will fail since the results have not been properly set up. - On the dialog box, click Yes to the Overwrite Empty Output? button to save the SOAP response. Right-click the unit test results in the project explorer and select Use as Output to prevent future test failures. The SOAP response is shown in Listing 2–19.
Listing 2–19. Test Case SOAP XML Response Message
<?xml version="1.0" encoding="UTF-8" standalone="no"?>
<SOAP-ENV:Envelope xmlns:SOAP-ENV="http://schemas.xmlsoap.org/soap/envelope/"
xmlns:xsi="http://www.w3.org/2001/XMLSchema-instance"
xsi:schemaLocation="http://schemas.xmlsoap.org/soap/envelope/
http://schemas.xmlsoap.org/soap/envelope/">
<SOAP-ENV:Body>
<m:jmsProviderOperationResponse xmlns:m=
"http://j2ee.netbeans.org/wsdl/JmsExample/jmsProvider">
<part1>test</part1>
</m:jmsProviderOperationResponse>
</SOAP-ENV:Body>
</SOAP-ENV:Envelope> - Look at the GlassFish log output by selecting Output and GlassFish v2.1 in the bottom window. The JMS message received by the jmsConsumer BPEL process should be logged to the GlassFish console output.
DIY Architecture, or How Not to Do an Integration
The J2EE platform provides the necessary pieces to implement an integration without resorting to one of the integration frameworks. In this section, we'll go through it.
Philosophy and Approach
The JCA framework was developed to create a consistent method of connecting to external applications and systems—similar to JDBC for databases and JMS for messaging. However, creating a JCA RA or connection is still a complex process requiring the implementation of several interfaces and configuration files. Fortunately, RAs for the more common connectors are available either from open source projects or commercial vendors. Still, implementing an integration just using the J2EE platform requires a large amount of custom coding. The message routing and data transformation must all be written from scratch.
Implementing the Integration Example
The integration example may be implemented using the JBoss application server. The process may be kicked off by posting rom a web browser to a servlet. The servlet will publish the JMS message to the JMS broker embedded in JBoss. A message-driven EJB will receive the JMS message and log the message to the console. JBoss 4.2.3 may be downloaded from http://jboss.org/jbossas/. Installation just requires a simple decompression of the ZIP file. The integration example skeleton is created again using a Maven archetype. The project is created by issuing the Maven command in Listing 2–20.
Listing 2–20. Maven Command for Creating a Simple J2EE Project
mvn archetype:create

  -DgroupId=com.apress.prospringintegration.j2ee

  -DartifactId=j2ee-example

  -DarchetypeArtifactId=maven-archetype-j2ee-simple
The Maven command creates the project structure shown in Listing 2–21.
Listing 2–21. j2ee-example Project Structure
j2ee-example

--ear

  --pom.xml

--ejbs

  --src

    --main

      --resources

        --META-INF

          --ejb-jar.xml

  --pom.xml

--primary-source

  --pom.xml

--projects

  --logging

    --pom.xml

  --pom.xml

--servlets

  --servlet

    --src

      --main

        --webapp

          --WEB-INF

            --web.xml

          --index.jsp

    --pom.xml

  -- pom.xml

--src

  --main

    --resources

--pom.xml
Remove the element <module>site</module> from the modules element in the main pom.xml file in the j2ee-example directory. The site module is not being used for this example, and removing it will allow the project to be built. The first step is to create a servlet that will accept a form POST with the string parameter message. First, modify the servlet pom.xml file in the directory servlets/servlet. The dependencies for the servlet, MS client, and JBoss JARs are added. The modified pom.xml file is shown in Listing 2–22.
Listing 2–22. Servlet pom.xml
<project>

  <modelVersion>4.0.0</modelVersion>

  <groupId>root.project.servlets</groupId>

  <artifactId>servlet</artifactId>

  <packaging>war</packaging>

  <name>servlet</name>

  <parent>

    <groupId>root.project</groupId>

    <artifactId>servlets</artifactId>

    <version>1.0</version>

  </parent>

  <dependencies>
<dependency>
<groupId>root.project</groupId>
<artifactId>primary-source</artifactId>
<scope>provided</scope>
</dependency>
<dependency>
<groupId>javax.servlet</groupId>
<artifactId>servlet-api</artifactId>
<version>2.4</version>
<scope>provided</scope>
</dependency>
<dependency>
<groupId>javax.jms</groupId>
<artifactId>jms</artifactId>
<version>1.1</version>
</dependency>
<dependency>
<groupId>jboss</groupId>
<artifactId>jbossmq-client</artifactId>
<version>4.0.2</version>
</dependency>
</dependencies>
<repositories>
<repository>
<id>jboss</id>
<url>https://repository.jboss.org/nexus/content/groups/public</url>
<releases>
</releases>
snapshots>
<enabled>false</enabled>
</snapshots>
</repository>
</repositories>
</project>
The next step is to create the directory for the servlet. Under the directory servlets/servlet/src/main, add the directory structure java/com/apress/prospringintegration/j2ee. The servlet class is added to this directory, as shown in Listing 2–23.
Listing 2–23. JmsServlet Class
package com.apress.prospringintegration.j2ee.servlet;


import javax.jms.*;

import javax.naming.Context;

import javax.naming.InitialContext;

import javax.naming.NamingException;

import javax.servlet.RequestDispatcher;

import javax.servlet.ServletException;

import javax.servlet.http.HttpServlet;

import javax.servlet.http.HttpServletRequest;

import javax.servlet.http.HttpServletResponse;

import java.io.IOException;
public class JmsServlet extends HttpServlet {
private static final String QUEUE_CONNECTION_FACTORY = "ConnectionFactory";
private static final String EXAMPLE_QUEUE = "queue/examples/ExampleQueue";
public void doGet(HttpServletRequest request, HttpServletResponse response)
throws ServletException, IOException {
doPost(request, response);
}
public void doPost(HttpServletRequest request, HttpServletResponse response)
throws ServletException, IOException {
System.out.println("Servlet JmsServlet");
String message = request.getParameter("message");
System.out.println("message: " + message);
try {
Connection connection = getConnectionFactory().createConnection();
Session session = connection.createSession(false, Session.AUTO_ACKNOWLEDGE);
MessageProducer messageProducer = session.createProducer(getDestination());
Message jmsMessage = session.createTextMessage(message);
messageProducer.send(jmsMessage);
System.out.println("Message sent to " + EXAMPLE_QUEUE);
messageProducer.close();
session.close();
connection.close();
} catch (JMSException e) {
e.printStackTrace();
}
request.setAttribute("started", "true");
RequestDispatcher dispatcher =
getServletContext().getRequestDispatcher("/index.jsp");
dispatcher.forward(request, response);
}
private ConnectionFactory getConnectionFactory() {
ConnectionFactory jmsConnectionFactory = null;
try {
Context ctx = new InitialContext();
jmsConnectionFactory = (ConnectionFactory)
ctx.lookup(QUEUE_CONNECTION_FACTORY);
} catch (NamingException e) {
e.printStackTrace();
}
return jmsConnectionFactory;
}
private Destination getDestination() {
Destination jmsDestination = null;
try {
Context ctx = new InitialContext();
jmsDestination = (Destination) ctx.lookup(EXAMPLE_QUEUE);
} catch (NamingException e) {
e.printStackTrace();
} return jmsDestination;
}
}
The servlet accepts a POST with the parameter message. Using the JMS API, the parameter is published to the JMS broker queue. Java Naming and Directory Interface (JNDI) is used to get the JMS connection factory and destination. The web.xml file will need to be modified to expose the servlet through the servlet container. The modified web.xml file is shown in Listing 2–24. Note that the servlet class is mapped to the path /SendJmsMessage.
Listing 2–24. web.xml File
<?xml version="1.0" encoding="ISO-8859-1"?>
<web-app xmlns="http://java.sun.com/xml/ns/j2ee"
xmlns:xsi="http://www.w3.org/2001/XMLSchema-instance"
xsi:schemaLocation="http://java.sun.com/xml/ns/j2ee
http://java.sun.com/xml/ns/j2ee/web-app_2_4.xsd"
version="2.4">
<display-name>jboss-jms example</display-name>
<servlet>
<servlet-name>JmsServlet</servlet-name>
<servlet-class>com.apress.prospringintegration.j2ee.servlet.JmsServlet</servlet-class>
</servlet>
<servlet-mapping>
<servlet-name>JmsServlet</servlet-name>
<url-pattern>/SendJmsMessage</url-pattern>
</servlet-mapping>
</web-app>
The final step for exposing the servlet is to create a form page to submit the parameter message. This JSP page is created by Maven, and may be modified as shown in Listing 2–25. This is a simple HTML form that posts the parameter message to the servlet. This completes the endpoint that publishes a JMS message to the broker.
Listing 2–25. index.jsp Page
<html>

<body>

<h2>JMS Integration Example</h2>

<form name="jmsForm" action="SendJmsMessage">

    Message: <input type="text" name="message" size="40"><br/>

    <br/><br/>

    <input type="submit" value="Send"/>

</form>

</body>

</html>
A message-driven EJB will be needed to receive the JMS message and log to the console. EJB 3.0 will be used so that only a simple set of annotations will be needed to configure the bean. But first the pom.xml file in the ejbs directory will need to be modified to support the message-driven bean. Java SE 1.6.x is used, since version 1.5.x or higher is required to support an annotated EJB. In addition, all the required dependencies for EJB 3.0 and JMS will be added. The modified pom.xml file is shown in Listing 2–26.
Listing 2–26. pom.xml for Message-Driven EJB
<project>

  <modelVersion>4.0.0</modelVersion>

  <groupId>root.project</groupId>

  <artifactId>ejbs</artifactId>

  <packaging>ejb</packaging>

  <version>1.0</version>

  <name>enterprise java beans</name>

  <parent>

    <groupId>root</groupId>

    <artifactId>project</artifactId>

    <version>1.0</version>

  </parent>

  <dependencies>

    <dependency>

      <groupId>root.project</groupId>

      <artifactId>primary-source</artifactId>

    </dependency>

    <dependency>

      <groupId>root.project.projects</groupId>

      <artifactId>logging</artifactId>

    </dependency>

    <dependency>

      <groupId>jboss</groupId>

      <artifactId>jboss-ejb3x</artifactId>

      <version>4.2.3.GA</version>

    </dependency>

    <dependency>

      <groupId>jboss</groupId>

      <artifactId>jboss-j2ee</artifactId>

      <version>4.2.3.GA</version>

    </dependency>

    <dependency>

      <groupId>javax.jms</groupId>

      <artifactId>jms</artifactId>

      <version>1.1</version>

    </dependency>

    <dependency>

      <groupId>jboss</groupId>

      <artifactId>jbossmq-client</artifactId>

      <version>4.0.2</version>

    </dependency>

  </dependencies>

  <build>

    <plugins>

      <plugin>

        <artifactId>maven-compiler-plugin</artifactId>

        <configuration>

          <source>1.6</source>

          <target>1.6</target>
</configuration>
</plugin>
<plugin>
<groupId>org.apache.maven.plugins</groupId>
<artifactId>maven-ejb-plugin</artifactId>
<version>2.3</version>
<configuration>
<ejbVersion>3.0</ejbVersion>
</configuration>
</plugin>
</plugins>
</build>
<repositories>
<repository>
<id>jboss</id>
<url>https://repository.jboss.org/nexus/content/groups/public</url>
<releases>
</releases>
<snapshots>
<enabled>false</enabled>
</snapshots>
</repository>
</repositories>
</project>
Delete the ejb-jar.xml in the directory ejbs/src/main/resource/META-INF. It is not required for an EJB 3.0 bean. In the directory ejbs/src/main, add the following directory structure: java/com/apress/prospringintegration/ejb/. Add the message-driven bean class JmsMessageBean.java shown in Listing 2–27.
Listing 2–27. JmsMessageBean.java (Message-Driven Bean)
package com.apress.prospringintegration.ejb;


import javax.annotation.Resource;

import javax.ejb.ActivationConfigProperty;

import javax.ejb.MessageDriven;

import javax.ejb.MessageDrivenContext;

import javax.jms.Message;

import javax.jms.MessageListener;

import javax.jms.TextMessage;


@MessageDriven(name = "JmsMessageBean", activationConfig = {

        @ActivationConfigProperty(propertyName = "destinationType",

                                  propertyValue = "javax.jms.Queue"),

        @ActivationConfigProperty(propertyName = "destination",

                                  propertyValue = "queue/examples/ExampleQueue")

})

public class JmsMessageBean implements MessageListener {


    @Resource

    private MessageDrivenContext context;


    @Override
public void onMessage(Message message) {
try {
if (message instanceof TextMessage) {
TextMessage objMessage = (TextMessage) message;
String textMessage = objMessage.getText();
System.out.println("****************************************************");
System.out.println("Received JMS message. message: " + textMessage);
System.out.println("****************************************************");
} else {
System.err.println("Expecting Text Message");
}
} catch (Throwable t) {
t.printStackTrace();
context.setRollbackOnly();
}
}
}
Note the MessageDriven annotation which sets the destination type to Queue and the queue name to queue/examples/ExampleQueue. The message driven bean will receive JMS messages from the queue when deployed in a J2EE application server. The bean class implements the MessageListener interface so that the message is sent to the onMessage method. The rest of the code extracts the test message and logs.
You can build the project by running the Maven command mvn clean install. The EAR file ear-1.0.ear will be created in the directory ear/target. To deploy the EAR file to JBoss, copy the file to the directory server/default/deploy in the JBoss installation home directory. Start the JBoss server by running the command bin/run.bat on Windows or bin/run.sh on Unix. You can run the integration example by entering http://localhost:8080/servlet/SendJmsMessage in a browser. The web page is shown in Figure 2–28. Enter a message into the form and click the Send button. The message will be published to the broker, received by the message-driven bean, and logged to the JBoss console.

Figure 2–28. j2ee-example Form Page
How Do They Compare?
Four different frameworks have been used to handle an integration. They will now be compared on three criteria:
- Ease of use
- Maintainability
- Extensibility
Ease of Use
One of the most import aspects of a framework is how easy it is to use. A framework should reduce the amount of time for development, not create more complications.
- Mule is probably the easiest framework to use where the entire configuration takes place in a single XML file with custom logic in a Java POJO. The main limitation of Mule is the available transports or connections. Some of the important transports, such as JDBC, are limited in their functionality unless you purchase the enterprise edition.
- ServiceMix turned out to be quite complicated to configure with all its configuration and deployment files. The Maven archetypes simplified the development process, but were not always up to date with the latest version. Camel, which uses an approach similar to Mule, is an interesting addition to ServiceMix. It appears that Camel may even be used standalone with its own adapter support.
- OpenESB is definitely tightly coupled to the NetBeans IDE. OpenESB's reliance on the cryptic BPEL and WSDL languages, as well as its lack of Maven support, make the graphical design tool almost a requirement. Graphical tools always help with the visualization of the process flow, but issues with round-tripping between the design tool and code, along with issues with customization, usually offset the advantages. Even with the graphical tool, the number of steps required to create the simple integration examples was large.
- Implementing an integration strictly based on the J2EE platform is possible but difficult due to the large amount of interfaces to implement and configuration files to create.
Maintainability
One of the most important reasons for using a framework is maintainability. A framework typically forces the implementation to use a specific structure. This consistency and componentization allow future modifications to be made easily.
- Mule offers a consistent architecture but complete freedom in the process logic implementation. As long as this freedom is not violated, Mule should provide good maintainability.
- ServiceMix enforces a strict standard though the JBI specification and its component-based framework should produce a very maintainable code base.
- OpenESB is maintained through a graphical tool that has advantages and disadvantages. The tool enforces consistent implementation, but round-trip support with the actual code is always an issue. In addition, OpenESB's lack of Maven support causes difficulties with the current build processes.
- J2EE custom coding is probably not the way to go for maintainable code, since its lack of framework fails to enforce a consistent structure.
Extensibility
There are two major extensibility points for an integration framework. First, the adapter or connector framework allows integration with external applications and systems not currently supported by the particular framework. Second, extension of business logic, allowing for such things as custom message routing and data transformation, needs to be supported.
- Mule provides a framework and archetype to create custom transport components. In addition, all process flows can be sent through a simple POJO, providing an ideal extension point.
- ServiceMix also provides a framework for custom binding components and service engines. Interestingly, Camel, Mule and ServiceMix support the Spring component model.
- OpenESB also provides extension through JBI binding components and service engines. NetBeans provides wizards to create these custom extensions.
- J2EE extensions are done through EJBs and JCA RAs. RAs are complex to implement, as discussed previously.
Summary
This chapter covered a number of the alternatives to Spring Integration for an enterprise integration framework. Some of the possible alternatives not covered so far are Microsoft's BizTalk and the .NET framework. BizTalk's limitations—including its dependence on Windows—have prevented its market penetration.
All the different frameworks have their positives and negatives in terms of ease of use, maintainability, and extensibility; hopefully, this chapter has given a basis on which to compare them.
The technologies discussed provide skin-deep support for the Spring component model, but fail to offer deep integration with the entire Spring portfolio. New, wayward developers must relearn the solution-specific way to solve problems already handily addressed by the Spring portfolio. Spring Integration, in contrast, is developed by the same people that made the Spring framework the most widely used Java technology today, and provides the most natural way to build lightweight, clean solutions to developers accustomed to Spring. The following chapters will focus on the strengths of Spring Integration and the reasons it is the integration solution of choice.