
CHAPTER 5
![]()
Introduction to Spring Integration
Spring Integration is an extension to the Spring Framework. It provides support for the standard patterns typically used in enterprise integration. Spring Integration adds lightweight messaging and support for integrating with external systems and services using an adapter framework. Adapters enable a higher-level abstraction for communication with external systems and for Spring’s support for data and remote access as well as scheduling. Spring Integration continues Spring’s component model approach to creating maintainable and testable code.
This chapter will introduce the basic Spring Integration components and how they extend the Spring Framework into the world of messaging and event-driven architectures. Maven will be leveraged as the build and project management tool. The basic of how to use Maven with Spring Integration will be covered. Maven allows for easy integration with most Java IDEs. We will walk through building your first Spring Integration example. The basic integration example used to compare the alternative technologies in Chapter 2 will be used to demonstrate Spring Integration’s ease of use. We will also address how Spring Integration plays with other Spring technologies. Spring Integration can enhance other projects with messaging and integration support.
Spring Integration Basics
A little bit of history and a review of the Spring approach is a good way to get started with Spring Integration. Spring Integration adds essentially three components to the core Spring Framework: messages, message channels, and endpoints. These three components and how they can be leveraged to support messaging and an event-driven architecture will be discussed.
History
Spring has become one of the most widely used frameworks for building vertical, database-backed web applications. The developers of the Spring Framework recognized the similarities between the common patterns used in Spring and those used for enterprise integration. By introducing messaging though component support for a pipes-and-filters model, Spring Integration began providing support for application integration across an enterprise. Most organizations have many different applications for different business domains, potentially using different technologies. Spring Integration facilitates horizontal interoperability across the enterprise.
Conceptually, a filter is any component that can consume or produce messages. A pipe describes how the messages move between the filters (in Spring Integration, these pipes are called channels). This model lets Spring Integration solutions leverage the advantages of messaging, loose coupling, performance, scalability, flexibility, and filtering.
Familiar Spring Idioms
Spring provides an Inversion of Control (IoC) container. IoC is used to free components in the container from the particulars of dependant resource creation and acquisition. Spring uses aspect-oriented programming support to move cross-cutting concerns such as transaction support to the container, and frees the developer from having to address these concerns in code.
Spring Integration takes the theme even further by freeing the integration code from having to know when and where data comes from, and how it does so. The framework handles where the business logic should be executed; it directs the message to the appropriate component and where the response should be sent—providing support for message routing and filtering. In addition, Spring Integration provides message transformation support so that the resultant application will be agnostic to the underlying message format and transport.
Spring Integration follows the same configuration scenarios as the Spring Framework, providing options for configuration through annotations, Java configuration, XML with namespace support, XML with the “standard” bean element, and direct access to the underlying API.
Low Coupling, High Productivity
Spring Integration makes it easy to compose single-focused POJO Spring beans in complex integrations. There is rarely any need to couple your code to the Spring Integration API.
Messages
A message is a generic wrapper for any Java object combined with metadata used by Spring Integration to handle the object. As shown in the Message interface in Listing 5–1, the Java object is the payload property, and the metadata is stored as a collection of message headers, which is in essence a Map with a String key and an Object value.
Listing 5–1. Spring Integration Message Interface
public interface org.springframework.integration.Message<T> {


        MessageHeaders getHeaders();


        T getPayload();


}
Headers
The org.springframework.integration.MessageHeaders object is a String/ObjectMap that typically maintains values for message housekeeping chores. MessageHeaders are immutable and are usually created using the MessageBuilder API. There are a number of predefined entries (headers), including id, timestamp, correlation id, and priority. In addition, the headers can maintain values required by the adapter endpoints (e.g., the file name for the file adapter or the email address for the mail adapter). Headers may be used any key/value pair required by the developer.
Payloads
The message payload can be any POJO. Spring Integration does not require message payloads to be in some sort of canonical payload or self-describing format. You can avail yourself of transformers to implement a canonical data model, as appropriate, but your hands aren’t tied if this isn’t appropriate for your application. Transformation support allows converting any payload into any type of format required by the message endpoint. This is in keeping with the noninvasive nature of Spring Integration.
Message Channels
A message channel is the component through which messages are moved. Message publishers send messages to the channel, and message consumers receive messages from the channel. The channel effectively decouples the producer and consumer. There are two types of messaging scenarios: point-to-point, in which a message is received only once, by a single consumer; and publish/subscribe, in which one or more consumers can attempt to receive a single message.
There are different ways to use a message channel, but generally your configuration will change according to whether you want messages on the channel to be published to you, or whether you want them queued.
Message Endpoints
A message endpoint is the abstraction layer between the application code and the messaging framework. An endpoint broadly defines all the types of components used in Spring Integration. It handles such tasks as producing and consuming messages, as well as interfacing with application code, external services, and applications. When data travels through a Spring Integration solution, it moves along channels from one endpoint to another. Data can come into the framework from external systems using a specific type of endpoint called an adapter. Spring Integration provides a number of adapters that interface with external applications and services; handling the interaction with the messaging infrastructure often only requires declarative configuration. Spring Integration provides a framework to build custom adapter endpoints in the (hopefully rare) event that the out-of-the-box adapters do not suffice.
The main endpoint types supported by Spring Integration are as follows:
- Transformer: Converts the message content or structure.
- Filter: Determines if the message should be passed to the message channel.
- Router: Can determine which channel to send a particular message based on its content.
- Splitter: Can break an incoming message into multiple messages and send them to the appropriate channel.
- Aggregator: Can combine multiple messages into one. An aggregator is more complex than a splitter often required to maintain state.
- Service activator: Is the interface between the message channel and a service instance, many times containing the application code for business logic.
- Channel adapter: Is used to connect the message channel to another system or transport.
All of these message endpoints will be discussed in more detail in a Chapters 7, 8 and 9.
Event-Driven Architecture
What is an event? In formal terms, an event is a significant change in state In an event-driven architecture, this event get sent or published to all interested parties. The subscribing parties can look at the event and choose to respond or ignore it. The response may include invoking a service, running a business process, or publishing another event.
Event-driven architecture is loosely coupled, meaning that the publisher of the event has no knowledge of what the consumers do downstream after the event has been processed. Spring Integration is well suited for this type of architecture, as it captures events as messages.
Event-driven architecture usually refers to simple event processing in which a published event leads to some downstream action. This type of processing is well suited to performing a real-time flow of work. By contrast, complex event processing (CEP) usually involves evaluating an aggregation of events, typically coming from all levels of a business. This may require analysis, correlation, and pattern matching to determine the appropriate action to be taken. Business process management (BPM) is a typical use case for CEP. There can be a number of different events that occur and only a certain combination of events will require a response. Spring Integration has the basic building blocks for CEP, including routers and aggregators (which will be discussed in Chapter 8).
First Steps for Spring Integration
Getting started with Spring Integration is straightforward, and only requires some basic steps. We will start with creating a Maven project and show how to add the necessary library support. The simplest method to create a Maven project is to use an archetype, as follows:
- For a command window, enter
mvnarchetype:generate. - Choose
maven-archetype-quickstartfrom the list of options, which provides a sample Maven project. - Select the latest version of the archetype and enter
com.apress.prospringintegrationfor thegroupId,firstprojectfor theartifactId, and the defaults forversionandpackage. Then enter Return to create the project.
The Maven dependencies shown in Listing 5–2 will be needed for the examples in this chapter.
Listing 5–2. Maven Dependencies for Spring Integration
<dependency>

  <groupId>org.springframework.integration</groupId>

  <artifactId>spring-integration-core</artifactId>

  <version>2.0.1.RELEASE</version>

</dependency>

<dependency>

  <groupId>org.springframework.integration</groupId>

  <artifactId>spring-integration-jms</artifactId>

  <version>2.0.1.RELEASE</version>

</dependency>
In addition, the Spring repositories shown in Listing 5–3 may be needed, especially when using the milestone and snapshot releases required throughout this book.
Listing 5–3. Spring Maven Repositories
<repositories>

  <repository>

    <id>repository.springframework.maven.release</id>

    <name>Spring Framework Maven Release Repository</name>

    <url>http://maven.springframework.org/release</url>

  </repository>

  <repository>

    <id>org.springframework.maven.milestone</id>

    <name>Maven Central Compatible Spring Milestone Repository</name>

    <url>http://maven.springframework.org/milestone</url>

  </repository>

  <repository>

    <id>org.springframework.maven.snapshot</id>

    <name>Maven Central Compatible Spring Snapshot Repository</name>

    <url>http://maven.springframework.org/snapshot</url>

  </repository>

</repositories>
The following configuration must be added to ensure that the code compiles against Java SE 6, and that the resources directory isn’t filtered.
Listing 5–4. pom.xml Build Element for Java SE 6
<build>

  <resources>

    <resource>

      <directory>src/main/resources</directory>

      <filtering>false</filtering>

    </resource>

  </resources>

  <plugins>

    <plugin>

      <groupId>org.apache.maven.plugins</groupId>

      <artifactId>maven-compiler-plugin</artifactId>

      <configuration>

        <source>1.6</source>

        <target>1.6</target>

      </configuration>

    </plugin>

  </plugins>

</build>
How to Set Up Your IDE
Most IDEs can automatically import the Maven project just created. Once imported, there is nothing else in particular you need to start with Spring Integration. Eclipse (and the Maven plug-in, called the m2eclipse plug-in), STS (which will be described below), and IntelliJ IDEA all come with support for importing a Maven project.
Starting Your First Spring Integration Project
Each Spring Integration application is completely embedded, and needs no server infrastructure. In fact, a Spring Integration application can be deployed inside another application—for example, in your web application endpoint. Spring Integration flips the deployment paradigms of most integration frameworks on their heads. That is, Spring Integration is deployed into your application; your application is not deployed into Spring Integration, as you might expect. There are no start and stop scripts and no ports to guard.
The simplest possible working Spring Integration application is a simple Java public static void main method to bootstrap a Spring context, as shown in Listing 5–5.
Listing 5–5. Class to Start Spring Integration Application
package com.apress.prospringintegration;


import org.springframework.context.support.ClassPathXmlApplicationContext;


public class App {

    public static void main(String[] args) {

        ClassPathXmlApplicationContext context =

                new ClassPathXmlApplicationContext("classpath:spring-context.xml");

        context.start();

    }

}
A standard Spring application context has been created and started. The contents of the Spring application context will be discussed shortly, but this example is shown to demonstrate the simplicity of starting a Spring Integration application. Next, the configuration file will be created for creating a simple input channel, a service activator to respond to a message published to the channel, and an output channel where the service activator sends it return value. This is shown in Listing 5–6.
Listing 5–6. Spring Configuration File spring-context.xml
<?xml version="1.0" encoding="UTF-8"?>

<beans xmlns="http://www.springframework.org/schema/beans"

       xmlns:xsi="http://www.w3.org/2001/XMLSchema-instance"

       xmlns:si="http://www.springframework.org/schema/integration"

       xmlns:context="http://www.springframework.org/schema/context"

       xsi:schemaLocation="

    http://www.springframework.org/schema/beans

    http://www.springframework.org/schema/beans/spring-beans-3.0.xsd

    http://www.springframework.org/schema/integration

    http://www.springframework.org/schema/integration/spring-integration-2.0.xsd

    http://www.springframework.org/schema/context

    http://www.springframework.org/schema/context/spring-context-3.0.xsd">


  <context:component-scan base-package="com.apress.prospringintegration"/>


  <int:channel id="input"/>


  <int:channel id="output">

    <int:queue capacity="10"/>

  </int:channel>
  <int:service-activator input-channel="input"

                        output-channel="output"

                        ref="messageHandler"/>


</beans>
A point-to-point direct channel input is created using the channel element, and a queue channel output is created by adding the queue element. In addition, a service activator messageHandler is created using the service-activator element. As discussed, Spring Integration supports annotations for configuring Spring bean components. By adding the component-scan element of the context library, any Java class in the package com.apress.prospringintegration with the annotation @Component will be configured as a Spring bean. By convention, the bean named messageHandler will refer to the class MessageHandler, resolved by capitalizing the first letter of the bean name. Thus, if a message is sent the channel input, it will be forwarded to the service activator class MessageHandler. Since no method has been configured in the Spring configuration class, the message will be directed to the method annotated with @ServiceActivator. The MessageHandler class is shown in Listing 5–7.
Listing 5–7. Service Activator Class MessageHandler
package com.apress.prospringintegration;


import org.springframework.integration.annotation.ServiceActivator;

import org.springframework.stereotype.Component;


@Component

public class MessageHandler {


    @ServiceActivator

    public String handleMessage(String message) {

        System.out.println("Received message: " + message);

        return "MESSAGE:" + message;

    }

}
Note that the MessageHandler class has the required annotations for component scanning and the service activator annotation that directs the input message to the handleMessage method. This is a good time to describe the convention for mapping the Message object to the method signature. Typically, the method signature will either map to the Message payload or the Message object itself. (Other mapping scenarios will be discussed in Chapter 7) In the case of this example, the method signature maps to the String payload. The message payload will be logged and forwarded to the output channel, and prefixed with MESSAGE:.
To test this example, the main method just shown will be augmented to send a message to the input channel and poll the output channel for the resultant message. The modified App class is shown in Listing 5–8.
Listing 5–8. Example Spring Integration Test Class App
package com.apress.prospringintegration;


import org.springframework.context.support.ClassPathXmlApplicationContext;

import org.springframework.integration.Message;

import org.springframework.integration.MessageChannel;
import org.springframework.integration.core.PollableChannel;

import org.springframework.integration.support.MessageBuilder;


public class App {

    public static void main(String[] args) {

        ClassPathXmlApplicationContext context =

                new ClassPathXmlApplicationContext("classpath:spring-context.xml");

        context.start();


        MessageChannel input =

                (MessageChannel) context.getBean("input", MessageChannel.class );

        PollableChannel output =

                (PollableChannel) context.getBean("output", PollableChannel.class );

        input.send(MessageBuilder.withPayload("Pro Spring Integration Example").build());

        Message<?> reply = output.receive();

        System.out.println("received: " + reply);


    }

}
The result of running the example code is shown in Listing 5–9.
Listing 5–9. Results of Running the Example Code
Received message: Pro Spring Integration Example

received: [Payload=MESSAGE:Pro Spring Integration Example][Headers={timestamp=1296618370609,

 id=d4c9fac6-655b-45f3-aa4e-e02c1167eb74}]
The main method accesses the input and output channel beans through the Spring context. A message is sent to the input channel with the string value Pro Spring Integration Example. Then the resultant Message is polled from the output channel. Of special note is the MessageBuilder utility class. This class provides support for creating a Spring Integration Message object with methods for specifying the payload and header values. In addition, there are other methods supporting enrichment of the header values (e.g., setHeader, setPriority, and setCorrelationId). With this, you’ve completed your first working Spring Integration program!
To extend this example and to provide a comparison to the example used in exploring alternative integration frameworks in Chapter 2, the example will be modified to send and receive the message to and from a JMS broker. This example will use the ActiveMQ JMS message broker, as described in Chapter 2. To support the ActiveMQ broker and JMS, the following Maven dependencies must be added to the pom.xml file shown in Listing 5–10.
Listing 5–10. Maven Dependencies to Support ActiveMQ and JMS
<dependency>

  <groupId>org.apache.activemq</groupId>

  <artifactId>activemq-core</artifactId>

  <version>5.4.1</version>

</dependency>

  <dependency>

    <groupId>javax.jms</groupId>

    <artifactId>jms</artifactId>

    <version>1.1</version>

  </dependency>
To simplify the example, an embedded ActiveMQ JMS broker is created using context scanning and Java configuration. The @Bean annotation creates the connectionFactory bean using a CachingConnectionFactory, and creates an embedded broker using the broker URL vm://localhost. This will create the required connection factory for the message-driven and outbound JMS channel adapters. The Java configuration file is shown in Listing 5–11.
Listing 5–11. Configuring the JMS Connection Using the JmsConfiguration Class
package com.apress.prospringintegration;


import org.apache.activemq.ActiveMQConnectionFactory;

import org.springframework.context.annotation.Bean;

import org.springframework.jms.connection.CachingConnectionFactory;

import org.springframework.stereotype.Component;


import javax.jms.ConnectionFactory;


@Component

public class JmsConfiguration {


    @Bean(name = "connectionFactory")

    public ConnectionFactory getConnectionFactory() {

        ActiveMQConnectionFactory targetConnectionFactory = new ActiveMQConnectionFactory();

        targetConnectionFactory.setBrokerURL("vm://localhost");


        CachingConnectionFactory connectionFactory =

                new CachingConnectionFactory(targetConnectionFactory);

        connectionFactory.setSessionCacheSize(10);

        connectionFactory.setCacheProducers(false);


        return connectionFactory;

    }

}
The first requirement for interacting with a JMS broker from Spring Integration is to add the namespace support, as shown in Listing 5–12. Note the addition of the jms namespace. By default, the message-driven and outbound JMS channel adapters use the connection factory with the default name connectionFactory, so it does not need to be declared in the adapter configuration. The message-driven-channel-adapter element is used instead of the inbound-channel-adapter element since it does not require polling, and will forward the JMS message as soon as it is received. Based on the configuration file, when a message is send to the input channel, it will be converted to a JMS message and sent to the requestQueue destination. By convention, a JMS text message is used since the input Message payload is a String. (Further information about JMS message mapping will be discussed in Chapter 12) The JMS message is then received by the message-driven adapter and forwarded to the outputMessage channel. The text message is converted to a String and sent as the Message payload.
Listing 5–12. Spring Configuration File for Sending and Receiving a JMS Message
<?xml version="1.0" encoding="UTF-8"?>

<beans xmlns="http://www.springframework.org/schema/beans"

       xmlns:xsi="http://www.w3.org/2001/XMLSchema-instance"

       xmlns:int="http://www.springframework.org/schema/integration"

       xmlns:jms="http://www.springframework.org/schema/integration/jms"

       xmlns:context="http://www.springframework.org/schema/context"
       xsi:schemaLocation="

    http://www.springframework.org/schema/beans

    http://www.springframework.org/schema/beans/spring-beans-3.0.xsd

    http://www.springframework.org/schema/integration

    http://www.springframework.org/schema/integration/spring-integration-2.0.xsd

    http://www.springframework.org/schema/integration/jms

    http://www.springframework.org/schema/integration/jms/spring-integration-jms-2.0.xsd

    http://www.springframework.org/schema/context

    http://www.springframework.org/schema/context/spring-context-3.0.xsd">


  <context:component-scan base-package="com.apress.prospringintegration"/>


  <int:channel id="input"/>


  <jms:outbound-channel-adapter channel="input" destination-name="requestQueue"/>


  <jms:message-driven-channel-adapter channel="output" destination-name="requestQueue"/>


  <int:channel id="output">

    <int:queue capacity="10"/>

  </int:channel>


</beans>
To test the JmsApp class, run the JMS Spring Integration example application, as shown in Listing 5–13. It should look familiar, since it is almost identical to the first integration project example shown previously. The only change is the reference to the Spring configuration file jms-spring-context.xml. This demonstrates the power of Spring Integration, in which the underlying transport mechanism is irrelevant to the application code. Only a simple configuration change was required to move from the internal message transport to a JMS broker.
Listing 5–13. Example JMS Spring Integration Test Class
package com.apress.prospringintegration;


import org.springframework.context.support.ClassPathXmlApplicationContext;

import org.springframework.integration.Message;

import org.springframework.integration.MessageChannel;

import org.springframework.integration.core.PollableChannel;

import org.springframework.integration.support.MessageBuilder;


public class JmsApp {

        public static void main(String[] args) {

        ClassPathXmlApplicationContext context =

                new ClassPathXmlApplicationContext("classpath:jms-spring-context.xml");

        context.start();


        MessageChannel input = (MessageChannel) context.getBean("input");

        PollableChannel output = (PollableChannel) context.getBean("output");

        input.send(MessageBuilder.withPayload("Pro Spring Integration Example").build());

        Message<?> reply = output.receive();

        System.out.println("received: " + reply);


    }

}
Using Spring Roo to Bootstrap Your Project
Spring Roo is a tool for rapidly developing database-backed web sites using convention over configuration, similar to Ruby on Rails. It creates a Spring-based Java application and supports the entire life cycle, from development to deployment to production. Spring Roo provides a shell interface that creates a web application from the back-end persistence to the front-end CRUD interface, requiring only a domain model definition. The supporting framework uses AOP so that it’s noninvasive and easily removable. There is currently an add-on in development for adding Spring Integration to the Spring Roo project, which will bring rapid convention-over-configuration development to enterprise integration. This Spring Roo add-on is still in early development at the time of this writing, so an example will not be provided, but we recommend keeping an eye out for its release.
Using SpringSource Tool Suite’s Visual Support
SpringSourceTool Suite (STS) is an Eclipse IDE bundled with a set of plug-ins specifically designed for developing Spring-powered enterprise applications. The most important addition for Spring Integration is the graphical Spring configuration design editor. This is an excellent tool for visualizing how your Spring Integration application is wired together between endpoints and channels. You can download STS from www.springsource.com/developer/sts.
For proper Maven integration a Java Development Kit (JDK), not Java Runtime Environment (JRE) must be specified as a runtime parameter using the –vm option in the STS.ini file. The line shown in Listing 5–14 should be added to the STS.ini file located in the STS installation directory.
Listing 5–14. STS.ini File with –vm Option Pointing to the JDK
-vm /path/to/javaw
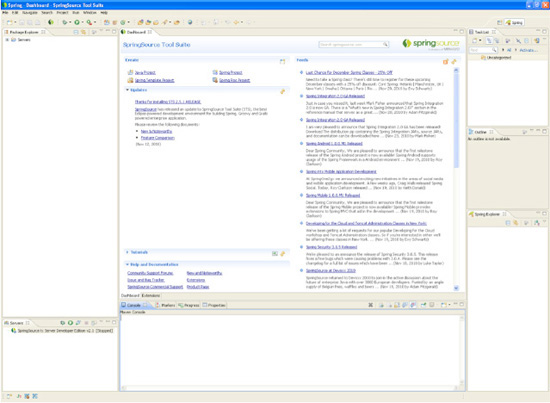
Starting STS displays the familiar Eclipse application’s welcome screen. Close the welcome page and STS will appear, as shown in Figure 5–1.
Creating a Spring Integration Application Using STS
STS has a number of starting templates for creating a Spring application. The templates create a Maven-based application that includes unit test support. To create a Spring project, select New ![]() Spring Template Project from the File menu, as shown in Figure 5–2.
Spring Template Project from the File menu, as shown in Figure 5–2.
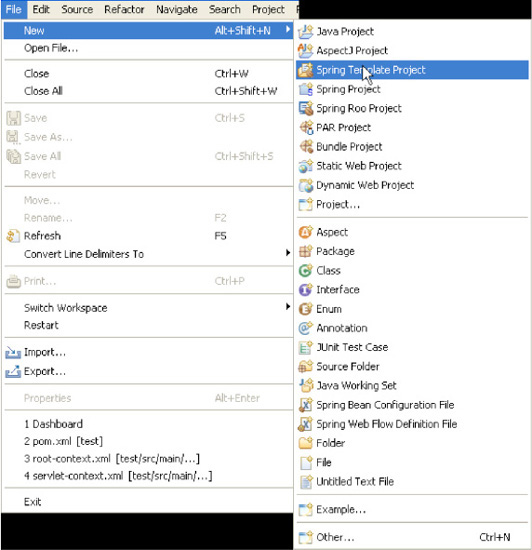
Figure 5–2. Creating a Spring project in STS
This will bring up the New Template Project wizard. STS comes with a number of templates for supporting projects ranging from web applications using Hibernate and JPA to Spring Batch. For this example, select the Simple Spring Utility Project, as shown in Figure 5–3, which will create a basic Spring project including an integration test to load the Spring context.

Figure 5–3. STS Project wizard
Next, specify sts-project as the project name and com.apress.prospringintegration as the package name. This will build a Maven project called sts-project with the base package com.apress.prospringintegration, as shown in Figure 5–4.
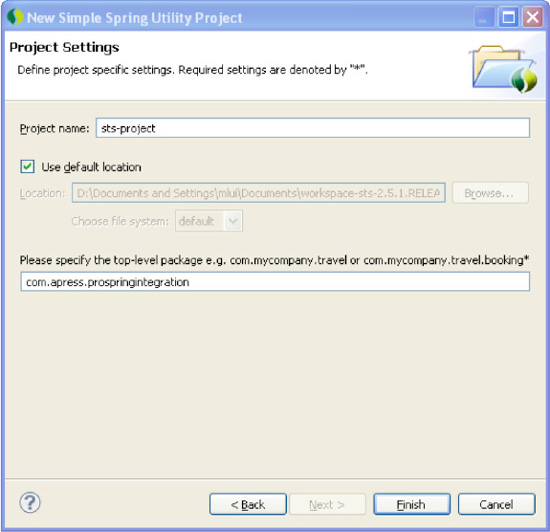
Figure 5–4. Specifying the project and package names
A basic Maven project will be created with the project structure shown in Figure 5–5. All of the basic classes and configuration files will be created, including the root Maven pom.xml file, the Spring configuration file app-context.xml, and the integration unit test file ExampleConfigurationTests.java, which leverages the Spring testing harness that loads the Spring context.
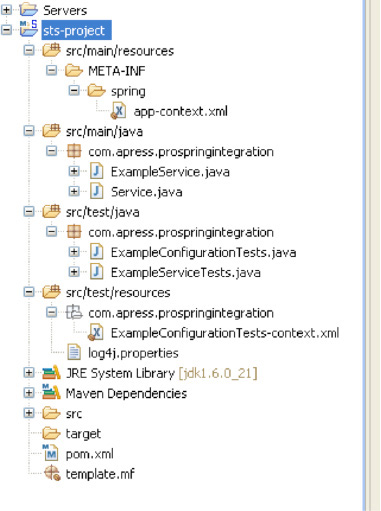
Figure 5–5. STS Spring project
Next, we will create an example similar to the first Spring project using STS, in which a message will published to a channel. An outbound JMS adapter will forward the message to the ActiveMQ JMS broker. A message-driven JMS channel adapter will receive the message and forward it to a service activator, which will log the message.
The first step is to add the Maven dependencies to the pom.xml file, as shown in Listing 5–12. Add the Spring Integration core and JMS dependencies to support our example. Also, add the ActiveMQ client and the CGLIB library to support context scanning to simplify the XML configuration. The spring-context dependency is removed, since it has already been brought in as a Spring Integration dependency, and to prevent version conflicts (see Listing 5–15). Also, a number of files may be removed from the project since they will not be used. These include ExampleService.java, Service.java, and ExampleServiceTests.java.
Listing 5–15. STS pom.xml Maven Confiuration File
<dependency>

  <groupId>org.springframework.integration</groupId>

  <artifactId>spring-integration-core</artifactId>

  <version>2.0.1.RELEASE</version>

</dependency>

<dependency>
  <groupId>org.springframework.integration</groupId>

  <artifactId>spring-integration-jms</artifactId>

  <version>2.0.1.RELEASE</version>

</dependency>

<dependency>

  <groupId>org.apache.activemq</groupId>

  <artifactId>activemq-core</artifactId>

  <version>5.4.1</version>

</dependency>

<dependency>

  <groupId>cglib</groupId>

  <artifactId>cglib-nodep</artifactId>

  <version>2.2</version>

</dependency>
Creating the Integration
One of the best features of using STS with Spring Integration is the design editor for wiring up the channels and endpoints used in the application. The design editor supports two-way round-tripping between the XML source file and the graphic design editor. Any changes in either the design or Spring XML configuration file will be synchronized with the other representation. The design editor also supports importing Spring configuration files created by other editors or IDEs. In order to use the STS integration design editor, the required Spring Integration namespaces must be added. You can do this by first double-clicking the app-context.xml Spring configuration file in the Project Explorer. Then select the Namespaces tab, as shown in Figure 5–6. For our example, select the int and int-jms Spring Integration namespaces, as well as the Spring context, in order to support context scanning. This will result in some additional tabs appearing in the design editor, including integration-graph, which is the Spring Integration design editor.
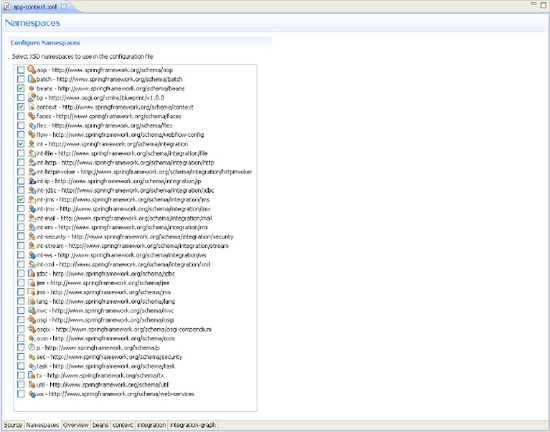
Figure 5–6. Namespace Selection for the Spring Configuration Design Editor
You can configure the previous integration example by dragging and dropping components onto the design pane. First select the Channels tab on the left side, and drag and drop two channel components to represent the input and output channels. You can name a component by double-clicking it, which will bring up the Properties pane in the lower window. Name one of the channels input and the other output. The resulting design will look something like Figure 5–7.
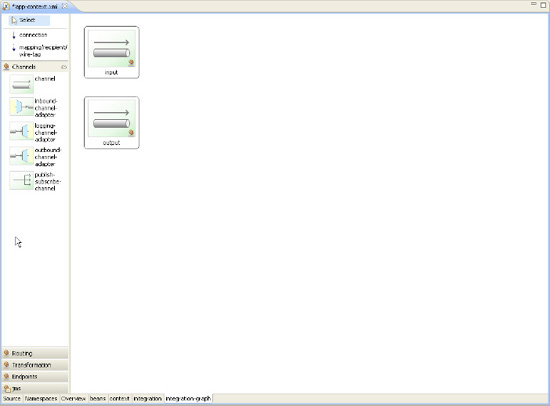
Figure 5–7. STS Spring Integration Design Editor
The next step is to add the JMS outbound channel adapter and the JMS message-driven channel adapter. Select the jms tab on the left side to bring up the JMS components. Drag and drop the outbound and message-driven JMS channel adapters onto the design pane. Name the outbound adapter jmsOut and the message-driven adapter jmsIn. In addition, set the destination-name properties to test.queue for both of the components so they will use the same JMS queue. The result should look similar to Figure 5–8.
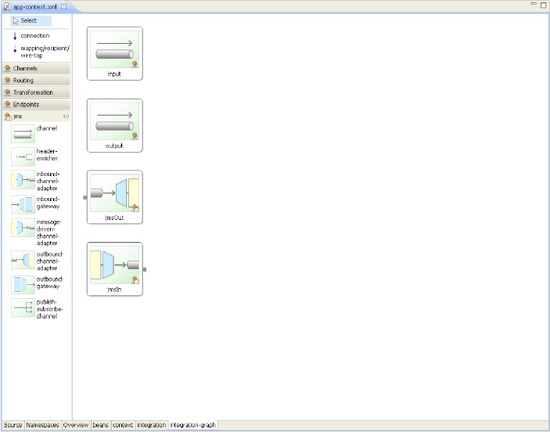
Figure 5–8. Adding Adapters using the Design Editor
The last component to add for this example is the service activator used to receive the incoming JMS message and log it. Select the Endpoints tab on the left, and drag and drop the service-activator endpoint to the design pane. Name the service-activator endpoint messageHandler. In addition, set the ref property to jmsHandler to reference the Spring service activator, which we will created shortly. The resultant diagram should look like Figure 5–9. The Spring Integration example is now ready for wiring up.
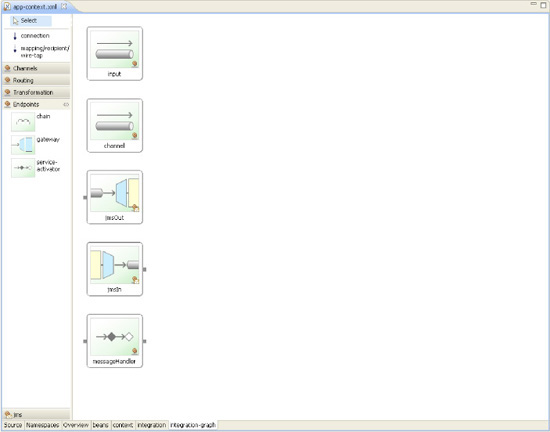
Figure 5–9. Adding Service Activator with Design Editor
The last step is to wire up the channels to the endpoints. Select the connection icon on the left side. This will allow creating connections between the channels and endpoints. Drag a connection between the input channel and the jmsOut outbound channel adapter. Then drag a connection between the jmsIn message-driven adapter and the output channel. Finally, drag a connection between the output channel and the messageHandler service activator. The final design should look like Figure 5–10. This completes the initial design. The next step is to review the app-context.xml file.
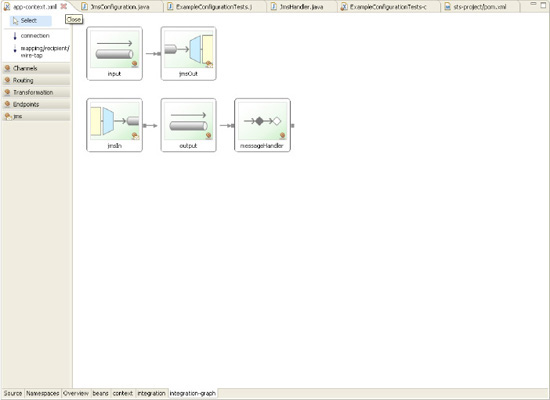
Figure 5–10. Wiring Components with Design Editor
You will need to make some modifications to the app-context.xml file. First, remove the service bean since it is not being used. Then add component scanning to support annotations for the service activator class by setting the base package to com.apress.prospringintegration. This will allow any class in this package to be scanned for annotation support. Component scanning will be used for the service activator and the JMS connection factory. The final app-context.xml file is shown in Listing 5–16.
Listing 5–16. Spring Integration Configuration file app-context.xml
<?xml version="1.0" encoding="UTF-8"?>

<beans xmlns="http://www.springframework.org/schema/beans"

       xmlns:xsi="http://www.w3.org/2001/XMLSchema-instance"

       xmlns:int="http://www.springframework.org/schema/integration"

       xmlns:int-jms="http://www.springframework.org/schema/integration/jms"

       xmlns:context="http://www.springframework.org/schema/context"

       xsi:schemaLocation="http://www.springframework.org/schema/integration

    http://www.springframework.org/schema/integration/spring-integration-2.0.xsd

    http://www.springframework.org/schema/integration/jms

    http://www.springframework.org/schema/integration/jms/spring-integration-jms-2.0.xsd

    http://www.springframework.org/schema/beans

    http://www.springframework.org/schema/beans/spring-beans-3.0.xsd
    http://www.springframework.org/schema/context

    http://www.springframework.org/schema/context/spring-context-3.0.xsd">


  <description>Example configuration to get you started.</description>


  <context:component-scan

      base-package="com.apress.prospringintegration"></context:component-scan>


  <int:channel id="input"></int:channel>


  <int:channel id="output"></int:channel>


  <int-jms:outbound-channel-adapter id="jmsOut" channel="input"

                                    destination-name="test.queue">

  </int-jms:outbound-channel-adapter>


  <int-jms:message-driven-channel-adapter id="jmsIn" channel="output"

                                          destination-name="test.queue"/>


  <int:service-activator id="messageHandler" input-channel="output"

                         ref="jmsHandler">

  </int:service-activator>


</beans>
The ActiveMQ configuration will be done using the Spring Java configuration support. Using a Java class, annotations, and component scanning, you can configure the ActiveMQ connection factory as shown in Listing 5–17. The Spring bean is named connectionFactory, which is the default connection factory bean name for the JMS channel adapters. The broker URL is set to vm://localhost to enable the embedded ActiveMQ JMS broker. This is done to simplify the example.
Listing 5–17. ActiveMQ Connection Factory Configuration
package com.apress.prospringintegration;


import org.apache.activemq.ActiveMQConnectionFactory;

import org.springframework.context.annotation.Bean;

import org.springframework.jms.connection.CachingConnectionFactory;

import org.springframework.stereotype.Component;


import javax.jms.ConnectionFactory;


@Component

public class JmsConfiguration {


    @Bean(name = "connectionFactory")

    public ConnectionFactory getConnectionFactory() {

        ActiveMQConnectionFactory targetConnectionFactory = new ActiveMQConnectionFactory();

        targetConnectionFactory.setBrokerURL("vm://localhost");


        CachingConnectionFactory connectionFactory =

                new CachingConnectionFactory(targetConnectionFactory);

        connectionFactory.setSessionCacheSize(10);

        connectionFactory.setCacheProducers(false);
        return connectionFactory;

    }

}
The final piece of the message chain is to create the service activator class. This class will receive the message from the output channel and log it to the console. Again, component scanning and annotations are used to identify the Spring bean and service activator method. The class is shown in Listing 5–18.
Listing 5–18. Service Activator Class
package com.apress.prospringintegration;


import org.springframework.integration.annotation.ServiceActivator;

import org.springframework.stereotype.Component;


@Component

public class JmsHandler {

    @ServiceActivator

    public void handleMessage(String message) {

        System.out.println("Received message: " + message);

    }

}
Testing the Integration
In order to test the Spring Integration example, the Spring test harness created by the STS Spring template will be used (see Listing 5–19). The input channel is autowired and the MessageBuilder utility class is used to send a message to the input channel. The test harness loads the Spring context, runs the test cases, and then exits. A delay is added to ensure that the JMS message is received by the message-driven adapter.
Listing 5–19. Spring Integration Test Class
package com.apress.prospringintegration;


import org.junit.Test;

import org.junit.runner.RunWith;

import org.springframework.beans.factory.annotation.Autowired;

import org.springframework.integration.MessageChannel;

import org.springframework.integration.support.MessageBuilder;

import org.springframework.test.context.ContextConfiguration;

import org.springframework.test.context.junit4.SpringJUnit4ClassRunner;


@ContextConfiguration

@RunWith(SpringJUnit4ClassRunner.class)

public class ExampleConfigurationTests {


        @Autowired

        private MessageChannel input;


        @Test
        public void testSendingMessage() throws Exception {

                input.send(MessageBuilder.withPayload("Pro Spring Integration Example")

                                .build());


                Thread.sleep(5000);

        }

}
You can execute the text code by right-clicking the ExampleConfigurationTest class in the Package Explorer window and selecting Run As ![]() JUnit Test. The unit test will run and the message payload “Pro Spring Integration Example” will be logged in the console window.
JUnit Test. The unit test will run and the message payload “Pro Spring Integration Example” will be logged in the console window.
Playing Well With Others
Since Spring Integration uses the underlying model and abstraction of Spring, it can work well with the other Spring projects. Some of the different possibilities in this regard will be discussed in more detail in later chapters.
Spring Batch
Despite all the movement toward services and message-based architectures, we often still need to process large sets of data using batch processes. Spring Batch is optimized for these types of needs (e.g., reading-in large flat files containing millions of rows of data and processing on some sort of calendar bases). Spring Integration interfaces easily with Spring Batch, using messaging to start jobs and publish events for processing “done” notifications and error handling. Many of the administrative requirements can be fulfilled using both of the projects. Using Spring Integration with Spring Batch will be discussed in detail in a Chapter 17.
Spring BlazeDS
BlazeDSis a server-side Java remoting and messaging technology for interfacing with the Adobe Flex and Adobe AIR rich web clients. It allows bidirectional messaging between the web client and server. Spring BlazeDS Integration is Spring project to support interfacing a Spring web application with Adobe Flex, a rich front end client. The messaging technology can be further enhanced by leveraging Spring Integration. This technology will be discussed in more detail in Chapter 18.
Summary
This chapter introduced the basic Spring Integration components and how they extend the Spring Framework into the world of messaging and event-driven architecture. We covered how Maven can be leveraged as the build and project management tool, and we discussed how to use Maven with Spring Integration. In addition, we showed how Maven can be integrated with most Java IDEs. We also demonstrated how to build a Spring Integration application. The example was extended to create the same application used in Chapter 2. Finally, we discussed how Spring Integration can be used with other Spring projects. Spring Integration can enhance other projects with messaging and integration support.