
CHAPTER 9
![]()
Endpoints and Adapters
An endpoint describes how application code communicates with the messaging framework. An endpoint also hides the complexity of interacting with the messaging system, allowing the developer to focus on the business logic instead of the details of how to send and receive messages. In previous chapters, we discussed the many endpoints that connect with directly with the Spring Integration Framework. These endpoints include transformers (discussed in Chapter 7), and routers, splitters, aggregators, and messaging bridges (discussed in Chapter 8). In this chapter we will focus on the endpoints that connect to the message channels, application code, external applications, and services. These include channel adapters, services activators, and messaging gateways. Finally, the topic of how secure and send messages to a secure message channel will be covered.
Messaging Endpoint API
Spring Integration provides a general API that supports sending and consuming messages to and from a message channel. Sending messages is very straightforward, but receiving them can be more complicated. There are two types of message consumers: polling consumers and event-driven consumers. which will be discussed in this chapter.
Polling and Event-Driven Consumers
A Spring Integration consumer can either pull messages from a channel periodically (using polling), or simply process messages when messages are given to it by the channel. Using polling, the application can control when to receive the messages from the message channel. When an application is busy, it has the option of slowing down the message consumption. However, there is the issue of latency since the messages are polled at a specified rate. The other option is an event-driven consumer, where the application handles the messages as soon as they arrive. Event-driven consumers will have no latency, and a fixed set of concurrent consumers can be used to throttle the load.
Message Assignment vs. Message Grab
When the message consumer is much slower than the message sender, there is a potential for large numbers of messages to queue up in the message channel. One approach to offset this problem is to add additional message consumers to handle the load. A better approach is to use the message dispatcher pattern, which allows a message consumer to receive messages, and delegates the messages to multiple message handlers. By using this pattern, the application can throttle the speed of message consumption. In Spring Integration, both polling and event-driven consumers accept a task executor that can dispatch the messages to separate worker threads to handle messages concurrently (see Figure 9–1). This is known as an executor channel, and was discussed in Chapter 6. More detailed discussion about the task executor can be found in Chapter 16.
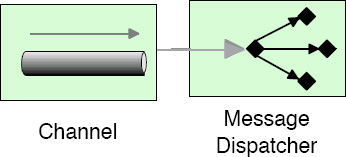
Figure 9–1. The Message Dispatcher Dispatches Messages Received from the Message Channel.
Synchronous and Asynchronous Services
A synchronous endpoint does not return until the downstream processing is finished. On the other hand, a asynchronous endpoint returns immediately, allowing the downstream process to run in another execution thread. It is often difficult to decide if a service endpoint should be exposed synchronously or asynchronously, since different clients may have different requirements. As a result, we would like to support both types of service endpoints. Using service activator, which will be discussed in more detail following, a synchronous service endpoint can be exposed as an asynchronous service endpoint as well. A service activator can be used to connect a message channel to the synchronous service endpoint. As a result, the synchronous client can invoke the application directly, while the asynchronous client can invoke the asynchronous endpoint by sending a message to the message channel.
Enterprise Integration Patterns 1 defines a number of patterns on how to consume a message, but only a few patterns on how to send a message. This is because sending a message from an application to a messaging system is very simple. The application only needs to package the data into a message and send to the message to the channel. However, receiving messages is another story. There are many factors that need to be considered when an application receives a message.
First, in order to receive a message, the application needs to understand how to retrieve a message from the message channel. The application may need to poll the message channel for messages. If the message channel is empty, the application may be blocked until a message arrives, or if the polling times out until the application can process some other business logic. Once the message arrives, the application can handle the message within the same thread or hand it off to a separate thread. To make things more complicated, the application may not poll the message channel, but will instead delegate the message to a dispatcher once it arrives in the message channel.
As discussed in Chapter 8, an endpoint that sends messages is called the message sender or producer, and the endpoint that receives messages is called the message receiver or consumer. Message endpoints can be defined similarly. A message endpoint that receives messages from a message channel is called the inbound message endpoint. A message endpoint that sends messages to a message channel is called the outbound message endpoint. Both the inbound and outbound message endpoints can be polling or event-driven.
__________
1 Gregor Hohpe op. cit.
The polling endpoint will send messages to the message channel periodically or receive messages from the message channel by polling. Alternatively, the event-driven endpoint will send messages to the message channel when it needs to, or receive messages from the message channel once a message has been sent.
Polling Consumers
Spring Integration enables two applications to communicate with each other via a message channel. This decoupling also allows the two applications processes to happen at different speeds (see Figure 9–2).
Figure 9–2. Application Decoupling via a Message Channel
For example, assume application B is a very busy system and has limited resources. If application A processes and produces messages faster than application B can handle, application B will be overloaded. In order to avoid this, application B needs to stop consuming messages when it is too busy. Depending on the type and capacity of the message channel queue, application A may fill up the message channel queue and block until the queue is freed up by application B.
Polling can be used as a throttling mechanism because the receiving application has control over when to consume messages from the messaging system. When the application is busy or short of resources, it has the option to stop consuming messages. Spring Integration implements polling by using the class org.springframework.integration.endpoint.PollingConsumer. The PollingConsumer interface defines an endpoint that interacts a message channel; this channel implements the org.springframework.integration.core.PollableChannel interface.
In Chapter 6, messages were received from QueueChannel by directly calling the PollableChannel's receive method. Let's modify the example used in Chapter 6 to use a PollingConsumer. Listing 9–1 is the Ticket model class, and Listing 9–2 shows the generator class that produces a list of Ticket objects.
Listing 9–1. Ticket.java
package com.apress.prospringintegration.endpoints.core;


import java.util.Calendar;


public class Ticket

{

    public enum Priority

    {

        low,

        medium,

        high,

        emergency

    }


    private long ticketId;

    private Calendar issueDateTime;

    private String description;

    private Priority priority;
    public Ticket()

    {

    }


    public long getTicketId()

    {

        return ticketId;

    }


    public void setTicketId(long ticketId)

    {

        this.ticketId = ticketId;

    }


    public Calendar getIssueDateTime()

    {

        return issueDateTime;

    }


    public void setIssueDateTime(Calendar issueDateTime)

    {

        this.issueDateTime = issueDateTime;

    }


    public String getDescription()

    {

        return description;

    }


    public void setDescription(String description)

    {

        this.description = description;

    }


    public Priority getPriority()

    {

        return priority;

    }


    public void setPriority(Priority priority)

    {

        this.priority = priority;

    }


    public String toString()

    {

        return String.format("Ticket# %d: [%s] %s", ticketId, priority, description);

    }

}
Listing 9–2. TicketGenerator.java
package com.apress.prospringintegration.endpoints.core;


import com.apress.prospringintegration.endpoints.core.Ticket.Priority;

import org.springframework.stereotype.Component;


import java.util.ArrayList;

import java.util.GregorianCalendar;

import java.util.List;


@Component

public class TicketGenerator {

    private long nextTicketId;


    public TicketGenerator() {

        this.nextTicketId = 1000L;

    }


    public List<Ticket> createTickets() {

        List<Ticket> tickets = new ArrayList<Ticket>();


        tickets.add(createLowPriorityTicket());

        tickets.add(createLowPriorityTicket());

        tickets.add(createLowPriorityTicket());

        tickets.add(createLowPriorityTicket());

        tickets.add(createLowPriorityTicket());

        tickets.add(createMediumPriorityTicket());

        tickets.add(createMediumPriorityTicket());

        tickets.add(createMediumPriorityTicket());

        tickets.add(createMediumPriorityTicket());

        tickets.add(createMediumPriorityTicket());

        tickets.add(createHighPriorityTicket());

        tickets.add(createHighPriorityTicket());

        tickets.add(createHighPriorityTicket());

        tickets.add(createHighPriorityTicket());

        tickets.add(createHighPriorityTicket());

        tickets.add(createEmergencyTicket());

        tickets.add(createEmergencyTicket());

        tickets.add(createEmergencyTicket());

        tickets.add(createEmergencyTicket());

        tickets.add(createEmergencyTicket());


        return tickets;

    }


    Ticket createEmergencyTicket() {

        return createTicket(Priority.emergency,

                "Urgent problem. Fix immediately or revenue will be lost!");

    }


    Ticket createHighPriorityTicket() {

        return createTicket(Priority.high,

                "Serious issue. Fix immediately.");

    }
    Ticket createMediumPriorityTicket() {

        return createTicket(Priority.medium,

                "There is an issue; take a look whenever you have time.");

    }


    Ticket createLowPriorityTicket() {

        return createTicket(Priority.low,

                "Some minor problems have been found.");

    }


    Ticket createTicket(Priority priority, String description) {

        Ticket ticket = new Ticket();

        ticket.setTicketId(nextTicketId++);

        ticket.setPriority(priority);

        ticket.setIssueDateTime(GregorianCalendar.getInstance());

        ticket.setDescription(description);


        return ticket;

    }

}
Listing 9–3 shows the TicketMessageHandler that implements theorg.springframework.integration.core.MessageHandler interface. For every received message from the message channel, the handleMessage method will be invoked. In the current implementation, the Ticket object will be extracted from the message, and the content of the Ticket will be displayed to the console.
Listing 9–3. TicketMessageHandler.java
package com.apress.prospringintegration.endpoints.eventdrivenconsumer;


import com.apress.prospringintegration.endpoints.core.Ticket;

import org.springframework.integration.Message;

import org.springframework.integration.MessageDeliveryException;

import org.springframework.integration.MessageHandlingException;

import org.springframework.integration.MessageRejectedException;

import org.springframework.integration.core.MessageHandler;

import org.springframework.stereotype.Component;


@Component

public class TicketMessageHandler implements MessageHandler {


    @Override

    public void handleMessage(Message<?> message)

            throws MessageHandlingException, MessageDeliveryException {

        Object payload = message.getPayload();


        if (payload instanceof Ticket) {

            handleTicket((Ticket) payload);

        } else {

            throw new MessageRejectedException(message,

                    "Unknown data type has been received.");
        }

    }


    void handleTicket(Ticket ticket) {

        System.out.println("Received ticket - " + ticket.toString());

    }

}
The ProblemReporter class creates a message with the payload Ticket and sends the message to the message channel, as shown in Listing 9–4.
Listing 9–4. ProblemReporter.java
package com.apress.prospringintegration.endpoints.pollingconsumer;


import com.apress.prospringintegration.endpoints.core.Ticket;

import org.springframework.beans.factory.annotation.Value;

import org.springframework.integration.channel.QueueChannel;

import org.springframework.integration.support.MessageBuilder;

import org.springframework.stereotype.Component;


@Component

public class ProblemReporter {


    private QueueChannel channel;


    public ProblemReporter() {

    }


    @Value("#{ticketChannel}")

    public void setChannel(QueueChannel channel) {

        this.channel = channel;

    }


    void openTicket(Ticket ticket) {

        channel.send(MessageBuilder.withPayload(ticket).build());

        System.out.println("Ticket Sent - " + ticket.toString());

    }

}
The Spring configuration file is shown in Listing 9–5. Component scanning is used for the ticket generator and message handling classes. A queue channel named ticketChannel is configured with a queue size of 50 messages.
Listing 9–5. polling-consumer.xml
<?xml version="1.0" encoding="UTF-8"?>

<beans xmlns="http://www.springframework.org/schema/beans"

       xmlns:xsi="http://www.w3.org/2001/XMLSchema-instance"

       xmlns:int="http://www.springframework.org/schema/integration"

       xmlns:context="http://www.springframework.org/schema/context"

       xsi:schemaLocation="http://www.springframework.org/schema/integration

    http://www.springframework.org/schema/integration/spring-integration-2.0.xsd

    http://www.springframework.org/schema/beans

    http://www.springframework.org/schema/beans/spring-beans-3.0.xsd
    http://www.springframework.org/schema/context

    http://www.springframework.org/schema/context/spring-context-3.0.xsd">


  <context:component-scan

      base-package="com.apress.prospringintegration.endpoints.core"/>


  <context:component-scan

      base-package="com.apress.prospringintegration.endpoints.pollingconsumer"/>


  <int:channel id="ticketChannel">

    <int:queue capacity="50"/>

  </int:channel>


</beans>
The main class using the PollingConsumer is shown in Listing 9–6. The PollingConsumer will poll the incoming message channel. Once a message has been polled from the message channel, the message will be delegated to the TicketMessageHandler instance. The PollingConsumer requires a trigger in order to poll messages defined by the org.springframework.scheduling.Trigger interface. There are two Trigger implementations: org.springframework.scheduling.support.PeriodicTrigger and org.springframework.scheduling.support.CronTrigger.
In this example, the PeriodicTrigger implementation is used. The first trigger will happen after 5000 ms, and each of following triggers will wait 1,000 ms between each poll. The time actually starts after the first completion of message handling if setFixedRate is false; otherwise, the time will be measured exactly between each scheduled polling.
Listing 9–6. Main.java for Polling Consumer
package com.apress.prospringintegration.endpoints.pollingconsumer;


import com.apress.prospringintegration.endpoints.core.Ticket;

import com.apress.prospringintegration.endpoints.core.TicketGenerator;

import org.springframework.context.support.ClassPathXmlApplicationContext;

import org.springframework.integration.channel.QueueChannel;

import org.springframework.integration.endpoint.PollingConsumer;

import org.springframework.integration.scheduling.PollerMetadata;

import org.springframework.scheduling.support.PeriodicTrigger;


import java.util.List;


public class Main {

    private final static int RECEIVE_TIMEOUT = 1000;


    public static void main(String[] args) {

        String contextName = "polling-consumer.xml";


        ClassPathXmlApplicationContext applicationContext =

                new ClassPathXmlApplicationContext(contextName);

        applicationContext.start();


        ProblemReporter problemReporter =

                applicationContext.getBean(ProblemReporter.class);

        TicketMessageHandler ticketMessageHandler =

                applicationContext.getBean(TicketMessageHandler.class);
        TicketGenerator ticketGenerator =

                applicationContext.getBean(TicketGenerator.class);


        QueueChannel channel =

                applicationContext.getBean("ticketChannel", QueueChannel.class);


        // Define the polling consumer

        PollingConsumer ticketConsumer =

                new PollingConsumer(channel, ticketMessageHandler);

        ticketConsumer.setReceiveTimeout(RECEIVE_TIMEOUT);

        ticketConsumer.setBeanFactory(applicationContext);


        // Setup the poller using periodic trigger

        PeriodicTrigger periodicTrigger = new PeriodicTrigger(1000);

        periodicTrigger.setInitialDelay(5000);

        periodicTrigger.setFixedRate(false);


        PollerMetadata pollerMetadata = new PollerMetadata();

        pollerMetadata.setTrigger(periodicTrigger);

        pollerMetadata.setMaxMessagesPerPoll(3);


        ticketConsumer.setPollerMetadata(pollerMetadata);


        // Starts the polling consumer in the other thread

        ticketConsumer.start();


        // Generates messages and sends to the channel

        List<Ticket> tickets = ticketGenerator.createTickets();

        while (true) {

            for (Ticket ticket : tickets) {

                problemReporter.openTicket(ticket);

            }

        }


    }


}
The PollingConsumer also can be polled based on a more complex schedule by using CronTrigger. The CronTrigger implementation supports cron expressions. In the following example, ticketConsumer will poll every minute.
CronTrigger cronTrigger = new CronTrigger("0 * * * * *");
The cron expression contains six space-separated fields: Second, Minute, Hour, Day of Month, Month, and Day of Week.
/* Trigger every hour after business hour (after 6:00pm) */

new CronTrigger("* 0 19–00 * * *");


/* Trigger between 09:00am to 05:00pm 15 minutes past every hour only on Monday to Friday */

new CronTrigger("* 15 9–17 * * MON-FRI");
The PollingConsumer also supports batch polling. By using the setMaxMessagesPerPoll method, PollingConsumer will keep polling the message channel until reaching the specific value or a null value. By combining the setMaxMessagesPerPoll method with the setReceiveTimeout method, there will be some interesting behavior. Considering the following code examples:
// Example 1

PollerMetadata pollerMetadata = new PollerMetadata();

pollerMetadata.setTrigger(periodicTrigger);

pollerMetadata.setMaxMessagesPerPoll(10);

ticketConsumer.setPollerMetadata(pollerMetadata);

ticketConsumer.setReceiveTimeout(100);


// Example 2

PollerMetadata pollerMetadata = new PollerMetadata();

pollerMetadata.setTrigger(periodicTrigger);

pollerMetadata.setMaxMessagesPerPoll(100);

ticketConsumer.setPollerMetadata(pollerMetadata);

ticketConsumer.setReceiveTimeout(10);
Assume that there are 1,000 messages in the message channel and it is waiting for polling. The first example has a 100-ms receive timeout and maximum ten messages per poll. This means that the endpoint will receive ten messages per second; in other words, it will take 1 second to drain the message channel. In the second example, the PollingConsumer has a 10-ms receive timeout and maximum 100 messages per poll. This means that the endpoint will take 100 ms to drain the message channel.
The PollingConsumer needs at least a single thread to perform message polling and handling. However, the PollingConsumer can delegate the message to the message handler in the separated threads by using the setTaskExecutor method with the Spring org.springframework.core.task.TaskExecutor interface. It also supports Spring managed transactions by calling the setTransactionManager method.
Event-Driven Consumers
Although a polling consumer is good for throttling when the receiving application is too busy, it involves active polling, so resources are wasted if there is no message to consume from the message channel. Event-driven consumers are very different from polling consumers. Event-driven consumers will handle a message as soon as the message has been delivered from the message channel. Instead of actively polling, an event-driven consumer does nothing but wait for the messages coming from the message channel. The org.springframework.integration.endpoint.EventDrivenConsumer only supports channels that implement the org.springframework.integration.core.SubscribableChannel interface, such as DirectChannel, ExecutorChannel, PublishSubscribeChannel, and SubscribableJmsChannel. In Chapter 6, the message receiver was implemented by calling SubscribableChannel's subscribe method.
The problem reporter example will be modified to use an event-driven consumer. The ProblemReporter class shown in Listing 9–7 is modified to use DirectChannel.
Listing 9–7. ProblemReporter.java for Event-Driven Consumer
package com.apress.prospringintegration.endpoints.eventdrivenconsumer;


import com.apress.prospringintegration.endpoints.core.Ticket;

import org.springframework.beans.factory.annotation.Value;

import org.springframework.integration.channel.DirectChannel;

import org.springframework.integration.message.GenericMessage;

import org.springframework.stereotype.Component;


@Component
public class ProblemReporter {

    private DirectChannel channel;


    public ProblemReporter() {

    }


    @Value("#{ticketChannel}")

    public void setChannel(DirectChannel channel) {

        this.channel = channel;

    }


    void openTicket(Ticket ticket) {

        channel.send(new GenericMessage<Ticket>(ticket));

        System.out.println("Ticket Sent - " + ticket.toString());

    }

}
The Spring configuration file is shown in Listing 9–8. Again, component scanning is used to configure the required classes.
Listing 9–8. Spring Configuration for Event-Driven Consumer event-driven-consumer.xml
<?xml version="1.0" encoding="UTF-8"?>

<beans xmlns="http://www.springframework.org/schema/beans"

       xmlns:xsi="http://www.w3.org/2001/XMLSchema-instance"

       xmlns:int="http://www.springframework.org/schema/integration"

       xmlns:context="http://www.springframework.org/schema/context"

       xsi:schemaLocation="http://www.springframework.org/schema/integration

    http://www.springframework.org/schema/integration/spring-integration-2.0.xsd

    http://www.springframework.org/schema/beans

    http://www.springframework.org/schema/beans/spring-beans-3.0.xsd

    http://www.springframework.org/schema/context

    http://www.springframework.org/schema/context/spring-context-3.0.xsd">


  <context:component-scan

      base-package="com.apress.prospringintegration.endpoints.core"/>


  <context:component-scan

      base-package="com.apress.prospringintegration.endpoints.eventdrivenconsumer"/>


  <int:channel id="ticketChannel">

    <int:dispatcher failover="true" load-balancer="none"/>

  </int:channel>


</beans>
The event-driven consumer main class is shown in Listing 9–9. A reference to the direct channel ticketChannel and to themessage handler TicketMessageHandler class is passed to the EventDrivenConsumer. Once a message has arrived from the message channel, the message will be dispatched to the provided message handler. There is no need to define a trigger since the message is pushed to the message consumer instead of polled.
Listing 9–9. Main.java for Event-Driven Consumer
package com.apress.prospringintegration.endpoints.eventdrivenconsumer;


import com.apress.prospringintegration.endpoints.core.Ticket;

import com.apress.prospringintegration.endpoints.core.TicketGenerator;

import org.springframework.context.support.ClassPathXmlApplicationContext;

import org.springframework.integration.channel.DirectChannel;

import org.springframework.integration.endpoint.EventDrivenConsumer;


import java.util.List;


public class Main {


    public static void main(String[] args) {

        String contextName = "event-driven-consumer.xml";


        ClassPathXmlApplicationContext applicationContext =

                new ClassPathXmlApplicationContext(contextName);

        applicationContext.start();


        ProblemReporter problemReporter =

                applicationContext.getBean(ProblemReporter.class);

        TicketGenerator ticketGenerator =

                applicationContext.getBean(TicketGenerator.class);

        TicketMessageHandler ticketMessageHandler =

                applicationContext.getBean(TicketMessageHandler.class);


        DirectChannel channel =

                applicationContext.getBean("ticketChannel", DirectChannel.class);


        EventDrivenConsumer eventDrivenConsumer =

                new EventDrivenConsumer(channel, ticketMessageHandler);

        eventDrivenConsumer.start();


        List<Ticket> tickets = ticketGenerator.createTickets();


        int count = 0;

        while (count++ < 5) {

            for (Ticket ticket : tickets) {

                problemReporter.openTicket(ticket);

            }

        }

    }

}
ConsumerEndpointFactoryBean
So far, the examples have required knowing of the type of messaging channel in order to decide which type of consumer to use. Spring Integration also provides an endpoint factory org.springframework.integration.config.ConsumerEndpointFactoryBean that works for any kind of message channel. Simply provide a MessageChannel, MessageHandler, and (if polling is required) PollerMetatdata reference, and this factory class will do the rest.
To demonstrate the power of the ConsumerEndpointFactoryBean factory, the previous event-driven consumer example will be modified to use the factory class. Minimal changes are required to the event-driven consumer example to use the factory. Java configuration provides a simple means of creating the endpoint, as shown in Listing 9–10. ConsumerEndpointFactoryBean is instantiated, and a reference is passed to the MessageChannelticketChannel and the MessageHandlerticketMessageHandler. The PollerMetadata reference is not required since this is an event-driven endpoint.
Listing 9–10. ConsumerEndpointFactoryBean Example Java Configuration
package com.apress.prospringintegration.endpoints.consumerendpointfactory;


import org.springframework.beans.factory.annotation.Value;

import org.springframework.context.annotation.Bean;

import org.springframework.context.annotation.Configuration;

import org.springframework.integration.MessageChannel;

import org.springframework.integration.config.ConsumerEndpointFactoryBean;

import org.springframework.integration.core.MessageHandler;


@Configuration

public class ConsumerEndpointConfiguration {


    @Value("#{ticketChannel}")

    private MessageChannel inputChannel;


    @Value("#{ticketMessageHandler}")

    private MessageHandler handler;


    @Bean

    public ConsumerEndpointFactoryBean consumerEndpoint() {

        ConsumerEndpointFactoryBean factoryBean = new ConsumerEndpointFactoryBean();

        factoryBean.setInputChannel(inputChannel);

        factoryBean.setHandler(handler);

        // Need to set pollerMetadata for polling consumer

        //factoryBean.setPollerMetadata(pollerMetadata);

        return factoryBean;

    }

}
Using Java configuration only requires adding the configuration class to the component-scanning package path, as shown in Listing 9–11. The only other elements in the Spring configuration file are component scanning for the message-sending components and the message channel itself.
Listing 9–11. ConsumerEndpointFactoryBean Spring Configuration consumer-endpoint-factory.xml
<?xml version="1.0" encoding="UTF-8"?>

<beans xmlns="http://www.springframework.org/schema/beans"

       xmlns:xsi="http://www.w3.org/2001/XMLSchema-instance"

       xmlns:int="http://www.springframework.org/schema/integration"

       xmlns:context="http://www.springframework.org/schema/context"

       xsi:schemaLocation="http://www.springframework.org/schema/integration

    http://www.springframework.org/schema/integration/spring-integration-2.0.xsd

    http://www.springframework.org/schema/beans
    http://www.springframework.org/schema/beans/spring-beans-3.0.xsd

    http://www.springframework.org/schema/context

    http://www.springframework.org/schema/context/spring-context-3.0.xsd">


  <context:component-scan

      base-package="com.apress.prospringintegration.endpoints.core"/>


  <context:component-scan

      base-package="com.apress.prospringintegration.endpoints.consumerendpointfactory"/>


  <int:channel id="ticketChannel"/>


</beans>
The ConsumerEndpointFactoryBean example main class is shown in Listing 9–12. The only code required for creating the endpoint are the calls to create and start the Spring context. The rest of the code is for supporting sending the message. The most important feature of the ConsumerEndpointFactoryBean factory is that it works for any type of message channel implementation.
Listing 9–12. ConsumerEndpointFactoryBean Example main Class
package com.apress.prospringintegration.endpoints.consumerendpointfactory;


import com.apress.prospringintegration.endpoints.core.Ticket;

import com.apress.prospringintegration.endpoints.core.TicketGenerator;

import org.springframework.context.support.ClassPathXmlApplicationContext;

import org.springframework.integration.channel.DirectChannel;

import org.springframework.integration.endpoint.EventDrivenConsumer;


import java.util.List;


public class Main {


    public static void main(String[] args) {

        ClassPathXmlApplicationContext applicationContext =

                new ClassPathXmlApplicationContext("consumer-endpoint-factory.xml");

        applicationContext.start();


        ProblemReporter problemReporter =

                applicationContext.getBean(ProblemReporter.class);

        TicketGenerator ticketGenerator =

                applicationContext.getBean(TicketGenerator.class);


        List<Ticket> tickets = ticketGenerator.createTickets();


        int count = 0;

        while (count++ < 5) {

            for (Ticket ticket : tickets) {

                problemReporter.openTicket(ticket);

            }

        }

    }

}
Service Activator
A service activator is a Spring Integration generic endpoint that handles incoming messages (see Figure 9–3). A service activator could be a method within a regular Java object; it does not have to implement the message handler using the MessageHandler interface.
Figure 9–3. Service Activator
Consider the same ticketing system example just discussed. Ticket objects are created by the TicketGenerator class, and the Ticket objects will be packaged into messages and sent to the message channel ticketChannel by the ProblemReporter class. Instead of using a PollingConsumer or EventDrivenConsumer, a service activator will be used to receive messages from the ticketChannel. In addition, an internal ticket counter will be added, which will be incremented for each received Ticket message. The ticket counter value will be sent to the counterChannel message channel and will be handled by the another service activator (see Figure 9–4).

Figure 9–4. Ticket Counter Service Activator
The Ticket, TicketGenerator, and ProblemReporter classes are the same as the previous examples. The TicketReceiver instance, however, is modified to become a service activator, as shown in Listing 9–13. A service activator can be any method, which is annotated by @ServiceActivator or specified by the service activator configuration. The method handleTicket will handle any message directed at this service activator.
Listing 9–13. Service Activator Class TicketReceiver.java
package com.apress.prospringintegration.serviceactivator;


import org.springframework.beans.factory.annotation.Value;

import org.springframework.integration.MessageChannel;

import org.springframework.integration.annotation.ServiceActivator;

import org.springframework.integration.support.MessageBuilder;
import org.springframework.stereotype.Component;


@Component

public class TicketReceiver {


    private MessageChannel counterChannel;

    private long counter;


    @Value("#{counterChannel}")

    public void setCounterChannel(MessageChannel counterChannel) {

        this.counterChannel = counterChannel;

    }


    @ServiceActivator

    public void handleTicket(Ticket ticket) {

        System.out.println("Received ticket - " + ticket.toString());

        counterChannel.send(MessageBuilder.withPayload(new Long(counter++)).build());

    }

}
In the same manner, a service activator class, Counter, is created using the @ServiceActivator annotation, as shown in Listing 9–14. The method handleCounter will handle any message directed at this service activator.
Listing 9–14. Service Activator Class Counter.java
package com.apress.prospringintegration.serviceactivator;


import org.springframework.integration.annotation.ServiceActivator;

import org.springframework.stereotype.Component;


@Component

public class Counter {

    @ServiceActivator

    public void handleCounter(Long count) {

        System.out.println(count.toString());

    }

}
The service activator is defined in the Spring configuration file, as shown as Listing 9–15. The service activator requires an input message channel and an optional output message channel. If the method is annotated by using the @ServiceActivator annotation, a ref value to the service activator object is needed; otherwise, a method value needs to be provided to specify the service activator method.
Listing 9–15. service-activator.xml
<?xml version="1.0" encoding="UTF-8"?>

<beans xmlns="http://www.springframework.org/schema/beans"

       xmlns:xsi="http://www.w3.org/2001/XMLSchema-instance"

       xmlns:context="http://www.springframework.org/schema/context"

       xmlns:int="http://www.springframework.org/schema/integration"

       xsi:schemaLocation="http://www.springframework.org/schema/integration

    http://www.springframework.org/schema/integration/spring-integration-2.0.xsd

    http://www.springframework.org/schema/beans
    http://www.springframework.org/schema/beans/spring-beans-3.0.xsd

    http://www.springframework.org/schema/context

    http://www.springframework.org/schema/context/spring-context-3.0.xsd">


  <context:component-scan base-package="com.apress.prospringintegration.serviceactivator"/>


  <int:channel id="ticketChannel"/>

  <int:channel id="counterChannel"/>


  <int:service-activator input-channel="ticketChannel"

                         output-channel="counterChannel"

                         ref="ticketReceiver"/>


  <int:service-activator input-channel="counterChannel"

                         ref="counter"/>


</beans>
The main class for the service activator example is shown in Listing 9–16. The Spring context will be created, and messages with the Ticket payload will be published to the ticketChannel message channel. From there, the message will hit the ticketReceiver service activator, where the Ticket payload details will be logged to the console. Then the total number of tickets handled so far will be publish to the counterChannel message channel. The counter service activator will then log the total count.
Listing 9–16. Service Activator Example main Class
package com.apress.prospringintegration.serviceactivator;


import org.springframework.context.support.ClassPathXmlApplicationContext;


import java.util.List;


public class Main {


    public static void main(String[] args)

            throws Exception {

        String contextName = "service-activator.xml";


        ClassPathXmlApplicationContext applicationContext =

                new ClassPathXmlApplicationContext(contextName);

        applicationContext.start();


        ProblemReporter problemReporter =

                applicationContext.getBean(ProblemReporter.class);

        TicketGenerator ticketGenerator =

                applicationContext.getBean(TicketGenerator.class);


        while (true) {

            List<Ticket> tickets = ticketGenerator.createTickets();

            for (Ticket ticket : tickets) {

                problemReporter.openTicket(ticket);

            }
            Thread.sleep(500);

        }

    }

}
Spring Integration Adapters
The adapter is the most important component for enterprise system integration. As discussed in Chapter 1, most corporations contain a variety of applications, technologies, and processes across the enterprise. An integration must be able to connect with disparate applications and services potentially using different communication protocols and underlying technologies. Adapters provide the bridge between integration framework and the external systems and services. Adapters can either be inbound or outbound as shown in Figure 9–5.
Figure 9–5. Inbound and Outbond Channel Adapters
Spring Integration contains several out-of-the-box adapters to support different kinds of protocols and technologies, including file, JDBC, JMD, web services, and mail adapters. In addition, Spring Integration provides an adapter framework to support adding additional endpoints not supported by current version.
File System Adapters
Other than TCP/IP, the file system provides one of the easiest ways to share data across multiple applications. The applications create files in a shared file system and share the data by consuming the files. Chapter 11 will discussed file adapters in detail.
Database (JDBC) Adapters
Many applications share information by storing the data in a database. Almost every organization has a database server; as a result, this is an important adapter for implementing an enterprise integration, and will be discussed in Chapter 11.
JMS Adapters
JMS is currently the most common messaging protocol for Java applications. The applications connect to a message broker and exchange data/events using messages. Due to the nature of messaging system, JMS allows applications to communicate asynchronously. Spring Integration provides a JMS adapter as well as native support for backing the message channels with a JMS message broker. The JMS adapter will be discussed in Chapter 12.
Web Services Adapters
Web services are the basis of service-oriented architecture (SOA). Web services support includes HTTP-RPC, SOAP, or REST. The applications exchange information by calling a web services endpoint. The web services adapter will be discussed in Chapter 14.
Custom Adapters
Spring Integration provides adapters for the most common communication protocols and systems, but there will come a time when the out-of-the-box adapters do not meet your present integration needs. For this, Spring Integration provides a framework for creating your own custom adapter. Custom adapters will be discussed in detail in Chapter 15.
Configuring an Adapter Through the XML Namespace
Let's modify the ticketing system example to use channel adapters as shown in Figure 9–6.
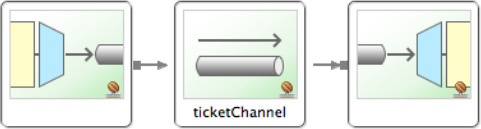
Figure 9–6. Inbound and Outbound Channel Adapters Connecting ticketChannel
There are no changes required for the Ticket, TicketGenerator, or TicketMessageHandler classes. However, the ProblemReporter class must be modified as shown in Listing 9–17. The openTickets method is modified to return a Ticket instead of a Message instance.
Listing 9–17. ProblemReporter.java
package com.apress.prospringintegration.adapters;


import org.springframework.beans.factory.annotation.Autowired;

import org.springframework.stereotype.Component;


import java.util.List;


@Component

public class ProblemReporter {


    @Autowired

    private TicketGenerator ticketGenerator;

    private List<Ticket> tickets;


    public Ticket openTickets() {

        if (tickets == null) {
            tickets = ticketGenerator.createTickets();

        }


        Ticket ticket = tickets.remove(0);

        System.out.println("Ticket Sent - " + ticket.toString());


        return ticket;

    }

}
Instead of sending the ticket messages into the message channel directly, the modified version only creates the Ticket bean by using the openTickets method. In order to integrate the ProblemReporter class into the messaging framework, an inbound channel adapter is used, as shown in the Spring configuration file in Listing 9–18.
Listing 9–18. Spring Configuration for Channel Adapter Example adapters.xml
<?xml version="1.0" encoding="UTF-8"?>

<beans xmlns="http://www.springframework.org/schema/beans"

       xmlns:xsi="http://www.w3.org/2001/XMLSchema-instance"

       xmlns:int="http://www.springframework.org/schema/integration"

       xmlns:context="http://www.springframework.org/schema/context"

       xsi:schemaLocation="http://www.springframework.org/schema/integration

    http://www.springframework.org/schema/integration/spring-integration-2.0.xsd

    http://www.springframework.org/schema/beans

    http://www.springframework.org/schema/beans/spring-beans-3.0.xsd

    http://www.springframework.org/schema/context

    http://www.springframework.org/schema/context/spring-context-3.0.xsd">


  <context:component-scan base-package="com.apress.prospringintegration.adapters"/>


  <int:channel id="ticketChannel">

    <int:queue capacity="50"/>

  </int:channel>


  <int:inbound-channel-adapter channel="ticketChannel"

                               ref="problemReporter"

                               method="openTickets">

    <int:poller>

      <int:interval-trigger interval="500"/>

    </int:poller>

  </int:inbound-channel-adapter>


  <int:outbound-channel-adapter channel="ticketChannel"

                                ref="ticketMessageHandler"

                                method="handleMessage">

    <int:poller>

      <int:interval-trigger interval="1000"/>

    </int:poller>

  </int:outbound-channel-adapter>


</beans>
The inbound message endpoint will invoke the openTickets method on the problemReporter bean every 1,000 ms, and send the returned Ticket instance as a message payload to the ticketChannel channel. Similar to the PollingConsumer, the poller within the inbound channel adapter can be replaced by a CronTrigger for more complex polling schedules.
<inbound-channel-adapter ref="problemReporter" method="openTickets" channel="ticketChannel">

  <poller cron="* 1 * * * MON-FRI"/>

</inbound-channel-adapter>
The outbound message endpoint is very similar to the inbound message endpoint. If the channel type is PollableChannel, PollingConsumer will be used as the outbound endpoint; if the channel type is SubscribableChannel, EventDrivenConsumer will be used, and a poller will not be required. In this example, ticketChannel is configured as a PollableChannel, requiring the additional poller element.
The channel adapter main class is shown in Listing 9–19. This class simply loads the Spring context to start up the channel adapters. The inbound channel adapter will publish a message to the ticketChannel message channel. In turn, the outbound adapter will receive the message from ticketChannel and log the Ticket payload to the console using the message handler class TicketMessageHandler.
Listing 9–19. Main.java for the Channel Adapter
package com.apress.prospringintegration.adapters;


import org.springframework.context.support.ClassPathXmlApplicationContext;


public class Main {


    public static void main(String[] args) {

        ClassPathXmlApplicationContext applicationContext =

                new ClassPathXmlApplicationContext("adapters.xml");

        applicationContext.start();

    }

}
Configuring Adapters with STS
Instead of hand-coding the Spring configuration file, we can use SpringSource Tool Suite (STS) 2.5.2 to define channel adapters via its graphical interface. For this example, STS must be installed on your computer. STS can be downloaded from www.springsource.com/products/springsource-tool-suite-download. More information about STS can be found in Chapter 5.
- From the STS menu, select File
 New Spring Template Project. Select Simple Spring Utility Project, and then click the Next button. Enter a project name, such as
 sts-example, and a package name ofcom.apress.prospringintegration, and then click Finish. This will create a simple Spring project and the Spring configuration fileapp-context.xmlin the directorysrc/main/resources. - Next, open the Spring configuration file
app-context.xmlby double-clicking in the Package Explorer. Click the Namespaces tab and add the Spring Integration namespace, as shown in Figure 9–7.
- After adding the Spring Integration namespace, the integration and integration-graph tabs will appear, as shown in Figure 9–8. Next, switch to the integration-graph tab and create a channel by dragging the channel icon to the workspace.
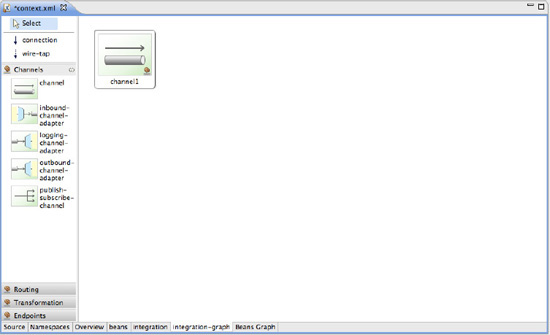
- Double-click the channel icon in the workspace to bring up the Properties pane, and modify the properties to assign the ID
ticketChannel, as shown in Figure 9–9.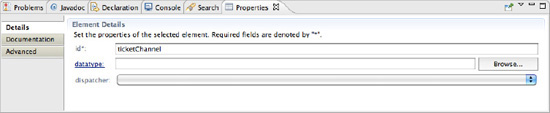
Figure 9–9. Channel Properties
- Next drag the inbound-channel-adapter icon from the left side toolbar to the workspace. In order to connect the inbound channel adapter to the channel, select connection from the toolbar and drag a line from the inbound channel adapter to the channel, as shown in Figure 9–10.
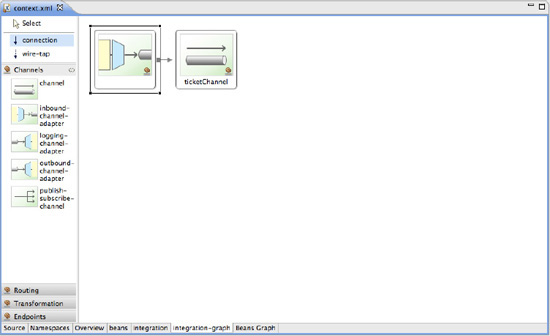
Figure 9–10. Connecting the Inbound Channel Adapter to the Channel
- Select the inbound-channel-adapter icon to bring up the Properties pane, and modify the adapter properties as shown in Figure 9–11.
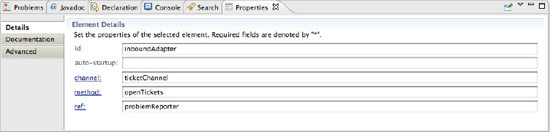
Figure 9–11. Inbound Channel Adapter Properties
- Create the outbound channel adapter by following the same process as for the inbound channel adapter. The main difference is that the connection needs to be drawn from the channel to the outbound-channel-adapter icon, as shown in Figure 9–12.
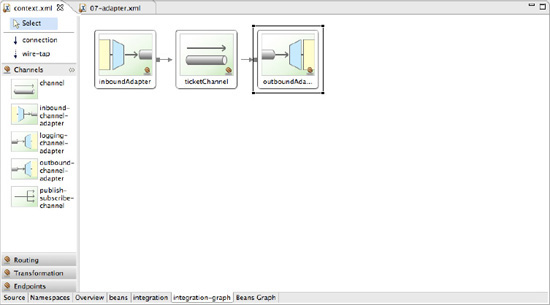
Figure 9–12. Adding an Outbound Channel Adapter to the Channel
- Select the outbound channel adapter to bring up the Properties pane, and enter the values shown in Figure 9–13.
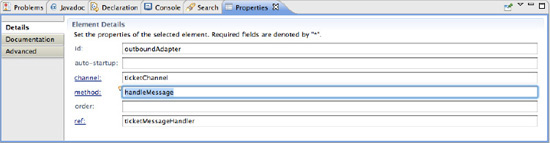
Figure 9–13. Outbound Channel Adapter Properties
- Now click the Source tab and examine the Spring configuration file, as shown in Figure 9–14.

Figure 9–14. Spring Configuration for the Channel and Adapters
STS has created the entire Spring configuration file. The only thing left is defining the Spring beans, as with other Spring applications. Using STS, we can visually create and connect Spring Integration components without typing a single line of XML.
Messaging Gateways
A messaging gateway is essentially a façade that allows the interface to a messaging system to be represented as a method or service call (see Figure 9–15). Typically, integrating an application with a messaging framework requires composing messages and moving them through message channels using inbound and outbound channel adapters, as discussed previously. This approach typically achieves the objective of integration, although it requires that application have knowledge of the messaging system. This tightly couples the application to the messaging framework. A gateway can be used to eliminate this coupling by creating a façade layer that abstracts away the functionality of the messaging system into a discrete interface. Thus, the application will only see a simple method or service interface, and will not be directly dependent on JMS or Spring Integration.
Figure 9–15. Gateway
A messaging gateway is a pattern designed to hide the underlying communication details from the application using it. It places an interface between the application and the target messaging infrastructure by providing a proxy, similar to what is seen in a remote façade. When a gateway is exposed with a simple method call that return values, it implies that for each request message generated when the method is called, there is a reply message generated when the method returns. Since messaging is by nature asynchronous, there is no guarantee that for each request there will be a reply. Spring Integration introduces support for an asynchronous gateway by providing a convenient method of starting a flow when a reply message cannot be assured to return in a timely fashion (or at all). Asynchronous gateways will be discussed in more detail following.
Spring Integration Support for Gateways
Let's get started with a simple example that illustrates an inbound messaging gateway. Spring Integration provides a org.springframework.integration.gateway.GatewayProxyFactoryBean that generates a proxy for the service interface; this proxy can safely interact with the Spring Integration framework. A messaging gateway can be created using the gateway namespace shown in Listing 9–20.
Listing 9–20. Gateway Example Spring Configuration gateway-simple.xml
<?xml version="1.0" encoding="UTF-8"?>

<beans xmlns="http://www.springframework.org/schema/beans"

       xmlns:xsi="http://www.w3.org/2001/XMLSchema-instance"

       xmlns:int="http://www.springframework.org/schema/integration"

       xmlns:context="http://www.springframework.org/schema/context"

       xsi:schemaLocation="http://www.springframework.org/schema/beans

    http://www.springframework.org/schema/beans/spring-beans-3.0.xsd

    http://www.springframework.org/schema/context

    http://www.springframework.org/schema/context/spring-context-3.0.xsd

    http://www.springframework.org/schema/integration

    http://www.springframework.org/schema/integration/spring-integration-2.0.xsd">


  <context:component-scan base-package="com.apress.prospringintegration.gateways"/>


  <int:channel id="ticketRequests">

    <int:interceptors>

      <int:wire-tap channel="logger"/>

    </int:interceptors>

  </int:channel>


  <int:channel id="ticketReplies">

    <int:queue capacity="10"/>

    <int:interceptors>

      <int:wire-tap channel="logger"/>

    </int:interceptors>

  </int:channel>


  <int:channel id="request"/>

  <int:channel id="reply"/>


  <int:logging-channel-adapter id="logger" level="INFO"/>


  <int:gateway id="ticketIssueGateway"

               default-request-channel="request"

               default-reply-channel="reply"
               service-interface=

                   "com.apress.prospringintegration.gateways.client.TicketIssuer"/>


  <int:service-activator input-channel="ticketRequests"

                         output-channel="ticketReplies"

                         ref="ticketIssuerService"/>


</beans>
A ticketIssueGateway messaging gateway is configured based on the interface com.apress.prospringintegration.gateway.client.TicketIssuer shown in Listing 9–21. The default request and reply channels are set to the channels request and reply, respectively. A reply channel is not required when configuring a gateway, since the gateway will create a temporary point-to-point reply channel; this channel is anonymous, and is added to the message header with the name replyChannel. If a publish-subscribe-channel is required, for example because there are other interested listeners, the reply channel needs to be explicitly defined.
There is always the possibility that the gateway invocation may result in errors. By default, any downstream error will result in an org.springframework.integration.MessagingException being thrown back to the gateway. You can also capture errors by defining an error channel using the gateway attribute error-channel.
The reason the request and reply channels are prefixed with default is because there is a mechanism to specify these channels on a per-method basis using the @Gateway annotation. In the TicketIssuer interface shown in Listing 9–21, the request and reply channels are overwritten with the ticketRequests and ticketReplies channels, respectively.
Listing 9–21. Gateway Example Service Interface TicketIssuer.java
package com.apress.prospringintegration.gateways.client;


import com.apress.prospringintegration.gateways.model.Ticket;

import org.springframework.integration.annotation.Gateway;


public interface TicketIssuer {


    @Gateway(replyChannel = "ticketReplies", requestChannel = "ticketRequests")

    public Ticket issueTicket(long ticketId);

}
A service activator is used to receive the request message from the gateway, as shown in Listing 9–22. The TicketIssuerService will take in incoming ticketId, create a Ticket instance, and send it to the reply channel.
Listing 9–22. Gateway Example Service Activator TicketIssuerService.java
package com.apress.prospringintegration.gateways.service;


import com.apress.prospringintegration.gateways.client.TicketIssuer;

import com.apress.prospringintegration.gateways.model.Ticket;

import org.springframework.integration.annotation.ServiceActivator;

import org.springframework.stereotype.Component;


import java.util.Date;


@Component

public class TicketIssuerService implements TicketIssuer {
    @ServiceActivator

    public Ticket issueTicket(long ticketId) {

        Ticket t = new Ticket();

        t.setIssueDateTime(new Date());

        t.setDescription("New Ticket");

        t.setPriority(Ticket.Priority.medium);

        t.setTicketId(ticketId);


        System.out.println("Issuing a Ticket: " + t.getIssueDateTime());


        return t;

    }

}
The Spring Integration configuration message flows are illustrated in Figure 9–16.
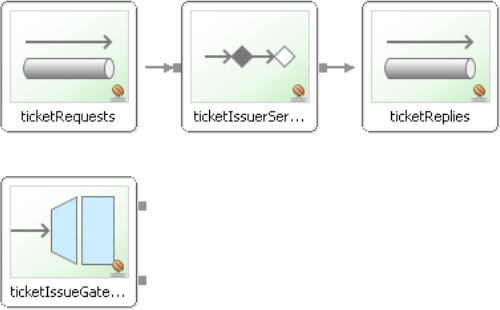
Figure 9–16. Simple Gateway Example
The gateway example can be tested using the simple main class shown in Listing 9–23. The main class creates the Spring context and obtains a reference to the ticketIssueGateway gateway. The ticketIssueGateway method issueTicket is called, resulting in a message sent to the ticketRequestChannel. The ticketIssuerService service activator receives the incoming message, creates the Ticket instance, and sends it to the ticketReplies channel. The ticketIssuerGateway receives an incoming Ticket message and logs its information. This represents a full integration with Spring Integration using only a simple method invocation.
Listing 9–23. Gateway Example main Class MainSimpleGateway.java
package com.apress.prospringintegration.gateways.client;


import com.apress.prospringintegration.gateways.model.Ticket;

import org.springframework.context.support.ClassPathXmlApplicationContext;
public class MainSimpleGateway {


    public static void main(String[] args) throws Exception {

        ClassPathXmlApplicationContext context =

                new ClassPathXmlApplicationContext("ioc-gateway-simple.xml");


        TicketIssuer ticketIssuer =

                context.getBean("ticketIssueGateway", TicketIssuer.class);


        Ticket ticket = ticketIssuer.issueTicket(100L);

        System.out.println("Ticket: " + ticket + " was issued on: " +

                ticket.getIssueDateTime() + " with ticket id: " +

                ticket.getTicketId());

    }

}
Asynchronous Gateways
The previous example showed a synchronous gateway, where there the method invocation will not return until the gateway receives the reply message. As discussed previously, messaging is asynchronous by nature, and there may be no way to know if or when a reply message will be returned. Spring Integration supports asynchronous gateways for this reason.
The only change required to create an asynchronous gateway is to modify the return type of the service interface to java.util.concurrent.Future, as shown in Listing 9–24. When the Spring Integration gateway detects that the return type is Future, it will immediate switch to the asynchronous mode using the org.springframework.core.task.AsychTaskExectutor. The method call will immediately return a Future instance. Then the Future instance can be handle as desired.
Listing 9–24. Asynchronous Gateway Service Interface
package com.apress.prospringintegration.gateways.client;


import com.apress.prospringintegration.gateways.model.Ticket;

import org.springframework.integration.annotation.Gateway;


import java.util.concurrent.Future;


public interface TicketIssuerAsync {

    @Gateway(replyChannel = "ticketReplies", requestChannel = "ticketRequests")

    public Future<Ticket> issueTicket(long ticketId);

}
The Spring configuration file and main class are modified to use the asynchronous service interface. The main class is shown in Listing 9–25. In this version, a timeout is set in which the code will wait for no longer than 1,000 seconds for the reply to return.
Listing 9–25. Asynchronous Gateway Example main Class
package com.apress.prospringintegration.gateways.client;


import com.apress.prospringintegration.gateways.model.Ticket;

import org.springframework.context.support.ClassPathXmlApplicationContext;
import java.util.concurrent.Future;

import java.util.concurrent.TimeUnit;


public class MainAsyncGateway {

    public static void main(String[] args) throws Exception {

        ClassPathXmlApplicationContext context =

                new ClassPathXmlApplicationContext("gateway-async.xml");


        TicketIssuerAsync ticketIssuerAsync =

                context.getBean("ticketIssueGatewayAsync", TicketIssuerAsync.class);


        Future<Ticket> result = ticketIssuerAsync.issueTicket(100L);


        Ticket ticket = result.get(1000, TimeUnit.SECONDS);

        System.out.println("Ticket: " + ticket + " was issued on: " +

                ticket.getIssueDateTime() + " with ticket id: " +

                ticket.getTicketId());

    }

}
Gateways Receiving No Response
A gateway maps a method invocation to a messaging system. However, a typical method invocation generally expects the method to always return, or at least throw an exception. This is not the case for a messaging system in which the reply message may be delayed or never arrive. Therefore, it is important to understand the behavior of a synchronous gateway when there is no response.
One of the attributes that make the gateway more predictable is reply-timeout. We will cover how the synchronous gateway behaves in relation to this attribute for both single-threaded scenarios (in which all downstream components are connected via a direct channel) and multithreaded scenarios (in which there may be a pollable or executor channel that breaks the thread boundary downstream).
For long-running downstream processes in the single-threaded case, the reply-timeout setting will have no effect. For the multithread case, the method will return once the timeout has been reached or the reply message has returned. In the case of a timeout, the returned value may be null or the reply message could come at a later time.
For downstream components returning a null reply in both the single-threaded and multithread cases, the gateway method will hang indefinitely unless the reply-timeout setting has be configured, or the requires-reply value has been set on the downstream components. If either of these have been set, an exception will be thrown back to the gateway for a null reply.
In the situation where the downstream component return signature is void while the gateway is nonvoid, the gateway method call will hang indefinitely in both the single-threaded and multithreaded cases. The reply-timeout attribute will have no effect.
If a downstream component throws a RuntimeException, it will be sent back to the gateway as an error message and rethrown by the gateway method.
It is important to realize that there are several scenarios where a gateway method invocation can hang indefinitely, even if the reply-timeout attribute for the gateway and requires-reply attribute for the down stream components have been set. Even more importantly, there are cases where the reply-timeout attribute will not help. Therefore, it is important to analyze your message flow, consider using these attribute settings, and consider using an asynchronous gateway when appropriate.
In addition, when using a router, remember that setting resolution-required to true will cause an exception only if the router is unable to resolve a particular channel. Similar to a filter, the throw-exception-on-reject will throw an exception if the filter if the message is rejected.
Inbound/Outbound Gateways via JMS
Many of the Spring Integration adapters (including HTTP and JMS) support inbound and outbound gateways. The next example will take a look at the inbound and outbound JMS gateways. The previous example for the synchronous gateway will be modified to use a JMS broker between the inbound message gateway TicketIssuer and the service activator TicketIssuerService. The inbound gateway will use the outbound JMS gateway to communicate with the JMS broker (client), and the service activator will use the inbound JMS gateway to communicate with the JMS broker (server).
Since Spring Integration will need to connect to a JMS broker, a connection factory is required. A Java configuration file will be used to create the connection factory, as shown in Listing 9–26. For simplicity, an embedded ActiveMQ broker will be configured using the URL vm://localhost.
Listing 9–26. Java Configuration for the JMS Connection Factory
package com.apress.prospringintegration.gateways.service;


import org.apache.activemq.ActiveMQConnectionFactory;

import org.springframework.context.annotation.Bean;

import org.springframework.context.annotation.Configuration;


@Configuration

public class JmsConfiguration {


    @Bean

    public ActiveMQConnectionFactory connectionFactory() {

        ActiveMQConnectionFactory connectionFactory =

                new ActiveMQConnectionFactory("vm://localhost");

        return connectionFactory;

    }

}
The Spring configuration for the client side of the JMS gateway example is shown in Listing 9–27. This configuration is the same as the previous example, except the service activator has been replaced with a JMS outbound-gateway using the jms namespace. The JMS outbound gateway is configured for a request/reply using the destination queue issue.request.
Listing 9–27. JMS Gateway Example Client Spring Configuration gateway-jms-client.xml
<?xml version="1.0" encoding="UTF-8"?>

<beans xmlns="http://www.springframework.org/schema/beans"

       xmlns:xsi="http://www.w3.org/2001/XMLSchema-instance"

       xmlns:int="http://www.springframework.org/schema/integration"

       xmlns:context="http://www.springframework.org/schema/context"

       xmlns:jms="http://www.springframework.org/schema/integration/jms"

       xsi:schemaLocation="http://www.springframework.org/schema/beans

    http://www.springframework.org/schema/beans/spring-beans-3.0.xsd

    http://www.springframework.org/schema/context

    http://www.springframework.org/schema/context/spring-context-3.0.xsd

    http://www.springframework.org/schema/integration

    http://www.springframework.org/schema/integration/spring-integration-2.0.xsd

    http://www.springframework.org/schema/integration/jms

    http://www.springframework.org/schema/integration/jms/spring-integration-jms-2.0.xsd">


  <context:component-scan base-package="com.apress.prospringintegration.gateways.service"/>
  <int:logging-channel-adapter id="logger" level="INFO" log-full-message="true"/>


  <int:channel id="ticketRequests">

    <int:interceptors>

      <int:wire-tap channel="logger"/>

    </int:interceptors>

  </int:channel>


  <int:channel id="ticketReplies">

    <int:queue capacity="10"/>

    <int:interceptors>

      <int:wire-tap channel="logger"/>

    </int:interceptors>

  </int:channel>


  <int:gateway id="ticketIssueGateway"

               service-interface=

                   "com.apress.prospringintegration.gateways.client.TicketIssuer"/>


  <jms:outbound-gateway

      request-destination-name="issue.request"

      request-channel="ticketRequests"

      reply-channel="ticketReplies"

      connection-factory="connectionFactory"/>


</beans>
The server-side Spring configuration is shown in Listing 9–28. Again, the Spring configuration file is the same as the previous example, except now the inbound gateway is replaced with a JMS inbound-gateway. The JMS inbound-gateway is configured for a request/reply using the destination queue issue.request. What is interesting in this example is that there is no mention of a response channel for either the service activator or the inbound JMS gateway. The service activator will look for a reply channel and fail to find one. Instead, it will use the reply channel created by the inbound JMS gateway, which was created based on the header metadata of the inbound JMS message. Thus, everything just works without additional specification.
Listing 9–28. JMS Gateway Example Server Spring Configuration gateway-jms-server.xml
<?xml version="1.0" encoding="UTF-8"?>

<beans xmlns="http://www.springframework.org/schema/beans"

       xmlns:xsi="http://www.w3.org/2001/XMLSchema-instance"

       xmlns:int="http://www.springframework.org/schema/integration"

       xmlns:context="http://www.springframework.org/schema/context"

       xmlns:jms="http://www.springframework.org/schema/integration/jms"

       xsi:schemaLocation="http://www.springframework.org/schema/beans

    http://www.springframework.org/schema/beans/spring-beans-3.0.xsd

    http://www.springframework.org/schema/context

    http://www.springframework.org/schema/context/spring-context-3.0.xsd

    http://www.springframework.org/schema/integration

    http://www.springframework.org/schema/integration/spring-integration-2.0.xsd

    http://www.springframework.org/schema/integration/jms

    http://www.springframework.org/schema/integration/jms/spring-integration-jms-2.0.xsd">
  <context:component-scan base-package="com.apress.prospringintegration.gateways.service"/>


  <int:logging-channel-adapter id="logger" level="INFO" log-full-message="true"/>


  <int:channel id="inboundTicketRequests">

    <int:interceptors>

      <int:wire-tap channel="logger"/>

    </int:interceptors>

  </int:channel>


  <jms:inbound-gateway request-channel="inboundTicketRequests"

                       request-destination-name="issue.request"

                       connection-factory="connectionFactory"/>


  <int:service-activator id="ticketIssuer"

                         input-channel="inboundTicketRequests"

                         ref="ticketIssuerService"/>


</beans>
The main class to run the JMS gateway example is shown in Listing 9–29. The main class creates the Spring context based on the two Spring configuration files. The main class obtains a reference to the ticketIssueGateway gateway. The ticketIssueGateway method issueTicket is called, resulting in a message being sent to the ticketRequestChannel. This message is sent to the JMS broker via the JMS outbound gateway. The message is received by the JMS inbound gateway and sent to the inboundTicketRequests channel. The ticketIssuerService service activator creates the Ticket instance and sends it to the ticketReplies channel. The message is sent to the JMS broker via the inbound JMS gateway. The message is received by the JMS outbound gateway and sent to the ticketReplies channel. The ticketIssuerGateway receives in incoming Ticket and logs its information. The complex message processing is well hidden by the simple gateway configuration. This demonstrates the power of thegateway pattern.
Listing 9–29. MainJMSGateway.java
package com.apress.prospringintegration.gateways.client;


import com.apress.prospringintegration.gateways.model.Ticket;

import org.springframework.context.support.ClassPathXmlApplicationContext;


public class MainJMSGateway {

    public static void main(String[] args) throws Exception {

        ClassPathXmlApplicationContext ctx =

                new ClassPathXmlApplicationContext("gateway-jms-service.xml");


        ClassPathXmlApplicationContext ctx1 =

                new ClassPathXmlApplicationContext("gateway-jms-client.xml");


        TicketIssuer ticketIssuer = ctx1.getBean("ticketIssueGateway",

                TicketIssuer.class);


        Ticket ticket = ticketIssuer.issueTicket(1);
        System.out.println("Ticket " + ticket + " was issued on:" +

                ticket.getIssueDateTime() + " with ticket id: " +

                ticket.getTicketId());

    }

}
Secure Channels
As a last topic in this chapter, the subject of security will be touched on—specifically how to secure a message channel. Spring Integration uses the Spring Security project (http://static.springsource.org/spring-security/site) to provide role-based security for sending to a message channel and receiving invocations.
Spring Integration provides the interceptororg.springframework.integration.security.channel.ChannelSecurityInterceptor, which extends org.springframework.security.access.intercept.AbstractSecurityInterceptor for intercepting send and receive calls on message channels. Access decisions are based on the access policies for specific channels, based on the metadata obtained fromorg.springframework.integration.security.channel.ChannelSecurityMetadataSource. The interceptor requires that a valid org.springframework.security.core.context.SecurityContext has been established by authenticating with Spring Security.
The si-security namespace is provided to configure security constraints. This namespace allows defining one or more channel name patterns in relation to the security constraints for sending and receiving messages via a message channel. The pattern is a regular expression (regex).
In the Spring configuration file shown in Listing 9–30, the secure-channels element establishes that any channel with an ID prefix of secure will have access limited to the roles ROLE_ADMIN and ROLE_PRESIDENT for sending, and ROLE_USER, ROLE_ADMIN, and ROLE_PRESIDENT for receiving. The secure-channels element requires an org.springframework.security.authentication.AuthenticationManager configured in this example using the Spring security namespace. In this example, the username secureuser has the roles ROLE_USER and ROLE_ADMIN, and the username unsecureuser has the role ROLE_USER. Thus, based on the current configuration, only the username secureuser can send and receive messages via channels prefixed with secure.
Listing 9–30. Secure Channel Example Spring Configuration secure-channel.xml
<?xml version="1.0" encoding="UTF-8"?>

<beans xmlns="http://www.springframework.org/schema/beans"

       xmlns:int="http://www.springframework.org/schema/integration"

       xmlns:xsi="http://www.w3.org/2001/XMLSchema-instance"

       xmlns:security="http://www.springframework.org/schema/security"

       xmlns:context="http://www.springframework.org/schema/context"

       xmlns:si-security="http://www.springframework.org/schema/integration/security"

       xsi:schemaLocation="http://www.springframework.org/schema/beans

    http://www.springframework.org/schema/beans/spring-beans.xsd

    http://www.springframework.org/schema/integration

    http://www.springframework.org/schema/integration/spring-integration-2.0.xsd

    http://www.springframework.org/schema/security

    http://www.springframework.org/schema/security/spring-security-3.0.xsd

    http://www.springframework.org/schema/context

    http://www.springframework.org/schema/context/spring-context.xsd

    http://www.springframework.org/schema/integration/security

    http://www.springframework.org/schema/integration/security/spring-integration-security-

2.0.xsd">
  <context:component-scan base-package="com.apress.prospringintegration.security"/>


  <security:authentication-manager alias="authenticationManager">

    <security:authentication-provider user-service-ref="userDetailsService"/>

  </security:authentication-manager>


  <security:user-service id="userDetailsService">

    <security:user name="secureuser" password="password"

                   authorities="ROLE_USER, ROLE_ADMIN"/>

    <security:user name="unsecureuser" password="password"

                   authorities="ROLE_USER"/>

  </security:user-service>


  <si-security:secured-channels>

    <si-security:access-policy pattern="secure.*"

                               send-access="ROLE_ADMIN, ROLE_PRESIDENT"

                               receive-access="ROLE_USER, ROLE_ADMIN, ROLE_PRESIDENT"/>

  </si-security:secured-channels>


  <int:logging-channel-adapter channel="secureCustomerData"

                               log-full-message="true"/>


  <int:channel id="secureCustomerData"/>


</beans>
The secure-channels namespace element also requires anorg.springframework.security.access.AccessDecisionManager, which is created using the Java configuration file shown in Listing 9–31.
Listing 9–31. Java Configuration File accessDecisionManager
package com.apress.prospringintegration.security;


import org.springframework.context.annotation.Bean;

import org.springframework.context.annotation.Configuration;

import org.springframework.security.access.AccessDecisionVoter;

import org.springframework.security.access.vote.AffirmativeBased;

import org.springframework.security.access.vote.RoleVoter;


import java.util.Arrays;


@Configuration

public class SecurityConfiguration {


    @Bean

    public AffirmativeBased accessDecisionManager() {

        AffirmativeBased affirmativeBased = new AffirmativeBased();

        affirmativeBased.setAllowIfAllAbstainDecisions(true);

        affirmativeBased.setDecisionVoters(

                Arrays.asList((AccessDecisionVoter) new RoleVoter()));


        return affirmativeBased;

    }

}
In a typical application, the SecurityContext is established via authentication through Spring Security. For this example, a simple token-based approach will be taken. The example main class for the secure channel example is shown in Listing 9–32. The main class first creates a SecurityContext with the username secureuser and tries to publish a message to the channel secureCustomerData. Since secureuser has the role ROLE_ADMIN, this username is able to send the message. Next, a SecurityContext is created with the username unsecureuser, and the main class tries to publish a message to the channel secureCustomerData. Since this username has the role ROLE_USER, this user is unable to send the message to the channel, and receives an exception.
Listing 9–32. Secure Channel Example main Class
package com.apress.prospringintegration.security;


import org.springframework.context.support.ClassPathXmlApplicationContext;

import org.springframework.integration.MessageChannel;

import org.springframework.integration.support.MessageBuilder;

import org.springframework.security.authentication.UsernamePasswordAuthenticationToken;

import org.springframework.security.core.GrantedAuthority;

import org.springframework.security.core.authority.GrantedAuthorityImpl;

import org.springframework.security.core.context.SecurityContext;

import org.springframework.security.core.context.SecurityContextHolder;

import org.springframework.security.core.context.SecurityContextImpl;

import org.springframework.util.CollectionUtils;


public class SecurityMain {


    public static void main(String[] args) throws Exception {


        ClassPathXmlApplicationContext context =

                new ClassPathXmlApplicationContext("classpath:secure-channel.xml");

        context.start();


        MessageChannel channel =

                context.getBean("secureCustomerData", MessageChannel.class);


        //Secure user with privileges

        login("secureuser", "password", "ROLE_ADMIN");

        try {

            send(channel, "hello secure world!");

        } catch (Exception ex) {

            System.out.println("Unable to send message for secureuser");

        }


        // Secure user with privileges

        login("unsecureuser", "password", "ROLE_USER");

        try {

            send(channel, "hello secure world!");

        } catch (Exception ex) {

            System.out.println("Unable to send message for unsecureuser");

            ex.printStackTrace();

        }


    }
    public static void login(String username, String password, String... roles) {

        SecurityContext context = createContext(username, password, roles);

        SecurityContextHolder.setContext(context);

    }


    public static void send(MessageChannel channel, String message) {

        channel.send(MessageBuilder.withPayload(message).build());

    }


    // Utility method taken from the Spring Integration tests to set up a context

    @SuppressWarnings("unchecked")

    public static SecurityContext createContext(String username,

                                                String password,

                                                String... roles) {

        SecurityContextImpl ctxImpl = new SecurityContextImpl();

        UsernamePasswordAuthenticationToken authToken;

        if (roles != null && roles.length > 0) {

            GrantedAuthority[] authorities = new GrantedAuthority[roles.length];

            for (int i = 0; i < roles.length; i++) {

                authorities[i] = new GrantedAuthorityImpl(roles[i]);

            }

            authToken = new UsernamePasswordAuthenticationToken(username, password,

                    CollectionUtils.arrayToList(authorities));

        } else {

            authToken = new UsernamePasswordAuthenticationToken(username, password);

        }

        ctxImpl.setAuthentication(authToken);

        return ctxImpl;

    }

}
Summary
An endpoint describes how application code communicates with the messaging framework. In this chapter, we covered the endpoints that connect to the message channel, application code, external applications, and services. These include messaging endpoints, channel adapters, service activators, and messaging gateways. Both polling and event-driven endpoints were discussed, as well as synchronous and asynchronous gateways. We used STS to show how a visual tool can be used to assist in configuring endpoints and message flows. Endpoints hide the complexity of the of the underlying message systems many times only requiring the proper configuration settings. This allows developers to focus on the business logic instead of the messaging API. Finally, this chapter covered how to secure a message channel and send to a message to a secure message channel.