
CHAPTER 12
![]()
Enterprise Messaging with JMS and AMQP
Spring Integration enables applications to share data and processes using different integration styles, such as shared file systems, shared databases, remote procedure invocation, and messaging. This chapter will focus on enterprise messaging using transports such as Java Message Service (JMS) and Advanced Message Queuing Protocol (AMQP). Other message brokers, such as Simple Queue Service (SQS) and Kestrel MQ, will be discussed at the end of the chapter.
JMS Integration
JMS was originally part of the Java 2 Enterprise Edition (J2EE) specification, and was defined in the Java Community Process Java Specification Request (JSR) 914. It is the current standard for the Java Platform Standard Edition (Java SE) and Java Platform Enterprise Edition (Java EE). It allows applications to connect to each other using message-oriented communication. Using JMS, applications can communicate with each other in a loosely coupled and reliable way.
Spring Integration comes with JMS support out of the box. Before Spring Framework 1.1, applications needed to handle JMS connection management, session management, message creation, synchronous and asynchronous message delivery, and error handling manually. Spring Framework 1.1 provided limited support for JMS 1.1. Spring Framework 2.0 offered complete support for JMS, allowing asynchronous communication between applications. Spring Integration 1.0 provided inbound and outbound JMS adapters, and Spring Integration 2.0 furthers this support with JMS-backed message channels.
In JMS, there are two types of destinations: queue and topic. A JMS queue (javax.jms.Queue) is a point-to-point destination that allows one consumer to receive a message at any given time. A JMS topic (javax.jms.Topic) is a publish/subscribe-style destination that allows messages to be delivered to multiple consumers. Both classes extend javax.jms.Destination. Figure 12–1 illustrates the difference between the two.
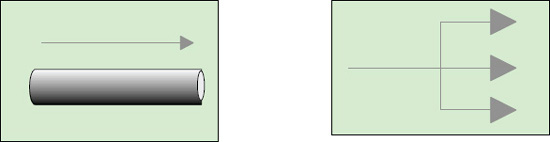
Figure 12–1. A JMS Queue (left) and a JMS Topic (right)
JMS Brokers
There are many JMS brokers available on the market. However, this chapter will mainly focus on two of the more popular open source JMS brokers: the Apache foundation’s ActiveMQ and JBoss’sHornetQ.
Apache ActiveMQ
Apache ActiveMQ (http://activemq.apache.org) is one of the more popular open source messaging brokers. It implements support for J2EE 1.4’s JMS 1.1 specification, which supports transient, persistent, transactional, and distributed transactional (XA) messaging. Although ActiveMQ implements JMS 1.1, it also supports a variety of non-Java programming and scripting languages, including C, C++, C#, Erlang, Perl, PHP, Python, and Ruby. It also includes several transport protocols, including VM, TCP, SSL, Zeroconf, HTTP, UDP, multicast, and JXTA. (For more details on the list of supported protocols, see http://activemq.apache.org/uri-protocols.html.) ActiveMQ provides message persistence by using a high-speed journal, KahaDB. In addition, ActiveMQ provides Spring namespace support for configuring clients. The latest version of the ActiveMQ binary distribution (5.4.2 at the time of this writing) can be downloaded from http://activemq.apache.org/download.html.
ActiveMQ has two types of distribution: Windows and Unix/Linux/Cygwin. For the Windows platform, download apache-activemq-5.4.2-bin.zip, and for the Unix/Linux/Cygwin platform, download apche-activemq-5.4.2-bin.tar.gz. This chapter will use the Unix/Linux/Cygwin distribution.
To install ActiveMQ, simply unzip the distribution tarball, like so:
$ tar –zxf apache-activemq-5.4.2-bin.tar.gzIn order to start ActiveMQ on 32-bit Linux, run the following command:
$ apache-activemq-5.4.2/bin/linux-x86-32/activemq start

Starting ActiveMQ Broker...
In order to start ActiveMQ on 64-bit Linux, run the following:
$ apache-activemq-5.4.2/bin/linux-x86-64/activemq start

Starting ActiveMQ Broker...
In order to start ActiveMQ on Mac OS X, run the following:
$ apache-activemq-5.4.2/bin/macosx/activemq start

Starting ActiveMQ Broker...
In order to stop the ActiveMQ broker on 32-bit Linux, use the following:
$ apache-activemq-5.4.2/bin/linux-x86-32/activemq stop

Stopping ActiveMQ Broker...

Waiting for ActiveMQ Broker to exit...

Stopped ActiveMQ Broker.
In order to stop the ActiveMQ broker on 64-bit Linux, use the following:
$ apache-activemq-5.4.2/bin/linux-x86-64/activemq stop

Stopping ActiveMQ Broker...

Waiting for ActiveMQ Broker to exit...

Stopped ActiveMQ Broker.
In order to stop the ActiveMQ broker on Mac OS X, use the following:
$ apache-activemq-5.4.2/bin/macosx/activemq stop

Stopping ActiveMQ Broker...

Waiting for ActiveMQ Broker to exit...

Stopped ActiveMQ Broker.
If the ActiveMQ broker is running on the 32-bit Linux environment, use the following:
$ cd apache-activemq-5.4.2/bin/linux-x86-32/activemq status

ActiveMQ Broker is running (86610).
If the ActiveMQ broker is not running on the 32-bit Linux environment, use the following:
$ cd apache-activemq-5.4.2/bin/linux-x86-32/activemq status

ActiveMQ Broker is not running.
ActiveMQ 4.2 and later comes with a web console for easy monitoring as shown in Figure 12–2. The ActiveMQ console can be reached by using a web browser and pointing to http://localhost:8161/admin/.
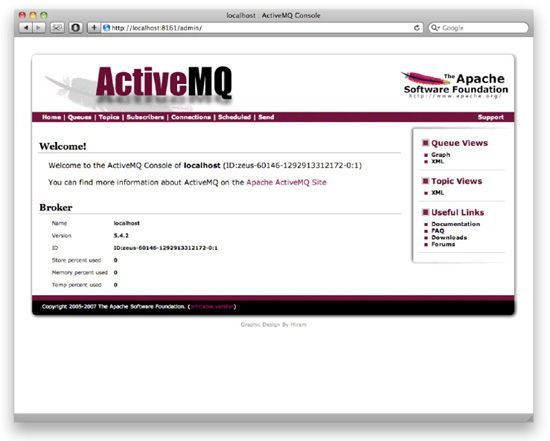
Figure 12–2. The ActiveMQ Web Console
Besides using the web console, ActiveMQ may also be modified by using a JMX console. By default, JMX support is disabled if ActiveMQ is launched with the wrapper. In order to enable JMX, the wrapper.conf file must be modified. On the Mac OS X platform, modify apache-activemq-5.4.2/bin/macosx/wrapper.conf using a text editor. Remove the comments and modify the configuration file as shown in Listing 12–1.
Listing 12–1. wrapper.conf
# ------------------------------------------------------------------------

# Licensed to the Apache Software Foundation (ASF) under one or more

# contributor license agreements.  See the NOTICE file distributed with

# this work for additional information regarding copyright ownership.

# The ASF licenses this file to You under the Apache License, Version 2.0

# (the "License"); you may not use this file except in compliance with

# the License.  You may obtain a copy of the License at
#

# http://www.apache.org/licenses/LICENSE-2.0

#

# Unless required by applicable law or agreed to in writing, software

# distributed under the License is distributed on an "AS IS" BASIS,

# WITHOUT WARRANTIES OR CONDITIONS OF ANY KIND, either express or implied.

# See the License for the specific language governing permissions and

# limitations under the License.

# ------------------------------------------------------------------------


#********************************************************************

# Wrapper Properties

#********************************************************************


#wrapper.debug=TRUE

set.default.ACTIVEMQ_HOME=../..

set.default.ACTIVEMQ_BASE=../..

wrapper.working.dir=.


# Java Application

wrapper.java.command=java


# Java Main class.  This class must implement the WrapperListener interface

#  or guarantee that the WrapperManager class is initialized.  Helper

#  classes are provided to do this for you.  See the Integration section

#  of the documentation for details.

wrapper.java.mainclass=org.tanukisoftware.wrapper.WrapperSimpleApp


# Java Classpath (include wrapper.jar)  Add class path elements as

#  needed starting from 1

wrapper.java.classpath.1=%ACTIVEMQ_HOME%/bin/wrapper.jar

wrapper.java.classpath.2=%ACTIVEMQ_HOME%/bin/run.jar


# Java Library Path (location of Wrapper.DLL or libwrapper.so)

wrapper.java.library.path.1=%ACTIVEMQ_HOME%/bin/macosx/


# Java Additional Parameters

# note that n is the parameter number starting from 1.

wrapper.java.additional.1=-Dactivemq.home=%ACTIVEMQ_HOME%

wrapper.java.additional.2=-Dactivemq.base=%ACTIVEMQ_BASE%

wrapper.java.additional.3=-Djavax.net.ssl.keyStorePassword=password

wrapper.java.additional.4=-Djavax.net.ssl.trustStorePassword=password

wrapper.java.additional.5=-Djavax.net.ssl.keyStore=%ACTIVEMQ_BASE%/conf/broker.ks

wrapper.java.additional.6=-Djavax.net.ssl.trustStore=%ACTIVEMQ_BASE%/conf/broker.ts

wrapper.java.additional.7=-Dcom.sun.management.jmxremote

wrapper.java.additional.8=-Dorg.apache.activemq.UseDedicatedTaskRunner=true

wrapper.java.additional.9=-Djava.util.logging.config.file=logging.properties


# Uncomment to enable jmx

wrapper.java.additional.10=-Dcom.sun.management.jmxremote.port=1616

wrapper.java.additional.11=-Dcom.sun.management.jmxremote.authenticate=false

wrapper.java.additional.12=-Dcom.sun.management.jmxremote.ssl=false
# Uncomment to enable YourKit profiling

#wrapper.java.additional.n=-Xrunyjpagent


# Uncomment to enable remote debugging

#wrapper.java.additional.n=-Xdebug -Xnoagent -Djava.compiler=NONE

#wrapper.java.additional.n=-Xrunjdwp:transport=dt_socket,server=y,suspend=n,address=5005


# Initial Java Heap Size (in MB)

#wrapper.java.initmemory=3


# Maximum Java Heap Size (in MB)

wrapper.java.maxmemory=512


# Application parameters.  Add parameters as needed starting from 1

wrapper.app.parameter.1=org.apache.activemq.console.Main

wrapper.app.parameter.2=start


#********************************************************************

# Wrapper Logging Properties

#********************************************************************

# Format of output for the console.  (See docs for formats)

wrapper.console.format=PM


# Log Level for console output.  (See docs for log levels)

wrapper.console.loglevel=INFO


# Log file to use for wrapper output logging.

wrapper.logfile=%ACTIVEMQ_BASE%/data/wrapper.log


# Format of output for the log file.  (See docs for formats)

wrapper.logfile.format=LPTM


# Log Level for log file output.  (See docs for log levels)

wrapper.logfile.loglevel=INFO


# Maximum size that the log file will be allowed to grow to before

#  the log is rolled. Size is specified in bytes.  The default value

#  of 0, disables log rolling.  May abbreviate with the 'k' (kb) or

#  'm' (mb) suffix.  For example: 10m = 10 megabytes.

wrapper.logfile.maxsize=0


# Maximum number of rolled log files which will be allowed before old

#  files are deleted.  The default value of 0 implies no limit.

wrapper.logfile.maxfiles=0


# Log Level for sys/event log output.  (See docs for log levels)

wrapper.syslog.loglevel=NONE


#********************************************************************

# Wrapper Windows Properties

#********************************************************************

# Title to use when running as a console

wrapper.console.title=ActiveMQ
#********************************************************************

# Wrapper Windows NT/2000/XP Service Properties

#********************************************************************

# WARNING - Do not modify any of these properties when an application

#  using this configuration file has been installed as a service.

#  Please uninstall the service before modifying this section.  The

#  service can then be reinstalled.


# Name of the service

wrapper.ntservice.name=ActiveMQ


# Display name of the service

wrapper.ntservice.displayname=ActiveMQ


# Description of the service

wrapper.ntservice.description=ActiveMQ Broker


# Service dependencies.  Add dependencies as needed starting from 1

wrapper.ntservice.dependency.1=


# Mode in which the service is installed.  AUTO_START or DEMAND_START

wrapper.ntservice.starttype=AUTO_START


# Allow the service to interact with the desktop.

wrapper.ntservice.interactive=false
Restart the ActiveMQ broker to have the new configuration takes effect,
$ apache-activemq-5.4.2/bin/macosx/activemq restart

Stopping ActiveMQ Broker...

Stopped ActiveMQ Broker.

Starting ActiveMQ Broker...
Now launch the JMX console (see Figure 12–3):
$ jconsole localhost:1616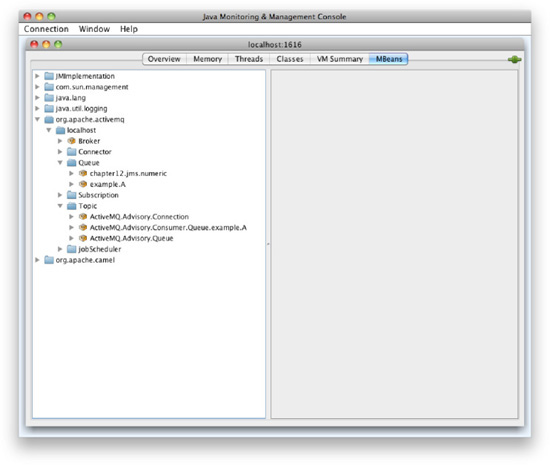
Figure 12–3. The ActiveMQ JMX Console
The ActiveMQ web and JMX consoles provide a lot of useful information regarding the message broker, message queue, message topic, and topic subscription. In addition, the consoles allow the administrator to operate and manage the ActiveMQ broker.
The ActiveMQ web console Queue page (see Figure 12–4) allows an administrator to create queues on the fly without modifying the ActiveMQ configuration file. It also shows statistics, including number of pending messages, number of consumers, messages enqueued, and messages dequeued. The web console also provides basic operations such as send, purge, and delete to allow the administrator to manage the message queue.
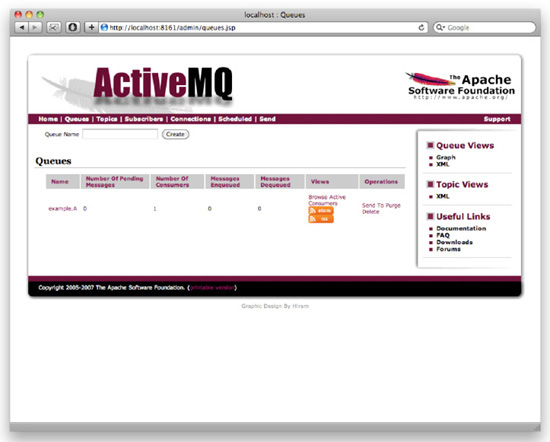
Figure 12–4. The Queue Page of the ActiveMQ Web Console
The JMX console also provides similar functionality to the web console as shown in Figures 12–5 and 12–6. The queue statistics are represented by JMX MBean attributes. The queue management operations can be invoked by using the JMX MBean methods.
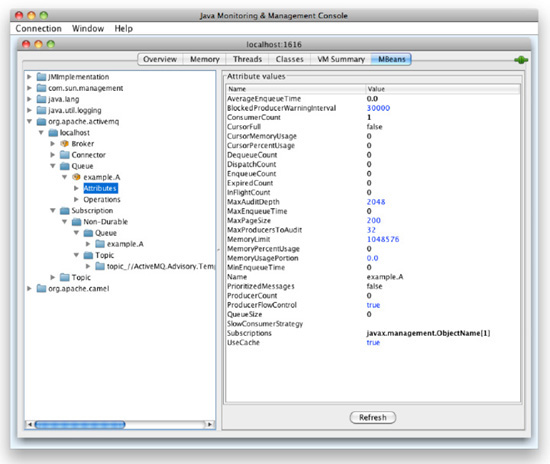
Figure 12–5. Queue MBean Attributes
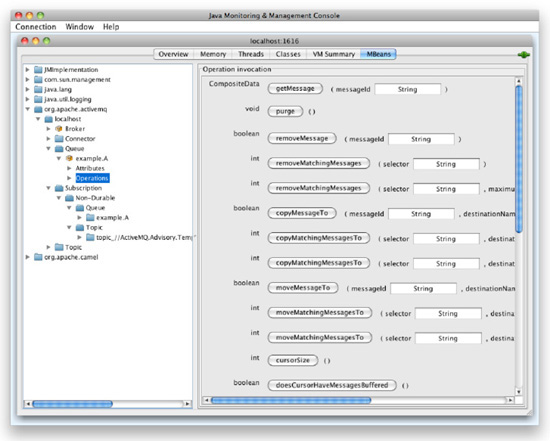
Figure 12–6. Queue MBean Operations
To use ActiveMQ, add the following dependency in your Maven pom.xml file:
<dependency>

  <groupId>org.apache.activemq</groupId>

  <artifactId>activemq-all</artifactId>

  <version5.4.2</version>

</dependency>
You’ll need to configure a JMS connection factory. There are many ways to do this, including the ActiveMQ specific Spring namespace. However, to keep things simple, we’ll use a Java configuration here:
    @Bean

    public ActiveMQConnectionFactory activeMqConnectionFactory() {

        ActiveMQConnectionFactory activeMQConnectionFactory =

                new ActiveMQConnectionFactory();

        activeMQConnectionFactory.setBrokerURL("tcp://localhost:61616");
        return activeMQConnectionFactory;

    }


    @Bean

    public CachingConnectionFactory connectionFactory() {

        CachingConnectionFactory cachingConnectionFactory =

                new CachingConnectionFactory();

        cachingConnectionFactory.setSessionCacheSize(10);

        cachingConnectionFactory.setCacheProducers(false);

        cachingConnectionFactory.setTargetConnectionFactory( activeMqConnectionFactory() );

        return cachingConnectionFactory;

    }
The preceding configuration example creates a connection factory which connects to the ActiveMQ broker on the localhost on port 61616. In addition, an instance of a Spring Framework class, CachingConnectionFactory, is defined, which makes working with JMS connection factories more sane in a Spring environment. Spring’s support for JMS assumes that all connection factories belong to a pool (as is typical in a Java EE environment), and closes all resources after the client is done with it. Once closed, a pooled resource is simply returned to the pool—an inexpensive operation. If the connection factory is used directly, as in this example, then Spring will end up closing heavyweight connections that are actually used by the container, which will yield devastating performance. So, the connection factory is wrapped with a caching implementation that will in effect pool the instance and provide the expected performance.
In order to use ActiveMQ message destinations, the topic or queue needs to be defined in Spring. If the ActiveMQ message queue and topic have never been created in the broker, they can be created programmatically, as shown following:
    @Bean

    public ActiveMQQueue ticketQueue() {

        ActiveMQQueue activeMQQueue = new ActiveMQQueue("ticket.queue");

        return activeMQQueue;

    }


    @Bean

    public ActiveMQTopic ticketTopic() {

        ActiveMQTopic activeMQTopic = new ActiveMQTopic("ticket.topic");

        return activeMQTopic;

    }
If the message queue and topic are precreated (they can be created by using the web console, JMX console, or configuration file), the message destination can be referenced by name instead of the actual bean. How to reference these will be discussed later in this chapter.
JBoss HornetQ
JBossHornetQ (www.jboss.org/hornetq) is an open source message broker under the Apache Software License 2.0. As of August 26, 2010, it is the fastest JMS message broker—faster than Apache ActiveMQ by 300 percent, according to SPECjms2007 (www.spec.org/jms2007/results/jms2007.html). The HornetQ project was launched by Tim Fox in 2009 and was originally intended to be the JBoss Messaging 2.0 project. HornetQ supports the JMS 1.1 specification, as well.
The latest version of HornetQ can be downloaded from www.jboss.org/hornetq/downloads.html. As of this writing, the latest release version is 2.1.2 (http://sourceforge.net/projects/hornetq/files/2.1.2.FINAL/hornetq-2.1.2.Final.tar.gz/download).
You can install HornetQ by simply decompressing the downloaded ZIP or tarball file, like so:
$ tar –zxf hornetq-2.1.2.Final.tar.gzTo start HornetQ in standalone mode on the Linux platform, run the following command:
$ hornetq-2.1.2.Final/bin/run.shRunning this command will produce the following output:
***********************************************************************************

java  -XX:+UseParallelGC -XX:+AggressiveOpts -XX:+UseFastAccessorMethods -Xms512M -Xmx1024M -Dhornetq.config.dir=../config/stand-alone/non-clustered -Djava.util.logging.config.file=../config/stand-alone/non-clustered/logging.properties -Djava.library.path=. -classpath ../lib/twitter4j-core.jar:../lib/netty.jar:../lib/jnpserver.jar:../lib/jnp-client.jar:../lib/jboss-mc.jar:../lib/jboss-jms-api.jar:../lib/hornetq-twitter-integration.jar:../lib/hornetq-logging.jar:../lib/hornetq-jms.jar:../lib/hornetq-jms-client.jar:../lib/hornetq-jms-client-java5.jar:../lib/hornetq-jboss-as-integration.jar:../lib/hornetq-core.jar:../lib/hornetq-core-client.jar:../lib/hornetq-core-client-java5.jar:../lib/hornetq-bootstrap.jar:../config/stand-alone/non-clustered:../schemas/ org.hornetq.integration.bootstrap.HornetQBootstrapServer hornetq-beans.xml

***********************************************************************************

[main] 16:21:04,477 INFO [org.hornetq.integration.bootstrap.HornetQBootstrapServer]  Starting HornetQ Server

[main] 16:21:05,707 WARNING [org.hornetq.core.deployers.impl.FileConfigurationParser]  AIO wasn't located on this platform, it will fall back to using pure Java NIO. If your platform is Linux, install LibAIO to enable the AIO journal

[main] 16:21:05,770 INFO [org.hornetq.core.server.impl.HornetQServerImpl]  live server is starting..

[main] 16:21:05,798 INFO [org.hornetq.core.persistence.impl.journal.JournalStorageManager]  Using NIO Journal

[main] 16:21:05,823 WARNING [org.hornetq.core.server.impl.HornetQServerImpl]  Security risk! It has been detected that the cluster admin user and password have not been changed from the installation default. Please see the HornetQ user guide, cluster chapter, for instructions on how to do this.

[main] 16:21:08,571 INFO [org.hornetq.core.remoting.impl.netty.NettyAcceptor]  Started Netty Acceptor version 3.2.1.Final-r2319 localhost:5445 for CORE protocol

[main] 16:21:08,574 INFO [org.hornetq.core.remoting.impl.netty.NettyAcceptor]  Started Netty Acceptor version 3.2.1.Final-r2319 localhost:5455 for CORE protocol

[main] 16:21:08,576 INFO [org.hornetq.core.server.impl.HornetQServerImpl]  HornetQ Server version 2.1.2.Final (Colmeia, 120) started
HornetQ may also be run in the background by using nohup, as follows:
$ nohup hornetq-2.1.2.Final/bin/run.sh &To stop HornetQ, enter the following command:
$ hornetq-2.1.2.Final/bin/stop.shHornetQ can be monitored using the JMX console. By default, JMX monitoring is only available on localhost. In order to enable remote JMX, modify hornet-2.1.2.Final/bin/run.sh as shown in Listing 12–2.
Listing 12–2. hornet-2.1.2.Final/bin/run.sh
#!/bin/sh


export HORNETQ_HOME=..

mkdir -p ../logs

# By default, the server is started in the non-clustered standalone configuration


if [ a"$1" = a ]; then CONFIG_DIR=$HORNETQ_HOME/config/stand-alone/non-clustered; else CONFIG_DIR="$1"; fi

if [ a"$2" = a ]; then FILENAME=hornetq-beans.xml; else FILENAME="$2"; fi


export CLASSPATH=$CONFIG_DIR:$HORNETQ_HOME/schemas/

#you can use the following line if you want to run with different ports

#export CLUSTER_PROPS="-Djnp.port=1099 -Djnp.rmiPort=1098 -Djnp.host=localhost -Dhornetq.remoting.netty.host=localhost -Dhornetq.remoting.netty.port=5445"

export JVM_ARGS="$CLUSTER_PROPS -XX:+UseParallelGC -XX:+AggressiveOpts -XX:+UseFastAccessorMethods -Xms512M -Xmx1024M -Dhornetq.config.dir=$CONFIG_DIR -Djava.util.logging.config.file=$CONFIG_DIR/logging.properties -Djava.library.path=."

#export JVM_ARGS="-Xmx512M -Djava.util.logging.config.file=$CONFIG_DIR/logging.properties -Dhornetq.config.dir=$CONFIG_DIR -Djava.library.path=. -Xdebug -Xrunjdwp:transport=dt_socket,server=y,suspend=y,address=5005"


for i in `ls $HORNETQ_HOME/lib/*.jar`; do

        CLASSPATH=$i:$CLASSPATH

done


echo "***********************************************************************************"

echo "java $JVM_ARGS -classpath $CLASSPATH org.hornetq.integration.bootstrap.HornetQBootstrapServer $FILENAME"

echo "***********************************************************************************"

java $JVM_ARGS -classpath $CLASSPATH -Dcom.sun.management.jmxremote –Dcom.sun.management.jmxremote.port=5000 -Dcom.sun.management.jmxremote.authenticate=false org.hornetq.integration.bootstrap.HornetQBootstrapServer $FILENAME
Restart HornetQ after the running script has been modified, by entering the following:
$ hornet-2.1.2.Final/bin/stop.sh

$ nohup hornet-2.1.2.Final/bin/run.sh &

$ jconsole localhost:5000
The JMX console (see Figure 12–7) exposes the statistics for the individual message queue or topic. The console also allows the administrator to operate the message queue and topic via the JMX operations as shown in Figure 12–8.
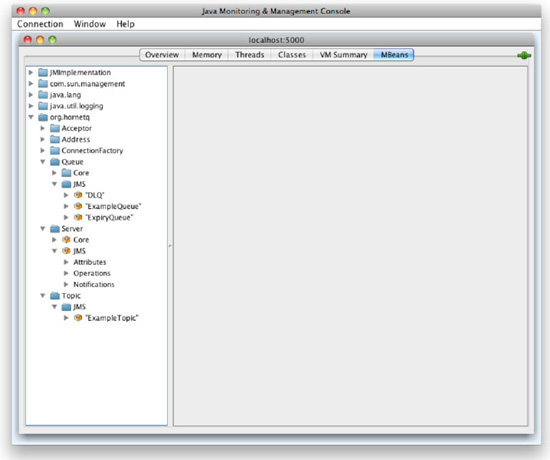
Figure 12–7. The HornetQ JMX Console

Figure 12–8. Queue Attributes in the HornetQ JMX Console
HornetQ comes with three point-to-point message queues out of the box: ExampleQueue, ExpiryQueue, and DLQ (which stands for “dead letter queue”). DLQ is used when HornetQ fails to deliver a message to a destination. Additionally, HornetQ also includes a sample topic, ExampleTopic. This queue can be seen in JConsole as shown in Figure 12–9.
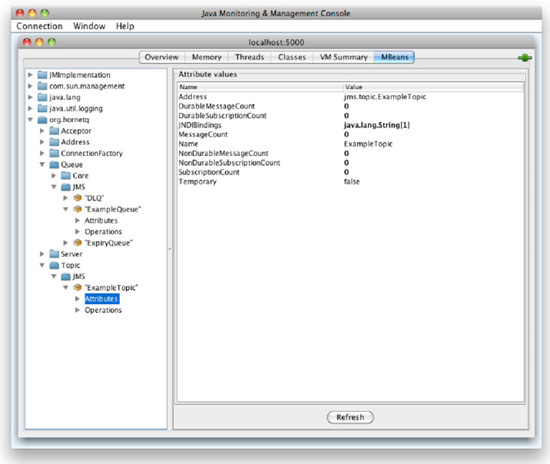
Figure 12–9. Topic Attributes in the HornetQ JMX Console
In order to use JBossHornetQ with Spring Integration, you have to include the following dependencies in the Maven pom.xml configuration file:
<dependency>

  <groupId>org.hornetq</groupId>

  <artifactId>hornetq-core</artifactId>

  <version>2.1.2.Final</version>

</dependency>

<dependency>

  <groupId>org.hornetq</groupId>

  <artifactId>hornetq-core-client</artifactId>

  <version>2.1.2.Final</version>

</dependency>

<dependency>
  <groupId>org.hornetq</groupId>

  <artifactId>hornetq-jms-client</artifactId>

  <version>2.1.2.Final</version>

</dependency>

<dependency>

  <groupId>org.jboss.netty</groupId>

  <artifactId>netty</artifactId>

  <version>3.2.2.Final</version>

</dependency>
Also, do not forget to add the JBoss Maven repositories:
<repository>

  <id>JBoss Repository</id>

  <url>https://repository.jboss.org/nexus/content/repositories/releases</url>

</repository>

<repository>

  <id>JBoss Maven2 Repository</id>

  <url>http://repository.jboss.org/maven2</url>

</repository>
Next, Spring requires a ConnectionFactory for HornetQ. Note that you can use a reference to a JMS topic, or the ID (a string) of the topic itself. In the following configuration, a CachingConnectionFactory is used, just as with ActiveMQ. Additionally, some HornetQ-specific configurations are used to help correctly set up the ConnectionFactory.
    @Bean

    public CachingConnectionFactory connectionFactory() {

        CachingConnectionFactory cachingConnectionFactory =

                new CachingConnectionFactory();

        cachingConnectionFactory.setSessionCacheSize(10);

        cachingConnectionFactory.setCacheProducers(false);

        cachingConnectionFactory.setTargetConnectionFactory(hornetQConnectionFactory());

        return cachingConnectionFactory;

    }


    @Bean

    public HornetQConnectionFactory hornetQConnectionFactory() {

        HornetQConnectionFactory connectionFactory =

                new HornetQConnectionFactory(transportConfiguration());

        return connectionFactory;

    }


    @Bean

    public TransportConfiguration transportConfiguration() {

        Map<String, Object> map = new HashMap<String, Object>();

        map.put("host", "localhost");

        map.put("port", 5445);

        TransportConfiguration configuration =

                new TransportConfiguration(

                        "org.hornetq.core.remoting.impl.netty.NettyConnectorFactory", map);

        return configuration;

    }
JMS Channel Adapters
Referring back to the Ticket system example in Chapter 6, there is a single process that contains two threads: the main thread produces tickets with different priorities, and a separate thread receives the tickets. In Chapter 6, the examples are using different types of in-memory channels to connect the ticket producer and consumer. What if the ticket producer and ticket receiver are running in two different processes or two different servers in different locations? How can Spring Integration connect them together?
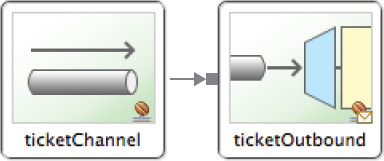
Figure 12–10. Ticket reporter Enterprise Integration Pattern (EIP) Diagram
The ProblemReporter will generate tickets with different priorities and send them to the ticketChannel message channel. In order to send the message to a different process outside of the JVM, an outbound JMS channel adapter is used to connect the ticketChannel with a JMS message queue, ticket.queue.
In order to use Spring JMS Integration, make sure the Spring configuration file contains the necessary namespaces as shown in Listing 12–3.
Listing 12–3. ticket-reporter.xml
<?xml version="1.0" encoding="UTF-8"?>

<beans xmlns="http://www.springframework.org/schema/beans"

       xmlns:xsi="http://www.w3.org/2001/XMLSchema-instance"

       xmlns:int="http://www.springframework.org/schema/integration"

       xmlns:int-jms="http://www.springframework.org/schema/integration/jms"

       xmlns:context="http://www.springframework.org/schema/context"

       xsi:schemaLocation="http://www.springframework.org/schema/integration

    http://www.springframework.org/schema/integration/spring-integration-2.0.xsd

    http://www.springframework.org/schema/integration/jms

    http://www.springframework.org/schema/integration/jms/spring-integration-jms-2.0.xsd

    http://www.springframework.org/schema/beans

    http://www.springframework.org/schema/beans/spring-beans-3.0.xsd

    http://www.springframework.org/schema/context

    http://www.springframework.org/schema/context/spring-context-3.0.xsd">


  <context:component-scan

      base-package="com.apress.prospringintegration.messaging.activemq.jms.adapter"/>


  <int-jms:outbound-channel-adapter id="ticketOutbound"

                                    destination="ticketQueue"

                                    channel="ticketChannel"/>


</beans>
The JMS channel adapter contains the attribute extract-payload. If the extract-payload attribute is true, which is the default, the adapter will try to extract the Spring Integration message payload by passing the message into the message converter SimpleMessageConverter. The SimpleMessageConverter will convert the incoming message into a JMS message payload. For example, if the Spring Integration message contains a string, the SimpleMessageConverter will convert the payload into a JMS TextMessage. Therefore, the Ticket object needs to implement the java.io.Serializable interface.
If the extract-payload value is set to false, then the whole Spring Integration message will be sent as a byte array and converted into a JMS message. This option can only be used if all the systems are using Spring Integration.
ActiveMQ will be used for these examples. Messages will travel through an ActiveMQ queue called ticket.queue. The JMS adapters require either a reference to a Spring JmsTemplate instance, or both a ConnectionFactory and java.jms.Destination reference. Directly specifying a destination name works as well:
  <int-jms:outbound-channel-adapter id="ticketOutbound"

                                    destination-name="ticket.queue"

                                    channel="ticketChannel"/>
The outbound channel adapter sends a JMS message to the ticket.queue destination any time a message is sent to the message channel ticketOutbound. The rest of the source code for the Ticket reporter example is shown below. The Ticket class is shown in Listing 12–4.
Listing 12–4. Ticket.java
package com.apress.prospringintegration.messaging;


import java.io.Serializable;

import java.util.Calendar;


public class Ticket implements Serializable {

    private static final long serialVersionUID = 721648261640069582L;


    public enum Priority    {

        low,

        medium,

        high,

        emergency

    }


    private long ticketId;

    private Calendar issueDateTime;

    private String description;

    private Priority priority;


    public long getTicketId() {

        return ticketId;

    }


    public void setTicketId(long ticketId) {

        this.ticketId = ticketId;

    }


    public Calendar getIssueDateTime() {

        return issueDateTime;
    }


    public void setIssueDateTime(Calendar issueDateTime) {

        this.issueDateTime = issueDateTime;

    }


    public String getDescription()   {

        return description;

    }


    public void setDescription(String description)  {

        this.description = description;

    }


    public Priority getPriority()   {

        return priority;

    }


    public void setPriority(Priority priority) {

        this.priority = priority;

    }


    public String toString() {

        return String.format("Ticket# %d: [%s] %s", ticketId, priority, description);

    }

}
The ProblemReporter class is shown in Listing 12–5. This component publishes a message with a Ticket object as the payload to the ticketChannel message channel.
Listing 12–5. ProblemReporter.java
package com.apress.prospringintegration.messaging.activemq.jms.adapter;


import org.springframework.beans.factory.annotation.Value;

import org.springframework.integration.MessageChannel;

import org.springframework.integration.support.MessageBuilder;

import org.springframework.stereotype.Component;


@Component

public class ProblemReporter {


    private MessageChannel channel;


    @Value("#{ticketChannel}")

    public void setChannel(MessageChannel channel) {

        this.channel = channel;

    }


    public void openTicket(Ticket ticket) {

        channel.send(MessageBuilder.withPayload(ticket).build());

        System.out.println("Ticket Sent - " + ticket.toString());

    }

}
The TicketGenerator class shown in Listing 12–6 generates the Ticket objects with different priority levels.
Listing 12–6. TicketGenerator.java
package com.apress.prospringintegration.messaging.activemq.jms.adapter;


import com.apress.prospringintegration.messaging.activemq.jms.adapter.Ticket.Priority;

import org.springframework.stereotype.Component;


import java.util.ArrayList;

import java.util.GregorianCalendar;

import java.util.List;


@Component

public class TicketGenerator {


    private long nextTicketId;


    public TicketGenerator() {

        this.nextTicketId = 1000l;

    }


    public List<Ticket> createTickets() {

        List<Ticket> tickets = new ArrayList<Ticket>();


        tickets.add(createLowPriorityTicket());

        tickets.add(createLowPriorityTicket());

        tickets.add(createLowPriorityTicket());

        tickets.add(createLowPriorityTicket());

        tickets.add(createLowPriorityTicket());

        tickets.add(createMediumPriorityTicket());

        tickets.add(createMediumPriorityTicket());

        tickets.add(createMediumPriorityTicket());

        tickets.add(createMediumPriorityTicket());

        tickets.add(createMediumPriorityTicket());

        tickets.add(createHighPriorityTicket());

        tickets.add(createHighPriorityTicket());

        tickets.add(createHighPriorityTicket());

        tickets.add(createHighPriorityTicket());

        tickets.add(createHighPriorityTicket());

        tickets.add(createEmergencyTicket());

        tickets.add(createEmergencyTicket());

        tickets.add(createEmergencyTicket());

        tickets.add(createEmergencyTicket());

        tickets.add(createEmergencyTicket());


        return tickets;

    }


    Ticket createEmergencyTicket() {

        return createTicket(Priority.emergency,

                "Urgent problem. Fix immediately or revenue will be lost!");

    }
    Ticket createHighPriorityTicket() {

        return createTicket(Priority.high,

                "Serious issue. Fix immediately.");

    }


    Ticket createMediumPriorityTicket() {

        return createTicket(Priority.medium,

                "There is an issue; take a look whenever you have time.");

    }


    Ticket createLowPriorityTicket() {

        return createTicket(Priority.low,

                "Some minor problems have been found.");

    }


    Ticket createTicket(Priority priority, String description) {

        Ticket ticket = new Ticket();

        ticket.setTicketId(nextTicketId++);

        ticket.setPriority(priority);

        ticket.setIssueDateTime(GregorianCalendar.getInstance());

        ticket.setDescription(description);


        return ticket;

    }

}
The main class that runs the Ticket reporter application is shown in Listing 12–27. This class creates the Spring context uses the TicketGenerator and ProblemReporter class to publish the Ticket objects with different priority levels to the JMS queue.
Listing 12–7. TicketReporterMain.java
package com.apress.prospringintegration.messaging.activemq.jms.adapter;


import org.springframework.context.support.ClassPathXmlApplicationContext;


import java.util.List;


public class TicketReporterMain {


    public static void main(String[] args)

            throws Throwable {

        String contextName = "ticket-reporter.xml";


        ClassPathXmlApplicationContext applicationContext =

                new ClassPathXmlApplicationContext(contextName);

        applicationContext.start();


        ProblemReporter problemReporter =

                applicationContext.getBean(ProblemReporter.class);

        TicketGenerator ticketGenerator =

                applicationContext.getBean(TicketGenerator.class);
        while (true) {

            List<Ticket> tickets = ticketGenerator.createTickets();

            for (Ticket ticket : tickets) {

                problemReporter.openTicket(ticket);

            }


            Thread.sleep(5000);

        }

    }

}
In order to run this example, the ActiveMQ broker needs to be started first. To start it, use the following command:
$ apache-activemq-5.4.2/bin/macosx/activemq start

Starting ActiveMQ Broker...
Next, start the JMX console so you can monitor the activity on the JMS broker:
$ jconsole localhost:1616Launch the example using the following command:
$ cd prospringintegration/messaging/activemq-jmschanneladapter

$ mvn exec:java –Dexec.mainClass="com.apress.prospringintegration.mesging.activemq.jms.adapter.TicketReporterMain"
The source code should be compiled and running. The following output will appear on the console:
12-25-2010 14:45:05 [INFO] Initializing ExecutorService  'taskScheduler'

12-25-2010 14:45:05 [INFO] Starting beans in phase -2147483648

12-25-2010 14:45:05 [INFO] started _org.springframework.integration.errorLogger

12-25-2010 14:45:05 [INFO] Starting beans in phase 2147483647

12-25-2010 14:45:05 [INFO] started ticketOutbound

12-25-2010 14:45:05 [INFO] Starting beans in phase -2147483648

12-25-2010 14:45:05 [INFO] Starting beans in phase 2147483647

Ticket Sent - Ticket# 1000: [low] Some minor problems have been found.

Ticket Sent - Ticket# 1001: [low] Some minor problems have been found.

Ticket Sent - Ticket# 1002: [low] Some minor problems have been found.

Ticket Sent - Ticket# 1003: [low] Some minor problems have been found.

Ticket Sent - Ticket# 1004: [low] Some minor problems have been found.

Ticket Sent - Ticket# 1005: [medium] There is an issue; take a look whenever you have time.

Ticket Sent - Ticket# 1006: [medium] There is an issue; Take a look whenever you have time.

Ticket Sent - Ticket# 1007: [medium] There is an issue; Take a look whenever you have time.

Ticket Sent - Ticket# 1008: [medium] There is an issue; Take a look whenever you have time.

Ticket Sent - Ticket# 1009: [medium] There is an issue; Take a look whenever you have time.

Ticket Sent - Ticket# 1010: [high] Serious issue. Fix immediately.

Ticket Sent - Ticket# 1011: [high] Serious issue. Fix immediately.

Ticket Sent - Ticket# 1012: [high] Serious issue. Fix immediately.

Ticket Sent - Ticket# 1013: [high] Serious issue. Fix immediately.

Ticket Sent - Ticket# 1014: [high] Serious issue. Fix immediately.

Ticket Sent - Ticket# 1016: [emergency] Urgent problem. Fix immediately or revenue will be lost!

Ticket Sent - Ticket# 1016: [emergency] Urgent problem. Fix immediately or revenue will be lost!

Ticket Sent - Ticket# 1017: [emergency] Urgent problem. Fix immediately or revenue will be lost!

Ticket Sent - Ticket# 1018: [emergency] Urgent problem. Fix immediately or revenue will be lost!

Ticket Sent - Ticket# 1019: [emergency] Urgent problem. Fix immediately or revenue will be lost!
Take a look at the JMX console that connects with the ActiveMQ broker. Switch to the MBeans tab and expand the MBean org.apache.activemq.localhost.Queue as shown in Listing 12–11. In addition to the default queue example, a new queue, ticket.queue, is created.
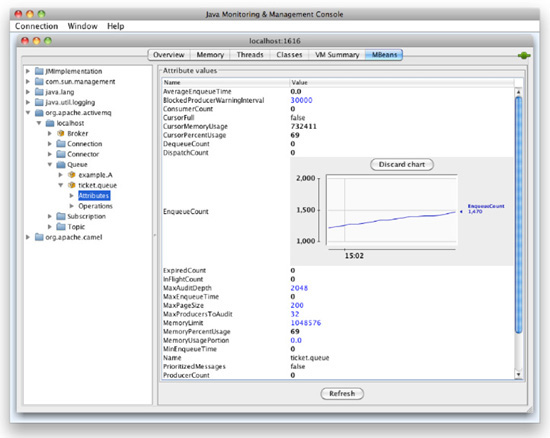
Figure 12–11. ticket.queue Attributes
Take a look at the MBean attributes of ticket.queue and double-click the EnqueueCount attribute. The count is increasing because the TicketReporter is generating messages and sending them to the JMS broker via the outbound channel adapter. Now stop the application by pressing Ctrl+C in the console window.
The Ticket receiver application will receive messages by using the inbound JMS message-driven adapter and connecting with the other message channel. The EIP diagram is illustrated in Figure 12–12.
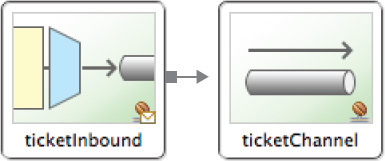
Figure 12–12. Ticket Receiver EIP diagram
The Spring configuration, as shown in Listing 12–8, is very similar to the Ticket reporter application.
Listing 12–8. ticket-receiver.xml
<?xml version="1.0" encoding="UTF-8"?>

<beans xmlns="http://www.springframework.org/schema/beans"

       xmlns:xsi="http://www.w3.org/2001/XMLSchema-instance"

       xmlns:int="http://www.springframework.org/schema/integration"

       xmlns:int-jms="http://www.springframework.org/schema/integration/jms"

       xmlns:context="http://www.springframework.org/schema/context"

       xsi:schemaLocation="http://www.springframework.org/schema/integration

    http://www.springframework.org/schema/integration/spring-integration-2.0.xsd

    http://www.springframework.org/schema/integration/jms

    http://www.springframework.org/schema/integration/jms/spring-integration-jms-2.0.xsd

    http://www.springframework.org/schema/beans

    http://www.springframework.org/schema/beans/spring-beans-3.0.xsd

    http://www.springframework.org/schema/context

    http://www.springframework.org/schema/context/spring-context-3.0.xsd">


  <context:component-scan

      base-package="com.apress.prospringintegration.messaging.activemq.jms.adapter"/>


  <int:channel id="receiveChannel"/>


  <int:service-activator input-channel="receiveChannel" ref="ticketReceiver"/>


  <int-jms:message-driven-channel-adapter id="ticketInbound"

                                          destination="ticketQueue"

                                          channel="receiveChannel"/>

</beans>
There are two types of inbound channel adapters: polling and message-driven. The polling channel adapter uses JmsTemplate internally while the message-driven inbound channel adapter uses the Spring MessageListener container abstraction.
The preceding example uses the message-driven JMS channel adapters. In order to use the inbound JMS channel adapters, a poller must be configured, as shown following:
  <int-jms:inbound-channel-adapter id="ticketInbound"

                                   channel="receiveChannel"

                                   destination="ticketQueue"

                                   connection-factory="connectionFactory">
    <int:poller fixed-rate="1000"/>

  </int-jms:inbound-channel-adapter>
The inbound JMS channel adapter also contains the attribute extract-payload. If the extract-payload attribute is true, which is the default, the adapter will try to extract the JMS message body by passing the message into the message converter SimpleMessageConverter. The SimpleMessageConverter will convert the incoming message body into a Spring message payload. For example, an incoming JMS TextMessage will be converted using the SimpleMessageConverter in a Spring Message with a string payload. If the extract-payload value is set to false, then the raw JMS message will become the Spring message payload
In inbound JMS message is routed to the receiveChannel message channel and forward to the TicketReceiver service activator shown in Listing 12–9. The TicketReceiver simply logs the Ticket object.
Listing 12–9. TicketReceiver.java
package com.apress.prospringintegration.messaging.activemq.jms.adapter;


import org.springframework.integration.annotation.ServiceActivator;

import org.springframework.stereotype.Component;


@Component

public class TicketReceiver {


    @ServiceActivator

    public void handleTicket(Ticket ticket) {

        System.out.println("Received ticket - " + ticket.toString());

    }


}
The main class for running the example is shown in Listing 12–10. The class will create the Spring context and the message driven bean which will listener for incoming JMS messages.
Listing 12–10. TicketReceiverMain.java
package com.apress.prospringintegration.messaging.activemq.jms.adapter;


import org.springframework.context.support.ClassPathXmlApplicationContext;


public class TicketReceiverMain {


    public static void main(String[] args) {

        String contextName = "ticket-receiver.xml";


        ClassPathXmlApplicationContext applicationContext =

            new ClassPathXmlApplicationContext(contextName);

        applicationContext.start();

    }

}
Run the TicketReceiver application by issuing the following command:
$ mvn exec:java -Dexec.mainClass="com.apress.prospringintegration.mesging.activemq.jms.adapter.TicketReceiverMain"Running the command will result in the following output:
12-25-2010 15:33:46 [INFO] Initializing ExecutorService  'taskScheduler'

12-25-2010 15:33:46 [INFO] Starting beans in phase -2147483648

12-25-2010 15:33:46 [INFO] started _org.springframework.integration.errorLogger

12-25-2010 15:33:46 [INFO] Starting beans in phase 2147483647

12-25-2010 15:33:46 [INFO] started ticketInbound

12-25-2010 15:33:46 [INFO] Starting beans in phase -2147483648

12-25-2010 15:33:46 [INFO] Starting beans in phase 2147483647

Received ticket - Ticket# 1000: [low] Some minor problems have been found.

Received ticket - Ticket# 1001: [low] Some minor problems have been found.

Received ticket - Ticket# 1002: [low] Some minor problems have been found.

Received ticket - Ticket# 1003: [low] Some minor problems have been found.

Received ticket - Ticket# 1004: [low] Some minor problems have been found.

Received ticket - Ticket# 1005: [medium] There is an issue; take a look whenever you have time.

Received ticket - Ticket# 1006: [medium] There is an issue; Take a look whenever you have time.

Received ticket - Ticket# 1007: [medium] There is an issue; Take a look whenever you have time.

Received ticket - Ticket# 1008: [medium] There is an issue; Take a look whenever you have time.

Received ticket - Ticket# 1009: [medium] There is an issue; Take a look whenever you have time.

Received ticket - Ticket# 1010: [high] Serious issue. Fix immediately.

Received ticket - Ticket# 1011: [high] Serious issue. Fix immediately.

Received ticket - Ticket# 1012: [high] Serious issue. Fix immediately.

Received ticket - Ticket# 1013: [high] Serious issue. Fix immediately.

Received ticket - Ticket# 1014: [high] Serious issue. Fix immediately.

Received ticket - Ticket# 1015: [emergency] Urgent problem. Fix immediately or revenue will be lost!

Received ticket - Ticket# 1016: [emergency] Urgent problem. Fix immediately or revenue will be lost!

Received ticket - Ticket# 1017: [emergency] Urgent problem. Fix immediately or revenue will be lost!

Received ticket - Ticket# 1018: [emergency] Urgent problem. Fix immediately or revenue will be lost!

Received ticket - Ticket# 1019: [emergency] Urgent problem. Fix immediately or revenue will be lost!
The JMX console also shows that the JMS message queue is draining by observing the decreasing DequeueCount MBean attribute (see Figure 12–13).
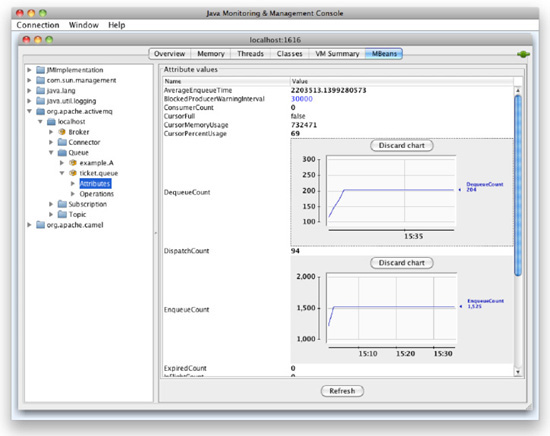
Figure 12–13. ticket.queue Attributes for Monitroing the Decreasing Queue Count
The preceding examples use ActiveMQ as the JMS broker. However, using HornetQ as the JMS broker instead is very simple. All Spring Integration requires is that the connectionFactory bean modified to use HornetQ. The new Java configuration file is shown in Listing 12–11.
Listing 12–11. HornetqConfiguration.java
package com.apress.prospringintegration.messaging.hornetq.jms.adapter;


import org.hornetq.api.core.TransportConfiguration;

import org.hornetq.jms.client.HornetQConnectionFactory;

import org.springframework.context.annotation.Bean;

import org.springframework.context.annotation.Configuration;

import org.springframework.integration.MessageChannel;

import org.springframework.integration.channel.DirectChannel;

import org.springframework.jms.connection.CachingConnectionFactory;
import java.util.HashMap;

import java.util.Map;


@Configuration

public class HornetqConfiguration {


    @Bean

    public CachingConnectionFactory connectionFactory() {

        CachingConnectionFactory cachingConnectionFactory =

                new CachingConnectionFactory();

        cachingConnectionFactory.setSessionCacheSize(10);

        cachingConnectionFactory.setCacheProducers(false);

        cachingConnectionFactory.setTargetConnectionFactory(hornetQConnectionFactory());

        return cachingConnectionFactory;

    }


    @Bean

    public HornetQConnectionFactory hornetQConnectionFactory() {

        HornetQConnectionFactory connectionFactory =

                new HornetQConnectionFactory(transportConfiguration());

        return connectionFactory;

    }


    @Bean

    public TransportConfiguration transportConfiguration() {

        Map<String, Object> map = new HashMap<String, Object>();

        map.put("host", "localhost");

        map.put("port", 5445);

        TransportConfiguration configuration =

                new TransportConfiguration(

                        "org.hornetq.core.remoting.impl.netty.NettyConnectorFactory", map);

        return configuration;

    }


    @Bean

    public MessageChannel ticketChannel() {

        MessageChannel channel = new DirectChannel();

        return channel;

    }

}
The HornetQ JMS destination can be monitored by using the JMX console, as shown in Figure 12–14.
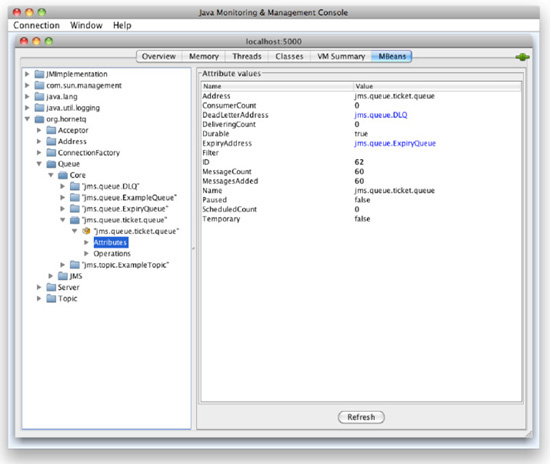
Figure 12–14. ticket.queue Attributes using HornetQ
JMS Gateway
The Spring Integration outbound JMS gateway creates a JMS message from a Spring Integration message, and sends it to the request-destination. The outbound JMS gateway handles the reply JMS message from the reply-destination. If no reply-destination is configured, the JMS gateway will create a TemporaryQueue in the JMS broker, and expect replies for the request to be sent to that queue. The outbound JMS gateway requires a reference to a ConnectionFactory. The inbound JMS gateway requires a reference to a ConnectionFactory and a request-destination as well.
  <int-jms:inbound-gateway id="inGateway"

                           request-destination="ticketQueue"

                           request-channel="ticketChannel"
                           connectionFactory="connectionFactory"/>


  <int-jms:outbound-gateway id="outGateway"

                            request-destination="ticketQueue"

                            request-channel="ticketChanne"

                            reply-destination="replyQueue"

                            reply-channel="jmsReply"/>
The inbound JMS gateway has an extract-reply-payload property, which works very similarly to the JMS channel adapter’s extract-payload property. When extract-reply-payload is set to true, which is the default setting, the Spring Integration message payload will be extracted and converted into a JMS message. If the extract-reply-payload property is set to false, the whole Spring Integration message will become the JMS message payload. The outbound JMS gateway has the extract-request-payload property. Again, this works just like the outbound JMS channel adapter’s extract-payload property.
JMS-Backed Message Channel
Spring Integration comes with a variety of in-memory message channels, which are discussed in Chapter 6. Since the messages are stored in memory, it could be a potential problem if the application were shut down accidentally. All the messages waiting in the message channel would be lost, and the message channel would become empty when the application restarts.
One solution to this problem is to have the message producer store the messages and redeliver them when the consumer (the application) is available. However, this requires additional work, and not all systems support message redelivery.
Another option is to use the JMS channel adapters, as described earlier in this chapter. However, this assumes that JMS is being used as the publisher and consumer. If a non-JMS endpoint is being used, then this will require an alternative way of providing durability and message redelivery to the application.
Here where Spring Integration 2.0 JMS-backed message channels come to the rescue. If a JMS-backed channel is being used, the messages between two endpoints (whether transactional or not) benefit from the guarantees that JMS provides—that is, messages will not be lost if the application crashes or is shut down. Let’s revisit the ticket example from Chapter 6, this time using JMS backed channels. The Spring configuration file is shown in Listing 12–12.
Listing 12–12. jms-backedchannel.xml
<?xml version="1.0" encoding="UTF-8"?>

<beans xmlns="http://www.springframework.org/schema/beans"

       xmlns:xsi="http://www.w3.org/2001/XMLSchema-instance"

       xmlns:int-jms="http://www.springframework.org/schema/integration/jms"

       xmlns:context="http://www.springframework.org/schema/context"

       xsi:schemaLocation=" http://www.springframework.org/schema/integration/jms

    http://www.springframework.org/schema/integration/jms/spring-integration-jms-2.0.xsd

    http://www.springframework.org/schema/beans

    http://www.springframework.org/schema/beans/spring-beans-3.0.xsd

    http://www.springframework.org/schema/context

    http://www.springframework.org/schema/context/spring-context-3.0.xsd">


  <context:component-scan

      base-package="com.apress.prospringintegration.messaging.activemq.jms.backedchannel"/>


  <int-jms:channel id="ticketChannel"

                   queue-name="ticket.queue"
                   connection-factory="connectionFactory"/>


</beans>
In this case, a point-to-point message channel is used. A corresponding JMS message queue is used to support the point-to-point message channel. If the message channel is a publish-subscribe channel, a JMS message topic should be used instead, as follows:
<int-jms:publish-subscribe-channel id="ticketChannel" topic-name="ticket.topic" />Spring Integration’s JMS-based support looks for a well-known connection factory in the Spring application context, connectionFactory, and uses it if available. Otherwise, one must be specified on the adapter or endpoint. Again the Ticket class is shown in Listing 12–13.
Listing 12–13. Ticket.java
package com.apress.prospringintegration.messaging.activemq.jms.backedchannel;


import org.springframework.stereotype.Component;


import java.io.Serializable;

import java.util.Calendar;


@Component

public class Ticket implements Serializable {

    private static final long serialVersionUID = 721648261640069582L;


    public enum Priority {

        low,

        medium,

        high,

        emergency

    }


    private long ticketId;

    private Calendar issueDateTime;

    private String description;

    private Priority priority;


    public Ticket() {

    }


    public long getTicketId() {

        return ticketId;

    }


    public void setTicketId(long ticketId) {

        this.ticketId = ticketId;

    }


    public Calendar getIssueDateTime() {

        return issueDateTime;

    }


    public void setIssueDateTime(Calendar issueDateTime) {
        this.issueDateTime = issueDateTime;

    }


    public String getDescription() {

        return description;

    }


    public void setDescription(String description) {

        this.description = description;

    }


    public Priority getPriority() {

        return priority;

    }


    public void setPriority(Priority priority) {

        this.priority = priority;

    }


    public String toString() {

        return String.format("Ticket# %d: [%s] %s", ticketId, priority, description);

    }

}
The TicketCreator class shown in Listing 12–14 will send the Ticket object to the message channel ticketChannel.
Listing 12–14. TicketCreator.java
package com.apress.prospringintegration.messaging.activemq.jms.backedchannel;


import org.springframework.beans.factory.annotation.Value;

import org.springframework.integration.core.SubscribableChannel;

import org.springframework.integration.support.MessageBuilder;

import org.springframework.stereotype.Component;


@Component

public class TicketCreator {


    private SubscribableChannel channel;


    @Value("#{ticketChannel}")

    public void setChannel(SubscribableChannel channel) {

        this.channel = channel;

    }


    void openTicket(Ticket ticket) {

        channel.send(MessageBuilder.withPayload(ticket).build());

        System.out.println("Ticket Sent - " + ticket.toString());

    }

}
Even though the JMS-backed message channel is a point-to-point message channel, it implements the SubscribableChannel interface. Your messaging code need not be aware of the makeup or capabilities of a given channel, and can in the general case simply depend on the core MesssageChannel interface. Whether it’s subscribable, publish/subscribe, or backed by JMS, it’s ultimately a MessageChannel reference. The ProblemReport class shown in Listing 12–15 will also work with a JMS-backed channel.
Listing 12–15. ProblemReporter.java
package com.apress.prospringintegration.messaging.activemq.jms.backedchannel;


import org.springframework.beans.factory.annotation.Value;

import org.springframework.integration.core.SubscribableChannel;

import org.springframework.integration.support.MessageBuilder;

import org.springframework.stereotype.Component;


@Component

public class ProblemReporter {

    private SubscribableChannel channel;


    @Value("#{ticketChannel}")

    public void setChannel(SubscribableChannel channel) {

        this.channel = channel;

    }


    public void openTicket(Ticket ticket) {

        channel.send(MessageBuilder.withPayload(ticket).build());

        System.out.println("Ticket Sent - " + ticket.toString());

    }

}
The Ticket objects with different priorities are again created using the TicketGenerator class shown in Listing 12–16.
Listing 12–16. TicketGenerator.java
package com.apress.prospringintegration.messaging.activemq.jms.backedchannel;


import com.apress.prospringintegration.messaging.activemq.jms.backedchannel.Ticket.Priority;

import org.springframework.stereotype.Component;


import java.util.ArrayList;

import java.util.GregorianCalendar;

import java.util.List;


@Component

public class TicketGenerator {


    private long nextTicketId;


    public TicketGenerator() {

        this.nextTicketId = 1000l;

    }


    public List<Ticket> createTickets() {

        List<Ticket> tickets = new ArrayList<Ticket>();
        tickets.add(createLowPriorityTicket());

        tickets.add(createLowPriorityTicket());

        tickets.add(createLowPriorityTicket());

        tickets.add(createLowPriorityTicket());

        tickets.add(createLowPriorityTicket());

        tickets.add(createMediumPriorityTicket());

        tickets.add(createMediumPriorityTicket());

        tickets.add(createMediumPriorityTicket());

        tickets.add(createMediumPriorityTicket());

        tickets.add(createMediumPriorityTicket());

        tickets.add(createHighPriorityTicket());

        tickets.add(createHighPriorityTicket());

        tickets.add(createHighPriorityTicket());

        tickets.add(createHighPriorityTicket());

        tickets.add(createHighPriorityTicket());

        tickets.add(createEmergencyTicket());

        tickets.add(createEmergencyTicket());

        tickets.add(createEmergencyTicket());

        tickets.add(createEmergencyTicket());

        tickets.add(createEmergencyTicket());


        return tickets;

    }


    Ticket createEmergencyTicket() {

        return createTicket(Priority.emergency,

                "Urgent problem. Fix immediately or revenue will be lost!");

    }


    Ticket createHighPriorityTicket() {

        return createTicket(Priority.high,

                "Serious issue. Fix immediately.");

    }


    Ticket createMediumPriorityTicket() {

        return createTicket(Priority.medium,

                "There is an issue; take a look whenever you have time.");

    }


    Ticket createLowPriorityTicket() {

        return createTicket(Priority.low,

                "Some minor problems have been found.");

    }


    Ticket createTicket(Priority priority, String description) {

        Ticket ticket = new Ticket();

        ticket.setTicketId(nextTicketId++);

        ticket.setPriority(priority);

        ticket.setIssueDateTime(GregorianCalendar.getInstance());

        ticket.setDescription(description);


        return ticket;

    }

}
The incoming messages are logged using the TicketMessageHandler class shown in Listing 12–17.
Listing 12–17. TicketMessageHandler.java
package com.apress.prospringintegration.messaging.activemq.jms.backedchannel;


import org.springframework.integration.Message;

import org.springframework.integration.MessageRejectedException;

import org.springframework.integration.MessagingException;

import org.springframework.integration.core.MessageHandler;

import org.springframework.stereotype.Component;


@Component

public class TicketMessageHandler implements MessageHandler {


    @Override

    public void handleMessage(Message<?> message) throws MessagingException {

        Object payload = message.getPayload();


        if (payload instanceof Ticket) {

            handleTicket((Ticket) payload);

        } else {

            throw new MessageRejectedException(message,

                    "Unknown data type has been received.");

        }

    }


    void handleTicket(Ticket ticket) {

        System.out.println("Received ticket - " + ticket.toString());

    }

}
The main class TicketMain is shown in Listing 12–18. The class creates the Spring context, initialized the message handler and send the Ticket objects with different priorities to the message channel.
Listing 12–18. TicketMain.java
package com.apress.prospringintegration.messaging.activemq.jms.backedchannel;


import org.springframework.context.support.ClassPathXmlApplicationContext;

import org.springframework.integration.core.SubscribableChannel;


import java.util.List;


public class TicketMain {


    public static void main(String[] args) {


        String contextName = "jms-backedchannel.xml";


        ClassPathXmlApplicationContext applicationContext =

                new ClassPathXmlApplicationContext(contextName);

        applicationContext.start();


        TicketCreator ticketCreator =

                applicationContext.getBean(TicketCreator.class);

        TicketGenerator ticketGenerator =

                applicationContext.getBean(TicketGenerator.class);

        TicketMessageHandler ticketMessageHandler =

                applicationContext.getBean(TicketMessageHandler.class);
        SubscribableChannel channel =

                applicationContext.getBean("ticketChannel", SubscribableChannel.class);

        channel.subscribe(ticketMessageHandler);


        while (true) {

            List<Ticket> tickets = ticketGenerator.createTickets();

            for (Ticket ticket : tickets) {

                ticketCreator.openTicket(ticket);

            }

        }

    }

}
Once again, the preceding example uses ActiveMQ as the JMS broker to back the Spring Integration message channel. In order to use a different JMS broker such as HornetQ, simply change the connectionFactory to point to the HornetQinstance.
AMQP Integration
AMQP is an open standard for messaging protocol. AMQP also allows applications to communicate asynchronously, reliably, and securely. Unlike JMS, AMQP is a wire-level format, which provides network message framing; JMS, on the other hand, is a Java API. By complying with the AMQP standard, middleware products written for different platforms and programming languages can send and receive messages to and from each other. In other words, applications do not need to be written in Java in order to use AMQP as their enterprise integration broker.
In order to integrate an AMQP-compatible message broker with Spring Integration, AMQP channel adapters are used. At the time of writing, the Spring Integration AMQP channel adapters are still under development. Therefore, the source code needs to be downloaded, compiled, and installed.
The source code may be downloaded from http://git-scm.com/download using Git. Use the following command to clone the Spring Integration sandbox source code from Spring Source Git Repository:
$ git clone git://git.springsource.org/spring-integration/sandbox

$ cd sandbox/spring-integration-amqp

$ mvn –DskipTests=true clean install
Add the following to the dependencies section of the Maven pom.xml configuration file:
<dependency>

  <groupId>org.springframework.integration</groupId>

  <artifactId>spring-integration-amqp</artifactId>

  <version>2.0.0.BUILD-SNAPSHOT</version>

</dependency>
In addition, make sure the Spring Integration AMQP namespaces are added to the Spring configuration file, as follows:
<?xml version="1.0" encoding="UTF-8"?>

<beans xmlns="http://www.springframework.org/schema/beans"

       xmlns:xsi="http://www.w3.org/2001/XMLSchema-instance"

       xmlns:int="http://www.springframework.org/schema/integration"

       xmlns:context="http://www.springframework.org/schema/context"

       xmlns:int-amqp="http://www.springframework.org/schema/integration/amqp"

       xmlns:amqp="http://www.springframework.org/schema/amqp"

       xsi:schemaLocation="http://www.springframework.org/schema/integration

    http://www.springframework.org/schema/integration/spring-integration-2.0.xsd

    http://www.springframework.org/schema/beans

    http://www.springframework.org/schema/beans/spring-beans-3.0.xsd

    http://www.springframework.org/schema/context

    http://www.springframework.org/schema/context/spring-context-3.0.xsd

    http://www.springframework.org/schema/integration/amqp

    http://www.springframework.org/schema/integration/amqp/spring-integration-amqp-2.0.xsd">

</beans>
The AMQP exchange is the target destination for a message sender to send messages. The AMQP queue is the staging area for the message receiver to fetch messages. The AMQP binding is the link between the AMQP exchange and the AMQP queue.
There are three different types of AMQP exchange: direct, topic, and fanout as shown in Table 12–1.
| Direct Exchange | Topic Exchange | Fanout Exchange | |
| Message Channel Type | Point-to-point | Publish/subscribe | Publish/subscribe |
| Routing Key | Absolute | Absolute, *, # | n/a |
| Example | ticket.queue |
ticket#, ticket* |
n/a |
Since the direct exchange has a routing key, the queue needs to be configured using the same routing key; otherwise, messages will not be delivered to the queue. For example, if the exchange creates with the routing key "ticket.queue, then the queue that links with this exchange is required to have the queue name "ticket.queue as well. In other words, the direct exchange works like a point-to-point message channel.
The topic exchange can specify that the routing key contains wildcard, such as * (matching one character) and # (matching any character), so the queue that is configured with the routing key that matches the pattern can deliver the messages. For example, if the exchange is created with the routing key "ticket*, then the queue that links with this exchange is required to have the queue name "ticket*, where"ticket* can receive the message.
The fanout exchange is the simplest AMQP exchange type. It works very similar to the publish/subscribe message channel pattern, so a producer can send a message to multiple consumers. In addition, a fanout exchange does not need a routing key defined. Any queues that are bound with the exchange will have the message delivered.
Similar to how Spring Integration JMS works, that Spring Integration AMQP namespace supports inbound/outbound AMQP channel adapter as follows:
<int-amqp:inbound-channel-adapter connection-factory="connectionFactory"

                                  queue-name="ticket.queue"

                                  channel="ticketChannel" />
<int-amqp:outbound-channel-adapter amqp-template="amqpTemplate"

                                   channel="ticketChannel" />
SpringSourceRabbitMQ
RabbitMQ (www.rabbitmq.com) is an open source message broker software that supports the AMQP standard. It is written in the Erlang language on top of the Open Telecom Platform (OTP), which is a library that promotes high performance, reliability, scalability, and availability through the use of many approaches, not the least of which is a job supervisor that respawns failed processes. RabbitMQ was originally written by Rabbit Technologies, and was acquired by SpringSource in early 2010. RabbitMQ is available under the Mozilla Public License.
Erlang needs to be installed in order to run RabbitMQ. The latest version of Erlang (R14B01at the time of this writing) can be downloaded from www.erlang.org/download.html. For Windows users, there is a binary version for download at www.erlang.org/download/otp_win32_R14B01.exe. For Mac OS X users, Erlang can be installed by using MacPorts. The latest version of MacPorts can be downloaded from www.macports.org/install.php. However, the MacPorts version (R13B03 at the time of writing) is up to date with the latest version on the Erlang official web site. After MacPorts is installed, Erlang may be installed as follows:
$ port list erlang

erlang                         @R13B03         lang/erlang

$ sudo port install erlang
After installing Erlang on Mac OS X, try to launch the Erlang shell to make sure everything is fine:
$ erl

Erlang R13B03 (erts-5.7.4) [source] [64-bit] [smp:2:2] [rq:2] [async-threads:0] [hipe] [kernel-poll:false]


Eshell V5.7.4  (abort with ^G)

1>
To quit the Erlang shell, simply enter Ctrl-C from the shell and choose the “(a)bort” option. For the other Linux platforms, only source code is available for download. Enter the following commands to download and build Erlang from the source code:
$ wget http://www.erlang.org/download/otp_src_R14B01.tar.gz

$ tar –zxf otp_src_R14B01.tar.gz

$ cd otp_src_R14B01

$ ./configure

$ make

$ sudo make install
After Erlang has been installed, launch the Erlang shell to make sure everything is fine:
$ erl

Erlang R14B01 (erts-5.8.2) [source] [smp:2:2] [rq:2] [async-threads:0] [hipe] [kernel-poll:false]


Eshell V5.8.2  (abort with ^G)

1>
Once Erlang is installed, the latest version of RabbitMQ Server (2.2.0 at the time of writing) may be downloaded from www.rabbitmq.com/download.html. Once again, RabbitMQ provides different compiled forms for different platform. Note that many Linux systems already provide binaries for both Erlang and RabbitMQ. So, for example, on the latest stable versions of Ubuntu, you can get both RabbitMQ and Erlang by using the following command: sudo apt-get install rabbitmq-server. For this book, the generic Unix system distribution will be used. Enter the following commands:
$ wget http://www.rabbitmq.com/releases/rabbitmq-server/v2.2.0/rabbitmq-server-generic-unix-2.2.0.tar.gz

$ tar –zxf rabbitmq-server-generic-unix-2.2.0.tar.gz

$ cd rabbitmq_server-2.2.0

$ cd sbin

$ sudo ./rabbitmq-server
The commands result in the output below:
Activating RabbitMQ plugins ...

0 plugins activated:


+---+   +---+

|   |   |   |

|   |   |   |

|   |   |   |

|   +---+   +-------+

|                   |

| RabbitMQ  +---+   |

|           |   |   |

|   v2.2.0  +---+   |

|                   |

+-------------------+

AMQP 0-9-1 / 0-9 / 0-8

Copyright (C) 2007-2010 LShift Ltd., Cohesive Financial Technologies LLC., and Rabbit Technologies Ltd.

Licensed under the MPL.  See http://www.rabbitmq.com/


node           : rabbit@zeus

app descriptor : /Users/prospringintegration/rabbitmq_server-2.2.0/sbin/../ebin/rabbit.app

home dir       : /Users/prospringintegration

cookie hash    : fYhvVkawwYRTZihsIhXUuQ==

log            : /var/log/rabbitmq/[email protected]

sasl log       : /var/log/rabbitmq/[email protected]

database dir   : /var/lib/rabbitmq/mnesia/rabbit@zeus

erlang version : 5.7.4


starting file handle cache server                                     ...done

starting worker pool                                                  ...done

starting database                                                     ...done

starting codec correctness check                                      ...done

-- external infrastructure ready

starting statistics event manager                                     ...done

starting logging server                                               ...done

starting exchange type registry                                       ...done

starting exchange type direct                                         ...done

starting exchange type fanout                                         ...done
starting exchange type headers                                        ...done

starting exchange type topic                                          ...done

-- kernel ready

starting alarm handler                                                ...done

starting node monitor                                                 ...done

starting cluster delegate                                             ...done

starting guid generator                                               ...done

starting memory monitor                                               ...done

-- core initialized

starting empty DB check                                               ...done

starting exchange recovery                                            ...done

starting queue supervisor and queue recovery                          ...done

-- message delivery logic ready

starting error log relay                                              ...done

starting networking                                                   ...done

-- network listeners available


broker running
Since RabbitMQ is not written in Java, it does not come with JMX support. Luckily, RabbitMQ Server comes with a command-line monitoring tool, rabbitmqctl, out of the box. However, it is difficult to use. A better alternative is to use the RabbitMQ server management plug-in. In order to install the management plug-in, enter the following commands:
$ cd rabbitmq_server-2.2.0/plugins

$ wget http://www.rabbitmq.com/releases/plugins/v2.2.0/mochiweb-2.2.0.ez

$ wget http://www.rabbitmq.com/releases/plugins/v2.2.0/webmachine-2.2.0.ez

$ wget http://www.rabbitmq.com/releases/plugins/v2.2.0/amqp_client-2.2.0.ez

$ wget http://www.rabbitmq.com/releases/plugins/v2.2.0/rabbitmq-mochiweb-2.2.0.ez

$ wget http://www.rabbitmq.com/releases/plugins/v2.2.0/rabbitmq-management-agent-2.2.0.ez

$ wget http://www.rabbitmq.com/releases/plugins/v2.2.0/rabbitmq-management-2.2.0.ez

$ sudo rabbitmq_server-2.2.0/sbin/rabbitmq-server
These commands will result in the following ouput:
Activating RabbitMQ plugins ...

*WARNING* Undefined function fdsrv:bind_socket/2

*WARNING* Undefined function fdsrv:start/0

*WARNING* Undefined function fdsrv:stop/0

*WARNING* Undefined function webmachine_resource:start_link/2

6 plugins activated:

* amqp_client-2.2.0

* mochiweb-1.3

* rabbit_management-2.2.0

* rabbit_management_agent-2.2.0

* rabbit_mochiweb-2.2.0

* webmachine-1.7.0

.

.

.
The RabbitMQ server should restart and show six plug-ins activated. Next, open the web browser and go to http://localhost:55672/mgmt/. Enter the default username and password, which are guest and guest. The management console is shown in Figure 12–15.
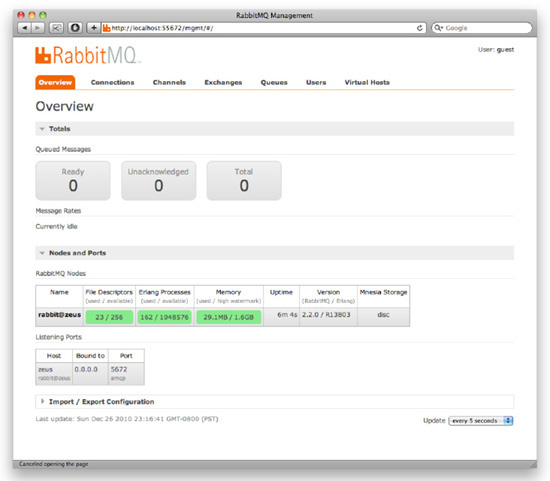
Figure 12–15. The RabbitMQ Management Console
Try to navigate to the Queues tab and create a new queue as shown in Figure 12–16.
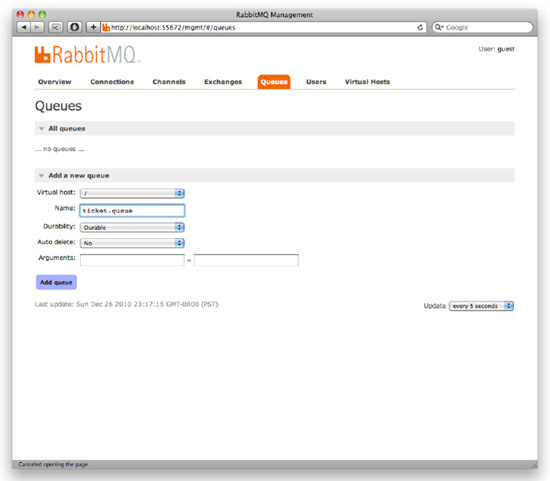
Figure 12–16. Creating a Queue in the RabbitMQ Management Console
Now returning to the Ticket system example described earlier in this chapter, the only code that needs to be changed in order to have the Ticket Reporter and Ticket Receiver applications work with RabbitMQ is in the Spring Java configuration file shown in Listing 12–19.
Listing 12–19. RabbitmqConfiguration.java Configuration File
package com.apress.prospringintegration.messaging.rabbitmq.jms.adapter;


import org.springframework.amqp.core.Queue;

import org.springframework.amqp.rabbit.connection.SingleConnectionFactory;

import org.springframework.amqp.rabbit.core.RabbitAdmin;

import org.springframework.amqp.rabbit.core.RabbitTemplate;
import org.springframework.context.annotation.Bean;

import org.springframework.context.annotation.Configuration;

import org.springframework.integration.MessageChannel;

import org.springframework.integration.channel.DirectChannel;


@Configuration

public class RabbitmqConfiguration {


    @Bean

    public SingleConnectionFactory connectionFactory() {

        SingleConnectionFactory connectionFactory =

                new SingleConnectionFactory("localhost");

        connectionFactory.setPort(5672);

        connectionFactory.setUsername("guest");

        connectionFactory.setPassword("guest");


        return connectionFactory;

    }


    @Bean

    public RabbitTemplate amqpTemplate() {

        RabbitTemplate rabbitTemplate = new RabbitTemplate();

        rabbitTemplate.setConnectionFactory(connectionFactory());

        rabbitTemplate.setRoutingKey("ticket.queue");

        rabbitTemplate.setQueue("ticket.queue");


        return rabbitTemplate;

    }


    @Bean

    public RabbitAdmin rabbitAdmin() {

        RabbitAdmin rabbitAdmin = new RabbitAdmin(connectionFactory());

        return rabbitAdmin;

    }


    @Bean

    public Queue ticketQueue() {

        Queue queue = new Queue("ticket.queue");

        return queue;

    }


    @Bean

    public MessageChannel ticketChannel() {

        MessageChannel channel = new DirectChannel();

        return channel;

    }

}
The Spring configuration file modified for RabbitMQ is shown in Listing 12–20.
Listing 12–20. ticket-reporter.xml
<?xml version="1.0" encoding="UTF-8"?>

<beans xmlns="http://www.springframework.org/schema/beans"

       xmlns:xsi="http://www.w3.org/2001/XMLSchema-instance"

       xmlns:context="http://www.springframework.org/schema/context"

       xmlns:int-amqp="http://www.springframework.org/schema/integration/amqp"

       xsi:schemaLocation="http://www.springframework.org/schema/beans

    http://www.springframework.org/schema/beans/spring-beans-3.0.xsd

    http://www.springframework.org/schema/context

    http://www.springframework.org/schema/context/spring-context-3.0.xsd

    http://www.springframework.org/schema/integration/amqp

    http://www.springframework.org/schema/integration/amqp/spring-integration-amqp-2.0.xsd”>


  <context:component-scan

      base-package="com.apress.prospringintegration.messaging.rabbitmq.jms.adapter"/>


  <int-amqp:outbound-channel-adapter routing-key="ticket.queue"

                                     amqp-template="amqpTemplate"

                                     channel="ticketChannel"/>


</beans>
Spring allows moving from JMS to RabbitMQ with a configuration change alone, insolating the business logic from any change. Again, as the Spring Integration AMQP support is still under heavy development, the outbound AMQP channel adapter currently only supports the AMQP protocol for RabbitMQ at this time; there is no option to specify lower-level primitives, as there is with the JMS adapters. The Ticket reporter application using RabbitMQ may run by using the following command.
$ mvn exec:java -Dexec.mainClass="com.apress.prospringintegration.mesging.rabbitmq.jms.adapter.TicketReporterThe command should result in the following output.
Main"

[INFO] Scanning for projects...

[INFO] Searching repository for plugin with prefix: 'exec'.

[INFO] ------------------------------------------------------------------------

[INFO] Building messaging-rabbitmq

[INFO]    task-segment: [exec:java]

[INFO] ------------------------------------------------------------------------

[INFO] Preparing exec:java

[INFO] No goals needed for project - skipping

[INFO] [exec:java {execution: default-cli}]

SLF4J: This version of SLF4J requires log4j version 1.2.12 or later. See also http://www.slf4j.org/codes.html#log4j_version

12-26-2010 23:13:24 [INFO] Refreshing org.springframework.context.support.ClassPathXmlApplicationContext@7d59ea8e: startup date [Sun Dec 26 23:13:24 PST 2010]; root of context hierarchy

12-26-2010 23:13:24 [INFO] Loading XML bean definitions from class path resource [ticket-reporter.xml]

12-26-2010 23:13:24 [WARN] Configuration problem: Poller configuration via 'interval-trigger' subelements is deprecated, use the 'fixed-delay' or 'fixed-rate' attribute instead.

Offending resource: class path resource [ticket-reporter.xml]
12-26-2010 23:13:24 [INFO] No bean named 'errorChannel' has been explicitly defined. Therefore, a default PublishSubscribeChannel will be created.

12-26-2010 23:13:24 [INFO] No bean named 'taskScheduler' has been explicitly defined. Therefore, a default ThreadPoolTaskScheduler will be created.

12-26-2010 23:13:24 [INFO] Pre-instantiating singletons in org.springframework.beans.factory.support.DefaultListableBeanFactory@5a4fdf11: defining beans [problemReporter,ticketGenerator,ticketReceiver,org.springframework.context.annotation.internalConfigurationAnnotationProcessor,org.springframework.context.annotation.internalAutowiredAnnotationProcessor,org.springframework.context.annotation.internalRequiredAnnotationProcessor,org.springframework.context.annotation.internalCommonAnnotationProcessor,org.springframework.integration.internalDefaultConfiguringBeanFactoryPostProcessor,org.springframework.scheduling.support.PeriodicTrigger#0,defaultPoller,ticketChannel,connectionFactory,amqpTemplate,org.springframework.integration.amqp.AmqpOutboundEndpoint#0,org.springframework.integration.config.ConsumerEndpointFactoryBean#0,nullChannel,errorChannel,_org.springframework.integration.errorLogger,taskScheduler]; root of factory hierarchy

12-26-2010 23:13:25 [INFO] Initializing ExecutorService  'taskScheduler'

12-26-2010 23:13:25 [INFO] Starting beans in phase -2147483648

12-26-2010 23:13:25 [INFO] started _org.springframework.integration.errorLogger

12-26-2010 23:13:25 [INFO] Starting beans in phase 2147483647

12-26-2010 23:13:25 [INFO] started org.springframework.integration.config.ConsumerEndpointFactoryBean#0

12-26-2010 23:13:25 [INFO] Starting beans in phase -2147483648

12-26-2010 23:13:25 [INFO] Starting beans in phase 2147483647

Ticket Sent - Ticket# 1000: [low] Some minor problems have been found.

Ticket Sent - Ticket# 1001: [low] Some minor problems have been found.

Ticket Sent - Ticket# 1002: [low] Some minor problems have been found.

Ticket Sent - Ticket# 1003: [low] Some minor problems have been found.

Ticket Sent - Ticket# 1004: [low] Some minor problems have been found.

Ticket Sent - Ticket# 1005: [medium] There is an issue; take a look whenever you have time.

Ticket Sent - Ticket# 1006: [medium] There is an issue; Take a look whenever you have time.

Ticket Sent - Ticket# 1007: [medium] There is an issue; Take a look whenever you have time.

Ticket Sent - Ticket# 1008: [medium] There is an issue; Take a look whenever you have time.

Ticket Sent - Ticket# 1009: [medium] There is an issue; Take a look whenever you have time.

Ticket Sent - Ticket# 1010: [high] Serious issue. Fix immediately.

Ticket Sent - Ticket# 1011: [high] Serious issue. Fix immediately.

Ticket Sent - Ticket# 1012: [high] Serious issue. Fix immediately.

Ticket Sent - Ticket# 1013: [high] Serious issue. Fix immediately.

Ticket Sent - Ticket# 1014: [high] Serious issue. Fix immediately.

Ticket Sent - Ticket# 1015: [emergency] Urgent problem. Fix immediately or revenue will be lost!

Ticket Sent - Ticket# 1016: [emergency] Urgent problem. Fix immediately or revenue will be lost!

Ticket Sent - Ticket# 1017: [emergency] Urgent problem. Fix immediately or revenue will be lost!

Ticket Sent - Ticket# 1018: [emergency] Urgent problem. Fix immediately or revenue will be lost!

Ticket Sent - Ticket# 1019: [emergency] Urgent problem. Fix immediately or revenue will be lost!
Listing 12–21 shows the Spring bean configuration file for the Ticket receiver application.
Listing 12–21. ticket-receiver.xml
<?xml version="1.0" encoding="UTF-8"?>

<beans xmlns="http://www.springframework.org/schema/beans"

       xmlns:xsi="http://www.w3.org/2001/XMLSchema-instance"

       xmlns:int="http://www.springframework.org/schema/integration"

       xmlns:context="http://www.springframework.org/schema/context"

       xmlns:int-amqp="http://www.springframework.org/schema/integration/amqp"

       xmlns:rabbit="http://www.springframework.org/schema/rabbit"

       xsi:schemaLocation="http://www.springframework.org/schema/integration

    http://www.springframework.org/schema/integration/spring-integration-2.0.xsd

    http://www.springframework.org/schema/beans

    http://www.springframework.org/schema/beans/spring-beans-3.0.xsd

    http://www.springframework.org/schema/context

    http://www.springframework.org/schema/context/spring-context-3.0.xsd

    http://www.springframework.org/schema/integration/amqp

    http://www.springframework.org/schema/integration/amqp/spring-integration-amqp-2.0.xsd

    http://www.springframework.org/schema/rabbit

    http://www.springframework.org/schema/rabbit/spring-rabbit-1.0.xsd">


  <context:component-scan

      base-package="com.apress.prospringintegration.messaging.rabbitmq.jms.adapter"/>


  <int:channel id="receiveChannel"/>


  <int:service-activator input-channel="receiveChannel" ref="ticketReceiver"/>


  <int-amqp:inbound-channel-adapter connection-factory="connectionFactory"

                                    queue-name="ticket.queue"

                                    channel="receiveChannel"/>


</beans>
The inbound AMQP channel adapter is different from the outbound AMQP channel adapter. Instead of accepting the AmqpTemplate reference, the inbound channel adapter accepts a reference to the ConnectionFactory instead. In addition, it takes the AMQP queue name only. This is somewhat inconsistent, but the AMQP integration is still in sandbox development at the time of writing, so it may be fixed later.
Apache Qpid
Apache Qpid (http://qpid.apache.org) is another open source AMQP messaging system. Qpid has both a Java and a C++ broker implementation. The latest version (0.8) can be downloaded from http://qpid.apache.org/download.cgi. The commands for downloading and running Qpid are shown below:
$ wget http://www.poolsaboveground.com/apache/qpid/0.8/qpid-java-0.8.tar.gz

$ tar –zxf qpid-java-0.8.tar.gz

$ cd qpid-0.8/bin

$ ./qpid-servers
Running the command will have the following output:
Setting QPID_WORK to /Users/psi as default

System Properties set to -Damqj.logging.level=info -DQPID_HOME=/Users/psi/ qpid-0.8 -DQPID_WORK=/Users/psi

QPID_OPTS set to -Damqj.read_write_pool_size=32 -DQPID_LOG_APPEND=

Using QPID_CLASSPATH /Users/psi/qpid-0.8/lib/qpid-all.jar

Info: QPID_JAVA_GC not set. Defaulting to JAVA_GC -XX:+UseConcMarkSweepGC -XX:+HeapDumpOnOutOfMemoryError

Info: QPID_JAVA_MEM not set. Defaulting to JAVA_MEM -Xmx1024m

[Broker] BRK-1006 : Using configuration : /Users/psi/qpid-0.8/etc/config.xml

[Broker] BRK-1007 : Using logging configuration : /Users/psi/qpid-0.8/etc/log4j.xml

[Broker] BRK-1001 : Startup : Version: 0.8 Build: 1037942

[Broker] MNG-1001 : Startup

[Broker] MNG-1002 : Starting : RMI Registry : Listening on port 8999

[Broker] MNG-1002 : Starting : JMX RMIConnectorServer : Listening on port 9099

[Broker] MNG-1004 : Ready

[Broker] BRK-1002 : Starting : Listening on TCP port 5672

[Broker] BRK-1004 : Qpid Broker Ready
Apache Qpid does not come with any management console for monitoring purpose. However, there is a JMX management console that can be downloaded from Qpid web site. There are different distributions for different running platforms. For Windows, Qpid can be downloaded from http://ftp.wayne.edu/apache//qpid/0.8/qpid-jmx-management-console-0.8-win32-win32-x86.zip; for Mac OS X, Qpid can downloaded from http://ftp.wayne.edu/apache//qpid/0.8/qpid-jmx-management-console-0.8-macosx.zip.
Once the compressed binary filehas been downloaded, unzip it and run the qpidmc executable. Since this will be the first time JMX management console is run, you’ll need to add the Qpid broker. The Qpid management console is shown in Figure 12–17. For details on using the Qpid JMX management console, refer to the Qpid web site (http://qpid.apache.org/books/0.8/AMQP-Messaging-Broker-Java-Book/html/ch03.html).
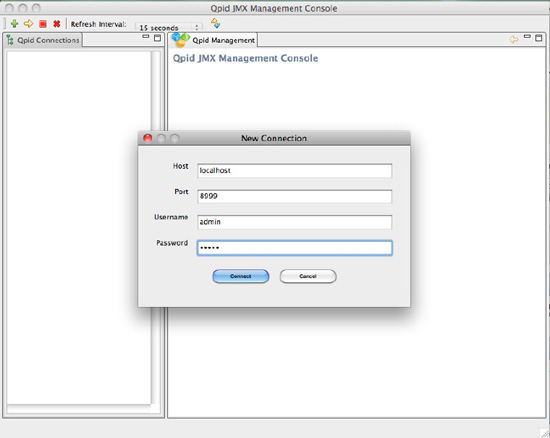
Figure 12–17. The Apache Qpid JMX Management Console
Although Apache Qpid is an AMQP messaging broker, it supports JMS 1.1 as well. The Spring Integration adapter uses the Spring AMQP project, and the Spring AMQP project itself provides the AMQP abstraction. At the time of this writing, there is no Qpid-specific client, so Spring AMQP might not offer a compelling way to approach using Qpid. This is sure to change as the projects move closer to a final release, though. In the meantime, Spring Integration’s JMS supports may be used with Apache Qpid.
Much like the other messaging brokers described in this chapter, using Qpid is simply a matter of changing the configuration. The Qpid Java configuration file is shown in Listing 12–22.
Listing 12–22. QpidConfiguration Java Configuration
package com.apress.prospringintegration.messaging.qpid.jms.adapter;


import org.apache.qpid.client.AMQQueue;

import org.springframework.beans.factory.annotation.Value;

import org.springframework.context.annotation.Bean;
import org.springframework.context.annotation.Configuration;

import org.springframework.integration.MessageChannel;

import org.springframework.integration.channel.DirectChannel;

import org.springframework.jms.connection.CachingConnectionFactory;

import org.springframework.jndi.JndiObjectFactoryBean;

import org.springframework.jndi.JndiTemplate;


import javax.jms.ConnectionFactory;

import java.net.URISyntaxException;

import java.util.Properties;


@Configuration

public class QpidConfiguration {


    @Value("#{qpidConnectionFactory}")

    private ConnectionFactory connectionFactory;


    @Bean

    public JndiTemplate jndiTemplate() {

        JndiTemplate jndiTemplate = new JndiTemplate();

        Properties properties = new Properties();

        properties.setProperty("java.naming.factory.initial",

                "org.apache.qpid.jndi.PropertiesFileInitialContextFactory");

        jndiTemplate.setEnvironment(properties);


        return jndiTemplate;

    }


    @Bean

    public JndiObjectFactoryBean qpidConnectionFactory() {

        JndiObjectFactoryBean jndiObjectFactoryBean = new JndiObjectFactoryBean();

        jndiObjectFactoryBean.setJndiTemplate(jndiTemplate());

        jndiObjectFactoryBean.setJndiName("amqpConnectionfactory");


        return jndiObjectFactoryBean;

    }


    @Bean

    public CachingConnectionFactory connectionFactory() {

        CachingConnectionFactory cachingConnectionFactory = new CachingConnectionFactory();

        cachingConnectionFactory.setTargetConnectionFactory(connectionFactory);

        cachingConnectionFactory.setSessionCacheSize(10);


        return cachingConnectionFactory;

    }


    @Bean

    public AMQQueue ticketQueue() throws URISyntaxException {

        AMQQueue amqQueue = new AMQQueue("ticket.queue");

        return amqQueue;

    }


    @Bean

    public MessageChannel ticketChannel() {
        MessageChannel channel = new DirectChannel();

        return channel;

    }

}
The Spring configuration file for the Ticket reporter application will look similar to the previous examples using different message brokers as shown in Listing 12–23.
Listing 12–23. ticket-reporter.xml
<?xml version="1.0" encoding="UTF-8"?>

<beans xmlns="http://www.springframework.org/schema/beans"

       xmlns:xsi="http://www.w3.org/2001/XMLSchema-instance"

       xmlns:int-jms="http://www.springframework.org/schema/integration/jms"

       xmlns:context="http://www.springframework.org/schema/context"

       xsi:schemaLocation="http://www.springframework.org/schema/integration/jms

    http://www.springframework.org/schema/integration/jms/spring-integration-jms-2.0.xsd

    http://www.springframework.org/schema/beans

    http://www.springframework.org/schema/beans/spring-beans-3.0.xsd

    http://www.springframework.org/schema/context

    http://www.springframework.org/schema/context/spring-context-3.0.xsd">


  <context:component-scan

      base-package="com.apress.prospringintegration.messaging.qpid.jms.adapter"/>


  <int-jms:outbound-channel-adapter id="ticketOutbound"

                                    destination="ticketQueue"

                                    channel="ticketChannel"/>


</beans>
The ConnectionFactory for Apache Qpid is a bit complicated since the messaging broker uses JNDI for property discovery. In order to work, it needs a jndi.properties file as shown in Listing 12–24.
Listing 12–24. jndi.properties
java.naming.factory.initial=org.apache.qpid.jndi.PropertiesFileInitialContextFactory

connectionfactory.amqpConnectionfactory=amqp://guest:guest@clientid/test?brokerlist='tcp://localhost:5672'&maxprefetch='1'
The changes required for the ticket-receiver.xml file are the same as for ticket-reporter.xml configuration file. All that is required is changing the ConnectionFactory configuration and the message queue configuration as shown in Listing 12–25.
Listing 12–25. ticket-receiver.xml
<?xml version="1.0" encoding="UTF-8"?>

<beans xmlns="http://www.springframework.org/schema/beans" xmlns:xsi="http://www.w3.org/2001/XMLSchema-instance"

       xmlns:int="http://www.springframework.org/schema/integration"

       xmlns:int-jms="http://www.springframework.org/schema/integration/jms"

       xmlns:context="http://www.springframework.org/schema/context"

       xsi:schemaLocation="http://www.springframework.org/schema/integration

    http://www.springframework.org/schema/integration/spring-integration-2.0.xsd

    http://www.springframework.org/schema/integration/jms

    http://www.springframework.org/schema/integration/jms/spring-integration-jms-2.0.xsd
    http://www.springframework.org/schema/beans

    http://www.springframework.org/schema/beans/spring-beans-3.0.xsd

    http://www.springframework.org/schema/context

    http://www.springframework.org/schema/context/spring-context-3.0.xsd">


  <context:component-scan

      base-package="com.apress.prospringintegration.messaging.qpid.jms.adapter"/>


  <int:channel id="receiveChannel"/>


  <int:service-activator input-channel="receiveChannel" ref="ticketReceiver"/>


  <int-jms:message-driven-channel-adapter id="ticketInbound"

                                          destination="ticketQueue"

                                          channel="receiveChannel"

                                          connection-factory="connectionFactory"/>

</beans>
Qpid requires that the message queue be declared before starting the broker. You can do this by adding the following lines to the virtualhosts.xml file in the etc directory of the Qpidinstallation:
<queue>

  <name>ticket.queue</name>

  <queue>

    <exchange>amq.direct</exchange>

    <maximumQueueDepth>4235264</maximumQueueDepth>

    <!-- 4Mb -->

    <maximumMessageSize>2117632</maximumMessageSize>

    <!-- 2Mb -->

    <maximumMessageAge>600000</maximumMessageAge>

    <!-- 10 mins -->

    </queue>

</queue>
Other Messaging Systems
Besides JMS and AMQP, there are some other messaging systems that use different communication protocols. Although Spring Integration may not support these messaging systems out of box, custom channel adapters can be written to work with them.
Amazon SQS
Amazon Simple Queue Service (SQS) (http://aws.amazon.com/sqs) is part of the Amazon Web Services (AWS) infrastructure. In conjunction with Amazon’s Elastic Compute Cloud (EC2), SQS provides a reliable and scalable messaging solution for cloud computing. In order to integrate with SQS, the application needs to be running in the EC2 stack inside the Amazon cloud environment. Since the SQS API is REST-based, the Spring Integration HTTP/Web Service channel adapter can be used to integrate with SQS. Alternatively, a quick search on the Internet reveals a couple SQS adapters already written by community members. Also note that RabbitMQ is more commonly used to meet cloud-scale messaging, even in the AWS environment.
Kestrel MQ
Kestrel MQ (http://github.com/robey/kestrel) is the messaging system used by Twitter, the popular social networking and microblogging web site. According to statistics, each user has 126 followers. This means that each tweet (message) will result in 126 messages in the message queue. During Obama’s inauguration, the system received several hundreds of tweets per second, resulting in tens of thousands of messages in the message queue. Because of events like this, Twitter’s messaging system needs to be very fast and memory-based.
Kestrel MQ is written in Scala. According to Kestrel’s README file, Kestrel is based on Blaine Cook’s “starling” simple distributed message queue, although it has added features and bulletproofing, as well as the scalability offered by clustering the Kestrel servers.
Kestrel MQ is a fast, small footprint message broker that’s durable and reliable. In order for Spring Integration to integrate Kestrel MQ, a custom channel adapter is required to tie the Kestrel MQ API together with Spring Integration framework.
Kafka
Kafka (http://sna-projects.com/kafka) is an open source message broker originally built by LinkedIn. It has similar scalability characteristics to Kestrel. It was engineered to handle activity stream data (news feeds, page views, searches, etc.). Think of Kafka as a highly scalable way to log (and process) important business events in a system.
Kafka, Kestrel, and SQS all require custom adapters to work with the Spring Integration Framework. It’s convenient that message-based solutions written against these brokers need not be aware of them, thanks to the indirection afforded by Spring Integration’s channel abstraction as demonstrated by the above examples.
Summary
This chapter covered a number of popular messaging systems based on the JMS and AMQP standards. Spring Integration provides JMS channel adapters, the JMS gateway, and the JMS-backed message channel out of the box so that developers can integrate Spring Integration with JMS messaging brokers very easy. This chapter also discussed the Spring Integration support of the AMQP messaging system. With Spring IoC, it is very easy to switch from one messaging system to another one by simply changing the Spring bean configuration; you don’t have to modify any Java code. Finally, this chapter discussed some new types of messaging systems that don’t use JMS or AMQP. Although these aren’t supported by Spring Integration out of the box, custom channel adapters may be written to allow them to work with Spring Integration.