
CHAPTER 7
![]()
Transformations and Enrichment
One approaches integration so that two or more applications may share services and data. One of the key challenges of integration is that the underlying data models of any two given applications are likely different, or incompatible. The various properties of, say, a customer record, can vary for a simple field such as an address. Some applications define the complete address as a single property, and others break down the address into the street number, street, city, state, zip code, and so on. In addition, the exchange format of the record itself may be incompatible: system A might expect a serialized Java object, and system B might expect an XML-encoded record or some other serialization. An integration platform should be able to adapt messages as required by consumers. Care should be taken that data is of as high fidelity as possible when moving from system to system. To support an extensible framework for data transformation, integration platforms support transformation.
A message used to support communication between the integration endpoints typically consists of two parts: the payload, which is the actual data being sent, and the header, which is used for information supporting the housekeeping tasks or service support required for the messaging service. In addition to providing support for transforming the message payload, there is often a need to add header data—to enrich it with—metadata required to support processing by downstream components.
Transformation is ideal when adapting data from one system to another, usually when the interchange is conceptually common, but different with regard to implementations among the multiple systems. On a small scale, this approach works fine: two transformations are required for a single, bidirectional connection. Things quickly become untenable as more systems are added, however; in the worst case, for every new system added, a connection (and transformation) between it and every other system is required. This quickly becomes nightmarishly tedious! Metcalfe's Law states that the value of a network is proportional to the square of the number of connected users in the system, and describes quadratic growth. A common way to reduce this complexity is to have a central node mediate communication on behalf of all the other nodes; all nodes need only to be adapted to send messages to, and receive messages from, this central node. The central node in turn routes to all other nodes. This is where the canonical data model pattern is most effective.
For those coming to Spring Integration from other products, the fact that Spring Integration itself doesn't mandate a canonical data model might be surprising. Spring Integration makes no assumptions about how messages travel inside the framework. A message might not ever leave the JVM, so there is no need for their payload be serialized in some form. Messages might not even live outside of a transaction, so there's no requirement that they even be marshalled, necessarily. Inbound adapters will often deliver messages with payloads specific to the inbound adapter; the inbound channel adapter in the file namespace, for example, delivers messages of type java.io.File, and must be transformed as required to something else. Outbound adapters, in the same way, will expect inbound message payloads to be of a known type, and will fail to work if this expectation isn't met. The framework provides several built-in transformers, and the ability to write your own, to meet these requirements.
The Canonical Data Model Concept
The canonical, or universal, data model is a concept that was developed to support the varying data representations of the same conceptual object. For example, customer relationship management (CRM) systems need to define an object representing a customer. However, the data model used for the different applications may be quite different. A canonical data model is a data structure that is agreed upon or contracted to be used for passing an object such as a customer across the enterprise or within an industry. For example, a new CRM system is purchased and must be integrated with a legacy mainframe system. The CRM system needs to obtain customer information from the legacy system. In addition, there are other systems within the organization that also will need access to the customer information. In order to integrate the various applications, a canonical data model is created for a customer object.
In the integration shown in Figure 7–1, the various data representations of a customer are transformed into the canonical data model. Thus, all interested parties will be able to communicate, since all are using the same canonical data model. In addition, the various endpoints will not need to know about the other internal data structures, since everything is being converted to the canonical.
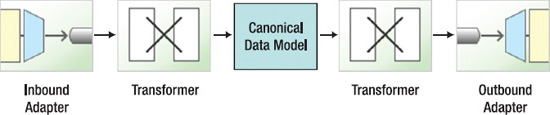
Figure 7–1. The Canonical Data Model
An example of a canonical data model is shown in Listing 7–1. An agreement was reached to use a Java bean representation for a customer object. All endpoints will be required to transform to this representation when communicating across the integration platform. Note the annotation @Component in the canonical data model class. This is used to support component scanning, in which the bean is brought into the Spring context using just a simple annotation without requiring any additional XML configuration information. A toString method is added to support logging in the following examples.
Listing 7–1. Canonical Data Model Representation of a Customer
package com.apress.prospringintegration.transform;


import org.springframework.stereotype.Component;


@Component

public class Customer {

    private String firstName;

    private String lastName;

    private String address;

    private String city;

    private String state;

    private String zip;


    public String getFirstName() {

        return firstName;

    }
    public void setFirstName(String firstName) {

        this.firstName = firstName;

    }


    public String getLastName() {

        return lastName;

    }


    public void setLastName(String lastName) {

        this.lastName = lastName;

    }


    public String getAddress() {

        return address;

    }


    public void setAddress(String address) {

        this.address = address;

    }


    public String getCity() {

        return city;

    }


    public void setCity(String city) {

        this.city = city;

    }


    public String getState() {

        return state;

    }


    public void setState(String state) {

        this.state = state;

    }


    public String getZip() {

        return zip;

    }


    public void setZip(String zip) {

        this.zip = zip;

    }


    @Override

    public String toString() {

        return "Customer{" +

                "firstName='" + firstName + ''' +

                ", lastName='" + lastName + ''' +

                ", address='" + address + ''' +

                ", city='" + city + ''' +

                ", state='" + state + ''' +
                ", zip='" + zip + ''' +

                '}';

    }

}
Spring Integration Transformer
To support message conversion or transformations, Spring Integration has the concept of a message transformer. This allows the message payload to be modified using a Spring bean. A transformer, like most Spring Integration components, accepts an input channel for the incoming message and an output channel for the modified message.
Transforming a Message
The transformer element is part of the Spring Integration namespace, and is used as shown in Listing 7–2.
Listing 7–2. Spring Configuration File transformer.xml Demostrating the transformer Element
<?xml version="1.0" encoding="UTF-8"?>

<beans xmlns="http://www.springframework.org/schema/beans"

       xmlns:xsi="http://www.w3.org/2001/XMLSchema-instance"

       xmlns:int="http://www.springframework.org/schema/integration"

       xmlns:context="http://www.springframework.org/schema/context"

       xsi:schemaLocation="http://www.springframework.org/schema/beans

    http://www.springframework.org/schema/beans/spring-beans.xsd

    http://www.springframework.org/schema/integration

    http://www.springframework.org/schema/integration/spring-integration-2.0.xsd

    http://www.springframework.org/schema/context

    http://www.springframework.org/schema/context/spring-context-3.0.xsd">


  <context:component-scan base-package="com.apress.prospringintegration.transform"/>


  <int:transformer input-channel="input"

                  output-channel="output"

                  ref="mapper"/>


  <int:channel id="input"/>


  <int:channel id="output">

    <int:queue capacity="10"/>

  </int:channel>


</beans>
The ref attribute points to the Spring bean with the transformation method defined either through the method attribute, as is done in Listing 7–2, or using the @Transformer attribute, as shown in Listing 7–3. A bean with only one method is valid, and Spring Integration will attempt to use that one method. It is a better practice to stipulate which method should be used with the @Transformer annotation, or through the method attribute in the XML schema. The transformer class may also be defined using an inner bean definition (in Spring XML), but the ref attribute must not be defined, as it will create an ambiguous condition and cause an exception to be thrown. In this example, component scanning is used, and eliminates the need for a bean element definition. The customer information is passed through the input channel as a Map. The map method coverts the customer data into the Customer canonical object described previously.
Listing 7–3. The Mapper Transformation Class
package com.apress.prospringintegration.transform;


import org.springframework.integration.annotation.Transformer;

import org.springframework.stereotype.Component;


import java.util.Map;


@Component

public class Mapper {


    @Transformer

    public Customer map(Map<String, String> message) {

        Customer customer = new Customer();


        customer.setFirstName(message.get("firstName"));

        customer.setLastName(message.get("lastName"));

        customer.setAddress(message.get("address"));

        customer.setCity(message.get("city"));

        customer.setState(message.get("state"));

        customer.setZip(message.get("zip"));

        return customer;

    }

}
To test the example transformer code, a simple main class Transformer, as shown in Listing 7–4, is created to push a Map object to the input channel and poll for the output channel Customer object. A Map object is created and populated with the customer data, and then sent to the input channel. The output channel is then polled for the resultant Customer object. The result of running the Transformer class is shown in Listing 7.5.
Listing 7–4. Transformer.java Class Used to Test a Basic Transformation
package com.apress.prospringintegration.transform;


import org.springframework.context.support.ClassPathXmlApplicationContext;

import org.springframework.integration.Message;

import org.springframework.integration.MessageChannel;

import org.springframework.integration.core.PollableChannel;

import org.springframework.integration.support.MessageBuilder;


import java.util.HashMap;

import java.util.Map;


public class Transformer {

    public static void main(String[] args) {

        ClassPathXmlApplicationContext context =

                new ClassPathXmlApplicationContext("classpath:transformer.xml");


        MessageChannel input = context.getBean("input", MessageChannel.class);
        PollableChannel output = context.getBean("output", PollableChannel.class);


        Map<String, String> customerMap = new HashMap<String, String>();

        customerMap.put("firstName", "John");

        customerMap.put("lastName", "Smith");

        customerMap.put("address", "100 State Street");

        customerMap.put("city", "Los Angeles");

        customerMap.put("state", "CA");

        customerMap.put("zip", "90064");


        Message<Map<String, String>> message =

                MessageBuilder.withPayload(customerMap).build();

        input.send(message);


        Message<?> reply = output.receive();

        System.out.println("received: " + reply.getPayload());

    }

}
Listing 7–5. Result of Running the Simple Spring Integration Transfomration
received: Customer{firstName='John', lastName='Smith', address='100 State Street', city='Los Angeles', state='CA', zip='90064'}
There are several options for the transformer method input parameter type and the return value type. The method argument may be
org.springframework.integration.Message- The payload type of the incoming
Message, which is used in the preceding example. - The header values separately, or the entire header
Mapusing the@Headeror@Headersannotation, respectively. Augmenting and using the message headers values will be discussed more following.
The return value may be any type, and will be sent to the output channel as the payload of the message, with the following exceptions:
- If the return type is
Message, it will be sent to the output channel as theMessagetype. - If the return type is a
Mapand the input payload was not aMap, then theMapentries will be added to the incoming message headerMap using String key values. - The transformer handles
nullreturn values by not sending any message to the output channel.
If the return type is void, then Spring Integration will consult the reply channel header in the inbound message and try to forward the message on that.
Built-In Transformers
Spring Integration comes with several out-of-the-box transformer implementations in the core. There are many more not encompassed in the following list that come as appropriate with specific namespaces; for example, the file namespace ships with support for transforming java.io.File objects to various target types:
object-to-string-transformerpayload-serializing-transformerpayload-deserializing-transformerobject-to-map-transformermap-to-object-transformerjson-to-object-transformerobject-to-json-transformerpayload-type-converting-transformer
Using the object-to-string Transformer
The first transformation supports the standard operation of converting an object to a string. This is a very common scenario (e.g., sending a message to a file adapter). An example of using the object-to-string transformer is shown in Listing 7–6.
Listing 7–6. Example of the object-to-string Transformer
<?xml version="1.0" encoding="UTF-8"?>

<beans xmlns="http://www.springframework.org/schema/beans"

       xmlns:xsi="http://www.w3.org/2001/XMLSchema-instance"

       xmlns:int="http://www.springframework.org/schema/integration"

       xsi:schemaLocation="http://www.springframework.org/schema/beans

    http://www.springframework.org/schema/beans/spring-beans.xsd

    http://www.springframework.org/schema/integration

    http://www.springframework.org/schema/integration/spring-integration-2.0.xsd">


  <int:object-to-string-transformer input-channel="input" output-channel="output"/>


  <int:channel id="input"/>


  <int:channel id="output">

    <int:queue capacity="10"/>

  </int:channel>


</beans>
The message payload coming in on the channel input is converted to a string using the toString() method of the incoming object and send as the payload to the channel output. This transformer works fine as long as the toString() method has the desired behavior; otherwise, a custom transformer will need to be used, as discussed previously.
Using the payload-serializing and payload-deserializing Transformers
The next two transformers, payload-serializing-transformer and payload-deserializing-transformer, perform the symmetric operation of serializing an object to a byte array and deserializing the byte array back into an object. This transformer is useful since many adapters and JMS work well with this format. An example of using this transformer is shown in Listing 7–7.
Listing 7–7. Example of payload-serializing-transformer and payload deserializing-transformer
<?xml version="1.0" encoding="UTF-8"?>

<beans xmlns="http://www.springframework.org/schema/beans"

       xmlns:xsi="http://www.w3.org/2001/XMLSchema-instance"

       xmlns:int="http://www.springframework.org/schema/integration"

       xsi:schemaLocation="http://www.springframework.org/schema/beans

    http://www.springframework.org/schema/beans/spring-beans.xsd

    http://www.springframework.org/schema/integration

    http://www.springframework.org/schema/integration/spring-integration-2.0.xsd">


  <int:payload-serializing-transformer input-channel="input"

                                       output-channel="byte-array"/>


  <int:payload-deserializing-transformer input-channel="byte-array"

                                         output-channel="output"/>


  <int:logging-channel-adapter id="logger"

                               log-full-message="true"

                               level="INFO"/>


  <int:channel id="input"/>


  <int:channel id="byte-array">

    <int:interceptors>

      <int:wire-tap channel="logger"/>

    </int:interceptors>

  </int:channel>


  <int:channel id="output">

    <int:queue capacity="10"/>

  </int:channel>


</beans>
In this example, the payload of the incoming message on channel input is transformed into a byte array. The logging adapter is used to see the transformed byte array. Then the byte array is transformed back into the original object. A Wire Tap interceptor is used to log the message as it goes through the byte-array channel. This is a useful tool for debugging; it allows the message to be logged any time it goes through the intercepted channel. To test the example, a simple main class SerializerTransformer is created (as shown in Listing 7–8), much like the previous example. The message is logged before it's sent to the input channel, after it's transformed to a byte array, and after it's transformed back to a Map object.
Listing 7–8. Main Class SerializerTransformer Used for Testing the Serializing Transformer
package com.apress.prospringintegration.transform;


import org.springframework.context.support.ClassPathXmlApplicationContext;

import org.springframework.integration.Message;

import org.springframework.integration.MessageChannel;

import org.springframework.integration.core.PollableChannel;

import org.springframework.integration.support.MessageBuilder;


import java.util.HashMap;

import java.util.Map;


public class SerializerTransformer {

    public static void main(String[] args) {

        ClassPathXmlApplicationContext context =

                new ClassPathXmlApplicationContext("classpath:serializer-transformer.xml");


        MessageChannel input = context.getBean("input", MessageChannel.class);

        PollableChannel output = context.getBean("output", PollableChannel.class);


        Map<String, String> customerMap = new HashMap<String, String>();

        customerMap.put("firstName", "John");

        customerMap.put("lastName", "Smith");

        customerMap.put("address", "100 State Street");

        customerMap.put("city", "Los Angeles");

        customerMap.put("state", "CA");

        customerMap.put("zip", "90064");


        System.out.println("toString(): " + customerMap.toString());


        Message<Map<String, String>> message =

                MessageBuilder.withPayload(customerMap).build();

        input.send(message);


        Message<?> reply = output.receive();

        System.out.println("received: " + reply.getPayload());

    }

}
The results of running the class SerializerTransformer is shown in Listing 7–9. The initial message is a Map object. After transformation, the message is now a byte array. Finally, the message is transformed back into a Map object.
Listing 7–9. Results of Running the Serializing Transformer
toString(): {zip=90064, lastName=Smith, address=100 State Street, state=CA, firstName=John, city=Los Angeles}


INFO : org.springframework.integration.handler.LoggingHandler -

[Payload=[B@97d01f][Headers={timestamp=1293421055587, id=97270abd-f449-410e-a99b-edb85b0f88df}]
received: {lastName=Smith, zip=90064, address=100 State Street, state=CA, firstName=John, city=Los Angeles}
Using the object-to-map and a map-to-object Transformers
It is very common to convert an object into a Map representation. This eliminates the need to serialize the object when sending it as a JMS message or to simplify the mapping process when transforming it into a different object required for another endpoint. Spring Integration provides an object-to-map transformer and a map-to-object transformer to support this need. The Map key is based on the Spring Expression Language. An example of this transformer is shown in Listing 7–10.
Listing 7–10. Example of object-to-map-transformer and map-to-object-transformer
<?xml version="1.0" encoding="UTF-8"?>

<beans xmlns="http://www.springframework.org/schema/beans"

       xmlns:xsi="http://www.w3.org/2001/XMLSchema-instance"

       xmlns:int="http://www.springframework.org/schema/integration"

       xsi:schemaLocation="http://www.springframework.org/schema/beans

    http://www.springframework.org/schema/beans/spring-beans.xsd

    http://www.springframework.org/schema/integration

    http://www.springframework.org/schema/integration/spring-integration-2.0.xsd">


  <int:object-to-map-transformer input-channel="input"

                                 output-channel="map"/>


  <int:map-to-object-transformer input-channel="map"

                                 output-channel="output"

                                 type="com.apress.prospringintegration.transform.Customer"/>


  <int:logging-channel-adapter id="logger"

                               log-full-message="true"

                               level="INFO"/>


  <int:channel id="input"/>


  <int:channel id="map">

    <int:interceptors>

      <int:wire-tap channel="logger"/>

    </int:interceptors>

  </int:channel>


  <int:channel id="output">

    <int:queue capacity="10"/>

  </int:channel>


</beans>
The incoming message object payload from the input channel is transformed into a Map object and sent to the map channel. The logging adapter is used to log the Map object. Then the Map object is transformed back into the original object and sent as the payload to the output channel. Note that the object class must be specified through the type attribute. The main class to test this example is again similar to the previous example, as shown in Listing 7–11. A Customer object is created and populated, and sent to the input channel. The object is converted to a Map representation and logged by the Wire Tap interceptor. The Map is then transformed back to a Customer object and polled and logged by the MapTransformer class. The results are shown in Listing 7–12.
Listing 7–11. MapTransformer main Class Used to Test object-to-map-transformer
package com.apress.prospringintegration.transform;


import org.springframework.context.support.ClassPathXmlApplicationContext;

import org.springframework.integration.Message;

import org.springframework.integration.MessageChannel;

import org.springframework.integration.core.PollableChannel;

import org.springframework.integration.support.MessageBuilder;


public class MapTransformer {

    public static void main(String[] args) {

        ClassPathXmlApplicationContext context =

                new ClassPathXmlApplicationContext("classpath:map-transformer.xml");


        MessageChannel input = context.getBean("input", MessageChannel.class);

        PollableChannel output = context.getBean("output", PollableChannel.class);


        Customer customer = new Customer();

        customer.setFirstName("John");

        customer.setLastName("Smith");

        customer.setAddress("100 State Street");

        customer.setCity("Los Angeles");

        customer.setState("CA");

        customer.setZip("90064");


        System.out.println("toString(): " + customer.toString());


        Message<Customer> message = MessageBuilder.withPayload(customer).build();

        input.send(message);


        Message<?> reply = output.receive();

        System.out.println("received: " + reply.getPayload());

    }

}
Listing 7–12. Output of Running the Map Transformer Example
toString(): Customer{firstName='John', lastName='Smith', address='100 State Street', city='Los

Angeles', state='CA', zip='90064'}


INFO : org.springframework.integration.handler.LoggingHandler - [Payload={zip=90064, lastName=Smith, address=100 State Street, state=CA, firstName=John, city=Los Angeles}][Headers={timestamp=1293423769790, id=81efb6d4-2d1f-44f0-b0ea-a2b8208ce7e9}]


received: Customer{firstName='John', lastName='Smith', address='100 State Street', city='Los Angeles', state='CA', zip='90064'}
Using the object-to-json and json-to-object Transformers
JSON is a very common data format, especially for communicating with the browser's JavaScript engine. Spring Integration has two transformers, object-to-json-transformer and json-to-object-transformer, which convert an object to a JSON representation and back from JSON to the object, respectively. An example of these transformers is shown in Listing 7–13.
Listing 7–13. Example of object-to-json-transformer and json-to-object-transformer
<?xml version="1.0" encoding="UTF-8"?>

<beans xmlns="http://www.springframework.org/schema/beans"

       xmlns:xsi="http://www.w3.org/2001/XMLSchema-instance"

       xmlns:int="http://www.springframework.org/schema/integration"

       xmlns:context="http://www.springframework.org/schema/context"

       xsi:schemaLocation="http://www.springframework.org/schema/beans

    http://www.springframework.org/schema/beans/spring-beans.xsd

    http://www.springframework.org/schema/integration

    http://www.springframework.org/schema/integration/spring-integration-2.0.xsd

    http://www.springframework.org/schema/context

    http://www.springframework.org/schema/context/spring-context-3.0.xsd">


  <context:component-scan base-package="com.apress.prospringintegration.transform"/>


  <int:object-to-json-transformer input-channel="input"

                                  output-channel="json"/>


  <int:json-to-object-transformer input-channel="json"

                                  output-channel="output"

                                  type="com.apress.prospringintegration.transform.Customer"/>


  <int:logging-channel-adapter id="logger" log-full-message="true" level="INFO"/>


  <int:channel id="input"/>


  <int:channel id="json">

    <int:interceptors>

      <int:wire-tap channel="logger"/>

    </int:interceptors>

  </int:channel>


  <int:channel id="output">

    <int:queue capacity="10"/>

  </int:channel>


</beans>
The payload on the incoming message on the input channel is transformed into JSON and converted back into the object as the payload of the message on the output channel. The logging adapter is used to log the intermediate JSON representation. Again, a simple main class, JsonTransformer, is created to run the example, as shown in Listing 7–14.
Listing 7–14. JsonTranformer main Class to Run the JSON Transformer Example
package com.apress.prospringintegration.transform;


import org.springframework.context.support.ClassPathXmlApplicationContext;

import org.springframework.integration.Message;

import org.springframework.integration.MessageChannel;

import org.springframework.integration.core.PollableChannel;

import org.springframework.integration.support.MessageBuilder;


public class JsonTransformer {

        public static void main(String[] args) {

        ClassPathXmlApplicationContext context =

                new ClassPathXmlApplicationContext("classpath:json-transformer.xml");


        MessageChannel input = context.getBean("input", MessageChannel.class);

        PollableChannel output = context.getBean("output", PollableChannel.class);


        Customer customer = new Customer();

        customer.setFirstName("John");

        customer.setLastName("Smith");

        customer.setAddress("100 State Street");

        customer.setCity("Los Angeles");

        customer.setState("CA");

        customer.setZip("90064");


        System.out.println("toString(): " + customer.toString());


        Message<Customer> message = MessageBuilder.withPayload(customer).build();

        input.send(message);


        Message<?> reply = output.receive();

        System.out.println("received: " + reply.getPayload());

    }

}
Running the JSON example will produce the results shown in Listing 7–15. As can be seen by the Wire Tap interceptor logging, the customer information is in JSON format.
Listing 7–15. JSON Transformer Example Results
toString(): Customer{firstName='John', lastName='Smith', address='100 State Street', city='Los

Angeles', state='CA', zip='90064'}


INFO : org.springframework.integration.handler.LoggingHandler -

[Payload={"firstName":"John","lastName":"Smith","city":"Los

Angeles","zip":"90064","address":"100 State

Street","state":"CA"}][Headers={timestamp=1293423966087, id=7f54c01e-f3bd-4661-b24e-0285bba5ff7c}]


received: Customer{firstName='John', lastName='Smith', address='100 State Street', city='Los Angeles', state='CA', zip='90064'}
Using XML Transformers
Unlike the Java Business Integration (JBI) specification, or many of the other integration servers, Spring Integration does not require the message payload to be XML based. However, Spring Integration does provide convenience transformers for XML payloads if this is required. Spring Integration provides two transformers based on the Spring OXM (Object-to-XML Mapping) framework's org.springframework.oxm.Marshaller and org.springframework.oxm.Unmarshaller classes, which support serializing an object to XML, and an XML stream to an object, respectively. There are implementations for JAXB, Castor, XMLBeans, JiBX, and XStream at the moment. Castor will be used to demonstrate the XML transformers, since it requires minimal configuration to work. The other implementations work in a similar fashion.
To support the XML transformers and Castor, the dependencies shown in Listing 7–16 must be added.
Listing 7–16. Additional Maven Dependencies Required for the XML Transformers
     <dependency>

       <groupId>org.springframework.integration</groupId>

       <artifactId>spring-integration-xml</artifactId>

       <version>2.0.1.RELEASE</version>

     </dependency>

     <dependency>

       <groupId>org.codehaus.castor</groupId>

       <artifactId>castor</artifactId>

       <version>1.2</version>

     </dependency>

     <dependency>

       <groupId>xerces</groupId>

       <artifactId>xercesImpl</artifactId>

       <version>2.9.1</version>

     </dependency>
Castor version 1.2 is used for this example since, at the time of writing, Spring has not been updated to work with version 1.3. A separate Spring Integration XML namespace is required to use the XML transformers. A simple example that converts the Customer canonical object into XML and back into the object is shown in Listing 7–17.
Listing 7–17. XML Transformer Example
<?xml version="1.0" encoding="UTF-8"?>

<beans xmlns="http://www.springframework.org/schema/beans"

       xmlns:xsi="http://www.w3.org/2001/XMLSchema-instance"

       xmlns:int="http://www.springframework.org/schema/integration"

       xmlns:int-xml="http://www.springframework.org/schema/integration/xml"

       xmlns:context="http://www.springframework.org/schema/context"

       xsi:schemaLocation="http://www.springframework.org/schema/beans

    http://www.springframework.org/schema/beans/spring-beans.xsd

    http://www.springframework.org/schema/integration

    http://www.springframework.org/schema/integration/spring-integration-2.0.xsd

    http://www.springframework.org/schema/integration/xml

    http://www.springframework.org/schema/integration/xml/spring-integration-xml.xsd

    http://www.springframework.org/schema/context

    http://www.springframework.org/schema/context/spring-context-3.0.xsd">
  <context:component-scan base-package="com.apress.prospringintegration.transform"/>


  <int-xml:marshalling-transformer input-channel="input"

                                   output-channel="xml"

                                   marshaller="marshaller"

                                   result-type="StringResult"/>


  <int-xml:unmarshalling-transformer id="defaultUnmarshaller"

                                     input-channel="xml-string"

                                     output-channel="output"

                                     unmarshaller="marshaller"/>


  <int:object-to-string-transformer input-channel="xml" output-channel="xml-string"/>


  <int:logging-channel-adapter id="logger" log-full-message="true" level="INFO"/>


  <int:channel id="input"/>


  <int:channel id="xml-string"/>


  <int:channel id="xml">

    <int:interceptors>

      <int:wire-tap channel="logger"/>

    </int:interceptors>

  </int:channel>


  <int:channel id="output">

    <int:queue capacity="10"/>

  </int:channel>

</beans>
Note the addition of the Spring Integration XML namespace. marshalling-transformer is used to convert an input channel payload object into XML using the org.springframework.oxm.castor.CastorMashaller configured using the Java configuration XmlConfiguration, as shown in Listing 7–18.
Listing 7–18. Java Configuration XmlConfiguration
package com.apress.prospringintegration.transform;


import org.springframework.context.annotation.Bean;

import org.springframework.context.annotation.Configuration;

import org.springframework.oxm.castor.CastorMarshaller;


@Configuration

public class XmlConfiguration {


    @Bean

    public CastorMarshaller marshaller() {

        return new CastorMarshaller();

    }

}
The output payload of the xml channel may either be a string that uses the result-type attribute of StringResult or an XML Document that uses DomResult. You can configure additional Result type outputs by setting the o rg.springframework.integration.xml.result.ResultFactory interface using the optional result-transformer attribute. For this example, the XML is returned in the payload as a javax.xml.transform.Result-wrapped string value. The XML is logged using the logging adapter, and then converted to a pure string using the object-to-string-transformer to allow it to be sent to the unmarshalling-transformer. The CastorMashaller supports both marshalling and unmarshalling, and is used in conjunction with the unmarshalling-transformer to convert the XML back into the Customer object. The other Marshaller and Unmarshaller implementations work in a similar fashion.
The XML Transformation example may be run using the main class XmlTransformer shown in Listing 7–19.
Listing 7–19. XMLTranformer main Class for Running the XML Transformer Example
package com.apress.prospringintegration.transform;


import org.springframework.context.support.ClassPathXmlApplicationContext;

import org.springframework.integration.Message;

import org.springframework.integration.MessageChannel;

import org.springframework.integration.core.PollableChannel;

import org.springframework.integration.support.MessageBuilder;


public class XmlTransformer {

    public static void main(String[] args) {

        ClassPathXmlApplicationContext context =

                new ClassPathXmlApplicationContext("classpath:xml-transformer.xml");


        MessageChannel input = context.getBean("input", MessageChannel.class);

        PollableChannel output = context.getBean("output", PollableChannel.class);


        Customer customer = new Customer();

        customer.setFirstName("John");

        customer.setLastName("Smith");

        customer.setAddress("100 State Street");

        customer.setCity("Los Angeles");

        customer.setState("CA");

        customer.setZip("90064");


        System.out.println("toString(): " + customer.toString());


        Message<Customer> message = MessageBuilder.withPayload(customer).build();

        input.send(message);


        Message<?> reply = output.receive();

        System.out.println("received: " + reply.getPayload());

    }

}
Again, the same pattern is used to demonstrate the XML transformer. A Customer object is created and passed to the XML transformer through the input channel. The object is transformed into an XML representation and logged using the Wire Tap interceptor. Then the XML payload is converted back to the Customer object. The results of running the example are shown in Listing 7–20. As can be seen in the results, the Customer object is converted into an XML message.
Listing 7–20. The Results of Running the XML Transformer Example
toString(): Customer{firstName='John', lastName='Smith', address='100 State Street', city='Los

Angeles', state='CA', zip='90064'}


INFO : org.springframework.integration.handler.LoggingHandler - [Payload=<?xml version="1.0" encoding="UTF-8"?>

<customer><address>100 State Street</address><last-name>Smith</last-name><zip>90064</zip><first-name>John</first-name><state>CA</state><city>Los Angeles</city></customer>][Headers={timestamp=1293427154837, id=9e3c590f-8312-4812-9d6e-ccee89bd5db9}]


received: Customer{firstName='John', lastName='Smith', address='100 State Street', city='Los Angeles', state='CA', zip='90064'}
Leveraging Transformations in Integration
Transformers are a required component for any integration framework. A Spring Integration implementation will be created that receives a JMS Map message. A Map message is used to eliminate the requirement to serialize the object, which would affect performance in a production scenario. The Map message will be transformed into the canonical Customer object. Spring Integration does not require the message payload to be XML, eliminating the expensive XML parsing requirements. The canonical Customer object is then transformed into JSON to meet the needs of the final endpoint.
Implementing this integration is straightforward. ActiveMQ will be used as the message broker; it can be downloaded from http://activemq.apache.org. Installation of ActiveMQ is straightforward. Simply decompress the installation archive and start by running the command bin/activemq.sh for Linux (Unix), or bin/activemq.bat for Windows. Alternatively, an embedded ActiveMQ broker may be used with the URL vm://localhost, which is leveraged by this example. An ActiveMQ broker will be initialized with the loading of the Spring context. The initial JMS message will be sent, leveraging the Spring org.springframework.jms.core.JmsTemplate. The Maven dependencies shown in Listing 7–21 must be added to support JMS and ActiveMQ.
Listing 7–21. Maven Dependencies for JMS and ActiveMQ
     <dependency>

       <groupId>org.springframework</groupId>

       <artifactId>spring-jms</artifactId>

       <version>2.0.1.RELEASE</version>

     </dependency>

     <dependency>

       <groupId>org.springframework.integration</groupId>

       <artifactId>spring-integration-jms</artifactId>

       <version>2.0.1.RELEASE</version>

     </dependency>

     <dependency>

       <groupId>org.apache.activemq</groupId>

      <artifactId>activemq-core</artifactId>

       <version>5.4.0</version>

     </dependency>

     <dependency>

       <groupId>javax.jms</groupId>

       <artifactId>jms</artifactId>
       <version>1.1</version>

     </dependency>
The JMS Map message is published, leveraging the Spring JmsTemplate. As shown in Listing 7–22, the customer information is placed in a JMS Map message and sent using the JmsTemplate. The final message in the output channel is logged to show the result.
Listing 7–22. Integration Example Using Transformers
package com.apress.prospringintegration.transform;


import org.springframework.context.support.ClassPathXmlApplicationContext;

import org.springframework.integration.Message;

import org.springframework.integration.core.PollableChannel;

import org.springframework.jms.core.JmsTemplate;

import org.springframework.jms.core.MessageCreator;


import javax.jms.JMSException;

import javax.jms.MapMessage;

import javax.jms.Session;


public class IntegrationTransformer {

    public static void main(String[] args) {

        ClassPathXmlApplicationContext context =

                new ClassPathXmlApplicationContext("classpath:integration-transformer.xml");


        JmsTemplate jmsTemplate = context.getBean("jmsTemplate", JmsTemplate.class);


        jmsTemplate.send(new MessageCreator() {


            @Override

            public javax.jms.Message createMessage(Session session) throws JMSException {

                MapMessage message = session.createMapMessage();

                message.setString("firstName", "John");

                message.setString("lastName", "Smith");

                message.setString("address", "100 State Street");

                message.setString("city", "Los Angeles");

                message.setString("state", "CA");

                message.setString("zip", "90064");

                System.out.println("Sending message: " + message);

                return message;

            }

        });


        PollableChannel output = (PollableChannel) context.getBean("output");

        Message<?> reply = output.receive();

        System.out.println("received: " + reply.getPayload());

    }

}
The Spring configuration file for the integration example is shown in Listing 7–23. Note the additional namespace definitions to support JMS.
Listing 7–23. Spring Configuration File for the Integration Example
<?xml version="1.0" encoding="UTF-8"?>

<beans xmlns="http://www.springframework.org/schema/beans"

       xmlns:xsi="http://www.w3.org/2001/XMLSchema-instance"

       xmlns:int="http://www.springframework.org/schema/integration"

       xmlns:jms="http://www.springframework.org/schema/integration/jms"

       xmlns:context="http://www.springframework.org/schema/context"

       xsi:schemaLocation="http://www.springframework.org/schema/beans

      http://www.springframework.org/schema/beans/spring-beans-3.0.xsd

      http://www.springframework.org/schema/integration

      http://www.springframework.org/schema/integration/spring-integration-2.0.xsd

      http://www.springframework.org/schema/integration/jms

      http://www.springframework.org/schema/integration/jms/spring-integration-jms-2.0.xsd

      http://www.springframework.org/schema/context

      http://www.springframework.org/schema/context/spring-context-3.0.xsd">


  <context:component-scan base-package="com.apress.prospringintegration.transform"/>


  <jms:message-driven-channel-adapter

      channel="map"

      extract-payload="true"

      connection-factory="cachingConnectionFactory"

      destination-name="transformation.example.queue"/>


  <int:map-to-object-transformer input-channel="map"

                                 output-channel="json"

                                 type="com.apress.prospringintegration.transform.Customer"/>


  <int:transformer input-channel="json"

                   output-channel="output"

                   ref="objectToJsonTransformer"/>


  <int:logging-channel-adapter id="logger"

                               log-full-message="true"

                               level="INFO"/>


  <int:channel id="json">

    <int:interceptors>

      <int:wire-tap channel="logger"/>

    </int:interceptors>

  </int:channel>


  <int:channel id="map">

    <int:interceptors>

      <int:wire-tap channel="logger"/>

    </int:interceptors>

  </int:channel>


  <int:channel id="output">

    <int:queue capacity="10"/>

  </int:channel>


</beans>
Spring Java configuration is used to create the JMS factory and JMS template, as shown in Listing 7–24. As discussed previously, the embedded broker is created by setting the URL to vm://localhost.
Listing 7–24. Java Configuration for JMS
package com.apress.prospringintegration.transform;


import org.apache.activemq.ActiveMQConnectionFactory;

import org.springframework.context.annotation.Bean;

import org.springframework.context.annotation.Configuration;

import org.springframework.jms.connection.CachingConnectionFactory;

import org.springframework.jms.core.JmsTemplate;


@Configuration

public class IntegrationConfiguration {


    @Bean

    public JmsTemplate jmsTemplate() {

        JmsTemplate jmsTemplate = new JmsTemplate();

        jmsTemplate.setConnectionFactory(cachingConnectionFactory());

        jmsTemplate.setDefaultDestinationName("transformation.example.queue");

        return jmsTemplate;

    }


    @Bean

    public CachingConnectionFactory cachingConnectionFactory() {

        CachingConnectionFactory cachingConnectionFactory =

                new CachingConnectionFactory();

        cachingConnectionFactory.setTargetConnectionFactory(activeMQConnectionFactory());

        cachingConnectionFactory.setSessionCacheSize(10);

        cachingConnectionFactory.setCacheProducers(false);

        return cachingConnectionFactory;

    }


    @Bean

    public ActiveMQConnectionFactory activeMQConnectionFactory() {

        ActiveMQConnectionFactory activeMQConnectionFactory =

                new ActiveMQConnectionFactory();

        activeMQConnectionFactory.setBrokerURL("vm://localhost");

        return activeMQConnectionFactory;

    }


}
The JmsTemplate is configured to send a message to the JMS queue transformation.example.queue. A message-driven-channel-adapter is used to receive the message from the same queue. The Map message is converted to the canonical Customer object using the map-to-object-transformer. The Customer object is then converted to a JSON representation using the object-to-json transformer for delivery to the final endpoint. The logger adapter is used to see how the message appears at each of the intermediate channels. As demonstrated by this example, Spring Integration can easily be configured to address a real integration scenario.
The results of this example are shown in Listing 7–25. As can be seen from the results, a JMS message is sent as a MapMessage. The MapMessage is then received from the JMS queue and converted to a Customer object, and then to a JSON representation.
Listing 7–25. Results of the Integration Transformation Example
Sending message: ActiveMQMapMessage {commandId = 0, responseRequired = false, messageId = null, originalDestination = null, originalTransactionId = null, producerId = null, destination = null, transactionId = null, expiration = 0, timestamp = 0, arrival = 0, brokerInTime = 0, brokerOutTime = 0, correlationId = null, replyTo = null, persistent = false, type = null, priority = 0, groupID = null, groupSequence = 0, targetConsumerId = null, compressed = false, userID = null, content = null, marshalledProperties = null, dataStructure = null, redeliveryCounter = 0, size = 0, properties = null, readOnlyProperties = false, readOnlyBody = false, droppable = false} ActiveMQMapMessage{ theTable = {zip=90064, lastName=Smith, address=100 State Street, state=CA, firstName=John, city=Los Angeles} }


INFO : org.springframework.integration.handler.LoggingHandler - [Payload={zip=90064, lastName=Smith, address=100 State Street, state=CA, firstName=John, city=Los Angeles}][Headers={timestamp=1293430883884, id=abc20ed2-b970-4f2c-8fe0-cb3dcfbe78d1, JMSXDeliveryCount=1, JMSExpiration=0, JMSRedelivered=false, jms_redelivered=false, JMSDeliveryMode=2, JMSPriority=4, JMSXGroupSeq=0, JMSTimestamp=1293430883821, jms_messageId=ID:susan-3870-1293430883321-3:0:2:1:1}]


INFO : org.springframework.integration.handler.LoggingHandler - [Payload=Customer{firstName='John', lastName='Smith', address='100 State Street', city='Los Angeles', state='CA', zip='90064'}][Headers={timestamp=1293430883946, id=9bd5d8d2-b2a1-4a22-999b-f8ad3785c262, JMSXDeliveryCount=1, JMSExpiration=0, jms_redelivered=false, JMSRedelivered=false, JMSDeliveryMode=2, JMSPriority=4, JMSXGroupSeq=0, jms_messageId=ID:susan-3870-1293430883321-3:0:2:1:1, JMSTimestamp=1293430883821}]


received: {"firstName":"John","lastName":"Smith","city":"Los Angeles","zip":"90064","address":"100 State Street","state":"CA"}
Header Enrichers
A Spring Integration Message consists of two parts:
- The message payload object itself.
- The header, which is an instance of Spring Integration's
MessageHeadersclass, which in turn extendsMap<String,?>. The headers are key/value pairs that provide metadata to components in Spring Integration or to other business components in an integration flow.
Spring Integration can augment or enrich header information. The header-enricher element provides a simple means to add additional header entries to a message. For example, the value 12 may be added to the key count, and an instance of the Customer object may be added to the key headerBean within the header Map using the header-enricher, as shown in Listing 7–26. The count might be used as an index of the message for removing duplicate messages, or for potentially correlating more than one message.
Listing 7–26. Header Enricher Configuration Example
<?xml version="1.0" encoding="UTF-8"?>

<beans xmlns="http://www.springframework.org/schema/beans"

       xmlns:xsi="http://www.w3.org/2001/XMLSchema-instance"

       xmlns:int="http://www.springframework.org/schema/integration"
       xmlns:context="http://www.springframework.org/schema/context"

       xsi:schemaLocation="http://www.springframework.org/schema/beans

    http://www.springframework.org/schema/beans/spring-beans.xsd

    http://www.springframework.org/schema/integration

    http://www.springframework.org/schema/integration/spring-integration-2.0.xsd

    http://www.springframework.org/schema/context

    http://www.springframework.org/schema/context/spring-context-3.0.xsd">


  <context:component-scan base-package="com.apress.prospringintegration.transform"/>


  <int:header-enricher input-channel="input" output-channel="interceptor">

    <int:header name="count" value="12"/>

    <int:header name="headerBean" ref="customer"/>

  </int:header-enricher>


  <int:transformer input-channel="interceptor"

                  output-channel="output"

                  ref="headerInterceptor"/>


  <int:channel id="input"/>


  <int:channel id="interceptor"/>


  <int:channel id="output">

    <int:queue capacity="10"/>

  </int:channel>


</beans>
Spring Integration also provides the annotations @Header and @Headers to access individual header values and the complete header Map as parameters to a method used for transformation. For example, to retrieve the header value key to the count parameter, use the @Header annotation, as shown in Listing 7–27. Alternatively, the entire Map of headers can be injected using the @Headers annotation, as shown in the example following.
Listing 7–27. @Header and @Headers Annotation Example
package com.apress.prospringintegration.transform;


import org.springframework.integration.*;

import org.springframework.integration.annotation.Header;

import org.springframework.integration.annotation.Headers;

import org.springframework.integration.annotation.Transformer;

import org.springframework.stereotype.Component;


import java.util.Map;


@Component

public class HeaderInterceptor {


    @Transformer

    public Customer map( Message<Map<String, String>> messageObj,

        @Header("count") int count, @Headers Map<String, Object> headerMap) {
        Customer customer = new Customer();


        Map<String,String> message=messageObj.getPayload();


        customer.setFirstName(message.get("firstName"));

        customer.setLastName(message.get("lastName"));

        customer.setAddress(message.get("address"));

        customer.setCity(message.get("city"));

        customer.setState(message.get("state"));

        customer.setZip(message.get("zip"));


        System.out.println("Count:" + count);


        for (String key : headerMap.keySet()) {

            System.out.println("Key: " + key + "  Value: " + headerMap.get(key));

        }

        return customer;

    }

}
In the preceding example, the first parameter is assumed to be a reference to the payload, even though it is not so-annotated. The second parameter is annotated with the @Header annotation, which has a value of count. This string is the key of the header. If the code is compiled with debug symbols, then Spring Integration can see the name of the parameter in the method definition and can map that to a header, negating the need to explicitly specify the key. Thus, @Header int count is the same as @Header("count") int count. While this is possible, it's not encouraged: it is easy to forget to include debug symbols, and failure to do so can introduce some very nasty bugs. Debug symbols are typically turned off in production-bound builds, which is the last place one hopes to find bugs in their code. Always specify a header key. Header keys don't have to be literal strings, and can be the result of any constant expression, including static variables. Many modules provide adapters and specific support for those adapters. They also publish well-known headers that might be of use to users of the module. While there are no hard-and-fast rules, look for a *Headers class (e.g., FileHeaders) that contains public static final Strings that can be used to key into a header Map to avoid hard-coding header keys in code. For example:
public void doSomethingWithFile(@Header(FileHeaders.FILENAME) String fileName) {

 ...

}
Finally, a header may be influenced programmatically using the MessageBuilder class. The example in Listing 7–28 shows another method for adding the header value 12 to the key count. This technique is completely customizable.
Listing 7–28. Modifying the Header Using the Spring Integration API
package com.apress.prospringintegration.transform;


import org.springframework.integration.Message;

import org.springframework.integration.annotation.Transformer;

import org.springframework.integration.support.MessageBuilder;

import org.springframework.stereotype.Component;


import java.util.Map;
@Component

public class HeaderMapper {


    @Transformer

    public Message<Customer> map(Message<Map<String, String>> message) {


        Map<String, String> mapMessage = message.getPayload();

        Customer customer = new Customer();


        customer.setFirstName(mapMessage.get("firstName"));

        customer.setLastName(mapMessage.get("lastName"));

        customer.setAddress(mapMessage.get("address"));

        customer.setCity(mapMessage.get("city"));

        customer.setState(mapMessage.get("state"));

        customer.setZip(mapMessage.get("zip"));


        return MessageBuilder.withPayload(customer)

                .copyHeadersIfAbsent(message.getHeaders())

                .setHeaderIfAbsent("count", 12).build();

    }

}
Bear in mind that Spring Integration Messages and MessageHeaders are immutable, so it's not possible to modify headers in a message, only to create a new message that's cloned from existing headers and use a new value for the new header. Even though MessageHeaders advertises the contract of java.util.Map, it doesn't fully support it.
Message Mappers: Moving Transformation into the Framework
Method-Mapping Transformation
Spring Integration uses a set of default rules and conventions to map the channel Message object to the target methods. This allows for adapting to most situations without resorting to addition configuration settings. The different scenarios will be described following.
The Spring Integration Message consists of two main parts, as discussed previously: the payload, and the header Map, which is a key/value pair where the key is a string and the value is an object. Spring Integration follows the basic premise that the mapping of the payload takes precedence over all other possibilities. Since a method can only return a single object or primitive, the complication occurs with how the input parameters are mapped. Starting with the return value, there are basically three possibilities for the return type:
- Object/primitive: This is mapped to the payload of the outgoing
Message. Message: This will be the outgoingMessage.void: This outputs no message.
The mapping for the methods' arguments is much more involved:
- The simplest case is no argument, in which no data from the
Messageis passed to the outbound channel, and the method acts as an event or trigger to invoke the method. - The next case is a single argument in which there can be three situations:
- First, an object/primitive argument type which is not a
Mapwill pass as the message payload. If the message payload is not the same type as the argument, an attempt will be made to convert the payload to the argument type. - The second possibility is that the argument type will be a
Messagein which theMessageobject will be passed as is. - The last possibility is that the argument type is a
Map. If the message payload is of typeMap, the payload will be passed, since the payload always takes priority. However, if the payload is not aMaptype, theMessageheader will be passed.
- First, an object/primitive argument type which is not a
- If there is more than one argument, the situation is even more complicated. For this, Spring Integration provides annotations to solve the problem.
Some examples of the different mapping situations are given in Listing 7–29.
Listing 7–29. Simple Mapping Examples
    public String example(Object object);


    public Message example(Object object);


    public Message example(Message message);


    public Message example(Map map);
In the first case, the input object is the Message payload and the String is returned in the Message payload. In the second case, the input object is passed as the Message payload and the return value is the Message. In the third case, the input is a Message and the output is a newly created Message. In the last case, if the input Message payload is not a Map type, the Message header will be passed as a Message header with a returned Message output.
Spring Integration provides several annotations to support the most complex case, when more than one argument exists in the method signature. A Message payload is denoted by @Payload, and, as discussed previously, a header value is noted by @Header and the entire header Map by @Headers. This prevents ambiguity when more than one object could be mapped to the payload or header (e.g., if the payload is a string object, and in addition, one of the header elements needs to be passed). The string payload is designated by the @Payload annotation and the header element count is designated by the @Header annotation, as shown in Listing 7–30.
Listing 7–30. Mappping Annotation Example
public String example(@Payload String message, @Header("count") int count);
Finally, Spring Integration supports multiple methods within a transformer where the payload type can be used to determine which method is to be called. The different method signatures within the same class must be unambiguous in mapping to the payload type; otherwise, an exception will be thrown. Alternatively, the method attribute must be used in the transformer element. Examples of method signatures that may be mapped are shown in Listing 7–31 It is clear which method to choose when the payload is either a String or Long type.
Listing 7–31. Method Mapping Example
public interface Example {


    public Message method(String message);


    public Message method(Long message);

}
However, if the method signatures are ambiguous in determining how to map the payload type, an exception will be thrown, as in the example in Listing 7–32.
Listing 7–32. Method Mapping Example That Will Throw an Exception
 public interface Example {


    public Message method(Long message, Map header);


    public Message method(Long message);

}
ConversionService
Spring 3 debuted support for the ConversionService, a framework-wide registry of known Converter objects that many satellite frameworks—including Spring MVC and Spring Integration—consume for common conversion tasks. One use of the ConversionService is when the default method-mapping rules fail: if your configuration really does expect an object of type F to be passed into an endpoint method with a parameter of type Y, and Y is not assignable to F, then it has to be converted.
Spring Integration already employs a few Converter instances out of the box with its own instance of the ConversionService, which has the bean name integrationConversionService. Spring Integration consults this instance for any applicable converters, looking for a converter that can help it convert the instance of type Y into an instance of type F. If the default resolution and conversion rules don't meet the requirement, or there's a conversion that's likely to be common enough that the rules should be available framework-wide, then register the converter with Spring Integration. Inject an instance of the ConversionService and register the instance through code or, more straightforwardly, use the simple Spring Integration namespace support's converter element:
<int:converter ref = "aConverterInstance" />
This will register the converter with the Spring Integration ConversionService instance.
Summary
This chapter covered how Spring Integration supports transformations, allowing the message payload to be modified to the format and structure required by the downstream endpoint. A number of examples were given, showing the built-in transformation support for Map, JSON, and XML messages, as well as object serialization. A simple integration example was given, demonstrating how easy it is to transform the message payloads as required for the different endpoints that may be encountered in real situations. In addition, Spring Integration supports augmenting and modifying the message header values as required for supporting downstream message handling and endpoint requirements. Several examples were shown demonstrating Spring Integration support for modifying the message header. Finally, the default rules and conventions were discussed on how Spring Integration maps the Message object to the method arguments and return values.