
Learning Objectives
By the end of this chapter, you will be able to:
- Use event modules in Node.js
- Create an event emitter to enhance the functionality of existing code
- Build custom event emitters
- Use built-in modules and utilities
- Implement a timer module to get an API to schedule timer functions
In this chapter, we will use event emitters and built-in modules to avoid creating projects with deeply coupled dependencies.
Introduction
In the previous chapter, we talked about how event-driven programming is used in Node.js and how we can modify normal callback-based async operations to use async-await and promises. We know that the Node.js core API is built on async-driven architecture. Node.js has one event loop that does the processing for most async and event-based operations.
In JavaScript, the event loops run constantly and digest messages from the callback queue to make sure it is executing the right functions. Without events, we can see that the code is very deeply coupled. For a simple chatroom application, we would need to write something like this:
class Room {
constructor() {
this.users = [];
}
addUser(user) {
this.users.push(user);
}
sendMessage(message) {
this.users.forEach(user => user.sendMessage(message));
}
}
As you can see, because we are not using events, we need to keep a list of all the users in the room. When we add a user to the room, we also need to add the user to the list we created. When sending messages, we also need to iterate through all the users in our list and call the sendMessage method. Our user class would be defined like this:
class User {
constructor() {
this.rooms = {}
}
joinRoom(roomName, room) {
this.rooms[roomName] = room;
room.addUser(this);
}
sendMessage(roomName, message) {
this.rooms[roomName].sendMessage(message);
}
}
You can see how this is getting far too complicated; in order to join a chatroom, we need to add both the room and the current user to the room. When our application eventually gets very complicated, we will see that this raises an issue with the traditional approach. If this application ever requires network requests (async operations), it will get very complex because we would need to wrap all the code we wish to execute with the async operation. We might be able to pull that logic out but when we are dealing with applications that are being driven by an unknown number of random events, using event-driven programming has the benefit of making our code much easier to maintain.
The Traditional Approach versus Event-Driven Programming
As we mentioned in the introduction, in traditional programming patterns, we like to have a direct link between our components when we want them to communicate. This is shown in the following diagram:

Figure 9.1: Traditional programming approach
For a simple application that allows the user to update their profile and receive messages, we can see that we have four components:
- Agent
- Profile
- Votes
- Messages
The way these components interact with each other is by calling the appropriate methods in the component that wishes to communicate. By doing this, it makes the code very easy to understand, but we might have to pass the component reference over. Take our Agent class, for example:
class Agent {
constructor(id, agentInfo, voteObj, messageObj) {
this.voteObj = voteObj;
this.messageObj = messageObj;
}
checkMessage() {
if (this.messageObj.hasMessage()) {
const message = this.messageObj.nextMessate();
return message;
}
return undefined;
}
checkVote() {
if (this.voteObj.hasNewVote()) {
return true;
}
return false;
}
}
The Agent class must store the reference to the component it wants to communicate with in the future. Without it, there is no way for our component to communicate with other components. In the preceding example, the Agent object we created is very deeply coupled with everything else. It needs all the references for these objects when it is created, which makes our code very hard to decouple if we want to change something in the future. Consider the preceding Agent code. If we are going to add more features to it, we want the agent class to communicate with new features such as a social page, a live stream page, and so on. It is technically doable as long we add the reference to these objects in our constructor. By doing this, we risk having our code look like this in the future:
class Agent {
constructor(id, agentInfo, voteObj, messageObj, socialPage, gamePage, liveStreamPage, managerPage, paymentPage...) {
this.voteObj = voteObj;
this.messageObj = messageObj;
this.socialPage = socialPage;
this.gamePage = gamePage;
this.liveStreamPage = liveStreamPage;
this.managerPage = managerPage;
this.paymentPage = paymentPage;
...
}
...
}
When our application gets more and more complex, so does our Agent class. Since it has all the references in constructor, we are open to issues that can be caused by mistakenly passing the wrong type for a parameter. This is a common problem when we are trying to communicate between multiple components at once.
Eventing
Our previous approach – that is, dealing with component communication – was direct and really static. We need to store the component reference we want to communicate with and write very component-specific code when we want to send a message to it. In JavaScript, there is a new way of communicating, and it's called eventing.
Let's consider this example; the light that's passed to you by your friend is a way for you to receive events from your friend. In JavaScript, we can have objects that have the ability to emit events. By emitting events, we can create a new way of communicating between our objects. This is also called the observer pattern. The following diagram depicts the observer pattern:

Figure 9.2: The observer pattern
In this pattern, instead of calling specific methods in our component, the component that wants to initiate communication will simply emit an event. We can have multiple observers that observe events from the components. This way, we put the responsibility of consuming the message purely on the consumer. When the observer decides to observe the event, it will receive the event every time the component emits it. If the preceding complex example is implemented using events, it will look like this:
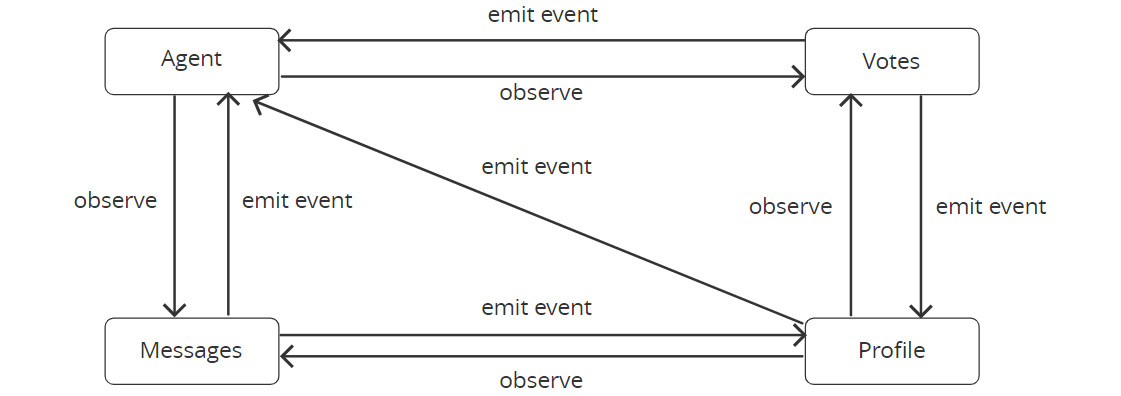
Figure 9.3: Observer patterns using events
Here, we can see that each component follows our observer pattern, and when we convert this into code, it will look something like this:
class Agent {
constructor(id, agentInfo, emitter) {
this.messages = [];
this.vote = 0;
emitter.on('message', (message) => {
this.messages.push(message);
});
emitter.on('vote', () => {
this.vote += 1;
})
}
}
Now, instead of taking all the references of all the components we want to communicate with, we are only passing one event emitter over, which handles all the messaging. This makes our code much more decoupled from the other components. This is basically how we implement an event observer pattern in our code. In real life, this can get more complicated. In the next exercise, we will go over a simple example to demonstrate how we can use the built-in event system in Node.js to emit events.
Exercise 67: A Simple Event Emitter
In the introduction, we talked about how we can use the event observer pattern to remove the references of all the components we want to communicate within our code. In this exercise, we will go over the built-in event module in Node.js, how we can create an EventEmitter, and how we can use it.
Perform the following steps to complete this exercise:
- Import the events module:
const EventEmitter = require('events');
We will be importing the events module built-in in Node.js. It provides a constructor that we can use to create our custom event emitters or create a class that inherits from it. Because this is a built-in module, there is no need to install it.
- Create a new EventEmitter:
const emitter = new EventEmitter();
- Try to emit an event:
emitter.emit('my-event', { value: 'event value' });
- Attach an event listener:
emitter.on('my-event', (value) => {
console.log(value);
});
To add an event listener to our emitter, we need to call the on method on our emitter with the event name and the function to be called when an event is emitted. When we add the event listener after we emit an event, we will see that the event listener is not called. The reason for this is that when we emitted our event before, there was no event listener attached for that event, and so it wasn't called.
- Emit another event:
emitter.emit('my-event', { value: 'another value' });
When we emit an event this time, we will see that our event listener is correctly called, and our event value is correctly printed out, like so:

Figure 9.4: Emitted event with the correct event value
- Attach another event listener for my-event:
emitter.on('my-event', (value) => {
console.log('i am handling it again');
});
We are not limited to only one listener per event – we can attach as many event listeners as possible. When an event is emitted, it will invoke all the listeners.
- Emit another event:
emitter.emit('my-event', { value: 'new value' });
The following is the output of the preceding code:

Figure 9.5: Output after emitting an event multiple times
When we emit the events again, we will see the first event we emitted. We will also see that it successfully printed out our messages. Notice that it kept the same order as when we attached the listener. When we emit an error, the emitter iterates through the array and invokes each listener, one by one.
- Create the handleEvent function:
function handleEvent(event) {
console.log('i am handling event type: ', event.type);
}
When we set our event listeners, we used anonymous functions. While this is easy and simple, it doesn't offer us all of the capability that EventEmitters offers:
- Attach the new handleEvent to a new type of event:
emitter.on('event-with-type', handleEvent);
- Emit the new event type:
emitter.emit('event-with-type', { type: 'sync' });
The following is the output of the preceding code:

Figure 9.6: Emitting the new event type
- Remove the event listener:
emitter.removeListener('event-with-type', handleEvent);
Because we are using a named function, we can use this function reference to remove listeners once we no longer need events to be passed to that listener.
- Emit the event after the listener has been removed:
emitter.emit('event-with-type', { type: 'sync2' });
The following is the output of the preceding code:

Figure 9.7: Output of the emit event after the listener has been removed
Because we just removed the listener to event-with-type, when we emit the event again, it will not be invoked.
In this exercise, we built a very simple event emitter and tested adding and removing listeners. Now, we know how to use events to pass messages from one component to another. Next, we will dig deeply into event listener methods and see what we can accomplish by calling them.
EventEmitter Methods
In the previous exercise, we went over a couple of methods we can call to emit events and attach listeners. We also used removeListener to remove the listener we had attached. Now, we will go over the various methods we can call on the event listeners. This will help us manage event emitters much more easily.
Removing Listeners
There are cases where we want to remove listeners from our emitter. Like we did in the previous exercise, we can remove a listener simply by calling removeListener:
emitter.removeListener('event-with-type', handleEvent);
When we call the removeListener method, we must provide it with an event name and function reference. When we are calling the method, it doesn't matter if the event listener is set or not; if the listener is not set to begin with, nothing will happen. If it is set, it will iterate through the array of the listener in our event emitter and remove the first occurrence of that listener, like so:
const emitter = new EventEmitter();
function handleEvent(event) {
console.log('i am handling event type: ', event.type);
}
emitter.on('event-with-type', handleEvent);
emitter.on('event-with-type', handleEvent);
emitter.on('event-with-type', handleEvent);
emitter.emit('event-with-type', { type: 'sync' });
emitter.removeListener('event-with-type', handleEvent);
In this code, we attached the same listener three times. This is allowed in event emitters when we are attaching event listeners; it is simply appended to the event listener array for that event. When we emit our event before removeListener, we will see that our listener is invoked three times:
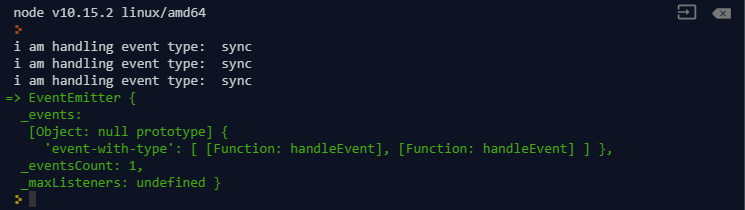
Figure 9.8: Listener invoked three times with the emit event before removing the listener
In this case, because we have three of the same listeners attached to our event, when we call removeListener, it will only remove the first listener in our listener array. When we emit the same event again, we will see that it will only runs two times:

Figure 9.9: After using removeListener, the first listener is removed
Removing all Listeners
We can remove a specific listener from our event emitter. But often, when we are dealing with several listeners on our emitter, there are cases where we want to remove all listeners. The EventEmitter class provides us with a method that we can use to remove all the listeners for a specific event. Consider the same example we used previously:
const emitter = new EventEmitter();
function handleEvent(event) {
console.log('i am handling event type: ', event.type);
}
emitter.on('event-with-type', handleEvent);
emitter.on('event-with-type', handleEvent);
emitter.on('event-with-type', handleEvent);
If we wanted to remove all the listeners for the event-with-type event, we would have to call removeListener multiple times. Sometimes, when we are sure that all the event listeners have been added by us and no other component or module, we can use a single method call to remove all the listeners for that event:
emitter.removeAllListeners('event-with-type');
When we are calling removeAllListeners, all we need to provide is the event name. This removes all the listeners attached to the event. After it is called, the event will have no handlers. Make sure you are not removing listeners that have been attached by another component if you are using this:
emitter.emit('event-with-type', { type: 'sync' });
When we emit the same event again after calling removeAllListeners, we will see that our program will output nothing:

Figure 9.10: Using removeAllListeners will output nothing
Attaching a One-Time Listener
There are times when we want our component to receive a certain event only once. We can accomplish this by using removeListener to make sure we remove the listener after it is called:
const EventEmitter = require('events');
const emitter = new EventEmitter();
function handleEvent(event) {
console.log('i am handling event type once : ', event.type);
emitter.removeListener('event-with-type', handleEvent);
}
emitter.on('event-with-type', handleEvent);
emitter.emit('event-with-type', { type: 'sync' });
emitter.emit('event-with-type', { type: 'sync' });
emitter.emit('event-with-type', { type: 'sync' });
Here, we can see that, in our handleEvent listener, we are also removing the listener after it has been executed. This way, we can make sure that our event listener will only be called once. When we run the preceding code, we will see this output:

Figure 9.11: Output after using the handleEvent listener
This does what we want, but it is not good enough. It requires us to keep a reference of the emitter inside the event listener. Also, it is not robust enough because there is no way for us to separate the listener logic into a different file. The EventEmitter class provided us with a very simple method that can be used to attach a one-time listener:
...
emitter.once('event-with-type', handleEvent);
emitter.emit('event-with-type', { type: 'sync' });
emitter.emit('event-with-type', { type: 'sync' });
emitter.emit('event-with-type', { type: 'sync' });
Here, we used the .once method when we were attaching our event listener. This tells our emitter that the function we are passing should only be invoked once and will be removed from the list of event listeners after it is invoked. When we run it, it will provide us with the same output as before:

Figure 9.12: Getting a one-time listener using the .once method
This way, we do not need to keep a reference to our event emitter in our listener. This makes our code more flexible and easily modularized.
Reading from Event Emitters
Until now, we have been setting and removing listeners from our event emitter. The EventEmitter class also provides us with several read methods where we can get more information about our event emitter. Consider the following example:
const EventEmitter = require('events');
const emitter = new EventEmitter();
emitter.on('event 1', () => {});
emitter.on('event 2', () => {});
emitter.on('event 2', () => {});
emitter.on('event 3', () => {});
Here, we added three types of event listeners to our emitter. For event 2, we set two listeners to it. To get the number of event listeners for a certain event in our emitter, we can call listenerCount. For the preceding example, if we want to know the number of event listeners that are attached to event 1, we can execute the following command:
emitter.listenerCount('event 1');
The following is the output of the preceding code:

Figure 9.13: Output showing the number of events attached to event 1
Similarly, we can check the number of event listeners attached to event 2 by executing the following command:
emitter.listenerCount('event 2');
The following is the output of the preceding code:

Figure 9.14: Output showing the number of events attached to event 2
There are times when we want to know about a list of event listeners that are attached to an event so that we can determine whether a certain handler is already attached, like so:
function anotherHandler() {}
emitter.on('event 4', () => {});
emitter.on('event 4', anotherHandler);
Here, we have attached one anonymous function to event 4 and another listener using a named function. If we want to know whether anotherHandler is already attached to event 4, we can attach a list of listeners to that event. The EventEmitter class provides us with a very easy method to invoke this:
const event4Listeners = emitter.listeners('event 4');
The following is the output of the preceding code:

Figure 9.15: Getting a list of listeners attached to the event using the EventEmitter class
Here, we can see the two listeners we have already attached to our emitter: one is our anonymous function, while the other is our named function, anotherHandler. To check whether our handler is already attached to the emitter, we can check to see if anotherHandler is in the event4Listeners array:
event4Listeners.includes(anotherHandler);
The following is the output of the preceding code:

Figure 9.16: Checking whether the handler is attached to the emitter
By using this method with the array includes a method, we can determine whether a function is already attached to our event.
Getting a List of Events That Have Listeners Registered
There are also times when we need to get a list of events that have listeners registered to them. This could be used to determine whether we have already attached listeners to an event or to see if an event name is already taken. Continuing from the preceding example, we can get that information by calling another internal method in the EventEmitter class:
emitter.eventNames();
The following is the output of the preceding code:

Figure 9.17: Getting information on event names using the EventEmitter class
Here, we can see that our event emitter has listeners attached to four different event types; that is, events 1-4.
Max Listeners
By default, each event emitter can only register a maximum of 10 listeners for any single event. When we attach more than the maximum, we will get a warning like this:

Figure 9.18: Warning when attaching more than 10 listeners for a single event
This is set as a preventive measure to make sure that we aren't leaking memory, but there are also times where we need to set more than 10 listeners for an event. If we are sure of that, we can update the default maximum by calling setMaxListeners:
emitter.setMaxListeners(20)
Here, we set the max listener default to 20. We can also set it to 0 or Infinity to allow an unlimited number of listeners.
Prepend Listeners
When we add listeners, they are appended to the end of the listener array. When an event is emitted, the emitter will call each of the assigned listeners in the order they were assigned. In some cases, where we need our listener to be invoked first, we can use a built-in method provided by the event emitter to accomplish this:
const EventEmitter = require('events');
const emitter = new EventEmitter();
function handleEventSecond() {
console.log('I should be called second');
}
function handleEventFirst() {
console.log('I should be called first');
}
emitter.on('event', handleEventSecond);
emitter.on('event', handleEventFirst);
emitter.emit('event');
Here, we attached handleEventSecond before handleEventFirst. When we emit the event, we will see the following output:

Figure 9.19: Emitting the event after attaching the second event before the first one
Because the event listeners are invoked in the order in which they are attached, we can see that when we emit the event, handleEventSecond is called first and handleEventFirst is called after. If we want handleEventFirst to be called first without modifying the order when they are attached using emitter.on(), we can call prependListener:
...
emitter.on('event', handleEventSecond);
emitter.prependListener('event', handleEventFirst);
emitter.emit('event');
The preceding code will yield the following output:

Figure 9.20: Ordering the event using prependListener
This can help us keep the order of our listeners and make sure the higher-priority listener is always called first. We will talk about concurrency in listeners next.
Concurrency in Listeners
In the previous chapters, we mentioned how we can attach multiple listeners to our emitter and how these work when an event is emitted. Later, we also talked about how to prepend listeners so that they are called first when an event is emitted. The reason we might want to prepend listeners is that when listeners are called, they are called one by one synchronously. Consider the following example:
const EventEmitter = require('events');
const emitter = new EventEmitter();
function slowHandle() {
console.log('doing calculation');
for(let i = 0; i < 10000000; i++) {
Math.random();
}
}
function quickHandle() {
console.log('i am called finally.');
}
emitter.on('event', slowHandle);
emitter.on('event', quickHandle);
emitter.emit('event');
Here, we have two listeners attached to the event type. When the event is emitted, it will call slowHandle first and quickHandle second. In slowHandle, we have a very large loop simulating a very time-consuming operation you can perform in the event listener. When we run the preceding code, we will first see doing calculation printed out, and then there will be a long wait until I am called finally is called. We can see that when the emitter invokes the event listeners, it does so synchronously. This might create issues for us because, in most cases, we do not want to wait for one listener to finish before we fire another one. There is an easy way to solve this, though: we can wrap our costly logic with the setImmediate function. The setImmediate function will wrap our logic into an immediately executed async block, meaning that the time-consuming loop is then non-blocking. We will cover the setImmediate function later in this book:
...
function slowHandle() {
console.log('doing calculation');
setImmediate(() => {
for(let i = 0; i < 10000000; i++) {
Math.random();
}
});
}
When we wrap our costly logic with setImmediate(), the code outputs doing calculation and I am called finally at almost the same time. By wrapping all the logic with setImmediate, we can make sure that it is invoked asynchronously.
Building Custom Event Emitters
There are cases where we want to build event emitting functionality into our own custom classes. We can do that by using JavaScript ES6 inheritance. This allows us to create a custom class while extending all the functionality of event emitters. For example, let's say we are building a class for fire alarms:
class FireAlarm {
constructor(modelNumber, type, cost) {
this.modelNumber = modelNumber;
this.type = type;
this.cost = cost;
this.batteryLevel = 10;
}
getDetail() {
return '${this.modelNumber}:[${this.type}] - $${this.cost}';
}
test() {
if (this.batteryLevel > 0) {
this.batteryLevel -= 0.1;
return true;
}
return false;
}
}
Here, we have a FireAlarm class with a constructor storing information about this fire alarm. It also has a couple of custom methods for testing the alarm, such as checking the battery level, and a getDetail method to return a string representing information about the alarm. After defining this class, we can use the FireAlarm class like this:
const livingRoomAlarm = new FireAlarm('AX-00101', 'BATT', '20');
console.log(livingRoomAlarm.getDetail());
The following is the output of the preceding code:

Figure 9.21: Defining the fire alarm class
Now, we want to set up events on the fire alarm we just created. One way we can do this is by creating a generic event emitter and storing that inside our FireAlarm object:
class FireAlarm {
constructor(modelNumber, type, cost) {
this.modelNumber = modelNumber;
this.type = type;
this.cost = cost;
this.batteryLevel = 10;
this.emitter = new EventEmitter();
}
...
}
And when we want to watch the events on the alarm, we must do something like this:
livingRoomAlarm.emitter.on('low-battery', () => {
console.log('battery low');
});
While this is perfectly fine and will work for our use cases, this is certainly not the most robust solution. Because our fire alarm is the one emitting the event, we want something like this:
livingRoomAlarm.on('low-battery', () => {
console.log('battery low');
});
By using .on directly on the fire alarm, we tell the future developer who's going to be working on this that our fire alarm is also an event emitter. But right now, our class definition does not allow one to be used. We can fix this by using class inheritance, where we can make our FireAlarm class extend the EventEmitter class. By doing that, it will have all the functionality of EventEmitter. We can modify our class like this:
class FireAlarm extends EventEmitter {
constructor(modelNumber, type, cost) {
this.modelNumber = modelNumber;
this.type = type;
this.cost = cost;
this.batteryLevel = 10;
}
...
}
By using the extends keyword followed by EventEmitter, we tell JavaScript that the FireAlarm class is a child class of EventEmitter. Therefore, it will inherit all the properties and methods from the parent. But this alone doesn't solve everything. When we run our code with the updated FireAlarm, we will see that an error is thrown:

Figure 9.22: An error is thrown when we run the code with the updated FireAlarm
This is happening because we are using a very customized class with a custom constructor and accessing this (this is used as a reference to the current object). We will need to make sure we call the parent constructor before that. To make this error disappear, we simply add a call to our parent constructor in our own constructor:
class FireAlarm extends EventEmitter {
constructor(modelNumber, type, cost) {
super();
this.modelNumber = modelNumber;
this.type = type;
this.cost = cost;
this.batteryLevel = 10;
}
...
}
Now, let's test our own custom EventEmitter:
livingRoomAlarm.on('low-battery', () => {
console.log('battery low');
});
livingRoomAlarm.emit('low-battery');
The following is the output of the preceding code:

Figure 9.23: Event listener for the 'low-battery' event triggered correctly
Here, we can see that we are treating livingRoomAlarm just like a regular EventEmitter, and when we emit the low-battery event, we see that the event listener for that event is triggered correctly. In the next exercise, we will make a very simple chatroom application with everything we have learned about EventEmitters.
Exercise 68: Building A Chatroom Application
Previously, we talked about how to attach event listeners and emit events on our event emitter. In this exercise, we will build a simple piece of chatroom managing software that communicates with events. We will create multiple components and see how we can make them communicate with each other.
Note:
The code files for this exercise can be found at https://github.com/TrainingByPackt/Professional-JavaScript/tree/master/Lesson09/Exercise68.
Perform the following steps to complete this exercise:
- Create a User class:
class User {
constructor(name) {
this.name = name;
this.messages = [];
this.rooms = {};
}
joinRoom(room) {
room.on('newMessage', (message) => {
this.messages.push(message);
});
this.rooms[room.name] = room;
}
getMesssages(roomName) {
return this.messages.filter((message) => {
return message.roomName === roomName;
})
}
printMessages(roomName) {
this.getMesssages(roomName).forEach((message) => {
console.log(`>> [${message.roomName}]:(${message.from}): ${message.message}`);
});
}
sendMessage(roomName, message) {
this.rooms[roomName].emit('newMessage', {
message,
roomName,
from: this.name
});
}
}
Here, we created a User class for our user. It has a joinRoom method that we can call to join that user to a room. It also has a sendMessage method, which will send the message to everyone in the room. When we join a room, we also listen to all the new message events from that room and append messages when we receive them.
- Create a Room class that extends the EventEmitter class:
class Room extends EventEmitter {
constructor(name) {
super();
this.name = name;
}
}
Here, we created a new Room class by extending the existing EventEmitter class. The reason we are doing this is that we want to have our own custom properties on our room object, and this creates more flexibility in our code.
- Create two users, bob and kevin:
const bob = new User('Bob');
const kevin = new User('Kevin');
- Create a room using our Room class:
const lobby = new Room('Lobby');
- Join bob and kevin to lobby:
bob.joinRoom(lobby);
kevin.joinRoom(lobby);
- Send a couple of messages from bob:
bob.sendMessage('Lobby', 'Hi all');
bob.sendMessage('Lobby', 'I am new to this room.');
- Print the message log for bob:
bob.printMessages('Lobby');
The following is the output of the preceding code:

Figure 9.24: Printing the message log for bob
Here, you can see that all of our messages are added correctly to the log of bob. Next, we will check the log of kevin.
- Print the message log for kevin:
kevin.printMessage('Lobby');
The following is the output of the preceding code:

Figure 9.25: Printing the message log for kevin
Even though we never explicitly did anything with kevin, he is receiving all the messages because he is listening to a new message event in the room.
- Send messages from kevin and bob:
kevin.sendMessage('Lobby', 'Hi bob');
bob.sendMessage('Lobby', 'Hey kevin');
kevin.sendMessage('Lobby', 'Welcome!');
- Check the message log for kevin:
kevin.printMessages('Lobby');
The following is the output of the preceding code:

Figure 9.26: Checking the message log for kevin
Here, we can see that all our messages are added correctly to our user objects. Because we are using event emitters, we avoided passing references of our receiver around. Also, because we are emitting the message event on our room and our users just listen to that event, we do not need to manually iterate through all the users in the room and pass the message on.
- Let's modify joinRoom and constructor so that we can remove the listener later:
class User {
constructor(name) {
this.name = name;
this.messages = [];
this.rooms = {};
this.messageListener = (message) => {
this.messages.push(message);
}
}
joinRoom(room) {
this.messageListener = (message) => {
this.messages.push(message);
}
room.on('newMessage', this.messageListener);
this.rooms[room.name] = room;
}
...
}
When we remove our listener, we need to pass a reference of that listener function, Because of this, we need to store that reference in the object so that we can use it to remove our listener later.
- Add leaveRoom:
class User {
...
leaveRoom(roomName) {
this.rooms[roomName].removeListener('newMessage', this.messageListener);
delete this.rooms[roomName];
}
}
Here, we are using the function reference we set in our constructor and passing it to the removeListener for our room. We also removed the reference in our object so that it can be released in memory later.
- Remove bob from room:
bob.leaveRoom('Lobby');
- Send a message from kevin:
kevin.sendMessage('Lobby', 'I got a good news for you guys');
- Check the message list for bob:
bob.printMessages('Lobby');
The following is the output of the preceding code:

Figure 9.27: Checking the message list for bob
Because bob left the room, and we removed the message listener, the newMessage event handler is not invoked again when a new message event is emitted.
- Check the message list for kevin:
kevin.printMessages('Lobby');
The following is the output of the preceding code:

Figure 9.28: Checking the message list for kevin again
When we check the message list for kevin, we should still able to see that he is still getting new messages from the room. If this was done using the traditional approach, we would need to write way more code to accomplish the same thing, which would be very error-prone.
In this exercise, we built a mock chat application with events in Node.js. We can see how easy passing events is in Node.js and how we can use it properly. Event-driven programming is not for every application, but when we need to connect multiple components together, it is much easier to implement that logic with events. The preceding code can still be improved – we can add notifications to the room when a user leaves a room and we can add checks while adding and removing rooms to make sure we aren't adding a duplicate room and make sure we are only removing rooms that we are in. Please feel free to extend this functionality on your own.
During this chapter we went over ways we can use events to manage the communication between components in our applications. In the next activity, we will build an event-driven module.
Activity 13: Building an Event-Driven Module
Suppose you are working for a software company that builds simulators for smoke detectors. You need to build a smoke detector simulator that raises an alarm when the detector's battery drops below a certain level. Here are the requirements:
- The detector needs to emit an alarm event.
- The smoke detector needs to emit a low battery event when the battery is below 0.5 units.
- Each smoke detector has 10 units of battery level when it's initially created.
- The test function on the smoke detector will return true if the battery level is above 0 and false if it's below 0. Each time a test function is run, it will decrease the battery by 0.1 units.
- You need to modify the provided House class to add the addDetector and demoveDetector methods.
- addDetector will take a detector object and attach a listener for the alarm event before printing out both low battery and an alarm event when they are emitted.
- The removeDetector method will take a detector object and remove the listeners.
Perform the following steps to complete this activity:
- Open the event.js file and find the existing code. Then, modify and add your own changes to it.
- Import the events module.
- Create the SmokeDetector class that extends EventEmitter and set batteryLevel to 10.
- Create a test method inside the SmokeDetector class to emit the low battery message.
- Create the House class, which will store the instances of our alarms.
- Create an addDetector method in the House class, which will attach the event listeners.
- Create a removeDetector method, which will help us remove the alarm event listeners we attached previously.
- Create a House instance called myHouse.
- Create a SmokeDetector instance called detector.
- Add the detector to myHouse.
- Create a loop to call the test function 96 times.
- Emit an alarm on the detector object.
- Remove the detector from the myHouse object.
- Test it to emit alarms on the detector.
Note
The solution for this activity can be found on page 617.
In this activity, we learned how we can model a smoke detector using event-driven programming. By using this approach, we eliminated the need to store multiple instances in our House object and avoided using many lines of code for their interactions.
In the section, we went over ways we can use the event system fully to help us manage complex communications in our application. In the next section, we will go over some of the best practices for working with event emitters.
Event-Driven Programming Best Practices
In the previous chapter, we mentioned ways we can create event-driven components using the event emitter and event emitter inheritance. But often, your code needs to be more than just able to work correctly. Having a better-managed code structure will not only make our code look less messy, it can also help us avoid making some avoidable mistakes in the future. In this section, we will go over some of the best practices when dealing with events in our code.
Recalling what we went over at the beginning of this chapter, we can pass events using the EventEmitter object:
const EventEmitter = require('events');
const emitter = new EventEmitter();
emitter.emit('event');
When we want to use the event emitter we have created, we will need to have its reference so that we can attach listeners and call the emit function on the emitter when we want to emit events later. This might cause our source code to be incredibly large, which will make future maintenance very difficult:
const EventEmitter = require('events');
const userEmitter = new EventEmitter();
const registrationEmitter = new EventEmitter();
const votingEmitter = new EventEmitter();
const postEmitter = new EventEmitter();
const commentEmitter = new EventEmitter();
userEmitter.on('update', (diff) => {
userProfile.update(diff);
});
registrationEmitter.on('user registered:activated', (user) => {
database.add(user, true);
});
registrationEmitter.on('user registered: not activated', (user) => {
database.add(user, false);
});
votingEmitter.on('upvote', () => {
userProfile.addVote();
});
votingEmitter.on('downvote', () => {
userProfile.removeVote();
});
postEmitter.on('new post', (post) => {
database.addPost(post);
});
postEmitter.on('edit post', (post) => {
database.upsertPost(post);
});
commentEmitter.on('new comment', (comment) => {
database.addComment(comment.post, comment);
});
To be able to use our emitters, we need to make sure that our emitter is accessible in the current scope. One way to do this is to create a file to keep all our emitters and the logic for attaching the event listeners. While this simplifies our code a lot, we will create very large source code that will confuse future developers, and maybe even us. To make our code more modularized, we can start by pulling all the listener functions into their respective files. Consider the following huge source code:
// index.js
const EventEmitter = require('events');
const userEmitter = new EventEmitter();
const registrationEmitter = new EventEmitter();
const votingEmitter = new EventEmitter();
const postEmitter = new EventEmitter();
const commentEmitter = new EventEmitter();
// Listeners
const updateListener = () => {};
const activationListener = () => {};
const noActivationListener = () => {};
const upvoteListener = () => {};
const downVoteListener = () => {};
const newPostListener = () => {};
const editPostListener = () => {};
const newCommentListener = () => {};
userEmitter.on('update', updateListener);
registrationEmitter.on('user registered:activated', activationListener);
registrationEmitter.on('user registered: not activated', noActivationListener);
votingEmitter.on('upvote', upvoteListener);
votingEmitter.on('downvote', downVoteListener);
postEmitter.on('new post', newPostListener);
postEmitter.on('edit post', editPostListener);
commentEmitter.on('new comment', newCommentListener);
Just by doing this, we have considerably reduced the file size of our code. But we can do more. One way to keep our code organized is to put all the emitters in one file and then import it when we need them. We can do that by creating a file called emitters.js and storing all the emitters in that file:
// emitters.js
const EventEmitter = require('events');
const userEmitter = new EventEmitter();
const registrationEmitter = new EventEmitter();
const votingEmitter = new EventEmitter();
const postEmitter = new EventEmitter();
const commentEmitter = new EventEmitter();
module.exports = {
userEmitter,
registrationEmitter,
votingEmitter,
postEmitter,
commentEmitter
};
What we did here is to create all our emitters in one file and set that emitter file to the exports module. By doing this, we can have all the emitters in one place and then, when we use the emitters, we can just import the file. This changes our code to the following:
// index.js
// Emitters
const {
userEmitter,
registrationEmitter,
votingEmitter,
postEmitter,
commentEmitter
} = require('./emitters.js');
... rest of index.js
Now, when we import emitter.js, we can use object restructuring to only pick the emitter we want. We can have multiple emitters in one file, and we can just pick the one we want when we require it. When we want to emit an event on the userEmitter, all we need to do is import the emitter into our code and send that event over:
const { userEmitter } = require('./emitters.js');
function userAPIHandler(request, response) {
const payload = request.payload;
const event = {
diff: payload.diff
};
userEmitter.emit('update', event);
}
We can see that whenever we want to use userEmitter, we can just import our emitter file over. This also applies when we want to attach listeners:
const { userEmitter } = require('./emitters.js');
userEmitter.on('update', (diff) => {
database.update(diff);
})
When we separate our emitters into different files, we not only make our code smaller but also make it more modular. By pulling our emitters into a separate file, it makes it very easy for us to reuse that file if we want to access our emitters in the future. By doing this, we do not need to pass our emitters around in functions, thus ensuring that our function declaration isn't cluttered.
Node.js Built-In Modules
In the previous section, we extensively went over the events module and learned everything about using events to achieve easy communication within our applications. The events module is a built-in module offered by Node.js, meaning that we do not need to use npm to install it. In this module, we will discuss how to use the fs, path, and util modules.
path
The path module is a built-in module that provides utilities that can help us work with file paths and filenames.
path.join(…paths)
Path.join() is a very useful function when we are working with directories and files in our applications. It allows us to join paths together and output a path string that we can use in the fs module. To use join paths, we can call the join method and provide it with a list of paths. Let's look at the following example:
const currentDir = '/usr/home/me/Documents/project';
const dataDir = './data';
const assetDir = './assets';
If we want to access the data directory in our current directory, we can use the path.join function to combine different paths into one string:
const absoluteDataDir = path.join(currentDir, dataDir);
The following is the output of the preceding code:

Figure 9.29: Using the path.join function to combine different paths
It also works with .. and ., if you are familiar with how the POSIX system signifies the current directory and parent directories. .. represents the parent directory while . represents the current directory. For example, the following code can give us the path of the parent directory of our current directory:
const parentOfProject = path.join(currentDir, '..');
The following is the output of the preceding code:

Figure 9.30: Showing the parent directory of our current directory
path.parse(path)
When we want to get information about a file path, we can use the path.parse() function to get its root directory, base directory, filename, and extension. Let's look at the following example:
const myData = '/usr/home/me/Documents/project/data/data.json';
If we want to parse this file path, we can call path.parse with the myData string to get the different path elements:
path.parse(myData);
This will generate the following output:

Figure 9.31: File path parsed using the path.parse function
Here, we can see that our file path includes a filename with a base name of data.json. The extension is .json and the filename is data. It also parsed out the directory in which the file is present.
path.format(path)
In the previous parse function, we managed to parse out our file path into its respected components. We can use path.format to combine that information into a single string path. Let's have a look at it:
path.format({
dir: '/usr/home/me/Pictures',
name: 'me',
ext: '.jpeg'
});
The following is the output of the preceding code:

Figure 9.32: Combining information into a single string path using path.format
This gives us the file path from the components we supplied to it.
fs
The fs module is a built-in module that provides APIs for you so that you can interact with the host filesystem. It is very useful when we need to work with files in our application. In this section, we will talk about how we can use the fs module in our application with async and await. Later, we will go over the recently added fs.promises API, which provides the same functionality but returns a promise rather than using callbacks.
Note
In this section, we will be using a POSIX system. If you are using a Windows system, make sure that you update the file path to the Windows equivalent. To import the fs module into your code, execute the following command:
const fs = require('fs');
fs.createReadStream(path, options)
When we are dealing with large files in Node.js, it is advised to always use stream. To create a read stream, we can call the fs.createReadStream method. It will return a stream object that we can attach to event handlers so that they get the content of the file:
const stream = fs.createReadStream('file.txt', 'utf-8');
fs.createWriteStream(path, options)
This works similar to createReadStream, but instead creates a writable stream that we can use to stream contents to it:
const stream = fs.createWriteStream('output', 'utf-8');
fs.stat(path, callback)
The fs.stat method is very useful when we need detailed information about the file we are accessing. We also see many developers use fs.stat to check for the existence of the file before calling, opening, reading, or writing data to it. While checking the file's existence using stat doesn't create any new issues, it is not recommended to do this. We should just use the error that's returned from the function we are using; this will eliminate any extra layers of logic and can reduce the number of API calls.
Consider the following example:
const fs = require('fs');
fs.stat('index.js', (error, stat) => {
console.log(stat);
});
This will give us output similar to the following:
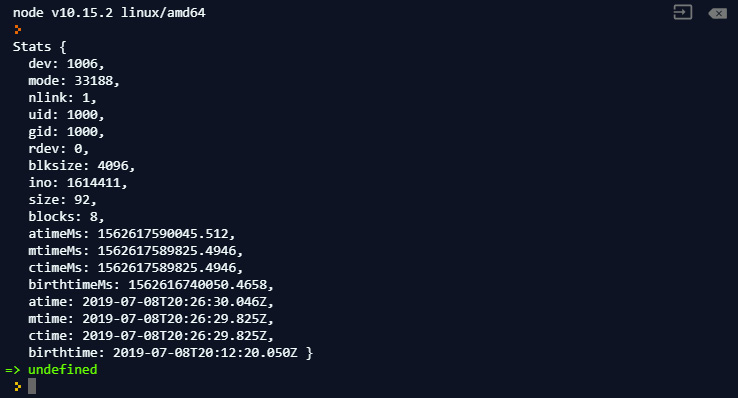
Figure 9.33: Output after using the fs.stat method
fs.readFile(path, options, callback)
This is the function that most people will be familiar with. When supplied with a file path, the method will attempt to read the entire content of a file. It will do so in an async fashion, and the callback will be called with the entire content of the file. When the file doesn't exist, the callback will be called with an error.
Consider the following example:
const fs = require('fs');
fs.readFile('index.js', (error, data) => {
console.log(data);
});
This will give us the following output:

Figure 9.34: Reading the entire content of a file using the fs.readFile function
This didn't output the result we wanted. This is because we didn't supply the encoding in our options; to read the contents into a string, we will need to supply encoding options. This changes our code into the following:
fs.readFile('index.js', 'utf-8', (error, data) => {
console.log(data);
});
Now, when we run the preceding code, it will give us the following output:
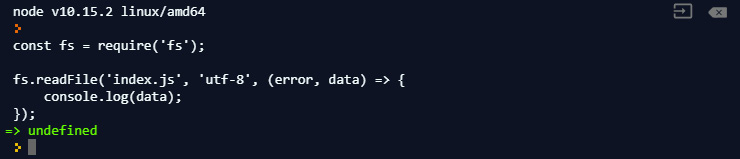
Figure 9.35: Reading the entire content of a file using the fs.readFile function after encoding
We just made a program that output itself.
fs.readFileSync(path, options)
This function does the same thing as the readFile method, but executes the read function synchronously, meaning it will block execution. During program startup, it is recommended – and is expected – to be called only once. The synchronous function is not recommended when it needs to be invoked more than once.
fs.writeFile(file, data, options, callback)
The writeFile function writes data to the file we specified. It will also replace the existing file unless you pass an append as flag to options.
fs.writeFileSync()
Just like readFileSync, it does the same as its non-sync counterpart. The difference between them is that this does the operation synchronously.
Exercise 69: Basic Usage of the Fs Module
In this exercise, we will be using the fs module to read and write files in our application. We will be using the methods we covered in the preceding section and will use them with callbacks. Then, we will promisify them so that we can use them with async and await.
Perform the following steps to complete this exercise:
- Create a new file called test.txt:
fs.writeFile('test.txt', 'Hello world', (error) => {
if (error) {
console.error(error);
return;
}
console.log('Write complete');
});
If you did this correctly, you will see the following output:

Figure 9.36: New test.txt file created
You should be able to see the new file in the same directory as your source code:

Figure 9.37: New file created in the same directory as your source code
- Read its contents and output it in the console:
fs.readFile('test.txt', 'utf-8', (error, data) => {
if (error) {
console.error(error);
}
console.log(data);
});
This simply reads our file back; we are supplying an encoding because we want the output to be a string instead of a buffer. This will give us the following output:

Figure 9.38: Reading the file's content using fs.readFile
- Try to read from a file that doesn't exist:
fs.readFile('nofile.txt', 'utf-8', (error, data) => {
if (error) {
console.error(error);
}
console.log(data);
});
When we try to open a file that doesn't exist, our callback will be called with an error. It is recommended that we handle any file-related errors inside the handler instead of creating a separate function to check it. When we run the preceding code, we will get the following error:

Figure 9.39: Error thrown when we try to read a file that doesn't exist
- Let's create our own version of readFile with promises:
function readFile(file, options) {
return new Promise((resolve, reject) => {
fs.readFile(file, options, (error, data) => {
if (error) {
return reject(error);
}
resolve(data);
})
})
}
This is the same thing we could have done with any callback-based methods, as follows:
readFile('test.txt', 'utf-8').then(console.log);
This will generate the following output:

Figure 9.40: Creating a readFile using callback-based methods
- Let's use file stat to get information about our file. After Node.js 10.0.0, fsPromises was introduced, so instead of converting them into promises and returning functions manually, we can simply import fsPromise and call the promised counterpart:
const fsPromises = require('fs').promises;
fsPromises.stat('test.txt').then(console.log);
This will generate the following output:

Figure 9.41: Calling the promise counterpart by importing fspromise
Here, you can get the size, creation time, modification time, and permission information about our file.
In this exercise, we went over some of the basic usages of the fs module. It is a very useful module in Node.js. Next, we will talk about how we should handle large files in Node.js.
Handling Large Files in Node.js
In the previous exercise, we went over how we can use the fs module to read file contents in Node.js. This works well when we are dealing with small files that are smaller than 100 MB. When we are dealing with large files (> 2 GB), sometimes, it is not possible to read the entire file using fs.readFile. Consider the following scenario.
You are given a 20 GB text file and you need to process the data in the file line by line and write the output into an output file. Your computer only has 8 GB of memory.
When you are using fs.readFile, it will attempt to read the entire content of the file into the computer's memory. In our case, this won't be possible because our computer does not have enough memory installed to fit the entire content of the file we are processing. Here, we need a separate approach to this problem. To process large files, we need to use streams.
The stream is an interesting concept in programming. It treats data not as a single block of memory but a stream of data that comes from the source one chunk at a time. This way, we do not need to fit all the data inside the memory. To create a file stream, we simply use the provided method in the fs module:
const fs = require('fs');
const stream = fs.createReadStream('file.txt', 'utf-8');
By using fs.createReadStream, we create a file stream that we can use later to get the contents of the file. We call this function just like fs.readFile, with the file path and encoding. The difference with this is that this doesn't require a callback to be supplied because it simply returns a stream object. To get the file content from the stream, we need to attach the event handlers to the stream object:
stream.on('data', data => {
// Data will be the content of our file
Console.log(data);
// Or
Data = data + data;
});
Inside the event handler for the data event, we will get the content of the file, and this handler will be called multiple times when the file is read by the stream. When we finish reading the file, we will also get an event emitted on the stream object to handle this event:
stream.on('close', () => {
// Process clean up process
});
Util
Util is a module that includes a lot of functions that help with the Node.js internal APIs. These can also be useful in our own development.
util.callbackify(function)
This is very useful when we are working on async and await code with existing legacy callback-based code. To use our async function as a callback-based function, we can call util.callbackify function. Let's consider the following example:
async function outputSomething() {
return 'Something';
}
outputSomething().then(console.log);
The following is the output of the preceding code:

Figure 9.42: Using the async function as a callback-based function
To use this async function with callbacks, simple call callbackify:
const callbackOutputSomething = util.callbackify(outputSomething);
Then, we can use it like this:
callbackOutputSomething((err, result) => {
if (err) throw err;
console.log('got result', result);
})
This will generate the following output:

Figure 9.43: Using the async function by calling the callbackify function
We have successfully converted an async function into a legacy function that uses callbacks. This is very useful when we need to keep backward compatibility.
util.promisify(function)
There is also a very useful method in the util module to help us promisify callback-based functions. This method takes a function as its parameter and will return a new function that returns a promise, like so:
function callbackFunction(param, callback) {
callback(null, 'I am calling back with: ${param}');
}
callbackFunction takes a parameter and will call the callback function we supplied with a new string. To convert this function to use promises, we can use the promisify function:
const promisifiedFunction = util.promisify(callbackFunction);
This returns a new function. Later, we can use it as a function that returns a promise:
promisifiedFunction('hello world').then(console.log);
The following is the output of the preceding code:

Figure 9.44: The promisify function is used for callbacks
There are also a number of type checking methods in the util module, which are very useful when we are trying to figure out the types of variables in our application.
Timer
The timer module gives us an API for scheduling timer functions. We can use it to set delays on parts of our code or to execute our code at desired intervals. Unlike the previous modules, the timer module does not need to be imported before we use it. Let's have a look at all the timer functions that are provided in Node.js and how we can use them in our application.
setInterval(callback, delay)
When we want to set up a function that is repeatedly executed by Node.js, we can use the setInterval function while providing a callback and a delay. To use it, we call the setInterval function with a function we want to run and a delay in milliseconds. For example, if we want to print the same message every second, we can achieve this like this:
setInterval(() => {
console.log('I am running every second');
}, 1000);
When we run the preceding code, we will see the following output:

Figure 9.45: Setting up a repeatedly executing function using the setInterval function
Here, we can see that the message is printed out every second.
setTimeout(callback, delay)
Using this function, we can set a one-time delayed invocation of a function. When we want to wait a certain amount of time before we run the function, we can use setTimeout to achieve this. In the previous sections, we also used setTimeout to simulate network and disk requests in our tests. To use it, we need to pass a function we want to run and a delay integer in milliseconds. If we want to print a message after 3 seconds, we can use the following code:
setTimeout(() => {
console.log('I waited 3 seconds to run');
}, 3000);
This will generate the following output:
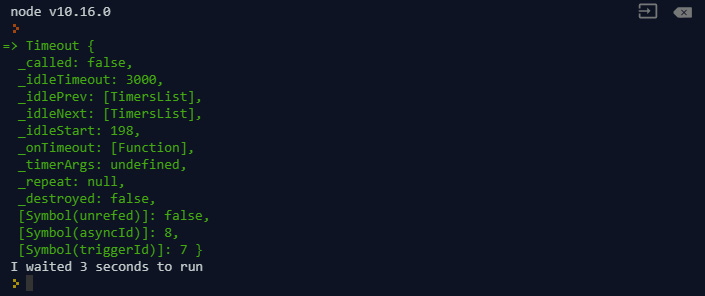
Figure 9.46: Setting a one-time delayed invocation of a function using the setTimeout function
You will see that the message is printed out after 3 seconds. This is very useful when we need delayed invocation of a function or just want to use it to mock API calls in our tests.
setImmediate(callback)
By using this method, we can push a function to be executed at the end of the event loop. If you want to invoke a certain piece of code after everything has completed running in the current event loop, you can use setImmediate to achieve this. Have a look at the following example:
setImmediate(() => {
console.log('I will be printed out second');
});
console.log('I am printed out first');
Here, we made a function that prints out I will be printed out second, which will be executed at the end of the event loop. When we execute this, we will see the following output:

Figure 9.47: Function to be executed at the end of the event loop pushed using setimmediate
We can also achieve the same by using setTimeout and using 0 as the delay parameter:
setTimeout(() => {
console.log('I will be printed out second');
}, 0);
console.log('I am printed out first');
clearInterval(timeout)
When we use setInterval to create a recurring function, the function also returns an object representing the timer. When we want to stop the interval from running, we can use clearInterval to clear the timer:
const myInterval = setInterval(() => {
console.log('I am being printed out');
}, 1000);
clearInterval(myInterval);
When we run the preceding code, we will see no output being produced because we cleared the interval we just created and it never got the chance to run:

Figure 9.48: Stopping the interval from running using the clearInterval function
If we want to run this interval for 3 seconds, we can wrap clearInterval inside setTimeout so that it will clear our interval after 3.1 seconds. We are giving 100 ms extra because we want the third invocation to happen before we clear the interval:
setTimeout(() => {
clearInterval(myInterval);
}, 3100);
When we run the preceding code, we will see our output printed out 3 times:
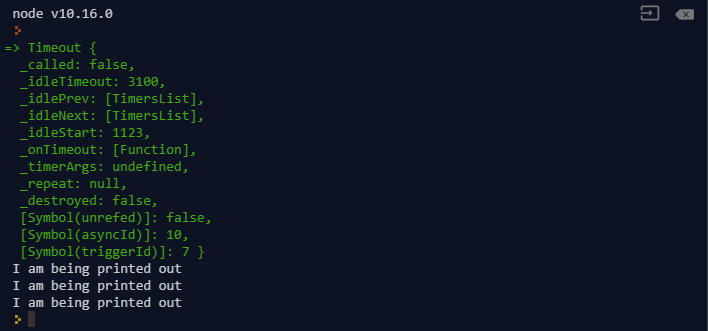
Figure 9.49: Using setTimeout to wrap clearInterval within the specified seconds
This is very useful when we are dealing with multiple scheduled timers. By clearing them, we can avoid issues such as memory leaks and unexpected issues in our application.
Activity 14: Building a File Watcher
In this activity, we will create a file watcher using timer functions that will indicate any modifications in the file. These timer functions will set up a watch on the file and will generate output every time there is a change in the file. Let's get started:
- We will need to create a fileWatcher class.
- A file watcher will be created with a file to watch. If no file exists, it will throw an exception.
- The file watcher will take another parameter to store the time between checks.
- The file watcher needs to allow us to remove the watch on the file.
- The file watcher needs to emit the file change event when the file is changed.
- When the file is changed, the file watcher will emit the event with the new content of the file.
Open the filewatcher.js file and do your work in that file. Perform the following steps to complete this activity:
- Import our libraries; that is, fs and events.
- Create a file watcher class that extends the EventEmitter class. Use a modify timestamp to keep track of the file change.
- Create the startWatch method to start watching the changes on the file.
- Create the stopWatch method to stop watching the changes on the file.
- Create a test.txt file in the same directory as filewatch.js.
- Create a FileWatcher instance and start watching the file.
- Modify some content in test.txt and save it.
- Modify startWatch so that it also retrieves the new content.
- Modify startWatch so that it emits events when the file is modified and an error when it encounters an error.
- Attach event handlers to the error and change it in fileWatcher.
- Run the code and modify test.txt to see the result.
Note
The solution for this activity can be found on page 620.
If you see the preceding output, this means your event system and file reading is working perfectly. Please feel free to extend this functionality on your own. You can also try to enable watching the entire folder or multiple files. In this activity, we just created a simple fileWatcher class using the filesystem module and event-driven programming. Using this helped us create a much smaller code base and gave us more clarity when we read the code directly.
Summary
In this chapter, we talked about the event system in JavaScript and how we can use the built-in events module to create our own event emitters. Later, we went over a few useful built-in modules and their sample usage. Using event-driven programming can help us avoid interlaced logic when we are writing a program that requires multiple components to communicate with each other. Also, by using built-in modules, we can avoid adding modules that provide the same functionality and avoid creating projects with huge dependencies. We also mentioned how we can use timers to control program execution, fs to manipulate files, and path to combine and get useful information about our file path. These are all very useful modules that can help us later when building applications. In the next chapter, we will go over how we can use functional programming in JavaScript.