
Learning Objectives
By the end of this chapter, you will be able to:
- Import and export functions and objects in JavaScript for code reusability
- Use JavaScript ES6 classes to reduce code complexity
- Implement object-oriented programming concepts in JavaScript
- Create private variables for an object using encapsulation
- Convert ES6 to generic JavaScript using Babel
- Create and publish an npm package in JavaScript
- Combine modules using composability and strategies to create higher-level modules
In this chapter, we will learn about the importance of reusable code in modern JavaScript and how ES6 has introduced syntax for easily creating and using modules. We will create a JavaScript module that can be imported and used by different endpoints of our API.
Introduction
In the previous chapter, we built an API using Node.js and Express. We talked about designing the API structure, HTTP methods, and JSON Web Token (JWT) authentication. In this chapter, we'll be looking at various aspects of JavaScript modules and module-based design.
Modules are important for programming productivity, breaking software into reusable modules. The modular design encourages developers to build software out of small, single-focus components. You may be familiar with popular UI libraries, such as Bootstrap, Material-UI, and jQuery UI. These are all sets of components – minimal graphical elements purposefully built so that they can be used in many situations.
Due to the extensive use of external libraries for both graphical elements and programming aspects, most developers are already familiar with the use of modules. That said, it is much easier to use a module than to create one or to write your application in a modular way.
Note Components, Modules, and ES6 Modules
There are various opinions as to the exact usage and relation of these terms. In this chapter, we refer to components as visual widgets that can be used on a website.
We'll refer to a module as a source code that is written in one file to be imported and used in another. As most components exist as reusable code, often imported by a script tag, we'll consider them modules. Of course, when you import the Bootstrap library, for example, you import all the components. That said, most libraries offer the ability to compile and import the specific components that are needed – for example, https://getbootstrap.com/docs/3.4/customize/.
When we refer to ES6 modules, we're talking about the specific syntax added to JavaScript in ES6 that allows for exporting a module in one file and importing it in another. While ES6 modules are part of the ES6 standard, it's important to remember that they're not currently supported by browsers. Making use of them requires a pre-compile step, which we will cover in this chapter.
The recent explosion in the popularity and productivity of JavaScript is in part due to the node package manager (npm) ecosystem. Whether doing frontend or backend development with JavaScript, you're bound to use npm at some point. Hundreds of useful packages are made available to developers through the simple npm install command.
npm has become the largest source of modularized code on the internet, out of any programming language. npm now contains nearly a half a billion packages.
All packages on npm are, at their core, modules. By grouping related functions as a module, we make that functionality reusable across multiple projects or multiple aspects of a single project.
All great packages on npm have been built in a way that makes reuse across many projects easy. A good datetime picker widget, for example, can be used across thousands of projects, saving many hours of development time and likely yielding a better end product.
In this section, we'll look at modular JavaScript and how we can improve our code by writing JavaScript in a modular way. This includes the basic syntax of exporting and importing, but, beyond that, there are several patterns and techniques that can be used to write better modules, such as concepts from object-oriented programming that are useful in module development. However, JavaScript is technically prototype-oriented, which is a specific style of object-oriented programming that differs from the classic object-oriented style in its use of prototypes as opposed to classes. We'll discuss prototypes and classes later in the chapter.
Dependencies and Security
While modules are a powerful technique, they can also get out of hand if not used with care. Each package added to a node.js project, for example, contains its own dependencies. So, it's important to keep an eye on the packages you're using to make sure you don't import anything malicious. There is a useful tool at the website http://npm.broofa.com, where you can upload a package.json file and get a visualization of the dependencies.
If we take the package.json file from Exercise 1, Creating an Express Project with an Index Route, in Chapter 4, RESTful APIs with Node.js, as an example, it contained only four dependencies:
"dependencies": {
"express": "^4.16.4",
"express-validator": "^5.3.1",
"jwt-simple": "^0.5.6",
"mongodb": "^3.2.3"
}
Yet, when we upload this package.json file, we can see that our 4 dependencies balloon out to over 60 when accounting for sub-dependencies:
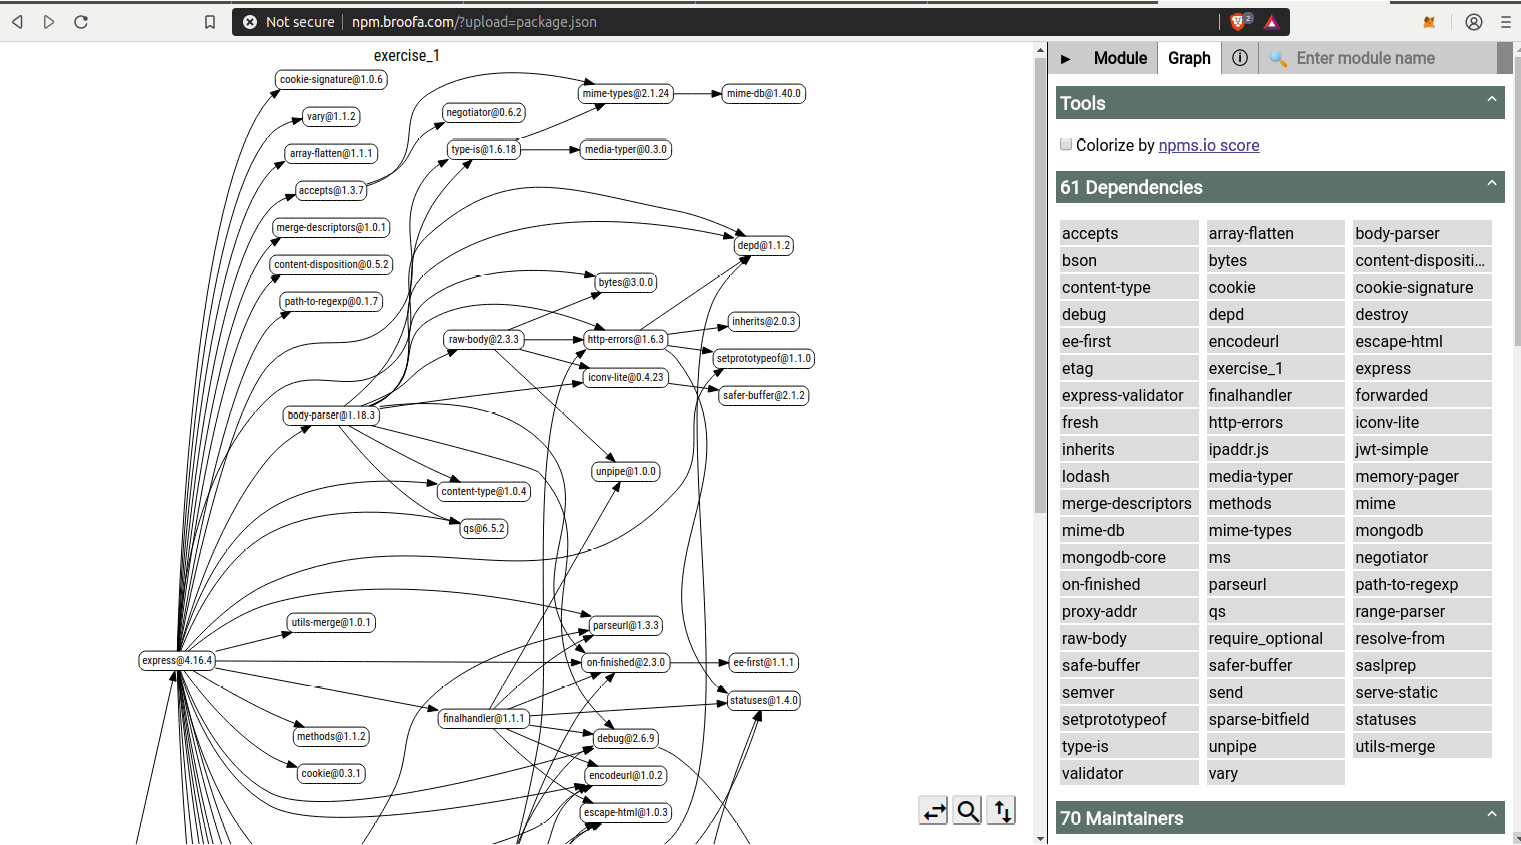
Figure 5.1: 61 dependencies in package.json
This highlights the risk associated with module-based design and the need for thoughtful design when making and using modules. Badly written packages or modules can have unintended consequences. In recent years, there have been stories of widely used packages becoming malicious. For example, the event-stream package was downloaded over 8 million times in 2.5 months in 2018. It was found that the once-legitimate module had been updated in an attempt to steal cryptocurrency from users' machines. Aside from security risks and bugs, there is also the risk of polluting the global namespace or lowering the performance of the parent project.
Note npm audit
As a response to cases of malicious dependencies or sub-dependencies, npm added an audit command, which can be used to check a package's dependencies for modules known to be malicious. Run npm audit in the directory of a Node.js project to check your project's dependencies. The command also runs automatically as part of npm install when you're installing projects downloaded from places such as GitHub.
Other Costs of Modularity
Other costs associated with modular design include:
- The cost of loading multiple parts
- The cost of bad modules (security and performance)
- A quick increase in the total amount of modules used
Overall, these costs are generally acceptable, but caution should be used. When it comes to the overhead associated with loading many modules, pre-compilers such as webpack and babel can help by converting your whole program to a single file.
A few things to bear in mind when you're creating a module or importing one are the following:
- Does using a module hide significant complexity or save a significant amount of work?
- Is the module from a trusted source?
- Does it have a lot of sub-dependencies?
Take the npm package, isarray, for example. The package contains a single function, which simply runs:
return toString.call(arr) == '[object Array]';
This is an example where the answer to the first question, "Does using a module hide significant complexity?", is no. The second question – "Is it a trusted source?" Not particularly. Finally, in answer to the last question about sub-dependencies, it does not – and this is a good thing. Given the simplicity of this module, it is recommended to just write your own function based on the preceding single line.
Carelessly installing packages that add little benefit while increasing the complexity of the project should be avoided. If you consider the three points mentioned, you likely won't find it worth it to import packages such as isarray.
Reviewing Imports and Exports
In the last section, we made use of importing and exporting without going into depth on the topic. Whenever we created a new route, we made sure to put it in its own file in the routes folder. If you recall, all of our route files ended with a line exporting a router object:
module.exports = router;
We also made use of our routes using the built-in require function from Node.js:
let light = require('./routes/devices/light');
Separation of Concerns
When it comes to designing a module, one of the key concepts is the separation of concerns. Separation of concerns means we should separate our software into parts that deal with a single concern of the program. A good module will focus on doing a single aspect of functionality well. Popular examples include:
- MySQL – A package with several methods for connecting to and using MySQL databases
- Lodash – A package for efficiently parsing and working with arrays, objects, and strings
- Moment – A popular package for working with dates and times
Within these packages or within our own projects, there is often a further separation into sub-modules.
Note ES6
We've already used some ES6 features in prior chapters, but, as a reminder, ES6, or the longer ECMAScript, is short for European Computer Manufacturer's Association Script. ECMA is the organization responsible for the standardization of standards, including the new version of JavaScript, which was standardized in 2015.
ES6 Modules
When writing JavaScript with Node.js, the ability to import modules using the built-in require() function has long been used. As this feature was useful, many frontend developers began making use of it by pre-processing their JavaScript with compilers such as Babel. A JavaScript pre-compiler processes code that normally wouldn't work on most browsers and generates a new JavaScript file that is compatible.
As there was a large demand for an import style function in JavaScript, it was eventually added to the language in the ES6 version. At the time of writing, the latest version of most browsers is almost completely ES6 compatible. Yet the use of import can't be taken for granted, as many devices will continue to run older versions for years.
The rapid standardization of ES6 shows us that, going forward, ES6 imports will be the most popular method.
In the last chapter, we made use of the Node.js require method for importing a module. For example, take this line:
const express = require('express');
The ES6 import function, on the other hand, has the following syntax:
import React from 'react';
The ES6 import function also allows you to import a subsection of a module, rather than importing the whole thing. This is one capability ES6's import has over Node.js' require function. Importing single components helps to save memory in your application. If we wanted to use just the button component from the React version of Bootstrap, for example, we could import just that:
import { Button } from 'reactstrap';
If we want to import additional components, we just add them to the list:
import { Button, Dropdown, Card } from 'reactstrap';
Note React
You've probably seen this style of importing if you've ever used the popular frontend framework React. The framework is known for its focus on modularity. It takes interactive frontend elements and packages them as components.
In traditional vanilla JavaScript/HTML, projects are often split into HTML/CSS/JavaScript with various components spread out across those files. React instead packages the related HTML/CSS/JavaScript of an element into a single file. That component is then imported into another React file and used as an element in the application.
Exercise 22: Writing a Simple ES6 Module
Note
This chapter has a starting point directory, which can be found at https://github.com/TrainingByPackt/Professional-JavaScript/tree/master/Lesson05/start.
The finished code for this exercise can be found at https://github.com/TrainingByPackt/Professional-JavaScript/tree/master/Lesson05/Exercise22.
In this exercise, we'll export and import a module using ES6 syntax:
- Change directories to /Lesson_05/start/; we'll use this as our starting point.
- Install project dependencies using npm install.
- Create the js/light.js file with the following code:
let light = {};
light.state = true;
light.level = 0.5;
var log = function () {
console.log(light);
};
export default log;
- Open the file called js/viewer.js. This is the JavaScript that will run on our page. At the top of the file, add:
import light from './light.js';
- At the bottom of js/viewer.js, add:
light();
- js/viewer.js is already being included in index.html, so we can now start the program with npm start.
- With the server running, open a web browser and go to localhost:8000. Once there, press F12 to open the developer tools.
If you've done everything right, you should see our object being logged in the Google Chrome console:

Figure 5.2: Object logged in the Google Chrome console
Objects in JavaScript
If you've been writing JavaScript for even a short time, you'll quickly come across the object type. JavaScript is designed using prototypes, a type of object-based programming. An object in JavaScript is a variable that can contain multiple properties. These properties can point to values, sub-objects, or even functions.
Every variable in a JavaScript program is either an object or a primitive. A primitive is a more basic type that contains only a single piece of information, with no properties or methods. What complicates JavaScript and makes objects even more important is that even most basic types such as strings and numbers are wrapped in an object once assigned to a variable.
For example:
let myString = "hello";
console.log(myString.toUpperCase()); // returns HELLO
console.log(myString.length); // returns 5
The preceding code shows that even a basic string variable in JavaScript has properties and methods.
A true primitive has no properties or methods. For example, numbers declared directly are primitives:
5.toString(); // this doesn't work because 5 is a primitive integer
let num = 5;
num.toString(); // this works because num is a Number object
Prototypes
As mentioned earlier, JavaScript is a prototype-oriented language. This is a variation on object-oriented programming where prototypes are used instead of classes. A prototype is an object that is used as a starting point for another. For example, in the last section, we looked at a simple string variable:
let myString = "hello";
As we saw in the last section, myString comes with some built-in functions, such as toUpperCase(), and attributes, such as length. Behind the scenes, myString is an object that is being created from the string prototype. This means that all the properties and functions that exist in the string prototype also exist in myString.
JavaScript objects contain a special attribute called __proto__ property, which contains the parent prototype for an object. To look at this, let's run console.dir(myString) in the Google Chrome Developer Console:

Figure 5.3: Prototypes in JavaScript (String)
Running the command returns String, an object that contains several methods. The built-in String object itself has a prototype. Next, run console.dir(myString.__proto__.__proto__):

Figure 5.4: Prototypes in JavaScript (Object)
Running it again with an additional __proto__ property will return null. All prototypes in JavaScript eventually lead to null, which is the only prototype that itself does not have a prototype:
Figure 5.5: Additional _proto_ returning null
This relationship, where one prototype leads to another and so on, is referred to as the prototype chain:

Figure 5.6: Prototype chain
Whenever you use an attribute of a variable in JavaScript, it starts at the current object, and, if it doesn't find it, it looks in the parent prototype. So, when we run myString.toUpperCase(), it first looks in myString. After not finding a method of that name, it checks String, where it finds the method. In the case that String did not contain the method, it would check the Object prototype, and then it would reach null, at which point a not found error is returned.
JavaScript provides the syntax to redefine the behavior of any prototype function, whether built-in or user defined. This can be done using the following command:
Number.prototype.functionName = function () {
console.log("do something here");
}
In the next exercise, we'll modify the built-in Number prototype to give it some extra functionality. Remember that this technique can be applied to both built-in and custom-built prototypes.
Exercise 23: Extending the Number Prototype
In this exercise, we'll look at an example of extending one of JavaScript's built-in prototypes, Number, to include some additional functions. After step 1, see whether you can come up with the second solution yourself:
- double (returns the value multiplied by two)
- square (returns the number multiplied by itself)
- Fibonacci (returns n in Fibonacci sequence, where each number is the sum of the previous two numbers)
- factorial (returns the result of multiplying all numbers between 1 and n)
Here are the steps to follow:
- In a new folder, create a file called number.js. We'll start by adding a double function to the Number prototype. Notice the use of this.valueOf() to retrieve the value of the number:
Number.prototype.double = function () {
return this.valueOf()*2;
}
- Next, following the same pattern, we'll add a solution for the square of any number:
Number.prototype.square = function () {
return this.valueOf()*this.valueOf();
}
- Again, we'll follow the same pattern, though the solution to this one is a bit trickier, as it uses recursion with memorization, and the use of the BigInt prototype:
Number.prototype.fibonacci = function () {
function iterator(a, b, n) {
return n == 0n ? b : iterator((a+b), a, (n-1n))
}
function fibonacci(n) {
n = BigInt(n);
return iterator(1n, 0n, n);
}
return fibonacci(this.valueOf());
}
Note BigInt (Big Integer)
You'll notice in the preceding step that we used the BigInt keyword. BigInt, like Number, is another prototype built into JavaScript. It was the first new primitive in ES6. The main difference is that BigInt is safe for dealing with very large numbers. The Number prototype starts to fail with any value greater than 9007199254740991.
A number can be converted to BigInt either by wrapping it with BigInt() or by appending n; notice the use of 0n and 1n.
- Next, we'll add a solution for the factorial using the same pattern and BigInt:
Number.prototype.factorial = function () {
factorial = (n) => {
n = BigInt(n);
return (n>1) ? n * factorial(n-1n) : n;
}
return factorial(this.valueOf());
}
- To demonstrate, define a number and call the functions:
let n = 100;
console.log(
"for number " + n +" ",
"double is " + n.double() + " ",
"square is " + n.square() + " ",
"fibonacci is " + n.fibonacci() + " ",
"factorial is " + n.factorial() + " "
);
- Run the script using Node.js:
node number.js
You should get back a similar result to the following:

Figure 5.7: Output after extending JavaScript's built-in prototype
ES6 Classes
As mentioned earlier, one of the key differences between prototype-based languages and classic object-oriented languages is the use of prototypes instead of classes. However, ES6 has introduced built-in classes. We will start by comparing and creating an object using prototype syntax to ES6 class syntax by creating a Vehicle prototype/class and a Car prototype/class.
First, the prototype way:
function Vehicle(name, color, sound) {
this.name = name;
this.color = color;
this.sound = sound;
this.makeSound = function() {console.log(this.sound);};
}
var car = new Vehicle("car", "red", "beep");
car.makeSound();
Then, the same thing with ES6 classes:
class Vehicle {
constructor(name, color, sound) {
this.name = name;
this.color = color;
this.sound = sound;
this.makeSound = () => console.log(this.sound);
}
}
const car = new Vehicle("car", "red", "beep");
car.makeSound();
The ES6 syntax for class syntax allows us to write code in an object-oriented way. At a lower level in the language, classes are simply syntactic styling for creating prototypes.
In the coming section, we'll discuss programming in an object-oriented style using ES6 classes.
Object-Oriented Programming (OOP)
It is important to make a clear distinction between JavaScript objects and object-oriented programming (OOP). These are two very different things. The JavaScript object is simply a key-value pair that contains properties and methods. OOP, on the other hand, is a set of principles that can be used to write more organized and efficient code.
OOP is not required for modular JavaScript, but it contains many concepts relevant to modular JavaScript. The use of classes is an essential aspect of OOP that allows us to reuse code by creating classes and subclasses.
It teaches us to group related aspects of a program in a way that makes maintenance and debugging easier. It has a focus on classes and subclasses that makes reusing code more practical.
Historically, OOP became a popular way to deal with spaghetti code (messy, hard-to-read code) that was being commonly written in procedural code. Often, unorganized procedural code became fragile and rigid due to the interdependence of functions. A change in one aspect of the program may cause completely unrelated bugs to appear.
Imagine we're fixing a car and changing the headlight caused a problem with the engine. We would consider this to be bad architecture on the part of the designer of the car. Modular programming embraces the grouping of common aspects of a program.
There are four core concepts of OOP:
- Abstraction
- Encapsulation
- Inheritance
- Polymorphism
Throughout this chapter, we'll look at these four principles and how they can be used in the JavaScript programming language using ES6 syntax. We'll try to focus on practical application in this chapter but relate back to the core concepts above.
Abstraction
Abstraction is a high-level concept used throughout programming and is the foundation of OOP. It allows us to create complex systems by not having to deal with the specific implementation. When we use JavaScript, many things are abstracted by default. For example, consider the following array and the use of the built-in includes() function:
let list = ["car", "boat", "plane"];
let answer = list.includes("car") ? "yes" : "no";
console.log(answer);
We don't need to know the algorithm or code that is used when we run includes(). All we need to know is that it will return true if the car is in the array and false if it is not. This is an example of abstraction. It is possible that as versions of JavaScript change, the inner workings of the algorithm for include() may change. It may get faster or smarter in some way, but because it has been abstracted, we don't need to worry about the program breaking. We simply have to know the condition upon which it will return true or false.
We don't need to consider how our computer converts binary to visuals on the screen, or how pressing a key creates an event in our browser. Even the keywords that make up the JavaScript language are themselves code.
It is possible to look at the lower-level code that executes when we use built-in JavaScript functions, which will differ between browser engines. With JSON.stringify().
Let's take a moment to think about what an abstract object is. Consider an apple on your desk sitting next to you; this is a specific apple. It's an instance of the idea or classification of an apple. We can also talk about the idea of the apple and what makes an apple an apple; what attributes are common in apples and which are required to make an apple.
When I say the word apple, a picture of the fruit comes into your mind. The exact details of how you imagine the apple is based on your mind's version of the idea of an apple. When we define an apple class in a computer program, we are defining how the program defines the class of an apple. As in our imagination, an idea of a thing can be as specific or unspecific as we desire. It may contain only a few factors, such as shape and color, or dozens, including weight, origin, and flavor.
Classes and Constructors
In the first exercise, we created a light module. While it is a module, it isn't object-oriented. In this section, we'll go about redesigning that module in an object-oriented way.
One of the most essential aspects of a class is its constructor. The constructor is a built-in function that is called when an instance of a class is created. Often, the constructor is used to define the attributes of an object. For example, you'll often see something like this:
class Apple {
constructor(color, weight) {
this.color = color;
this.weight = weight;
}
}
The passed arguments are saved to the instance for later use. You also might add some additional attributes not based on the passed arguments. For example, say we want to give our apple a birthdate by attaching a datetime stamp. We could add a third line inside our constructor:
this.birthdate = Date.now();
Or we may want to call some other function within the light module. Imagine a game where every apple that enters the world has a 1 in 10 chance of being rotten:
this.checkIfRotten();
Our class would need to contain a checkIfRotten function, which would set the isRotten attribute to true 1 out of 10 times:
checkIfRotten() {
If (Math.floor(Math.random() * Math.floor(10)) == 0) {
this.isRotten = true;
} else {
this.isRotten = false;
}
}
Exercise 24: Converting a Light Module to a Class
Note
This exercise uses the end product of Exercise 22, Writing a Simple ES6 Module of this chapter, as a starting point. The state of the code after completing this exercise can be found at https://github.com/TrainingByPackt/Professional-JavaScript/tree/master/Lesson05/Exercise24.
Let's return to our light example from Exercise 22, Writing a Simple ES6 Module, of this chapter. We'll take the attributes defined in the previous chapter for the light module and assign them at creation. In addition, we'll write functions that check the format of the light attributes. If a light was created with an invalid attribute value, we'll set it to a default value.
The following are the steps to perform the exercise:
- Open up js/light.js and delete the code from the previous exercise.
- Create a class declaration for our Light class:
class Light {
}
- Add the constructor function to the class and set the attributes from the arguments as well as a datetime attribute. Instead of setting state and brightness directly, we'll first pass arguments to two functions to check the correct format. The logic for these functions will be written in the following steps:
class Light {
constructor(state, brightness) {
// Check that inputs are the right types
this.state = this.checkStateFormat(state);
this.brightness = this.checkBrightnessFormat(brightness);
this.createdAt = Date.now();
}
}
- Add the checkStateFormat and checkBrightnessFormat functions to the class declaration:
checkStateFormat(state) {
// state must be true or false
if(state) {
return true;
} else {
return false;
}
}
checkBrightnessFormat(brightness) {
// brightness must be a number between 0.01 and 1
if(isNaN(brightness)) {
brightness = 1;
} else if(brightness > 1) {
brightness = 1;
} else if(brightness < 0.01) {
brightness = 0.01;
}
return brightness;
}
- Add a toggle function and a test function, which we'll use for debugging. Both of these functions should also be within the class declaration. The toggle function will simply turn the light's state to the opposite of its current state; for example, on to off, and vice versa:
toggle() {
this.state = !this.state;
}
test() {
alert("state is " + this.state);
}
- In js/lightBulb.js, below your class declaration, add a module export as we did in the previous exercise:
export default Light;
- Open js/viewer.js and replace the light() line we wrote in Exercise 22, Writing a Simple ES6 Module, with a variable containing an instance of the Light class:
let light = new Light(true, 0.5);
- Below the preceding line in js/viewer.js, add the following code. This code connects the source of the image to state, and the opacity of the image to brightness:
// Set image based on light state
bulb.src = light.state ? onImage : offImage;
// Set opacity based on brightness
bulb.style.opacity = light.brightness;
// Set slider value to brightness
slider.value = light.brightness;
bulb.onclick = function () {
light.toggle();
bulb.src = light.state ? onImage : offImage;
}
slider.onchange = function () {
light.brightness = this.value;
bulb.style.opacity = light.brightness;
}
- Return to the project directory and run npm start. With the project running, open localhost:8000 in your browser. You should see a new picture for the light indicating that it's on:

Figure 5.8: Light with a state of true
With the page open, click the image and ensure that doing so causes the image to change. Also, notice the input slider at the bottom of the page. Try changing the value to confirm that doing so updates the opacity of the image.
Note Naming Convention of Classes
In the preceding code, we created a Light class. Notice that we're using a capital "L" rather than the usual camelcase used in JavaScript. It is common practice to capitalize the names of classes; refer to Google's JavaScript styling guide for more details on naming conventions: https://google.github.io/styleguide/javascriptguide.xml#Naming.
Camelcase is the most popular naming style in JavaScript. Other styles include snake_case, kebab-case, and PascalCase.
Default Attributes
One of the most common things you'll want to make use of with classes is default attribute values. Often, you want to create an instance of your class but don't care about the specifics of the attributes – without specifying arguments, for example:
myLight = new Light();
Both state and brightness will default to undefined.
With the code we've written, calling light without attributes won't raise an error because we've written checkStateFormat and checkBrightnessFormat to account for all invalid values. However, in many cases, you can simplify your code by providing default values in the constructor as follows:
constructor(state=false, brightness=100) {
The preceding syntax isn't specific to the class constructor and can be used to set the default arguments of any function, assuming you're using ES6, ES2015, or a newer version of JavaScript. Default parameters are not available in versions before ES2015.
Encapsulation
Encapsulation is the idea that modules should only make object properties available for consumption when necessary. Furthermore, properties should be accessed and modified using functions rather than directly. As an example, let's go back to our light module. Inside the constructor function, we made sure that we first ran the values through state checkers:
constructor(state, brightness) {
// Check that input has the right format
this.brightness = this.checkBrightnessFormat(brightness);
}
Let's say you develop the preceding module and release it to be used by your colleagues. You don't have to worry about them initializing the class with the wrong values, because if they do, checkBrightnessFormat() will automatically correct the value. However, once an instance of our class exists, nothing is stopping others from modifying that value directly:
let light = new Light();
light.brightness = "hello";
In a single command, our Light class's checkBrightnessFormat function has been sidestepped and we have a light with a brightness value of hello.
Encapsulation is the idea of writing our code in a way that makes this impossible. Languages such as C# and Java make encapsulation easy. Unfortunately, even with the ES6 update, the use of encapsulation in JavaScript is not obvious. There are a few ways to do this; one of the most popular takes advantage of the built-in WeakMap object type, which is also new to ES6.
WeakMap
The WeakMap object is a key-value pair collection where a key is an object. WeakMap has a special characteristic where, if an object that is a key in WeakMap is removed from the program and no reference exists to it, WeakMap removes the associated pair from its collection. This process of removing the pair is known as garbage collection. Thus, the element is particularly useful in cases where the use of a map could cause a memory leak.
An example where WeakMap would be used over Map is that of a script that keeps track of each element in a dynamically changing HTML page. Say that each element in the DOM is iterated and we create some extra data about each element in our Map. Then, as time goes on, elements are added and removed from the DOM. With Map, all the old DOM elements will continue to be referenced, causing the memory used to increase over time, by storing useless information relating to deleted DOM elements. With WeakMap, the deletion of the DOM element (which is the key object in the collection) causes the associated entry in the collection to be removed during garbage collection.
Here, we will make use of WeakMap(). First, we create an empty map variable, and then create a light object with some attributes. Then, we associate the object itself with a string, kitchen light. This isn't a case of adding a property to light; rather, we are using the object as if it was a property name in the map:
var map = new WeakMap();
var light = {state: true, brightness: 100};
map.set(light, "kitchen light");
console.log(map.get(light));
Also, it's important to note that the key object is based on the specific reference to the object. If we create a second light with the same attribute values, that counts as a new key:
let light2 = {state: true, brightness: 100};
map.set(light2, "bedroom light");
// above has not changed kitchen light reference
console.log(map.get(light));
If we update the properties of an object, that doesn't change the mapping:
light.state = false;
// reference does not change
console.log(map.get(light));
The mapping will exist until the key object goes out of scope, or until it is set to null and garbage collected; for example:
light = null;
// value will not be returned here
console.log(map.get(light));
Exercise 25: WeakMap for Encapsulation
Note
This exercise uses the end product of Exercise 24, Converting a Light Module to a Class, of this chapter as a starting point. The state of the code after completing this exercise can be found at https://github.com/TrainingByPackt/Professional-JavaScript/tree/master/Lesson05/Exercise25.
In this exercise, we will use WeakMap to create private variables that can't be accessed directly from outside a module. Perform the following steps to complete the exercise:
- Open js/light.js and, at the very top of the file, add a WeakMap object called privateVars:
let privateVars = new WeakMap();
- In js/light.js, modify the constructor function so that the object properties are saved to privateVars using the set method, instead of directly on the object:
constructor(state, brightness) {
// Parse values
state = this.checkStateFormat(state);
brightness = this.checkBrightnessFormat(brightness);
// Create info object
let info = {
"state": state,
"brightness": brightness,
"createdAt": Date.now()
};
// Save info into privateVars
privateVars.set(this, info);
}
- Now, in js/light.js, modify the toggle function so that we're getting state info from our WeakMap object named privateVars. Notice that when we set the variable, we are sending back an object that contains all info, not just state. In our example, each instance of light has a single info object associated with WeakMap:
toggle() {
let info = privateVars.get(this);
info.state = !info.state;
privateVars.set(this, info);
}
- We also need to modify the test function in js/light.js in a similar way. We'll change the source of state that is sent to the user in an alert to WeakMap:
test() {
let info = privateVars.get(this);
alert("state is " + privateVars.get(this).state);
}
- Since encapsulation takes away the ability to change state and brightness directly, we need to add methods that allow for this. We'll start by adding a setState function in js/light.js. Notice that it is almost identical to our toggle function:
setState(state) {
let info = privateVars.get(this);
info.state = checkStateFormat(state);
privateVars.set(this, info);
}
- Next, add the getter method in js/light.js:
getState() {
let info = privateVars.get(this);
return info.state;
}
- Follow the pattern from the last two steps to add getter and setter functions for the brightness property in js/light.js:
setBrightness(brightness) {
let info = privateVars.get(this);
info.brightness = checkBrightnessFormat(brightness);
privateVars.set(this, info);
}
getBrightness() {
let info = privateVars.get(this);
return info.brightness;
}
- The last change we need to make is in js/viewer.js. Below where the variables are declared, change each reference to light brightness and state to use the getter methods we created:
// Set image based on light state
bulb.src = light.getState() ? onImage : offImage;
// Set opacity based on brightness
bulb.style.opacity = light.getBrightness();
// Set slider value to brightness
slider.value = light.getBrightness();
bulb.onclick = function () {
light.toggle();
bulb.src = light.getState() ? onImage : offImage;
}
slider.onchange = function () {
light.setBrightness(this.value);
bulb.style.opacity = light.getBrightness();
}
- Run the code with npm start and view the page project in your browser at localhost:8000. Check to make sure clicking the image works, as well as changing brightness using the input slider:

Figure 5.9: Correctly rendering the site with click and slider functions
Getters and Setters
When using encapsulation, most objects will end up having getter and setter functions for some or all of their properties, since we no longer allow users to access properties directly:
console.log(light.brightness);
// will return undefined
Instead, we specifically create functions that allow getting and setting the property. These are known as getters and setters, and they are a popular design pattern, especially in languages such as Java and C++. If you completed step 7 in the last exercise, you should have added setters and getters for brightness:
setBrightness(brightness) {
let info = privateVars.get(this);
info.brightness = checkBrightnessFormat(state);
privateVars.set(this, info);
}
getBrightness() {
let info = privateVars.get(this);
return info.brightness;
}
Inheritance
Inheritance is the concept of having one class inherit the properties and methods of another class. A class that inherits from another is known as a subclass, and a class that is inherited from is known as a superclass.
It's from the term superclass that we get the built-in super() function, which can be used to call the constructor of a subclass's superclass. We'll use super() later in this chapter to make our own subclass.
It should be noted that a class can be both a subclass and a superclass. For example, say we have a program that simulates different types of animals. In our program, we have a mammal class, which is a subclass of animal class and a superclass to the dog class.
By organizing our program this way, we can put properties and methods that are relevant to all animals in the animal class. The mammal subclass contains methods relevant to mammals, but not reptiles; for example:

Figure 5.10: Inheritance in JavaScript
This may sound complex at first, but it often saves a significant amount of coding. Without the use of classes, we would end up copying and pasting methods from one animal to another. With that comes the difficulty of having to update a function in multiple places.
Going back to our smart house scenario, say we have received a new colored lightbulb device. We want our colored lightbulb to have all the attributes and functions that are contained in a lightbulb. In addition, the colored light should have an extra attribute of color, containing a hex color code, a color format checker, and functions related to changing color.
Our code should also be written in a way that if we make changes to the underlying Light class, the colored lightbulb will automatically gain any added functionality.
Exercise 26: Extending a Class
Note
This exercise uses the end product of Exercise 25, WeakMap for Encapsulation, as a starting point. The state of the code after completing this exercise can be found at https://github.com/TrainingByPackt/Professional-JavaScript/tree/master/Lesson05/Exercise26.
To extend the Light class written in the previous exercise, we will create a new ColorLight class:
- Create a new file at /js/colorLight.js. On the first line, we'll import ./light.js, which we'll use as a starting point:
import Light from './light.js';
- Next, we'll create WeakMap for private variables. Then, we'll create a class statement for our ColorLight class, and use the extends keyword to tell JavaScript that it will use Light as a starting point:
let privateVars = new WeakMap();
class ColorLight extends Light {
}
- Inside the ColorLight class statement, we'll create a new constructor that uses the built-in super() function, which runs the constructor() function of our base class, Light:
class ColorLight extends Light {
constructor(state=false, brightness=100, color="ffffff") {
super(state, brightness);
// Create info object
let info = {"color": this.checkColorFormat(color)};
// Save info into privateVars
privateVars.set(this, info);
}
}
- Notice in the preceding constructor that we make a call to checkColorFormat(), a function that will check that the color value provided is a valid hex value. If not, we'll set the value to the hex value of white (#FFFFFF). The function should be inside the ColorLight class statement:
checkColorFormat(color) {
// color must be a valid hex color
var isHexColor = /^#[0-9A-F]{6}$/i.test('#'+color);
if(!isHexColor) {
// if invalid make white
color = "ffffff";
}
return color;
}
- Add getter and setter functions, like we did in the later exercise:
getColor() {
let info = privateVars.get(this);
return info.color;
}
setColor(color) {
let info = privateVars.get(this);
info.color = this.checkColorFormat(color);
privateVars.set(this, info);
}
- At the bottom of js/colorLight.js, add an export statement to make the module available for import:
export default ColorLight;
- Open js/viewer.js at the top of the file and switch the Light import with one for ColorLight. Below that, we will import a pre-written script called changeColor.js:
import ColorLight from './colorLight.js';
import changeColor from './__extra__/changeColor.js';
- Further below, in js/viewer.js, find the line where we initialize the light variable and replace it with this:
let light = new ColorLight(true, 1, "61AD85");
- At the bottom of js/viewer.js, add the following:
// Update image color
changeColor(light.getColor());
- Start the program again using npm start and go to localhost:8000 in your browser:
If you've followed the instructions correctly, you should now see the light in a light green color, as demonstrated in the following diagram. Try opening js/viewer.js and changing the hex value; doing so should result in a different color for the light image:

Figure 5.11: The change-color function applying a CSS filter to make the lightbulb green
Polymorphism
Polymorphism is simply overriding the default behavior of a parent class. In strongly typed languages such as Java and C#, polymorphism can take a bit of effort. With JavaScript, polymorphism is straightforward. You simply overwrite a function.
For example, in the previous exercise, we took Light and extended it with the ColorLight class. Say we wanted to take the test() function that was written in Light and override it so that instead of alerting the state of the light, we alert the current color value of the light.
So, our js/light.js file would contain this:
test() {
let info = privateVars.get(this);
alert("state is " + privateVars.get(this).state);
}
Then all we have to do is create a new function in js/colorLight.js which has the same name, and replace state with color:
test() {
let info = privateVars.get(this);
alert("color is " + privateVars.get(this).color);
}
Exercise 27: LightBulb Builder
Note
This exercise uses the end product of Exercise 26, Extending a Class, as a starting point. The state of the code after completing this exercise can be found at https://github.com/TrainingByPackt/Professional-JavaScript/tree/master/Lesson05/Exercise27.
In this exercise, we will use the concepts we've learned so far to enhance our example project. Instead of having a single lightbulb, we will modify the project to allow us to create unlimited instances of the lightbulb class, choosing the color, brightness, and state:
- Open js/light.js and add two values for the image source just below the WeakMap reference:
let onImage = "images/bulb_on.png";
let offImage = "images/bulb_off.png";
- Next, in js/light.js, below where the info variable is defined, add the following:
// Create html element
let div = document.createElement("div");
let img = document.createElement("img");
let slider = document.createElement("input");
// Save reference to element as private variable
info.div = div;
info.img = img;
info.slider = slider;
this.createDiv(div, img, slider, state, brightness);
- In the last step in js/light.js, we made a reference to this.createDiv. In this step, we'll create that function below the constructor in js/light.js. This function creates HTML for every instance of the Light class:
createDiv(div, img, slider, state, brightness) {
// make it so we can access this in a lower scope
let that = this;
// modify html
div.style.width = "200px";
div.style.float = "left";
img.onclick = function () { that.toggle() };
img.width = "200";
img.src = state ? onImage : offImage;
img.style.opacity = brightness;
slider.onchange = function () { that.setBrightness(this.value) };
slider.type = "range";
slider.min = 0.01;
slider.max = 1;
slider.step = 0.01;
slider.value = brightness;
div.appendChild(img);
div.appendChild(slider);
// append to document
document.body.appendChild(div);
}
- Next, in js/light.js, find the setState function and add the following line within the function:
info.img.src = info.state ? onImage : offImage;
- Add the same line to the toggle function in js/light.js:
info.img.src = info.state ? onImage : offImage;
- Similarly, we will update the setBrightness function in js/light.js to set the opacity of the image based on brightness:
info.img.style.opacity = brightness;
- The last change in js/light.js is to add a getter function for the img HTML object. We will place it between the getBrightness and toggle functions:
getImg() {
let info = privateVars.get(this);
return info.img;
}
- In js/colorLight.js, we'll import the pre-built colorChange function. This should go with your imports just under the Light import:
import changeLight from './__extra__/changeColor.js';
- Next, in js/colorLight.js, we're going to update the constructor by adding the following lines:
let img = this.getImg();
img.style.webkitFilter = changeLight(color);
- In js/viewer.js, delete all the code and replace it with the following:
import ColorLight from './colorLight.js';
let slider = document.getElementById("brightnessSlider");
let color = document.getElementById("color");
let button = document.getElementById("build");
button.onclick = function () {
new ColorLight(true, slider.value, color.value);
}
- The final change is index.html; remove the img and input tags and replace them with the following:
<div style="position: 'fixed', top: 0, left: 0">
<input type="color" id="color" name="head" value="#e66465">
<input id="brightnessSlider" min="0.01" max="1" step="0.01" type="range"/>
<button id="build">build</button>
</div>
- With all the changes made, run npm start and open your browser to localhost:8000. If you've done everything correctly, hitting the build button should add a new element to the page based on the color chosen:

Figure 5.12: Creating multiple instances of the lightclub class
As you can see, classes really start to come in handy once you're creating many instances of a single thing. In the next section, we'll look at npm packages and how we can export our Light class as one.
npm Package
An npm package is a JavaScript module that has been packaged and uploaded to the npm server. Once a module has been uploaded to npm, it can quickly be installed and used by anyone.
This probably isn't new to you, as anyone who has used Node.js quickly ends up installing a package. What is less commonly done and known about is how to create and upload a package. It's easy to spend years as a developer without having the need to publish a public module, yet it is something worth knowing. It will help not only when you want to export your own module, but when you want to read and understand the packages that your project uses.
The first step in creating an npm module is making sure you have a complete package.json file. When running a project locally, it is normal to not worry much about fields such as author and description. It's a different story when you prepare a module for public use. You should take the time to fill out all fields relevant to your package.
The following is a table that includes the common properties recommended by npm. Many of these are optional. For more information and a complete list, refer to https://docs.npmjs.com/files/package.json.
At the very minimum, metadata should include a name, version, and description. In addition, most packages will need a dependencies property; however, this should be generated automatically by using the --save or -s option whenever installing a dependency using npm install:

Figure 5.13: npm properties table
The following table shows some more properties of npm:

Figure 5.14: npm properties table continued
npm Link Command
Once you have your package.json complete, and the first version of your package that you want to test, you can make use of the npm link command. The link command will associate your local npm project with a namespace. For example, first navigate to the project folder where you want to use a local npm package:
cd ~/projects/helloWorld
npm link
Then, go into another project folder where you want to make use of that package, and run npm link helloWorld, where helloWorld is the name of the package you are testing:
cd ~/projects/otherProject
npm link helloWorld
These two steps will allow you to work as if you had installed helloWorld using npm install helloWorld. By doing this, you can ensure that your package is working locally when used in another project.
Npm Publish Command
Once you are satisfied with the results of testing your package locally, you can easily upload it to npm with the npm publish command. To make use of the publish command, you will first need to create an account at https://www.npmjs.com/. Once you have an account, you can log in to it locally by running npm login on your command line.
Once logged in, it is very simple to publish your package. Simply navigate to your project folder and run npm publish. Here is an example of a package being successfully uploaded to npm for others to use:
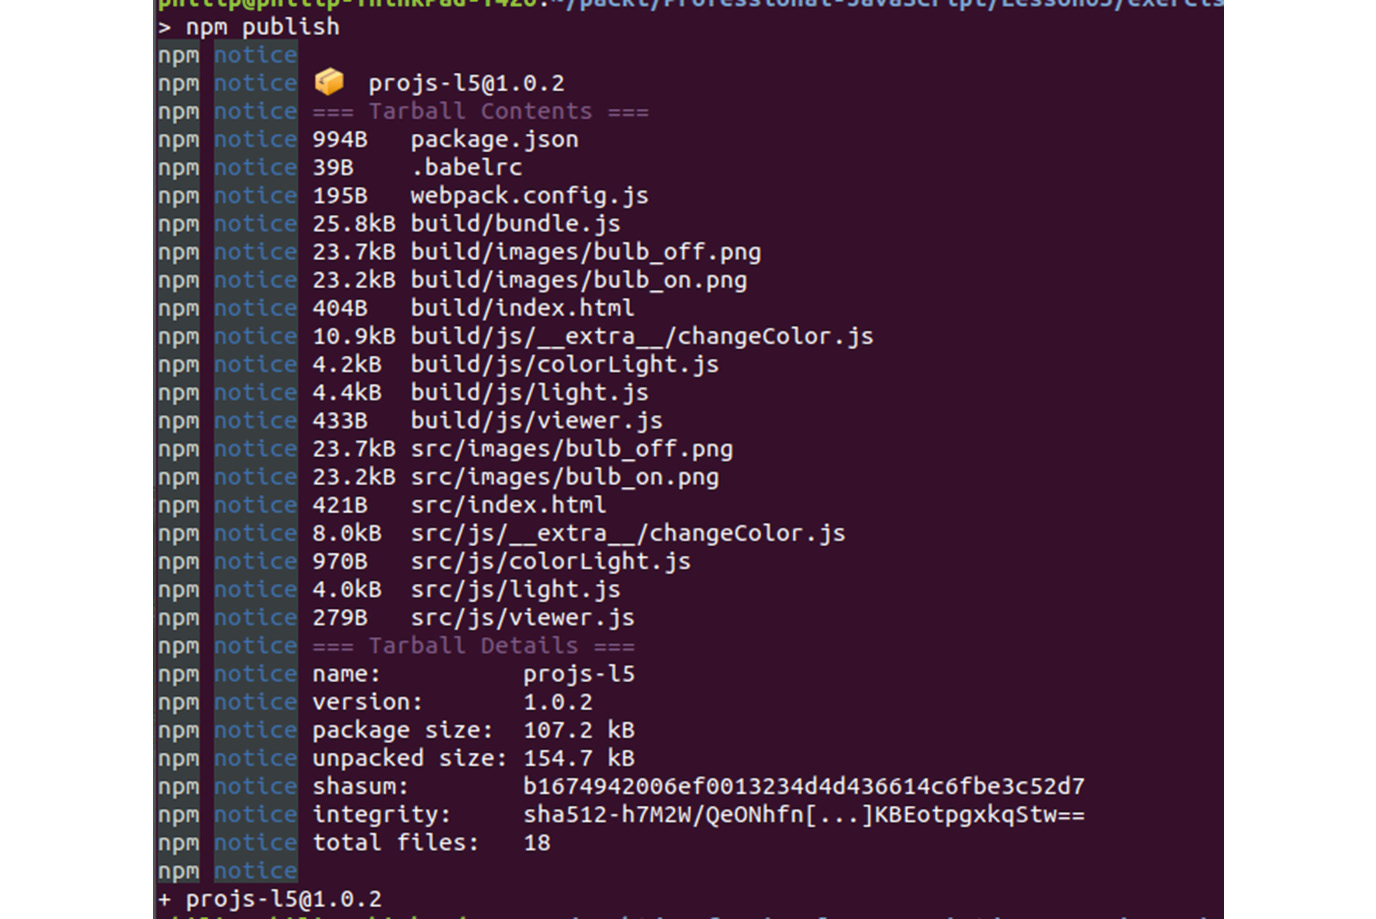
Figure 5.15: Example of an npm package published
ESM versus CommonJS
ESM is short for ECMAScript Modules, which is the standard used for modules in ES6. So, you may hear "ES6 Modules" referred to as ESM. This is due to the fact that the ESM standard has been in development before ES6 was a standard.
You've likely seen the CommonJS format that was used in the previous chapter:
const express = require('express');
The same code in the ES6 module style would be like this:
import express from 'express';
ES6 modules are great because they give JavaScript developers more control over their imports. However, it is important to note that, currently, JavaScript is in a transition period. ES6 has given a definite standard as to how ES6 modules should work. While most browsers have implemented it, npm is still using its own standard CommonJS.
That said, the introduction of ES6 is being quickly accepted. npm now ships with an experimental flag, --experimental-modules, which allows the use of ES6-style modules. However, use of this flag is not recommended, as it adds unneeded complexity, such as having to change your file extensions from .js to .mjs.
Babel
The more common and recommended way to use ES6 modules with Node.js is to run a JavaScript compiler. The most popular compiler is Babel.js, which takes ES6 code and compiles it down to older versions of JavaScript that can run anywhere.
Babel is a widely used tool in the Node.js ecosystem. Often, projects use starter templates that have Babel and other bundling tools, such as webpack, built in. These starter projects allow developers to start using ES6 imports without thinking about the fact that a compile step is required. For example, there's Facebook's create-react-app, which compiles and displays your application every time a change is made to a file.
React is one of the largest communities pushing ES6. In the React ecosystem, the standard import used is ES6. The following is taken from the React documentation on creating a component:
import React, { Component } from 'react';
class Button extends Component {
render() {
// ...
}
}
export default Button; // Don't forget to use export default!
Note the similarity between the preceding code and what we've been working on. It's an example of inheritance, where Button inherits the properties of Component, just like ColorLight inherited those of Light. React is a component-based framework that makes heavy use of ES6 features such as imports and classes.
webpack
Another common JavaScript compiler is webpack. webpack takes multiple JavaScript files and compiles them into a single bundled file. In addition, webpack can take steps to improve performance, such as minifying code to reduce the total size. webpack is particularly useful when using modules, as each separate file loaded into an HTML site increases load time due to making an extra HTTP call.
With webpack, we can very simply specify the entry point for the JavaScript we want to compile, and it will automatically merge any referenced files. For example, if we want to compile the code from our last exercise, we would create a webpack.config.js file to specify the entry point:
const path = require("path");
module.exports = {
mode: 'development',
entry: "./src/js/viewer.js",
output: {
path: path.resolve(__dirname, "build"),
filename: "bundle.js"
}
};
Notice where entry is defined above; this would be the starting point of our program from where webpack will automatically find all referenced files. The other important value to take note of is output. This defines the location and filename of the resulting bundled JavaScript file created by the compiler.
In the next exercise, we'll make use of Babel to convert our code from ES6 to generic JavaScript. Once we've converted our JavaScript, we'll use webpack to compile the resulting files into a single bundled JavaScript file.
Exercise 28: Converting ES6 and Packages with webpack and Babel
Note
This exercise uses the end product of Exercise 27, LightBulb Builder, as a starting point. The state of the code after completing this exercise can be found at https://github.com/TrainingByPackt/Professional-JavaScript/tree/master/Lesson05/Exercise28.
In this exercise, we will use Babel to convert our ES6 to generic JavaScript that is compatible with older browsers such as Internet Explorer. The second thing we'll do is run webpack to compile all our JavaScript files into a single file:
- Create two new folders in the base of your project, one called build and the other src:
mkdir src build
- Move the images, index.html, and js folders into the new src folder. The source folder will be used to generate the contents of the build folder later:
mv images index.html js src
- Install babel-cli and babel preset as developer dependencies:
npm install --save-dev webpack webpack-cli @babel/core @babel/cli @babel/preset-env
- Add a file called .babelrc to the root directory. In it, we will tell Babel to use the preset settings:
{
"presets": ["@babel/preset-env"]
}
- Add a webpack configuration file at webpack.config.js in the root directory:
const path = require("path");
module.exports = {
mode: 'development',
entry: "./build/js/viewer.js",
output: {
path: path.resolve(__dirname, "build"),
filename: "bundle.js"
}
};
- To generate the contents of the build folder from src, we need to add a new script command to our project. Open up package.json and look for the section that lists scripts. In that section, we'll add a build command that runs Babel and webpack and copies our image files to the build folder. We will also modify the start command to reference our build folder, so we can test it after building:
"scripts": {
"start": "ws --directory build",
"build": "babel src -d build && cp -r src/index.html src/images build && webpack --config webpack.config.js"
},
Note
Windows users should use the following command:
"build": "babel src -d build && copy src build && webpack --config webpack.config.js"
- To make sure the command has been added properly, run npm run build on the command line. You should see output like this:
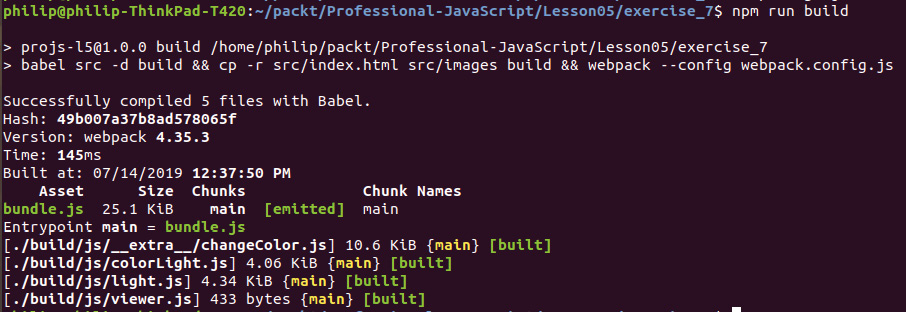
Figure 5.16: npm run build output
- Next, open up build/index.html and change the script tag to import our newly created file, bundle.js:
<script src="bundle.js"></script>
- To test, run npm start and open localhost:8000 in the browser. You should see the same website as the last exercise. Press the build button a few times to ensure that it is working as expected:
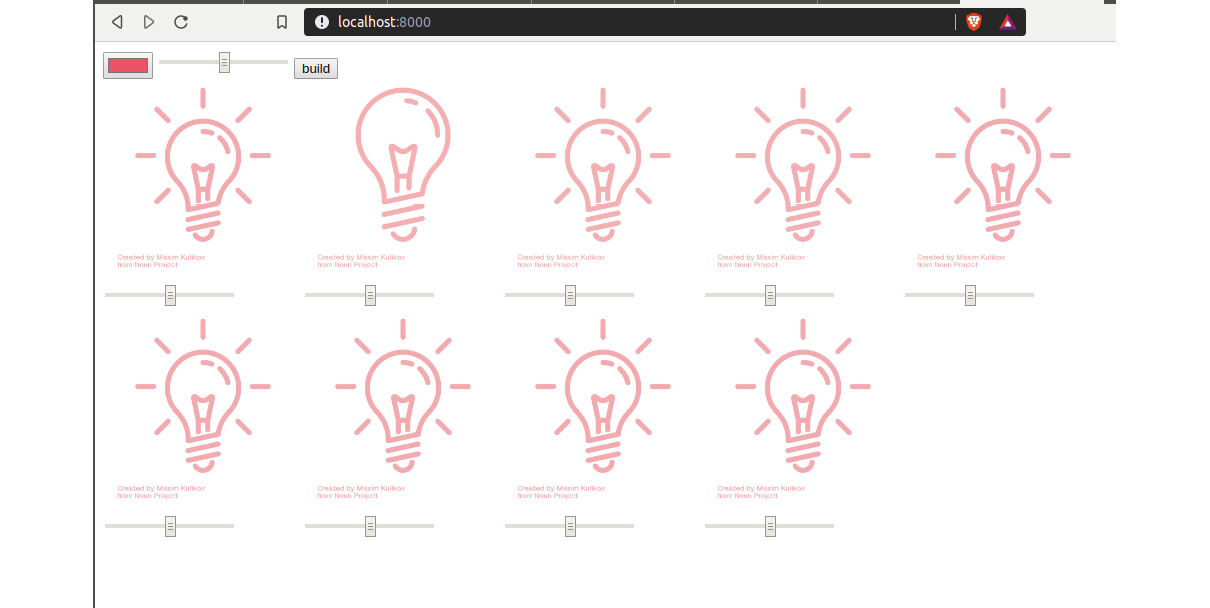
Figure 5.17: Test run using the build button
- To double check that everything has compiled correctly, go to localhost:8000/bundle.js in the browser. You should see a large file that contains the compiled version of all our JavaScript source files:

Figure 5.18: A complied version of all our JavaScript source files
If you've done everything right, you should have a bundle.js file that contains all our JavaScript code compiled into a single file.
Composability and Strategies for Combining Modules
We've seen how a module can be an extension of another, as ColorLight was to Light. Another common strategy when a project grows is to have modules that are themselves made up of multiple sub-modules.
The use of sub-modules is a simple as importing a module in the module file itself. For example, say we wanted to improve the brightness slider in our light modules. It may be that if we created a new Slider module, we could use it in multiple cases besides just the Light class. This is the kind of situation where it would be advised to make our "advanced slider input" a sub-module.
If, on the other hand, you think your new slider will only ever be used in the Light class, then adding it is a new class will only create more overhead. Don't fall into the trap of over-modularizing simply because you can. The key factor here is reusability and utility.
Activity 6: Creating a Lightbulb with a Flash Mode
The lightbulb company you work for has asked you to work on a version of their product. They want a lightbulb with a special "flash mode" that can be used at events and concerts. The flash mode light should allow people to put the light in flash mode and have it automatically turned on and off at a given time interval.
Create a FlashingLight class that extends Light. The class should be the same as Light, except it has a property called flashMode. If flashMode is on, then the value of the state should switch every five seconds.
Once you've created this new component, add it to the package exports in js/index.js and compile the project using Babel.
Perform the following steps to complete the activity:
- Install the babel-cli and babel presets as developer dependencies.
- Add .babelrc to tell Babel to use preset-env.
- Add a webpack configuration file that specifies the mode, entry, and output location.
- Create a new file called js/flashingLight.js; it should start as a blank ES6 component that extends Light.
- At the top of the file, add a privateVars variable of the weakMap type.
- In the constructor, set the flashMode property and save it to privateVars within the constructor.
- Add a setter method for the FlashingLight object.
- Add a getter method for the FlashingLight object.
- On line 2, add an empty variable that will keep track of the flashing timer at the global level of the class.
- Create a startFlashing function that references the parent class's lightSwitch() function. This step is tricky because we have to bind it to setInterval.
- Create a stopFlashing function that can be used to turn off the timer.
- In the constructor, check whether flashMode is true, and, if it is, run startFlashing.
- Also, check flashMode when setting mode – if true, startFlashing; or else, stopFlashing.
- Import and export the new component in index.js.
- Compile the code by running our build function with npm.
Expected output:

Figure 5.19: Lightbulb with flash mode
Note
The solution to this activity can be found on page 599.
Summary
In this chapter, we've explored concepts of modular design, ES6 modules, and their use with node. The principles of object-oriented design can be useful when designing programs that have several layers of modules composed as a complex system.
ES6 classes allow us to create classes much more easily than previous versions of JavaScript. These classes can be built by using the extends keyword. This allows for layers of complexity where more complex objects can be built on top of simple ones and so on.
We also saw how the new ES6 WeakMap type allows us to create private variables. This pattern limits the number of errors in modules that will be used by others. For example, by requiring properties to be changed, we can check the format and value before allowing the change. This was the case with the light example, where we wanted to check that state was a Boolean value before allowing it to be set. We did this by creating getter and setter methods for each private variable that we wanted to make available to other parts of our code.
After that, we talked about how ES6 modules aren't currently supported natively in Node.js, even though big-name projects such as Facebook-backed React make use of them extensively. As a solution to this limitation, we installed Babel, an ES6-to-JavaScript compiler, and used it to convert our src folder to the final build code.
We also talked about how, once you have a project working locally, you can convert it to an npm package that can be shared and updated via npm. This process involved testing locally using npm link. Then, once satisfied with how the package works, publish it using npm publish.
In the next chapter, we will look at code quality and how automated testing can be implemented to defend against regression as we update our code.