
Learning Objectives
By the end of this chapter, you will be able to:
- Implement Node.js applications using global objects
- Create readable and writable Streams
- Read and write to files using asynchronous and synchronous APIs
- Create static and dynamic web servers using the http module
- Download content from websites using the http/https modules
- Query and extract data from parsed HTML content
In this chapter, we will learn about global objects and functions. Then, we will learn how to write efficient web servers, both static and dynamic, using the http module. Finally, we will use the http and https modules to scrape web pages and extract data from them.
Introduction
From the outset, Node.js was created to provide an alternative to the thread-per-request model of the first generation of HTTP servers. The event loop and the asynchronous nature of Node.js make it ideal for I/O-intensive servers that need to provide high throughput for a high number of concurrent clients. Because of that, it came armed with powerful and simple-to-use APIs to build HTTP servers out of the box.
In the previous chapter, we talked about what Node.js and NPM are and how they work. In this chapter, you will learn about the basic global objects that are available to every script in Node.js. You will learn about readable and writable streams and how you can use them to read and write to files asynchronously. You will also learn how to read and write to files using the synchronous filesystem APIs.
In the last couple of sections, you will learn how to use the HTTP module to write web servers and make HTTP requests. You will build a static and a dynamic web server. Then, you will learn the basics of web scraping and how to use it to extract data from websites.
Globals
The Node.js execution context contains a few global variables and functions that can be used from anywhere in any script. The most widely used of all is the require function, since it is the function that helps you load other modules and access the non-global functions, classes, and variables that are available from the Node.js APIs.
You must have noticed this function being used in the previous chapter when we loaded the commander module from the package you installed in your application:
const program = require('commander');
It receives one parameter, which is a string representing the ID of the module you want to load, and returns the module's content. Internal modules, such as the ones we will discuss in this chapter, and the modules that are loaded from packages and installed by npm, are identified directly by their names, such as commander, fs, and http. In Chapter 5, Modular JavaScript, you will see how to create your own modules and how to use this function to load them.
Another important and widely used global is the console. Just like in the Chrome Developer tools, the console can be used to print text to the Terminal using standard output and standard error. It can also be used to print text to files for logging.
So far, you have used console many times, like in the last exercise of the previous chapter, where you printed the following manipulated HTML:
console.log(html);
The console has a lot more to offer than just the log function. Let's take a deeper look at some of its applications.
When you want to print some text to the console, you can use any of the following functions: debug, error, info, and warn. The difference between them is where the text ends up. When you use the debug and info methods, the text will be printed to standard output. For warn and error, the messages will be printed to standard error.
Ensure that you have the following code inside index.js:
console.debug('This will go to Standard Output');
console.info('This will also go to Standard Output');
console.warn('This will go to standard error');
console.error('Same here');
Now, run the script and redirect to different files, and then print their content:
$ node index.js > std.out 2> err.out
$ cat std.out
This will go to Standard Output
This will also go to Standard Output
$ cat err.out
This will go to standard error
Same here
All the preceding functions, as well as the log function, can format text if you want, which they do by providing extra arguments and a format string. You can read more about format strings in the util.format function documentation: https://nodejs.org/dist/latest-v12.x/docs/api/util.html#util_util_format_format_args. You can also use backticks if you prefer:
const whatILike = 'cheese';
console.log('I like %s', whatILike);
console.log(`I like ${whatILike}`);
The output would be as follows:
I like cheese
I like cheese
If you need to print some text conditionally, you can use assert. Assert can be used to check whether a condition is true. If it's false, then it will print the text using console.warn, with some text explaining that the assertion failed. If it's true, then it will not print anything. Here is an example:
console.assert(1 == 1, 'One is equal to one');
console.assert(2 == 1, 'Oh no! One is not equal to two');
This would only output the following:
Assertion failed: Oh no! One is not equal to two
The trace function is used to identify the source file and line of the output. It receives the same arguments as log and the others, but it will also print the stack trace for the log statement; that is, the filenames and lines where the call happened:
console.trace('You can easily find me.');
This would print the following:
Trace: You can easily find me.
at Object.<anonymous> (.../Lesson03/sample_globals/console.js:14:9)
at Module._compile (internal/modules/cjs/loader.js:776:30)
at Object.Module._extensions.js (internal/modules/cjs/loader.js:787:10)
at Module.load (internal/modules/cjs/loader.js:653:32)
at tryModuleLoad (internal/modules/cjs/loader.js:593:12)
at Function.Module._load (internal/modules/cjs/loader.js:585:3)
at Function.Module.runMain (internal/modules/cjs/loader.js:829:12)
at startup (internal/bootstrap/node.js:283:19)
at bootstrapNodeJSCore (internal/bootstrap/node.js:622:3)
If you have an array of data and want to show it as a table, you can use the table method. It receives two arguments: the tabular data and the properties you want to see in the table. For example, consider the following tabular data (array of objects):
const myTable = [
{ name: 'John Doe', age: 10 },
{ name: 'Jane Doe', age: 17 },
];
You could print all the columns by passing the data to console.table:
console.table(myTable);
This would give us the following output:

Figure 3.1: Output of the console.table function
Alternatively, you could pass a list of the property names that you want:
console.table(myTable, ['name']);
The following is the output of the preceding code:

Figure 3.2: Output of console.table when passing a list of properties to print
Another interesting thing you can use console for is to time how long specific parts of your code will take to run. To do that, you use the time and timeEnd methods, as shown in the following example:
console.time();
blockFor2Seconds();
console.timeEnd();
This would output the following:
default: 2000.911ms
You can also give your timer a name and use multiple timers at the same time:
console.time('Outer');
console.time('Inner');
blockFor2Seconds();
console.timeEnd('Inner');
console.timeEnd('Outer');
This would output the following:
Inner: 2000.304ms
Outer: 2000.540ms
Sometimes, you want to know where a script was loaded from or what the full path of the file is. For that, every script has two globals defined: __filename and __dirname (that's two underscores, and then filename/dirname). An example is as follows:
console.log(`This script is in: ${__dirname}`);
console.log(`The full path for this file is: ${__filename}`);
This would output the following:
This script is in: /.../Lesson03/sample_globals
The full path for this file is: /.../Lesson03/sample_globals/dir_and_filename.js
In the browser, when you want to execute a certain function in the future or at regular intervals, you can use setTimeout and setInterval, respectively. These functions are also available in the Node.js execution context and work the same way as in the browser.
You can schedule code to execute some time from now by passing a callback function to be executed and the amount of time in milliseconds in the future you want it to be executed:
const start = Date.now();
setTimeout(() => {
console.log('I'm ${Date.now() - start}ms late.');
}, 1000);
In the browser, setTimeout returns a timer ID, which is an integer and can't do more than canceling the timer through the clearTimeout function. In Node.js, setTimeout returns a Timeout object that has some methods itself. An interesting one is the refresh method, which resets the start time of the timer to the current time and restarts counting the timer as if it had been scheduled at that moment. Take a look at the following example code:
const secondTimer = setTimeout(() => {
console.log(`I am ${Date.now() - start}ms late.');
}, 3000);
setTimeout(() => {
console.log(`Refreshing second timer at ${Date.now() - start}ms`);
secondTimer.refresh();
}, 2000);
This prints the following:
Refreshing second timer at 2002ms
I am 5004ms late.
From the output, you can see that even though secondTimer was scheduled to run 3 seconds in the future, it ran 5 seconds in the future. That's because the second setTimeout, which was set to 2 seconds, refreshes it, restarting the count at that time, adding 2 seconds to the 3-second timer.
As we mentioned previously, you can use the Timeout instance to cancel the timer using the clearTimeout function. The following code is an example of this:
const thirdTimer = setTimeout(() => {
console.log('I am never going to be executed.');
}, 5000);
setTimeout(() => {
console.log('Cancelling third timer at ${Date.now() - start}ms');
clearTimeout(thirdTimer);
}, 2000);
The output for this code would be as follows:
Cancelling third timer at 2007ms
setTimeout executes only once. You can use setInterval to do a specific task every specific amount of time. setInterval also returns a Timeout instance that can be used to cancel the timer using clearInterval. The following example sets a timer to run every second and keeps track of the number of times it ran. After a certain number of executions, it cancels the timer:
let counter = 0;
const MAX = 5;
const start = Date.now();
const timeout = setInterval(() => {
console.log(`Executing ${Date.now() - start}ms in the future.`);
counter++
if (counter >= MAX) {
console.log(`Ran for too long, cancelling it at ${Date.now() - start}ms`);
clearInterval(timeout);
}
}, 1000);
The output for this code looks something like the following:
Executing 1004ms in the future.
Executing 2009ms in the future.
Executing 3013ms in the future.
Executing 4018ms in the future.
Executing 5023ms in the future.
Ran for too long, cancelling it at 5023ms
In the browser, we have a global object called window that represents the browser. In Node.js, we have process, which represents the currently running application. Through it, we can access the arguments that are passed into the application, including standard inputs and outputs and other information about the process, such as version or process ID.
To access the arguments that are passed into the process, you can use the argv attribute of the global variable process. argv is an array that contains each argument in a position. It includes the path to the Node.js binary and the full path of the script as the first two elements. After that, all the other extra arguments are passed in.
The following code would print all the arguments passed in, each in one line:
console.log(`Arguments are: ${process.argv.join(' ')}`);
Let's go over some sample outputs for this single-line application.
No extra argument:
$ node argv.js
Arguments are:
/usr/local/bin/node
/Users/visola/git/Professional-JavaScript/Lesson03/sample_globals/argv.js
Many arguments separated one by one:
$ node argv.js this is a test
Arguments are:
/usr/local/bin/node
/Users/visola/git/Professional-JavaScript/Lesson03/sample_globals/argv.js
this
is
a
test
One argument all in one string:
$ node argv.js 'this is a test'
Arguments are:
/usr/local/bin/node
/Users/visola/git/Professional-JavaScript/Lesson03/sample_globals/argv.js
this is a test
In the previous chapter, we used the commander library to parse command-line arguments. When configuring commander, the last call to it was parse(process.argv), which gave commander access to all the options that were passed in:
program.version('0.1.0')
.option('-b, --add-bootstrap', 'Add Bootstrap 4 to the page.')
.option('-c, --add-container', 'Adds a div with container id in the body.')
.option('-t, --title [title]', 'Add a title to the page.')
.parse(process.argv);
Another important role that the process variable holds is access to standard inputs and outputs. If you want to print something to the console, you can use stdout and stderr. These two attributes are what console.log and all the other methods in the console use under the hood. The difference is that stdout and stderr do not add a new line at the end of each call, so you have to do that yourself if you want each output to go into its own line:
process.stdout.write(`You typed: '${text}' `);
process.stderr.write('Exiting your application now. ');
These are two examples that print something with a new line at the end. For most cases, it is recommended to use the console since it gives you some extra stuff on top, such as logging levels and formatting.
If you want to read input from the command line, you can use process.stdin. stdin is a Stream, which we're going to talk more about in the next section. For now, you just need to know that Streams are based on events. That means that when input comes in, it will arrive in the form of a data event. To receive input from the user, you need to listen to that event:
process.stdin.addListener('data', (data) => {
...
});
When there's no more code to be executed, the event loop will block, waiting for input from standard input. When the input is read, it will be passed into the callback function as a Buffer of bytes. You can convert it into a string by calling its toString method, as shown in the following code:
const text = data.toString().trim();
Then, you can use it like any normal string. The following sample application demonstrates how you can use stdout, stderr, and stdin to request input from the user from the command line:
process.stdout.write('Type something then press [ENTER] ');
process.stdout.write('> ');
process.stdin.addListener('data', (data) => {
const text = data.toString().trim();
process.stdout.write('You typed: '${text}' ');
if (text == 'exit') {
process.stderr.write('Exiting your application now. ');
process.exit(0);
} else {
process.stdout.write('> ');
}
});
The following code shows what it would look like after running the application and typing some words, pressing Enter, and then typing "exit" to quit the application:
$ node read_input.js
Type something then press [ENTER]
> test
You typed: 'test'
> something
You typed: 'something'
> exit
You typed: 'exit'
Exiting your application now.
In the preceding code, you can see that when the user types "exit", it executes a special branch of the application code that calls process.exit, which is a function that exits the whole process and returns the specified exit code.
Exercise 11: Creating a Task Reminder Application
In this exercise, we will create a task reminder application. Now that we have learned how to interact with the user using the global variable process and also learned how to create timers, let's write an application that will use these new skills to manage reminders from the command line.
The application will receive inputs from the user and collect information to build a reminder. It will use a message, a time unit, and an amount of time. The input to the application will be provided in phases. Each phase will ask the user for some input, collect it, validate it, and then set the value of a variable to move to the next phase.
Perform the following steps to complete this exercise:
- In an empty folder, create a new package using npm init and a file called index.js. In the index.js file, we will start by adding some constants and variables where we will store the state to create the timer:
// Constants to calculate the interval based on time unit
const timeUnits = ['Seconds', 'Minutes', 'Hours'];
const multipliers = [1000, 60 * 1000, 3600 * 1000];
// Variables that will store the application state
let amount = null;
let message = null;
let timeUnit = null;
// Alias to print to console
const write = process.stdout.write.bind(process.stdout);
- Next, we will add the function that is the heart of the application. This is what the function looks like:
function processInput(input) {
// Phase 1 - Collect message
if (message == null) {
askForMessage(input);
input = null;
}
// Phase 2 - Collect time unit
if (message != null && timeUnit == null) {
askForTimeUnit(input);
input = null;
}
// Phase 3 - Collect amount of time
if (timeUnit != null && amount == null) {
askForAmount(input);
}
}
This function processes all the input from the user in a set of conditions that will be based on the current state, based on what variables are already available. When the input is processed, it's then set back to null so that the next stage can be executed.
The preceding function calls some functions that don't exist yet: askForMessage, askForTimeUnit, and askForAmount. These functions are responsible for validating the input and setting the variables according to each phase so that the code can move to the next phase.
- Add some details to the askForMessage function. The first thing the function does is check whether the input is null, which means that it's changing phase for the first time. This means it needs to print the prompt for input for the user.
This is what the code looks like:
function askForMessage(input) {
if (input == null) {
write('What do you want to be reminded of? > ');
return;
}
if (input.length == 0) {
write('Message cannot be empty. Please try again. > ');
return;
}
message = input;
}
If the input is not null, this means that the user already inputted information for the current state and it needs to be validated. If validation fails, print more information and wait for the next input.
If the input is valid, then it sets the variable for the current state, which is message in this case, which will move the code to the next phase.
- Next, we create the askForTimeUnit function, which is the function that will handle the next phase of the code. This function uses the constants listed in the first step to print the supported time units and lets the user pick one. It works similar to the askForMessage function: prompt, validate, and set value:
function askForTimeUnit(input) {
if (input == null) {
console.log('What unit?');
timeUnits.forEach((unit, index) => console.log('${index + 1} - ${unit}') );
write('> ');
return;
}
const index = parseInt(input, 10);
if (isNaN(index) || index <= 0 || index > timeUnits.length) {
write(`Sorry, '${input}' is not valid. Please try again. > `);
return;
}
timeUnit = index - 1;
console.log(`Picked: ${timeUnits[timeUnit]}`);
}
- Lastly, we create the askForAmount function, which handles the last phase. This function prompts the user for some amount of time to create the timer. Like before, it has three parts: prompt, validate, and set value:
function askForAmount(input) {
if (input == null) {
write(`In how many ${timeUnits[timeUnit]}? > `);
return;
}
const number = parseInt(input, 10);
if (isNaN(number)) {
write(`Sorry, '${input}' is not valid. Try again. > `);
return;
}
amount = number;
setTimerAndRestart();
}
- At the end of the askForAmount function, it calls the setTimerAndRestart function. Let's create that function, which creates the timer and resets all states so that the loop can start again, and the user can create new timers. This is what the setTimerAndRestart function looks like:
function setTimerAndRestart() {
const currentMessage = message;
write(`Setting reminder: '${message}' in ${amount} ${unit} from now. `);
let timerMessage = ` x07Time to '${currentMessage}' > `;
setTimeout(() => write(timerMessage), amount * multipliers[timeUnit]);
amount = message = timeUnit = null;
askForMessage();
}
One important bit here is the special character, x07. This will cause your Terminal to make a beep and then print the text set in the message. Also, the text is specially formatted with new lines at the beginning and end so that it doesn't disrupt the usage of the tool that much since the timers will print while the user continues to use the application.
- The final piece of the application needs to register the listener to the data event in standard input and start the cycle by asking the user for the message:
process.stdin.on('data', (data) => processInput(data.toString().trim()));
askForMessage();
- Now, you can run the application from your Terminal, set up a couple of reminds, and hear it beep back at you as the timers expire:
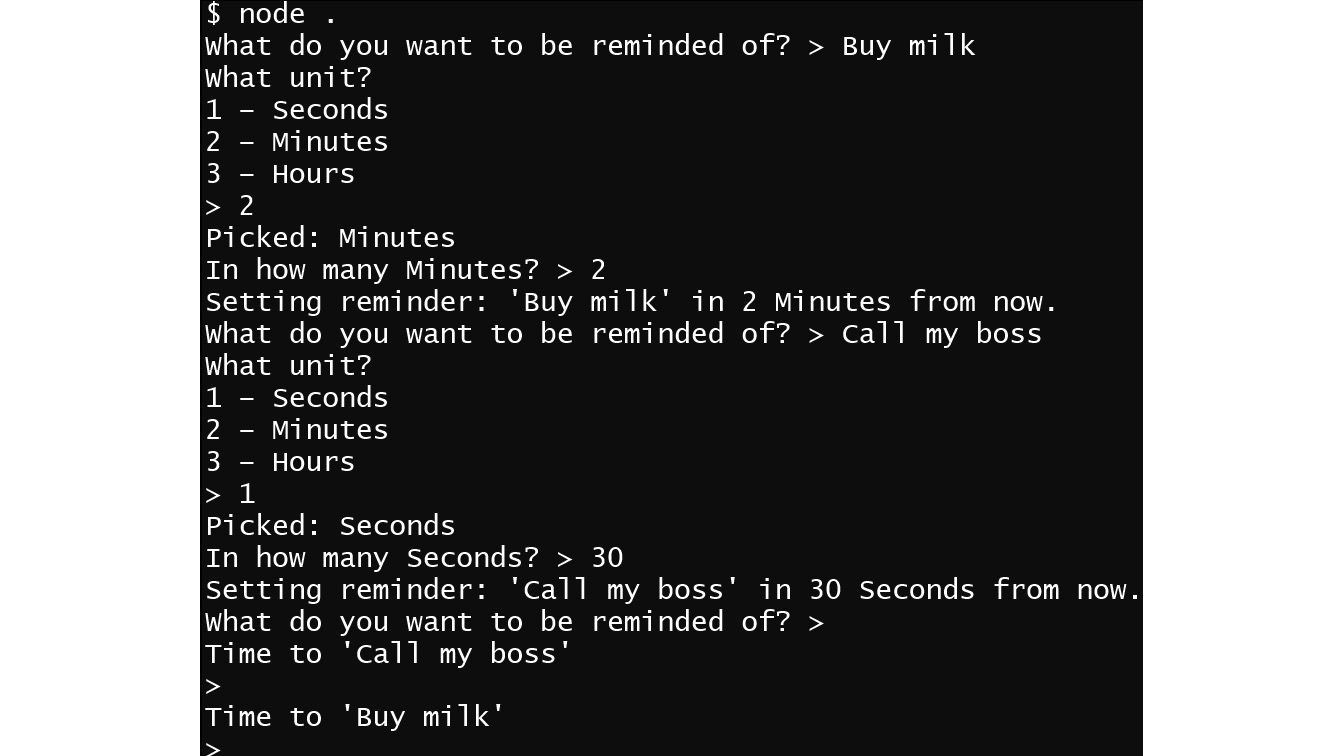
Figure 3.3: Output after running the application
You will notice that the only way to exit the application is to send the interrupt signal by pressing the Ctrl+C keys at the same time. As an extra challenge, try adding some code that will create an exit point so that the user can exit in a friendlier way.
Dealing with user inputs is fundamental for every command-line application. In this exercise, you learned how to master the asynchronous nature of Node.js so that you could handle a complex set of inputs to guide the user in the decision-making process of creating a reminder.
FileSystem APIs
In the previous section, we learned about the global variables available to us in the Node.js execution context. In this section, we will learn about the FileSystem APIs, which are the APIs that are used to access files and directories, read and write data to files, and much more.
But before we dig into the FileSystem APIs, we need to understand streams. In Node.js, a Stream is an abstract interface that represents streaming data. In the previous section, we used the standard I/O and briefly mentioned that they are streams, so let's understand them in detail.
Streams can be readable, writable, or both. They are event emitters, which means that to receive data, you need to register event listeners, just like we did with standard input in the previous section:
process.stdin.addListener('data', (data) => {
...
});
In the next section, we will continue to build on our understanding of the previous sections and see that streams are used as an abstraction to represent all the things that data can flow through, including standard input and outputs, files, and network sockets.
To start understanding how this works, we will write an application that reads its own code by using createReadStream from the filesystem package. To use the FileSystem APIs, we need to import them, since they are not globally available:
const fs = require('fs');
Then, we can create a readable stream that points to the script file itself:
const readStream = fs.createReadStream(__filename);
Finally, we register for the events of the stream so that we can understand what's going on. The read stream has four events that you should care about: ready, data, close, and error.
Ready tells you when the file is ready to start reading, although when you create a readable stream that points to a file, it will start reading the file immediately when it is available.
Data, as we saw with standard input, will be called by passing in the data that was read from the stream as a byte buffer. The buffer needs to be transformed into a string by either calling its toString method or by concatenating it with another string.
Close is called when all the bytes have been read, and the stream is not readable anymore.
Error is called if an error occurs while reading from the stream.
The following code demonstrates how we can register for the events by printing content to the console as the events occur:
readStream.on('data', (data) => console.log(`--data-- ${data}`));
readStream.on('ready', () => console.log(`--ready--`));
readStream.on('close', () => console.log(`--close--`));
The output of this application appears as follows:
$ node read_stream.js
--ready--
--data--
const fs = require('fs');
const readStream = fs.createReadStream(__filename);
readStream.on('data', (data) => console.log(`--data-- ${data}`));
readStream.on('ready', () => console.log(`--ready--`));
readStream.on('close', () => console.log(`--close--`));
--close--
Now that you know how to read a file and how to use read streams, let's take a look at writable streams in more detail. You saw some of their usage in the previous section, since standard output is a writable stream:
process.stdout.write('You typed: '${text}' ');
process.stderr.write('Exiting your application now. ');
The write method is the one most frequently used in writable streams. If you want to create a writable stream that writes to a file, you just need to pass the name of the filename:
const fs = require('fs');
const writable = fs.createWriteStream('todo.txt');
Then, you can start writing to it:
writable.write('- Buy milk ');
writable.write('- Buy eggs ');
writable.write('- Buy cheese ');
Don't forget to add the newline character at the end, otherwise everything will be printed in the same line.
After you're done writing to the file, you call the end method to close it:
writable.end();
Writable streams also have events you can listen to. The two most important ones are error and close. The error event will be triggered when an error occurs while writing to the stream. The close event will be called when the stream is closed. There's also the finish event, which will be triggered when the end method is called. The following code is the final part of the sample code that can be found on GitHub: https://github.com/TrainingByPackt/Professional-JavaScript/blob/master/Lesson03/sample_filesystem/write_stream.js:
writable.on('finish', () => console.log("-- finish --"));
writable.on('close', () => console.log("-- close --"));
After running the application, you will see that it will create the todo.txt file with the expected content in it:
$ node write_stream.js
-- finish --
-- close --
$ cat todo.txt
- Buy milk
- Buy eggs
- Buy cheese
Note
Creating a stream that points to a file will create a stream that overwrites the file content by default. To create a stream to append to the file, you need to pass an option object with the "a" flag, as in append, like so:
const writable = fs.createWriteStream('todo.txt', { flags: 'a'});
Another interesting thing about streams is that you can pipe them. This means that you can send all the bytes from a read stream to a write stream. You could easily copy the content of one file to another with the following code:
const fs = require('fs');
fs.createReadStream('somefile.txt')
.pipe(fs.createWriteStream('copy.txt'));
Besides reading and writing to files, the FileSystem APIs also provide methods so that you can list files in directories, check a file's status, watch a directory or file for changes, copy, delete, change file permissions, and so on.
When dealing with filesystem operations, you have to remember that the operations are asynchronous. This means that all the operations receive a callback that gets called when the operation has finished. When making a directory, for example, you could write the following code:
const firstDirectory = 'first';
fs.mkdir(firstDirectory, (error) => {
if (error != null) {
console.error(`Error: ${error.message}`, error);
return;
}
console.log(`Directory created: ${firstDirectory}`);
});
The callback receives an error argument if something goes wrong while trying to create a directory, for example, if the directory already exists. Running the code for the first time would work:
$ node directories_and_files.js
...
Directory created: first
But when running it for the second time, it would fail as the directory has already been created:
$ node directories_and_files.js
Error: EEXIST: file already exists, mkdir 'first' { [Error: EEXIST: file already exists, mkdir 'first'] errno: -17, code: 'EEXIST', syscall: 'mkdir', path: 'first' }
...
If you want to create a file in the directory you just created, you need to create the file inside the callback that is passed into mkdir. Doing it the following way can fail:
const firstDirectory = 'first';
fs.mkdir(firstDirectory, (error) => {
...
});
fs.writeFile(`${firstDirectory}/test.txt`, 'Some content', (error) => {
console.assert(error == null, 'Error while creating file.', error);
});
This happens when you try to run it:
$ node directories_and_files.js
Assertion failed: Error while creating file. { [Error: ENOENT: no such file or directory, open 'first/test.txt']
...
That's because when the call to writeFile happens, there's a chance that the directory still doesn't exist. The correct way to do it is to call writeFile inside the callback that's passed into mkdir:
const firstDirectory = 'first';
fs.mkdir(firstDirectory, (error) => {
...
fs.writeFile(`${firstDirectory}/test.txt`, 'Some content', (error) => {
console.assert(error == null, 'Error while creating file.', error);
});
});
Since dealing with the preceding asynchronous calls is complicated and not all cases require high-performance asynchronous operations, in the filesystem module, almost all operations include a synchronous version of the same API. So, if you wanted to make a directory and create a file with some content in it, and there's nothing else your application can be doing while the directory doesn't exist, you could write the code in the following way:
const thirdDirectory = 'third';
fs.mkdirSync(thirdDirectory);
console.log(`Directory created: ${thirdDirectory}`);
const thirdFile = `${thirdDirectory}/test.txt`;
fs.writeFileSync(thirdFile, 'Some content');
console.log(`File created: ${thirdFile}`);
Notice the Sync word at the end of each method name. The output of the preceding code is as follows:
$ node directories_and_files.js
Directory created: third
File created: third/test.txt
In Node.js 10, a promise-based API was also added to the filesystem module. Promises and other techniques that deal with asynchronous operations will be discussed in further chapters, so we will skip this for now.
Now that you know how to create directories and read and write data to files, let's move on to the next most frequently used filesystem operation: listing directories.
To list files in a directory, you can use the readdir method. The callback that's passed to the function will receive an error object if something goes wrong when you're trying to read the directory and a list of filenames. The following code will print the names of all the files in the current directory:
fs.readdir('./', (error, files) => {
if (error != null) {
console.error('Error while reading directory.', error);
return;
}
console.log('-- File names --');
console.log(files.join(' '));
});
This is a sample output:
$ node list_dir.js
-- File names --
.gitignore
copy_file.js
directories_and_files.js
first
list_dir.js
read_stream.js
second
third
write_stream.js
...
But sometimes, you want more than just filenames. Here, the readdir function accepts an options object, which can be provided with the withFileTypes flag. If the flag is passed, then what the callback gets, instead of filenames, is an array of Dirents, which contains some extra information about the file, such as if it is a directory or a file. The following example will print the filenames in the current directory and prepend it with a (D) or (F), depending on whether it is a directory or file, respectively:
fs.readdir('./', { withFileTypes: true }, (error, files) => {
if (error != null) {
console.error('Error while reading directory.', error);
return;
}
console.log('-- File infos --');
console.log(files.map(d => `(${d.isDirectory() ? 'D': 'F'}) ${d.name}`)
.sort()
.join(' '));
});
The sample output looks like this:
$ node list_dir.js
...
-- File infos --
(D) first
(D) second
(D) third
(F) .gitignore
(F) copy_file.js
(F) directories_and_files.js
(F) list_dir.js
(F) read_stream.js
(F) write_stream.js
The last operation of the FileSystem APIs that is important to be aware of is concerned with how to check the status of a file. If you just need to know whether a file exists and is readable, you can use the access function, which receives the path to the file and a set of status flags to check for. If the file state matches the specified flags, then no error will be passed to the callback. Let's take a look at an example:
const fs = require('fs');
const filename = process.argv[2];
fs.access(filename, fs.constants.F_OK | fs.constants.R_OK, (error) => {
if (error == null) {
console.log('File exists and is readable');
} else {
console.log(error.message);
}
});
In this example, we're combining two flags, F_OK and R_OK. The first checks whether the file exists, while the second checks whether it's readable. You can combine multiple flags with the | (or) operator.
After executing the preceding code, you would see the following output if the file exists:
$ node file_status.js test.txt
File exists and is readable
If the file doesn't exist, then you would see the following output:
$ node file_status.js not.txt
ENOENT: no such file or directory, access 'not.txt'
Finally, if the file exists but is not readable, you would receive the following message:
$ node file_status.js not.txt
EACCES: permission denied, access 'not.txt'
All of this looks interesting, but if you need to know whether a path is a file or a directory, when it was last modified, and so on, then you need to use the lstat function, which will return a Stats instance. Stats contains everything you need to know about a path.
The following example checks whether the path is a file or directory, when it was created and last modified, and prints that information to the console:
fs.lstat(filename, (statError, stat) => {
if (statError != null) {
console.error('Error while file status.', statError);
return;
}
console.log(`Is file: ${stat.isFile()}`);
console.log(`Is directory: ${stat.isDirectory()}`);
console.log(`Created at: ${stat.birthtime}`);
console.log(`Last modified at: ${stat.mtime}`);
});
This is a sample output:
$ node file_status.js first/test.txt
...
Is file: true
Is directory: false
Created at: Tue Aug 13 2019 20:39:37 GMT-0400 (Eastern Daylight Time)
Last modified at: Tue Aug 13 2019 21:26:53 GMT-0400 (Eastern Daylight Time)
Globs are path-like strings that contain parts of the path replaced by wildcards, represented by *. When you have two *, for example, **, this means any directory or subdirectory. A simple example is to search for all the .txt files in any subdirectory of the current directory:
$ search '**/*.txt'
Exercise 12: Searching for a File through a Directory Using Glob Pattern
In this exercise, we will create an application that will scan through a directory tree and search for files based on glob. To achieve this, we will recursively call the synchronous version of the readdir function and use the commander and the glob-to-regexp modules to help us with processing the user's input.
Perform the following steps to complete this exercise:
- In an empty directory, start a new application using npm init and add an index.js file, which will be our entry point.
- Install the two external modules that we will be using: commander and glob-to-regexp. For that, execute the npm install command:
$ npm install commander glob-to-regexp
npm notice created a lockfile as package-lock.json. You should commit this file.
added 2 packages from 2 contributors and audited 2 packages in 0.534s
found 0 vulnerabilities
- Inside the index.js file, using your favorite editor, import all the necessary modules for this project at the beginning of the file:
const fs = require('fs');
const globToRegExp = require('glob-to-regexp');
const join = require('path').join;
const program = require('commander');
We are already aware of the fs and commander modules. The globToRegExp module and join function will be explained in the upcoming steps.
- Initialize the counter and found variables. These will be used to show some statistics relating to the search being executed:
let counter = 0;
let found = 0;
const start = Date.now();
- Configure the commander to receive the glob as the argument and an extra option for the user to set the initial directory to start the search from:
program.version('1.0.0')
.arguments('<glob>')
.option('-b, --base-dir <dir>', 'Base directory to start the search.', './')
.parse(process.argv);
- For this exercise, we will use a recursive function to walk through the directory tree. The walkDirectory function calls readdirSync, with the withFileTypes flag set to true. The walkDirectory function receives two arguments: the path to start reading from and the callback to be called for each file. When a directory is found, it is passed to the walkDirectory function so that the recursion continues:
function walkDirectory(path, callback) {
const dirents = fs.readdirSync(path, { withFileTypes: true });
dirents.forEach(dirent => {
if (dirent.isDirectory()) {
walkDirectory(join(path, dirent.name), callback);
} else {
counter++;
callback(join(path, dirent.name));
}
});
}
When a file is found, the path is passed to the callback and the counter is incremented. Here, we use the path.join function to join the filename to the parent path to reconstruct the whole path to the file.
- Now that we have the walkDirectory tree function, we will validate the arguments that have been passed to the application:
const glob = program.args[0];
if (typeof glob === 'undefined') {
program.help();
process.exit(-1);
}
- Then, we use the globToRegExp module to transform the glob to a RegExp that can be used to test files:
const matcher = globToRegExp(program.args[0], { globstar: true });
- With the matcher and the walk directory tree function ready, we can now walk the directory tree and test each file we find:
walkDirectory(program.baseDir, (f) => {
if (matcher.test(f)) {
found++;
console.log(`${found} - ${f}`);
}
});
- Finally, since all the code is executing synchronously, after the call to walkDirectory finishes, all the directories and subdirectories will have been processed. Now, we can print the statistics of what we found:
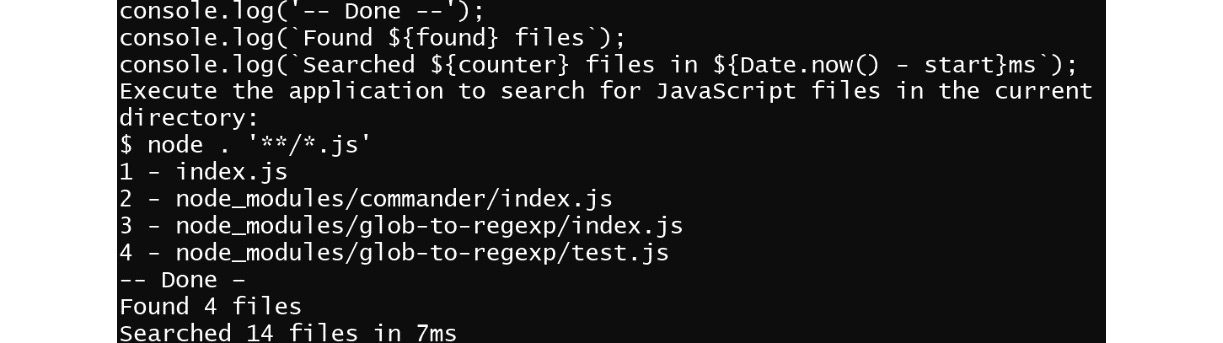
Figure 3.4: Statistics of the files found
You can execute the search by starting in the parent directory:
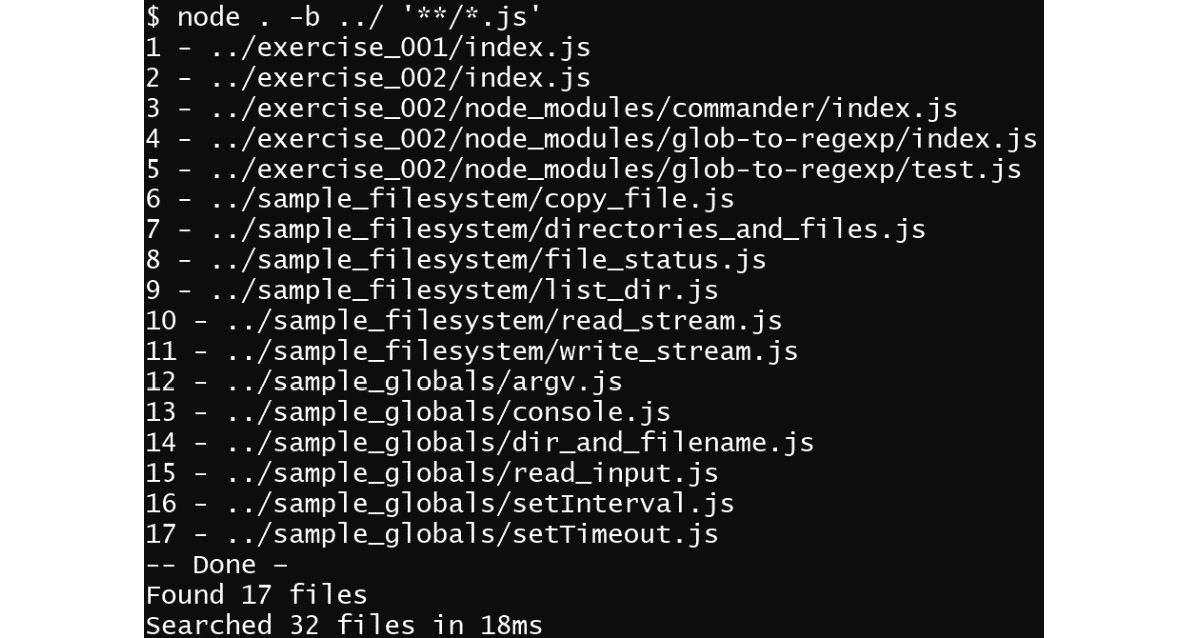
Figure 3.5: Executing the search in the parent directory
In this exercise, you learned how to use the FileSystem APIs to traverse a directory tree. You also used regular expressions to filter files by name.
The FileSystem APIs provide the foundation for almost every application. Learning how to use them synchronously and asynchronously is fundamental for anything you will be doing in the backend world. In the next section, we will use these APIs to build a basic web server to serve files to the browser.
HTTP APIs
In the beginning, Node.js was created with the objective of replacing old web servers that used the traditional model of one thread per connection. In the thread-per-request model, the server keeps a port open, and when a new connection comes in, it uses a thread from the pool or creates a new one to execute the work the user asked for. All of the operations on the server side happen synchronously, which means that while a file is being read from disk or a record from the database, the thread sleeps. The following illustration depicts this model:
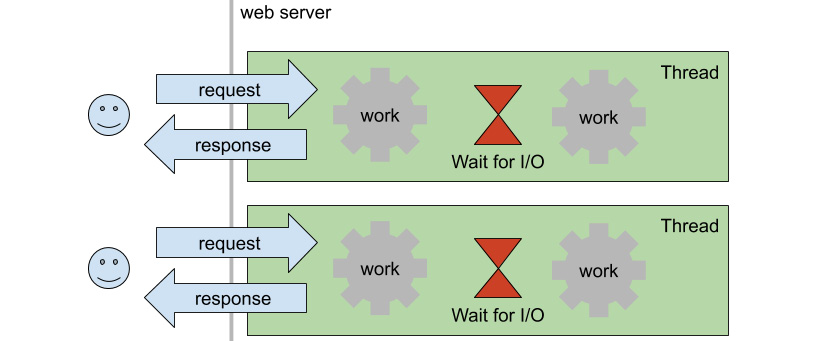
Figure 3.6: On the thread-per-request model, threads sleep while the I/O and other blocking operations happen
The problem with the thread-per-request model is that threads are expensive to create, and having them sleep while there's more work to do means a waste of resources. Another issue is that when the number of threads is higher than the number of CPUs, they start losing their most precious value: concurrency.
Because of these issues, web servers that used the thread-per-request model would have a thread pool that's not big enough so that the server can still respond to many requests in parallel. And because the number of threads is limited when the number of concurrent users making requests grows too much, the server runs out of threads and the users now have to wait:

Figure 3.7: Users have to wait for threads to become available when the number of concurrent requests grows
Node.js, with its asynchronous model and the event loop, brought the idea that you can be more efficient if you have only one thread to execute work and move the blocking and I/O operations to the background, only coming back to it when data is available to be processed. When you have data-intensive work to be done, such as with web servers, which mostly read and write from files, disks, and records from databases, the asynchronous model becomes much more efficient. The following illustration depicts this model:
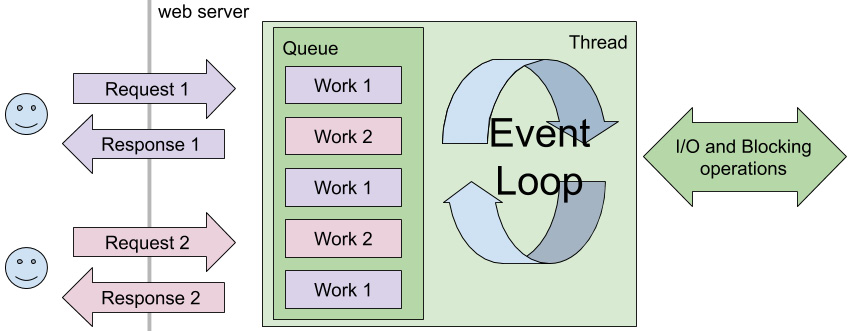
Figure 3.8: Asynchronous model with an event loop
Of course, this model is no silver bullet and, under heavy load and a high number of concurrent users, the amount of work on the queue will become so high that users will eventually start blocking each other.
Now that you know the history of the asynchronous model and why Node.js implemented it, let's build a simple hello world web server. In the upcoming chapters, you will learn more about REST APIs and how to use some libraries to help you do some more advanced things. For now, we will use the http module to build a server that returns a "hello world" string.
To create an HTTP server, you can use the createServer function from the http module. It's as simple as doing the following:
const http = require('http');
const server = http.createServer();
The server is driven by events, and the event that we're most interested in is the request. This event is triggered when an HTTP client connects to the server and initiates a request. We can listen to this event with a callback that receives two parameters:
- request: The request the client is sending to the server.
- response: The response object used to communicate with the client.
The response is a writable stream, which means we already know how to send data to it: by calling the write method. But it also contains a special method called writeHead, which will send back the HTTP status code and any additional headers. The following is an example of how to send the hello world string back to the client:
server.on('request', (request, response) => {
console.log('Request received.', request.url);
response.writeHead(200, { 'Content-type': 'text/plain' });
response.write('Hello world!');
response.end();
});
We have the server and the request handler. Now, we can start listening for requests on a specific port. To do that, we call the listen method on the server instance:
const port = 3000;
console.log('Starting server on port %d.', port);
console.log('Go to: http://localhost:%d', port);
server.listen(port);
The code for this sample is available in GitHub at https://github.com/TrainingByPackt/Professional-JavaScript/blob/master/Lesson03/sample_http/http_server.js.
If you start the hello world server by running this application, you will see something like this in your console:
$ node http_server.js
Starting server on port 3000.
Go to: http://localhost:3000
And if you open your browser and go to the specified path, you will see the following:

Figure 3.9: Hello world web server example response
You can try reaching other paths such as http://localhost:3000/index.html, for example. The result will be the same:

Figure 3.10: Hello world server always responds with Hello world
If you go back to the console where you're running your server from, you will see something like the following:
$ node http_server.js
Starting server on port 3000.
Go to: http://localhost:3000
Request received. /
Request received. /favicon.ico
Request received. /index.html
Request received. /favicon.ico
You can see that the server is receiving the path correctly from the browser. However, because the code doesn't handle any special case, it just returns Hello world. Clients always get the same result, no matter what path they request.
Exercise 13: Serving Static Files
We have learned how to build a hello world web server that always responds with the same string, no matter what the client asks for. In this exercise, we're going to create an HTTP server that serves files from a directory. This type of server is called a static HTTP server since it only finds files in a directory and returns them to the client without any modification.
Perform the following steps to complete this exercise:
- In an empty directory, initialize a new npm application using the init command and add an index.js file to it. Also, install the mime package using npm install. We will use this package to determine what the content type is for the files we will be serving:
npm install mime
- Let's start by importing all the modules we will need for this project:
const fs = require('fs');
const http = require('http');
const mime = require('mime');
const path = require('path');
const url = require('url');
We will use the fs module to load files from disk. The http module will be used to create the HTTP server and handle the HTTP requests. The mime module is the one we installed in the previous step and will be used to determine the content type for each file. The path module is used to handle paths in a platform-independent way. Finally, the url module is used to parse URLs.
- To know which files we will have to serve, we will scan the directory using the walkDirectory function from the previous exercise:
function walkDirectory(dirPath, callback) {
const dirents = fs.readdirSync(dirPath, { withFileTypes: true });
dirents.forEach(dirent => {
if (dirent.isDirectory()) {
walkDirectory(path.join(dirPath, dirent.name), callback);
} else {
callback(path.join(dirPath, dirent.name));
}
});
}
- Then, we will pick the root directory, which can be passed as an argument. Otherwise, we will just assume it is the directory from where we're running the script:
const rootDirectory = path.resolve(process.argv[2] || './');
- Now, we can scan the directory tree and store the path to all files in a Set, which will make the process of checking the availability of the file quicker:
const files = new Set();
walkDirectory(rootDirectory, (file) => {
file = file.substr(rootDirectory.length);
files.add(file);
});
console.log(`Found ${files.size} in '${rootDirectory}'...`);
- With the list of files ready to serve, we will create the HTTP server instance:
const server = http.createServer();
- Start the request handler function:
server.on('request', (request, response) => {
- Inside the handler function, parse what the user is requesting to a URL. For this, we will use the url module and, from the parsed URL, we will fetch the pathname that points to the file the client wants:
const requestUrl = url.parse(request.url);
const requestedPath = path.join(requestUrl.pathname);
- With the path to the file, we will check whether the file is in the list we collected before and, if not, respond with a 404 (not found) error message, log the result of the request, and return it:
if (!files.has(requestedPath)) {
console.log('404 %s', requestUrl.href);
response.writeHead(404);
response.end();
return;
}
- If the file is in the Set, we will use the path module to extract its extension and resolve the content type using the mime module. Then, we will respond with a 200 (ok) error message, create a read stream to the file, and pipe it to the response:
const contentType = mime.getType(path.extname(requestedPath));
console.log('200 %s', requestUrl.href);
response.writeHead(200, { 'Content-type': contentType });
fs.createReadStream(path.join(rootDirectory, requestedPath))
.pipe(response);
});
- That's all for the handler function. After that, we can start the server by picking a port, letting the user know what that is, and calling what to listen to the method in the http server:
const port = 3000;
console.log('Starting server on port %d.', port);
console.log('Go to: http://localhost:%d', port);
server.listen(port);
- You can start the server by running the following command:
$ node .
Found 23 in '/Path/to/Folder'...
Starting server on port 3000.
o to: http://localhost:3000
- From another Terminal window, we can use the command-line HTTP client curl to call our server and see the response:
$ curl -i localhost:3000/index.js
HTTP/1.1 200 OK
Content-type: application/javascript
Date: Fri, 16 Aug 2019 02:06:05 GMT
Connection: keep-alive
Transfer-Encoding: chunked
const fs = require('fs');
const http = require('http');
const mime = require('mime');
... rest of content here....
We can also do the same from the browser:
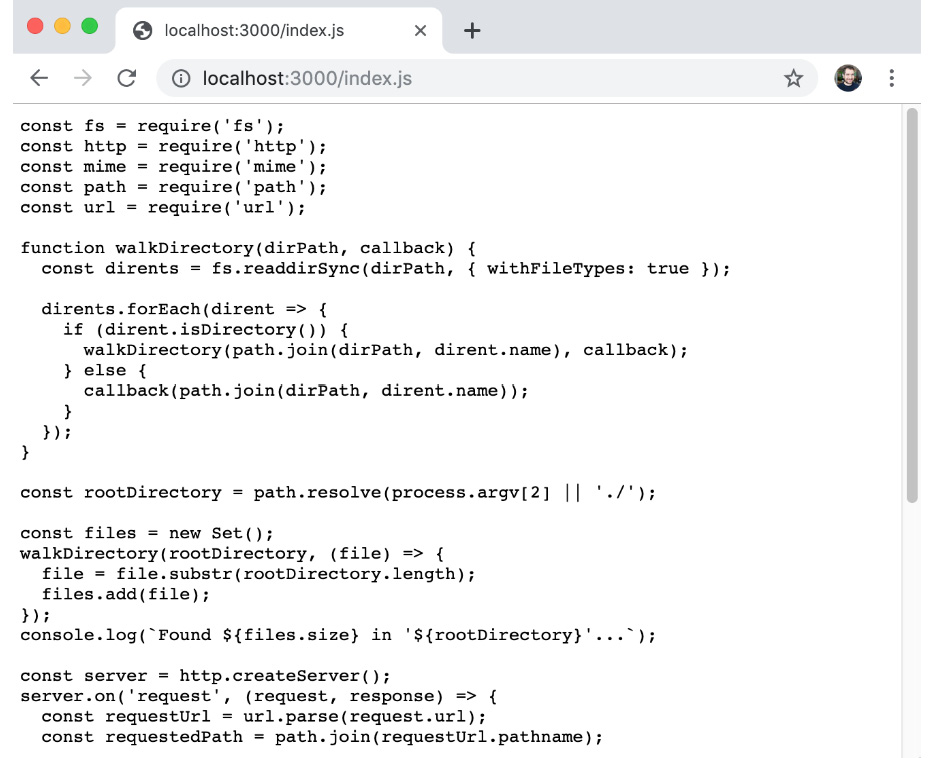
Figure 3.11: Static index.js served from our HTTP server as viewed from the browser
You can also try this with a file that doesn't exist to see the result:
$ curl -i localhost:3000/not_real.js
HTTP/1.1 404 Not Found
Date: Fri, 16 Aug 2019 02:07:14 GMT
Connection: keep-alive
Transfer-Encoding: chunked
From the browser, the 404 response looks like an error page:

Figure 3.12: The server responds with a 404 error when asked for a file that doesn't exist
On the Terminal where you're running the server, you can see that it prints information about what's being served:
$ node .
Found 23 in '/Path/to/Folder'...
Starting server on port 3000
Go to: http://localhost:3000
200 /index.js
404 /not_real.js
With just a few lines of code, you were able to build an HTTP server that serves static content.
An HTTP server is one of the fundamental components of the internet. Node.js makes it simple to build powerful servers. In this exercise, with just a few lines of code, we have built a static HTTP server. In the rest of this section, we will learn how to build a dynamic server that can generate HTML using templates and data that have passed in the request and also loaded from other data sources, such as a JSON file.
Before we move on to building a dynamic HTTP server, let's take a look at the HTTP client APIs that are available in Node.js. To test the HTTP client APIs, we will be using HTTP Bin, a free service that can be used to test HTTP requests. You can read more about it here: https://httpbin.org.
In the upcoming chapters, you will learn about what each HTTP method means, but for now, we will just explore two of them: GET and POST. HTTP GET is what we have been using until now. It tells the server: "Go get this URL for me." HTTP POST means: "Store this content at this URL for me." In the static server we built in the previous exercise, it was a real path to a real file on disk. But it can be used in whatever way the server sees fit.
Let's use Node.js to execute a GET request to the httpbin API. The HTTP client module lives in the same module as the server since it uses a lot of the same constructs. Therefore, we have to require the http module:
const http = require('http');
Since GET is such a widely used HTTP method, the http module has an alias for it. We can execute GET by calling the get function:
const request = http.get('http://httpbin.org/get', (response) => {
The get function receives the URL and a callback, which will be called and passed to the response as soon as the server starts sending it. The response that's passed to the callback is a readable stream that we can get data from by listening to the data event:
response.on('data', (data) => {
console.log(data.toString());
});
The data here is the body of the response. If we just print it to the console, we will see the response in the Terminal.
The request instance that's returned by the get method is a writable stream. To tell the server that we're done with the request, we need to call the end method:
request.end();
The following is some sample output from the preceding code, which can be found on GitHub at https://github.com/TrainingByPackt/Professional-JavaScript/blob/master/Lesson03/sample_http/http_client_get.js:
$ node http_client_get.js
{
"args": {},
"headers": {
"Host": "httpbin.org"
},
"origin": "100.0.53.211, 100.0.53.211",
"url": "https://httpbin.org/get"
}
You can see that it printed the response body to the Terminal.
Sometimes, you need to send some extra headers or use HTTP basic authentication. For that, the get method accepts an options object, where you can set headers, basic authentication, and so on. The following is a sample options object where a custom header and basic authentication have been set:
const options = {
auth: 'myuser:mypass',
headers: {
Test: 'Some Value'
}
};
Then, you pass the options object before the callback function:
const request = http.get(url, options, (response) => {
The following snippet is the output of preceding code, which is also available on GitHub at https://github.com/TrainingByPackt/Professional-JavaScript/blob/master/Lesson03/sample_http/http_client_get_with_headers.js:
$ node http_client_get_with_headers.js
{
"args": {},
"headers": {
"Authorization": "Basic bXl1c2VyOm15cGFzcw==",
"Host": "httpbin.org",
"Test": "Some Value"
},
"origin": "100.0.53.211, 100.0.53.211",
"url": "https://httpbin.org/get"
}
httpbin responds with all the information that we passed in our request. You can see that there are two extra headers now, Test and Authorization, with the values we specified. The authorization header is base64-encoded, as specified in the Basic Authentication spec.
As we mentioned previously, the get method is just an alias. The request method is the more flexible version of it and can be used to execute an HTTP POST request. Even though it is more flexible, the request method receives the same arguments: url, options, and callback.
To specify the HTTP method to be executed, we set it in the options object:
const options = {
method: 'POST',
};
Then, we call the request function, instead of the get function:
const request = http.request(url, options, (response) => {
If you want to post data to the server, you can use the request object we created. Remember that it is a writable stream, so we can write the content directly to it:
request.write('Hello world.');
After you're done writing the data to the request, call the end method and the request is done:
request.end();
Some sample code that uses the write and end methods we explained previously is available on GitHub at https://github.com/TrainingByPackt/Professional-JavaScript/blob/master/Lesson03/sample_http/http_client_post.js.
The following is the output of running the preceding code:
$ node http_client_post.js
{
"args": {},
"data": "Hello world.",
"files": {},
"form": {},
"headers": {
"Content-Length": "12",
"Host": "httpbin.org"
},
"json": null,
"origin": "100.0.53.211, 100.0.53.211",
"url": "https://httpbin.org/post"
}
You can see that the http module automatically sets the Content-Length header, based on the amount of data you sent. You can also see that the data attribute is set on the response, indicating the data that the server received.
Exercise 14: Serving Dynamic Content
In this exercise, we will be rewriting the storefront from the previous chapter. But now, the content will be served dynamically, and the HTML will be generated on the server side. For that, we will have an array of products stored in a JSON file, which will be loaded and used to generate an HTML file to return to the client.
There are many ways of generating HTML to send to clients: concatenating strings, search and replace, template strings, and even a library such as cheerio could be used. Templating is, in general, the easiest since you can store the template in a separate file that can be written just like a normal HTML file but with some placeholders. For this exercise, we will use the handlebars templating library to do the hard work.
Perform the following steps to complete this exercise:
- Create a new npm package with an index.js file in it. Install the two external packages that we will use in this exercise:
$ npm init
...
$ npm install handlebars mime
updated 2 packages and audited 10 packages in 1.075s
found 0 vulnerabilities
The handlebars package is a template engine. It can be used to render template text with placeholders and some basic logic, such as for loops and if/else statements. We will also be using the mime package we used previously to determine the content type of files that are going to be served statically.
- Require all the modules that will be used in the application:
const fs = require('fs');
const handlebars = require('handlebars');
const http = require('http');
const mime = require('mime');
const path = require('path');
const url = require('url');
- Check the path for static files using a base directory. That directory will be the static directory where the script is loaded from. We store that path in a variable so that we can use it later:
const staticDir = path.resolve(`${__dirname}/static`);
console.log(`Static resources from ${staticDir}`);
- Next, we load the product array from the JSON file using readFileSync. We parse the JSON using the built-in JSON.parse function and then print the number of products found to the console:
const data = fs.readFileSync(`products.json`);
const products = JSON.parse(data.toString());
console.log(`Loaded ${products.length} products...`);
Handlebars have a concept of helper functions. These are functions that can be registered and used from within your templates. To register a helper function, you call the registerHelp function, passing the name of your helper as the first argument and the handler function as the second.
- Let's add a helper function that can be used to format currency:
handlebars.registerHelper('currency', (number) => `$${number.toFixed(2)}`);
- To initialize the HTTP handler and start listening to connections, we will use the following function:
function initializeServer() {
const server = http.createServer();
server.on('request', handleRequest);
const port = 3000;
console.log('Go to: http://localhost:%d', port);
server.listen(port);
}
We registered a function called handleRequest with our HTTP server. This is the root handler, and all requests will go through it. For this application, we're expecting two types of requests: the first is static requests that will point to css, images, and other static files, while the second is a request to get the storefront HTML. This means that our root handler will only care about these two.
- To request the storefront, we will assume that when the user requests / or /index.html (http://localhost:3000/ or http://localhost:3000/index.html), the user is trying to access the store, also known as the base or root page of an application. Everything else will be considered a static resource. To handle these requests, we will parse the URL, check the pathname, and use an if statement:
function handleRequest(request, response) {
const requestUrl = url.parse(request.url);
const pathname = requestUrl.pathname;
if (pathname == '/' || pathname == '/index.html') {
handleProductsPage(requestUrl, response);
return;
}
handleStaticFile(pathname, response);
}
- To handle static files, we will prepend the path to the directory where the static files should come from and use that as the full path. Then, we will check whether the file exists and is readable using the access function from the filesystem API. If there's an error, then return a 404 error; otherwise, just create a readable stream and pipe the content of the file to the response. We also want to use the mime library to check the content type for each file and add a header to the response:
function handleStaticFile(pathname, response) {
// For security reasons, only serve files from static directory
const fullPath = path.join(staticDir, pathname);
// Check if file exists and is readable
fs.access(fullPath, fs.constants.R_OK, (error) => {
if (error) {
console.error(`File is not readable: ${fullPath}`, error);
response.writeHead(404);
response.end();
return;
}
const contentType = mime.getType(path.extname(fullPath));
response.writeHead(200, { 'Content-type': contentType });
fs.createReadStream(fullPath)
.pipe(response);
});
}
- Now that we have the function to serve static files, let's use handlebars to serve the dynamic content. For that, we need to load the HTML template using readFileSync and then compile it. The compiled script is transformed into a function that, when called, returns a string of the processed template.
The template function receives the context that will be used to render the template. The context can be accessed in the template, which will be demonstrated in the next step. For this application, the context will be an object with one attribute called products:
const htmlString = fs.readFileSync(`html/index.html`).toString();
const template = handlebars.compile(htmlString);
function handleProductsPage(requestUrl, response) {
response.writeHead(200);
response.write(template({ products: products }));
response.end();
}
- With the template handling in place, we need a template. Handlebars uses double curly braces as placeholders (for example, {{variable}}), and you can execute a for loop using the double curly braces with a hash: {{#arrayVariable}}. In a separate html/index.html file, relative to the index.js file, add the following HTML template:
<html>
<head>
<link rel="stylesheet" type="text/css" href="css/semantic.min.css" />
<link rel="stylesheet" type="text/css" href="css/store.css" />
</head>
<body>
<section>
<h1 class="title">Welcome to Fresh Products Store!</h1>
<div class="ui items">
{{#products}}
<div class="item">
<div class="image"><img src="{{image}}" /></div>
<div class="content">
<a class="header">{{name}}</a>
<div class="meta">
<span>{{currency price}} / {{unit}}</span>
</div>
<div class="description">{{description}}</div>
<div class="extra">
{{#tags}}
<div class="ui label teal">{{this}}</div>
{{/tags}}
</div>
</div>
</div>
{{/products}}
</div>
</section>
</body>
</html>
Notice the helper function, currency, which is called to render the price: {{currency price}}.
- Don't forget to call the initialize function at the end to start listening for HTTP connections:
initializeServer();
To make the storefront load and render correctly, you will also need the css files and images. Just put them all in a folder called static. You can find the files on GitHub at https://github.com/TrainingByPackt/Professional-JavaScript/tree/master/Lesson03/Exercise14.
- With all the files in place, run the server:
$ node .
Static resources from
.../Lesson03/Exercise14/static
Loaded 21 products...
Go to: http://localhost:3000
- Open a browser window and go to http://localhost:3000. You should see the storefront:
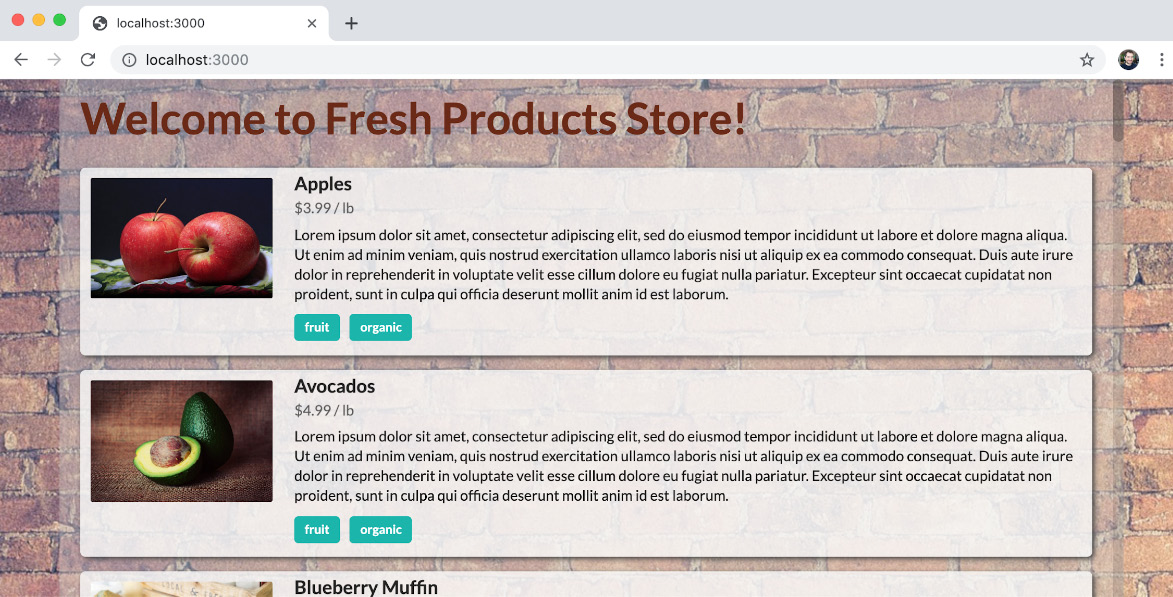
Figure 3.13: Storefront served from the dynamic web server
In this exercise, we transformed the storefront application into a dynamic web application that reads data from a JSON file and renders an HTML request when the user requests it.
Dynamic web servers are the basis of all online applications, from Uber to Facebook. You can summarize the work as loading data/processing data to generate HTML. In Chapter 2, Node.js and npm, we used some simple HTML and did the processing in the frontend. In this exercise, you learned how to do the same work on the backend using a template engine. Each methodology has its pros and cons and most applications end up with a combination of both.
You can add filtering options to the storefront web page as an improvement. Let's say the users want to filter the products by tag or a combination of them. In your handleProductsPage function, you could use query parameters to filter the list of products you're passing to the template for rendering. See if you can make this improvement yourself.
What is Scraping?
For the remainder of this chapter, we will be talking about web scraping. But what exactly is web scraping? It's the process of downloading a page and processing its content to execute some repetitive automated tasks that would otherwise take too long to do manually.
For example, if you want to get car insurance, you need to go to each insurance company website and get a quote. That process normally takes hours since you have to fill in a form, submit it, wait for them to send you an email on each website, compare prices, and pick the one you want:

Figure 3.14: The user downloads content, types data in, submits it, and then wait for the results
So why not make a program that can do that for you? That's what web scraping is all about. A program downloads a page as if it were a human, scrapes information from it, and makes decisions based on some algorithm, and submits the necessary data back to the website.
When you're getting insurance for your car, it doesn't seem like automating would bring much value. Writing an application that does that correctly for different websites would take many hours – more than doing it yourself manually. But what if you were an insurance broker? Then you would have to do this hundreds of times a day, maybe more.
If you are an insurance broker company, and if you spend your time building one robot (that's what these applications are called), you will start to become more efficient. That's because, for that one website, you won't be spending time filling out the forms. With the efficiency that you got from building your first robot, you can save time and be able to build a second one, then a third one, and so forth:

Figure 3.15: Robot executing the task automatically by downloading content and making decisions based on an algorithm
Web scraping started in the early days of the internet when Yahoo! was trying to manually index all the websites that existed. Then, a start-up, out of two college students' garages, started using robots to pull the data and index everything. In a very short amount of time, Google became the number one search website, a position that only gets harder and harder for competitors to challenge.
Web scraping is a widely used technique to extract data from websites that do not provide APIs, such as most insurance companies and banks. Search and indexing is also another very common case. Some companies use scraping to analyze a website's performance and grade them, such as HubSpot (https://website.grader.com).
There are many techniques for web scraping, depending on what goal you're trying to achieve. The most basic one is to download the base HTML from a website and read the content from there. If you only need to download data or fill in a form, this might be more than enough:

Figure 3.16: The basic scraping technique involves downloading and processing the base HTML file
But sometimes, websites use Ajax to dynamically load the content after the HTML has been rendered. For those cases, just downloading the HTML wouldn't be enough since it would just be an empty template. To solve that, you can use a headless browser, which works like a browser, parsing all HTML, downloading and parsing the related files (CSS, JavaScript, and so on), rendering everything together, and executing the dynamic code. That way, you can wait for the data to be available:

Figure 3.17: Depending on the use case, scraping requires a simulated or a fully headless browser to download and render the page more accurately
The second technique is much slower since it requires the whole page to download, parse, and render. It is also much more brittle since executing the extra calls can fail, and waiting for JavaScript to finish processing the data can be hard to predict.
Downloading and Parsing Web Pages
Let's examine the simpler approach to web scraping. Suppose we wanted to follow the latest posts about JavaScript in Medium. We could write an application to download the JavaScript topic page, then search for anchors (links), and use that to navigate around.
To start, having a generic download function that will do some basic wrapping on the HTTP client is a good idea. We could use an external library, such as request, but let's see how we would go about wrapping that kind of logic.
We will need the http module, but in this case, we will use the https version of it, since most websites these days will redirect you to their secure version if you try to reach the plain HTTP version. The https module provides the same APIs except it understands HTTPS protocol, which is the secure version of HTTP:
const http = require('https');
The downloadPage function receives a URL to download and a callback function that will be called after the content of the page has finished downloading:
function downloadPage(urlToDownload, callback) {
}
Inside that function, we will start by making a request and ensuring that we are calling the end function to complete the request:
const request = http.get(urlToDownload, (response) => {
});
request.end();
In the callback we pass to the get function, the first thing we will do is check for the response status and print an error message if it doesn't match 200, which is the HTTP code that means we have a successful request. We also stop everything by returning from the callback since the body will probably not be what we're expecting if this happens:
if (response.statusCode != 200) {
console.error('Error while downloading page %s.', urlToDownload);
console.error('Response was: %s %s', response.statusCode, response.statusMessage);
return;
}
After that if statement, we can accumulate the content of the page in a variable using the data event. When the connection is closed, in the close event, we call the callback function with the full content that was accumulated in the content variable:
let content = '';
response.on('data', (chunk) => content += chunk.toString());
response.on('close', () => callback(content));
The full code for this sample is available on GitHub at https://github.com/TrainingByPackt/Professional-JavaScript/blob/master/Lesson03/sample_scraping/print_all_texts.js.
A simple usage of this function would be as follows:
downloadPage('https://medium.com/topic/javascript', (content) => {
console.log(content);
});
This would download the page and print it to the console. But we want to do more, so we will use the jsdom library to parse the HTML and fetch some information from it. jsdom is a library that parses HTML and generates a DOM representation of it that can be queried and manipulated, just like the DOM in a browser.
After installing it using the npm install command, you can require it in your code. The module exposes a constructor that receives a string. After being instantiated, the JSDOM instance contains a window object that works exactly like the window object in the browser. The following is an example of using it to fetch all the anchors, filter out the ones that are empty, and print their texts:
const JSDOM = require('jsdom').JSDOM;
downloadPage('https://medium.com/topic/javascript', (content) => {
const document = new JSDOM(content).window.document;
Array.from(document.querySelectorAll('a'))
.map((el) => el.text)
.filter(s => s.trim() != '')
.forEach((s) => console.log(s));
});
The following is the sample output of the preceding code:
$ node print_all_texts.js
Javascript
Become a member
Sign in
14 Beneficial Tips to Write Cleaner Code in React Apps
Be a hygienic coder by writing cleaner
14 Beneficial Tips to Write Cleaner Code in React Apps
Be a hygienic coder by writing cleaner
...
Exercise 15: Scraping Medium Articles
In this exercise, we will use scraping to print articles in the console. Let's use this knowledge to build an application that will download topic pages from Medium, parse the information, and print it in a consumable way. The application will have a hardcoded list of topics and will download the HTML for each of the pages. Then, it will use jsdom to parse the downloaded content, fetch information about each article, and print that in a pretty format in the console to make each article just a click away.
Perform the following steps to complete this exercise:
- Create a new folder, with an index.js file in it. Then, run npm init and install jsdom using npm install:
$ npm init
...
$ npm install jsdom
added 97 packages from 126 contributors and audited 140 packages in 12.278s
found 0 vulnerabilities
- In the index.js file, use the require function for all the modules we will be using:
const http = require('https');
const JSDOM = require('jsdom').JSDOM;
const url = require('url');
- Create a constant array that will contain all the topics we will be downloading pages for:
const topics = [
'artificial-intelligence',
'data-science',
'javascript',
'programming',
'software-engineering',
];
- Copy the downloadPage function we created in the previous section:
function downloadPage(urlToDownload, callback) {
const request = http.get(urlToDownload, (response) => {
if (response.statusCode != 200) {
console.error('Error while downloading page %s.', urlToDownload);
console.error('Response was: %s %s', response.statusCode, response.statusMessage);
return;
}
let content = '';
response.on('data', (chunk) => content += chunk.toString());
response.on('close', () => callback(content));
});
request.end();
}
- Iterate over each topic calling the downloadPage function for each topic:
topics.forEach(topic => {
downloadPage(`https://medium.com/topic/${topic}`, (content) => {
const articles = findArticles(new JSDOM(content).window.document);
Object.values(articles)
.forEach(printArticle);
});
});
In the preceding code, we call two functions: findArticles and printArticle. The first will go through the DOM parsed from the page and return an object, of which the keys are the article titles and the values are objects containing information about each article.
- Next, we write the findArticles function. We start by initializing the object, which will be the result of the function, and then querying the document that was passed in for all the anchor elements inside the H1 and H3 elements, which represent the title of the articles:
function findArticles(document) {
const articles = {};
Array.from(document.querySelectorAll('h1 a, h3 a'))
- Filter the anchors based on the fact that Medium article paths have two parts: /author/articleId. This means we can parse the href of the anchor as a URL, get the pathname, split using "/" as a separator, and ignore anyone that doesn't have exactly two parts:
.filter(el => {
const parsedUrl = url.parse(el.href);
const split = parsedUrl.pathname.split('/').filter((s) => s.trim() != '');
return split.length == 2;
})
Using the Chrome Developer Tools on the page, you can see that the title of the article lives inside a header element whose next sibling is a DIV that contains the following short description:

Figure 3.18: The next sibling of the parent contains a short description of the article
This means that for each anchor element, we can get that DIV, query for an anchor, and fetch its text as the description for the article.
- Set the article information in the result object using the title as the key. We use the title of the article as the key because that will automatically deduplicate articles from the result:
.forEach(el => {
const description = el.parentNode.nextSibling.querySelector('p a').text;
articles[el.text] = {
description: description,
link: url.parse(el.href).pathname,
title: el.text,
};
});
- Lastly, from the findArticles function, we return the array containing all the articles:
return articles;
}
The other function we call inside the callback passed to downloadPage is printArticle. It is also the last piece of code to make this application.
- Let's write the printArticle function, which receives an article object and prints it to the console in a pretty way:
function printArticle(article) {
console.log('-----');
console.log(` ${article.title}`);
console.log(` ${article.description}`);
console.log(` https://medium.com${article.link}`);
}
Run the application to print the articles to the console with the extra information in a nice format:

Figure 3.19: Article printed to the console after running the application
In this exercise, we wrote an application that pulls data from Medium and prints a summary of the articles found to the console.
Web scraping is a powerful way of fetching data when no API is available. Many companies use scraping to sync data between systems, to analyze the performance of websites, and to optimize processes that otherwise would not scale, thus blocking some important business needs. Understanding the concepts behind scraping allows you to build systems that would otherwise be impossible to build.
Activity 4: Scraping Products and Prices from Storefront
In Chapter 2, Node.js and npm, we wrote some code that would fetch information about the products in the storefront example page. At the time, we said that the site wasn't going to be updated that frequently, so manually doing it from the Chrome Developer Console was fine. For some scenarios, this is fine, but when the content is dynamically generated, like in the newer version of the storefront that we wrote in this chapter, we might need to eliminate all manual intervention.
In this activity, you will write an application that will scrape the storefront web page by downloading it using the http module and parsing it using jsdom. Then, you will extract the data from the DOM and generate a CSV file with the data.
You will need to perform the following steps to complete this activity:
- Use the previous code you built or use a copy of it to serve the storefront website in localhost:3000. The code can be found on GitHub at https://github.com/TrainingByPackt/Professional-JavaScript/tree/master/Lesson03/Activity04.
- Create a new npm package, install the jsdom library, and create an entry file called index.js.
- In the entry file, call the require() method to load all the modules that are needed in the project.
- Make an HTTP request to localhost:3000.
- Ensure a successful response and collect data from the body.
- Parse the HTML using jsdom.
- Extract the product data from DOM; you will want the name, price, and unit.
- Open the CSV file where the data will be written to.
- Write the product data to a CSV file, which is one product line.
- Run the application and check the results.
The output should look something like this:
$ node .
Downloading http://localhost:3000...
Download finished.
Parsing product data...
.....................
Found 21 products.
Writing data to products.csv...
Done.
$ cat products.csv
name,price,unit
Apples,3.99,lb
Avocados,4.99,lb
Blueberry Muffin,2.5,each
Butter,1.39,lb
Cherries,4.29,lb
Chocolate Chips Cookies,3.85,lb
Christmas Cookies,3.89,lb
Croissant,0.79,each
Dark Chocolate,3.49,lb
Eggs,2.99,lb
Grapes,2.99,lb
Milk Chocolate,3.29,lb
Nacho Chips,2.39,lb
Parmesan Cheese,8.99,lb
Pears,4.89,lb
Petit French Baguette,0.39,each
Smiling Cookies,2.79,lb
Strawberries,7.29,lb
Swiss Cheese,2.59,lb
White Chocolate,3.49,lb
Whole Wheat Bread,0.89,each
Note
The solution for this activity can be found on page 591.
Summary
In this chapter, we learned about the global variables that are available to every Node.js script. We learned how to set timers and read from, and write to, the console. After that, we learned about streams and how to use them to read and write data from files. We also learned how to use the synchronous filesystem APIs. Then, we learned how to use the HTTP module to build web servers and scrape content from web pages.
Now that you are well acquainted with the web scraping concept, you are ready to explore opportunities where you can build your own web applications and build automated robots to scrape content from other web applications. A good idea is to try and build a simple content management application to serve your blog, where you're going to write about all the new things you just learned about.
In the next chapter, you will learn about REST APIs and use some frameworks to help you build them. In further chapters, you will learn about techniques you can use to manage asynchronous operations to make your Node.js applications powerful, but keep the code easy to write and maintain.