Learning Objectives
By the end of this chapter, you will be able to:
- Install and use Node.js to build applications
- Run JavaScript code using the Node.js execution environment
- Install and manage multiple Node.js versions using nvm
- Identify and use modules developed by other developers using npm
- Create and configure your own npm package
In this chapter, we will switch gears to the backend world by learning about Node.js and the basic concepts around it. We will go through how to install and manage multiple versions of Node.js using nvm, and then we will learn about npm and how to find and use external modules.
Introduction
In the previous chapter, we learned about how HTML becomes the DOM and how to use JavaScript to query and manipulate the content of a page.
Before JavaScript, all pages were static. After Netscape introduced the scripting environment to its browser, developers started using it to create dynamic and responsive applications. The applications started to become more and more complex but the only place where JavaScript was running was inside the browser. Then, in 2009, Ryan Dahl, the original developer of Node.js, decided to create a way to run JavaScript on the server side, simplifying the web developer's life by allowing them to build applications without having to depend on other languages.
In this chapter, you will learn how Node.js works and how to use it to create scripts using JavaScript. You will learn about the basics of the Node.js core APIs, where to find their documentation, and how to use their read-eval-print loop (REPL) command line.
With the skills to build JavaScript code, you will then learn how to manage multiple versions of Node.js and understand the importance of Node.js. You will also learn what npm is and how to import and use packages from other developers and build Node.js applications.
What is Node.js?
Node.js is an execution environment that runs on top of the V8 JavaScript engine. Its base premise is that it is asynchronous and event-driven. This means that all the blocking operations, such as reading data from a file, can be handled in the background while the other parts of the application continue to do their work. When the data has finished loading, an event is emitted and whoever was waiting for the data can now execute and do the work.
From its inception, Node.js was designed to serve as an efficient backend for web applications. Because of that, it was widely adopted by companies of all sizes and industry types. Trello, LinkedIn, PayPal, and NASA are some of the companies that use Node.js in multiple parts of their technology stack.
But what is an execution environment? An execution environment provides basic functionality, such as APIs, for a programmer to write applications. Think about the browser, for example – it has the DOM, objects such as documents and windows, functions such as setTimeout and fetch, and so many other things you can do in the frontend world. All of that is part of the browser's execution environment. Since that execution environment is focused on the browser, it provides ways for you to interact with the DOM and to communicate with the server, which is all that exists in it.
Node.js focuses on creating an environment for developers to build the backend part of web applications in an efficient way. It provides APIs to create HTTP(S) servers, read/write files, manipulate processes, and so on.
Node.js, as we mentioned previously, uses the V8 JavaScript engine underneath the hood. This means that to transform the JavaScript text into executable code for the computer to process, it uses V8, the open source JavaScript engine built by Google to power the Chromium and Chrome browsers. The following is an illustration of this process:
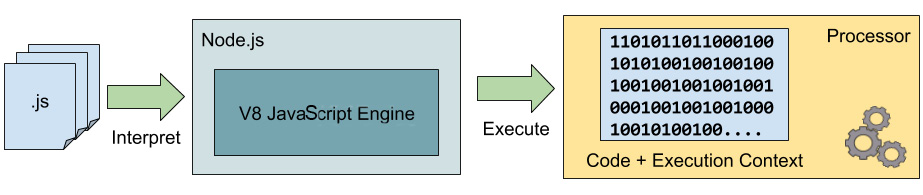
Figure 2.1: Node.js uses the V8 engine to transform JavaScript source code into executable code that runs in the processor
The execution environment that Node.js provides is single-threaded. This means that only one piece of JavaScript code can execute at each given moment. But Node.js has something called an event loop, which is a way to take code that is waiting for something, such as reading data from a file, and put it in a queue while another piece of code can execute.
Reading or writing data from files and sending or receiving data through the network are all tasks that are handled by the system kernel, which is multithreaded in most modern systems. Due to this, some of the work ends up being distributed in multiple threads. But for developers who are working in the Node.js execution environment, that is all hidden away in the form of a programming paradigm called asynchronous programming.
Asynchronous programming means that you are going to ask some tasks to be executed and when the result is available, your code will be executed. Let's go back to the read data from a file example. In most programming languages and paradigms, you would just write some pseudocode, like so:
var file = // open file here
var data = file.read(); // do something with data here
With the asynchronous programming model, this works in a different way. You open the file and tell Node.js that you want to read it. You also give it a callback function, which will be called when the data is available to you. This is what the pseudocode looks like:
var file = // open file here
file.read((data) => {
// do something with data here
});
In this example, the script would be loaded, and execution would start. The script would execute line by line and open the file. When it gets to the read operation, it starts reading the file and schedules the callback to be executed later. After that, it reaches the end of the script.
When Node.js reaches the end of the script, it starts processing the event loop. The event loop is divided into phases. Each phase has a queue that stores code that's scheduled to run in them. I/O operations get scheduled in the poll phase, for example. There are six phases, and they are executed in the following order:
- Timers: Code that's scheduled using setTimeout or setInterval
- Pending Callbacks: Deferred callbacks for the I/O from the previous cycle
- Idle, Prepare: Internal only
- Poll: Code that's scheduled for I/O handling
- Check: The setImmediate callbacks are executed here
- Close callbacks: Code that's scheduled on closing sockets, for example
Code will be executed for each phase until one of two things happens: the phase queue is exhausted, or a maximum number of callbacks is executed:

Figure 2.2: Event loop phases
To understand how this works, let's look at some code and map the phases to the event loop and understand what exactly is going on under the hood:
console.log('First');
setTimeout(() => {
console.log('Last');
}, 100);
console.log('Second');
In this short piece of code, we print something to the console (which, in Node.js, goes to Standard Output by default), and then we set a function to be called after 100 ms and print some other text to the console.
When Node.js starts your application, it parses the JavaScript and executes the script all the way to the end. When it finishes, it starts the event loop. This means that, when printing to the console directly, it is executed immediately. The scheduled function gets pushed to the Timers queue and waits for the script to finish (and for the 100 ms to pass) to be executed. When the event loop runs out of tasks to execute, the application finishes. The following diagram illustrates this process:

Figure 2.3: Execution flow for a Node.js application
Because of this order of execution, the output of the application is as follows:
First
Second
Last
There are two important things happening here. First, the code that is passed to the setTimeout function gets executed after the script finishes executing. Second, the application doesn't exit immediately after the script executes to the end; instead, it waits for the event loop to run out of tasks to execute.
Node.js has two methods of execution. The most used one is when you pass in the path of a file, from where the JavaScript code will be loaded and executed. The second method is in the REPL. If you execute the Node.js command without giving it any arguments, it will start in REPL mode, which is like the Console from the Dev Tools, which we looked at in the previous chapter. Let's explore this in detail in the next exercise.
Exercise 8: Running Your First Node.js Commands
In this exercise, you will download and install Node.js on your computer, create your first script, and run it. Then, we will use the REPL tool that comes with Node.js and run some commands in there.
Note
To be able to run Node.js applications, you need to have it installed on your machine. For that, you can go to nodejs.org and download a Node.js package. It is recommended to download the latest Long-Term Support (LTS) version, which will give you the most stable and longest support time for security and bug patches. At the time of this writing, that version is 10.16.0.
Perform the following steps to complete this exercise:
- After downloading and installing Node.js, go to the command line and check the version you have installed:
$ node –version
v10.16.0
- Now, create a new text file called event_loop.js and add an extended version of the code (event loop example), as shown previously. This is what it looks like:
console.log('First');
const start = Date.now();
setTimeout(() => {
console.log(`Last, after: ${Date.now() - start}ms`);
}, 100);
console.log('Second');
- To run JavaScript using Node.js, call node and pass the path to the file you want to execute. To run the file you just created, execute the following code in the command line from the directory where you created the file:
$ node event_loop.js
You will see the following output:
$ node event_loop.js
First
Second
Last, after: 106ms
The time you see in the end will vary on every run. This is because setTimeout only ensures that the code will run after the specified time, but it can't guarantee that it will execute exactly at the time you asked it to.
- Run the node command without any argument; you will go into REPL mode:
$ node
>
The > indicates that you are now inside the Node.js execution environment.
- In the REPL command line, type in a command and press Enter to execute it. Let's try the first one:
> console.log('First');
First
Undefined
You can see that it prints the string you passed into the console.log call. It also prints Undefined. This is the return value of the last executed statement. Since console.log doesn't return anything, it printed undefined.
- Create the constant that stores the current time:
> const start = Date.now()
undefined
- Declaring a variable also doesn't return anything, so it prints undefined again:
> start
1564326469948
If you want to know what the value of a variable is, you can just type the name of the variable and press Enter. The return statement of the variable name is the variable value, so it prints the value for it.
- Now, type the setTimeout call, just like it was in your file. If you press Enter and your statement is incomplete because you are starting a function or opening parenthesis, Node.js will print an ellipsis indicating that it is waiting for the rest of the command:
> setTimeout(() => {
...
- You can continue typing until all of the commands have been typed out. The setTimeout function returns a Timeout object, and you can see it in the console. You can also see the text that's printed when the callback is executed:
> setTimeout(() => {
... console.log('Last, after: ${Date.now() - start}ms');
... }, 100);
The following is the output of the preceding code:
Timeout {
_called: false,
_idleTimeout: 100,
_idlePrev: [TimersList],
_idleNext: [TimersList],
_idleStart: 490704,
_onTimeout: [Function],
_timerArgs: undefined,
_repeat: null,
_destroyed: false,
domain: [Domain],
[Symbol(unrefed)]: false,
[Symbol(asyncId)]: 492,
[Symbol(triggerId)]: 5 }
> Last, after: 13252ms
You can see that the time that's printed is much longer than 100 ms. This is because the start variable was declared some time ago and it is subtracting the current time from that initial value. So, that time indicates the 100 ms, plus the time it took for you to type and execute the command.
- Try changing the value of start. You will observe that Node.js won't let you do it since we declared it as a constant:
> start = Date.now();
Thrown:
TypeError: Assignment to constant variable.
We could try to redeclare it as a variable but Node.js won't let us since it was already declared in the current environment:
> let start = Date.now()
Thrown:
SyntaxError: Identifier 'start' has already been declared
- Declare the whole scheduling of the timeout inside another function to get a new scope every time the function is executed:
> const scheduleTimeout = () => {
... const start = Date.now();
... setTimeout(() => {
..... console.log('Later, after: ${Date.now() - start}');
..... }, 100);
... };
Every time you call the function, it will schedule it and execute it after 100 ms, just like in your script. This would output the following:
Undefined
> scheduleTimeout
[Function: scheduleTimeout]
> scheduleTimeout()
Undefined
> Later, after: 104
- To exit the REPL tool, you can press Ctrl + C twice or type .exit and then press Enter:
>
(To exit, press ^C again or type .exit)
>
It is easy to install Node.js and start using it. Its REPL tool allows you to quickly prototype and test things. Knowing how to use both can boost your productivity and help you a lot in the day-to-day development of JavaScript applications.
In this exercise, you installed Node.js, wrote a simple program, and learned how to run it using Node.js. You also used the REPL tool to explore the Node.js execution environment and run some code.
Node Version Manager (nvm)
Node.js and JavaScript have a huge community and a very fast-paced development cycle. Because of this rapid development and its release cycles, it is very easy to become out of date (check Node.js's previous releases page for more information: https://nodejs.org/en/download/releases/).
Can you imagine working on a project that uses Node.js and is a few years old? By the time you come back to fix a bug, you will notice that the version you have installed can't run the code anymore because of some compatibility issues. Or, you will find that you can't change the code using your current version since what is running in production is a couple of years old and doesn't have async/await or some other lifesaving feature you use a lot in the most recent version.
That issue happens with all programming languages and development environments, but in Node.js, this is prominent because of the extremely fast release cycles.
To solve this, it is common to use a version management tool so that you can quickly switch between versions of Node.js. Node Version Manager (nvm) is a widely used tool that's used to manage installed versions of Node.js. You can find instructions on how to download and install it at https://github.com/nvm-sh/nvm.
Note
If you are using Windows, you can try nvm-windows (https://github.com/coreybutler/nvm-windows), which provides similar functionality for nvm in Linux and Mac. Also, in this chapter, many commands are specific to Mac and Linux. For Windows, please refer to the help section of nvm-windows.
The installer script does two things in your system:
- Creates a .nvm directory inside your home directory where it puts all the scripts that are necessary for working with and keeping all the managed versions of Node.js
- Adds some configuration to make nvm available in all Terminal sessions
nvm is very simple to use and very well-documented. The idea behind it is that you will have multiple versions of Node.js running in your machine and you can quickly install new versions and switch between them.
In my computer, I initially only had the Node.js version I downloaded some time ago (10.16.0). After installing nvm, I ran the command to list all the versions. The following is the output:
$ nvm ls
->system
iojs -> N/A (default)
node -> stable (-> N/A) (default)
unstable -> N/A (default)
You can see that I have no other versions available. I also have a system version, which is whatever version you have installed in your system. I could check the current Node.js version by running node --version:
$ node --version
v10.16.0
As an example of how to use nvm, let's say you wanted to test some experimental features on the latest version. The first thing you need to do is find out which version that is. So, you run the nvm ls-remote command (or the nvm list command for a Windows system), which is the list remote versions command:
$ nvm ls-remote
v0.1.14
v0.1.15
v0.1.16
...
v10.15.3 (LTS: Dubnium)
v10.16.0 (Latest LTS: Dubnium)
...
v12.6.0
v12.7.0
That prints a long list with all the versions available. The last one, 12.7.0, at the time of writing, is the latest, so let's install that one. To install any version, run the nvm install <version> command. This will download the Node.js binaries for the specified version, verify that the package is not corrupted, and set it as the current version in your Terminal:
$ nvm install 12.7.0
Downloading and installing node v12.7.0...
Downloading https://nodejs.org/dist/v12.7.0/node-v12.7.0-darwin-x64.tar.xz...
######################################################################## 100.0%
Computing checksum with shasum -a 256
Checksums matched!
Now using node v12.7.0 (npm v6.10.0)
Now, you can verify that you have the latest version installed and ready to be used in your Terminal:
$ node --version
v12.7.0
Alternatively, you could just use the alias node, which is an alias to the latest version. But for Windows, you will need to mention the specific version that needs to be installed:
$ nvm install node
v12.7.0 is already installed.
Now using node v12.7.0 (npm v6.10.0)
It is common for widely used frameworks and languages (such as Node.js) to have LTS for specific versions. These LTS versions are considered more stable and guaranteed to have longer support for bug and security fixes, which is important for companies or teams that can't migrate to new versions as fast as the normal release cycles. If you want to use the most latest LTS version, you can use the --lts option:
$ nvm install --lts
Installing the latest LTS version.
Downloading and installing node v10.16.0...
Downloading https://nodejs.org/dist/v10.16.0/node-v10.16.0-darwin-x64.tar.xz...
######################################################################## 100.0%
Computing checksum with shasum -a 256
Checksums matched!
Now using node v10.16.0 (npm v6.9.0)
After installing multiple versions of Node.js using nvm, you can switch between them by using the use command:
$ nvm use system --version
Now using system version of node: v10.16.0 (npm v6.9.0)
$ nvm use node
Now using node v12.7.0 (npm v6.10.0)
$ nvm use 7
Now using node v7.10.1 (npm v4.2.0)
When you have multiple projects and you switch between them frequently, it is hard to remember the Node.js version you are using for each one. To make our lives easier, nvm supports a configuration file in the project's directory. You can just add a .nvmrc file in the root of the project and it will use the version that is in the file. You can also have an .nvmrc file in any parent directory of the project. So, if you want to group projects by Node.js version in a parent directory, you could add the configuration file in that parent directory.
For example, if you have a .nvmrc file in a folder that's version 12.7.0, when you change into the folder and run nvm use, it will automatically pick that version:
$ cat .nvmrc
12.7.0
$ nvm use
Found '.../Lesson02/Exercise09/.nvmrc' with version <12.7.0>
Now using node v12.7.0 (npm v6.10.0)
Exercise 9: Using nvm to Manage Versions
As we mentioned previously, Node.js releases have a very short cycle. If you look for the URL class, for example (https://nodejs.org/dist/latest-v12.x/docs/api/url.html#url_class_url), you will see that only recently has it become available in the global scope. This happened in version 10.0.0, which is only about a year old at the time of writing.
In this exercise, we will write an .nvmrc file, install multiple versions of Node.js using nvm, and experiment with different versions to see what type of error you get when you are using the wrong version of Node.js.
Perform the following steps to complete this exercise:
- Add an .nvmrc file to your project. In an empty folder, create a file called .nvmrc and add the number 12.7.0 to it. You can do that in one command by using the echo command and redirecting the output to the file:
$ echo '12.7.0' > .nvmrc
- You can check that the file has the content you want by using cat:
$ cat .nvmrc
12.7.0
- Let's use nvm use command, which will try to use the version from inside the .nvmrc file:
$ nvm use
Found '.../Lesson02/Exercise09/.nvmrc' with version <12.7.0>
N/A: version "12.7.0 -> N/A" is not yet installed.
You need to run nvm install 12.7.0 to install it before using it. If you don't have the specified version installed, nvm will give you a clear message.
- Call nvm install to install the version the project needs:
$ nvm install
Found '.../Lesson02/Exercise09/.nvmrc' with version <12.7.0>
Downloading and installing node v12.7.0...
Downloading https://nodejs.org/dist/v12.7.0/node-v12.7.0-darwin-x64.tar.xz...
#################################################################### 100.0%
Computing checksum with shasum -a 256
Checksums matched!
Now using node v12.7.0 (npm v6.10.0)
Notice that you don't have to pass the version you want since nvm will pick this up from the .nvmrc file.
- Now, create a file called url_explorer.js. In it, create an instance of the URL by passing a complete URL to it. Let's also add some calls to explore the parts of a URL:
const url = new URL('https://www.someserver.com/not/a/path?param1=value1¶m2=value2`);
console.log(`URL is: ${url.href}`);
console.log(`Hostname: ${url.hostname}`);
console.log(`Path: ${url.pathname}`);
console.log(`Query string is: ${url.search}`);
console.log(`Query parameters:`)
Array.from(url.searchParams.entries())
.forEach((entry) => console.log(` - ${entry[0]} = ${entry[1]}`));
- Run the script. You will see that the URL is parsed correctly and that all the details about it are printed to the console correctly:
$ node url_explorer.js
URL is: https://www.someserver.com/not/a/path?param1=value1¶m2=value2
Hostname: www.someserver.com
Path: /not/a/path
Query string is: ?param1=value1¶m2=value2
Query parameters:
- param1 = value1
- param2 = value2
- Now, let's experiment with the wrong version of Node.js. Install version 9.11.2 using nvm:
$ nvm install 9.11.2
Downloading and installing node v9.11.2...
Downloading https://nodejs.org/dist/v9.11.2/node-v9.11.2-darwin-x64.tar.xz...
################################################################## 100.0%
Computing checksum with shasum -a 256
Checksums matched!
Now using node v9.11.2 (npm v5.6.0)
- Now, you can run url_explorer.js again and see what happens:
$ node url_explorer.js
.../Exercise09/url_explorer.js:1 ... { const url = new URL('...);^
ReferenceError: URL is not defined
at Object.<anonymous> (.../Exercise09/url_explorer.js:1:75)
at Module._compile (internal/modules/cjs/loader.js:654:30)
at Object.Module._extensions..js (internal/modules/cjs/loader.js:665:10)
at Module.load (internal/modules/cjs/loader.js:566:32)
at tryModuleLoad (internal/modules/cjs/loader.js:506:12)
at Function.Module._load (internal/modules/cjs/loader.js:498:3)
at Function.Module.runMain (internal/modules/cjs/loader.js:695:10)
at startup (internal/bootstrap/node.js:201:19)
at bootstrapNodeJSCore (internal/bootstrap/node.js:516:3)
You should see an error similar to the one in the preceding code. It is telling you that the URL is not defined. That is because, as we mentioned previously, the URL class only became globally available in version 10.0.0.
- Fix the version of Node.js and run the script again to see the correct output:
$ nvm use
Found '.../Lesson02/Exercise09/.nvmrc' with version <12.7.0>
Now using node v12.7.0 (npm v6.10.0)
$ node url_explorer.js
URL is: https://www.someserver.com/not/a/path?param1=value1¶m2=value2
Hostname: www.someserver.com
Path: /not/a/path
Query string is: ?param1=value1¶m2=value2
Query parameters:
- param1 = value1
- param2 = value2
The error message in step 7 doesn't mention the Node.js version. It is just some cryptic error about a missing class. Errors like these are hard to identify and take a lot of effort in terms of history hunting. This is why having .nvmrc in the root of your project is important. It makes it easy for other developers to quickly identify and use the correct version.
In this exercise, you learned how to install and use multiple versions of Node.js, and also learned how to create a .nvmrc file for a project. Finally, you looked at the type of errors you expect to see when you use the wrong version, as well as the importance of the .nvmrc files.
Node Package Manager (npm)
When someone talks about Node Package Manager or npm for short, they can be referring to one or more of the following three things:
- A command-line application that manages packages for a Node.js application
- The repository where developers and companies publish their packages for others to use
- The website where people manage their profile and search for packages
Most programming languages offer at least one way for developers to share packages with each other: Java has Maven, C# has NuGet, Python has PIP, and so on. Node.js started to ship with its own package manager just a few months after its initial release.
Packages can include any type of code that developers think would be useful to others. And sometimes, they also include tools to aid developers in terms of local development.
As the packaged code needs to be shared, there needs to be a repository where all the packages are stored. And to publish their packages, authors need to sign up and register themselves and their packages. This explains the repository and the website part.
The third part, that is, the command-line tool, is the actual package manager for your application. It comes with Node.js and can be used to set up a new project, manage dependencies, and manage scripts for your application, such as build and test scripts.
Note
A Node.js project or application is also considered a package since it contains a package.json file that represents what is in the package. So, it is common to use the following terms interchangeably: application, package, and project.
Every Node.js package has a package.json file that describes the project and its dependencies. To create one for your project, you can use the npm init command. Just run it inside the folder where you want your project to live:
$ cd sample_npm
$ npm init
This utility will walk you through creating a package.json file.
It only covers the most common items and tries to guess sensible defaults.
See 'npm help json' for definitive documentation on these fields and exactly what they do.
Use 'npm install <pkg>' afterwards to install a package and save it as a dependency in the package.json file.
Press ^C at any time to quit.
package name: (sample_npm)
version: (1.0.0)
description: Sample project for the Professional JavaScript.
entry point: (index.js)
test command:
git repository: https://github.com/TrainingByPackt/Professional-JavaScript/
keywords:
author:
license: (ISC) MIT
About to write to .../Lesson02/sample_npm/package.json:
{
"name": "sample_npm",
"version": "1.0.0",
"description": "Sample project for the Professional JavaScript.",
"main": "index.js",
"scripts": {
"test": "echo "Error: no test specified" && exit 1"
},
"repository": {
"type": "git",
"url": "git+https://github.com/TrainingByPackt/Professional-JavaScript.git"
},
"author": "",
"license": "MIT",
"bugs": {
"url": "https://github.com/TrainingByPackt/Professional-JavaScript/issues"
},
"homepage": "https://github.com/TrainingByPackt/Professional-JavaScript#readme"
}
Is this OK? (yes) yes
The command will ask you a few questions, guiding you regarding the creation of your package.json file. In the end, it will print the generated file and ask you to confirm it. It contains all the information about the project, including where to find the code, what license it uses, and who the author is.
Now that we have an npm package, we can start looking for external modules we can use. Let's go to https://npmjs.com and look for a package to help us parse command-line arguments. Typing command line into the search box and pressing Enter gives us a list of packages to choose from:

Figure 2.4: Searching for a package to help us build a command-line application
Since we are looking for a tool to help us parse command-line arguments, commander sounds like a good solution. Its short description is The complete solution for node.js command-line programs. Let's install that in an application and use it to understand how this flow works.
To add a package as a dependency to your package, you ask npm to install it by name from the command line:
$ npm install commander
npm notice created a lockfile as package-lock.json. You should commit this file.
added 1 package from 1 contributor and audited 1 package in 1.964s
found 0 vulnerabilities
You can see that npm found the package and downloaded the latest version, which is 2.20.0 as of this writing. It also mentions something about a package-lock.json file. We are going to talk more about that later, so don't worry about it for now.
Another cool feature that was added to npm recently is vulnerability checks. At the end of the install command output, you can see a note about vulnerabilities found, or better, no vulnerabilities found. The npm team is doing a great job of increasing the vulnerability checks and security scans for all the packages in their repository.
Note
It is so easy to use packages from npm that a lot of people out there are pushing malicious code to catch the least-attentive developers. It is highly recommended that you pay a lot of attention when installing packages from npm. Check the spelling, the download count, and the vulnerability reports and make sure that the package you are going to install is really the one you want. You also need to ensure that it is from a trusted party.
After running npm install, you will notice that a new section has been added to your package.json file. It is the dependencies section and contains the package you just asked for:
"dependencies": {
"commander": "^2.20.0"
}
That is what the + sign in front of commander in the output of the install command meant: that the package was added as a dependency to your project.
The dependencies section is used to automatically detect and install all the packages that your project needs. When you are working on a Node.js application that has a package.json file, you don't have to manually install each dependency. You can just run npm install and it will figure everything out based on the dependencies section of the package.json file. Here is an example:
$ npm install
added 1 package from 1 contributor and audited 1 package in 0.707s
found 0 vulnerabilities
Even though no package was specified, npm assumes you want to install all the dependencies for the current package, which reads from package.json.
Besides adding the dependencies section to your package.json file, it also created a node_modules folder. That is where it downloads and keep all the packages for your project. You can check what is inside node_modules by using the list command (ls):
$ ls node_modules/
commander
$ ls node_modules/commander/
CHANGELOG.md LICENSE Readme.md index.js package.json typings
If you run npm install again to install the commander, you will notice that npm won't install the package again. It only shows the package as updated and audited:
$ npm install commander
updated 1 package and audited 1 package in 0.485s
found 0 vulnerabilities
In the next exercise, we will build an npm package that uses commander as a dependency and then creates a command-line HTML generator.
Exercise 10: Creating a Command-Line HTML Generator
Now that you have learned the basics of using npm to create a package and how to install some dependencies, let's put this all together and build a command-line tool that can generate HTML templates for your next website project.
In this exercise, you will create an npm package that uses commander as a dependency to process command-line arguments. Then, you will explore the tool that you have created and generate some HTML files.
The code for this exercise can be found on GitHub at https://github.com/TrainingByPackt/Professional-JavaScript/tree/master/Lesson02/Exercise10.
Perform the following steps to complete this exercise:
- Create a new folder where you are going to put all the files for this exercise.
- In the command line, change to the new folder and run npm init to initialize a package.json file. Picking all the default options should be enough:
$ npm init
This utility will walk you through creating a package.json file.
...
Press ^C at any time to quit.
package name: (Exercise10)
version: (1.0.0)
...
About to write to .../Lesson02/Exercise10/package.json:
{
"name": "Exercise10",
"version": "1.0.0",
"description": "",
"main": "index.js",
"scripts": {
"test": "echo "Error: no test specified" && exit 1"
},
"author": "",
"license": "ISC"
}
Is this OK? (yes)
- Install the commander package as a dependency:
$ npm install commander
npm notice created a lockfile as package-lock.json. You should commit this file.
added 1 package from 1 contributor and audited 1 package in 0.842s
found 0 vulnerabilities
In your package.json, add the following:
"main": "index.js"
This means that the entry point for our application is the index.js file.
- Run an npm package that has an entry point and use the node command, passing the directory that contains the package.json file in it. The following is an example that runs the package in Lesson02/sample_npm, which is available at https://github.com/TrainingByPackt/Professional-JavaScript/tree/master/Lesson02/sample_npm:
$ node sample_npm/
I'm an npm package running from sample_npm
- Create a file called index.js and in it, load the commander package using the require function:
const program = require('commander');
That is all you need to start using an external package.
Commander parses the arguments that are passed into your Node.js application. You can configure it to tell it what type of parameters you are expecting. For this application, we will have three options: -b or --add-bootstrap, which adds bootstrap 4 to the generated output; -c or --add-container, which adds a <div> tag with the ID container in the body; and -t or --title, which adds a <title> to the page that accepts the text to add in the title.
- To configure commander, we call the version method and then the option method multiple times to add each option that our application will support. Lastly, we call parse, which will verify that the arguments that are passed in (process.argv will be discussed in detail in the next chapter) match the expected options:
program.version('0.1.0')
.option('-b, --add-bootstrap', 'Add Bootstrap 4 to the page.')
.option('-c, --add-container', 'Adds a div with container id in the body.')
.option('-t, --title [title]', 'Add a title to the page.')
.parse(process.argv);
- Now, you can run your application and check out the results so far:
$ node . –help
We will receive the following output:
Usage: Exercise10 [options]
Options:
-V, --version output the version number
-b, --add-bootstrap Add Bootstrap 4 to the page.
-c, --add-container Adds a div with container id in the body.
-t, --title [title] Add a title to the page.
-h, --help output usage information
You can see that commander gives you a nice help message explaining how your tool is supposed to be used.
- Now, let's use these options to generate the HTML. The first thing we need to do is declare a variable that will hold all the HTML:
let html = '<html><head>';
We can initialize it with the <html> and <head> opening tags.
- Then, check whether the program received the title option. If it did, add a <title> tag with the content passed in the tag:
if (program.title) {
html += `<title>${program.title}</title>`;
}
- Do the same thing for the Bootstrap option. In this case, the option is just a Boolean, so you just check and add a <link> tag pointing to the Bootstrap.css file:
if (program.addBootstrap) {
html += '<link';
html += ' rel="stylesheet"';
html += ' href="https://stackpath.bootstrapcdn.com';
html += '/bootstrap/4.3.1/css/bootstrap.min.css"';
html += '/>';
}
- Close the <head> tag and open the <body> tag:
html += '</head><body>';
- Check for the container <div> option and add it if enabled:
if (program.addContainer) {
html += '<div id="container"></div>';
}
- Finally, close the <body> and <html> tags and print the HTML to the console:
html += '</body></html>';
console.log(html);
- Running the application with no options will give us a very simple HTML:
$ node .
<html><head></head><body></body></html>
- Run the application, enabling all the options:
$ node . -b -t Title -c
This will return a more elaborate HTML:
<html><head><title>Title</title><link rel="stylesheet" href="https://stackpath.bootstrapcdn.com/bootstrap/4.3.1/css/bootstrap.min.css"/></head><body><div id="container"></div></body></html>
npm makes it really easy to use packages in your applications. Packages such as commander and the other hundreds of thousands in the npm repository make Node.js a great alternative for building powerful and complex applications with very little code. Exploring and learning how to use packages can save you a lot of time and effort, making the difference between a project that never sees the light of day and a successful application that's used by millions of users.
In this exercise, you created an npm package that uses an external package to parse command-line arguments, which in general is a laborious task. You have configured the commander to parse the arguments into a nice useable format and also learned how to use the parsed arguments to build an application that makes decisions based on input from the user.
Dependencies
In the previous section, we saw how npm uses the dependencies section of your package.json file to keep track of the dependencies your package has. Dependencies are a complex topic, but what you must keep in mind is that npm supports the semantic version, or semver, format for version numbers and that it can use interval and other complicated operators to determine what versions of other packages yours can accept.
By default, as we saw in the previous exercise, npm marks all the package versions with a caret, such as 2.20.0. That caret means that your package can use any version that's compatible with 2.20.0. Compatibility, in the sense of semver, means that new minor or patch versions are considered valid since they are backward compatible:

Figure 2.5: Semantic format considering minor and patch versions as valid
Compatible versions with 2.20.0 are 2.21.0 or 2.21.5, or even 2.150.47!
Every now and then, you will want to update the versions of your packages to improve security or move to a version that has a fix for some issue you hit in one of your dependencies. That is the reason why npm adds the caret for versions of packages you install. With one command, you can update all your dependencies to newer compatible versions.
Let's say, for example, that a command-line application that was started a long time ago was using version 2.0.0 of commander. When the developer ran the install command, they got version 2.0.0 in their package.json file. A few years later, they go back and notice that there are some security vulnerabilities in commander. They can just run the npm update command to take care of that:
$ npm update
added 1 package from 1 contributor and audited 1 package in 0.32s
found 0 vulnerabilities
Most of the time, developers follow the semver convention and do not make breaking changes with minor or patch version changes. But when projects grow, the number of dependencies quickly gets to the thousands or even tens of thousands, and the probability of breaking changes or compatibility issues grows exponentially.
To help you in times when you get complicated dependency trees, npm also generates a package-lock.json file. This file contains a representation of the packages in your node_modules directory, as they were when you last changed the packages you depend on. This can happen when you install a new dependency using the install command or update versions using the update command.
The package-lock.json file should be checked in with the rest of your code because it keeps track of your dependency tree and is useful for debugging complicated compatibility issues. node_modules, on the other hand, should always be added to your .gitignore file since npm can recreate that folder any time using information from your package.json and package-lock.json files and downloading the packages from the npm repository.
Besides the dependencies section, your package.json file can also contain a devDependencies section. This section is a way for developers to keep dependencies they use during building or testing the package, but others won't need it. This can include tools such as babel to transpile code or testing frameworks such as jest.
Dependencies in devDependencies don't get pulled when your package is pulled by other packages to use. Some frameworks, such as Webpack or Parcel.js, also have a production model that will ignore these dependencies when creating the final bundle.
npm Scripts
When you run the npm init command, the package.json file that gets created has a scripts section in it. By default, a test script is added to it. This is what it looks like:
"scripts": {
"test": "echo "Error: no test specified" && exit 1"
},
Scripts can be used to run any type of command that a developer may need when working on a package. Common examples of scripts are testing, linting, and other code analysis tools. It is also possible to have scripts to start an application or any other thing you can do from the command line.
To define a script, you add an attribute to the scripts section, where the value is the script that will be executed, as in the following:
"scripts": {
"myscript": "echo 'Hello world!'"
},
The preceding code creates a script called myscript. When invoked, it will print the text "Hello World!".
To invoke a script, you can use the npm run or run-script command, passing in the name of the script:
$ npm run myscript
> [email protected] myscript .../Lesson02/sample_scripts
> echo 'Hello World!'
Hello World!
npm will output all the details of what is being executed to let you know what it is doing. You can ask it to be silent by using the --silent (or -s) option:
$ npm run myscript --silent
Hello World!
$ npm run myscript -s
Hello World!
$ npm run-script myscript -s
Hello World!
One interesting thing about scripts is that you can use the prefixes "pre" and "post" to invoke other scripts before and after you do setup and/or cleanup tasks. The following is an example of such usage:
"scripts": {
"preexec": "echo 'John Doe' > name.txt",
"exec": "node index.js",
"postexec": "rm -v name.txt"
}
index.js is a Node.js script that reads a name from a name.txt file and prints a hello message. The exec script will execute the index.js file. The pre and post exec scripts will be automatically called before and after the exec one, creating and deleting the name.txt file (in Windows, you can use the del command instead of rm). Running the exec script will result in the following output:
$ ls
index.js package.json
$ npm run exec
> [email protected] preexec ../Lesson02/sample_scripts
> echo 'John Doe' > name.txt
> [email protected] exec ../Lesson02/sample_scripts
> node index.js
Hello John Doe!
> [email protected] postexec ../Lesson02/sample_scripts
> rm -v name.txt
name.txt
$ ls
index.js package.json
You can see that, before invoking the exec script, the name.txt file didn't exist. The preexec script is invoked, which creates the file with the name inside. Then, the JavaScript is called and prints the hello message. Finally, the postexec script is invoked, which deletes the file. You can see that the name.txt file doesn't exist after npm's execution has finished.
npm also comes with some predefined script names. Some of them are published, install, pack, test, stop, and start. The advantage of these predefined names is that you don't need to use the run or run-script command; you can directly invoke the script by name. For example, to invoke the default test script created by npm init, you can just call npm test:
$ npm test
> [email protected] test .../Lesson02/sample_scripts
> echo "Error: no test specified" && exit 1
Error: no test specified
npm ERR! Test failed. See above for more details.
Here, you can see that it fails since it has an exit 1 command, which makes the npm script's execution fail since any command that exits with a non-zero status will make the invocation stop immediately.
start is a widely used script to start web servers for local frontend development. The exec example in the preceding code could be rewritten to look like the following:
"scripts": {
"prestart": "echo 'John Doe' > name.txt",
"start": "node index.js",
"poststart": "rm -v name.txt"
}
Then, it can be be run just by calling npm start:
$ npm start
> [email protected] prestart .../Lesson02/sample_scripts
> echo 'John Doe' > name.txt
> [email protected] start .../Lesson02/sample_scripts
> node index.js
Hello John Doe!
> [email protected] poststart .../Lesson02/sample_scripts
> rm -v name.txt
name.txt
Note
One important thing to keep in mind when writing npm scripts is whether there is a need to make them platform independent. For example, if you are working with a big group of developers and some of them use Windows machines and some use Mac and/or Linux, scripts that are written to run in Windows will probably fail in the Unix world, and vice versa. JavaScript is a perfect use case for this since Node.js abstracts platform dependency away for you.
As we saw in the previous chapter, sometimes we want to extract data from a web page. In that chapter, we used some JavaScript that was injected into the page from the Developer Tools Console tab to do that so that didn't need to write an application for it. Now, you will write a Node.js application to do something similar.
Activity 3: Creating an npm Package to Parse HTML
In this activity, you will use npm to create a new package. Then, you will write some Node.js code to load and parse the HTML code using a library called cheerio. With the loaded HTML, you will query and manipulate it. In the end, you will print the manipulated HTML to see the results.
The steps to perform are as follows:
- Use npm to create a new package inside a new folder.
- Install a library called cheerio using npm install (https://www.npmjs.com/package/cheerio).
- Create a new entry file called index.js and inside it, load the cheerio library.
- Create a variable that stores the HTML from the first sample from Chapter 1, JavaScript, HTML, and the DOM (the file can be found in GitHub: https://github.com/TrainingByPackt/Professional-JavaScript/blob/master/Lesson01/Example/sample_001/sample-page.html).
- Use cheerio to load and parse the HTML.
- Add a paragraph element with some text into the div in the loaded HTML.
- Using cheerio, iterate over all the paragraphs in the current page, and print their content to the console.
- Print the manipulated version of the console.
- Run your application.
The output should look something like the following:

Figure 2.6: Expected output after calling the application from Node.js
Note
The solution for this activity can be found on page 588.
In this activity, you created a Node.js application by using the npm init command. Then, you imported an HTML parser library. You used it to manipulate and query the parsed HTML. In the next chapter, we will continue to explore techniques that will help us scrape web pages faster and we will actually use against a website.
Summary
In this chapter, we learned about what Node.js is and how its single-threaded, asynchronous, event-driven programming model can be used to build simple and efficient applications. We also learned about nvm and how to manage multiple versions of Node.js. Then, we studied npm and used external libraries in our Node.js applications. Finally, we learned what npm scripts are and some basic concepts related to them.
To help you understand what you learned about in this chapter, you can go to the npm repository, find some projects, and explore their code bases. The best way to learn about npm, Node.js, and the packages and libraries that exist out there is to explore other people's code and see what and how they are building and also what libraries they use.
In the next chapter, we will explore the Node.js APIs and learn how to use them to build a real web scraping application. In future chapters, you will learn how to use npm scripts and packages to improve the quality of your code through linting and automated tests.